若该文为原创文章,转载请注明原文出处。
记录使用STM32通过ESP8266-01S模块连接华为云服务器并上传和下发数据。
一、固件选择
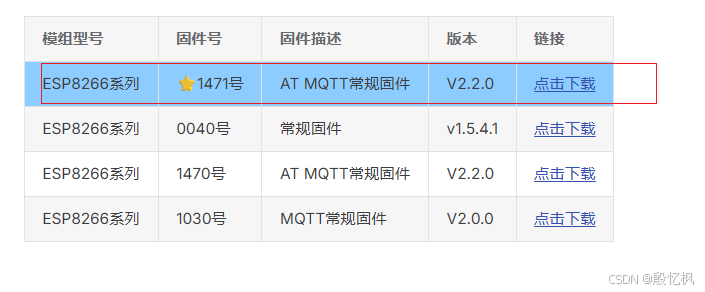
ESP-01S默认固件是AT常规固件,这里使用AT MQTT常规固件,所以需要先更新ESP-01S固件。
1、固件下载
下载地址:docs.ai-thinker.com/esp8266/
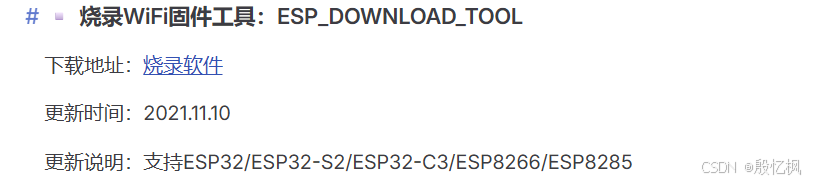
2、烧写工具
https://docs.ai-thinker.com/tools
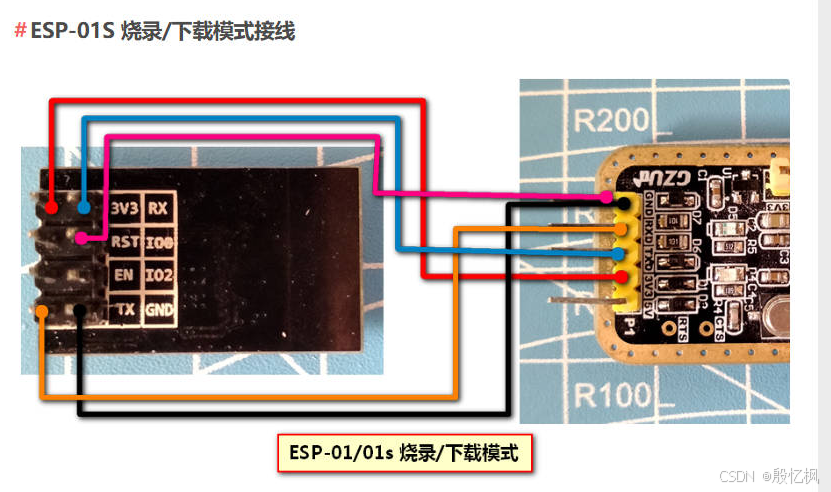
3、ESP-01S接线
4、下载更新固件
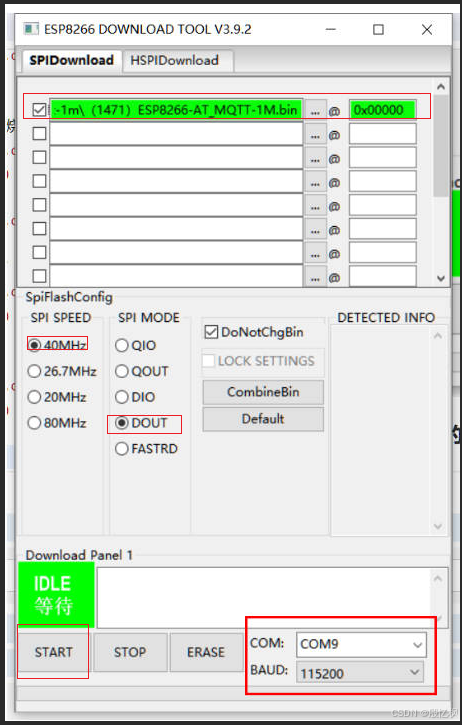
根据上图,配置好,点击START即可,注意接线,IO0接地在上电。
二、华为云
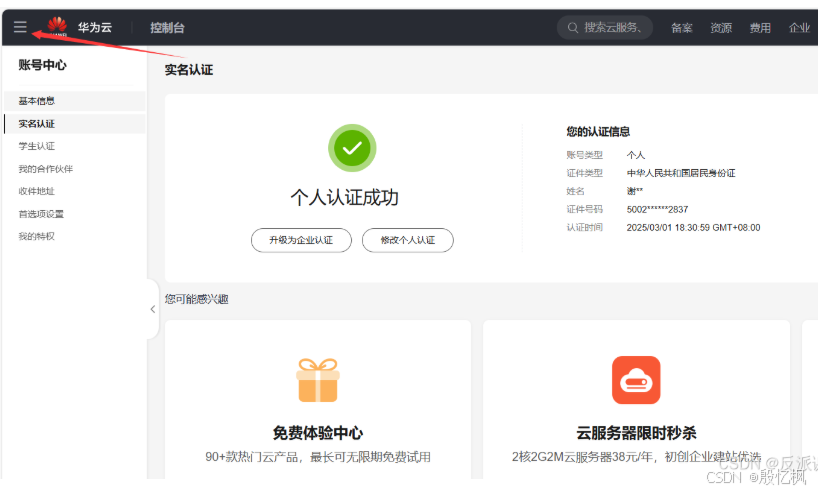
1、打开华为云链接,并注册账号
2、打开设备接入ioTDA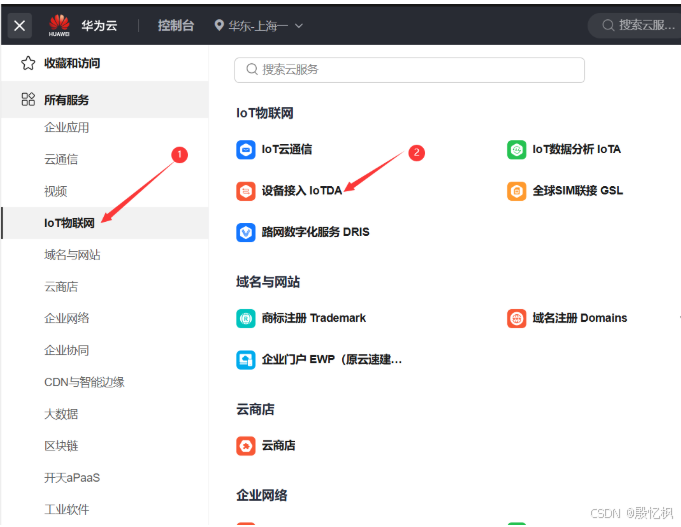
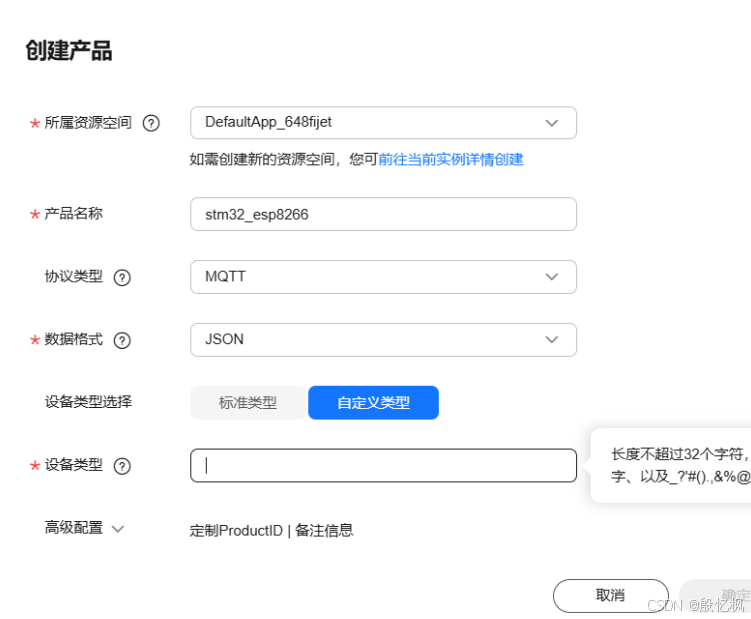
3、创建产品
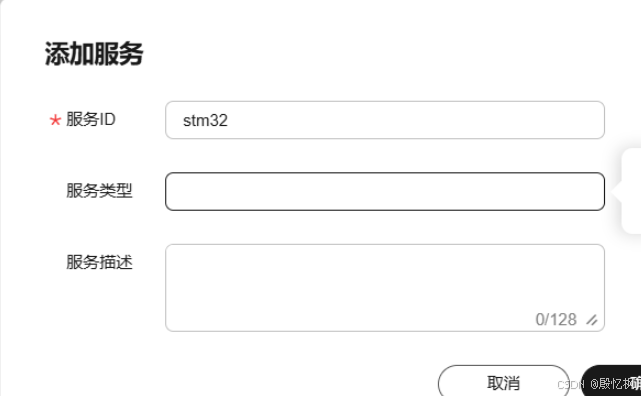
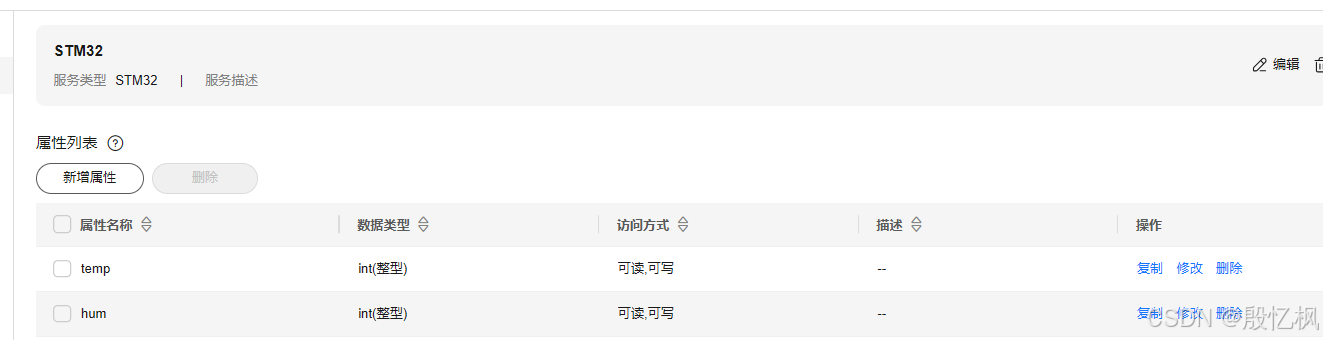
4、添加服务
记住服务ID
5、添加属性
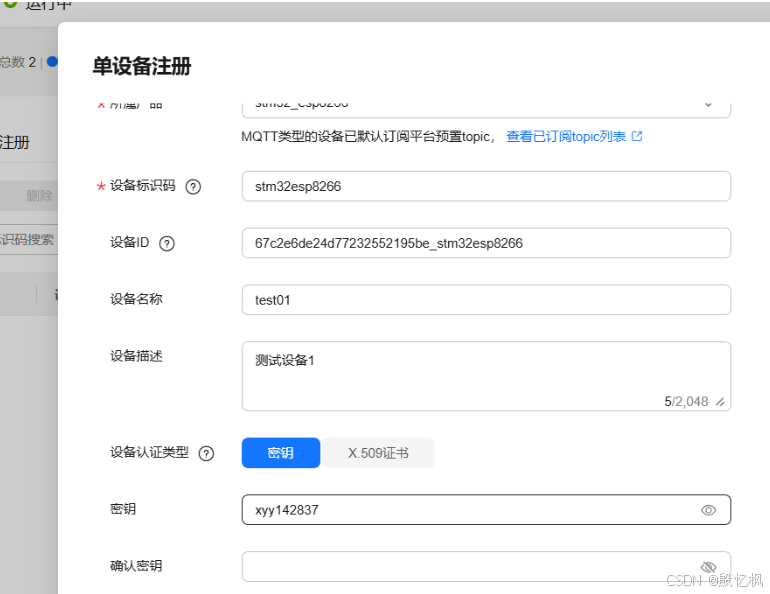
6、添加设备
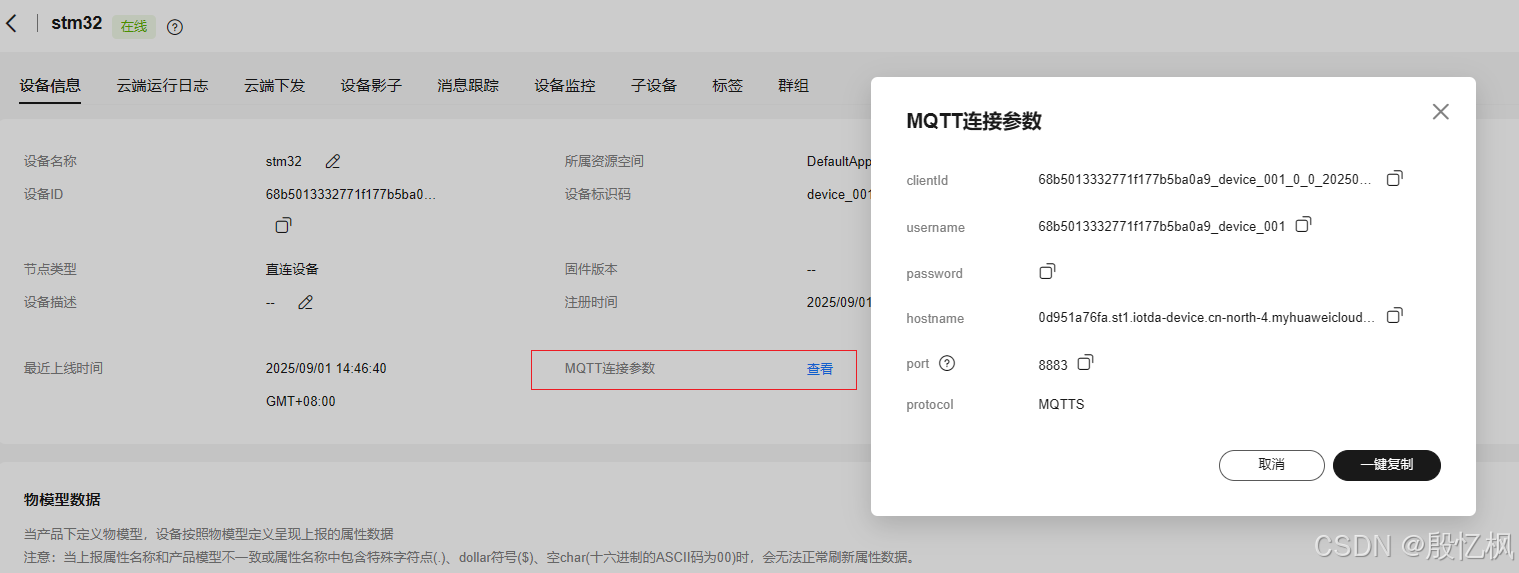
7、获取华为云相关参数
三、STM32软件
1、初始化串口
void initUART2(void)
{
     GPIO_InitTypeDef GPIO_InitStructure;
	 USART_InitTypeDef usartInitStruct;
	 NVIC_InitTypeDef nvicInitStruct;


	/*配置USART2和GPIO时钟*/
  RCC_APB2PeriphClockCmd(RCC_APB2Periph_GPIOA, ENABLE);
  RCC_APB1PeriphClockCmd(RCC_APB1Periph_USART2, ENABLE);

  /*GPIO配置*/
  GPIO_InitStructure.GPIO_Pin = GPIO_Pin_2;
  GPIO_InitStructure.GPIO_Mode = GPIO_Mode_AF_PP;
  GPIO_InitStructure.GPIO_Speed = GPIO_Speed_50MHz;
  GPIO_Init(GPIOA, &GPIO_InitStructure);

  GPIO_InitStructure.GPIO_Pin = GPIO_Pin_3;
  GPIO_InitStructure.GPIO_Mode = GPIO_Mode_IN_FLOATING;
  GPIO_Init(GPIOA, &GPIO_InitStructure);

 	usartInitStruct.USART_BaudRate = 115200;
 	usartInitStruct.USART_HardwareFlowControl = USART_HardwareFlowControl_None;     //无硬件控流
 	usartInitStruct.USART_Mode = USART_Mode_Rx | USART_Mode_Tx;                     //接收和发送
 	usartInitStruct.USART_Parity = USART_Parity_No;                                 //无校验
	 usartInitStruct.USART_StopBits = USART_StopBits_1;                              //1位停止位
 	usartInitStruct.USART_WordLength = USART_WordLength_8b;                         //8位数据位
 	USART_Init(USART2,&usartInitStruct);

	 USART_Cmd(USART2,ENABLE);                         //使能串口

 	USART_ITConfig(USART2, USART_IT_RXNE, ENABLE);									//使能接收中断

	 nvicInitStruct.NVIC_IRQChannel = USART2_IRQn;
	 nvicInitStruct.NVIC_IRQChannelCmd = ENABLE;
	 nvicInitStruct.NVIC_IRQChannelPreemptionPriority = 0;
	 nvicInitStruct.NVIC_IRQChannelSubPriority = 0;
	 NVIC_Init(&nvicInitStruct);
}
2、华为云参数定义
#define ESP8266_WIFI_INFO  "AT+CWJAP=\"yifeng\",\"1234567890\"\r\n"

#define HUAWEI_MQTT_USERNAME_PASSWORD   "AT+MQTTUSERCFG=0,1,\"NULL\",\"68b5013332771f177b5ba0a9_device_001\",\"85722f940cb55985bbdcc1b74aeeef2f16fe94fc7c2befe83d8d3ed89e777327\",0,0,\"\"\r\n"
#define HUAWEI_MQTT_ClientID			         "AT+MQTTCLIENTID=0,\"68b5013332771f177b5ba0a9_device_001_0_0_2025090102\"\r\n"
#define HUAWEI_MQTT_ADDRESS_PORT "AT+MQTTCONN=0,\"0d951a76fa.st1.iotda-device.cn-north-4.myhuaweicloud.com\",1883,1\r\n"
#define HUAWEI_MQTT_DeviceID            "AT+MQTTSUB=0,\"$oc/devices/68b5013332771f177b5ba0a9_device_001_0_0_2025090102/sys/properties/report\",1\r\n"
#define HUAWEI_MQTT_DeviceID_VALUE      "68b5013332771f177b5ba0a9_device_001_0_0_2025090102"
#define HUAWEI_MQTT_ServiceID           "STM32"

#define HUAWEI_MQTT_SUB                 "AT+MQTTSUB=0,\"$oc/devices/68b5013332771f177b5ba0a9_device_001_0_0_2025090102/sys/messages/down\",1\r\n"
3、初始化ESP8266
void ESP8266_Init(void)
{
  GPIO_InitTypeDef GPIO_Initure;

  RCC_APB2PeriphClockCmd(cEsp8266RstPortClk, ENABLE);

  //ESP8266复位引脚
  GPIO_Initure.GPIO_Mode  = GPIO_Mode_Out_PP;
  GPIO_Initure.GPIO_Pin   = cEsp8266RstPin;     //GPIOB9-复位
  GPIO_Initure.GPIO_Speed = GPIO_Speed_50MHz;
  GPIO_Init(cEsp8266RstPort, &GPIO_Initure);

  //复位操作
  GPIO_WriteBit(cEsp8266RstPort, cEsp8266RstPin, Bit_RESET);
  delay_ms(250);
  GPIO_WriteBit(cEsp8266RstPort, cEsp8266RstPin, Bit_SET);
  delay_ms(500);

  ESP8266_Clear();

	UsartPrintf(USART_DEBUG, "00. AT\r\n");
	while(ESP8266_SendCmd("AT\r\n", "OK"))
		 delay_ms(500);

	UsartPrintf(USART_DEBUG, "01. RST\r\n");
	ESP8266_SendCmd("AT+RST\r\n", "");
		delay_ms(500);
	ESP8266_SendCmd("AT+CIPCLOSE\r\n", "");
		delay_ms(500);

	UsartPrintf(USART_DEBUG, "02. CWMODE\r\n");
	while(ESP8266_SendCmd("AT+CWMODE=1\r\n", "OK"))
		delay_ms(500);

	UsartPrintf(USART_DEBUG, "03. AT+CWDHCP\r\n");
	while(ESP8266_SendCmd("AT+CWDHCP=1,1\r\n", "OK"))
		delay_ms(500);

	UsartPrintf(USART_DEBUG, "04. CWJAP\r\n");
	while(ESP8266_SendCmd(ESP8266_WIFI_INFO, "GOT IP"))
		delay_ms(500);

	UsartPrintf(USART_DEBUG, "05. ESP8266 Init OK\r\n");

}
4、接入华为云
_Bool HuaWei_DevLink(void)
{

 _Bool status = 1;
	UsartPrintf(USART_DEBUG, "01. AT+MQTTUSERCFG\r\n");
	while(ESP8266_SendCmd(HUAWEI_MQTT_USERNAME_PASSWORD,"OK"))
		delay_ms(500);

	UsartPrintf(USART_DEBUG,"02. AT+MQTTCLIENTID\r\n");
	while(ESP8266_SendCmd(HUAWEI_MQTT_ClientID,"OK"))
			delay_ms(500);

	UsartPrintf(USART_DEBUG,"03. AT+MQTTCONN\r\n");
	while(ESP8266_SendCmd(HUAWEI_MQTT_ADDRESS_PORT,"OK"))
			delay_ms(500);

	UsartPrintf(USART_DEBUG, "04. AT+MQTTSUB\r\n");
	while(ESP8266_SendCmd(HUAWEI_MQTT_DeviceID,"OK"))
			delay_ms(500);

	UsartPrintf(USART_DEBUG, "05. AT+MQTTSUB\r\n");
	while(ESP8266_SendCmd(HUAWEI_MQTT_SUB, "OK"))
			delay_ms(500);
	status = 0;

	UsartPrintf(USART_DEBUG, "05. HuaWei_DevLink OK\r\n");

 return status;

}
5、发布数据
void SendMQTTPubData(const char* properties, double value)
{
    char cmd[256] = {0};

    sprintf(cmd, "AT+MQTTPUB=0,\"$oc/devices/%s/sys/properties/report\",\"		\
		{\\\"services\\\":[{\\\"service_id\\\":\\\"%s\\\"\\,\\\"properties\\\":		\
			{\\\"%s\\\": %f}}]}\",0,0\r\n", HUAWEI_MQTT_DeviceID_VALUE, HUAWEI_MQTT_ServiceID, properties, value);

    // 发送命令并等待"OK"响应
    while(ESP8266_SendCmd(cmd, "OK") == 1) {
        delay_ms(500);
    }
		UsartPrintf(USART_DEBUG, "发布数据成功\r\n");
}
6、接收数据
华为云下发数据,程序初始化时订阅了down主题
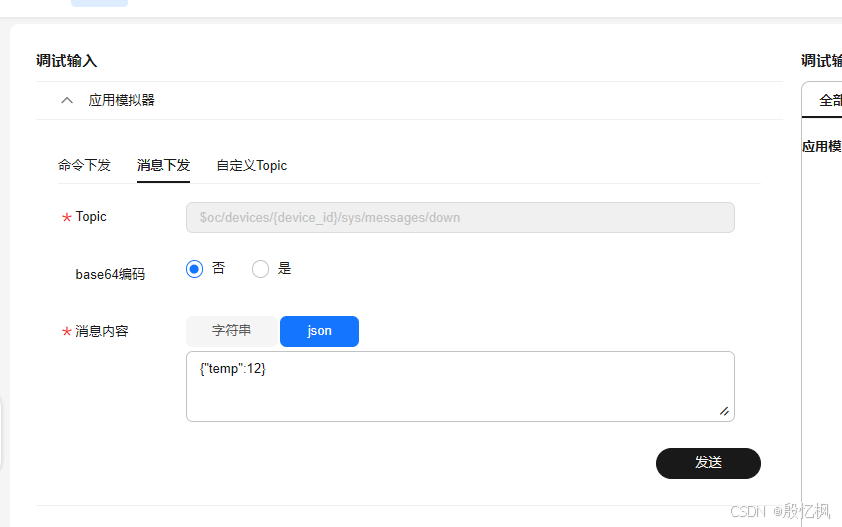
单片机接收到的数据,程序未处理

7、主程序
功能还未完善,只是个流程,但基本已经实现了想要的功能了
#include "led.h"
#include "delay.h"
#include "sys.h"
#include "oled.h"
#include "iic.h"
#include "uart.h"
#include <string.h>
#include <stdio.h>
#include "key.h"
#include "timer.h"
#include "esp8266.h"
#include "aliyun.h"


#define NULL 0


//  MQTT 订阅主题
const char *topics[] = {"$oc/devices/68b5013332771f177b5ba0a9_device_001_0_0_2025090102/sys/messages/down"};


void SendMQTTPubData(const char* properties, double value);

u8 updateTime = 0;  // 定时每秒采集数据

u8 wifi_update_data = 0;
u8 wifi_recv_ack = 0;

u8 RecBuf[32];
u8 RecCnt = 0;


//定时器3中断服务程序
void TIM2_IRQHandler(void)   //TIM3中断
{
  if (TIM_GetITStatus(TIM2, TIM_IT_Update) != RESET)  //检查TIM3更新中断发生与否
  {
    TIM_ClearITPendingBit(TIM2, TIM_IT_Update);  //清除TIMx更新中断标志

    updateTime = 1;
    wifi_update_data++;

		  	RecCnt = 0;

  }
}


void USART1_IRQHandler(void)                	//串口1中断服务程序
{
		u8  Res;
		if(USART_GetITStatus(USART1, USART_IT_RXNE) != RESET)  //接收中断(接收到的数据必须是0x0d 0x0a结尾)
		{
		  Res = USART_ReceiveData(USART1);

			 RecBuf[RecCnt] = Res;
			 RecCnt++;

  }
}


int main(void)
{
  u8 keyval;
  u16 value = 0;
  char buffer[256] = {0};
  char cmd[32];
  unsigned char *dataPtr = NULL;

  delay_init();       //延时函数初始化
  NVIC_PriorityGroupConfig(NVIC_PriorityGroup_2);  //设置NVIC中断分组2:2位抢占优先级,2位响应优先级

  RCC_APB2PeriphClockCmd(RCC_APB2Periph_AFIO, ENABLE);
  GPIO_PinRemapConfig(GPIO_Remap_SWJ_JTAGDisable , ENABLE);

  initUART();        // 串口1初始化
  LED_Init();        //  LED端口初始化
  initIIC();         // iiC驱动
  initOLED();        // oled初始化
  initKey();

		initUART2();
  formatScreen(0x00);//清屏
	 ESP8266_Init();     // ESP8266初始化
  while(HuaWei_DevLink())   //接入阿里云
  delay_ms(500);

  formatScreen(0x00);//清屏

  delay_ms(2000);

  TIM2_Int_Init(9999,7199);//10Khz的计数频率,计数到9999为1秒

  while(1)
  {
    keyval = KEY_Scan(0);


    if(updateTime == 1)  // 每秒更新一次数据
    {
      updateTime = 0;

    }

				OLED_ShowCHinese(0, 0, 4);
				OLED_ShowCHinese(16, 0, 5);
				memset(cmd, 0, 32);
				sprintf(cmd, ":%02d  ", (int)wifi_update_data);
				OLED_ShowString(32, 0, cmd, 16);

				/* WIFI */
    if(wifi_update_data >= 10 || wifi_recv_ack == 1)
    {
      wifi_update_data = 0;
      wifi_recv_ack = 0;

      SendMQTTPubData("temp", 29.99);

      ESP8266_Clear();
    }
    dataPtr = ESP8266_GetIPD(3);
    if(dataPtr != NULL)
      AliYun_RevPro(dataPtr);


    delay_ms(1);
  }

}


int strrindex(char s[], char t[])
{
  int i,j,k,r = -1;
  for(i = 0; s[i] != '\0'; i++)
  {
    k = 0;
    for(j = i; t[k] !='\0';j++,k++)
    {
        if(t[k] == s[j])
        {
            continue;
        }
        else
        {
            break;
        }
    }
    if(t[k] == '\0')
      r = i;
  }


  return r+sizeof(t)+2;
}


/*!
 * \fn     AliYun_Publish_Data_Handle
 * \brief   处理publish数据
 *
 * \param  [in] int8 **payload        #
 * \param  [in] uint16 *payload_len   #
 *
 * \retval void
 */
void AliYun_Publish_Data_Handle(char *payload, unsigned short *payload_len)
{
  int index = 0;
  char *ptr1 = NULL, *ptr2 = NULL;
  char *temp_pos;
  int temp_val;

	  // 控制
  ptr1 = strstr((char *)payload, "Relay1");
  if(ptr1 != NULL)
  {
    index = strrindex(payload, "Relay1");

    wifi_recv_ack  = 1;

    if(payload[index+2] == 0x30)
    {

    }

    return ;
  }

		  // 阈值
  ptr2   = strstr((char *)payload, "val1");
  if(ptr2  != NULL)
  {
    temp_pos = strstr((char *)payload, "\"val1\":");
       wifi_recv_ack  = 1;

    sscanf(temp_pos, "\"val1\":%d", &temp_val);
//    temp_hight = temp_val;

    return ;
  }

}


void SendMQTTPubData(const char* properties, double value)
{
    char cmd[256] = {0};

    sprintf(cmd, "AT+MQTTPUB=0,\"$oc/devices/%s/sys/properties/report\",\"		\
		{\\\"services\\\":[{\\\"service_id\\\":\\\"%s\\\"\\,\\\"properties\\\":		\
			{\\\"%s\\\": %f}}]}\",0,0\r\n", HUAWEI_MQTT_DeviceID_VALUE, HUAWEI_MQTT_ServiceID, properties, value);

    // 发送命令并等待"OK"响应
    while(ESP8266_SendCmd(cmd, "OK") == 1) {
        delay_ms(500);
    }
		UsartPrintf(USART_DEBUG, "发布数据成功\r\n");
}
8、华为云效果
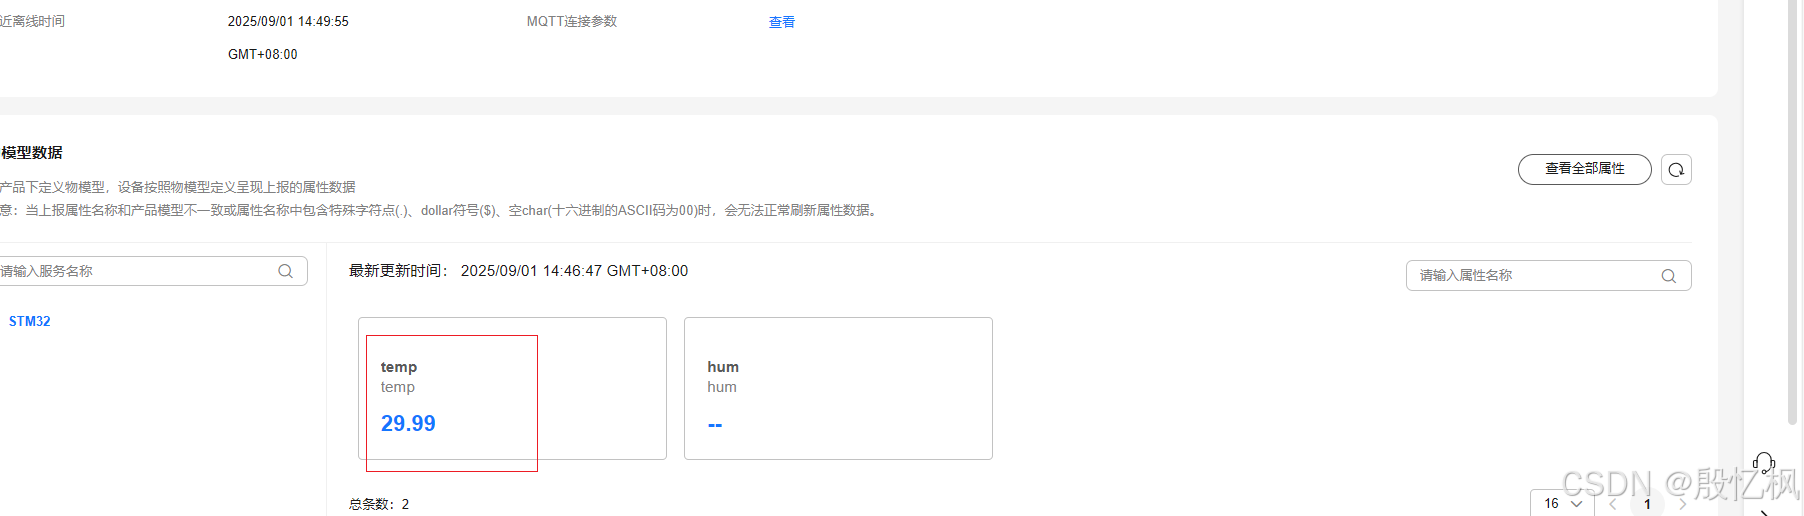
四、注意
ESP8266的固件一定要用AT MQTT常规固件
后面增加APP,通过APP查看数据和下发数据
五、附发送和接收的格式
1、发布的主题
$oc/devices/68b5013332771f177b5ba0a9_app_001_0_0_2025090106/sys/properties/report2、发送的数据格式
{"services":[{"service_id":"STM32","properties":{"temp":33,"hum":44}}]}3、订阅主题
$oc/devices/68b5013332771f177b5ba0a9_app_001_0_0_2025090106/sys/messages/down4、接收数据
(2025/9/1 15:12:28)
Topic=$oc/devices/68b5013332771f177b5ba0a9_app_001/sys/messages/down
Message={"name":null,"id":"8c2d85a6-551c-42e1-9c3c-123e2204e67e","content":{"temp":124}}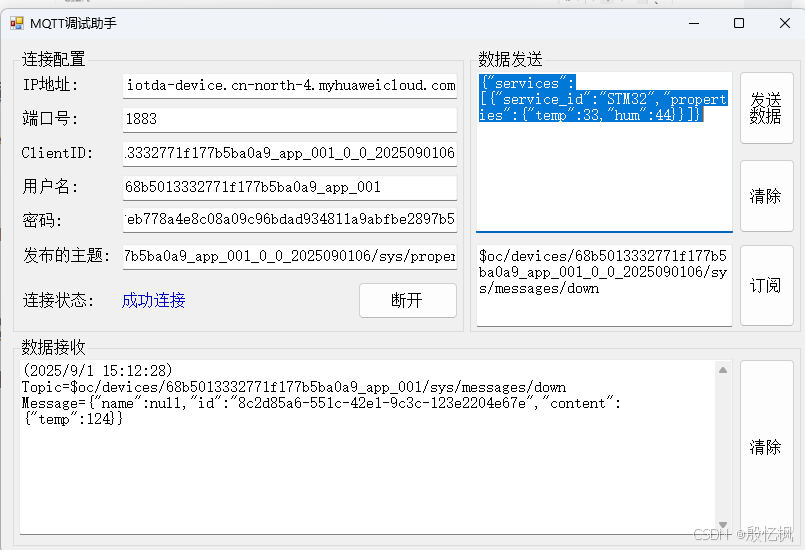
如有侵权,或需要完整代码,请及时联系博主。