并发容器的艺术:从ConcurrentHashMap到BlockingQueue的完美协奏
📚 文章导读
🎯 想象一下 :你正在管理一个超级繁忙的餐厅,每天有成千上万的顾客同时点餐、用餐、结账。如果只有一个服务员,那场面一定很混乱!但如果有了 并发容器这个"智能调度系统",就能让多个服务员同时高效工作,既不会重复服务,也不会遗漏任何顾客。
今天我们将深入学习Java并发编程中的核心工具------并发容器和工具类。这些工具就像是 高并发系统的"瑞士军刀" ,掌握它们的使用和原理,将大大提升我们的并发编程能力。
💡 今天你将学到:
- 🏪 如何用ConcurrentHashMap打造"永不拥堵"的数据超市
- 🚦 如何用BlockingQueue实现"智能红绿灯"系统
- 🎯 如何用同步工具类协调"团队作战"
- 🚀 如何避免常见的"并发陷阱"
🎯 学习目标
通过本文学习,您将掌握并发容器和工具类的核心知识,从理论到实践,从基础到进阶,为构建高并发系统打下坚实基础。
1. 并发容器概述
1.1 为什么需要并发容器?
🏪 生活场景:想象你开了一家小超市,只有一个收银台。平时顾客不多时,一个收银员完全够用。但到了节假日,顾客蜂拥而至,一个收银员根本忙不过来,顾客排起了长队,甚至有人因为等不及而离开。
在单线程环境下,我们使用普通的容器(如HashMap、ArrayList)就足够了。但在多线程环境下,这些容器就像"单收银台超市",存在严重的线程安全问题:
🚨 问题场景:
- 多个线程同时"结账"(修改数据)
- 可能出现"重复收费"或"漏收费"(数据不一致)
- 严重时整个"收银系统"崩溃(程序异常)
arduino
// 问题示例:HashMap在多线程下的问题
public class HashMapConcurrencyIssue {
    private static Map<String, Integer> map = new HashMap<>();

    public static void main(String[] args) throws InterruptedException {
        // 创建多个线程同时修改HashMap
        Thread[] threads = new Thread[10];
        for (int i = 0; i < 10; i++) {
            threads[i] = new Thread(() -> {
                for (int j = 0; j < 1000; j++) {
                    map.put("key" + j, j);
                }
            });
            threads[i].start();
        }

        // 等待所有线程完成
        for (Thread thread : threads) {
            thread.join();
        }

        // 结果可能不是预期的1000
        System.out.println("Map size: " + map.size());
    }
}
运行结果可能出现的异常:
ConcurrentModificationException- 数据丢失
- 死循环(JDK 7及以下版本)
1.2 并发容器的分类
Java并发包提供了多种并发容器,按功能分类如下:

2. ConcurrentHashMap深度解析
2.1 演进历程:从"小作坊"到"现代化工厂"
🏭 进化故事:ConcurrentHashMap就像一家不断升级的工厂,从最初的手工作坊,到现代化的智能生产线,每一次升级都带来了效率的飞跃!

核心变化对比:
| 特性 | JDK 1.7 | JDK 1.8+ |
|---|---|---|
| 锁机制 | 分段锁(16个Segment) | CAS + synchronized |
| 锁粒度 | 整个Segment | 单个链表头节点 |
| 数据结构 | HashEntry数组 | Node数组 + 红黑树 |
| 并发度 | 16个线程 | 更高(取决于桶数量) |
| 性能 | 高 | 更高 |
2.2 核心实现原理
2.2.1 初始化过程
arduino
// 基本初始化方式
ConcurrentHashMap<String, Integer> map1 = new ConcurrentHashMap<>();           // 默认参数
ConcurrentHashMap<String, Integer> map2 = new ConcurrentHashMap<>(16);         // 指定初始容量
ConcurrentHashMap<String, Integer> map3 = new ConcurrentHashMap<>(16, 0.75f);  // 指定容量和负载因子
ConcurrentHashMap<String, Integer> map4 = new ConcurrentHashMap<>(16, 0.75f, 16); // 完整参数
2.2.2 put操作详解
arduino
ConcurrentHashMap<String, Integer> map = new ConcurrentHashMap<>();

// 基本操作
map.put("key1", 1);                                    // 基本put
Integer oldValue = map.putIfAbsent("key1", 100);       // 只有key不存在时才put
boolean replaced = map.replace("key1", 1, 10);         // 替换已存在的值
map.compute("key3", (k, v) -> v == null ? 1 : v + 1); // 计算新值
map.merge("key4", 1, (oldVal, newVal) -> oldVal + newVal); // 合并值
2.2.3 源码分析:put方法
java
// ConcurrentHashMap.put方法核心逻辑(简化版)
public V put(K key, V value) {
    return putVal(key, value, false);
}

final V putVal(K key, V value, boolean onlyIfAbsent) {
    if (key == null || value == null) throw new NullPointerException();

    int hash = spread(key.hashCode());
    int binCount = 0;

    for (Node<K, V>[] tab = table; ; ) {
        Node<K, V> f;
        int n, i, fh;

        // 1. 如果table为空,初始化
        if (tab == null || (n = tab.length) == 0)
            tab = initTable();

            // 2. 如果对应位置为空,CAS插入
        else if ((f = tabAt(tab, i = (n - 1) & hash)) == null) {
            if (casTabAt(tab, i, null, new Node<K, V>(hash, key, value, null)))
                break;
        }

        // 3. 如果正在扩容,帮助扩容
        else if ((fh = f.hash) == MOVED)
            tab = helpTransfer(tab, f);

            // 4. 如果位置不为空,synchronized锁住头节点
        else {
            V oldVal = null;
            synchronized (f) {
                // 在锁内再次检查
                if (tabAt(tab, i) == f) {
                    // 链表插入或红黑树插入
                    // ... 具体实现
                }
            }
        }
    }
    return null;
}
2.3 性能特点分析
性能对比图表:

适用场景矩阵:
| 场景类型 | ConcurrentHashMap | SynchronizedMap | HashMap |
|---|---|---|---|
| 高并发读写 | ✅ 推荐 | ❌ 性能差 | ❌ 不安全 |
| 缓存系统 | ✅ 推荐 | ⚠️ 可用 | ❌ 不安全 |
| 计数器应用 | ✅ 推荐 | ⚠️ 可用 | ❌ 不安全 |
| 单线程场景 | ⚠️ 过度设计 | ⚠️ 过度设计 | ✅ 推荐 |
3. 其他并发容器详解
3.1 CopyOnWriteArrayList - "快照式图书馆"
📚 图书馆比喻 :想象一个特殊的图书馆,读者可以随时自由进出阅读(读操作),但每当有新书要上架时(写操作),图书馆会先关闭,复制所有现有书籍到新书架,然后重新开放。这样读者永远不会看到" 半成品"的图书馆!
CopyOnWriteArrayList适用于读多写少的场景,采用写时复制策略:
csharp
CopyOnWriteArrayList<String> list = new CopyOnWriteArrayList<>();

// 基本操作
list.add("元素1");
list.add("元素2");

// 读操作不需要加锁,性能很好
for (String item : list) {
    System.out.println("读取: " + item);
}

// 写操作会复制整个数组,性能较差
list.add("元素3");
适用场景:
- 读多写少
- 数据量不大
- 对数据一致性要求不是特别严格
注意事项:
- 写操作性能较差(需要复制整个数组)
- 内存占用较大
- 迭代器反映的是创建时的快照
3.2 BlockingQueue系列 - "智能排队系统"
🚦 排队系统比喻:BlockingQueue就像一个智能的排队系统,有不同类型的"排队通道":
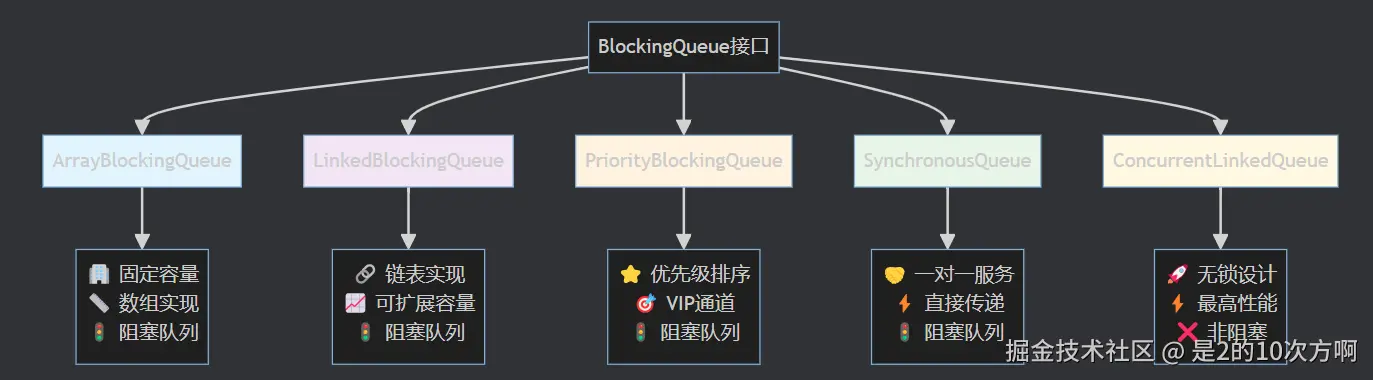
3.2.1 ArrayBlockingQueue
ini
public class ArrayBlockingQueueDemo {
    public static void main(String[] args) throws InterruptedException {
        // 创建容量为3的阻塞队列
        ArrayBlockingQueue<String> queue = new ArrayBlockingQueue<>(3);

        // 生产者线程
        Thread producer = new Thread(() -> {
            try {
                for (int i = 0; i < 5; i++) {
                    // put方法会阻塞直到有空间
                    queue.put("消息" + i);
                    System.out.println("生产: 消息" + i);
                    Thread.sleep(1000);
                }
            } catch (InterruptedException e) {
                Thread.currentThread().interrupt();
            }
        });

        // 消费者线程
        Thread consumer = new Thread(() -> {
            try {
                for (int i = 0; i < 5; i++) {
                    // take方法会阻塞直到有元素
                    String message = queue.take();
                    System.out.println("消费: " + message);
                    Thread.sleep(2000);
                }
            } catch (InterruptedException e) {
                Thread.currentThread().interrupt();
            }
        });

        producer.start();
        consumer.start();

        producer.join();
        consumer.join();
    }
}
3.2.2 LinkedBlockingQueue
typescript
public class LinkedBlockingQueueDemo {
    public static void main(String[] args) {
        // 无界队列(默认Integer.MAX_VALUE)
        LinkedBlockingQueue<String> unboundedQueue = new LinkedBlockingQueue<>();

        // 有界队列
        LinkedBlockingQueue<String> boundedQueue = new LinkedBlockingQueue<>(10);

        // 使用示例
        try {
            // 非阻塞操作
            boolean offered = boundedQueue.offer("消息1");
            System.out.println("offer结果: " + offered);

            // 阻塞操作
            boundedQueue.put("消息2");

            // 非阻塞获取
            String message = boundedQueue.poll();
            System.out.println("poll结果: " + message);

            // 阻塞获取
            String message2 = boundedQueue.take();
            System.out.println("take结果: " + message2);

        } catch (InterruptedException e) {
            Thread.currentThread().interrupt();
        }
    }
}
3.2.3 PriorityBlockingQueue
arduino
public class PriorityBlockingQueueDemo {
    public static void main(String[] args) throws InterruptedException {
        // 创建优先级阻塞队列
        PriorityBlockingQueue<Task> queue = new PriorityBlockingQueue<>();

        // 添加任务
        queue.put(new Task("低优先级任务", 3));
        queue.put(new Task("高优先级任务", 1));
        queue.put(new Task("中优先级任务", 2));

        // 按优先级消费
        while (!queue.isEmpty()) {
            Task task = queue.take();
            System.out.println("执行任务: " + task);
        }
    }

    static class Task implements Comparable<Task> {
        private String name;
        private int priority;

        public Task(String name, int priority) {
            this.name = name;
            this.priority = priority;
        }

        @Override
        public int compareTo(Task other) {
            return Integer.compare(this.priority, other.priority);
        }

        @Override
        public String toString() {
            return name + "(优先级:" + priority + ")";
        }
    }
}
3.3 ConcurrentLinkedQueue - "无锁高速通道"
🚀 高速公路比喻:ConcurrentLinkedQueue就像一条没有红绿灯的高速公路,车辆(数据)可以自由通行,不需要等待信号灯(锁),所有车辆都能以最高速度行驶,实现真正的"无锁并发"!
ConcurrentLinkedQueue是一个基于链接节点的无界线程安全队列,采用CAS(Compare-And-Swap)操作实现无锁并发。
ini
public class ConcurrentLinkedQueueDemo {
    public static void main(String[] args) throws InterruptedException {
        ConcurrentLinkedQueue<String> queue = new ConcurrentLinkedQueue<>();

        // 多线程并发操作
        Thread[] producers = new Thread[3];
        Thread[] consumers = new Thread[2];

        // 创建生产者线程
        for (int i = 0; i < 3; i++) {
            final int producerId = i;
            producers[i] = new Thread(() -> {
                for (int j = 0; j < 10; j++) {
                    queue.offer("生产者" + producerId + "-消息" + j);
                    try {
                        Thread.sleep(100);
                    } catch (InterruptedException e) {
                        Thread.currentThread().interrupt();
                    }
                }
            });
        }

        // 创建消费者线程
        for (int i = 0; i < 2; i++) {
            final int consumerId = i;
            consumers[i] = new Thread(() -> {
                while (true) {
                    String message = queue.poll();
                    if (message != null) {
                        System.out.println("消费者" + consumerId + "消费: " + message);
                    } else {
                        try {
                            Thread.sleep(50);
                        } catch (InterruptedException e) {
                            Thread.currentThread().interrupt();
                            break;
                        }
                    }
                }
            });
        }

        // 启动所有线程
        for (Thread producer : producers) {
            producer.start();
        }
        for (Thread consumer : consumers) {
            consumer.start();
        }

        // 等待生产者完成
        for (Thread producer : producers) {
            producer.join();
        }

        // 等待队列清空
        Thread.sleep(2000);

        // 停止消费者
        for (Thread consumer : consumers) {
            consumer.interrupt();
        }
    }
}核心特点:
- 🔓 无锁设计:使用CAS操作保证线程安全,无锁竞争开销
- ⚡ 高并发性能:适合高并发、低延迟场景
- 📋 链表结构:基于单向链表,头尾指针分离,减少竞争
- 📏 无界队列:理论上可以无限增长
适用场景:
- ✅ 高并发消息队列
- ✅ 任务调度系统
- ✅ 生产者-消费者模式(非阻塞)
- ❌ 需要阻塞等待的场景
- ❌ 需要精确size()的场景(size()是O(n)操作)
4. 线程同步工具类 - "团队协作指挥官"
4.1 CountDownLatch - "倒计时门闩"
🎯 团队协作比喻 :想象一个项目团队,项目经理(主线程)需要等待所有开发人员(工作线程)完成各自的任务后,才能进行项目总结。CountDownLatch就像一个" 倒计时门闩",当所有任务完成时,门闩才会打开!
CountDownLatch是一个同步辅助类,允许一个或多个线程等待,直到一组在其他线程中执行的操作完成。
csharp
public class CountDownLatchDemo {
    public static void main(String[] args) throws InterruptedException {
        int workerCount = 5;
        CountDownLatch latch = new CountDownLatch(workerCount);

        // 创建多个工作线程
        for (int i = 0; i < workerCount; i++) {
            final int workerId = i;
            new Thread(() -> {
                try {
                    System.out.println("工作线程" + workerId + "开始工作");
                    // 模拟工作
                    Thread.sleep(2000 + workerId * 500);
                    System.out.println("工作线程" + workerId + "完成工作");
                } catch (InterruptedException e) {
                    Thread.currentThread().interrupt();
                } finally {
                    // 工作完成后计数减1
                    latch.countDown();
                }
            }).start();
        }

        System.out.println("主线程等待所有工作线程完成...");
        // 主线程等待所有工作线程完成
        latch.await();
        System.out.println("所有工作线程已完成,主线程继续执行");
    }
}
实际应用场景:
- 等待多个服务启动完成
- 等待多个数据源加载完成
- 等待多个任务执行完成
4.2 CyclicBarrier - "循环栅栏"
🔄 接力赛比喻 :想象一场接力赛,每个运动员(线程)都要在起跑线等待,只有当所有运动员都准备好时,才能同时起跑。CyclicBarrier就像一个"循环栅栏" ,可以重复使用,每轮比赛结束后栅栏会重置,准备下一轮!
CyclicBarrier允许一组线程互相等待,直到所有线程都到达一个公共的屏障点。
csharp
public class CyclicBarrierDemo {
    public static void main(String[] args) {
        int threadCount = 4;
        CyclicBarrier barrier = new CyclicBarrier(threadCount, () -> {
            System.out.println("所有线程都到达屏障点,开始下一轮");
        });

        // 创建多个线程
        for (int i = 0; i < threadCount; i++) {
            final int threadId = i;
            new Thread(() -> {
                try {
                    System.out.println("线程" + threadId + "开始工作");
                    Thread.sleep(1000 + threadId * 500);
                    System.out.println("线程" + threadId + "到达屏障点");

                    // 等待其他线程
                    barrier.await();

                    System.out.println("线程" + threadId + "继续执行");
                } catch (InterruptedException | BrokenBarrierException e) {
                    Thread.currentThread().interrupt();
                }
            }).start();
        }
    }
}
与CountDownLatch的区别:
- CountDownLatch:一次性使用,不可重置
- CyclicBarrier:可重复使用,可以重置
4.3 Semaphore - "资源许可证管理器"
🎫 许可证比喻 :想象一个热门景点的门票系统,每天只发放有限数量的门票(许可证),游客需要先获得门票才能进入景区。Semaphore就像一个" 资源许可证管理器",控制同时访问特定资源的线程数量!
csharp
public class SemaphoreDemo {
    public static void main(String[] args) {
        // 创建信号量,允许3个线程同时访问
        Semaphore semaphore = new Semaphore(3);

        // 创建10个线程竞争资源
        for (int i = 0; i < 10; i++) {
            final int threadId = i;
            new Thread(() -> {
                try {
                    System.out.println("线程" + threadId + "尝试获取资源");
                    // 获取许可
                    semaphore.acquire();
                    System.out.println("线程" + threadId + "获得资源,开始工作");

                    // 模拟工作
                    Thread.sleep(2000);

                } catch (InterruptedException e) {
                    Thread.currentThread().interrupt();
                } finally {
                    System.out.println("线程" + threadId + "释放资源");
                    // 释放许可
                    semaphore.release();
                }
            }).start();
        }
    }
}
实际应用场景:
- 限制数据库连接数
- 限制文件访问数
- 控制线程池大小
4.4 Exchanger
Exchanger允许两个线程在某个汇合点交换对象。
typescript
public class ExchangerDemo {
    public static void main(String[] args) {
        Exchanger<String> exchanger = new Exchanger<>();

        // 生产者线程
        new Thread(() -> {
            try {
                String data = "生产者数据";
                System.out.println("生产者准备交换: " + data);
                String received = exchanger.exchange(data);
                System.out.println("生产者收到: " + received);
            } catch (InterruptedException e) {
                Thread.currentThread().interrupt();
            }
        }).start();

        // 消费者线程
        new Thread(() -> {
            try {
                String data = "消费者数据";
                System.out.println("消费者准备交换: " + data);
                String received = exchanger.exchange(data);
                System.out.println("消费者收到: " + received);
            } catch (InterruptedException e) {
                Thread.currentThread().interrupt();
            }
        }).start();
    }
}
5. 实战案例:生产者-消费者模式 - "高效流水线"
🏭 流水线比喻:想象一个现代化的汽车工厂,有多个工位同时生产零件(生产者),也有多个工位同时组装汽车(消费者)。它们通过传送带(队列)连接,形成一个高效的流水线系统!
5.1 使用BlockingQueue实现 - "智能传送带"
ini
public class ProducerConsumerWithBlockingQueue {
    public static void main(String[] args) {
        // 创建阻塞队列
        BlockingQueue<String> queue = new ArrayBlockingQueue<>(10);

        // 创建生产者
        Thread producer = new Thread(() -> {
            try {
                for (int i = 0; i < 20; i++) {
                    String item = "商品" + i;
                    queue.put(item);
                    System.out.println("生产: " + item + " 队列大小: " + queue.size());
                    Thread.sleep(100);
                }
            } catch (InterruptedException e) {
                Thread.currentThread().interrupt();
            }
        });

        // 创建消费者
        Thread consumer = new Thread(() -> {
            try {
                for (int i = 0; i < 20; i++) {
                    String item = queue.take();
                    System.out.println("消费: " + item + " 队列大小: " + queue.size());
                    Thread.sleep(150);
                }
            } catch (InterruptedException e) {
                Thread.currentThread().interrupt();
            }
        });

        producer.start();
        consumer.start();

        try {
            producer.join();
            consumer.join();
        } catch (InterruptedException e) {
            Thread.currentThread().interrupt();
        }
    }
}
5.2 使用wait/notify实现
ini
public class ProducerConsumerWithWaitNotify {
    private final Object lock = new Object();
    private final Queue<String> queue = new LinkedList<>();
    private final int maxSize = 10;

    public void produce() throws InterruptedException {
        synchronized (lock) {
            while (queue.size() == maxSize) {
                System.out.println("队列已满,生产者等待");
                lock.wait();
            }

            String item = "商品" + System.currentTimeMillis();
            queue.offer(item);
            System.out.println("生产: " + item + " 队列大小: " + queue.size());

            lock.notifyAll();
        }
    }

    public void consume() throws InterruptedException {
        synchronized (lock) {
            while (queue.isEmpty()) {
                System.out.println("队列为空,消费者等待");
                lock.wait();
            }

            String item = queue.poll();
            System.out.println("消费: " + item + " 队列大小: " + queue.size());

            lock.notifyAll();
        }
    }

    public static void main(String[] args) {
        ProducerConsumerWithWaitNotify pc = new ProducerConsumerWithWaitNotify();

        // 创建多个生产者和消费者
        Thread[] producers = new Thread[3];
        Thread[] consumers = new Thread[2];

        for (int i = 0; i < 3; i++) {
            final int producerId = i;
            producers[i] = new Thread(() -> {
                try {
                    for (int j = 0; j < 10; j++) {
                        pc.produce();
                        Thread.sleep(100);
                    }
                } catch (InterruptedException e) {
                    Thread.currentThread().interrupt();
                }
            });
        }

        for (int i = 0; i < 2; i++) {
            final int consumerId = i;
            consumers[i] = new Thread(() -> {
                try {
                    for (int j = 0; j < 15; j++) {
                        pc.consume();
                        Thread.sleep(150);
                    }
                } catch (InterruptedException e) {
                    Thread.currentThread().interrupt();
                }
            });
        }

        // 启动所有线程
        for (Thread producer : producers) {
            producer.start();
        }
        for (Thread consumer : consumers) {
            consumer.start();
        }

        // 等待完成
        try {
            for (Thread producer : producers) {
                producer.join();
            }
            for (Thread consumer : consumers) {
                consumer.join();
            }
        } catch (InterruptedException e) {
            Thread.currentThread().interrupt();
        }
    }
}
5.3 使用Semaphore实现
arduino
public class ProducerConsumerWithSemaphore {
    private final Semaphore producerSemaphore;
    private final Semaphore consumerSemaphore;
    private final Queue<String> queue;
    private final Object lock = new Object();

    public ProducerConsumerWithSemaphore(int capacity) {
        this.producerSemaphore = new Semaphore(capacity);
        this.consumerSemaphore = new Semaphore(0);
        this.queue = new LinkedList<>();
    }

    public void produce(String item) throws InterruptedException {
        producerSemaphore.acquire();
        synchronized (lock) {
            queue.offer(item);
            System.out.println("生产: " + item + " 队列大小: " + queue.size());
        }
        consumerSemaphore.release();
    }

    public String consume() throws InterruptedException {
        consumerSemaphore.acquire();
        String item;
        synchronized (lock) {
            item = queue.poll();
            System.out.println("消费: " + item + " 队列大小: " + queue.size());
        }
        producerSemaphore.release();
        return item;
    }

    public static void main(String[] args) {
        ProducerConsumerWithSemaphore pc = new ProducerConsumerWithSemaphore(10);

        // 生产者线程
        Thread producer = new Thread(() -> {
            try {
                for (int i = 0; i < 20; i++) {
                    pc.produce("商品" + i);
                    Thread.sleep(100);
                }
            } catch (InterruptedException e) {
                Thread.currentThread().interrupt();
            }
        });

        // 消费者线程
        Thread consumer = new Thread(() -> {
            try {
                for (int i = 0; i < 20; i++) {
                    pc.consume();
                    Thread.sleep(150);
                }
            } catch (InterruptedException e) {
                Thread.currentThread().interrupt();
            }
        });

        producer.start();
        consumer.start();

        try {
            producer.join();
            consumer.join();
        } catch (InterruptedException e) {
            Thread.currentThread().interrupt();
        }
    }
}
6. 性能对比与选择策略
6.1 性能特点总结
| 容器类型 | 读性能 | 写性能 | 内存开销 | 适用场景 |
|---|---|---|---|---|
| ConcurrentHashMap | ⭐⭐⭐⭐⭐ | ⭐⭐⭐⭐ | ⭐⭐⭐⭐ | 高并发Map |
| Collections.synchronizedMap | ⭐⭐ | ⭐⭐ | ⭐⭐⭐ | 低并发Map |
| CopyOnWriteArrayList | ⭐⭐⭐⭐⭐ | ⭐ | ⭐⭐ | 读多写少List |
| Collections.synchronizedList | ⭐⭐ | ⭐⭐ | ⭐⭐⭐ | 低并发List |
| ConcurrentLinkedQueue | ⭐⭐⭐⭐⭐ | ⭐⭐⭐⭐⭐ | ⭐⭐⭐⭐ | 高并发队列 |
| LinkedBlockingQueue | ⭐⭐⭐⭐ | ⭐⭐⭐⭐ | ⭐⭐⭐⭐ | 生产者-消费者 |
| ArrayBlockingQueue | ⭐⭐⭐ | ⭐⭐⭐ | ⭐⭐⭐⭐⭐ | 有界队列 |
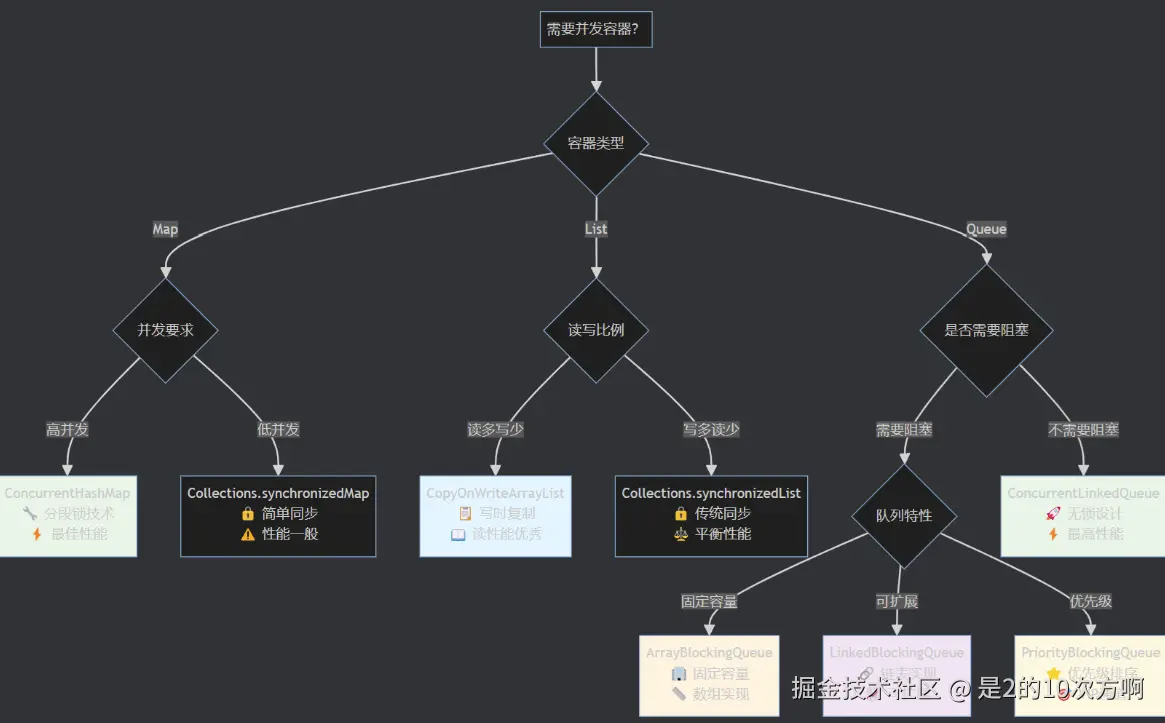
6.2 选择策略指南
容器选择决策流程图:
7. 常见问题与解决方案
7.1 内存泄漏问题
问题:无界缓存可能导致内存泄漏
dart
// ❌ 错误:无界缓存
Map<String, Object> cache = new ConcurrentHashMap<>();
for (int i = 0; i < 1000000; i++) {
    cache.put("key" + i, new byte[1024]); // 可能无限增长
}解决方案:使用有界缓存
arduino
// ✅ 正确:有界缓存
public class BoundedCache<K, V> {
    private final Map<K, V> cache = new ConcurrentHashMap<>();
    private final int maxSize;

    public void put(K key, V value) {
        if (cache.size() >= maxSize) {
            cache.remove(cache.keySet().iterator().next()); // 移除最旧的
        }
        cache.put(key, value);
    }
}
7.2 死锁问题
问题:多个锁的获取顺序不一致可能导致死锁
java
// ❌ 错误:可能导致死锁
synchronized (lock1) {
    synchronized (lock2) {
        // ...
    }
}
// 另一个线程
synchronized (lock2) {
    synchronized (lock1) {
        // ... 死锁!
    }
}解决方案:
- 统一锁的获取顺序
- 使用
tryLock()方法 - 避免嵌套锁
7.3 性能问题
问题:频繁的synchronized操作影响性能
csharp
// ❌ 错误:每次操作都获取锁
for (int i = 0; i < 1000000; i++) {
    synchronized (list) {
        list.add("item" + i);
    }
}解决方案:批量操作减少锁竞争
ini
// ✅ 正确:批量操作
List<String> batch = new ArrayList<>();
for (int i = 0; i < 1000000; i++) {
    batch.add("item" + i);
}
synchronized (list) {
    list.addAll(batch); // 只获取一次锁
}
8. 最佳实践总结
8.1 容器选择原则
-
根据使用场景选择
- 读多写少:CopyOnWriteArrayList
- 写多读少:ConcurrentHashMap
- 生产者-消费者:BlockingQueue
-
考虑性能要求
- 高并发:ConcurrentHashMap
- 低延迟:ConcurrentLinkedQueue
- 内存敏感:ArrayBlockingQueue
-
考虑数据一致性
- 强一致性:synchronized容器
- 最终一致性:ConcurrentHashMap
8.2 使用注意事项
ConcurrentHashMap使用:
arduino
// ✅ 正确:使用原子操作
map.compute("key", (k, v) -> v == null ? 1 : v + 1);

// ❌ 错误:非原子操作
if (!map.containsKey("key")) {
    map.put("key", 1); // 可能被其他线程修改
}BlockingQueue使用:
scss
// ✅ 正确:处理InterruptedException
try {
    String item = queue.take();
} catch (InterruptedException e) {
    Thread.currentThread().interrupt();
}CountDownLatch使用:
arduino
// ✅ 正确:设置超时时间
boolean completed = latch.await(5, TimeUnit.SECONDS);
if (!completed) {
    System.out.println("操作超时");
}
🎯 总结
🎉 恭喜你! 通过今天的学习,你已经掌握了Java并发编程中的核心工具------并发容器和工具类。这些工具是构建高并发系统的重要基石!
🏆 核心要点回顾
- ConcurrentHashMap 🏪:高并发场景下的"数据超市",永不拥堵!
- BlockingQueue系列 🚦:生产者-消费者模式的"智能红绿灯"系统
- CopyOnWriteArrayList 📚:读多写少场景的"快照式图书馆"
- 同步工具类 🎯:团队协作的"指挥官",让多线程和谐共舞
💡 实践建议
- 选择合适的容器 🎯:就像选择工具一样,选对工具事半功倍!
- 注意性能影响 ⚡:理解各种容器的"性格特点",避免性能陷阱
- 避免常见陷阱 🚨:内存泄漏、死锁、性能问题,这些"坑"要小心!
- 做好监控 📊:像医生一样,定期"体检"你的并发系统
📚 参考资源
本文使用 markdown.com.cn 排版