目录
[响应式实现关键字 ref](#响应式实现关键字 ref)
[Vue 生命周期](#Vue 生命周期)
[Vue 组件](#Vue 组件)
[组件之间传递数据 - 兄弟传参](#组件之间传递数据 - 兄弟传参)
模板语法
Vue 使用一种基于 HTML 的模板语法,是我们能够声明式地将其组件实例的数据绑定到呈现的 DOM 树中。在底层机制中,Vue 会将模板编译成高度优化的 JavaScript 代码。结合响应式系统,当应用状态发生变更,Vue 能够智能地推导出需要重新渲染的组件的最少数量,并应用最少的 DOM 操作。
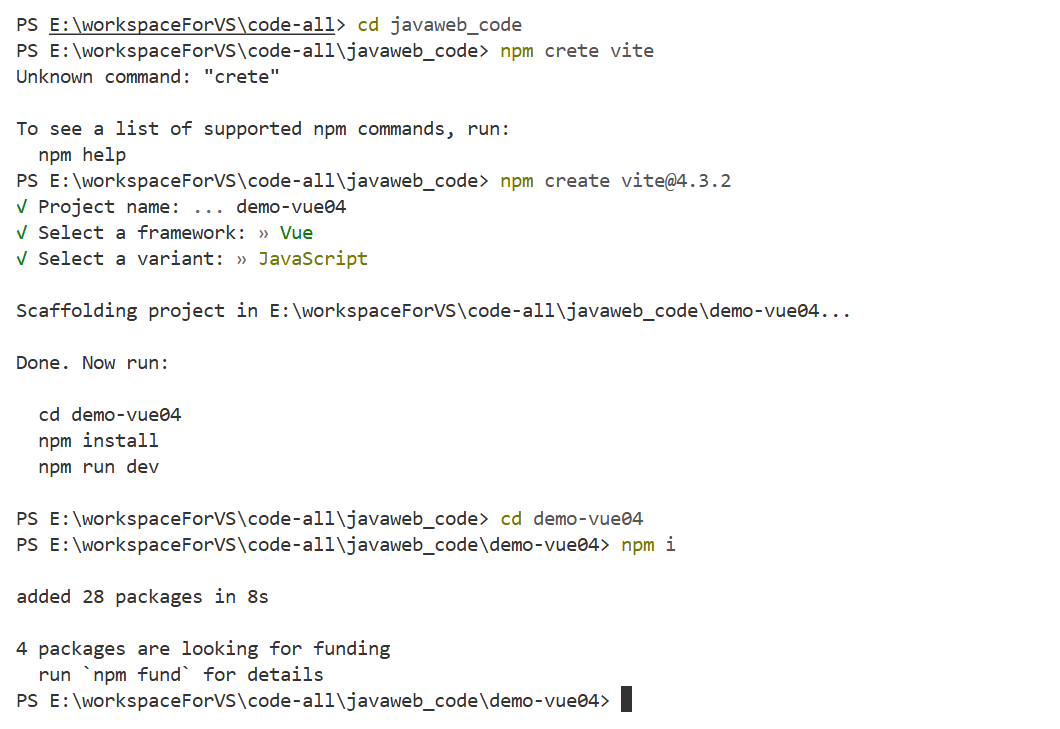
仍然如同之前一般,利用 npm 命令在终端创建一个项目,并完成相关初始化。
插值表达式和文本渲染
插值表达式:最基本的数据绑定形式,语法格式为: {{ }}
是将数据渲染到元素的指定位置的手段之一;
不绝对依赖标签,其位置相对自由;
支持 Javascript 的运算表达式
支持函数的调用
举例如下:
html
<script setup>
  let msg = "hello vue3"
  let getMsg = () => {
    return "hello vue3 message"
  }

  let age = 19
  let bee = "蜜 蜂"

  // 购物车
  const carts = [{name:'可乐',price:3,number:10},{name:'薯片',price:6,number:8}]
  // 计算购物车总金额
  function compute() {
    let count = 0
    for (let index in carts) {
      count += carts[index].price * carts[index].number;
    }
    return count
  }
</script>

<template>
  <div>
    <h1>{{ msg }}</h1><br>
    通过 getMsg 函数来打印 msg {{ getMsg() }}<br>
    是否成年:{{ age >= 18 ? '是' : '否'}}<br>
    反转:{{ bee.split(' ').reverse().join('-') }} <br>
    购物车总金额:{{ compute() }}<br>
    购物车总金额:{{carts[0].price*carts[0].number + carts[1].price*carts[1].number}}
  </div>
</template>

<style scoped>

</style>
我们可以使用 v-text 和 v-html 命令,来对文字进行渲染
v-*** 这种写法的方式,使用的是 vue 命令
v-*** 的命令必须依赖元素,并且要写在元素的开始标签中
v-*** 指令支持 ES6 中的字符串模板
v-texxt 可以将数据渲染成双标签中间的文本,但不识别 html 元素结构的文本
v-html 可以将数据渲染成双标签中间的文本,识别 html 元素结构的文本
举例如下:
html
<script setup>
  let msg = "hello vue3"
  let getMsg = () => {
    return msg
  }
  let age = 19
  let bee = "蜜 蜂"
  let redMsg = `<font color = 'red'>msg</font>`
  let greenMsg = `<font color = '\green'>${msg}</font>`

</script>

<template>
  <div>
    <span v-text = "msg"></span> <br>
    <span v-text = "redMsg"></span><br>
    <span v-text = "getMsg()"></span><br>
    <span v-text = "age > 18 ? '是':'否'"></span><br>
    <span v-text = "bee.split(' ').reverse().join('-')"></span><br>
    <span v-html = "msg"></span><br>
    <span v-html = "redMsg"></span><br>
    <span v-html = "greenMsg"></span><br>
    <span v-html = "`<font color = 'yellow'>${msg}</font>`"></span><br>

  </div>
</template>

<style scoped>

</style>
属性渲染
当我们想要渲染一个元素的 attribute,应该使用 v-bind 指令
由于插值表达式不能直接放在标签的属性中,要渲染元素的属性就需要使用 v-bind
v-bind 命令可以用于渲染任何元素的属性,语法为:v-bind:属性名='数据名',可以简写
:属性名 = '数据名'
举例如下:
html
<script setup>
  const data = {
    name:'百度',
    url:'https://www.baidu.com/',
    logo:'https://www.baidu.com/img/flexible/logo/pc/result.png'
  }
</script>

<template>
  <div>
    <a
      v-bind:href='data.url'
      target='_self'>
      <img
        v-bind:src='data.logo'
        v-bind:title='data.name'>
      <br>
      <input type = "button"
        v-bind:value="`点击访问${data.name}`">
    </a>
  </div>
</template>

<style scoped>

</style>
事件的绑定
我们可以使用 v-on 来监听 DOM 事件,并在事件触发的时候执行对应的 Vue 的 Javascript 代码
用法:v-on:click = "handler",可以简写为 @click="handler"
vue 中的事件名 = 原生事件名去掉 on 前缀,如 onClick --> click
handler 的值可以是方法事件处理器(逻辑定义在方法中,模板中仅引用方法名),也可以是内联事件处理器(逻辑直接写在模板中)
绑定事件时候,可以增加一些绑定的修饰符,常见的事件修饰符如下:
.once:只触发一次
.prevent:阻止默认事件
举例如下:
html
<script setup>
  import {ref} from 'vue'

  // 响应式数据 当发生变化,会自动更新 DOM 树
  let count = ref(0)
  let addCount = () => {
    count.value++
  }
  let incrCount = () => {
    count.value--
  }
  function fun() {
    // alert("超链接被点击了")
    let flag = confirm("确认要访问目标连接吗")
    if (!flag) {
      // 原生 js 编码方式阻止组件的默认行为
      event.preventDefault()
    }
  }
  function fun2() {
    alert("超链接被点击了")
  }

</script>

<template>
  <div>
    <h1>count 的值是:{{count}}</h1>
    <!-- 方法事件处理器 -->
    <button v-on:click="addCount()">addCount</button>
    <!-- 内联事件处理器 -->
    <button @click="count++">addCount2</button>
    <!-- 事件修饰符 once 只绑定一次事件 -->
    <button @click.once="count--">incrCountOnce</button>
    <br>
    <a href = "https://www.baidu.com" v-on:click="fun($event)">百度</a>
    <a href = "https://www.baidu.com" v-on:click.prevent="fun2()">百度</a>
  </div>
</template>

<style scoped>

</style>
响应式基础
这里的响应式是指:数据模型(自定义的变量,对象)发生变化的时候,自动更新 DOM树的内容,页面上显示的内容会进行同步变化。vue3 的数据模型默认部署自动响应的,需要我们做一些特殊的处理。
响应式需求案例
需求:实现 + - 按钮,数字 +1 -1
html
<script type="module" setup>
let counter = 0;
function show() {
  alert(counter);
}
</script>

<template>
  <div>
    <button @click="counter--">-</button>
    {{ counter }}
    <button @click="counter++">+</button>
    <hr>
    <!-- 此案例,我们发现counter值,会改变,但是页面不改变! 默认Vue3的数据是非响应式的!-->
    <button @click="show()">显示counter值</button>
  </div>
</template>

<style scoped>
</style>
响应式实现关键字 ref
ref 可以将一个基本类型的数据(如字符串,数字等)转换成一个响应式对象。但,ref 只能包裹单一元素
html
<script setup>
  /* 从 vue 中引入 ref  */
  import {ref} from 'vue'
  let counter = ref(0);
  function show() {
    alert(counter.value);
  }
  // 函数中要操作 ref 处理过的数据,需要通过 .value 形式
  let decr  = () => {
    counter.value--
  }
  let incr = () => {
    counter.value++
  }
</script>

<template>
  <div>
    <button @click="counter--">-</button>
    <button @click="decr()">-</button>
    {{ counter }}
    <button @click="counter++">+</button>
    <button @click="incr()">+</button>
    <hr>
    <button @click="show()">显示counter值</button>
  </div>
</template>

<style scoped>
</style>
在上面的例子中,我们用 ref 包裹了一个数字。但需要注意的是,在使用 ref 后,在 script 标签中,访问该对象时,需要使用 .value 来获取其实际的值。
响应式实现关键字reactive
我们可以使用 reactive() 函数创建一个响应式对象/数组
html
<script setup>
  /* 从 vue 中引入 reactive  */
  import {reactive} from 'vue'
  let data = reactive ({
    counter:0
  })
  function show() {
    alert(data.counter)
  }
  /* 该函数在操作 reactive 处理过的数据,需要通过对象名.属性名的方式 */
  let decr = () => {
    data.counter--
  }
  let incr = () => {
    data.counter++
  }
</script>

<template>
  <div>
    <button @click="data.counter--">-</button>
    <button @click="decr">-</button>
    {{data.counter}}
    <button @click="data.counter++">+</button>
    <button @click="incr">+</button>
  </div>
</template>

<style scoped>

</style>
对比 ref 和 reactive:
对于只有一个字符等基本类型数据或自定义组件情况,建议使用 ref
对于对象,函数等较为复杂的数据结构,建议使用 reactive
条件和列表渲染
条件渲染
v-if 条件渲染:
v-if = '表达式' 只会在指令的表达式返回真值时候被渲染
也可以使用 v-else 为 v-if 添加一个"else区块"
一个 v-else 元素必须跟在一个 v-if 元素后面,否则它不会被识别
html
<script setup>
  import {ref} from 'vue'
  let awesome = ref(true)
</script>

<template>
  <div>
    <h1 v-if="awesome">Vue is awesome!</h1>
    <!-- v-else 自动和前一个 v-if 做一个取反操作 -->
    <h1 v-else>Oh no </h1>
    <button @click = "awesome = !awesome">Toggle</button>

  </div>
</template>

<style scoped>

</style>
v-show 条件渲染扩展:
另一个可以用来按条件显示一个元素的指令是 v-show。用法基本一样。
不同之处在于 v-show 会在 DOM 渲染中保留该元素。v-show 仅仅切换了该元素上名为 display 的 CSS 属性
html
<script setup>
  import {ref} from 'vue'
  let awesome = ref(true)
</script>

<template>
  <div>
    <h1 id = "ha" v-show="awesome">Vue is awesome!</h1>
    <h1 id = "hb" v-if="awesome">Vue is awesome!</h1>
    <h1 id = "hc" v-else >Oh no</h1>
    <button @click = "awesome = !awesome">Toggle</button>

  </div>
</template>

<style scoped>

</style>
对比:
v-if 是"真实的"按条件渲染,它确保了在切换的时候,条件区块内的事件监听器和子组件都会被销毁与重建
v-if 也是惰性的:如果在初次渲染时,条件值为 false,则不会做任何事。只有当条件首次变为 true 的时候才会被渲染
v-show 简单许多,元素无论初始条件如何,始终会被渲染,只有 CSS 的 display 属性会被来回切换。
列表渲染
我们可以使用 v-for 指令基于一个数组来渲染一个列表
v-for 指令的值需要使用 item in items 形式的特殊语法,其中 items 是源数据的数据,而 item 是迭代项的别名
v-for 块中可以完整的访问父作用域内的属性和变量。v-for 也支持使用可选的第二个参数表示当前项的位置索引
html
<script setup>
  import {ref, reactive} from 'vue'
  let parentMessage = ref('产品')
  let items = reactive([
    {
      id:'item1',
      message:'薯片'
    },
    {
      id:'item2',
      message:'可乐'
    }
  ])
</script>

<template>
  <div>
    <ul>
      <li v-for = 'item in items' v-bind:key = 'item.id'>
        {{item.message}}
      </li>
    </ul>
    <ul>
      <!-- index 表示索引 -->
      <li v-for = "(item, index) in items" v-bind:key="index">
        {{parentMessage}} - {{index}} - {{item.message}}
      </li>
    </ul>
  </div>
</template>

<style scoped>

</style>
案例:实现购物车显示和删除购物项
html
<script setup>

  import { reactive } from 'vue'

  const carts = reactive([
    {name:'可乐',price:3,number:10},
    {name:'薯片',price:6,number:8}
    ])

    // 计算总金额
    function compute() {
      let count = 0;
      for (let index in carts) {
        count += carts[index].number*carts[index].price
      }
      return count
    }

    // 删除购物车的购物项的方法
    function removeCart(index) {
      carts.splice(index,1)
    }
    // 清空购物车
    function clearCart() {
      carts.splice(0,carts.length)
    }
</script>

<template>
  <div>
    <table style="border:1px solid">
      <thead>
        <tr>
          <th>序号</th>
          <th>商品名</th>
          <th>价格</th>
          <th>数量</th>
          <th>小计</th>
          <th>操作</th>
        </tr>
      </thead>
      <tbody v-if="carts.length > 0">
        <tr v-for = "cart,index in carts" v-bind:key="index">
          <td>{{index+1}}</td>
          <td>{{cart.name}}</td>
          <td>{{cart.price}}</td>
          <td>{{cart.number}}</td>
          <td>{{cart.price*cart.number}}</td>
          <td><button @click="removeCart(index)">删除</button></td>
        </tr>
      </tbody>
      <tbody v-else>
        <tr>
          <td colspan="6"> 购物车没有数据</td>
        </tr>
      </tbody>
      <button @click="clearCart()">一键清空购物车</button>
    </table>
    购物车总金额:{{compute()}}
  </div>
</template>

<style scoped>

</style>
双向绑定
单项绑定:响应式数据的变化会更新 DOM 树,但是 DOM 树上用户的操作造成的数据改变,不会同步更新到响应式数据
双向绑定:响应式数据的变化会更新 DOM 树,且 DOM 树上用户的操作造成的数据改变,会同步更新到响应式数据。
用户通过表单标签才能输入数据,所以双向绑定都是应用在表单标签上的,其他标签不可以
v-model 专门用于双向绑定表单标签的 value 属性。语法为:v-model :vale = "" 可以简写为
v-model=' '
v-model 还可以用于各种不同类型的输入 <textarea> <select> 元素
html
<script setup>
  import {ref, reactive} from 'vue'
  let user = reactive({
    username:'',
    userPwd:'',
    intro:'',
    pro:'',

  })
  let hbs = ref([])
  function clearForm() {
    user.username='',
    user.userPwd='',
    user.intro='',
    user.pro=''
    hbs.value.splice(0,hbs.value.length) // 注意 hbs 是 ref 类型的,需要加 value
  }
</script>

<template>
  <div>
    <input type = 'text' v-model = 'user.username'><br>
    <input type = 'text' v-model = 'user.userPwd'><br>
    爱好:
    唱 <input type = 'checkbox' v-model = "hbs" value = 'sing'>
    跳 <input type = 'checkbox' v-model = 'hbs' value = 'dance'>
    rap <input type = 'checkbox' v-model = 'hbs' value = 'rap'>
    <br>
    简介 <textarea v-model="user.intro"></textarea>
    <br>
    籍贯:
    <select v-model = 'user.pro'>
      <option value = '1'>京</option>
      <option value = '2'>津</option>
      <option value = '3'>冀</option>
    </select>
    <button @click="clearForm()">清空</button>
    <br>
    {{user}} <br>
    {{hbs}}
  </div>
</template>

<style scoped>

</style>
属性计算
模板中的表达式虽然方便,但也只能用来做一些简单的操作。如果在模板中写太多逻辑,会让模板变得臃肿,难以维护。
我们可以使用计算属性来描述以来响应式状态的复杂逻辑:
html
<script setup>
import { reactive,computed } from "vue";

const author = reactive({
  name: "zzzz",
  books: ["java", "javaweb", "数据结构与算法"],
});

function hasBooks() {
  // 通过方法返回数据 每使用一次就执行一次
  return author.books.length>0?'yes':'no'
}
let bookMessage = computed(() => {
  // 计算属性,每次使用,如果和上次使用时,数据没有变化,则直接使用上一次的结果
  return author.books.length>0?'yes':'no'
})
</script>

<template>
  <div>
    <p>作者:{{author.name}}</p>
    是否出版过图书:{{hasBooks()}}
    是否出版过图书:{{bookMessage}}
  </div>
</template>

<style scoped></style>
注意:计算属性值会基于其响应式依赖被缓存,一个计算属性仅仅会在其响应式更新时候才重新计算,这意味着,只要 author.books 不改变,无论访问多少此 bookMessage 都会立即返回先前的计算结果
数据监听器
我们可以使用 watch 函数在每次响应式状态发生变化时,触发回调函数
watch 函数应用场景:
当数据发生变化时需要执行响应操作
监听数据变化,满足一定条件的时候触发响应操作
在异步操作前或操作后需要执行响应的操作
html
<script setup>
import { ref, reactive, watch } from "vue";
let firstname = ref("");
let lastname = reactive({ name: "" });
let fullname = ref("");

// 监听一个 ref 响应式数据
watch(firstname, (newValue, oldValue) => {
  console.log(`${oldValue}变为${newValue}`);
  fullname.value = firstname.value + lastname.name;
});
// 监听一个 reactive 响应式数据的指定属性
watch(
  () => lastname.name,
  (newValue, oldValue) => {
    console.log(`${oldValue}变为${newValue}`);
    fullname.value = firstname.value+lastname.name
  }
);
// 监听 reactive 响应式数据的所有属性(深度监视)
// deep:true 深度监视
// immediate:true 深度监视在进入页面时立即实行一次
  // watch(()=>lastname,(newValue,oldValue)=>{
  //   // 此时的 newValue 和 oldValue 都是一样的,都是 lastname
  //   console.log(oldValue)
  //   console.log(newValue)
  //   fullname.value=firstname.value+lastname.name
  // },{deep:true,immediate:false})

</script>

<template>
  <div>
    全名:{{fullname}}<br>
    姓:<input type = "text" v-model='firstname'><br>
    名:<input type = "text" v-model="lastname.name"><br>

  </div>
</template>

<style scoped></style>
监控响应式数据(watchEffect):
html
<script setup>
import { ref, reactive, watch, watchEffect } from "vue";

let firstname = ref("");
let lastname = reactive({name:''});
let fullname = ref(" ");
// 监听所有响应式数据
watchEffect(() => {
  //直接在内部使用监听属性即可!
  // 默认初始化就加载,不需要回调设置
  console.log(firstname.value);
  console.log(lastname.name);
  fullname.value = `${firstname.value}${lastname.name}`;
});
</script>

<template>
  <div>
    全名:{{ fullname }}<br />
    姓:<input type="text" v-model="firstname" /><br />
    名:<input type="text" v-model="lastname.name" /><br />
  </div>
</template>

<style scoped></style>
watch 和 watchEffect:
都能响应式地执行有副作用的回调。区别主要是追踪响应式依赖的方式:
watch 只追踪明确侦听的数据源,不会追踪任何在回调中访问的东西。仅在数据源确实发生变化的时候才会触发回调。
watchEffect 会在副作用发生期间追踪依赖。会在同步过程中,自动追踪所有能访问到的响应式数据。
Vue 生命周期
简介
每个 Vue 组件实例,在创建时都需要经历一系列的初始化步骤,比如设置好数据侦听,编译模板,挂在实例到 DOM,以及在数据改变时更新 DOM。在此过程中,它也会运行被称为生命周期钩子的函数,让开发者有机会在特定阶段运行自己的代码。
图解:
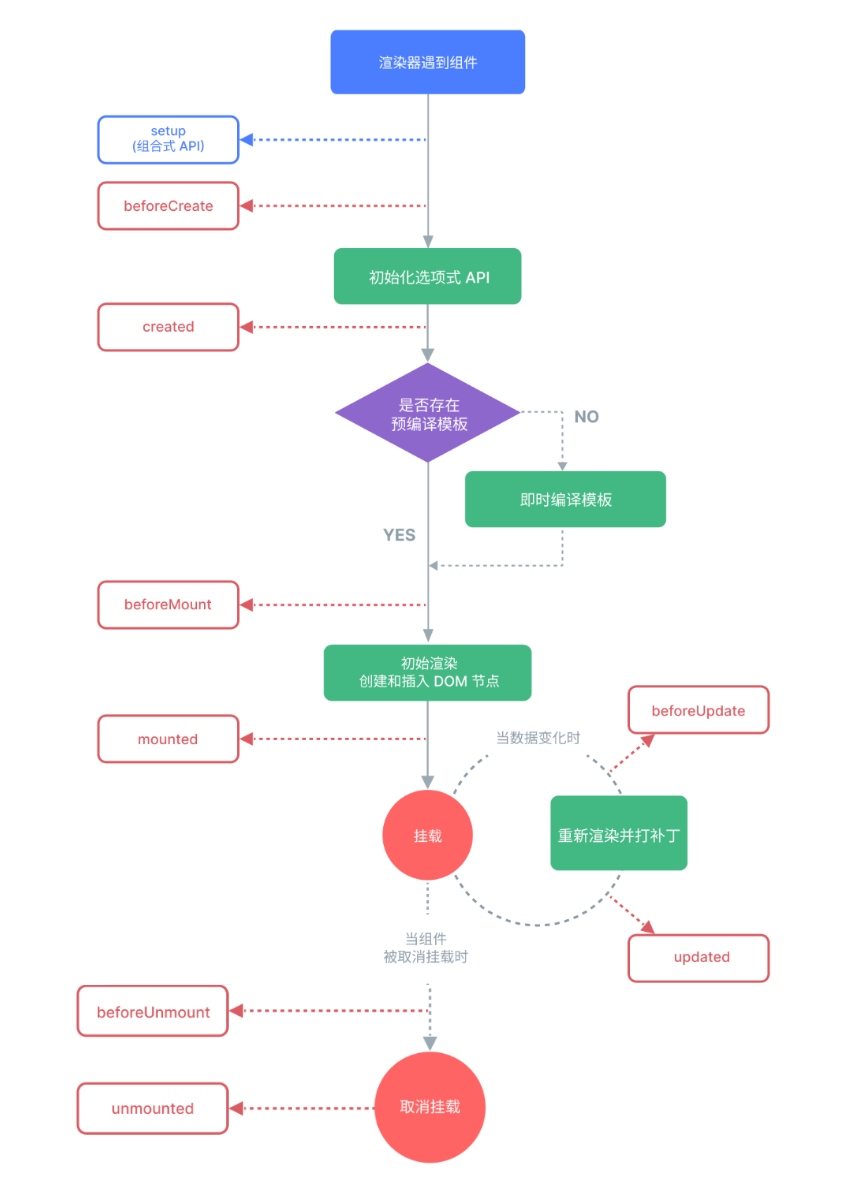
常见钩子函数:
onMounted() 注册一个回调函数,在组件挂载完成后执行。
onUpdated() 注册一个回调函数,在组件因为响应式状态变更而更新其 DOM 树之后调用
onUnmounted() 注册一个回调函数,在实例被携带之后调用
onBeforeMount() 注册一个钩子,在组件被挂载之前调用
onBeforeUpdate() 注册一个钩子,在组件即将因为响应式状态变更而更新其 DOM 树之前调用
onBeforeUnmount() 注册一个钩子,在组件实例被卸载之前调用
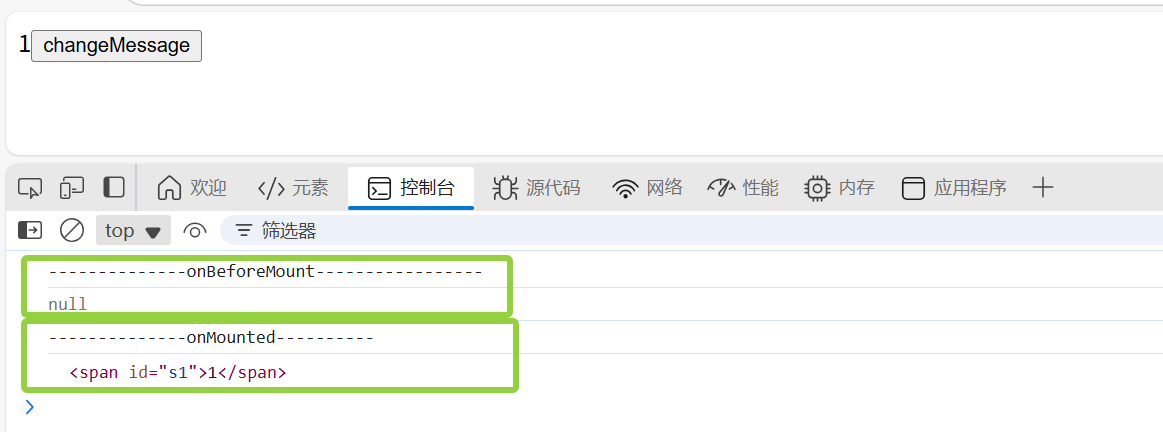
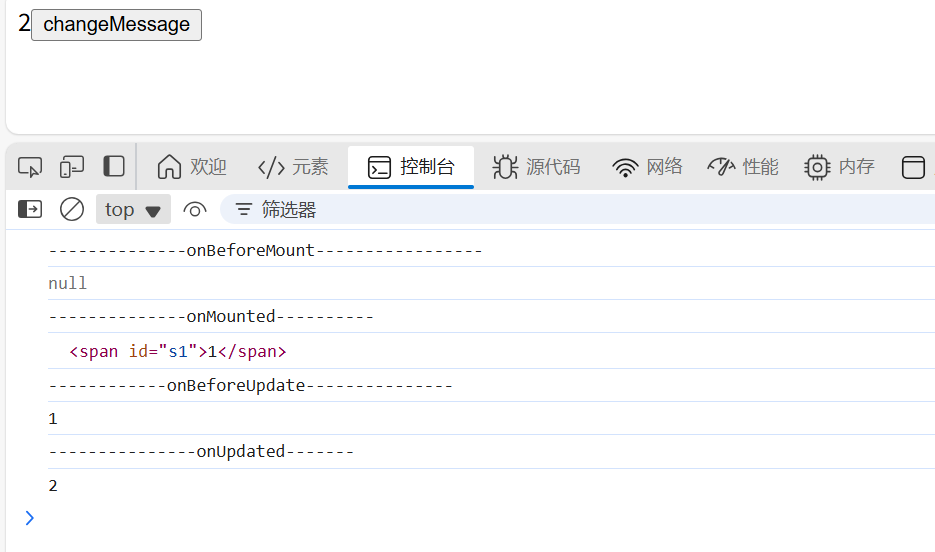
生命周期案例:
Vue 组件
组件基础
组件允许我们将 UI 划分为独立的,可重用的部分,并且可以对每个部分进行单独的设置。软件就是实现应用中局部功能代码和资源的集合。在实际应用中,组件常常被组织为层层嵌套的树状结构。
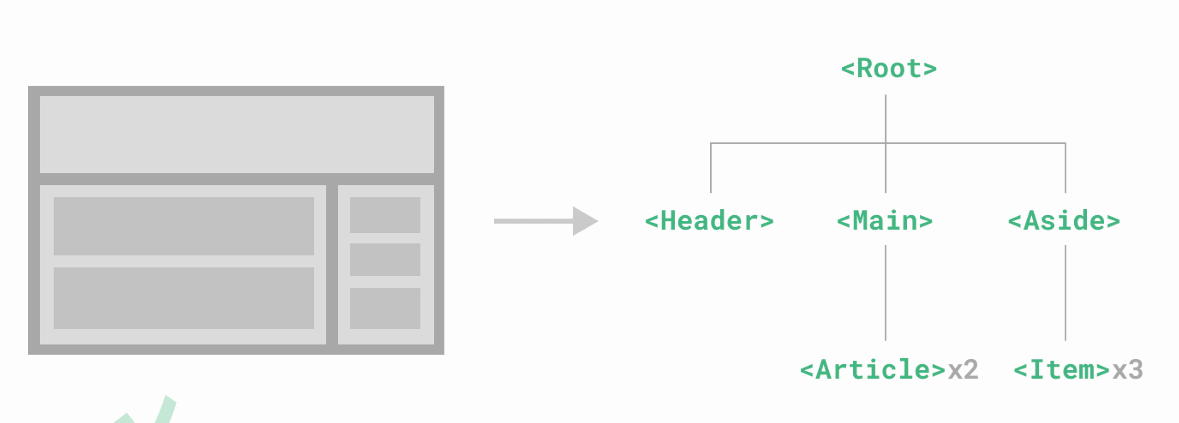
这与我们嵌套 HTML 元素的方式类似,Vue 实现了自己的组件模型
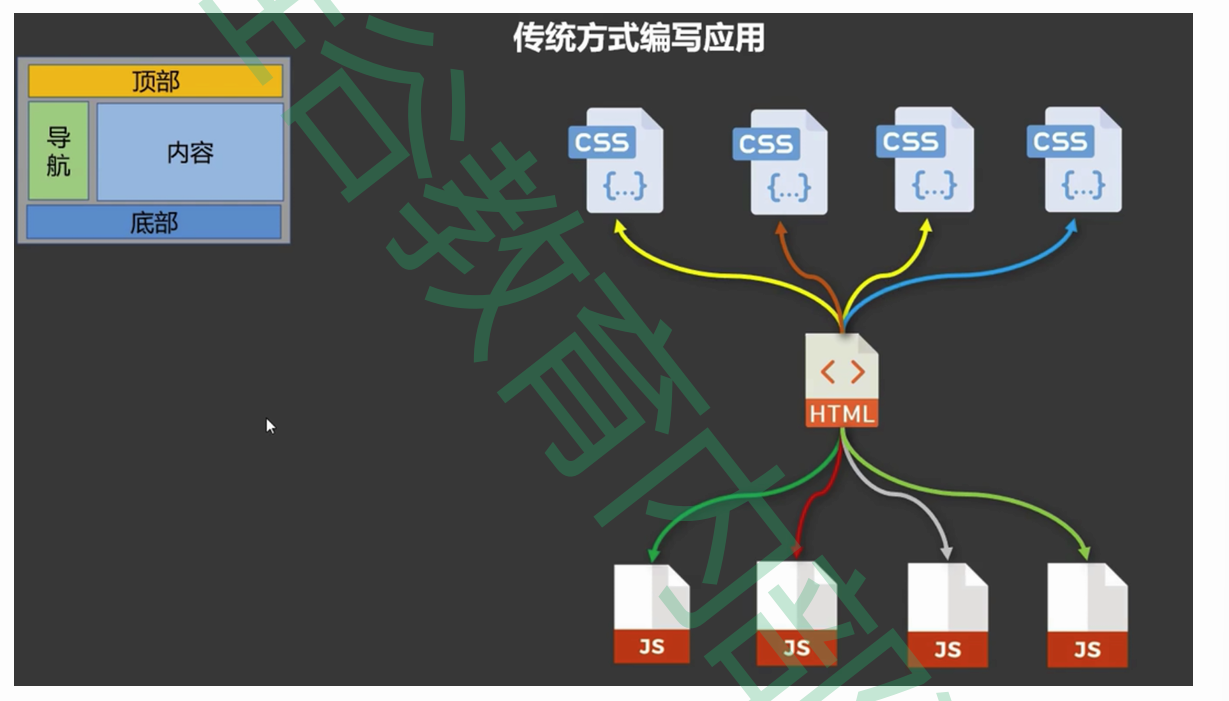
传统方式编写应用:
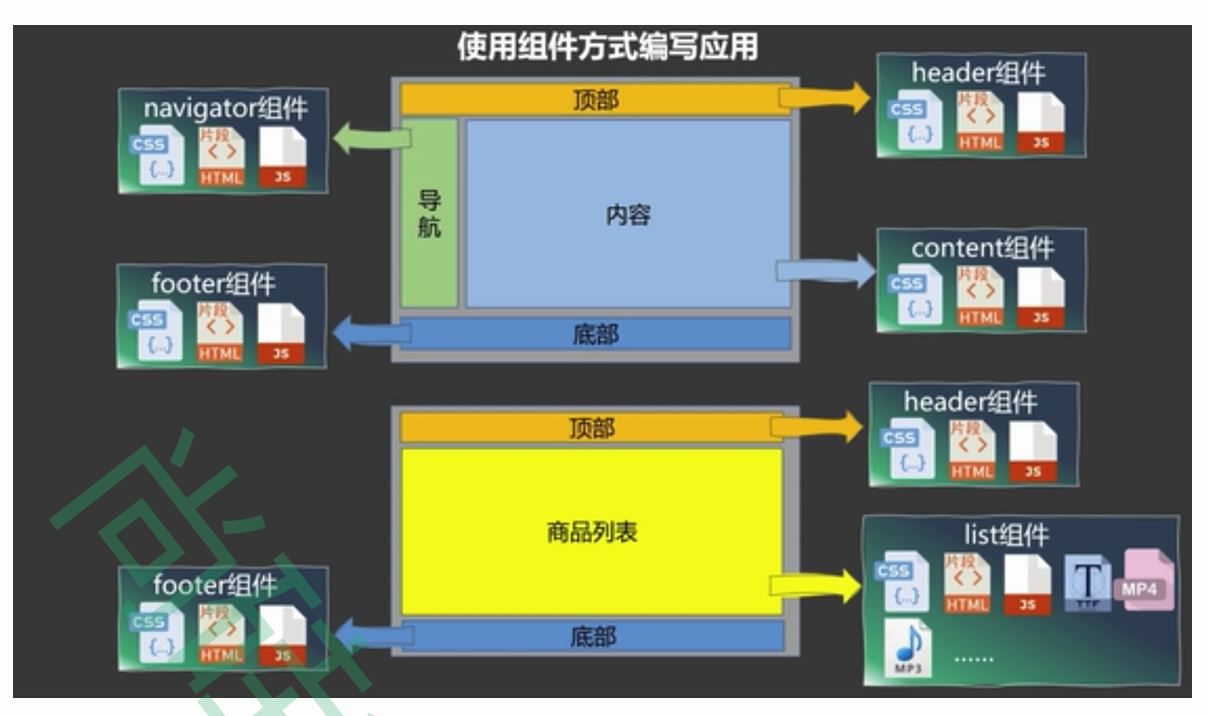
组件方式编写应用:
组件化入门案例
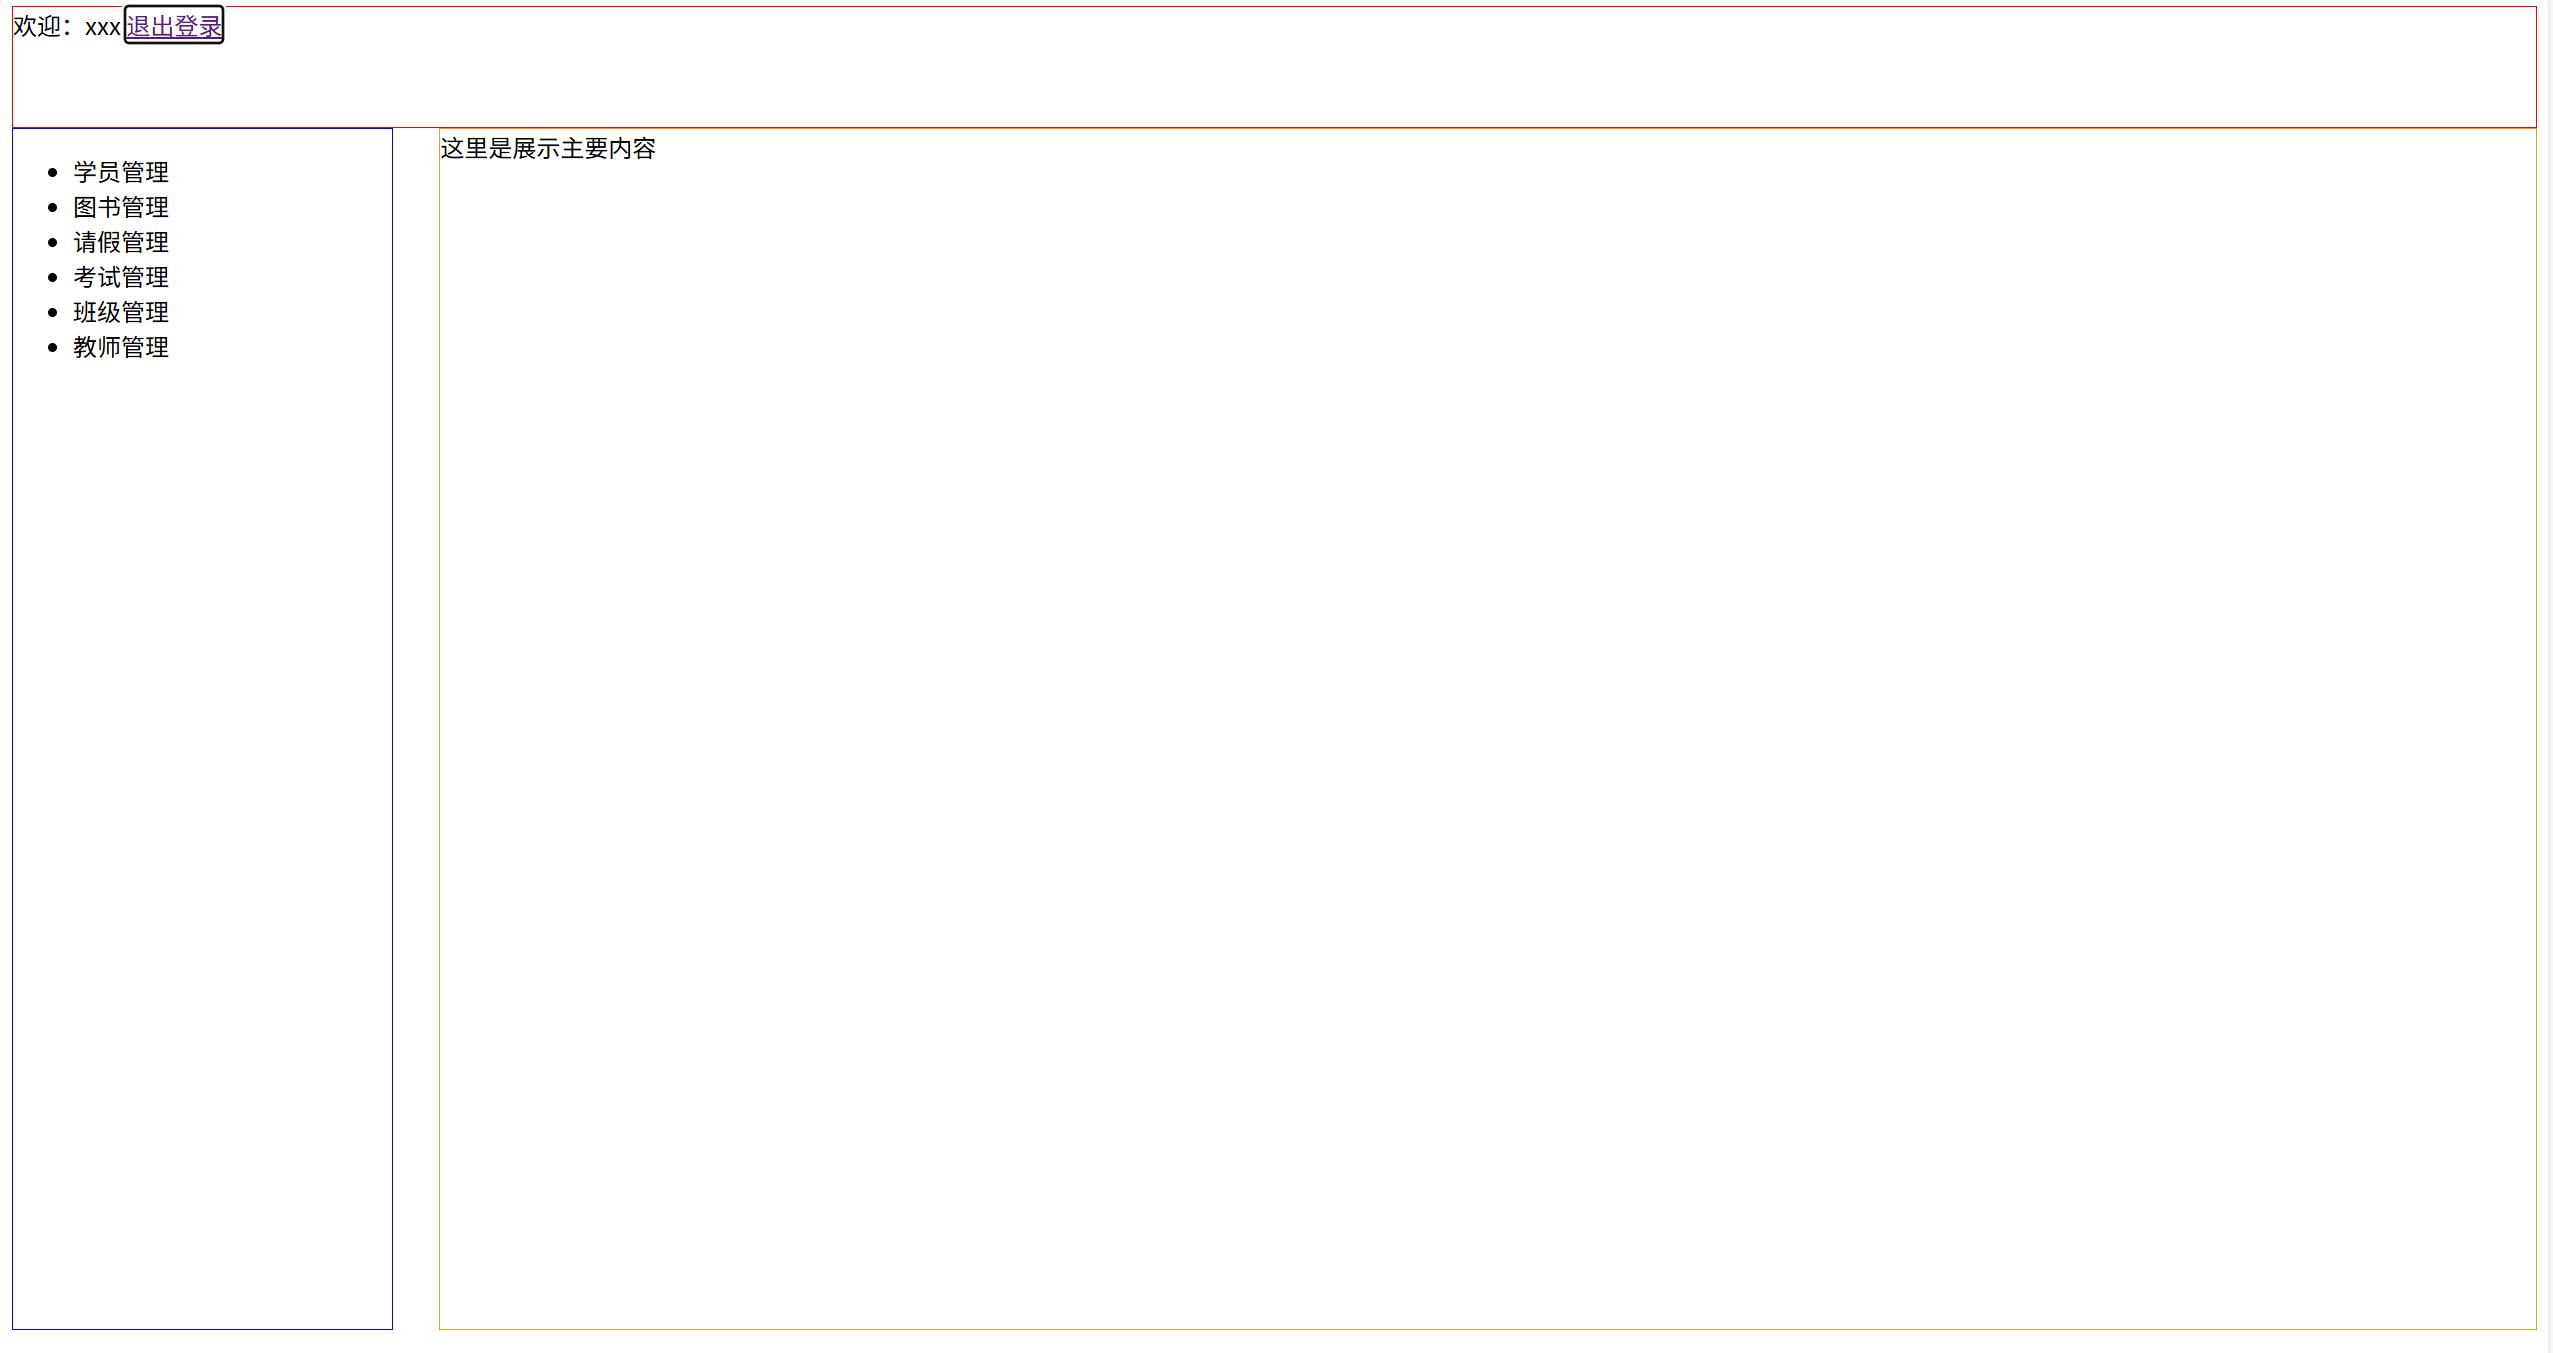
创建一个页面,包含头部,菜单以及内容显示区域,每个区域使用独立组件
准备 vue 项目:Header.vue Navigator.vue Content.vue
Header.vue:
html
<script setup>

</script>

<template>
  <div>
    欢迎:xxx <a href = "#">退出登录</a>
  </div>
</template>

<style scoped>

</style>
Navigator.vue:
html
<script setup>

</script>

<template>
  <div>
    <ul>
        <li>学员管理</li>
        <li>图书管理</li>
        <li>请假管理</li>
        <li>考试管理</li>
        <li>班级管理</li>
        <li>教师管理</li>
    </ul>
  </div>
</template>

<style scoped>

</style>
Content.vue:
html
<script setup>

</script>

<template>
  <div>
    这里是展示主要内容
  </div>
</template>

<style scoped>

</style>
APP.vue 入口组件来引入组件:
html
<script setup>
  // 引入多个 .vue 组件
  import Header from './components/Header.vue'
  import Navigator from './components/Navigator.vue'
  import Content from './components/Content.vue'
</script>

<template>
  <div>
    <Header class = "header"></Header>
    <Navigator class = "navigator"></Navigator>
    <Content class="content"></Content>
  </div>
</template>

<style scoped>
  .header{
    height: 80px;
    border: 1px solid red;
  }
  .navigator{
    width:15%;
    height: 800px;
    border:1px solid blue;
    float:left
  }
  .content{
    width:83%;
    height: 800px;
    border: 1px solid goldenrod;
    float:right
  }
</style>
启动测试:npm run dev,结果如下:
组件之间传递数据 - 兄弟传参
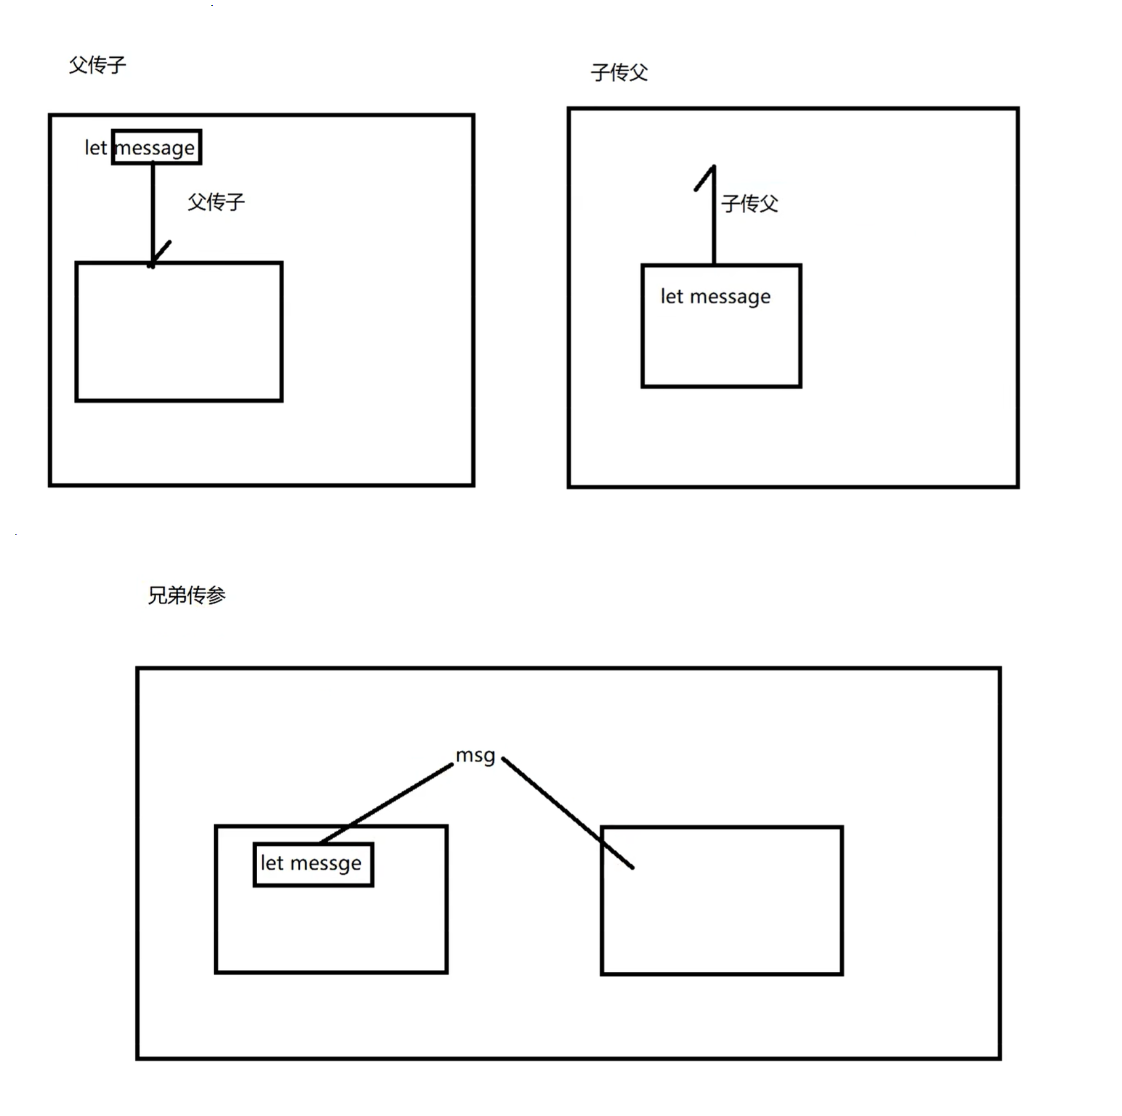
需求:在上面的页面中,当我们点击 Navigator 处的菜单,Content 处的主要内容区域会改变
Navigator:
html
<script setup>
// 向父组件发送参数
// defineEmits 用于定于向父组件提交数据的事件以及正式的提交数据
import {defineEmits} from 'vue'
// 定义一个向父组件提交数据的事件,事件名称自定义
const emits = defineEmits(["sendMenu"])
// 提交数据的方法
function send(data) {
emits("sendMenu",data)
}
</script>
<template>
<div>
<ul>
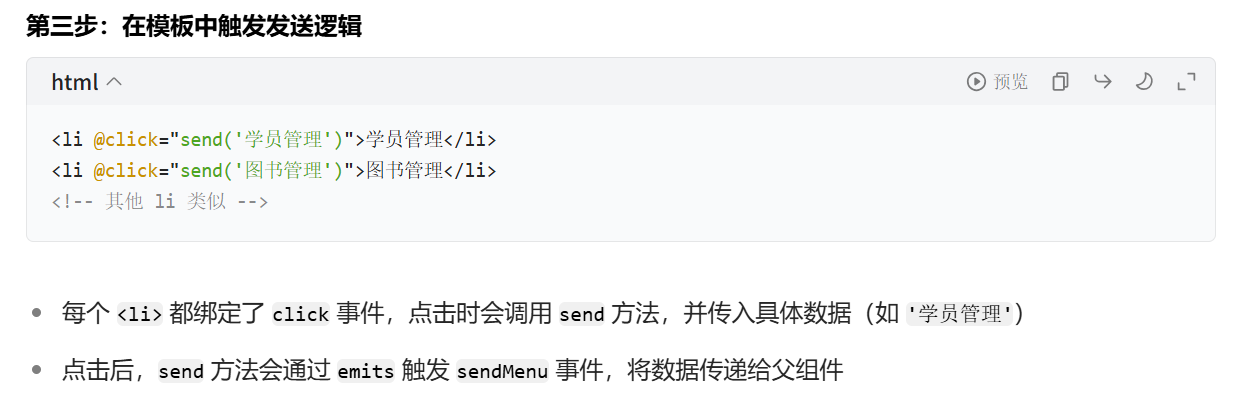
<li @click="send('学员管理')">学员管理</li>
<li @click="send('图书管理')">图书管理</li>
<li @click="send('请假管理')">请假管理</li>
<li @click="send('考试管理')">考试管理</li>
<li @click="send('班级管理')">班级管理</li>
<li @click="send('教师管理')">教师管理</li>
</ul>
</div>
</template>
<style scoped>
</style>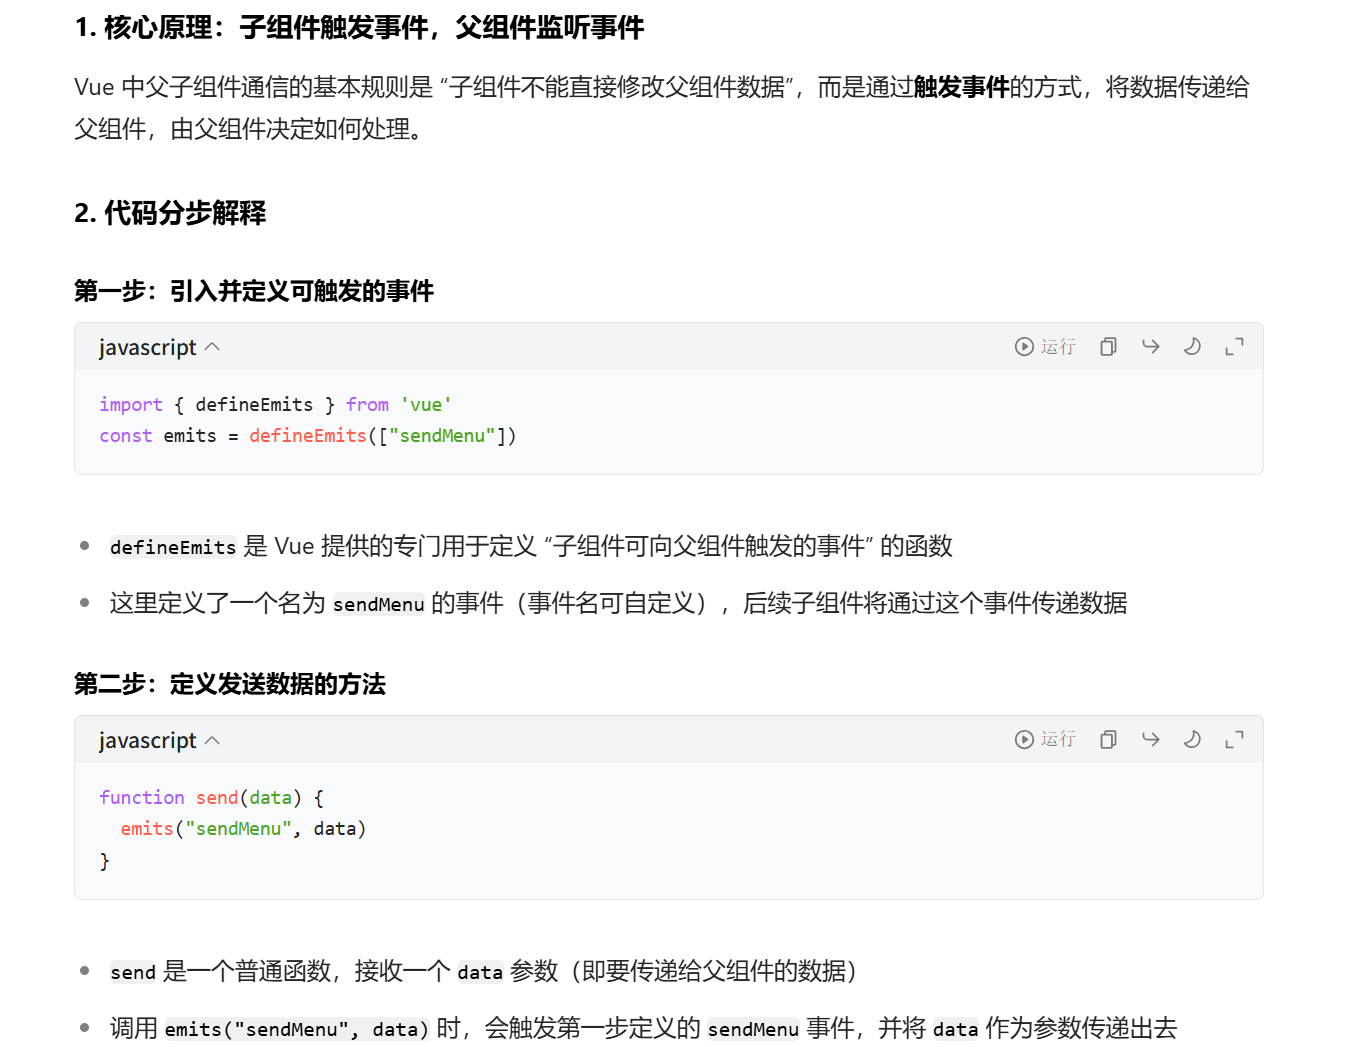
App.vue
html
<script setup>
  // 引入多个 .vue 组件
  import {ref} from 'vue'
  import Header from './components/Header.vue'
  import Navigator from './components/Navigator.vue'
  import Content from './components/Content.vue'

  // 1. 定义响应式变量存储接收的数据
  let menu = ref("")
  // 2. 定义接收方法,更新 menu 的值
  function receiver(data) {
    menu.value = data // data 就是子组件传递过来的数据
  }
</script>

<template>
  <div>
    {{menu}}
    <Header class = "header"></Header>
    <!-- 3. 在模板中监听子组件的 sendMenu事件,绑定接收方法 -->
    <Navigator @sendMenu="receiver" class = "navigator"></Navigator>
    <!-- 父传子 通过 :message 向 Content 组件传递数据 -->
    <!-- :message 等价于 v-bind:message 是动态绑定的 Props 属性 -->
    <Content class="content" :message="menu"></Content>
  </div>
</template>

<style scoped>
  .header{
    height: 80px;
    border: 1px solid red;
  }
  .navigator{
    width:15%;
    height: 800px;
    border:1px solid blue;
    float:left
  }
  .content{
    width:83%;
    height: 800px;
    border: 1px solid goldenrod;
    float:right
  }
</style>