在现代前端开发中,React 以其组件化思想为核心,极大地提升了代码的可复用性和可维护性。然而,随着应用复杂度的提升,一个不可避免的问题浮出水面:如何在不同组件间高效、清晰、可预测地共享数据?
本文将全面、深入地探讨 React 中组件间数据通信的各种方法,从最基础的父子通信到复杂的全局状态管理,并提供详细的代码示例、适用场景以及核心流程图,助你为下一个 React 项目选择最合适的数据流方案。
一、引言:为什么需要数据共享?
一个简单的 React 应用可能只有几个组件,通过 props 传递数据就足够了。但当应用成长为包含数十上百个组件的大型应用时,你会面临如下挑战:
- Prop Drilling(属性钻取):为了将数据从高层级组件传递到深层嵌套的组件,你不得不经过许多中间组件,即使这些中间组件本身并不需要这个数据。这使得代码变得冗长且难以维护。
- 兄弟组件通信:两个平级的组件如何同步状态?
- 全局状态:用户登录信息、主题、语言偏好等需要被许多无关组件访问的数据,如何管理?
为了解决这些问题,React 生态圈诞生了多种数据共享方案。
二、数据共享方法概览
以下是本文将要详细介绍的方法,你可以根据复杂度与场景进行选择:
| 方法 | 适用场景 | 优点 | 缺点 |
|---|---|---|---|
| Props / Callback | 父子组件间简单的数据传递 | 简单、内置支持、数据流清晰 | 容易产生 Prop Drilling |
| Context API | 跨多层组件共享"全局"数据(如主题、语言) | 避免 Prop Drilling、React 内置 | 不适合频繁更新的数据,可能引起不必要的重渲染 |
| Redux | 大型应用、复杂状态逻辑、需要可预测状态管理 | 状态可预测、强大的中间件生态、时间旅行调试 | 样板代码多、概念复杂、相对笨重 |
| Zustand | 中大型应用,需要轻量级替代 Redux 的方案 | API 极其简单、少样板代码、性能良好 | 社区生态略小于 Redux |
| Hooks (useState, useReducer) | 组件内部或通过组合提升状态 | 简单、灵活 | 自身无法直接解决跨组件通信,需与其他方法结合 |
| 事件总线(Event Bus) | 任意组件间通信,非 React 体系 | 完全解耦、使用简单 | 违背 React 单向数据流、难以调试、不推荐 |
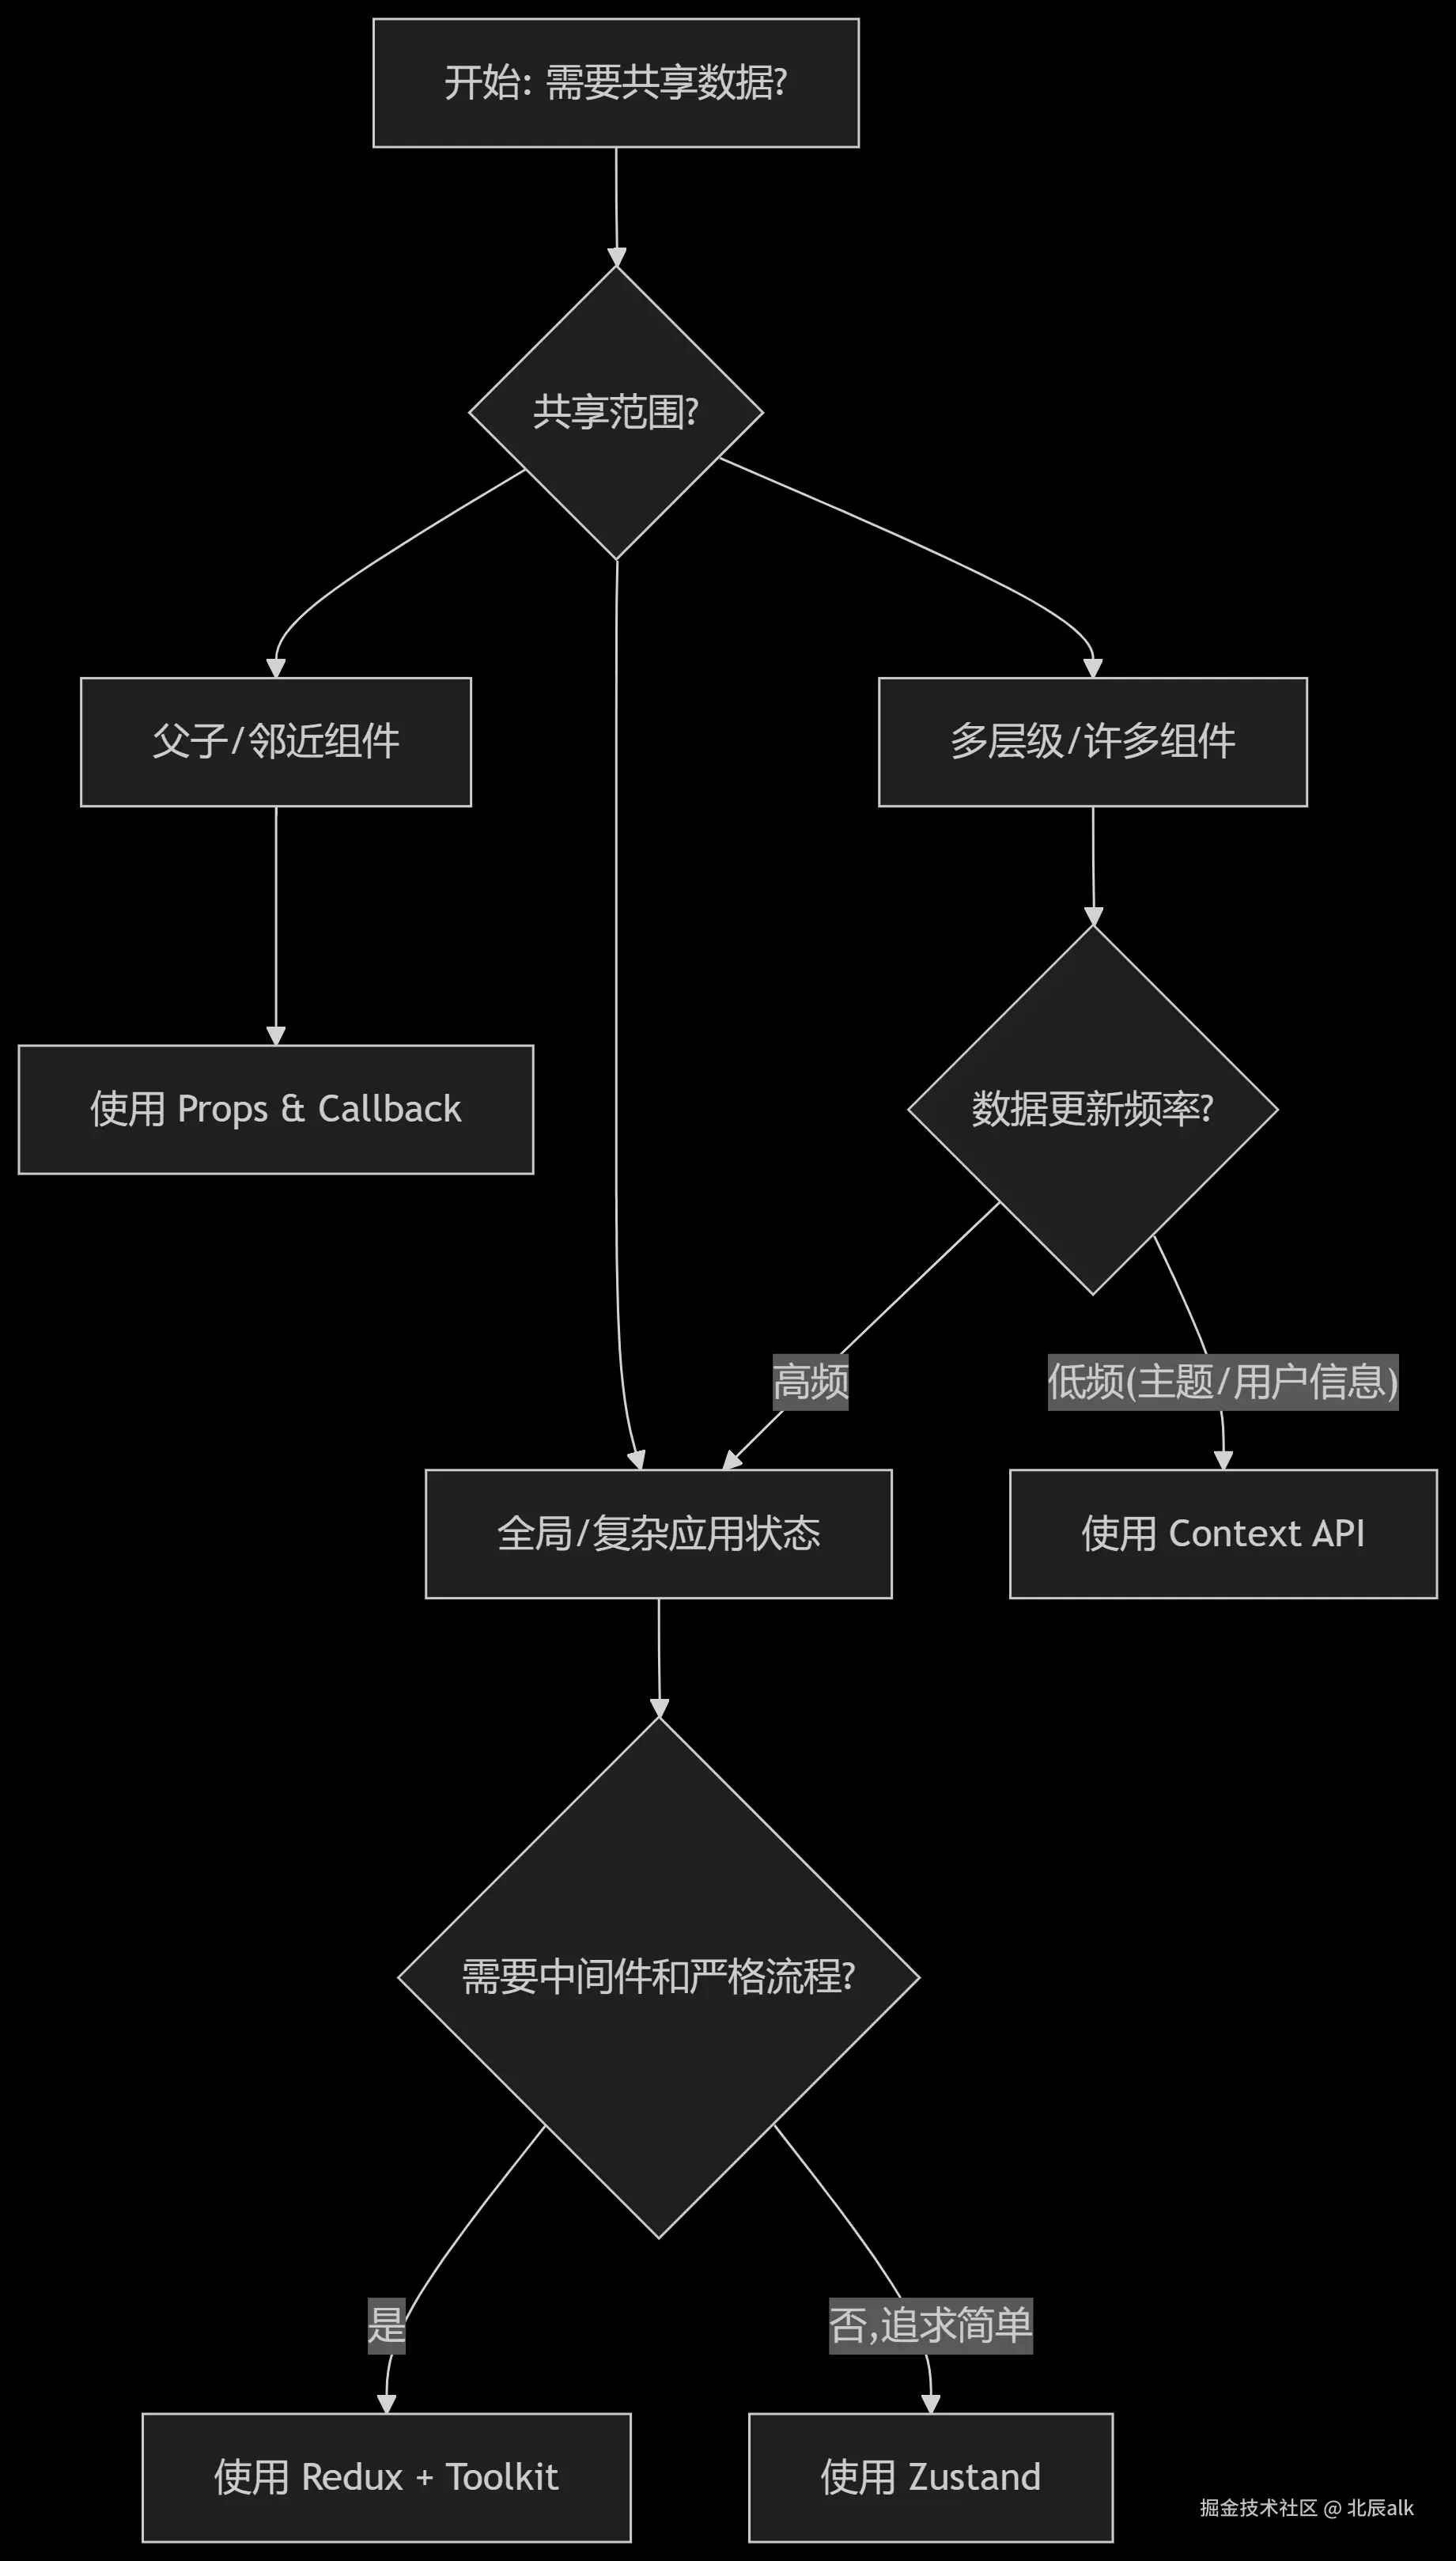
为了让您对核心方法的选择有一个更直观的认识,可以参考以下决策流程图:
接下来,我们逐一深入每种方案。
三、详解各种数据共享方法
1. Props 与 Callback Functions(父子组件通信)
这是最基础、最常见的数据传递方式。
- 父传子 (Props):父组件通过子组件的属性(props)将数据传递下去。
- 子传父 (Callback):父组件将一个函数作为 props 传递给子组件,子组件调用此函数,从而将数据传递回父组件。
代码示例:
jsx
// 子组件
function ChildComponent({ message, onSendDataToParent }) {
  const data = "Hello from Child!";
  return (
    <div>
      <p>收到父组件消息: {message}</p>
      <button onClick={() => onSendDataToParent(data)}>发送数据给父组件</button>
    </div>
  );
}

// 父组件
function ParentComponent() {
  const [parentData, setParentData] = useState("Hello from Parent");
  const [childData, setChildData] = useState("");

  // 接收子组件数据的回调函数
  const handleReceiveData = (dataFromChild) => {
    setChildData(dataFromChild);
  };

  return (
    <div>
      <ChildComponent
        message={parentData}
        onSendDataToParent={handleReceiveData}
      />
      <p>收到子组件消息: {childData}</p>
    </div>
  );
}
流程图:
scss
父组件状态更新 → ParentComponent 重渲染 → 新的 props (message) 传递给 ChildComponent → ChildComponent 重渲染2. Context API(跨层级组件通信)
Context 旨在解决"prop drilling"问题,它提供了一个在组件树中无需每层手动传递就能共享值的方法。
核心概念:
React.createContext(): 创建一个 Context 对象。<MyContext.Provider>: 提供数据的组件,接收一个valueprop。<MyContext.Consumer>或useContextHook: 消费数据的组件。
代码示例:
jsx
// 1. 创建一个 Context
const ThemeContext = React.createContext('light'); // 'light' 为默认值

// 2. 提供者组件 (Provider)
function App() {
  const [theme, setTheme] = useState('dark');
  return (
    // 使用 Provider 包裹,并传递 value(这里传递了 theme 和 setTheme)
    <ThemeContext.Provider value={{ theme, setTheme }}>
      <Toolbar />
    </ThemeContext.Provider>
  );
}

// 中间的组件不需要再传递 theme prop
function Toolbar() {
  return (
    <div>
      <ThemedButton />
    </div>
  );
}

// 3. 消费者组件 (使用 useContext Hook)
function ThemedButton() {
  //  useContext 接收 Context 对象,返回当前的 value
  const { theme, setTheme } = useContext(ThemeContext);
  return (
    <button
      style={{ background: theme === 'dark' ? '#333' : '#CCC' }}
      onClick={() => setTheme(theme === 'dark' ? 'light' : 'dark')}
    >
      当前主题: {theme}
    </button>
  );
}
最佳实践: 将 Context 的逻辑封装在一个自定义 Hook 中,提高可用性和错误处理。
jsx
function useTheme() {
  const context = useContext(ThemeContext);
  if (!context) {
    throw new Error('useTheme must be used within a ThemeProvider');
  }
  return context;
}
// 在组件中直接使用
const { theme } = useTheme();
3. Redux(可预测的状态容器)
Redux 是一个独立的第三方状态管理库,并非 React 专属,但常与 React 结合使用。它遵循 Flux 架构的思想,强调状态的不可变性和单一数据源。
核心概念:
- Store:唯一的数据源,存储整个应用的状态。
- Action:一个描述"发生了什么"的普通对象。
- Reducer:一个纯函数,接收旧的 state 和 action,返回新的 state。
- Dispatch :唯一能改变 state 的方法,即
store.dispatch(action)。
数据流流程图:
scss
React Component --(dispatches)--> Action --(flows into)--> Reducer --(updates)--> Store --(notifies)--> React Component代码示例(使用现代 Redux Toolkit):
Redux Toolkit (RTK) 是官方推荐的简化 Redux 开发的工具集。
jsx
// 1. 创建 Slice (包含 reducer 和 actions)
import { createSlice, configureStore } from '@reduxjs/toolkit';

const counterSlice = createSlice({
  name: 'counter',
  initialState: { value: 0 },
  reducers: {
    incremented: state => { state.value += 1; },
    decremented: state => { state.value -= 1; },
  },
});

export const { incremented, decremented } = counterSlice.actions;

// 2. 创建 Store
const store = configureStore({
  reducer: counterSlice.reducer
});

// 3. 在 React 组件中使用 (需要 react-redux 库)
import { Provider, useSelector, useDispatch } from 'react-redux';

// 在应用最外层提供 Store
function ReduxApp() {
  return (
    <Provider store={store}>
      <Counter />
    </Provider>
  );
}

// 在子组件中连接 Redux
function Counter() {
  const count = useSelector(state => state.value); // 从 Store 获取状态
  const dispatch = useDispatch(); // 获取 dispatch 函数

  return (
    <div>
      <span>{count}</span>
      <button onClick={() => dispatch(incremented())}>+</button>
      <button onClick={() => dispatch(decremented())}>-</button>
    </div>
  );
}
4. Zustand(轻量级状态管理)
Zustand 德语意为"状态",它是一个非常小巧、快速且可扩展的状态管理解决方案,API 基于 Hook,使用体验非常舒适。
代码示例:
jsx
import create from 'zustand';

// 1. 创建 Store(一个 Hook!)
const useBearStore = create((set) => ({
  bears: 0,
  increasePopulation: () => set((state) => ({ bears: state.bears + 1 })),
  removeAllBears: () => set({ bears: 0 }),
}));

// 2. 在组件中使用,直接选择需要的状态和动作
function BearCounter() {
  const bears = useBearStore((state) => state.bears);
  return <h1>{bears} around here...</h1>;
}

function Controls() {
  const increasePopulation = useBearStore((state) => state.increasePopulation);
  return <button onClick={increasePopulation}>Add bear</button>;
}
Zustand 自动处理优化,默认进行状态切片的浅比较,避免不必要的重渲染,非常简单高效。
四、总结与选择建议
| 特性 | Props / Callback | Context API | Redux | Zustand |
|---|---|---|---|---|
| 学习曲线 | 简单 | 中等 | 陡峭 | 平缓 |
| 样板代码 | 无 | 少量 | 多 | 极少 |
| 性能 | 好 | 需手动优化 | 好 | 非常好(自动优化) |
| 调试 | 困难(深嵌套) | 一般 | 优秀(DevTools) | 良好(DevTools) |
| 测试 | 容易 | 容易 | 容易 | 容易 |
| 适用规模 | 小到中 | 中小 | 中到大 | 所有规模 |
选择指南:
- 简单父子通信 :毫无疑问,使用 Props。
- 主题、用户信息等低频更新数据 :使用 Context API。
- 大型、复杂应用,需要严格的流程控制和中间件(日志、异步处理) :使用 Redux(尤其是搭配 Redux Toolkit)。
- 追求开发效率、简单性,不想写太多样板代码 :尝试 Zustand,它几乎能满足大部分状态管理需求。
记住,没有一种方法是银弹。最适合你项目当前和可预见未来复杂度的,就是最好的方法。从小开始,只在需要时才引入更复杂的状态管理工具。
希望这篇详尽的指南能帮助你更好地理解 React 中的数据流,并在项目中做出明智的选择!