1 环境安装
- 安装所需要的环境
shell
sudo apt update && sudo apt install git cmake gdb build-essential clang clang-tidy clang-format gcc-doc pkg-config glibc-doc tcpdump tshark-
老相识了,没什么好说的
-
我这里使用的是
Ubuntu 24.04,版本比较新,因为NeoVim支持比较好hhh -
顺带一提,本篇是基于CS144 Winter2025的check(但测试框架用的是2024,发现的时候已经用了半个星期了,emmm就这样吧)
2 感受一下网络
- 这里其实可以先把课程学到
1-3,这边其实会更好理解一些 - 这里在
shell使用telnet,对服务器中cs144.keithw.org进行HTTP协议的访问,即telnet cs144.keithw.org http,它会返回
shell
Trying 104.196.238.229...
Connected to cs144.keithw.org.
Escape character is '^]'.- 输入:
shell
GET /hello HTTP/1.1
Host: cs144.keithw.org
Connection: close
每一行都要回车,最后一行不输入直接回车 以下做一些解释
- 第一行中,
GET表示一个请求,紧接着是请求的目录,最后是协议类型及其版本- 第二行中,表示告诉服务器
URL的主机部分(老实说这部分不太懂,不过应该不影响)- 第三行中,
close表示不再发请求给服务器了,让服务器完成请求返回内容后就关闭连接- 第四行中,直接回车表示所有内容输入完毕,表示
EOF
shell
oldking@iZwz9b2bj2gor4d8h3rlx0Z:~$ telnet cs144.keithw.org http
Trying 104.196.238.229...
Connected to cs144.keithw.org.
Escape character is '^]'.
GET /hello HTTP/1.1
Host: cs144.keithw.org
Connection: close

HTTP/1.1 200 OK
Date: Tue, 02 Sep 2025 01:33:02 GMT
Server: Apache
Last-Modified: Thu, 13 Dec 2018 15:45:29 GMT
ETag: "e-57ce93446cb64"
Accept-Ranges: bytes
Content-Length: 14
Connection: close
Content-Type: text/plain

Hello, CS144!
Connection closed by foreign host.-
如你所见,服务器返回了一个
HTTP/1.1 200 OK,这个是确认信息,表示服务器收到了请求并返回了内容给你 -
而这一部分则是浏览器渲染要用的,我们暂时不用关心
shell
Date: Tue, 02 Sep 2025 01:33:02 GMT
Server: Apache
Last-Modified: Thu, 13 Dec 2018 15:45:29 GMT
ETag: "e-57ce93446cb64"
Accept-Ranges: bytes
Content-Length: 14
Connection: close
Content-Type: text/plain-
而这个网页的内容就是简单的一串字符
Hello, CS144! -
然后断开链接
Connection closed by foreign host. -
那么,如果你已经已经学到了
1-3再来做这个实验的话,你就很容易明白,其实这个实验就是让你自己手动写一个HTTP协议的包给服务器,要求访问某个特定的页面,换句话说就是手搓了一份HTTP报文 -
当然,我们也可以在一台主机上模拟实现一下两台主机互相沟通的场景
-
这里一个窗口作为服务端,运行
netcat等待对应端口
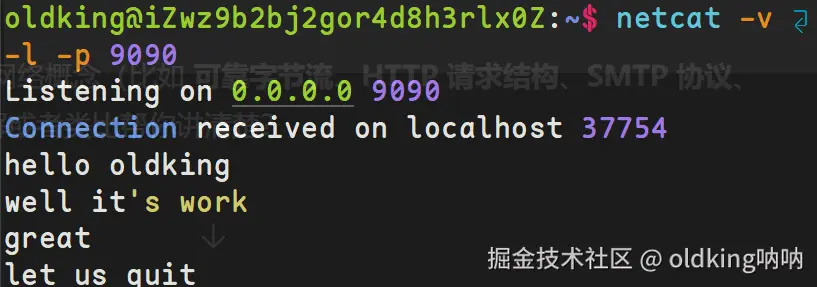
- 另一个窗口作为用户端,用相同的方式(
telnet)连接上服务端
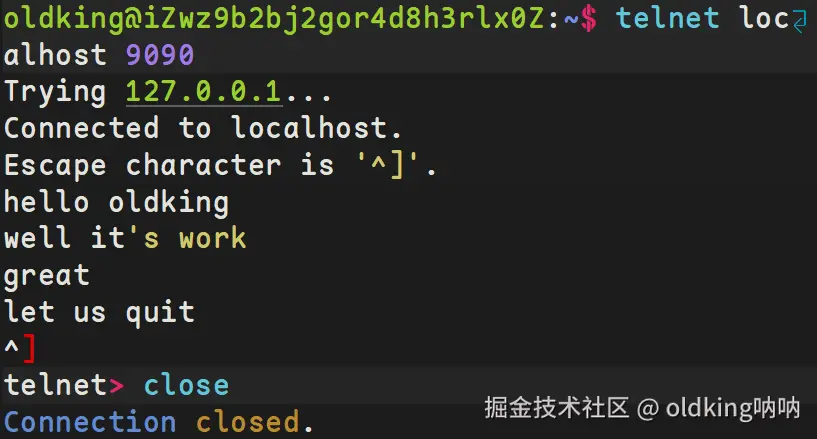
- 在用户端输入任何东西,在服务端都会冒出来,反之也是一样的,但其实这里没有做任何应用层的处理,仅仅只是传输,是一个裸
TCP管道
3 代码书写规范以及测试代码前要做的事情
- 这里记录一下书写规范,方便以后查阅
- 不要用
malloc()或free()- 不要用
new或delete- 基本不用原始指针
*,也不要用unique_ptr或shared_ptr(CS144 用不到)- 不要用模板、线程、锁、虚函数(CS144 用不到)
- 不要用 C 风格字符串 (
char*),而是用std::string- 不要用 C 风格强转
(FILE*)x,如果必须,用 C++ 的static_cast- 函数参数尽量用
const &(比如const Address & address)- 变量和方法都加上
const(如果能保证不修改的话)- 不要用全局变量,变量作用域尽量小
- 做
lab前,我们首先要找到整个测试框架,这里贴一下2024winter的测试框架backpack,记得给这个备份的老哥star,找到的时候真是救大命了 fork到自己这边然后clone到本地就行
shell
oldking@iZwz9b2bj2gor4d8h3rlx0Z:~$ tree CS144-2024-winter-backup/
CS144-2024-winter-backup/
├── apps
│   ├── bidirectional_stream_copy.cc
│   ├── bidirectional_stream_copy.hh
│   ├── CMakeLists.txt
│   ├── tcp_native.cc
│   └── webget.cc
├── CMakeLists.txt
├── compile_commands.json -> build/compile_commands.json
├── etc
│   ├── build_type.cmake
│   ├── cflags.cmake
│   ├── scanners.cmake
│   └── tests.cmake
├── README.md
├── scripts
│   ├── lines-of-code
│   ├── make-parallel.sh
│   └── tun.sh
├── src
│   ├── byte_stream.cc
│   ├── byte_stream_helpers.cc
│   ├── byte_stream.hh
│   └── CMakeLists.txt
├── tests
│   ├── byte_stream_basics.cc
│   ├── byte_stream_capacity.cc
│   ├── byte_stream_many_writes.cc
│   ├── byte_stream_one_write.cc
│   ├── byte_stream_speed_test.cc
│   ├── byte_stream_stress_test.cc
│   ├── byte_stream_test_harness.hh
│   ├── byte_stream_two_writes.cc
│   ├── CMakeLists.txt
│   ├── common.cc
│   ├── common.hh
│   ├── conversions.hh
│   ├── test_should_be.hh
│   └── webget_t.sh
├── util
│   ├── address.cc
│   ├── address.hh
│   ├── checksum.hh
│   ├── CMakeLists.txt
│   ├── eventloop.cc
│   ├── eventloop.hh
│   ├── exception.hh
│   ├── file_descriptor.cc
│   ├── file_descriptor.hh
│   ├── ipv4_datagram.hh
│   ├── ipv4_header.cc
│   ├── ipv4_header.hh
│   ├── parser.hh
│   ├── random.cc
│   ├── random.hh
│   ├── socket.cc
│   ├── socket.hh
│   ├── tun.cc
│   └── tun.hh
└── writeups
    └── check0.md

8 directories, 53 files-
以下我们要编译一下
-
使用
cmake -S . -B build创建目录
shell
oldking@iZwz9b2bj2gor4d8h3rlx0Z:~/CS144-2024-winter-backup$ cmake -S . -B build
-- The CXX compiler identification is GNU 13.3.0
-- Detecting CXX compiler ABI info
-- Detecting CXX compiler ABI info - done
-- Check for working CXX compiler: /usr/bin/c++ - skipped
-- Detecting CXX compile features
-- Detecting CXX compile features - done
-- Setting build type to 'Debug'
-- Building in 'Debug' mode.
-- Configuring done (0.8s)
-- Generating done (0.1s)
-- Build files have been written to: /home/oldking/CS144-2024-winter-backup/build- 使用
cmake --build build开始编译
shell
oldking@iZwz9b2bj2gor4d8h3rlx0Z:~/CS144-2024-winter-backup$ cmake --build build
[  5%] Building CXX object util/CMakeFiles/util_debug.dir/address.cc.o
[ 10%] Building CXX object src/CMakeFiles/minnow_debug.dir/byte_stream.cc.o
[ 15%] Building CXX object src/CMakeFiles/minnow_debug.dir/byte_stream_helpers.cc.o
[ 21%] Linking CXX static library libminnow_debug.a
[ 26%] Building CXX object util/CMakeFiles/util_debug.dir/eventloop.cc.o
[ 26%] Built target minnow_debug
[ 31%] Building CXX object util/CMakeFiles/util_debug.dir/file_descriptor.cc.o
[ 36%] Building CXX object tests/CMakeFiles/minnow_testing_debug.dir/common.cc.o
[ 42%] Building CXX object util/CMakeFiles/util_debug.dir/ipv4_header.cc.o
[ 47%] Linking CXX static library libminnow_testing_debug.a
[ 47%] Built target minnow_testing_debug
[ 52%] Building CXX object util/CMakeFiles/util_debug.dir/random.cc.o
[ 57%] Building CXX object apps/CMakeFiles/stream_copy.dir/bidirectional_stream_copy.cc.o
[ 63%] Building CXX object util/CMakeFiles/util_debug.dir/socket.cc.o
[ 68%] Linking CXX static library libstream_copy.a
[ 68%] Built target stream_copy
[ 73%] Building CXX object util/CMakeFiles/util_debug.dir/tun.cc.o
[ 78%] Linking CXX static library libutil_debug.a
[ 78%] Built target util_debug
[ 84%] Building CXX object apps/CMakeFiles/webget.dir/webget.cc.o
[ 89%] Building CXX object apps/CMakeFiles/tcp_native.dir/tcp_native.cc.o
[ 94%] Linking CXX executable tcp_native
[100%] Linking CXX executable webget
[100%] Built target tcp_native
[100%] Built target webget
4 使用测试框架
-
这里我们需要做一个小
lab来见一见怎么使用测试框架,理解一下在程序中,TCP协议该如何进行操作 -
首先我们要阅读一下这几个文件:
address.hh,file_descriptor.hh,socket.hh -
类
Address用于构建一个地址类,他也能自动在"域名+协议"和"IP地址+端口号"之间进行转换(本质是DNS解析,但我们暂时不了解) -
类
FileDescriptor是文件描述符类,类似于用C++语境封装了一个C下的fd,包含一些读写操作,以及判断末尾等等方法,他的功能非常强大,可以把各种对象当作文件打开,比方说我们这里这个实验一定会用到的网卡 -
类
TCPSocket继承自Socket类,但他们本质其实都是fd的壳类,仅封装了方法,我们无需在意底层细节,但通过FD和TCPSocket,我们可以吧某个Address当作一个文件打开,读写操作就像是文件操作一样 -
要求我们在
../apps/webget.cc下的get_URL()接口中编写一个简单程序,用于使用HTTP协议获取网页内容,就像上一小节中做的那样(他要求不仅仅可以访问cs144.keithw.org,要求可以获取任意网页)
CPP
void get_URL( const string& host, const string& path )
{
  Address dest_addr( host, "http" );

  TCPSocket tcps;
  tcps.connect( dest_addr );
  std::string w_buff = "GET " + path + " HTTP/1.1\r\n" + "Host: " + host + "\r\nConnection: close\r\n\r\n";
  tcps.write( w_buff );

  std::string r_buff;
  while ( !tcps.eof() ) {
    tcps.read( r_buff );
    std::cout << r_buff;
    r_buff.clear();
  }

  // cerr << "Function called: get_URL(" << host << ", " << path << ")\n";
  // cerr << "Warning: get_URL() has not been implemented yet.\n";
}- 这个命令可以用于创建工作路径
shell
cmake -S . -B [dirname]- 这个命令用于在工作路径中编译文件
shell
cmake --build [dirname]- 编译完成之后你可以在
../[dirname]/apps/中找到编译完成的webget可执行程序 - 你可以直接使用该可执行程序
shell
oldking@iZwz9b2bj2gor4d8h3rlx0Z:~/CS144-2024-winter-backup$ ./build_check0_3.5/apps/webget cs144.keithw.org /hello
HTTP/1.1 200 OK
Date: Sun, 07 Sep 2025 03:28:29 GMT
Server: Apache
Last-Modified: Thu, 13 Dec 2018 15:45:29 GMT
ETag: "e-57ce93446cb64"
Accept-Ranges: bytes
Content-Length: 14
Connection: close
Content-Type: text/plain

Hello, CS144!- 最后我们可以用以下命令跑一下测试程序
shell
cmake --build [dirname] --target check_webget5 实现字节流
- 要求在
./src/byte_stream.hh和./src/byte_stream.cc这两个文件中实现字节流,框架已经搭好了,只需要实现接口具体逻辑和相关成员变量
CPP
// ./src/byte_stream.hh

#pragma once

#include <cstdint>
#include <string>
#include <string_view>

#define READ_BYTES_SIZE 128

class Reader;
class Writer;

class ByteStream
{
public:
  explicit ByteStream( uint64_t capacity );

  // Helper functions (provided) to access the ByteStream's Reader and Writer interfaces
  Reader& reader();
  const Reader& reader() const;
  Writer& writer();
  const Writer& writer() const;

  void set_error() { error_ = true; };       // Signal that the stream suffered an error.
  bool has_error() const { return error_; }; // Has the stream had an error?

protected:
  // Please add any additional state to the ByteStream here, and not to the Writer and Reader interfaces.

    // about buffer
        uint64_t capacity_;
        uint64_t bytes_pushed_ {};
        uint64_t bytes_popped_ {};
        std::string buffer_;

    // about state
        bool error_ {};
        bool close_ {};
};

class Writer : public ByteStream
{
public:
  void push( std::string data ); // Push data to stream, but only as much as available capacity allows.
  void close();                  // Signal that the stream has reached its ending. Nothing more will be written.

  bool is_closed() const;              // Has the stream been closed?
  uint64_t available_capacity() const; // How many bytes can be pushed to the stream right now?
  uint64_t bytes_pushed() const;       // Total number of bytes cumulatively pushed to the stream
};

class Reader : public ByteStream
{
public:
  std::string_view peek() const; // Peek at the next bytes in the buffer
  void pop( uint64_t len );      // Remove `len` bytes from the buffer

  bool is_finished() const;        // Is the stream finished (closed and fully popped)?
  uint64_t bytes_buffered() const; // Number of bytes currently buffered (pushed and not popped)
  uint64_t bytes_popped() const;   // Total number of bytes cumulatively popped from stream
};

/*
 * read: A (provided) helper function thats peeks and pops up to `len` bytes
 * from a ByteStream Reader into a string;
 */
void read( Reader& reader, uint64_t len, std::string& out );
CPP
// ./src/byte_stream.cc

#include "byte_stream.hh"
#include <cstdint>
#include <iostream>
#include <string_view>

using namespace std;

ByteStream::ByteStream( uint64_t capacity ) : capacity_( capacity ) , buffer_({}) {}

bool Writer::is_closed() const
{
        return close_;
}

void Writer::push( string data )
{
        // safe check
        if(static_cast<uint64_t>(data.length()) > available_capacity())
        {
                if(available_capacity() != 0)
                {
                        bytes_pushed_ += data.substr(0, available_capacity()).length();
                        buffer_ += data.substr(0, available_capacity());
                }
        }
        else
        {
                if(!buffer_.length())
                {
                        bytes_pushed_ += data.length();
                        buffer_ = std::move(data);
                }
                else
                {
                        bytes_pushed_ += data.length();
                        buffer_ += data;
                }
        }

        return;
}

void Writer::close()
{
        close_ = true;
}

uint64_t Writer::available_capacity() const
{
        return capacity_ - buffer_.length();
}

uint64_t Writer::bytes_pushed() const
{
        return bytes_pushed_;
}

bool Reader::is_finished() const
{
        return close_ && !static_cast<bool>(bytes_buffered());
}

uint64_t Reader::bytes_popped() const
{
        return bytes_popped_;
}

string_view Reader::peek() const
{
        return std::string_view(buffer_.c_str(), buffer_.length() < READ_BYTES_SIZE ? buffer_.length() : READ_BYTES_SIZE);
}

void Reader::pop( uint64_t len )
{
        // safe check
        if(buffer_.length() < len)
                bytes_popped_ += buffer_.length();
        else
                bytes_popped_ += len;
        buffer_.erase(0, len);
}

uint64_t Reader::bytes_buffered() const
{
        return buffer_.length();
}- 实际上,本质上,网络也是一种字节流,通过网络将数据按照字节流写入到内容
- 只是我们这里实现的字节流不经过网络,只是在本地写入
- 有趣的是,这里也是采用壳派生类来实现不同种功能的,实际初始化的时候不需要实例化
Writer和Reader,只需要初始化ByteStream,同时,获取Writer和Reader只需要通过接口强转就行