在上一篇文章中,我们讲到了仿真引擎的设计,开发,实现。我们重点讲解了加工站实体类怎么接收产品,怎么加工,怎么派发产品
在这篇文章中,我们主要来讲一下发生器,吸收器,缓冲区的离散事件仿真,这三个实体类和加工站类一样,都需要继承BaseStation类
发生器-Generator.ts
1. 核心定义
发生器 是一个用于在仿真模型中按特定规则创建实体 的模块。它的主要作用是模拟到达过程,即实体在什么时间、以何种方式进入系统。
2. 设计思想
由于发生器继承了BaseStation类,但是发生器不需要接收产品的流入,只需要负责产生产品,派发产品,那么,在代码层面,我们就很好的进行开发了
- 首先是new一个产品
- 然后遍历下一站所有设备,查看哪个设备处于空闲状态
- 将产品派发给空闲的设备,最后设置一个事件,传入到eventQueue队列中
3. 代码开发
ts
import { generateUUID } from '../../utils'
import { addReadyProduct } from '../core/ReadyProducts'
import { schedule } from '../core/Scheduler'
import { currentTime } from '../core/SimulationClock'
import { messageTransfer } from '../messaging/MessageTransfer'
import BaseStation from './BaseStation'
import Product from './Product'

class Generator extends BaseStation {
  productCounter = 0
  interval: number | string
  totalCount: number
  selfCirculation: boolean
  productWidth: number
  productHeight: number

  constructor(
    id: string,
    name: string,
    x: number,
    y: number,
    width = 100,
    height = 100,
    interval: number | string,
    totalCount: number,
    selfCirculation = true,
    productWidth: number = 20,
    productHeight: number = 20
  ) {
    super(id, name, x, y, width, height)
    this.interval = interval
    this.totalCount = totalCount
    this.selfCirculation = selfCirculation
    this.productWidth = productWidth
    this.productHeight = productHeight
  }

  start(): void {
    this.tryDispatchCurrentProduct(true)
  }

  scheduleNext(): void {
    if (this.totalCount !== -1 && this.productCounter >= this.totalCount) return
    let time = 0
    if (typeof this.interval === 'string') {
      time = new Function(this.interval)()
    } else {
      time = this.interval
    }
    schedule(time, () => this.tryDispatchCurrentProduct(true), `${this.id} 生成产品`)
  }

  canReceiveProduct(): boolean {
    return false
  }
  onProductReceived(): void {
    throw new Error('Generator cannot receive ready product')
  }

  tryDispatchCurrentProduct(outside = false): boolean {
    const intervalAllocation = (): void => {
      const product = new Product(generateUUID(), this.productWidth, this.productHeight)

      const availableStation = this.nextStations.find((s) => s.canReceiveProduct(this.id, product))
      if (availableStation === undefined) {
        console.log(`[${currentTime}] ⛔ ${this.name} 下游无空闲设备`)
        this.scheduleNext()
        //如果下游不接收,则删除本产品
        return
      }

      console.log(`[${currentTime}] 🚀 ${this.name} 产生 ${product.id}`)
      product.setFrom(this.id)
      messageTransfer('product', 'generate', { targetId: this.id, productId: product.id })
      // messageTransfer('product', 'startProcessing', { targetId: this.id, productId: product.id })

      //把产品交给就绪产品队列中
      addReadyProduct(product)
      availableStation.receiveReadyProduct(product.id)
      this.productCounter++
      if (this.totalCount !== -1) {
        messageTransfer('style', null, {
          targetId: this.id,
          style: {
            quantity: this.totalCount - this.productCounter
          }
        })
      }

      this.scheduleNext()
    }
    if (outside) {
      if (this.selfCirculation) {
        intervalAllocation()
        return false
      } else {
        console.log('正在开发')
        return false
      }
    } else {
      if (this.selfCirculation) {
        console.log('直接跳过')
        return false
      } else {
        console.log('正在开发')
        return false
      }
    }
  }
}

export default Generator
发生器有三个方法需要说明一下
- start()发生器的启动方法,在仿真引擎开启后,需要在代码层面主动触发该方法
- scheduleNext()用来处理事件循环往复,同时也处理time值,判断time值是固定值还是拟合函数
- tryDispatchCurrentProduct()产品派发方法
tryDispatchCurrentProduct方法是怎么处理产品的,已经在设计思想里面讲过,那此时我们就会有一个疑问,start方法在哪里触发
这就需要我们回到我们的建模文件里面
ModelBuilder.ts
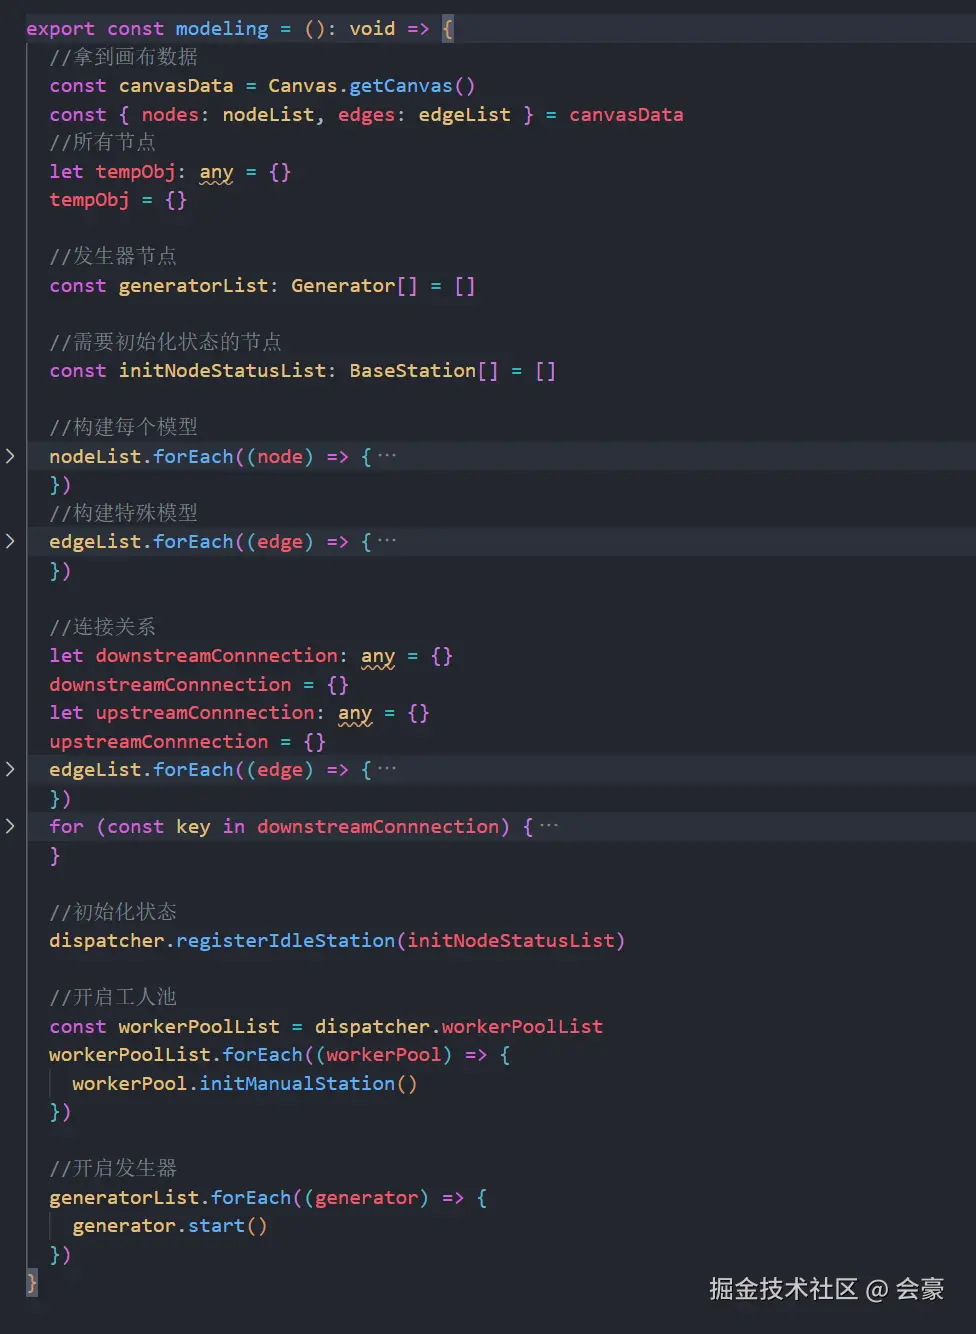
在上述代码,最下面,有一个开启发生器,也就是说我们在建完模后,就立即开启了发生器的start(),而这个modeling方法,则在仿真控制器里面运行
ts
async start(): Promise<void> {
    //清空一下数据
    this.clearAll()
    if (this.status !== 'idle' && this.status !== 'stopped') return

    console.log('[Sim] ✅ 开始仿真')
    this.status = 'running'
    this.shouldStop = false
    let lastEventTime = 0
    modeling() // 初始化模型(只运行一次)
    while (!eventQueue.isEmpty()) {
      if (this.shouldStop) break
      if (this.status === ('paused' as SimStatus)) {
        await this.waitUntilResume()
      }

      const event = eventQueue.dequeue()
      if (event) {
        const simDelay = event.time - lastEventTime
        lastEventTime = event.time
        const waitMs = (simDelay * 1000) / SimulationSpeed.getSpeed
        await delay(waitMs)
        //发送仿真时间
        messageTransfer('simTime', null, event.time)
        setCurrentTime(event.time)
        event.action()
      }
    }

    if (this.status !== ('paused' as SimStatus)) {
      this.status = 'stopped'
      console.log('[Sim] 🛑 仿真完成或已停止')
    }
  }
到此我们的发生器就讲解完毕,发生器相对于加工站实体类来说,还是比较简单理解的,因为发生器不需要和上一站交互,只需要产生产品,然后将产品给下一站,并且也不需要转变状态
吸收器-Sink.ts
1. 核心定义
吸收器 是一个用于从仿真模型中移出已完成所有处理的实体 的模块。它的主要作用是模拟实体的离开过程 ,并在此刻收集关键的最终绩效数据。除此以外,吸收器还要负责收集最终统计数据
这是吸收器最重要的作用。当实体被吸收器销毁前,仿真引擎会在此刻记录该实体的各项数据,用于生成最终的性能报告。常见的数据包括:
- 吞吐量:单位时间内离开系统的实体数量。这是衡量系统整体效率的核心指标。
- 停留时间/周期时间 :一个实体从被发生器 创建到被吸收器移出的总时间。这直接反映了系统完成一个任务所需的时间。
- 准时交货率:如果实体有"到期时间"属性,吸收器可以判断它是否延迟,从而统计准时率。
- WIP(在制品)计算:通过"进入系统的实体总数"减去"离开系统的实体总数",可以随时计算出系统当前的WIP数量。
2. 设计思想
吸收器是发生器的反向面,也就是说只需要接收产品,销毁产品,那我们直接看代码
3. 代码开发
ts
import { getReadyProduct } from '../core/ReadyProducts'
import { currentTime } from '../core/SimulationClock'
import { messageTransfer } from '../messaging/MessageTransfer'
import BaseStation from './BaseStation'
import Product from './Product'

class Sink extends BaseStation {
  receivedCount = 0

  constructor(id: string, name: string, x: number, y: number, width = 100, height = 100) {
    super(id, name, x, y, width, height)
  }

  //是否可以接受产品
  canReceiveProduct(): boolean {
    return true
  }

  // 接受就绪产品
  receiveReadyProduct(productId: string): void {
    this.receiveProduct(productId)
  }

  receiveProduct(productId: string): void {
    const product = getReadyProduct(productId)
    if (product) {
      messageTransfer('product', 'move', { targetId: this.id, productId: product.id })
      this.receivedCount++
      console.log(`[${currentTime}] ✅ ${product.id} 已被 ${this.name} 吸收`)
      messageTransfer('product', 'recycle', { targetId: this.id, productId: product.id })
    } else {
      console.log(`[${currentTime}] ❌ ${productId} 没有发现`)
    }
  }

  public onProductReceived(product: Product): void {
    return
  }

  public tryDispatchCurrentProduct(): void {
    return
  }
}

export default Sink相对于发生器来说,代码似乎要简介不少,在canReceiveProduct()方法中,直接返回true, 表示永远都可以接收产品,然后拿到产品后,立即销毁
缓冲区-Buffer.ts
1. 核心定义
缓冲区 是一个用于临时存放实体 的模块,这些实体已经进入了系统但尚未被下游资源或工序处理。起到了临时存放作用, 实体不会在缓冲区中被加工或处理,它们只是在此处等待。
缓冲区的核心作用
a) 解耦生产工序
这是缓冲区最重要的作用。它像一个"减震器"或"蓄水池",隔离了相邻工序之间的相互影响。
- 情景:前道工序(A)速度很快,后道工序(B)速度很慢。
- 没有缓冲区:工序A一完成就必须交给工序B,但B还在忙,于是A被迫停止工作(阻塞),整个系统效率降低。
- 有缓冲区:工序A完成的产品可以先放入缓冲区,然后A可以继续处理下一个任务。工序B在空闲时再从缓冲区中取货。这样保证了工序A不会因B的忙碌而停工。
b) 应对 variability(可变性)
真实生产中充满了不确定性(如设备随机故障、操作员效率波动、物料到达时间随机等)。缓冲区可以吸收这些波动,保证生产线的连续运行。
- 情景:后道工序(B)的机器突然发生故障,需要维修1小时。
- 没有缓冲区:工序A会立刻被阻塞,整个生产线停摆。
- 有缓冲区:在B维修的1小时内,工序A生产的产品可以暂存在缓冲区中。只要缓冲区不满,A就能继续生产。这提高了系统的抗干扰能力和稳健性。
c) 维持资源利用率
通过防止上游工序因下游阻塞而停工,缓冲区确保了昂贵的生产资源(如机器、机器人)能够保持较高的利用率。
2. 设计思想
缓冲区和加工站类似,产品流入--等待--产品流入
- 当收到产品流入的请求时,先判断自己是否有足够的剩余空间,返回Boolean值
- 收到就绪产品后,立即触发派发产品方法
- 派发产品方法和加工站一样
3. 代码开发
ts
import { currentTime } from '../core/SimulationClock'
import { messageTransfer } from '../messaging/MessageTransfer'
import Product from './Product'
import BaseStation from './BaseStation'
import { addReadyProduct, getReadyProduct } from '../core/ReadyProducts'
class BufferNode extends BaseStation {
capacity: number
queue: Product[] = []
isDispatchScheduled: boolean = false // 防止重复调度
constructor(
id: string,
name: string,
x: number,
y: number,
width = 100,
height = 100,
capacity: number
) {
super(id, name, x, y, width, height)
this.capacity = capacity
}
canReceiveProduct(): boolean {
return this.queue.length < this.capacity
}
receiveReadyProduct(productId: string): void {
if (this.queue.length < this.capacity) {
const product = getReadyProduct(productId)
if (product) {
product.setFrom(this.id)
this.onProductReceived(product)
} else {
console.log(`[${currentTime}] ❌ ${productId} 没有发现`)
}
} else {
console.log(`[${currentTime}] ❌ ${this.name} 已经满了`)
}
}
onProductReceived(product: Product): void {
this.queue.push(product)
messageTransfer('style', null, { targetId: this.id, style: { quantity: this.queue.length } })
console.log(`[${currentTime}] 📥 ${product.id} 进入 ${this.name}`)
messageTransfer('product', 'move', { targetId: this.id, productId: product.id })
this.tryDispatchCurrentProduct()
}
// 触发调度但只允许一次调度同时运行
public tryDispatchCurrentProduct(): void {
for (const next of this.nextStations) {
if (this.queue.length > 0 && next.canReceiveProduct(this.id, this.queue[0])) {
const product = this.queue.shift()
if (product) {
addReadyProduct(product)
next.receiveReadyProduct(product.id)
messageTransfer('style', null, {
targetId: this.id,
style: { quantity: this.queue.length }
})
}
}
}
}
}
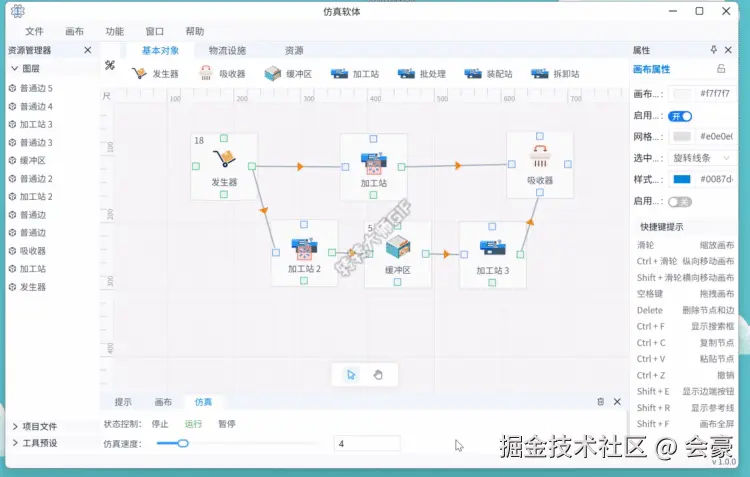
export default BufferNode展示效果