react + next.js + ethers v6
本文档为一个简单的与eth智能合约交互的前端项目实例。
创建项目
必要组件
shell
$ git --version
git version 2.37.0.windows.1

$ node --version
v18.17.1

$ yarn --version
4.6.0
创建项目
创建项目时的选项:
| 选项 | 作用 | 选 Yes 的效果 | 选 No 的效果 | 新手建议 |
|---|---|---|---|---|
| TypeScript | 给 JS 加上类型检查 | 文件后缀 .ts/.tsx,类型安全,VS Code 智能提示更强 |
纯 .js/.jsx,没有类型检查,语法更简单 |
No(先学 JS 基础) |
| ESLint | 代码质量检查工具 | 提示语法错误、格式问题,可自动修复 | 不检查错误,写法更随意 | Yes(养成好习惯) |
| Tailwind | 原子化 CSS 框架 | 用类名快速写样式 | 自己写 CSS/SCSS | No(先学原生 CSS) |
| App Router | Next.js 13 新路由系统 | 用 app/ 目录,支持 React Server Components 等新特性 |
用 pages/ 目录,老版本路由写法 |
Yes(体验最新语法) |
| Import alias | 路径别名(@ 代表 src/) |
import x from "@/xxx",路径简短 |
必须用 ../../ 相对路径 |
No(前期项目小) |
新手推荐组合:
yaml
TypeScript: No
ESLint: Yes
Tailwind: No
App Router: Yes
Import alias: No- 创建项目
shell
$ yarn create next-app@13.5.6 nextjs-smartcontract-lottery-fcc
➤ YN0000: · Yarn 4.6.0
➤ YN0000: ┌ Resolution step
➤ YN0085: │ + create-next-app@npm:13.5.6
➤ YN0000: └ Completed
➤ YN0000: ┌ Fetch step
➤ YN0013: │ A package was added to the project (+ 958.07 KiB).
➤ YN0000: └ Completed
➤ YN0000: ┌ Link step
➤ YN0000: └ Completed
➤ YN0000: · Done in 0s 107ms

? Would you like to use TypeScript? >> No / Yes No
√ Would you like to use TypeScript? ... No / Yes
? Would you like to use ESLint? >> No / Yes
√ Would you like to use ESLint? ... No / Yes
? Would you like to use Tailwind CSS? >> No / Yes No
√ Would you like to use Tailwind CSS? ... No / Yes
? Would you like to use `src/` directory? >> No / Yes
√ Would you like to use `src/` directory? ... No / Yes
? Would you like to use App Router? (recommended) >> No / Yes
√ Would you like to use App Router? (recommended) ... No / Yes
? Would you like to customize the default import alias (@/*)? >> No / Yes
√ Would you like to customize the default import alias (@/*)? ... No / Yes
Creating a new Next.js app in D:\workspace\src\react\nextjs-smartcontract-lottery-fcc.
Next.js 13 要求 Node >=16.8.0(13.5.x 对 Node 18 支持非常好).在交互输入时,会给出默认选项,如果不变,
Enter进行下一步,否则,手动输入想要的选项后按Enter键进入下一步.
- 安装依赖
Yarn Berry(v4)在 Windows 下的一个痛点: 它的 PnP(Plug'n'Play) 机制把依赖缓存为 .zip 文件放在用户目录下,但部分工具(如 esbuild)在解析带有中文路径的 .zip 依赖时会出错.
解决方法: 关闭 Yarn PnP, 改用传统 node_modules, 在根目录新建或编辑 .yarnrc.yml, 添加:
yaml
nodeLinker: node-modules
shell
cd nextjs-smartcontract-lottery-fcc
yarn install- 启动开发服务
shell
yarn dev- 代码格式化
shell
yarn add --dev prettier.prettierrc文件:
json
{
  "tabWidth": 4,
  "useTabs": false,
  "semi": false,
  "singleQuote": false,
  "printWidth": 99
}
与 web3 服务交互
6 Ways to connect your dapp to a wallet
目前Web3前端生态中,大多数成熟项目更推荐使用wagmi + web3modal这套组合来实现钱包连接和链交互, 尤其是在 Next.js+React 等现代框架下:
- 依赖少,兼容性好,文档完善,社区活跃;
- 支持
MetaMask、WalletConnect、Coinbase等主流钱包; - 与
Next.js 13+高度兼容; - 灵活扩展,适合生产环境.
Moralis 适合需要后端服务、链数据同步、用户管理等一站式解决方案的项目. react-moralis 是一个用于在 React 应用中集成 Moralis 的库. Moralis 提供 Web3 后端服务, 支持区块链数据、钱包连接、用户认证等功能.
通过 react-moralis, 开发者可以方便地在 React 项目中实现钱包连接、获取链上数据、用户登录等 Web3 功能, 无需自己搭建后端.
- 引入
moralis库
shell
yarn add moralis-v1 react-moralis magic-sdk @web3auth/web3auth bufferutil utf-8-validate在 Next.js 13+ 项目中, 推荐在 layout.js 文件中包裹 MoralisProvider, 这样全站所有页面和组件都能访问 Moralis 上下文.
jsx
"use client"
import { MoralisProvider } from "react-moralis"

export function MoralisClientProvider({ children }) {
  return (
          <MoralisProvider apiKey="" initializeOnMount={false}>
            {children}
          </MoralisProvider>
  )
}
Moralis Dashboard 可申请
apiKey
layout.jsx文件:
jsx
import { Inter } from "next/font/google"
import "./globals.css"

import { MoralisClientProvider } from "./moralis-client-provider"

const inter = Inter({ subsets: ["latin"] })

export const metadata = {
  title: "Smart Contract Lottery",
  description: "My first Next.js app with a smart contract lottery",
}


export default function RootLayout({ children }) {
    return (
        <html lang="en">
            <body className={inter.className}>
                <MoralisClientProvider>{children}</MoralisClientProvider>
            </body>
        </html>
    )
}
连接钱包
通过 moralis 链接浏览器钱包插件, 并与之交互.
jsx
"use client"
import { useMoralis, useMoralisWeb3Api } from "react-moralis"
import { useEffect, useState } from "react"
import { ethers } from "ethers"

export function ManualHeader() {
  const { enableWeb3, isWeb3Enabled, account, Moralis,
    deactivateWeb3, isWeb3EnableLoading } = useMoralis()
  // const web3Api = useMoralisWeb3Api()
  const [balance, setBalance] = useState("0")

  useEffect(() => {
    console.log("isWeb3Enabled changed", isWeb3Enabled)
    if (
            !isWeb3Enabled &&
            typeof window !== "undefined" &&
            window.localStorage.getItem("connected") // check if key(connected) exists
    ) {
      enableWeb3()
    }
  }, [isWeb3Enabled])
  // no array, run on every render
  // empty array, run once
  // dependency array, run when the stuff in it changesan

  useEffect(() => {
    Moralis.onAccountChanged((newAccount) => {
      console.log(`Account changed to ${newAccount}`)
      if (newAccount == null) {
        window.localStorage.removeItem("connected")
        deactivateWeb3()
        console.log("Null account found")
      }
    })
  }, [])

  useEffect(() => {
    async function fetchBalance() {
      // if (account) {
      //     // 获取余额用 Moralis 的 Web3API,需要依赖 Moralis 后端服务, 要有 apiKey, 有些版本还存在兼容性问题
      //     const result = await web3Api.account.getNativeBalance({
      //         chain: "0x7a69",  // 本地链用链ID 31337 的十六进制 "0x7a69"
      //         address: account })
      //     // 返回的是 Wei,需要转换为 ETH
      //     const balanceInEth = Moralis.Units.FromWei(result.balance)
      //     setBalance(balanceInEth)
      // }

      // 另一种获取余额的方式是直接用 ethers.js
      if (account && typeof window !== "undefined") {
        const provider = new ethers.providers.Web3Provider(window.ethereum)
        const balanceBigInt = await provider.getBalance(account)
        const balanceInEth = ethers.utils.formatEther(balanceBigInt)
        setBalance(balanceInEth)
      }
    }
    fetchBalance()
  }, [account])

  return (
          <div>
            {
              account ? (
                              <>
                                <div>
                                  Connect to {account.slice(0, 6)}...
                                  {account.slice(account.length - 4)}
                                </div>
                                <div>
                                  Balance: {balance} ETH
                                </div>
                              </>
                      ) :
                      (<button onClick={
                        async () => {
                          const ret = await enableWeb3()
                          if (typeof ret !== "undefined") {
                            // depends on what button they picked
                            if (typeof window !== "undefined") {
                              window.localStorage.setItem("connected", "injected") // key-value
                            }
                          }
                        }
                      } disabled={isWeb3EnableLoading}
                      >Connect</button>)
            }
          </div>
  )
}
Next.js 13+的app目录默认所有组件都是Server Component, 而react-moralis里的useMoralis只能在Client Component里用.

使用 web3 UI
web3uikit 最早是 Moralis 出的一套 Demo 级 UI 组件库, 主要是给初学者快速做个钱包连接、按钮、通知,不用自己写 UI. 它的问题就是更新慢, 依赖老版本(React 18), 而 React 19 / Next.js 14 已经是主流了, 结果一用就冲突.
商用项目建议组合:
-
钱包连接 &
Web3 hooks- wagmi(以太坊交互 Hooks,React 友好,维护活跃,支持 React 19)
- viem(比 ethers.js 更新,更快,TypeScript 体验好)
- RainbowKit(钱包连接 UI,很漂亮)
-
UI 组件库
- shadcn/ui(基于 Radix + Tailwind,现代 React 项目常用)
- chakra-ui 或 mantine(全功能 React 组件库)
-
链交互
ethers.js(v6)- viem(wagmi 默认基于 viem)
shell
yarn add wagmi@2 viem@2 @rainbow-me/rainbowkit@2调用合约
前端调用合约需要知道合约地址、合约 ABI, 可由后端部署代码生成, 代码如下:
jsx
const { readFileSync, writeFileSync } = require("fs")
const { ethers, network } = require("hardhat")
const path = require("path")
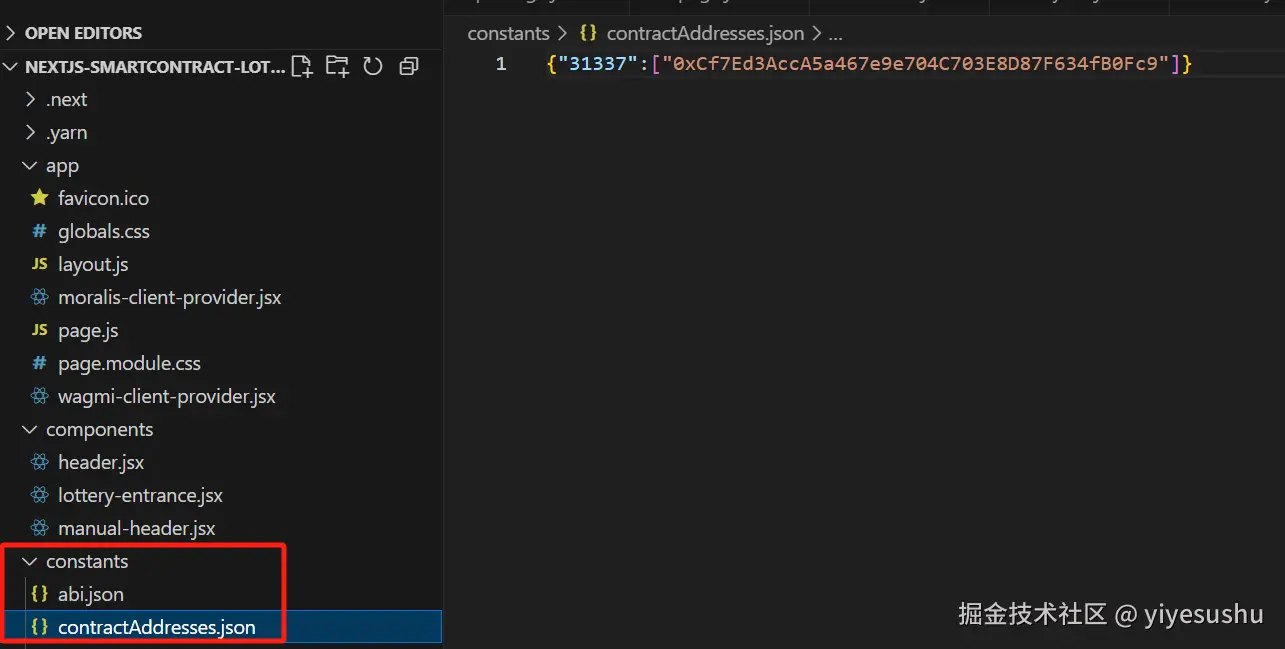
const FRONT_END_ADDRESSES_FILE = "../../../react/nextjs-smartcontract-lottery-fcc/constants/contractAddresses.json"
const FRONT_END_ABI_FILE = "../../../react/nextjs-smartcontract-lottery-fcc/constants/abi.json"
const RAFFLE_ARTIFACT_PATH = path.join(__dirname, "../artifacts/contracts/Raffle.sol/Raffle.json")
module.exports = async () => {
if (process.env.UPDATE_FRONT_END) {
console.log("Updating front end...")
updateContractAddress()
updateAbi()
}
}
async function updateContractAddress() {
const raffle = await ethers.getContract("Raffle")
const chainId = network.config.chainId.toString()
const contractAddresses = JSON.parse(readFileSync(FRONT_END_ADDRESSES_FILE, "utf8"))
if (chainId in contractAddresses) {
if (!contractAddresses[chainId].includes(raffle.target)) {
contractAddresses[chainId].push(raffle.target)
}
} else {
contractAddresses[chainId] = [raffle.target]
}
writeFileSync(FRONT_END_ADDRESSES_FILE, JSON.stringify(contractAddresses))
console.log("Front end contractAddress written!")
}
async function updateAbi() {
const raffle = await ethers.getContract("Raffle")
// ethers V6 不再返回标准的 JSON 格式,直接从 Hardhat 编译产物中读取 ABI
const artifact = JSON.parse(readFileSync(RAFFLE_ARTIFACT_PATH, "utf8"))
writeFileSync(FRONT_END_ABI_FILE, JSON.stringify(artifact.abi, null, 2))
console.log("Front end ABI written!")
}
module.exports.tags = ["all", "frontend"]这样在执行 deploy 或 node 后会在前端项目目录的相应文件中生成.
shell
> yarn hardhat node
# others log ...
Updating front end...
Front end contractAddress written!
Front end ABI written!
Started HTTP and WebSocket JSON-RPC server at http://127.0.0.1:8545/
对应文件变化:
调用合约
jsx
"use client";
import { useEffect, useState } from "react";
import { abi, contractAddresses } from "../constants"
import { useWeb3Contract, useMoralis } from "react-moralis"
import { ethers } from "ethers"
// have a function to enter the lottory contract
export default function LotteryEntrance() {
const { chainId: chainIdHex, isWeb3Enabled, Moralis } = useMoralis()
const chainIdString = chainIdHex ? parseInt(chainIdHex).toString() : "31337"
console.log(`chainIdString is ${chainIdString}`)
const contractAddress = contractAddresses[chainIdString]
? contractAddresses[chainIdString][0]
: null
console.log(`Contract Address is ${contractAddress}`)
// state hooks
// https://stackoverflow.com/questions/58252454/react-hooks-using-usestate-vs-just-variables
const [ entranceFee, setEntranceFee ] = useState("0")
const [ numberOfPlayers, setNumberOfPlayers ] = useState("0")
const [ players, setPlayers] = useState([]) // array of addresses
const [ recentWinner, setRecentWinner ] = useState("0")
/* view functions
getEntranceFee
getNumberOfPlayers
getRecentWinner
*/
const { runContractFunction: getEntranceFee } = useWeb3Contract({
abi: abi,
contractAddress: contractAddress,
functionName: "getEntranceFee",
params: {},
})
// Another way we could make a contract call:
// const options = { abi, contractAddress: raffleAddress }
// const fee = await Moralis.executeFunction({
// functionName: "getEntranceFee",
// ...options,
// })
const { runContractFunction: getPlayersNumber } = useWeb3Contract({
abi: abi,
contractAddress: contractAddress,
functionName: "getNumberOfPlayers",
params: {},
})
const { runContractFunction: getRecentWinner } = useWeb3Contract({
abi: abi,
contractAddress: contractAddress,
functionName: "getRecentWinner",
params: {},
})
async function updateUIValues() {
// try to read the raffle entrance fee
const entranceFeeFromCall = (await getEntranceFee()).toString()
const numPlayersFromCall = (await getPlayersNumber()).toString()
const recentWinnerFromCall = await getRecentWinner()
setEntranceFee(entranceFeeFromCall) // setState hook 是异步的, 会触发组件重新渲染, 但不会立即更新变量的值, 而是在下一次渲染时更新
setNumberOfPlayers(numPlayersFromCall)
setRecentWinner(recentWinnerFromCall)
updatePlayers(Number(numPlayersFromCall))
}
useEffect(
() => {
console.log("useEffect triggered, isWeb3Enabled:", isWeb3Enabled)
if (isWeb3Enabled) {
updateUIValues()
}
} , [isWeb3Enabled]
)
const {
data: enterTxResponse,
// error,
runContractFunction: enterRaffle, // 将对象的属性重命名为 enterRaffle, 代替 runContractFunction, 让代码更语义化
isFetching,
isLoading
} =
useWeb3Contract();
const options = {
abi: abi,
contractAddress: contractAddress,
functionName: "enterRaffle",
params: {},
msgValue: entranceFee,
}
const { runContractFunction: getPlayer } = useWeb3Contract()
async function updatePlayers(numberOfPlayersInt) {
setPlayers([]) // 先清空当前玩家列表
for (let i = 0; i < numberOfPlayersInt; i++) {
const getPlayerOptions = {
abi: abi,
contractAddress: contractAddress,
functionName: "getPlayer",
params: { index: i },
}
const playerFromCall = await getPlayer({ params: getPlayerOptions })
setPlayers((prevPlayers) => [...prevPlayers, playerFromCall])
// 或者也可以用下面这种方式, 但不推荐, 因为这种方式依赖于 players 的当前值, 可能会有异步问题
// setPlayers([...players, playerFromCall])
// 也可以直接在这里打印出来
// console.log(`Player ${i}: ${playerFromCall}`)
}
}
function handleNewNotification(tx) { // 也可以写为 const handleNewNotification = (tx) => {
console.log("Transaction Complete ...")
if (tx) {
console.log("Contract Address:", tx.to) // 合约地址
console.log("Transaction Hash:", tx.hash) // 交易哈希
console.log("From:", tx.from) // 交易发起地址
}
}
const handleSuccess = async (tx) => { // 也可以写为 async function handleSuccess(tx) {
try {
await tx.wait(1)
updateUIValues()
handleNewNotification(tx)
} catch (error) {
console.log(error)
}
}
return (
<>
<div>
Hi from LotteryEntrance!
{ contractAddress ? (
<>
<button
className="bg-blue-500 hover:bg-blue-700 text-white font-bold py-2 px-4 rounded ml-auto"
onClick={
async () => {
await enterRaffle(
{
params: options,
onSuccess: handleSuccess,
onError: (error) => console.log(error),
}
)
}
}
disabled={isLoading || isFetching}
>
{ isLoading || isFetching ? (
<div className="animate-spin spinner-border h-8 w-8 border-b-2 rounded-full"></div>
) : (
"Enter Raffle"
)}
</button>
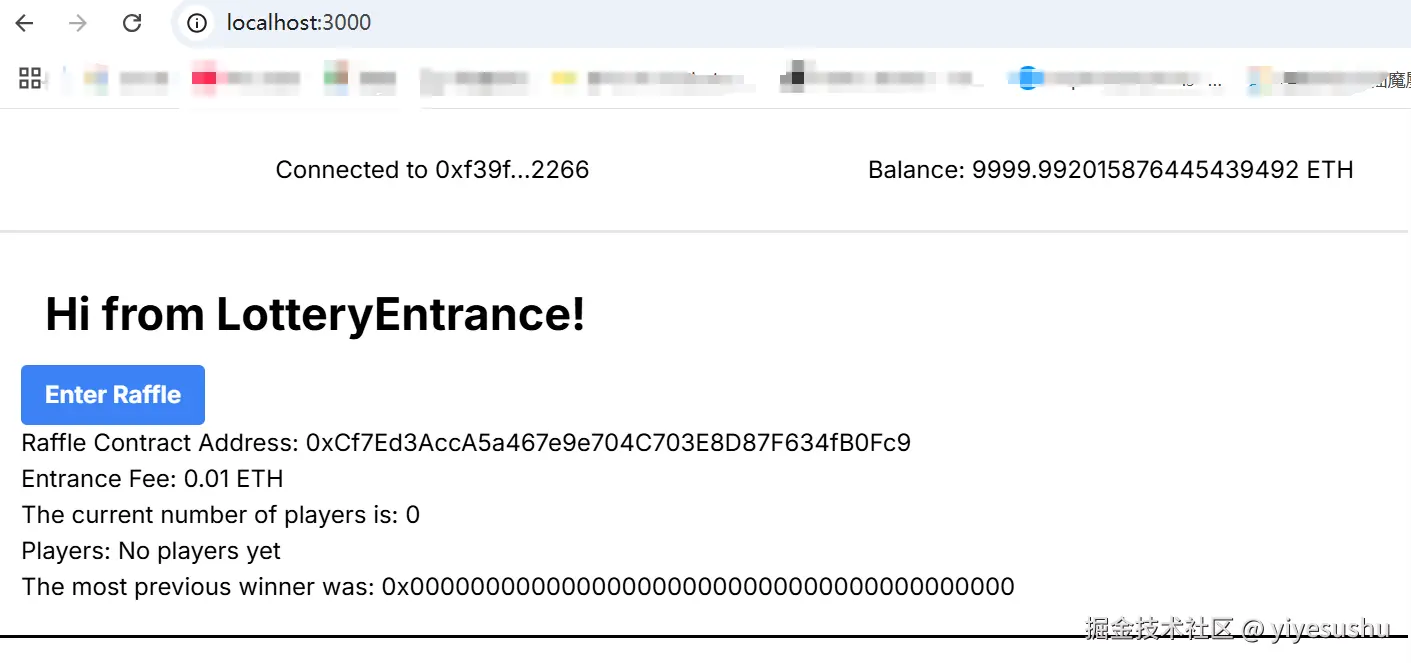
<div>Raffle Contract Address: {contractAddress}</div>
<div>Entrance Fee: {ethers.utils.formatUnits(entranceFee, "ether")} ETH</div>
<div>The current number of players is: {numberOfPlayers}</div>
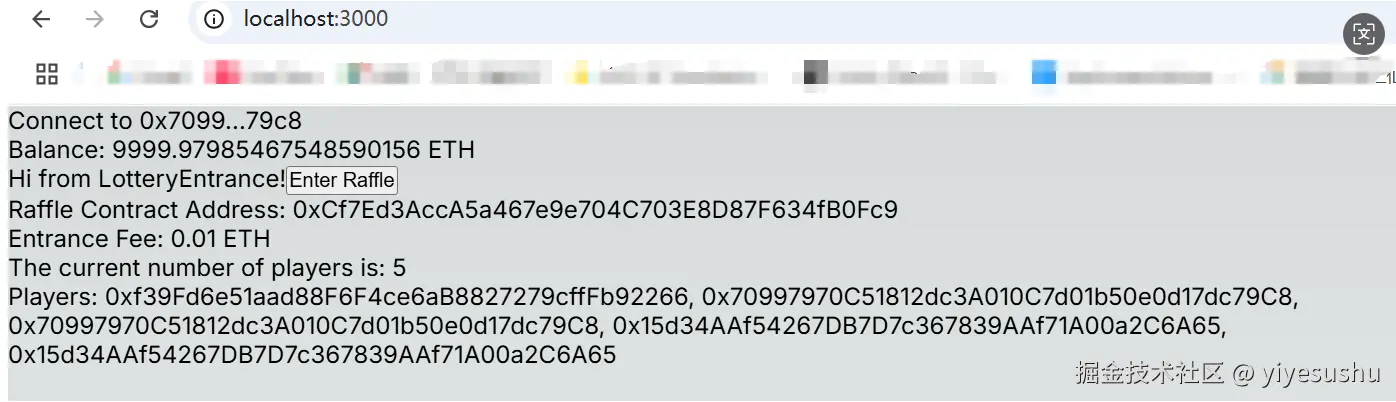
<div>Players: {players.length > 0 ? players.join(", ") : " No players yet"}</div>
<div>The most previous winner was: {recentWinner}</div>
</>):
(<div> Please connect to a supported chain </div>)
}
</div>
</>
)
}上述代码演示了通过react-moralis调用合约getEntranceFee接口.
export default 在 ES6 模块中表示默认导出, 一个文件只能有一个默认导出. 导入时可以用任意名字, 不需要加花括号. 适合导出主内容 或*主组件**.
触发抽奖
测试环境触发抽奖脚本:
js
const { ethers, network } = require("hardhat")
// const { keccak256, toUtf8Bytes } = require("ethers") // v6

async function mockKeepers() {
  const raffle = await ethers.getContract("Raffle")
  // const checkData = ethers.utils.keccak256(ethers.utils.toUtf8Bytes("")) // v5
  const checkData = keccak256(toUtf8Bytes("")) // v6
  // const { upkeepNeeded } = await raffle.callStatic.checkUpkeep(checkData) // v5
  const [upkeepNeeded, performData] = await raffle.checkUpkeep.staticCall("0x")
  console.log("upkeepNeeded:", upkeepNeeded)
  console.log("performData:", performData)

  const raffleState = await raffle.getRaffleState()
  const interval = await raffle.getInterval()
  const lastTime = await raffle.getLastTimeStamp()
  const players = await raffle.getNumberOfPlayers()
  const balance = await ethers.provider.getBalance(raffle.target)

  console.log("raffleState:", raffleState.toString())  // 应该是 0 (OPEN)
  const now = BigInt(Math.floor(Date.now() / 1000))
  console.log("timePassed:", now - lastTime > interval)
  console.log("players:", players.toString())
  console.log("balance:", balance.toString())

  if (upkeepNeeded) {
    const tx = await raffle.performUpkeep(checkData)
    const txReceipt = await tx.wait(1)
    // const requestId = txReceipt.events[1].args.requestId // v5
    const requestId = txReceipt.logs[1].args.requestId // v6 logs 代替 events
    console.log(`Performed upkeep with RequestId: ${requestId}`)
    if (network.config.chainId == 31337) {
      await mockVrf(requestId, raffle)
    }
  } else {
    console.log("No upkeep needed!")
  }
}

async function mockVrf(requestId, raffle) {
  console.log("We on a local network? Ok let's pretend...")
  const vrfCoordinatorV2Mock = await ethers.getContract("VRFCoordinatorV2_5Mock")
  // await vrfCoordinatorV2Mock.fulfillRandomWords(requestId, raffle.address) // v5
  await vrfCoordinatorV2Mock.fulfillRandomWords(requestId, raffle.target) // v6
  console.log("Responded!")
  const recentWinner = await raffle.getRecentWinner()
  console.log(`The winner is: ${recentWinner}`)
}

mockKeepers()
        .then(() => process.exit(0))
        .catch((error) => {
          console.error(error)
          process.exit(1)
        })
执行脚本:
shell
> yarn hardhat run .\scripts\mockOffChain.js --network localhost
upkeepNeeded: true
performData: 0x
raffleState: 0
timePassed: true
players: 3
balance: 30000000000000000
Performed upkeep with RequestId: 1
We on a local network? Ok let's pretend...
Responded!
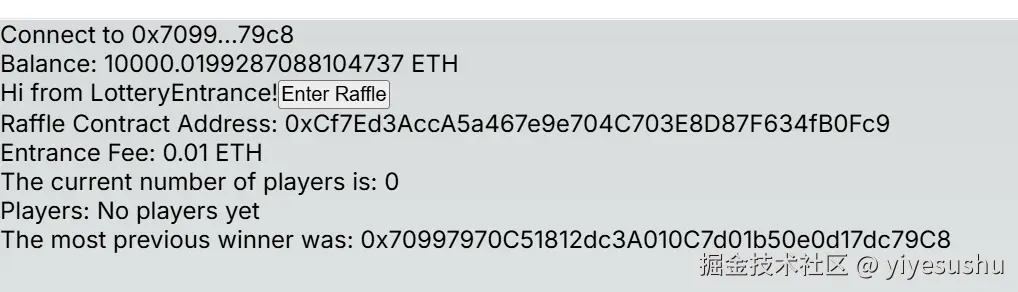
The winner is: 0x70997970C51812dc3A010C7d01b50e0d17dc79C8刷新界面
css
- 安装
tailwindcss
shell
yarn add --dev tailwindcss @tailwindcss/postcss postcss此文档写作时最新版本为V4, Tailwind v4 和 Next.js App Router 是不兼容的, 需要使用V3.
shell
# remove tailwindcss v4
yarn remove tailwindcss @tailwindcss/postcss
# add tailwindcss v3
yarn add -D tailwindcss@3 postcss@8 autoprefixer@10
# init
yarn tailwindcss init -pglobals.css文件引入
less
/* tailwindcss v4 */
/*@import "tailwindcss"; */
@tailwind base;
@tailwind components;
@tailwind utilities;tailwind.config.js文件修改:
js
/** @type {import('tailwindcss').Config} */
module.exports = {
    content: ["./app/**/*.{js,ts,jsx,tsx}", "./components/**/*.{js,ts,jsx,tsx}"],
    theme: {
        extend: {},
    },
    plugins: [],
}
效果如下:
deploy
部署到服务器或开放平台,如 IPFS.
build
shell
yarn buildNext.js 会默认生成服务端渲染 (SSR) 构建,产物在 .next 目录。包括:
- server/ → 需要 Node.js 才能运行的服务端代码
- static/ → 静态资源(JS/CSS 等)
- app/ → App Router 相关构建产物
- BUILD_ID 等元信息
这种
.next/不是纯静态文件, 不能直接部署, 因为它依赖Next.js的Node.js运行时(要next start才能用).
要生成纯静态文件,在next.config.js进行如下配置:
js
/** @type {import('next').NextConfig} */
const nextConfig = {
    output: "export", // 必须, 启用静态导出
    images: {
        unoptimized: true, // 禁用图像优化, 因为静态导出不支持动态图像优化
    },
    distDir: "out", // 可选, 默认导出到 out/ 文件夹
}

module.exports = nextConfigout目录生成文件:
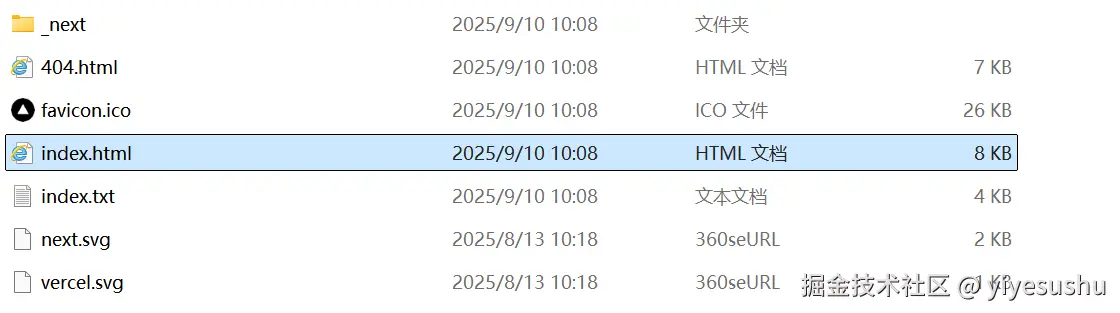
deploy
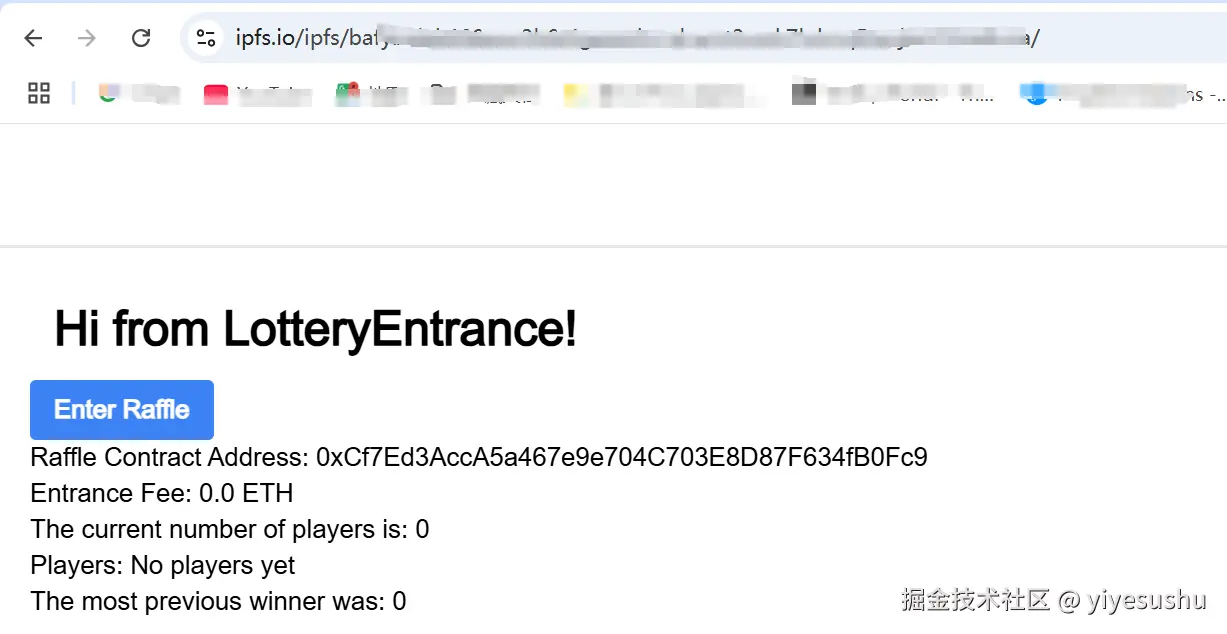
将out目录上传到服务器或托管平台.如pinata.cloud
这里有个问题: Next.js 默认所有静态资源都放到 /_next/ 路径下,静态导出的时候也是一样. 但是 IPFS 没有根路径(不像传统服务器有 /),所以 / _next/... 在 IPFS 里就变成了 404,必须改成相对路径 ./_next/....
shell
# linux/unix
find out -type f -name "*.html" -exec sed -i 's|/_next/|./_next/|g' {} +
效果如下:
这里, 更方便的做法是增加脚本:
shell
yarn add --dev replace-in-file
json
{
  "postbuild": "replace-in-file \"/_next\" \"./_next\" out/**/*.html"
}