【系列文章】Linux中的并发与竞争02-原子操作
该文章为系列文章:Linux中的并发与竞争中的第2篇
该系列的导航页连接:
【系列文章】Linux中的并发与竞争-导航页
文章目录
前言
在上一篇文章中,对并发与竞争进行了实验,两个 app 应用程序之间对共享资源的竞争访问引起了数据传输错误,而在 Linux 内核中,提供了四种处理并发与竞争的常见方法,分别是原子操作、自旋锁、信号量、互斥体,在之后的几篇文章中会依次对上述四种方法进行讲解
文章首先对四种常见方法中的原子操作进行讲解。
一、原子操作
"原子"是化学世界中不可再分的最小微粒,一切物质都由原子组成。在 Linux 内核中的原子操作可以理解为"不可被拆分的操作",就是不能被更高等级中断抢夺优先的操作。在 C语言中可以使用以下代码对一个整形变量赋值。
c
int v;//定义一个 int 类型的变量 v
v = 1;//将 int 类型的变量 v 赋值为 1
而上述代码仍然不是"不可拆分的操作",C 语言程序仍然需要翻译成汇编指令,在汇编指令的执行过程中仍可能会有竞争的产生。而原子操作会将整形变量的操作当成一个整体,不可再进行分割。而原子操作又可以进一步细分为 "整型原子操作" 和 "位原子操作" ,这里首先对整型原子操作进行讲解。
在 Linux 内核中使用 atomic_t 和 atomic64_t 结构体分别来完成 32 位系统和 64 位系统的整形数据原子操作,两个结构体定义在"内核源码/include/linux/types.h"文件中,具体定义如下:
c
typedef struct {
	int counter;
} atomic_t;

#ifdef CONFIG_64BIT
	typedef struct {
		long counter;
	} atomic64_t;
#endif
例如可以使用以下代码定义一个 64 位系统的原子整形变量:
c
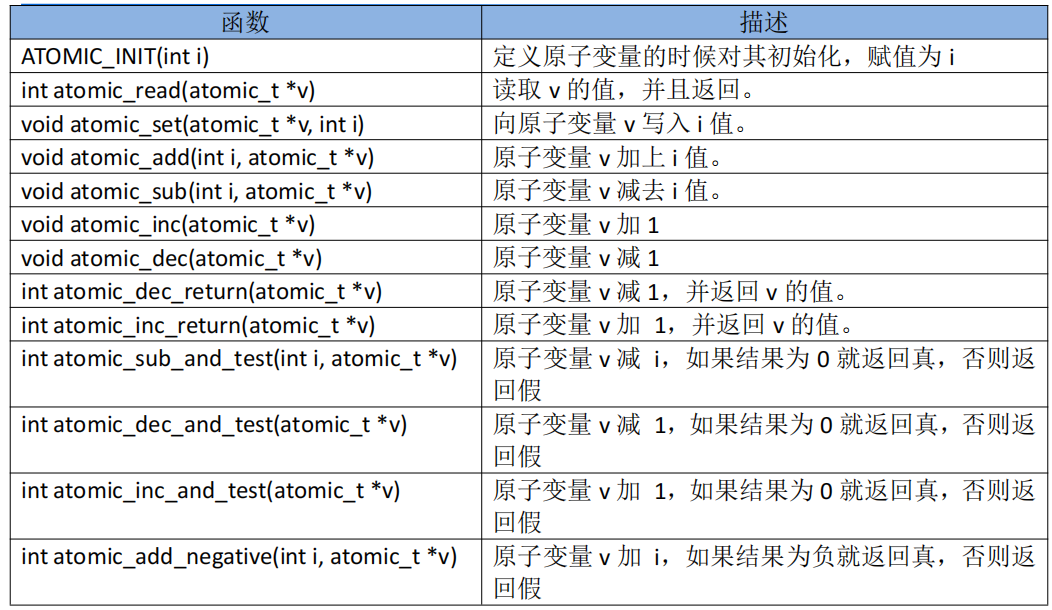
atomic64_t v;在成功定义原子变量之后,必然要对原子变量进行读取、加减等动作,原子操作的部分常用 API 函数如下所示,定义在"内核源码/include/linux/atomic.h"文件中,所以在接下来的实验中需要加入该头文件的引用。
下面对原子位操作进行讲解,和原子整形变量不同,原子位操作没有 atomic_t 的数据结构,原子位操作是直接对内存进行操作,原子位操作相关 API 函数如下所示:

二.实验程序的编写
2.1驱动程序编写
为了解决并发与竞争的问题,本章节实验将加入原子整形操作相关实验代码,在 open()函数和 release()函数中加入原子整形变量 v 的赋值代码,并且在 open()函数中加入原子整形变量 v 的判断代码,从而实现同一时间内只允许一个应用打开该设备节点,以此来防止共享资源竞争的产生。
编写完成的 atomic.c 代码如下所示
c
#include <linux/init.h>
#include <linux/module.h>
#include <linux/fs.h>
#include <linux/cdev.h>
#include <linux/kdev_t.h>
#include <linux/uaccess.h>
#include <linux/delay.h>
#include <linux/atomic.h>
#include <linux/errno.h>

static atomic64_t v = ATOMIC_INIT(1);//初始化原子类型变量 v,并设置为 1

static int open_test(struct inode *inode,struct file *file)
{
	if(atomic64_read(&v) != 1)//读取原子类型变量 v 的值并判断是否等于 1
	{
		return -EBUSY;
	}
	atomic64_set(&v,0);//将原子类型变量 v 的值设置为 0
	//printk("\nthis is open_test \n");
	return 0;
}

static ssize_t read_test(struct file *file,char __user *ubuf,size_t len,loff_t *off)
{
	int ret;
	char kbuf[10] = "topeet";//定义 char 类型字符串变量 kbuf
	printk("\nthis is read_test \n");
	ret = copy_to_user(ubuf,kbuf,strlen(kbuf));//使用 copy_to_user 接收用户空间传递的数据
	if (ret != 0)
	{
		printk("copy_to_user is error \n");
	}
	printk("copy_to_user is ok \n");
	return 0;
}

static char kbuf[10] = {0};//定义 char 类型字符串全局变量 kbuf
static ssize_t write_test(struct file *file,const char __user *ubuf,size_t len,loff_t *off)
{
	int ret;
	ret = copy_from_user(kbuf,ubuf,len);//使用 copy_from_user 接收用户空间传递的数据
	if (ret != 0)
	{
		printk("copy_from_user is error\n");
	}
	if(strcmp(kbuf,"topeet") == 0 )//如果传递的 kbuf 是 topeet 就睡眠四秒钟
	{
		ssleep(4);
	}
	else if(strcmp(kbuf,"itop") == 0)//如果传递的 kbuf 是 itop 就睡眠两秒钟
	{
		ssleep(2);
	}
	printk("copy_from_user buf is %s \n",kbuf);
	return 0;
}

static int release_test(struct inode *inode,struct file *file)
{
	//printk("\nthis is release_test \n");
	atomic64_set(&v,1);//将原子类型变量 v 的值赋 1
	return 0;
}

struct chrdev_test {
	dev_t dev_num;//定义 dev_t 类型变量 dev_num 来表示设备号
	int major,minor;//定义 int 类型的主设备号 major 和次设备号 minor
	struct cdev cdev_test;//定义 struct cdev 类型结构体变量 cdev_test,表示要注册的字符设备
	struct class *class_test;//定于 struct class *类型结构体变量 class_test,表示要创建的类
};

struct chrdev_test dev1;//创建 chrdev_test 类型的

struct file_operations fops_test = {
	.owner = THIS_MODULE,//将 owner 字段指向本模块,可以避免在模块的操作正在被使用时卸载该模块
	.open = open_test,//将 open 字段指向 open_test(...)函数
	.read = read_test,//将 read 字段指向 read_test(...)函数
	.write = write_test,//将 write 字段指向 write_test(...)函数
	.release = release_test,//将 release 字段指向 release_test(...)函数
};

static int __init atomic_init(void)
{
	if(alloc_chrdev_region(&dev1.dev_num,0,1,"chrdev_name") < 0 )//自动获取设备号,设备名
	{
		chrdev_name
		printk("alloc_chrdev_region is error \n");
	}
	printk("alloc_chrdev_region is ok \n");
	dev1.major = MAJOR(dev1.dev_num);//使用 MAJOR()函数获取主设备号
	dev1.minor = MINOR(dev1.dev_num);//使用 MINOR()函数获取次设备号
	printk("major is %d,minor is %d\n",dev1.major,dev1.minor);
	//使用 cdev_init()函数初始化 cdev_test 结构体,并链接到fops_test 结构体
	cdev_init(&dev1.cdev_test,&fops_test);
	//将 owner 字段指向本模块,可以避免在模块的操作正在被使用时卸载该模块
	dev1.cdev_test.owner = THIS_MODULE;
	cdev_add(&dev1.cdev_test,dev1.dev_num,1);//使用 cdev_add()函数进行字符设备的添加
	//使用 class_create 进行类的创建,类名称为class_test
	dev1.class_test = class_create(THIS_MODULE,"class_test");
	//使用 device_create 进行设备的创建,设备名称为 device_test
	device_create(dev1.class_test,0,dev1.dev_num,0,"device_test");
	return 0;
}

static void __exit atomic_exit(void)
{
	device_destroy(dev1.class_test,dev1.dev_num);//删除创建的设备
	class_destroy(dev1.class_test);//删除创建的类
	cdev_del(&dev1.cdev_test);//删除添加的字符设备 cdev_test
	unregister_chrdev_region(dev1.dev_num,1);//释放字符设备所申请的设备号
	printk("module exit \n");
}

module_init(atomic_init);
module_exit(atomic_exit)
MODULE_LICENSE("GPL v2");
MODULE_AUTHOR("topeet");
2.2编写测试 APP
c
#include <stdio.h>
#include <sys/types.h>
#include <sys/stat.h>
#include <fcntl.h>
#include <string.h>
#include <unistd.h>

int main(int argc, char *argv[])
{
	int fd;//定义 int 类型的文件描述符
	char str1[10] = {0};//定义读取缓冲区 str1
	fd = open(argv[1],O_RDWR);//调用 open 函数,打开输入的第一个参数文件,权限为可读可写
	if(fd < 0 )
	{
		printf("file open failed \n");
		return -1;
	}
	/*如果第二个参数为 topeet,条件成立,调用 write 函数,写入 topeet*/
	if (strcmp(argv[2],"topeet") == 0 )
	{
		write(fd,"topeet",10);
	}
	/*如果第二个参数为 itop,条件成立,调用 write 函数,写入 itop*/
	else if (strcmp(argv[2],"itop") == 0 )
	{
		write(fd,"itop",10);
	}
	close(fd);
	return 0;
}
2.3运行测试
使用以下命令运行测试 app,运行结果如下图所示:
c
./app /dev/device_test topeet
可以看到传递的 buf 值为 topeet,然后输入以下命令在后台运行两个 app,来进行竞争测试,运行结果如下图所示:
c
./app /dev/device_test topeet &
./app /dev/device_test itop
可以看到应用程序在打开第二次/dev/device_test 文件的时候,出现了"file open failed"打印,证明文件打开失败,只有在第一个应用关闭相应的文件之后,下一个应用才能打开,通过限制同一时间内设备访问数量,来对共享资源进行保护。