文章目录
日历组件实现
一个基于 Vue3 + Composition API 的日历组件,功能包括:
✅ 功能概览
| 功能点 | 实现情况 |
|---|---|
| 月份切换 | ✅ 通过 handleLastMonth / handleNestMonth 实现 |
| 今日高亮 | ✅ 使用 isToday 判断并加样式 |
| 选中日期 | ✅ 使用 SelectedDate 存储并高亮 |
| 跨月补全 | ✅ 上月和下月的日期用 isOtherMonth 标记并灰显 |
| 响应式布局 | ✅ 使用 grid + aspect-ratio 实现正方形格子 |
| 样式变量 | ✅ 使用 CSS 变量(如 --primary, --gary_light) |
✅ 代码亮点
- 逻辑清晰 :用
computed生成days数组,结构干净。 - 日期处理封装得好 :
getDate和formatDate方法复用性强。 - 样式语义化 :类名如
.today,.selected,.other-month非常直观。 - 组件化思维 :使用
TagCop作为子组件,符合 uni-app 风格。
接下来开始我们的代码之旅😄:
基础功能搭建
首先创建模板结构:
js
<template>
  <div class="calendarCop">
    <!-- 日历顶部栏 -->
    <div class="calendarCop-header"></div>
    <!-- 日历星期栏 -->
    <div class="calendarCop-weekdays">
      <div>一</div>
      <div>二</div>
      <div>三</div>
      <div>四</div>
      <div>五</div>
      <div>六</div>
      <div>日</div>
    </div>
    <!-- 日历 -->
    <div class="calendarCop-days"></div>
  </div>
</template>

<script setup></script>

<style scoped lang="scss">
.calendarCop {
  background-color: var(--gary_light);
  padding: 16rpx;
  border-radius: var(--radius);
  .calendarCop-header {
  }
  .calendarCop-weekdays {
  }
  .calendarCop-days {
  }
}
</style>搭建日历顶部栏结构:
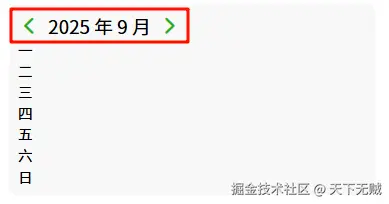
创建出顶部栏需要展示的空间,分别有分布于左侧的切换至上个月图标按钮和右侧的切换至下个月图标按钮,以及中间年月份展示区:
html
<!-- 日历顶部栏 -->
<div class="calendarCop-header">
    <!-- 顶部栏月份切换区 -->
    <div class="changeMouth">
        <!-- 切换至上个月图标按钮 -->
        <span class="left">
            <uni-icons type="left" size="24" color="#23ad1e"> </uni-icons>
        </span>
        <!-- 年月份展示区 -->
        <p class="data">2025 年 9 月</p>
        <!-- 切换至下个月图标按钮 -->
        <span class="right">
            <uni-icons type="right" size="24" color="#23ad1e"></uni-icons>
        </span>
    </div>
</div>
接下来编写样式:
css
.calendarCop-header {
    .changeMouth {
        display: inline-flex;
        align-items: center;
        gap: 16rpx;
        height: 50rpx;
        .left,
        .right {
            font-weight: 900;
        }
        .data {
            font-size: 36rpx;
            line-height: 50rpx;
        }
    }
}
效果:
现在结构已经搭建好了,逻辑交互等日历日期渲染出来了再做。
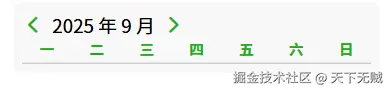
搭建日历星期栏样式:
直接使用网格布局将七个星期都渲染出来,然后再添加一些修饰就完成啦。
css
  .calendarCop-weekdays {
    color: var(--primary_dark);
    font-weight: 900;
    display: grid;
    grid-template-columns: repeat(7, 1fr);
    text-align: center;
    padding-bottom: 8rpx;
    margin-bottom: 8rpx;
    border-bottom: 4rpx solid var(--gary_dark);
  }
效果:
渲染日历日期
接下来就是重头戏了,要想渲染出时间日期,我们就要请出Date时间对象来。
先来获取到当前年|月|日数据:
- 这里使用ref响应式创建了一个时间对象
- 然后用计算属性分别计算出
CurrentDate时间对象的年|月|日信息
js
/* 当前日期时间 */
// 获取当前时间对象
const CurrentDate = ref(new Date());
// 获取当前年份
const Year = computed(() => CurrentDate.value.getFullYear());
// 获取当前月份
const Month = computed(() => CurrentDate.value.getMonth());
// 获取当前日期
const Today = computed(() => CurrentDate.value.getDate());拿到了日期时间后,就可以在日历顶部栏中替换掉之前写死的年月份:
vue
<!-- 年月份展示区 -->
<p class="data">{{ Year }} 年 {{ Month + 1 }} 月</p>
⚠注意:时间对象中拿到的月份是
从0开始的,所以相比较于现实的月份会少1,所以要在渲染月份的时候加上1。
写一个获取日期对象方法:
js
const getDate = ({ year, month, day } = {}) =>
  new Date(year ?? Year.value, month ?? Month.value, day ?? Today.value);
生成日期数据:
js
/* 生成日期数据 */
const days = computed(() => {
  const result = [];
  // 获取每个月的第一天和最后一天
  const firstDay = getDate({ day: 0 });
  const lastDay = getDate({ month: Month.value + 1, day: 0 });
  // 通过遍历来渲染所有日期
  for (let i = 1; i <= lastDay.getDate(); i++) {
     const date = getDate({ year: Year.value, month: Month.value, day: i });
    result.push({
      date,
      text: i,
    });
  }
  return result;
});
整体逻辑就是先拿 lastDay 定出本月共有多少天,然后从 1 号循环到该天数,每天调用 getDate 生成一个 Date 对象塞进数组,最终得到"本月所有日期"列表。
我们可以打印一下days来观察数据长啥样:console.log("🚀:", days.value);

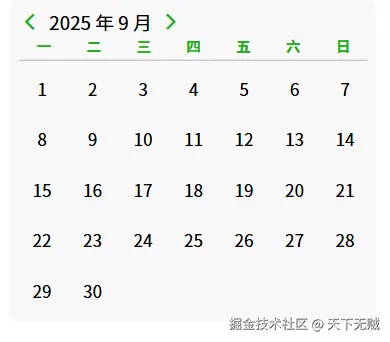
接下来将日期数据渲染到模板上:
vue
    <!-- 日历 -->
    <div class="calendarCop-days">
      <div class="item" v-for="day in days" :key="day.date">
        <div class="day">
          {{ day.text }}
        </div>
      </div>
    </div>

// 样式
  .calendarCop-days {
    display: grid;
    grid-template-columns: repeat(7, 1fr);
    gap: 8rpx;
    .item {
      font-size: 32rpx;
      aspect-ratio: 1; // 宽=高,正方形
      display: flex;
      flex-direction: column;
      align-items: center;
      justify-content: center;
      .day {
      }
    }
  }
如今,日历已经有初步形态:
接下来完成今日日期显示:
给日期格子添加上样式类名和并且准备好样式:
vue
<div class="calendarCop-days">
    <div class="item" v-for="day in days" :key="day.date">
        <div
             :class="{
                     day: true,
                     base: true,
                     today: isToday(day.date),
                     }"
             >
            {{ day.text }}
        </div>
    </div>
</div>

// 样式:
.base {
    width: 100%;
    height: 100%;
    display: flex;
    align-items: center;
    justify-content: center;
    border-radius: var(--radius);
    font-weight: 900;
}
.today {
    color: var(--primary_dark);
    background: var(--primary_light);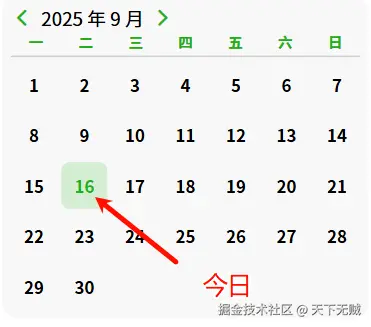
}判断是否为今天isToday方法:
js
// 格式化日期方法
const formatDate = (date) =>
  `${date.getFullYear()}-${String(date.getMonth() + 1).padStart(
    2,
    "0"
  )}-${String(date.getDate()).padStart(2, "0")}`;

/* 今日日期 */
const today_date = new Date();
const isToday = (date) => formatDate(today_date) === formatDate(date);
这里补充一下
padStart方法:
padStart只做一件事:把字符串"补长"到指定长度 ,不够就在前面补规定的字符。语法:
str.padStart(目标长度, 补什么)例如:
js'5'.padStart(2, '0') // 长度=1,差1位 →补0 → '05' '12'.padStart(2, '0') // 长度已够 → 原样返回 '12'
效果:
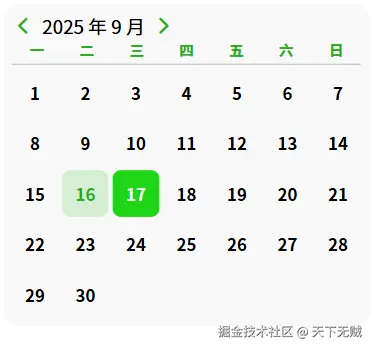
处理选中日期效果:
同样的,先添加上选中的类名和样式效果:
html
<div
     :class="{
             day: true,
             base: true,
             today: isToday(day.date),
             selected: isSelected(day.date),
             }"
     @click="selectDay(day.date)"
     >
    {{ day.text }}
</div>

// 样式:⚠注意selected类名要在today下方,这样选中效果才能覆盖掉today样式
.today {
    color: var(--primary_dark);
    background: var(--primary_light);
}
.selected {
	color: #fff;
	background: var(--primary);
}
编写逻辑:
js
/* 选择日期相关 */
// 选中日期
const SelectedDate = ref(null);
// 选中日期方法
const selectDay = (date) => {
  SelectedDate.value = formatDate(date);
};
const isSelected = (date) => SelectedDate.value === formatDate(date);
// 初始化选中今天
onMounted(() => {
  SelectedDate.value = formatDate(today_date);
});
现在选中效果也做好啦:
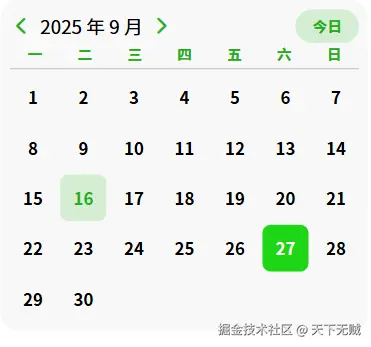
回到今日:
html
<div class="calendarCop-header">
    <!-- 顶部栏月份切换区 -->
    <div class="changeMouth">
        <!-- ... -->
    </div>
    <TagCop
            class="selectToday"
            text="今日"
            backgroundColor="var(--primary_light)"
            @click="selectToday"
            />
</div>
⚠这个
<TagCop>就是一个标签组件而已啦!
添加回到今日方法:
js
/* 今日日期 */
const today_date = new Date();
const isToday = (date) => formatDate(today_date) === formatDate(date);
const selectToday = () => {
  CurrentDate.value = today_date;
  selectDay(today_date);
};
效果:
月份切换
现在来制作月份切换效果:
给图标绑定好切换方法:
html
<!-- 切换至上个月图标按钮 -->
<uni-icons
           class="left"
           type="left"
           size="24"
           color="#23ad1e"
           @click="handleLastMonth" ⭕添加
           >
</uni-icons>
<!-- 年月份展示区 -->
<p class="data">{{ Year }} 年 {{ Month + 1 }} 月</p>
<!-- 切换至下个月图标按钮 -->
<uni-icons
           class="right"
           type="right"
           size="24"
           color="#23ad1e"
           @click="handleNestMonth"	⭕添加
           >
</uni-icons>
编写方法:
js
	/* 月份切换相关 */
const handleLastMonth = () => {
  CurrentDate.value = getDate({
    year: Year.value,
    month: Month.value - 1,
    day: 1,
  });
};
const handleNestMonth = () => {
  CurrentDate.value = getDate({
    year: Year.value,
    month: Month.value + 1,
    day: 1,
  });
};
现在月份可以切换了,但是每个日期对应的星期没有正确分布出来,接下来就需要引入上个月的日期,才能保证后面星期数是对的上的。
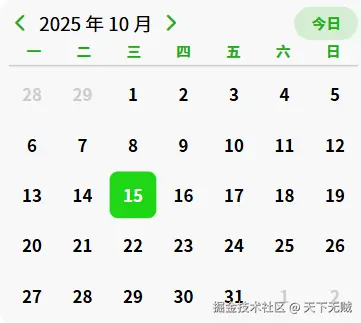
月份补充
为了方便理解,先记住 3 个前提:
getDate({ year, month, day })内部就是new Date(year, month, day)-- 月份从 0 开始(0=1 月 ... 11=12 月) -- 如果day=0会得到"上个月的最后一天",day=-n会得到"上个月倒数第 n 天"------这是 JS Date 的天生能力。- 组件要求日历从周一开头(模板里周一在第一个格子)。
- 一行 7 格,总共 5 行 = 35 格。 如果"上月补头 + 当月天数 + 下月补尾"不足 35,就再补 7 格,凑够 42 格(6 行)。
可视化说明:
js
gap = 5(周一到周五共 5 天)
头补:1 月 27、28、29、30、31 日

当月:1 日 ... 28 日
已用:5 + 28 = 33

remains = 35 - 33 = 2
尾补:3 月 1、2 日
最终数组长度:35
上月补充(补"头部")
js
// 1. 当月 1 号
const firstDay = getDate({ day: 1 });

// 2. 当月 1 号是星期几? 0=周日 1=周一 ... 6=周六
const startDayOfWeek = firstDay.getDay(); // 例如 3 → 周三

// 3. 要补几个空位?
//    我们想让它从"周一"开始,所以:
//    周一 → 补 0 个
//    周二 → 补 1 个
//    ...
//    周日 → 补 6 个
const gap = startDayOfWeek === 0 ? 6 : startDayOfWeek - 1;
举例:
- 2025-09-01 是周一 →
startDayOfWeek=1→gap=0→ 不补。 - 2025-10-01 是周三 →
startDayOfWeek=3→gap=2→ 补 2 天
| 本月1号 | 周日 | 周一 | 周二 | 周三 | 周四 | 周五 | 周六 |
|---|---|---|---|---|---|---|---|
getDay() |
0 | 1 | 2 | 3 | 4 | 5 | 6 |
| 需补几天 | 6 | 0 | 1 | 2 | 3 | 4 | 5 |
所以就可以通过这一特性,当作遍历次数:
js
/* 上月补充 */
// 获取第一天的星期数
const startDayOfWeek = firstDay.getDay(); // 0=周日
// 获取上个月最后一天(从周一开始算,所以要调整偏移)
const gap = startDayOfWeek === 0 ? 6 : startDayOfWeek - 1;
for (let i = gap; i > 0; i--) {
    // 倒序生成日期对象
    const date = getDate({ year: Year.value, month: Month.value, day: -i });
    result.push({
        date,
        text: date.getDate(),
        isOtherMonth: true,
    });
}
下月补充(补"尾部")
实现原理:
js
// 1. 已经装了几天?
const already = result.length; // 头补 + 当月天数

// 2. 一共想要 35 格(5 行),不够就再补 7 格,凑够 42 格
const remains = 5 * 7 - already; // 可能为 0 甚至负数
如果 remains ≤ 0 说明 35 格已够,就不会再进循环; 如果 remains > 0 就继续往后数数:
js
/* 下月补充 */
  const remains = 5 * 7 - result.length;
  for (let i = 1; i <= remains; i++) {
    const date = getDate({ year: Year.value, month: Month.value + 1, day: i });
    result.push({
      date,
      text: i,
      isOtherMonth: true,
    });
}技巧点:
month: Month.value + 1如果原来是 11(12 月),+1 变成 12,JS 会自动变成下一年 0 月(1 月),无需手写跨年逻辑。- 只补到 35 格,保证永远是完整 5 行;如果想固定 6 行,可把
5*7改成6*7。
完成效果:
完整代码:
js
<template>
  <div class="calendarCop">
    <!-- 日历顶部栏 -->
    <div class="calendarCop-header">
      <!-- 顶部栏月份切换区 -->
      <!-- 年月展示区 -->
      <div class="changeMouth">
        <!-- 切换至上个月图标按钮 -->
        <uni-icons
          class="left"
          type="left"
          size="24"
          color="#23ad1e"
          @click="handleLastMonth"
        >
        </uni-icons>
        <!-- 年月份展示区 -->
        <p class="data">{{ Year }} 年 {{ Month + 1 }} 月</p>
        <!-- 切换至下个月图标按钮 -->
        <uni-icons
          class="right"
          type="right"
          size="24"
          color="#23ad1e"
          @click="handleNestMonth"
        ></uni-icons>
      </div>
      <!-- 回到今日 -->
      <TagCop
        class="selectToday"
        text="今日"
        backgroundColor="var(--primary_light)"
        @click="selectToday"
      />
      <!-- 更多操作 -->
      <uni-icons
        v-show="false"
        type="more-filled"
        class="more"
        size="24"
        color="#23ad1e"
      ></uni-icons>
    </div>
    <!-- 日历星期栏 -->
    <div class="calendarCop-weekdays">
      <div>一</div>
      <div>二</div>
      <div>三</div>
      <div>四</div>
      <div>五</div>
      <div>六</div>
      <div>日</div>
    </div>
    <!-- 日历 -->
    <div class="calendarCop-days">
      <div class="item" v-for="day in days" :key="day.date">
        <div
          :class="{
            day: true,
            base: true,
            today: isToday(day.date),
            selected: isSelected(day.date),
            'other-month': day.isOtherMonth,
          }"
          @click="selectDay(day.date)"
        >
          {{ day.text }}
        </div>
      </div>
    </div>
  </div>
</template>

<script setup>
import { ref, computed, onMounted } from "vue";
import TagCop from "@/components/base/tag-cop";

/* 当前日期时间 */
// 获取当前时间对象
const CurrentDate = ref(new Date());
// 获取当前年份
const Year = computed(() => CurrentDate.value.getFullYear());
// 获取当前月份
const Month = computed(() => CurrentDate.value.getMonth());
// 获取当前日期
const Today = computed(() => CurrentDate.value.getDate());

// 获取日期对象方法
const getDate = ({ year, month, day } = {}) =>
  new Date(year ?? Year.value, month ?? Month.value, day ?? Today.value);
// 格式化日期方法
const formatDate = (date) =>
  `${date.getFullYear()}-${String(date.getMonth() + 1).padStart(
    2,
    "0"
  )}-${String(date.getDate()).padStart(2, "0")}`;

/* 生成日期数据 */
const days = computed(() => {
  const result = [];
  // 获取每个月的第一天和最后一天
  const firstDay = getDate({ day: 1 });
  const lastDay = getDate({ month: Month.value + 1, day: 0 });
  /* 上月补充 */
  // 获取第一天的星期数
  const startDayOfWeek = firstDay.getDay(); // 0=周日
  // 获取上个月最后一天(从周一开始算,所以要调整偏移)
  const gap = startDayOfWeek === 0 ? 6 : startDayOfWeek - 1;
  for (let i = gap; i > 0; i--) {
    // 倒序生成日期对象
    const date = getDate({ year: Year.value, month: Month.value, day: -i });
    result.push({
      date,
      text: date.getDate(),
      isOtherMonth: true,
    });
  }

  /* 本月日期 */
  // 通过遍历来渲染所有日期
  for (let i = 1; i <= lastDay.getDate(); i++) {
    const date = getDate({ year: Year.value, month: Month.value, day: i });
    result.push({
      date,
      text: i,
    });
  }

  /* 下月补充 */
  const remains = 5 * 7 - result.length;
  for (let i = 1; i <= remains; i++) {
    const date = getDate({ year: Year.value, month: Month.value + 1, day: i });
    result.push({
      date,
      text: i,
      isOtherMonth: true,
    });
  }

  return result;
});

/* 今日日期 */
const today_date = new Date();
const isToday = (date) => formatDate(today_date) === formatDate(date);
const selectToday = () => {
  CurrentDate.value = today_date;
  selectDay(today_date);
};

/* 选择日期相关 */
// 选中日期
const SelectedDate = ref(null);
// 选中日期方法
const selectDay = (date) => {
  SelectedDate.value = formatDate(date);
};
const isSelected = (date) => SelectedDate.value === formatDate(date);
// 初始化选中今天
onMounted(() => {
  SelectedDate.value = formatDate(today_date);
});

/* 月份切换相关 */
const handleLastMonth = () => {
  CurrentDate.value = getDate({
    year: Year.value,
    month: Month.value - 1,
    day: 1,
  });
};
const handleNestMonth = () => {
  CurrentDate.value = getDate({
    year: Year.value,
    month: Month.value + 1,
    day: 1,
  });
};
</script>

<style scoped lang="scss">
.calendarCop {
  background-color: var(--gary_light);
  padding: 16rpx;
  border-radius: var(--radius_big);
  .calendarCop-header {
    display: flex;
    align-items: center;
    justify-content: space-between;
    .more {
      transform: rotate(90deg);
    }
    .changeMouth {
      display: inline-flex;
      align-items: center;
      gap: 16rpx;
      height: 50rpx;
      .left,
      .right {
        font-weight: 900;
      }
      .data {
        font-size: 36rpx;
        line-height: 50rpx;
      }
    }
  }
  .calendarCop-weekdays {
    color: var(--primary_dark);
    font-weight: 900;
    display: grid;
    grid-template-columns: repeat(7, 1fr);
    text-align: center;
    padding-bottom: 8rpx;
    margin: 8rpx 0;
    border-bottom: 4rpx solid var(--gary_dark);
  }
  .calendarCop-days {
    display: grid;
    grid-template-columns: repeat(7, 1fr);
    gap: 8rpx;
    .item {
      font-size: 32rpx;
      aspect-ratio: 1; // 宽=高,正方形
      display: flex;
      flex-direction: column;
      align-items: center;
      justify-content: center;
      .day {
      }
      .other-month {
        color: var(--gary_dark);
      }
      .base {
        width: 100%;
        height: 100%;
        display: flex;
        align-items: center;
        justify-content: center;
        border-radius: var(--radius);
        font-weight: 900;
      }
      .today {
        color: var(--primary_dark);
        background: var(--primary_light);
        position: relative;
        &::after {
          content: "今";
          font-size: 18rpx;
          position: absolute;
          top: 4rpx;
          right: 8rpx;
        }
      }
      .selected {
        color: #fff;
        background: var(--primary);
      }
    }
  }
}
</style>
最终效果: 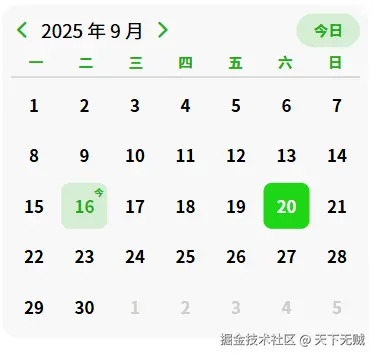
🧩 未来迭代方向
- 把"选中"改成 v-model 双向绑定 父组件
<CalendarCop v-model="date" />就能直接拿到日期。 - 加"事件点" 父组件传
events: Record<'yyyy-mm-dd', {dot?: boolean, text?: string, color?: string}>, 日历在对应格子画小圆点/小标签。 - 支持"范围选择" 把
SelectedDate: Ref<string>升级成SelectedRange: Ref<{start?: string; end?: string}>, 点击逻辑改为:- 第一次点 → start
- 第二次点 → end(若再点则清空重设) 样式层加
.in-range做背景条。
- 支持"多选"
SelectedDates: Set<string>,点击 toggle,样式加.selected即可。 - 加" swipe 手势" 因为你在 uni-app,可以直接用
@touchstart/@touchend算滑动距离, 或者引uni-swiper-action做整月滑动切换。 - 加"农历/节假日" 把
text: number拓展成text: number | {solar: number; lunar: string; festival?: string}, 下面再画一行小字。