今天是嗯啊战神面试的又一天,面试官说你写熟悉WMS,能简单讲一下WMS中窗口的构建过程么? 我说纳尼?what?吗?~~

涉及类
- ViewRootImpl
- WindowManagerGlobal
- WindowManagerImpl
- ActivityThread
- PhoneWindow
- DecorView
- WindowState
- WindowToken
前菜系列之PhoneWindow 从哪里来的
在 ActivityThread的 performLaunchActivity 方法中,调用了反射构建了Activity, 然后 调用了attach 方法,在该方法里直接 构建了出了PhoneWindow。
java
final void attach(Context context, ActivityThread aThread,
        Instrumentation instr, IBinder token, int ident,
        Application application, Intent intent, ActivityInfo info,
        CharSequence title, Activity parent, String id,
        NonConfigurationInstances lastNonConfigurationInstances,
        Configuration config, String referrer, IVoiceInteractor voiceInteractor,
        Window window, ActivityConfigCallback activityConfigCallback, IBinder assistToken,
        IBinder shareableActivityToken) {
    attachBaseContext(context);

    mFragments.attachHost(null /*parent*/);

    mWindow = new PhoneWindow(this, window, activityConfigCallback);
}大家肯定都习惯在onCreate里面,熟练的写下 setContentView(xxx);
java
public void setContentView(@LayoutRes int layoutResID) {
    getWindow().setContentView(layoutResID);
    initWindowDecorActionBar();
}

public Window getWindow() {
    return mWindow;
}这里其实就是调用了PhoneWindow``的setContentView 方法
java
//frameworks/base/core/java/com/android/internal/policy/PhoneWindow.java
public void setContentView(int layoutResID) {
    if (mContentParent == null) {
        installDecor();
    }

    if (hasFeature(FEATURE_CONTENT_TRANSITIONS)) {
        final Scene newScene = Scene.getSceneForLayout(mContentParent, layoutResID,
                getContext());
        transitionTo(newScene);
    } else {
        mLayoutInflater.inflate(layoutResID, mContentParent);
    }
    mContentParent.requestApplyInsets();
    final Callback cb = getCallback();
    if (cb != null && !isDestroyed()) {
        cb.onContentChanged();
    }

}这里我们要介绍一下mContentParent 和 installDecor ,我就想知道他俩怎么来的。
java
//frameworks/base/core/java/com/android/internal/policy/PhoneWindow.java
private void installDecor() {
    mForceDecorInstall = false;
    if (mDecor == null) {
        mDecor = generateDecor(-1);
       //省略
    } else {
        mDecor.setWindow(this);
    }
    if (mContentParent == null) {
    //注意 mDecor进去了
        mContentParent = generateLayout(mDecor);
 //省略

}
generateDecor() 方法 其实直接就 new 了一个出来。不贴代码了。
java
//frameworks/base/core/java/com/android/internal/policy/PhoneWindow.java

public static final int ID_ANDROID_CONTENT = com.android.internal.R.id.content;

protected ViewGroup generateLayout(DecorView decor) {
    // Apply data from current theme.

    TypedArray a = getWindowStyle();

    int layoutResource;
    int features = getLocalFeatures();
     //省略。。。。
    if ((features & ((1 << FEATURE_LEFT_ICON) | (1 << FEATURE_RIGHT_ICON))) != 0) {
        if (mIsFloating) {
            TypedValue res = new TypedValue();
            getContext().getTheme().resolveAttribute(
                    R.attr.dialogTitleIconsDecorLayout, res, true);
            layoutResource = res.resourceId;
        } else {
            layoutResource = R.layout.screen_title_icons;
        }
    //省略。。。。
        // System.out.println("Title Icons!");
    } else if ((features & ((1 << FEATURE_PROGRESS) | (1 << FEATURE_INDETERMINATE_PROGRESS))) != 0
            && (features & (1 << FEATURE_ACTION_BAR)) == 0) {
        // Special case for a window with only a progress bar (and title).
        // XXX Need to have a no-title version of embedded windows.
        layoutResource = R.layout.screen_progress;
        // System.out.println("Progress!");
    } else if ((features & (1 << FEATURE_CUSTOM_TITLE)) != 0) {

      //省略。。。。
        if (mIsFloating) {
            TypedValue res = new TypedValue();
            getContext().getTheme().resolveAttribute(
                    R.attr.dialogCustomTitleDecorLayout, res, true);
            layoutResource = res.resourceId;
        } else {
            layoutResource = R.layout.screen_custom_title;
        }

    }
    //省略。。。。

    } else if ((features & (1 << FEATURE_ACTION_MODE_OVERLAY)) != 0) {
        layoutResource = R.layout.screen_simple_overlay_action_mode;
    } else {
        // Embedded, so no decoration is needed.
        layoutResource = R.layout.screen_simple;
        // System.out.println("Simple!");
    }

    mDecor.startChanging();
    mDecor.onResourcesLoaded(mLayoutInflater, layoutResource);

    ViewGroup contentParent = (ViewGroup)findViewById(ID_ANDROID_CONTENT);
   //省略。。。。

 //省略。。。。

    mDecor.finishChanging();

    return contentParent;
}


//core/java/com/android/internal/policy/DecorView.java
    void onResourcesLoaded(LayoutInflater inflater, int layoutResource) {
   //省略
        mDecorCaptionView = createDecorCaptionView(inflater);
        final View root = inflater.inflate(layoutResource, null);
     //省略
addView(root, 0, new ViewGroup.LayoutParams(MATCH_PARENT, MATCH_PARENT));
        mContentRoot = (ViewGroup) root;
        initializeElevation();
}这段代码总结一下,根据特性,找出来一个合适的布局,然后调用mDecor.onResourcesLoaded() ,在该方法里调用 inflater 构建出一个View,然后赋值给了给 mContentRoot。
contentParent 是 DecorView 查找对应布局里的R.id.content。 DecorView 本身继承了 FrameLayout,也就是相当于DecorView自己有了自己的填充物。 这里摘抄了两个布局,里面都包含了content 这个id。
xml
 <!-- frameworks/base/core/res/res/layout/screen_custom_title.xml -->
<LinearLayout xmlns:android="http://schemas.android.com/apk/res/android"
    android:orientation="vertical"
    android:fitsSystemWindows="true">
    <!-- Popout bar for action modes -->
    <ViewStub android:id="@+id/action_mode_bar_stub"
              android:inflatedId="@+id/action_mode_bar"
              android:layout="@layout/action_mode_bar"
              android:layout_width="match_parent"
              android:layout_height="wrap_content"
              android:theme="?attr/actionBarTheme" />

    <FrameLayout android:id="@android:id/title_container"
        android:layout_width="match_parent"
        android:layout_height="?android:attr/windowTitleSize"
        android:transitionName="android:title"
        style="?android:attr/windowTitleBackgroundStyle">
    </FrameLayout>
    <FrameLayout android:id="@android:id/content"
        android:layout_width="match_parent"
        android:layout_height="0dip"
        android:layout_weight="1"
        android:foregroundGravity="fill_horizontal|top"
        android:foreground="?android:attr/windowContentOverlay" />
</LinearLayout>
xml
<!--frameworks/base/core/res/res/layout/screen_simple_overlay_action_mode.xml-->
<?xml version="1.0" encoding="utf-8"?>
<FrameLayout xmlns:android="http://schemas.android.com/apk/res/android"
    android:layout_width="match_parent"
    android:layout_height="match_parent"
    android:fitsSystemWindows="true">
    <FrameLayout
         android:id="@android:id/content"
         android:layout_width="match_parent"
         android:layout_height="match_parent"
         android:foregroundInsidePadding="false"
         android:foregroundGravity="fill_horizontal|top"
         android:foreground="?android:attr/windowContentOverlay" />
    <ViewStub android:id="@+id/action_mode_bar_stub"
              android:inflatedId="@+id/action_mode_bar"
              android:layout="@layout/action_mode_bar"
              android:layout_width="match_parent"
              android:layout_height="wrap_content"
              android:theme="?attr/actionBarTheme" />
</FrameLayout>
继续看一下
java
//frameworks/base/core/java/com/android/internal/policy/PhoneWindow.java
public void setContentView(int layoutResID) {
    if (mContentParent == null) {
        installDecor();
    }

   //省略...
        mLayoutInflater.inflate(layoutResID, mContentParent);

    mContentParent.requestApplyInsets();
    final Callback cb = getCallback();
    if (cb != null && !isDestroyed()) {
        cb.onContentChanged();
    }

}
我们传的布局 ,最后塞给了DecorView里面的content 这个布局里面。
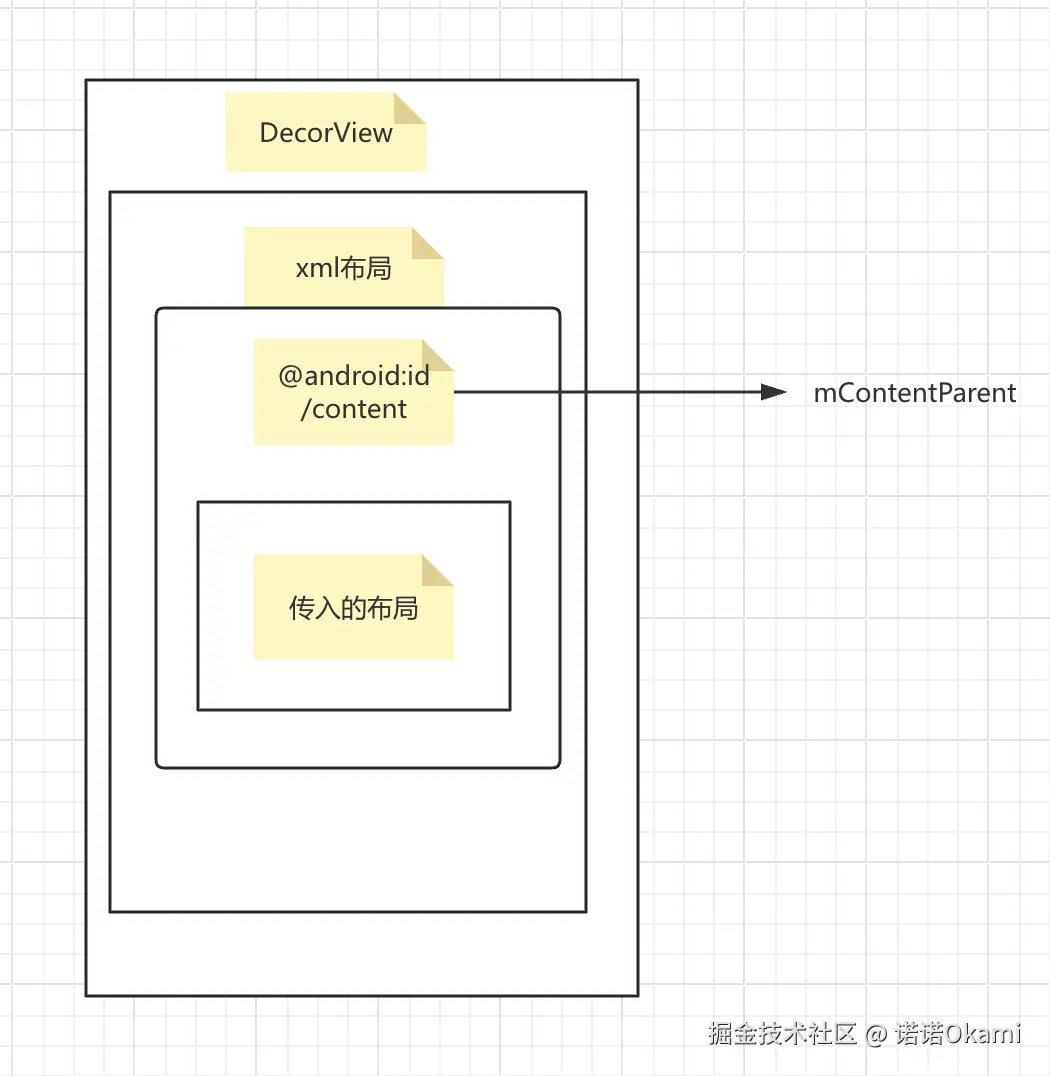
到现在为止,已经知道我们正常传入一个布局,会被像洋葱一样给包到芯里。

我当时讲到这里,甚至为自己的超级大内存脑袋瓜子沾沾自喜了一下, 面试官问然后呢?
然后,在ActivityThread 的 handleResumeActivity 方法中,我们会调用到onresume方法。
java
public void handleResumeActivity(ActivityClientRecord r, boolean finalStateRequest,
        boolean isForward, boolean shouldSendCompatFakeFocus, String reason) {

//省略。。
    final Activity a = r.activity;

//省略。。
    if (r.window == null && !a.mFinished && willBeVisible) {
      //PhoneWindwo
        r.window = r.activity.getWindow();
      //decorView
        View decor = r.window.getDecorView();
        decor.setVisibility(View.INVISIBLE);
      //拿到WindowManager
        ViewManager wm = a.getWindowManager();
        WindowManager.LayoutParams l = r.window.getAttributes();
        a.mDecor = decor;
        l.type = WindowManager.LayoutParams.TYPE_BASE_APPLICATION;
        l.softInputMode |= forwardBit;
        if (r.mPreserveWindow) {
            a.mWindowAdded = true;
            r.mPreserveWindow = false;
            ViewRootImpl impl = decor.getViewRootImpl();
            if (impl != null) {
                impl.notifyChildRebuilt();
            }
        }
        if (a.mVisibleFromClient) {
            if (!a.mWindowAdded) {

                a.mWindowAdded = true;
              //添加docorView 和LayoutParams
                wm.addView(decor, l);
            }
          //省略。。
        }


    }
//省略...

}
这里代码就很直白。 调用ViewManager.addView() 将decor 添加了进去。
ViewManager 的实现类是WindowManagerImpl
进入 WindowManagerImpl的addView()
java
//android/view/WindowManagerImpl.java
@Override
public void addView(@NonNull View view, @NonNull ViewGroup.LayoutParams params) {
    applyTokens(params);
    mGlobal.addView(view, params, mContext.getDisplayNoVerify(), mParentWindow,
            mContext.getUserId());
}
WindowManagerGlobal ,对于这个类 ,所有的Window 大小参数 等包含和wms的交互的都归他管理,我们这里简单理解他大管家就行。区区配角而已。
java
//frameworks/base/core/java/android/view/WindowManagerGlobal.java
public void addView(View view, ViewGroup.LayoutParams params,
        Display display, Window parentWindow, int userId) {

   //省略...
    ViewRootImpl root;
    View panelParentView = null;

    synchronized (mLock) {

    //省略...

        IWindowSession windowlessSession = null;

         //省略...

        if (windowlessSession == null) {
            root = new ViewRootImpl(view.getContext(), display);
        } else {
            root = new ViewRootImpl(view.getContext(), display,
                    windowlessSession, new WindowlessWindowLayout());
        }


        mViews.add(view);
        mRoots.add(root);
        mParams.add(wparams);

        // do this last because it fires off messages to start doing things
        try {
            root.setView(view, wparams, panelParentView, userId);
        } catch (RuntimeException e) {
            final int viewIndex = (index >= 0) ? index : (mViews.size() - 1);
            // BadTokenException or InvalidDisplayException, clean up.
            if (viewIndex >= 0) {
                removeViewLocked(viewIndex, true);
            }
            throw e;
        }
    }
}
这里大体可以分为3部分
ViewRootImpl的构建mViews/mRoots/mParams添加管理,真大管家模式。ViewRootImpl将我们传过来的view 设置了进去
看一下 ViewRootImpl 的构造函数
java
public final Surface mSurface = new Surface();
private final SurfaceControl mSurfaceControl = new SurfaceControl();

public ViewRootImpl(Context context, Display display) {
    this(context, display, WindowManagerGlobal.getWindowSession(), new WindowLayout());
}

  public ViewRootImpl(@UiContext Context context, Display display, IWindowSession session,
            WindowLayout windowLayout) {

       mWindowSession = session;
      mWindow = new W(this);
      mChoreographer = Choreographer.getInstance();
  }

  static class W extends IWindow.Stub {

}会调用到四个参数的构造,里面构建了一个静态W类,该类继承IWindow.Stub。我们暂且不展开。注意哦,ViewRootImpl自带SurfaceControl和Surface。 这里注意 mWindow = new W(this); 后面要用。
WindowManagerGlobal.getWindowSession() ,也就是说没有Session 不用担心WindowManagerGlobal 调用到WMS的 openSession() 构建一个Session 。
java
private static IWindowSession sWindowSession;
@UnsupportedAppUsage
public static IWindowSession getWindowSession() {
    synchronized (WindowManagerGlobal.class) {
        if (sWindowSession == null) {
            try {
               InputMethodManager.ensureDefaultInstanceForDefaultDisplayIfNecessary();
              //获取到wms
                IWindowManager windowManager = getWindowManagerService();
              //调用wms的openSession 其实返回是Session类
              //frameworks/base/services/core/java/com/android/server/wm/Session.java
                sWindowSession = windowManager.openSession(
                        new IWindowSessionCallback.Stub() {
                            @Override
                            public void onAnimatorScaleChanged(float scale) {
                                ValueAnimator.setDurationScale(scale);
                            }
                        });
            } catch (RemoteException e) {
                throw e.rethrowFromSystemServer();
            }
        }
        return sWindowSession;
    }
}等等,这玩意好像是个静态的,岂不是所有人用一个?是的,一个进程里面,所有的window 都用一个sWindowSession,是进程级别的。
现在注意我们的DecorView 已经传递给了ViewRootImpl了 。 我们继续看setView后做了什么?
java
public void setView(View view, WindowManager.LayoutParams attrs, View panelParentView,
        int userId) {
mView = view;
  //省略..
           requestLayout();
         InputChannel inputChannel = null;
                if ((mWindowAttributes.inputFeatures
                        & WindowManager.LayoutParams.INPUT_FEATURE_NO_INPUT_CHANNEL) == 0) {
                    inputChannel = new InputChannel();
                }

    res = mWindowSession.addToDisplayAsUser(mWindow, mWindowAttributes,
                            getHostVisibility(), mDisplay.getDisplayId(), userId,
                            mInsetsController.getRequestedVisibilities(), inputChannel, mTempInsets,
                            mTempControls, attachedFrame, compatScale);

    if (mInputQueueCallback != null) {
                        mInputQueue = new InputQueue();
                        mInputQueueCallback.onInputQueueCreated(mInputQueue);
                    }
                    mInputEventReceiver = new WindowInputEventReceiver(inputChannel,
                            Looper.myLooper());
}- 我们构建的
requestLayout()会 触发布局请求 也就是我们那说的绘制流程 。- 触摸 按键等事件的接受处理
InputChannel和WindowInputEventReceiver。 - 调用
mWindowSession调用addToDisplayAsUser()把mWindow等参数等添加进去
java
//services/core/java/com/android/server/wm/Session.java
    @Override
    public int addToDisplayAsUser(IWindow window, WindowManager.LayoutParams attrs,
            int viewVisibility, int displayId, int userId, InsetsVisibilities requestedVisibilities,
            InputChannel outInputChannel, InsetsState outInsetsState,
            InsetsSourceControl[] outActiveControls, Rect outAttachedFrame,
            float[] outSizeCompatScale) {
        return mService.addWindow(this, window, attrs, viewVisibility, displayId, userId,
                requestedVisibilities, outInputChannel, outInsetsState, outActiveControls,
                outAttachedFrame, outSizeCompatScale);
}继续调用到了WMS 的addWindow()
java
//frameworks/base/services/core/java/com/android/server/wm/WindowManagerService.java
public int addWindow(Session session, IWindow client, LayoutParams attrs, int viewVisibility,
        int displayId, int requestUserId, InsetsVisibilities requestedVisibilities,
        InputChannel outInputChannel, InsetsState outInsetsState,
        InsetsSourceControl[] outActiveControls, Rect outAttachedFrame,
        float[] outSizeCompatScale) {
//省略...
    WindowState parentWindow = null;
    final int callingUid = Binder.getCallingUid();
    final int callingPid = Binder.getCallingPid();
  //这里之前也被问到过,基本定义服务基本都用到到
    final long origId = Binder.clearCallingIdentity();
    final int type = attrs.type;

    synchronized (mGlobalLock) {
       //省略...
      //找DisplayContent
        final DisplayContent displayContent = getDisplayContentOrCreate(displayId, attrs.token);

        //省略...

         ActivityRecord activity = null;
      //判断是否有父亲 有就用父亲的windowtoken 没有就得构建了 一般用于subwindow 比如toast  popwindows 、dialog这种
            final boolean hasParent = parentWindow != null;
            WindowToken token = displayContent.getWindowToken(
                    hasParent ? parentWindow.mAttrs.token : attrs.token);

       //省略...

           if (hasParent) {

                    token = parentWindow.mToken;
                } else if (mWindowContextListenerController.hasListener(windowContextToken)) {

             //有则更换
                    final IBinder binder = attrs.token != null ? attrs.token : windowContextToken;
                    final Bundle options = mWindowContextListenerController
                            .getOptions(windowContextToken);
                    token = new WindowToken.Builder(this, binder, type)
                            .setDisplayContent(displayContent)
                           .setOwnerCanManageAppTokens(session.mCanAddInternalSystemWindow)
                            .setRoundedCornerOverlay(isRoundedCornerOverlay)
                            .setFromClientToken(true)
                            .setOptions(options)
                            .build();
                } else {
             //我打断点看走了 client.asBinder 这里的client 是IWindow 也就是viewRootImp里的W类
                    final IBinder binder = attrs.token != null ? attrs.token : client.asBinder();
                    token = new WindowToken.Builder(this, binder, type)
                            .setDisplayContent(displayContent)
                            .setOwnerCanManageAppTokens(session.mCanAddInternalSystemWindow)
                            .setRoundedCornerOverlay(isRoundedCornerOverlay)
                            .build();
                }


      //windowState的构建
       final WindowState win = new WindowState(this, session, client, token, parentWindow,
                    appOp[0], attrs, viewVisibility, session.mUid, userId,
                    session.mCanAddInternalSystemWindow);


          win.attach();
            mWindowMap.put(client.asBinder(), win);
            win.initAppOpsState();

        win.mToken.addWindow(win);

    return res;
}- 构建
WindowToken - 构建
WindowState WindowState调用attach()WindowState.mToken.addWindow()把自己传进去。
先看下 WindowToken
java
//frameworks/base/services/core/java/com/android/server/wm/WindowToken.java
WindowToken build() {
            return new WindowToken(mService, mToken, mType, mPersistOnEmpty, mDisplayContent,
                    mOwnerCanManageAppTokens, mRoundedCornerOverlay, mFromClientToken, mOptions);
        }


 protected WindowToken(WindowManagerService service, IBinder _token, int type,
            boolean persistOnEmpty, DisplayContent dc, boolean ownerCanManageAppTokens,
            boolean roundedCornerOverlay, boolean fromClientToken, @Nullable Bundle options) {
        super(service);
        token = _token;
        windowType = type;
        mOptions = options;
        mPersistOnEmpty = persistOnEmpty;
        mOwnerCanManageAppTokens = ownerCanManageAppTokens;
        mRoundedCornerOverlay = roundedCornerOverlay;
        mFromClientToken = fromClientToken;
        if (dc != null) {
            dc.addWindowToken(token, this);
        }
    }

//DisplayContent
  void addWindowToken(IBinder binder, WindowToken token) {

       //省略

        mTokenMap.put(binder, token);

        if (token.asActivityRecord() == null) {

            token.mDisplayContent = this;

            final DisplayArea.Tokens da = findAreaForToken(token).asTokens();
            da.addChild(token);
        }
    }
WindowToken 也就是我们一路传递过来的W类。(我们先绕过利用父Token的情况)。 然后 DisplayContent 把 W作为key ,当前widowToken 做为值 存入了自己的mTokenMap。 然后找到对应的DisplayArea的tokens 加了进去。
WindowToken , WindowState 和 token的关系,怎么理解好呢? 举个简单例子。

我们爱好学习,构建了青龙帮 学习小分队,小分队编号为 001。 青龙帮 学习小分队 就是WindowToken, token就是小队编号。 WindowState 是啥呢? 是小分队的团伙 队成员,高矮胖瘦,各不相同。 世界上可能有很多个青龙帮 学习小分队,但是编号是唯一的。 有一天总部需要我们青龙帮学习小分队的时候,就靠编号找到我们。
接下来看windowState的相关操作
java
     win.attach();
            mWindowMap.put(client.asBinder(), win);
            win.initAppOpsState();

        win.mToken.addWindow(win);
attach()
java
 void attach() {

        mSession.windowAddedLocked();
    }

 void windowAddedLocked() {
        if (mPackageName == null) {
            final WindowProcessController wpc = mService.mAtmService.mProcessMap.getProcess(mPid);
            if (wpc != null) {
                mPackageName = wpc.mInfo.packageName;
                mRelayoutTag = "relayoutWindow: " + mPackageName;
            }
        }
        if (mSurfaceSession == null) {

            mSurfaceSession = new SurfaceSession();

            mService.mSessions.add(this);
            if (mLastReportedAnimatorScale != mService.getCurrentAnimatorScale()) {
                mService.dispatchNewAnimatorScaleLocked(this);
            }
        }
        mNumWindow++;
    }
emmm, 个人理解设置了包名,构建了SurfaceSession() 加入 WMS 的mSessions 把当前Session 加进去的, 构建 SurfaceSession。
win.mToken.addWindow(win) 其实就是之前构建的的windowToken, 把自己传入了进去。
java
void addWindow(final WindowState win) {

    if (win.isChildWindow()) {

        return;
    }

    if (mSurfaceControl == null) {
        createSurfaceControl(true /* force */);
        reassignLayer(getSyncTransaction());
    }
    if (!mChildren.contains(win)) {

        addChild(win, mWindowComparator);
        mWmService.mWindowsChanged = true;

    }
}


    private final Comparator<WindowState> mWindowComparator =
            (WindowState newWindow, WindowState existingWindow) -> {
        final WindowToken token = WindowToken.this;
       //省略

        return isFirstChildWindowGreaterThanSecond(newWindow, existingWindow) ? 1 : -1;
};-
createSurfaceControl(true /* force */);不拓展开,这里其实就是构建了SurfaceControl有了SurfaceControl才能真正进行绘制。青龙帮学习小分队才有了自己的地盘。 -
addChild(win, mWindowComparator);mWindowComparator其实就是比较Z轴的高低,进行排序。 简单理解 青龙山学习小组 按个头高矮来排,谁高谁占前面。在子类
ActivityReocord里面 涉及了window的替换逻辑。
java
@Override
    void addWindow(WindowState w) {
        super.addWindow(w);

        boolean gotReplacementWindow = false;
        for (int i = mChildren.size() - 1; i >= 0; i--) {
            final WindowState candidate = mChildren.get(i);
            gotReplacementWindow |= candidate.setReplacementWindowIfNeeded(w);
        }

        // if we got a replacement window, reset the timeout to give drawing more time
        if (gotReplacementWindow) {
            mWmService.scheduleWindowReplacementTimeouts(this);
        }
        checkKeyguardFlagsChanged();
}其实从ViewRootImpl里 mWindowSession.addToDisplayAsUser()开始,我们可以注意到,其实这里传递的参数 并不是像我最初理解的一样,直接把视图传过去。而是给总部传递了W类做为最核心的钥匙, LayoutParams 等诸多参数。 套用青龙山帮 学习小组,就是通过中间人(Session)联系联系到指挥WMS挂靠到总部(DisplayContent),我们的编号是多少,我们多少人,怎么联系我们,而不是真的把自己的队伍带去到总部。 总部在收到我们电话后,确认我们的信息真实有效,就把我们挂到了xx分区(DisplayArea)下面。 在此之前,ViewRootImpl 直接吞并(setView())DecorView, 把他变为自己的 mView,成功构建青龙山帮 学习小组。 可惜DecorView 辛苦忙活半天,居然被人偷家了

简历已经改为 熟悉WMS的拼写