前言
本文将会实现一个使用整洁架构的笔记应用,介绍请观看以下视频。
参考视频:How to Make a Clean Architecture Note App (MVVM / CRUD / Jetpack Compose)
什么是整洁架构?
这是整洁架构的分层图:
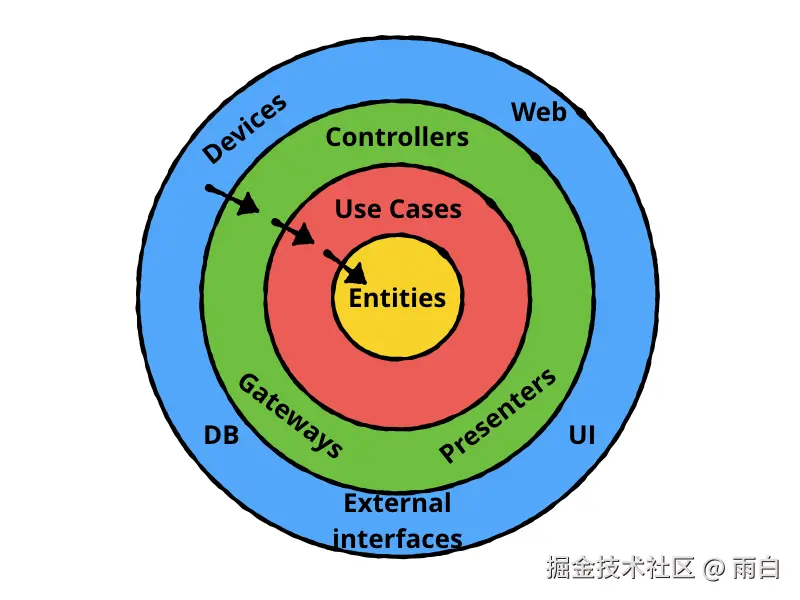
它将应用分为了多层(Layers),最内层是最稳定的,最外层是最容易改变的。
依赖关系是外层指向内层,比如外层的 UI 可以依赖于内层的 Use Cases。
各个层次
我们来看看各个层次。
-
Entities (实体)
它就是应用的核心业务对象,比如在当前应用中,就是
Note数据类。kotlindata class Note( val id: Int? = null, val title: String, val content: String, val timestamp: Long, val color: Int, ) -
Use Cases (用例)
它是应用的业务规则,简单来说,就是一次操作,比如可以是
AddNoteUseCase添加笔记的操作、GetNotesUseCase获取所有笔记的操作(使用一定的规则排序)。 -
Interface Adapters (接口适配器)
它负责转换数据,在 Android 应用中,它可分为两部分,分别是:
-
Presentation (表现层)
用于给 UI 准备数据,响应 UI 的操作,具体来说是 ViewModel。
它会从
UseCases中获取数据,转为 UI 状态给 UI;响应 UI 事件,调用对应的UseCases。 -
Data (数据层)
用于与数据进行交互,比如
NoteRespositoryImpl,它使用NoteDao或是 Web API 来存取数据。
这里有一个很关键的点,为什么数据层不是 NoteRespository?
因为 Use Cases 需要与数据交互,但不能直接依赖于
NoteRespositoryImpl。所以解决方法就是在 Use Cases 层中定义一个
NoteRespository抽象接口,让 Use Cases 依赖于这个接口,Data 层实现这个接口(NoteRespositoryImpl)。这样依赖关系就倒置了,还是外层的 Data 依赖于内层的 Use Cases 定义的接口。
-
-
Frameworks & Drivers (框架与驱动)
所有具体实现、框架和工具,这是最容易改变的一层。
在当前项目中,UI 是 Jetpack Compose 框架,Database 是 Room。
搭建项目框架
了解了这些后,我们开始搭建项目框架。
引入依赖
我们将会用到依赖注入框架 Hilt、数据库框架 Room、导航框架 Compose Navigation。
在项目根路径的 build.gradle.kts 文件中,添加如下内容:
kotlin
plugins {
    // ...

    // Hilt 和 KSP 插件
    id("com.google.dagger.hilt.android") version "2.57.1" apply false
    id("com.google.devtools.ksp") version "2.0.21-1.0.27" apply false
}
在模块级别的 build.gradle.kts 文件中,添加如下内容,然后同步即可。
kotlin
plugins {
    // ...

    id("com.google.dagger.hilt.android")
    id("com.google.devtools.ksp")
}

dependencies {

    // Hilt
    val hiltVersion = "2.57.1"
    implementation("com.google.dagger:hilt-android:$hiltVersion")
    ksp("com.google.dagger:hilt-compiler:$hiltVersion")
    implementation("androidx.hilt:hilt-navigation-compose:1.2.0")

    // Room
    val roomVersion = "2.7.2"
    implementation("androidx.room:room-runtime:$roomVersion")
    implementation("androidx.room:room-ktx:$roomVersion")
    ksp("androidx.room:room-compiler:$roomVersion")

    // Compose Navigation
    implementation("androidx.navigation:navigation-compose:2.9.3")

    // ...
}
注意:KSP 插件的版本需要和当前项目中的 Kotlin 版本保持一致,KSP 版本列表。
调整主题
在 ui/theme/Color.kt 文件中,添加如下颜色:
kotlin
val DarkGray = Color(0xFF202020)
val LightBlue = Color(0xFFD7E8DE)

// 笔记背景
val RedOrange = Color(0xffffab91)
val RedPink = Color(0xfff48fb1)
val BabyBlue = Color(0xff81deea)
val Violet = Color(0xffcf94da)
val LightGreen = Color(0xffe7ed9b)
在 ui/theme/Theme.kt 文件中,修改主题:
kotlin
private val DefaultColorScheme = darkColorScheme(
    primary = Color.White,
    background = DarkGray,
    onBackground = Color.White,
    surface = LightBlue,
    onSurface = DarkGray
)


@Composable
fun CleanArchitectureNoteAppTheme(
    content: @Composable () -> Unit,
) {
    // 主题始终是 DefaultColorScheme
    val colorScheme = DefaultColorScheme
    MaterialTheme(
        colorScheme = colorScheme,
        typography = Typography,
        content = content
    )
}
创建图标资源
我们将会用到两个图标,在 drawable 目录中创建 sort.xml 和 save.xml。
sort.xml
xml
<vector xmlns:android="http://schemas.android.com/apk/res/android"
    android:width="24dp"
    android:height="24dp"
    android:autoMirrored="true"
    android:tint="#FFFFFFFF"
    android:viewportWidth="960"
    android:viewportHeight="960">
    <path
        android:fillColor="@android:color/white"
        android:pathData="M120,720L120,640L360,640L360,720L120,720ZM120,520L120,440L600,440L600,520L120,520ZM120,320L120,240L840,240L840,320L120,320Z" />
</vector>
save.xml
xml
<vector xmlns:android="http://schemas.android.com/apk/res/android"
    android:width="24dp"
    android:height="24dp"
    android:tint="#FFFFFFFF"
    android:viewportWidth="960"
    android:viewportHeight="960">
    <path
        android:fillColor="@android:color/white"
        android:pathData="M840,280L840,760Q840,793 816.5,816.5Q793,840 760,840L200,840Q167,840 143.5,816.5Q120,793 120,760L120,200Q120,167 143.5,143.5Q167,120 200,120L680,120L840,280ZM480,720Q530,720 565,685Q600,650 600,600Q600,550 565,515Q530,480 480,480Q430,480 395,515Q360,550 360,600Q360,650 395,685Q430,720 480,720ZM240,400L600,400L600,240L240,240L240,400Z" />
</vector>
创建包结构
我们按照上述的整洁架构来创建包结构,创建后的项目包结构:
less
cleanarchitecturenoteapp
├── di
├── feature_note
│   ├── data
│   │   ├── data_source
│   │   └── repository
│   ├── domain
│   │   ├── exception
│   │   ├── model
│   │   ├── repository
│   │   ├── use_case
│   │   └── util
│   └── presentation
│       ├── add_edit_note
│       │   └── components
│       ├── notes
│       │   └── components
|       └── util
├── ui
|   └── theme
└── MainActivity.kt
注意:包结构和理论会有一点差别。
我们来解释一下上述的包结构:
根包
MainActivity 属于最外层的框架层,我们在这设置 Compose Navigation 的导航图和全局的主题。
di 包中配置依赖注入,用来提供依赖的实例。
ui 包用来存放全局共享的 UI 元素,比如主题,或是全局可复用的 Composable 组件。
功能包
我们将笔记功能封装在了 feature_note 包下。
-
domain(领域层):定义业务逻辑和数据结构。包含了存放实体的
model包、存放仓库接口的repository包、存放业务逻辑的use_case包、定义异常的exception包。 -
data(数据层):负责数据来源,依赖了domain层。包含了与数据直接进行交互的
data_source包、存放上述仓库接口实现的repository包。 -
presentation(表现层):负责显示数据和响应用户交互,依赖domain层。add_edit_note、notes子包是应用的各个屏幕,在这些子包中会有ViewModel、Composable和存放通用组件的components包。
当然,现在你可能还不清楚每个包的含义,我们通过实践来理解,从最内层开始。
domain 层
定义实体
先来定义实体,在 domain/model 包中创建 Node 数据类,这是笔记的信息。
kotlin
@Entity(tableName = "note_table") // 数据库表名为 note_table
data class Note(
    @PrimaryKey(autoGenerate = true) // id 自增
    val id: Int? = null,
    val title: String, // 标题
    val content: String, // 内容
    val timestamp: Long, // 创建时间
    val color: Int, // 背景色
){
    companion object {
        // 笔记背景颜色
        val noteColors = listOf(RedOrange, LightGreen, Violet, BabyBlue, RedPink)
    }
}
定义仓库接口
在 domain/repository 包下创建 NoteRepository 接口,定义了对数据的操作。
kotlin
interface NoteRepository {

    fun getNotes(): Flow<List<Note>>

    suspend fun getNoteById(id: Int): Note?

    suspend fun insertNote(note: Note)

    suspend fun deleteNote(note: Note)

}其中,getNotes() 函数并没有使用 suspend 关键字,因为它返回的是一个可以被异步收集的数据流(Flow)。当在数据库中的笔记发生变化时,Room 框架会自动发出一个新的笔记列表,UI 可以通过监听这个数据流来实现自动更新。
定义用例
在 domain/use_case 包中,创建 GetNotesUseCase.kt、DeleteNoteUseCase.kt、AddNoteUseCase.kt、GetNoteUseCase.kt。
DeleteNoteUseCase
kotlin
// DeleteNoteUseCase.kt
class DeleteNoteUseCase(
    val noteRepository: NoteRepository,
) {
    suspend operator fun invoke(note: Note) {
        noteRepository.deleteNote(note)
    }
}
为了 Use Cases 层能够与数据进行交互,并且不依赖于 Data 层。我们让 DeleteNoteUseCase 的构造函数接收仓库接口 NoteRepository。
其中有一点很关键,operator fun invoke 重载了 () 操作符(invoke 只是一个特定的函数名),我们能够让这个类实例像函数一样被调用。比如我们可以通过 deleteNoteUseCase(note) 来执行删除笔记的操作。
GetNotesUseCase
然后因为我们需要获取特定顺序的笔记列表,所以在 domain.util 包中创建笔记的排序规则。
kotlin
sealed class OrderType {
    object Ascending : OrderType()
    object Descending : OrderType()
}
OrderType 定义了排序方向:升序和降序。
kotlin
sealed class NoteOrder(val orderType: OrderType) {
    class Title(orderType: OrderType) : NoteOrder(orderType)
    class Date(orderType: OrderType) : NoteOrder(orderType)
    class Color(orderType: OrderType) : NoteOrder(orderType)
}
NoteOrder 则定义了完整的排序规则,按标题、日期或是颜色进行排序,并且需要带上排序方向。比如按日期降序的实例会是 NoteOrder.Date(OrderType.Descending)。
有了排序规则后,就来完成获取笔记的实例:
kotlin
class GetNotesUseCase(
    private val noteRepository: NoteRepository,
) {
    operator fun invoke(
        noteOrder: NoteOrder = NoteOrder.Date(OrderType.Descending), // 默认按日期降序排序
    ): Flow<List<Note>> {
        return noteRepository.getNotes().map { oldNotes ->
            // ... 排序逻辑 ...
            val newNotes = when (noteOrder.orderType) {
                is OrderType.Ascending -> when (noteOrder) {
                    is NoteOrder.Title -> oldNotes.sortedBy { it.title.lowercase() }
                    is NoteOrder.Date -> oldNotes.sortedBy { it.timestamp }
                    is NoteOrder.Color -> oldNotes.sortedBy { it.color }
                }

                is OrderType.Descending -> when (noteOrder) {
                    is NoteOrder.Title -> oldNotes.sortedByDescending { it.title.lowercase() }
                    is NoteOrder.Date -> oldNotes.sortedByDescending { it.timestamp }
                    is NoteOrder.Color -> oldNotes.sortedByDescending { it.color }
                }
            }
            newNotes
        }
    }
}
AddNoteUseCase
kotlin
class AddNoteUseCase(
    private val noteRepository: NoteRepository,
) {
    @Throws(InvalidNoteException::class)
    suspend operator fun invoke(note: Note) {
        if (note.title.isBlank() || note.content.isBlank()) {
            throw InvalidNoteException("The title or content of the note can't be empty.")
        }
        noteRepository.insertNote(note)
    }
}
这是增加/修改笔记的实例,当要增加/修改的笔记标题或内容为空时,会抛出 InvalidNoteException 异常。
这个异常我们定义在 domain.exception 包下,创建 InvalidNoteException.kt:
kotlin
// 无效笔记异常
class InvalidNoteException(message: String) : Exception(message)
GetNoteUseCase
kotlin
class GetNoteUseCase(
    private val noteRepository: NoteRepository,
) {
    suspend operator fun invoke(id: Int): Note? {
        return noteRepository.getNoteById(id)
    }
}
这是获取单个笔记的用例。
最后创建 NoteUseCases 数据类,包装这四个用例,这样在注入时,只需注入一个类。
kotlin
data class NoteUseCases(
    val getNotesUseCases: GetNotesUseCase,
    val deleteNoteUseCases: DeleteNoteUseCase,
    val addNoteUseCases: AddNoteUseCase,
    val getNoteUseCases: GetNoteUseCase,
)
data 层
data 层依赖 domain 层。
设置 Room
在 data/data_source 包下创建 NoteDao.kt,让它来和 Room 数据库中的数据表进行交互。
kotlin
@Dao
interface NoteDao {

    @Query("SELECT * FROM note_table")
    fun getNotes(): Flow<List<Note>>

    @Query("SELECT * FROM note_table WHERE id = :id")
    suspend fun getNoteById(id: Int): Note?

    // 冲突策略:替换旧数据
    @Insert(onConflict = OnConflictStrategy.REPLACE)
    suspend fun insertNote(note: Note)

    @Delete
    suspend fun deleteNote(note: Note)
}
前面我们说到:当数据表发生变化时,新的 List<Note> 会由 Room 框架发出。
关键在于当前 NoteDao 接口定义的 getNotes(),它的返回值定义为 Flow。这样,Room 会在 note_table 数据发生变化时重新查询,将最新的笔记列表发射出去。
再在相同的包下,创建 NoteDatabase.kt 文件定义 Room 数据库。
kotlin
@Database(
    entities = [Note::class], // 数据库实体类
    version = 1 // 数据库版本号
)
abstract class NoteDatabase : RoomDatabase() {
    // 通过抽象属性获取 DAO
    abstract val noteDao: NoteDao

    companion object {
        const val DATABASE_NAME = "notes_db"
    }
}
实现仓库
在 data.repository 包下创建 NoteRepositoryImpl.kt,让它来访问数据源中的数据。
kotlin
class NoteRepositoryImpl(
    private val noteDao: NoteDao,
) : NoteRepository {
    override fun getNotes(): Flow<List<Note>> {
        return noteDao.getNotes()
    }

    override suspend fun getNoteById(id: Int): Note? {
        return noteDao.getNoteById(id)
    }

    override suspend fun insertNote(note: Note) {
        noteDao.insertNote(note)
    }

    override suspend fun deleteNote(note: Note) {
        noteDao.deleteNote(note)
    }

}
di 层
要启用 Hilt 依赖注入,需要在自定义的 Application 上加上 @HiltAndroidApp 注解。
首先在根包下创建 NoteApp.kt:
kotlin
@HiltAndroidApp
class NoteApp : Application()
然后,在 AndroidManifest.xml 文件中注册这个 Application 即可。
xml
<application
    android:name=".NoteApp"
    ...>

</application>
项目中需要提供 NoteUseCases 包装类实例给 ViewModel 使用,而用例依赖 NoteRepository,NoteRepository 依赖 NoteDatabase 中的 NoteDao 接口,所以有了:
kotlin
@Module
@InstallIn(SingletonComponent::class) // 表示该模块在单例组件中运行,也就是实例为单例
object AppModule {

    @Provides
    @Singleton
    fun provideNoteDatabase(app: Application): NoteDatabase {
        return Room.databaseBuilder(
            app,
            NoteDatabase::class.java,
            NoteDatabase.DATABASE_NAME
        ).build()
    }

    @Provides
    @Singleton
    fun provideNoteRepository(db: NoteDatabase): NoteRepository {
        return NoteRepositoryImpl(db.noteDao)
    }

    @Provides
    @Singleton
    fun provideNoteUseCases(repository: NoteRepository): NoteUseCases {
        return NoteUseCases(
            getNotesUseCases = GetNotesUseCase(repository),
            deleteNoteUseCases = DeleteNoteUseCase(repository),
            addNoteUseCases = AddNoteUseCase(repository),
            getNoteUseCases = GetNoteUseCase(repository)
        )
    }
}
当依赖的是接口(不知道该创建哪个实现类)、第三方库的类、全局单例,我们需要使用 Modules 来配置,就像上面那样。
presentation 层
在这层中,我们会处理 UI 的逻辑。
notes
定义 UI 状态
在笔记列表页面中,会展示笔记、排序规则的选择区域,还可以隐藏选择区域。
所以在 presentation.notes 包下创建一个 NotesState 数据类来持有这些状态。
kotlin
data class NotesState(
    val notes: List<Note> = emptyList(), // 笔记列表
    val noteOrder: NoteOrder = NoteOrder.Date(OrderType.Descending), // 排序规则
    val isOrderSectionVisible: Boolean = false, // 是否显示排序
)
定义用户操作
在 presentation.notes 创建 NotesEvent 密封类来定义用户的所有操作。
kotlin
sealed class NotesEvent {
    data class Order(val newNodeOrder: NoteOrder) : NotesEvent() // 排序笔记
    data class DeleteNote(val note: Note) : NotesEvent() // 删除笔记
    object RestoreNote : NotesEvent() // 恢复笔记
    object ToggleOrderSection : NotesEvent() // 点击显示/隐藏排序
}
为什么点击笔记没有作为一个用户操作?
虽然它是 UI 事件,但也会触发导航。而导航应该被 UI 层持有,因为 NavController 是 UI 框架的一部分,ViewModel 不应该持有它,也不应该知道 UI 框架的细节。
虽然你可以通过 ViewModel 发出一次性事件来让 UI 完成导航操作,但为了简单,我们就直接在 UI(Composable)中直接处理导航,即使它并不符合单向数据流和整洁架构的思想。
定义 ViewModel
在 presentation.notes 包下创建 NotesViewModel,让它来管理 UI 需要的数据,响应 UI 操作(onEvent()),操作数据的任务通过调用 Use Case 来完成。
kotlin
@HiltViewModel
class NotesViewModel @Inject constructor(
    private val noteUseCases: NoteUseCases,
) : ViewModel() {

    // 提供给 UI 的状态
    private val _state = MutableStateFlow(NotesState())
    val state = _state.asStateFlow()

    // 最近删除的笔记
    private var recentlyDeletedNote: Note? = null

    private var getNotesJob: Job? = null

    init {
        // 初始时,加载默认排序的笔记列表
        getNotes(NoteOrder.Date(OrderType.Descending))
    }

    /**
     * 处理用户事件
     */
    fun onEvent(event: NotesEvent) {
        when (event) {
            is NotesEvent.Order -> {
                if (state.value.noteOrder::class == event.newNodeOrder::class &&
                    state.value.noteOrder.orderType == event.newNodeOrder.orderType
                ) {
                    return
                }
                getNotes(event.newNodeOrder)
            }

            is NotesEvent.DeleteNote -> {
                viewModelScope.launch {
                    recentlyDeletedNote = event.note
                    noteUseCases.deleteNoteUseCases(event.note)
                }
            }

            is NotesEvent.RestoreNote -> {
                viewModelScope.launch {
                    recentlyDeletedNote?.let {
                        noteUseCases.addNoteUseCases(it)
                    }
                    recentlyDeletedNote = null
                }
            }

            is NotesEvent.ToggleOrderSection -> {
                _state.value = state.value.copy(
                    isOrderSectionVisible = !state.value.isOrderSectionVisible
                )
            }
        }
    }

    /**
     * 根据排序规则获取笔记
     */
    private fun getNotes(noteOrder: NoteOrder) {
        getNotesJob?.cancel()
        getNotesJob = noteUseCases.getNotesUseCases(noteOrder) // 获取新Flow
            .onEach { notes -> // Flow发射新数据时
                _state.value = state.value.copy(
                    notes = notes,
                    noteOrder = noteOrder
                )
            }.launchIn(viewModelScope)
    }
}
为什么使用 StateFlow?
我们并没有使用 mutableStateOf,这是为了保证整个数据流响应式的一致性。数据从 data 层的 Room 流向 presentation 层的 ViewModel。最后才被 ui 层通过响应式的方式收集,这样 ui 更可被预测。
add_edit_note
add_edit_note 的实现步骤和 notes 类似,我们同样从定义 UI 的状态和用户操作开始。
首先是输入框的状态:
kotlin
data class NoteTextFieldState(
    val text: String = "",
    val hint: String = "",
    val isHintVisible: Boolean = true,
)
然后是该界面的用户事件:
kotlin
sealed class AddEditNoteEvent {
    data class EnteredTitle(val value: String) : AddEditNoteEvent() // 输入标题
    data class ChangeTitleFocus(val focusState: FocusState) : AddEditNoteEvent() // 改变标题焦点
    data class EnteredContent(val value: String) : AddEditNoteEvent() // 输入内容
    data class ChangeContentFocus(val focusState: FocusState) : AddEditNoteEvent() // 改变内容焦点
    data class ChangeColor(val color: Int) : AddEditNoteEvent() // 改变笔记颜色
    object SaveNote : AddEditNoteEvent() // 保存笔记
}
接下来是 ViewModel,不过我们先要理解一下"一次性"事件。
输入框的文字,或是选中的背景颜色,在屏幕旋转后应该被保留,这些就是状态。但有些比如 "标题不能为空" 的提示,在屏幕旋转后不应该被再次触发(影响用户体验),这些就是事件,只应该被触发一次。
我们可以通过 SharedFlow 来发送一次性的 UI 事件,让 UI 层来监听这个 Flow,执行对应的操作。
现在,来看看 AddEditNoteViewModel.kt 的完整代码:
kotlin
@HiltViewModel
class AddEditNoteViewModel @Inject constructor(
    private val noteUseCases: NoteUseCases,
    savedStateHandle: SavedStateHandle, // 用于获取导航参数
) : ViewModel() {

    private val _noteTitle = mutableStateOf(
        NoteTextFieldState(
            hint = "Enter title..."
        )
    )
    val noteTitle: State<NoteTextFieldState> = _noteTitle

    private val _noteContent = mutableStateOf(
        NoteTextFieldState(
            hint = "Enter some content"
        )
    )
    val noteContent: State<NoteTextFieldState> = _noteContent

    private val _noteColor = mutableIntStateOf(Note.noteColors.random().toArgb())
    val noteColor: State<Int> = _noteColor


    // 通过一次性的事件流,发出 UI 事件,让 UI 层能够显示提示或是导航回到主页
    private val _eventFlow = MutableSharedFlow<UiEvent>()
    val eventFlow = _eventFlow.asSharedFlow()

    // 保存导航传入的笔记的 id
    // 以便后续更新笔记
    private var currentNoteId: Int? = null

    init {
        // 从导航参数中获取 noteId
        savedStateHandle.get<Int>("noteId")?.let { noteId ->
            if (noteId != -1) { // -1 表示"新建笔记"
                viewModelScope.launch {
                    // 获取笔记
                    noteUseCases.getNoteUseCases(noteId)?.also { note ->
                        // "编辑笔记"模式,使用笔记数据填充UI状态
                        currentNoteId = note.id
                        _noteTitle.value = noteTitle.value.copy(
                            text = note.title,
                            isHintVisible = false // 默认不显示提示
                        )
                        _noteContent.value = _noteContent.value.copy(
                            text = note.content,
                            isHintVisible = false // 默认不显示提示
                        )
                        _noteColor.intValue = note.color
                    }
                }
            }
        }
    }

    fun onEvent(event: AddEditNoteEvent) {
        when (event) {
            is AddEditNoteEvent.EnteredTitle -> {
                _noteTitle.value = noteTitle.value.copy(
                    text = event.value
                )
            }

            is AddEditNoteEvent.ChangeTitleFocus -> {
                _noteTitle.value = noteTitle.value.copy(
                    // 只有在焦点丢失,并且输入框文本为空时,才显示提示语
                    isHintVisible = !event.focusState.isFocused &&
                            noteTitle.value.text.isBlank()
                )
            }

            is AddEditNoteEvent.EnteredContent -> {
                _noteContent.value = _noteContent.value.copy(
                    text = event.value
                )
            }

            is AddEditNoteEvent.ChangeContentFocus -> {
                _noteContent.value = _noteContent.value.copy(
                    isHintVisible = !event.focusState.isFocused &&
                            _noteContent.value.text.isBlank()
                )
            }

            is AddEditNoteEvent.ChangeColor -> {
                // 改变颜色状态
                _noteColor.intValue = event.color
            }

            is AddEditNoteEvent.SaveNote -> {
                viewModelScope.launch {
                    try {
                        noteUseCases.addNoteUseCases(
                            Note(
                                title = noteTitle.value.text,
                                content = noteContent.value.text,
                                timestamp = System.currentTimeMillis(),
                                color = noteColor.value,
                                id = currentNoteId
                            )
                        )
                        // 保存成功,发送导航事件
                        _eventFlow.emit(UiEvent.SaveNote)
                    } catch (e: InvalidNoteException) {
                        // 发送显示Snackbar的事件
                        _eventFlow.emit(
                            UiEvent.ShowSnackbar(
                                message = e.message ?: "Couldn't save note"
                            )
                        )
                    }
                }
            }
        }
    }

    // 定义ViewModel可以发出的所有"一次性"事件
    sealed class UiEvent {
        // 显示提示
        data class ShowSnackbar(val message: String) : UiEvent()

        // 保存笔记
        object SaveNote : UiEvent()
    }
}
ui 层
这下终于要开始构建界面了,ui 层依赖 presentation 层。
构建 Composable 屏幕
笔记首页
我们将当前页面的笔记、排序单选按钮、排序区域抽取出来。
在 presentation/notes/components 包下创建 NoteItem.kt、DefaultRadioButton.kt、OrderSection.kt。
kotlin
@Composable
fun NoteItem(
    note: Note,
    modifier: Modifier = Modifier,
    cornerRadius: Dp = 10.dp,
    cutCornerSize: Dp = 30.dp, // 切角半径
    onDeleteClick: () -> Unit,
) {
    Box(
        modifier = modifier
    ) {
        Canvas(modifier = Modifier.matchParentSize()) {
            // 绘制了一个右上角被切掉的矩形
            val clipPath = Path().apply {
                lineTo(size.width - cutCornerSize.toPx(), 0f)
                lineTo(size.width, cutCornerSize.toPx())
                lineTo(size.width, size.height)
                lineTo(0f, size.height)
                close()
            }

            clipPath(clipPath) {
                // 绘制笔记背景
                drawRoundRect(
                    color = Color(note.color),
                    size = size,
                    cornerRadius = CornerRadius(cornerRadius.toPx())
                )
                // 绘制右上角阴影
                drawRoundRect(
                    color = Color(
                        ColorUtils.blendARGB(note.color, 0x000000, 0.2f)
                    ),
                    topLeft = Offset(size.width - cutCornerSize.toPx(), -100f),
                    size = Size(cutCornerSize.toPx() + 100f, cutCornerSize.toPx() + 100f),
                    cornerRadius = CornerRadius(cornerRadius.toPx())
                )
            }
        }

        Column(
            modifier = Modifier
                .fillMaxSize()
                .padding(16.dp)
                .padding(end = 32.dp)
        ) {
            Text(
                text = note.title,
                style = MaterialTheme.typography.titleLarge,
                color = MaterialTheme.colorScheme.onSurface,
                maxLines = 1,
                overflow = TextOverflow.Ellipsis
            )
            Spacer(modifier = Modifier.height(8.dp))
            Text(
                text = note.content,
                style = MaterialTheme.typography.bodyLarge,
                color = MaterialTheme.colorScheme.onSurface,
                maxLines = 10,
                overflow = TextOverflow.Ellipsis
            )
        }
        IconButton(
            onClick = onDeleteClick,
            modifier = Modifier.align(Alignment.BottomEnd)
        ) {
            Icon(
                imageVector = Icons.Default.Delete,
                contentDescription = "Delete note",
                tint = MaterialTheme.colorScheme.onSurface
            )
        }
    }
}
因为我们的笔记组件形状比较特殊,不能通过普通的 Modifier 来实现,所以使用了 Canvas 来自定义绘制。
Canvas 创建时需要一个确定的尺寸,不能使用 Modifier.fillMaxsize(),这里我们使用 Modifier.matchParentSize() 来让它匹配父容器的尺寸。
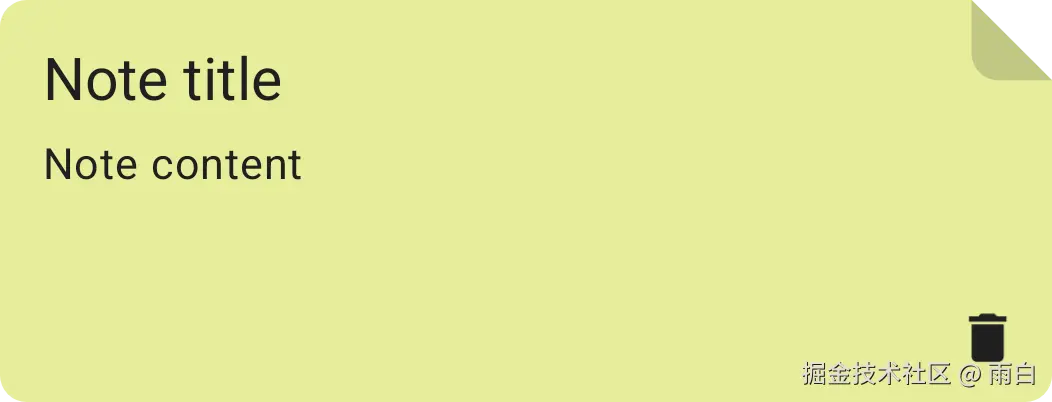
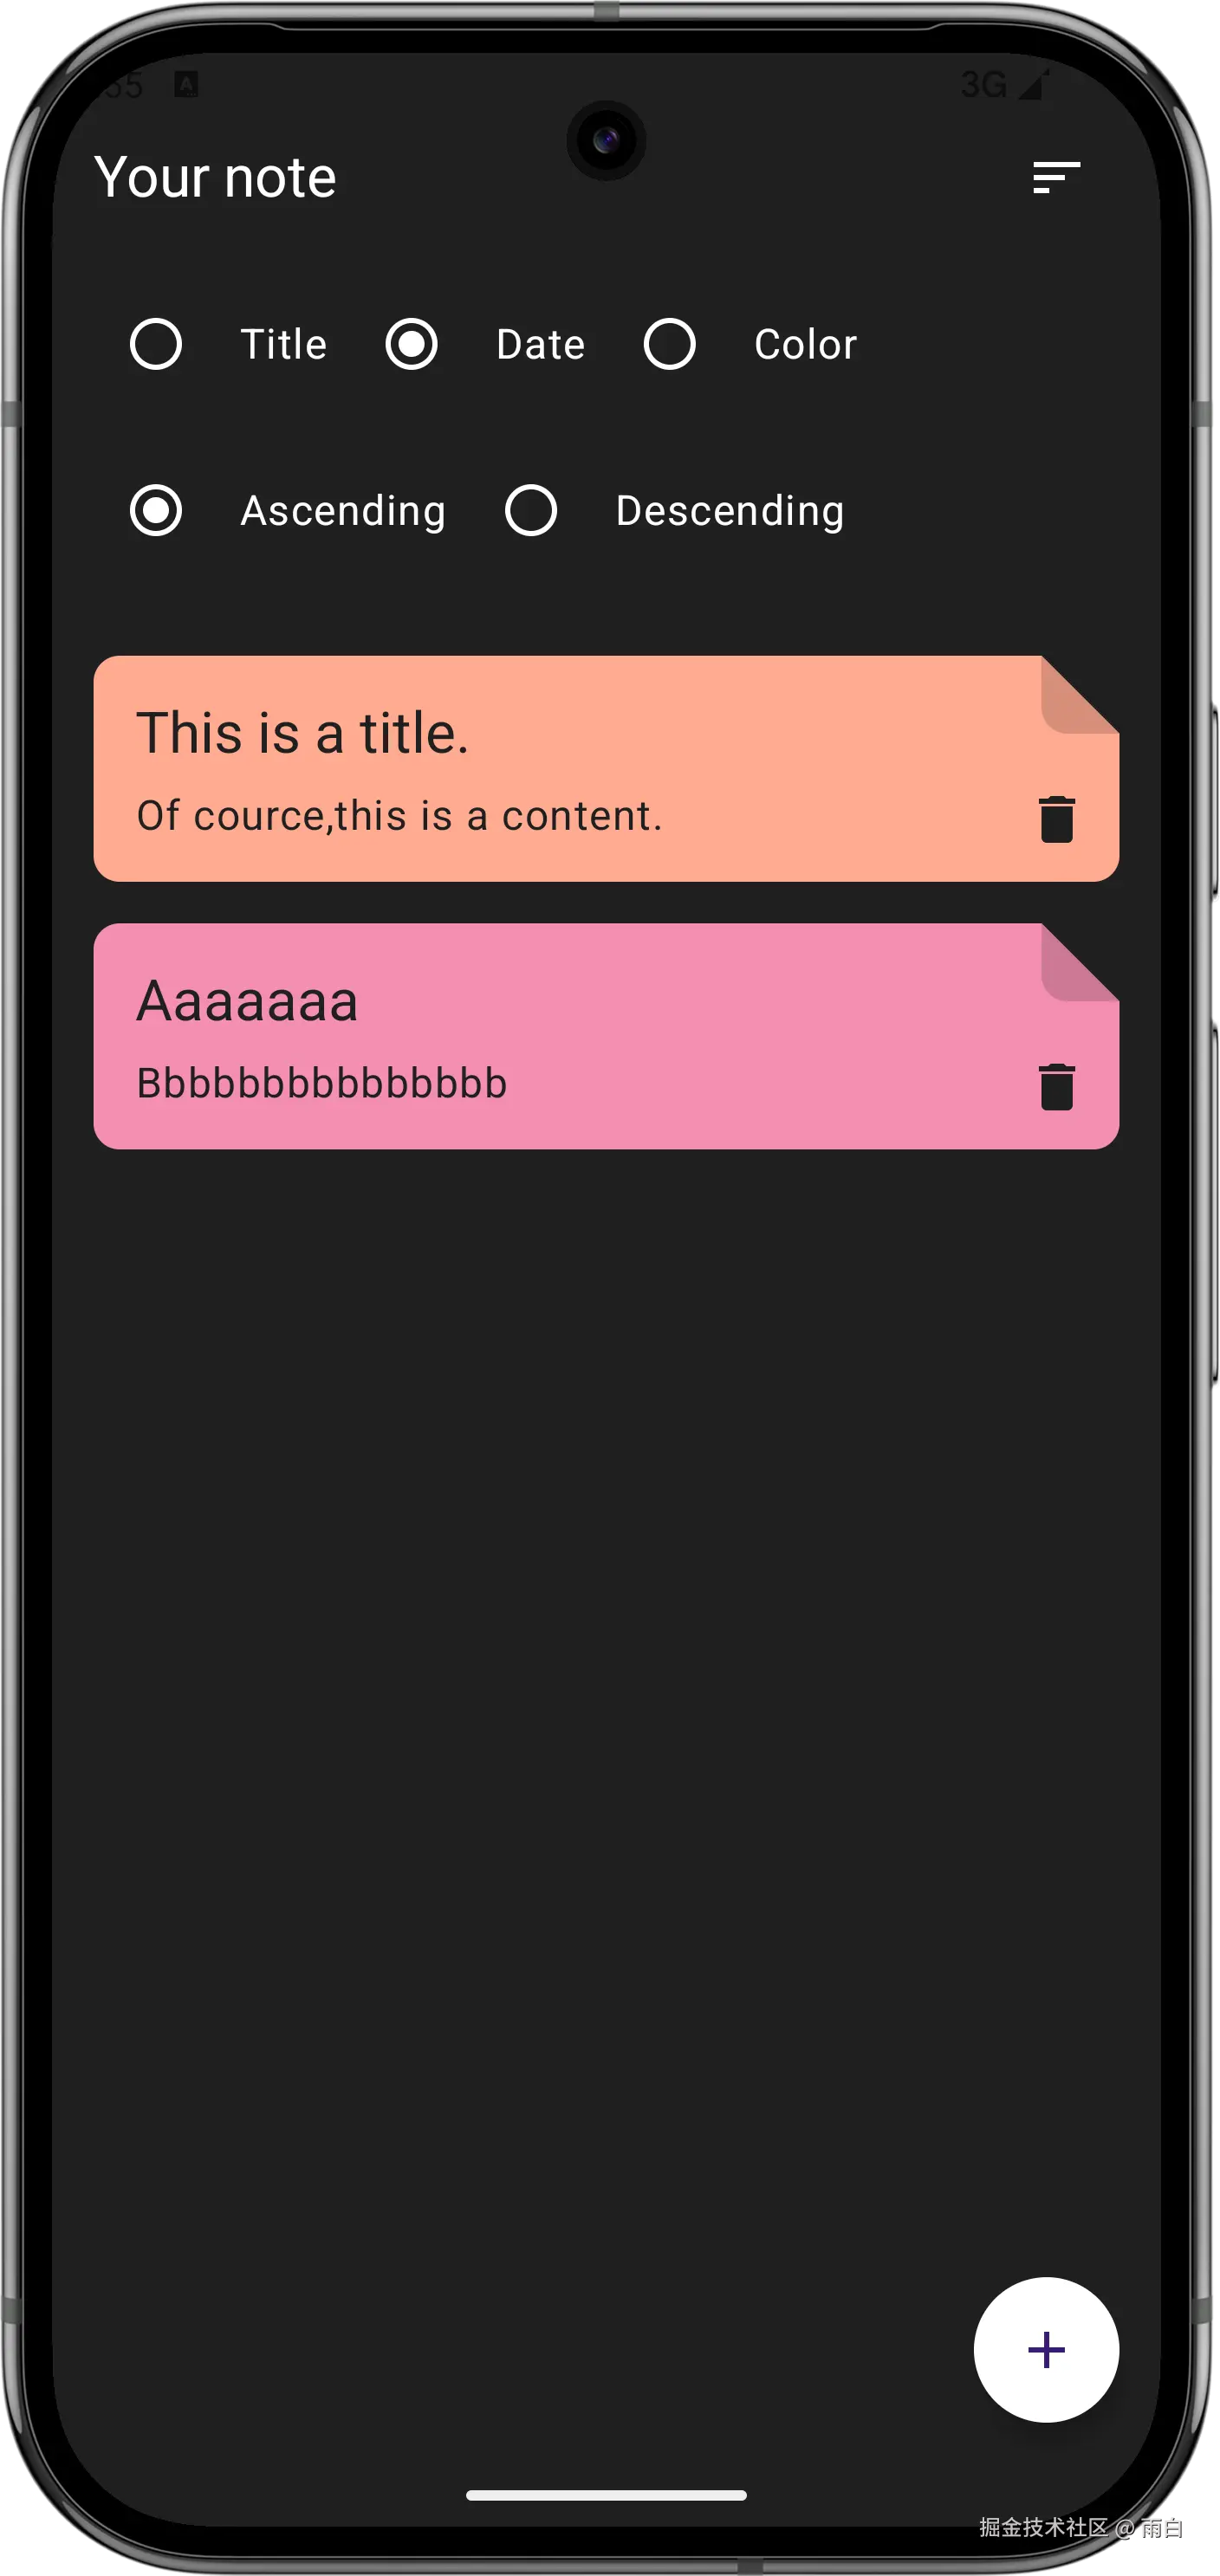
预览效果:
kotlin
@Composable
fun DefaultRadioButton(
text: String,
selected: Boolean,
onSelect: () -> Unit,
modifier: Modifier = Modifier,
) {
Row(
modifier = modifier,
verticalAlignment = Alignment.CenterVertically
) {
RadioButton(
selected = selected,
onClick = onSelect,
colors = RadioButtonDefaults.colors(
selectedColor = MaterialTheme.colorScheme.primary,
unselectedColor = MaterialTheme.colorScheme.onBackground
)
)
Spacer(modifier = Modifier.width(8.dp))
Text(
text = text,
style = MaterialTheme.typography.bodyLarge
)
}
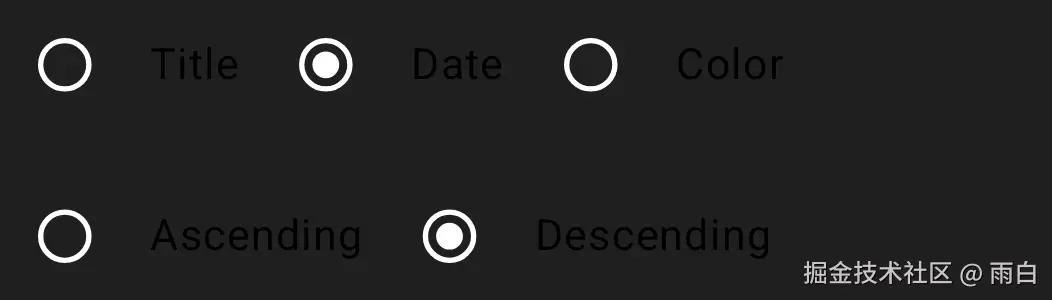
}预览效果:

kotlin
@Composable
fun OrderSection(
    modifier: Modifier = Modifier,
    noteOrder: NoteOrder = NoteOrder.Date(OrderType.Descending),
    onOrderChange: (NoteOrder) -> Unit,
) {
    Column(
        modifier = modifier
    ) {
        Row(
            modifier = Modifier.fillMaxWidth()
        ) {
            DefaultRadioButton(
                text = "Title",
                selected = noteOrder is NoteOrder.Title,
                onSelect = { onOrderChange(NoteOrder.Title(noteOrder.orderType)) }
            )
            Spacer(modifier = Modifier.width(8.dp))
            DefaultRadioButton(
                text = "Date",
                selected = noteOrder is NoteOrder.Date,
                onSelect = { onOrderChange(NoteOrder.Date(noteOrder.orderType)) }
            )
            Spacer(modifier = Modifier.width(8.dp))
            DefaultRadioButton(
                text = "Color",
                selected = noteOrder is NoteOrder.Color,
                onSelect = { onOrderChange(NoteOrder.Color(noteOrder.orderType)) }
            )
        }

        Spacer(modifier = Modifier.height(16.dp))

        Row(
            modifier = Modifier.fillMaxWidth()
        ) {
            DefaultRadioButton(
                text = "Ascending",
                selected = noteOrder.orderType is OrderType.Ascending,
                onSelect = {
                    onOrderChange(noteOrder.copy(OrderType.Ascending))
                }
            )
            Spacer(modifier = Modifier.width(8.dp))
            DefaultRadioButton(
                text = "Descending",
                selected = noteOrder.orderType is OrderType.Descending,
                onSelect = {
                    onOrderChange(noteOrder.copy(OrderType.Descending))
                }
            )
        }
    }
}
我们还要在 NoteOrder 密封类中添加一个 copy 方法,用于创建排序方向不同的 NoteOrder。
kotlin
sealed class NoteOrder(val orderType: OrderType) {
    // ...

    fun copy(orderType: OrderType) =
        when (this) {
            is NoteOrder.Title -> NoteOrder.Title(orderType = orderType)
            is NoteOrder.Date -> NoteOrder.Date(orderType = orderType)
            is NoteOrder.Color -> NoteOrder.Color(orderType = orderType)
        }
}
预览效果:
我们在 presentation/notes 包下创建 NotesScreen.kt 来组合这些 Composable,代码如下:
kotlin
@Composable
fun NotesScreen(
    navController: NavController,
    viewModel: NotesViewModel = hiltViewModel(),
) {

    val state by viewModel.state.collectAsState()
    // 用于控制底部提示
    val snackbarHostState = remember {
        SnackbarHostState()
    }
    val scope = rememberCoroutineScope()

    Scaffold(
        floatingActionButton = {
            FloatingActionButton(
                onClick = {
                    // TODO 导航至新增页面
                },
                shape = CircleShape,
                containerColor = MaterialTheme.colorScheme.primary
            ) {
                Icon(imageVector = Icons.Default.Add, contentDescription = "Add note")
            }
        },
        snackbarHost = {
            SnackbarHost(hostState = snackbarHostState)
        }
    ) { paddingValues ->
        Column(
            modifier = Modifier
                .fillMaxSize()
                .padding(
                    16.dp,
                    paddingValues.calculateTopPadding(),
                    16.dp,
                    paddingValues.calculateTopPadding()
                )
        ) {
            Row(
                modifier = Modifier.fillMaxWidth(),
                horizontalArrangement = Arrangement.SpaceBetween,
                verticalAlignment = Alignment.CenterVertically
            ) {
                Text(
                    text = "Your note",
                    style = MaterialTheme.typography.titleLarge
                )
                IconButton(
                    onClick = {
                        viewModel.onEvent(NotesEvent.ToggleOrderSection)
                    },
                ) {
                    Icon(
                        imageVector = ImageVector.vectorResource(id = R.drawable.sort),
                        contentDescription = "Sort"
                    )
                }
            }

            // 动画显隐排序区域
            AnimatedVisibility(
                visible = state.isOrderSectionVisible,
                enter = fadeIn() + slideInVertically(),
                exit = fadeOut() + slideOutVertically()
            ) {
                OrderSection(
                    modifier = Modifier
                        .fillMaxWidth()
                        .padding(vertical = 16.dp),
                    noteOrder = state.noteOrder,
                    onOrderChange = {
                        viewModel.onEvent(NotesEvent.Order(it))
                    }
                )
            }

            Spacer(modifier = Modifier.height(16.dp))
            LazyColumn(modifier = Modifier.fillMaxSize()) {
                items(state.notes) { note ->
                    NoteItem(
                        note = note,
                        modifier = Modifier
                            .fillMaxWidth()
                            .clickable {
                                // TODO 跳转到编辑页面
                            },
                        onDeleteClick = {
                            viewModel.onEvent(NotesEvent.DeleteNote(note))
                            scope.launch {
                                // 显示提示
                                val result = snackbarHostState.showSnackbar(
                                    message = "Note deleted",
                                    actionLabel = "Undo",
                                    duration = SnackbarDuration.Short // 自动消失
                                )
                                // 如果点击了撤销
                                if (result == SnackbarResult.ActionPerformed) {
                                    viewModel.onEvent(NotesEvent.RestoreNote)
                                }
                            }
                        }
                    )
                    Spacer(modifier = Modifier.height(16.dp))
                }
            }
        }
    }

}
新增/编辑笔记页
抽取该页面中的输入框控件,在 presentation.add_edit_note.components 包下创建 TransparentHintTextField.kt:
kotlin
@Composable
fun TransparentHintTextField(
    text: String, // 输入文本
    hint: String, // 提示文本
    modifier: Modifier = Modifier,
    isHintVisible: Boolean = true, // 是否显示提示
    onValueChange: (String) -> Unit,
    textStyle: TextStyle = TextStyle(), // 文本样式
    singleLine: Boolean = false,
    onFocusChange: (FocusState) -> Unit, // 焦点改变回调
) {
    Box(
        modifier = modifier
    ) {
        BasicTextField(
            value = text,
            onValueChange = onValueChange,
            singleLine = singleLine,
            textStyle = textStyle,
            modifier = Modifier
                .fillMaxWidth()
                .onFocusChanged {
                    onFocusChange(it)
                }
        )
        if (isHintVisible) {
            // 显示提示
            Text(text = hint, style = textStyle, color = Color.DarkGray)
        }
    }
}
在 presentation.add_edit_note 包下创建 AddEditNoteScreen.kt,来构建页面内容。
kotlin
@Composable
fun AddEditNoteScreen(
    navController: NavController,
    noteColor: Int,
    viewModel: AddEditNoteViewModel = hiltViewModel(),
) {
    val titleState = viewModel.noteTitle.value
    val contentState = viewModel.noteContent.value

    val snackbarHostState = remember {
        SnackbarHostState()
    }

    // 背景改变的动画,设置初始背景颜色
    val noteBackgroundAnimatable = remember {
        Animatable(
            Color(if (noteColor != -1) noteColor else viewModel.noteColor.value)
        )
    }

    val scope = rememberCoroutineScope()

    LaunchedEffect(key1 = true) {
        // 监听 ViewModel 中的事件
        viewModel.eventFlow.collectLatest { event ->
            when (event) {
                is AddEditNoteViewModel.UiEvent.ShowSnackbar -> {
                    snackbarHostState.showSnackbar(
                        message = event.message
                    )
                }

                is AddEditNoteViewModel.UiEvent.SaveNote -> {
                    // 返回
                    navController.navigateUp()
                }
            }
        }
    }

    Scaffold(
        floatingActionButton = {
            FloatingActionButton(
                onClick = {
                    viewModel.onEvent(AddEditNoteEvent.SaveNote)
                },
                shape = CircleShape,
                containerColor = MaterialTheme.colorScheme.primary
            ) {
                Icon(imageVector = ImageVector.vectorResource(id = R.drawable.save), contentDescription = "Save note")
            }
        },
        snackbarHost = {
            SnackbarHost(snackbarHostState)
        }
    ) { paddingValues ->
        Column(
            modifier = Modifier
                .fillMaxSize()
                .background(noteBackgroundAnimatable.value)
                .padding(
                    16.dp,
                    paddingValues.calculateTopPadding(),
                    16.dp,
                    paddingValues.calculateTopPadding()
                )
        ) {
            Row(
                modifier = Modifier
                    .fillMaxWidth()
                    .padding(8.dp),
                horizontalArrangement = Arrangement.SpaceBetween
            ) {
                Note.noteColors.forEach { color ->
                    val colorInt = color.toArgb()
                    Box(
                        modifier = Modifier
                            .size(50.dp)
                            .shadow(15.dp, CircleShape)
                            .clip(CircleShape)
                            .background(color)
                            .border(
                                width = 3.dp,
                                color = if (viewModel.noteColor.value == colorInt) {
                                    Color.Black
                                } else Color.Transparent,
                                shape = CircleShape
                            )
                            .clickable {
                                scope.launch {
                                    // 以动画改变背景颜色
                                    noteBackgroundAnimatable.animateTo(
                                        targetValue = Color(colorInt),
                                        animationSpec = tween(
                                            durationMillis = 500
                                        )
                                    )
                                }
                                viewModel.onEvent(AddEditNoteEvent.ChangeColor(colorInt))
                            }
                    )
                }
            }
            Spacer(modifier = Modifier.height(16.dp))
            TransparentHintTextField(
                text = titleState.text,
                hint = titleState.hint,
                onValueChange = {
                    viewModel.onEvent(AddEditNoteEvent.EnteredTitle(it))
                },
                onFocusChange = {
                    viewModel.onEvent(AddEditNoteEvent.ChangeTitleFocus(it))
                },
                isHintVisible = titleState.isHintVisible,
                singleLine = true,
                textStyle = MaterialTheme.typography.titleLarge
            )
            Spacer(modifier = Modifier.height(16.dp))
            TransparentHintTextField(
                text = contentState.text,
                hint = contentState.hint,
                onValueChange = {
                    viewModel.onEvent(AddEditNoteEvent.EnteredContent(it))
                },
                onFocusChange = {
                    viewModel.onEvent(AddEditNoteEvent.ChangeContentFocus(it))
                },
                isHintVisible = contentState.isHintVisible,
                textStyle = MaterialTheme.typography.bodyLarge,
                modifier = Modifier.fillMaxHeight()
            )
        }
    }
}
导航
现在大部分工作就已经完成了,最后来配置导航。
首先在 feature_note.presentation.util 包下创建 Screen 密封类,定义每个页面的导航路由:
kotlin
sealed class Screen(val route: String) {
    object NotesScreen : Screen("notes_screen")
    object AddEditNoteScreen : Screen("add_edit_note_screen")
}
然后,在 MainActivity 中配置我们的 NavHost(导航图)。
kotlin
@AndroidEntryPoint
class MainActivity : ComponentActivity() {
override fun onCreate(savedInstanceState: Bundle?) {
super.onCreate(savedInstanceState)
enableEdgeToEdge()
setContent {
CleanArchitectureNoteAppTheme {
Surface(color = MaterialTheme.colorScheme.background) {
val navController = rememberNavController()
NavHost(
navController = navController,
startDestination = Screen.NotesScreen.route // 默认显示的页面是笔记列表页
) {
// 配置主页路由
composable(route = Screen.NotesScreen.route) {
NotesScreen(navController = navController)
}
// 配置添加或编辑笔记页面路由
composable(
route = Screen.AddEditNoteScreen.route + "?noteId={noteId}¬eColor={noteColor}",
arguments = listOf(
// 解释每个参数的类型
navArgument("noteId") {
type = NavType.IntType
defaultValue = -1 // -1 表示新建笔记
},
navArgument("noteColor") {
type = NavType.IntType
defaultValue = -1
}
)) {
// noteId 会从 ViewModel 中通过 SavedStateHandle 获取
val noteColor = it.arguments?.getInt("noteColor") ?: -1
AddEditNoteScreen(navController = navController, noteColor = noteColor)
}
}
}
}
}
}
}其中 @AndroidEntryPoint 注解一定要加上,这是让 Hilt 能够正常工作的开关。没有的话,例如 @HiltViewModel 将会失效,在使用 hiltViewModel() 获取一个 ViewModel 时,会直接崩溃。
定义了导航图后,将之前的 TODO 完成:
kotlin
// NotesScreen.kt
// TODO 导航至新增页面
navController.navigate(Screen.AddEditNoteScreen.route)
// TODO 跳转到编辑页面
navController.navigate(
Screen.AddEditNoteScreen.route +
"?noteId=${note.id}¬eColor=${note.color}"
)运行效果
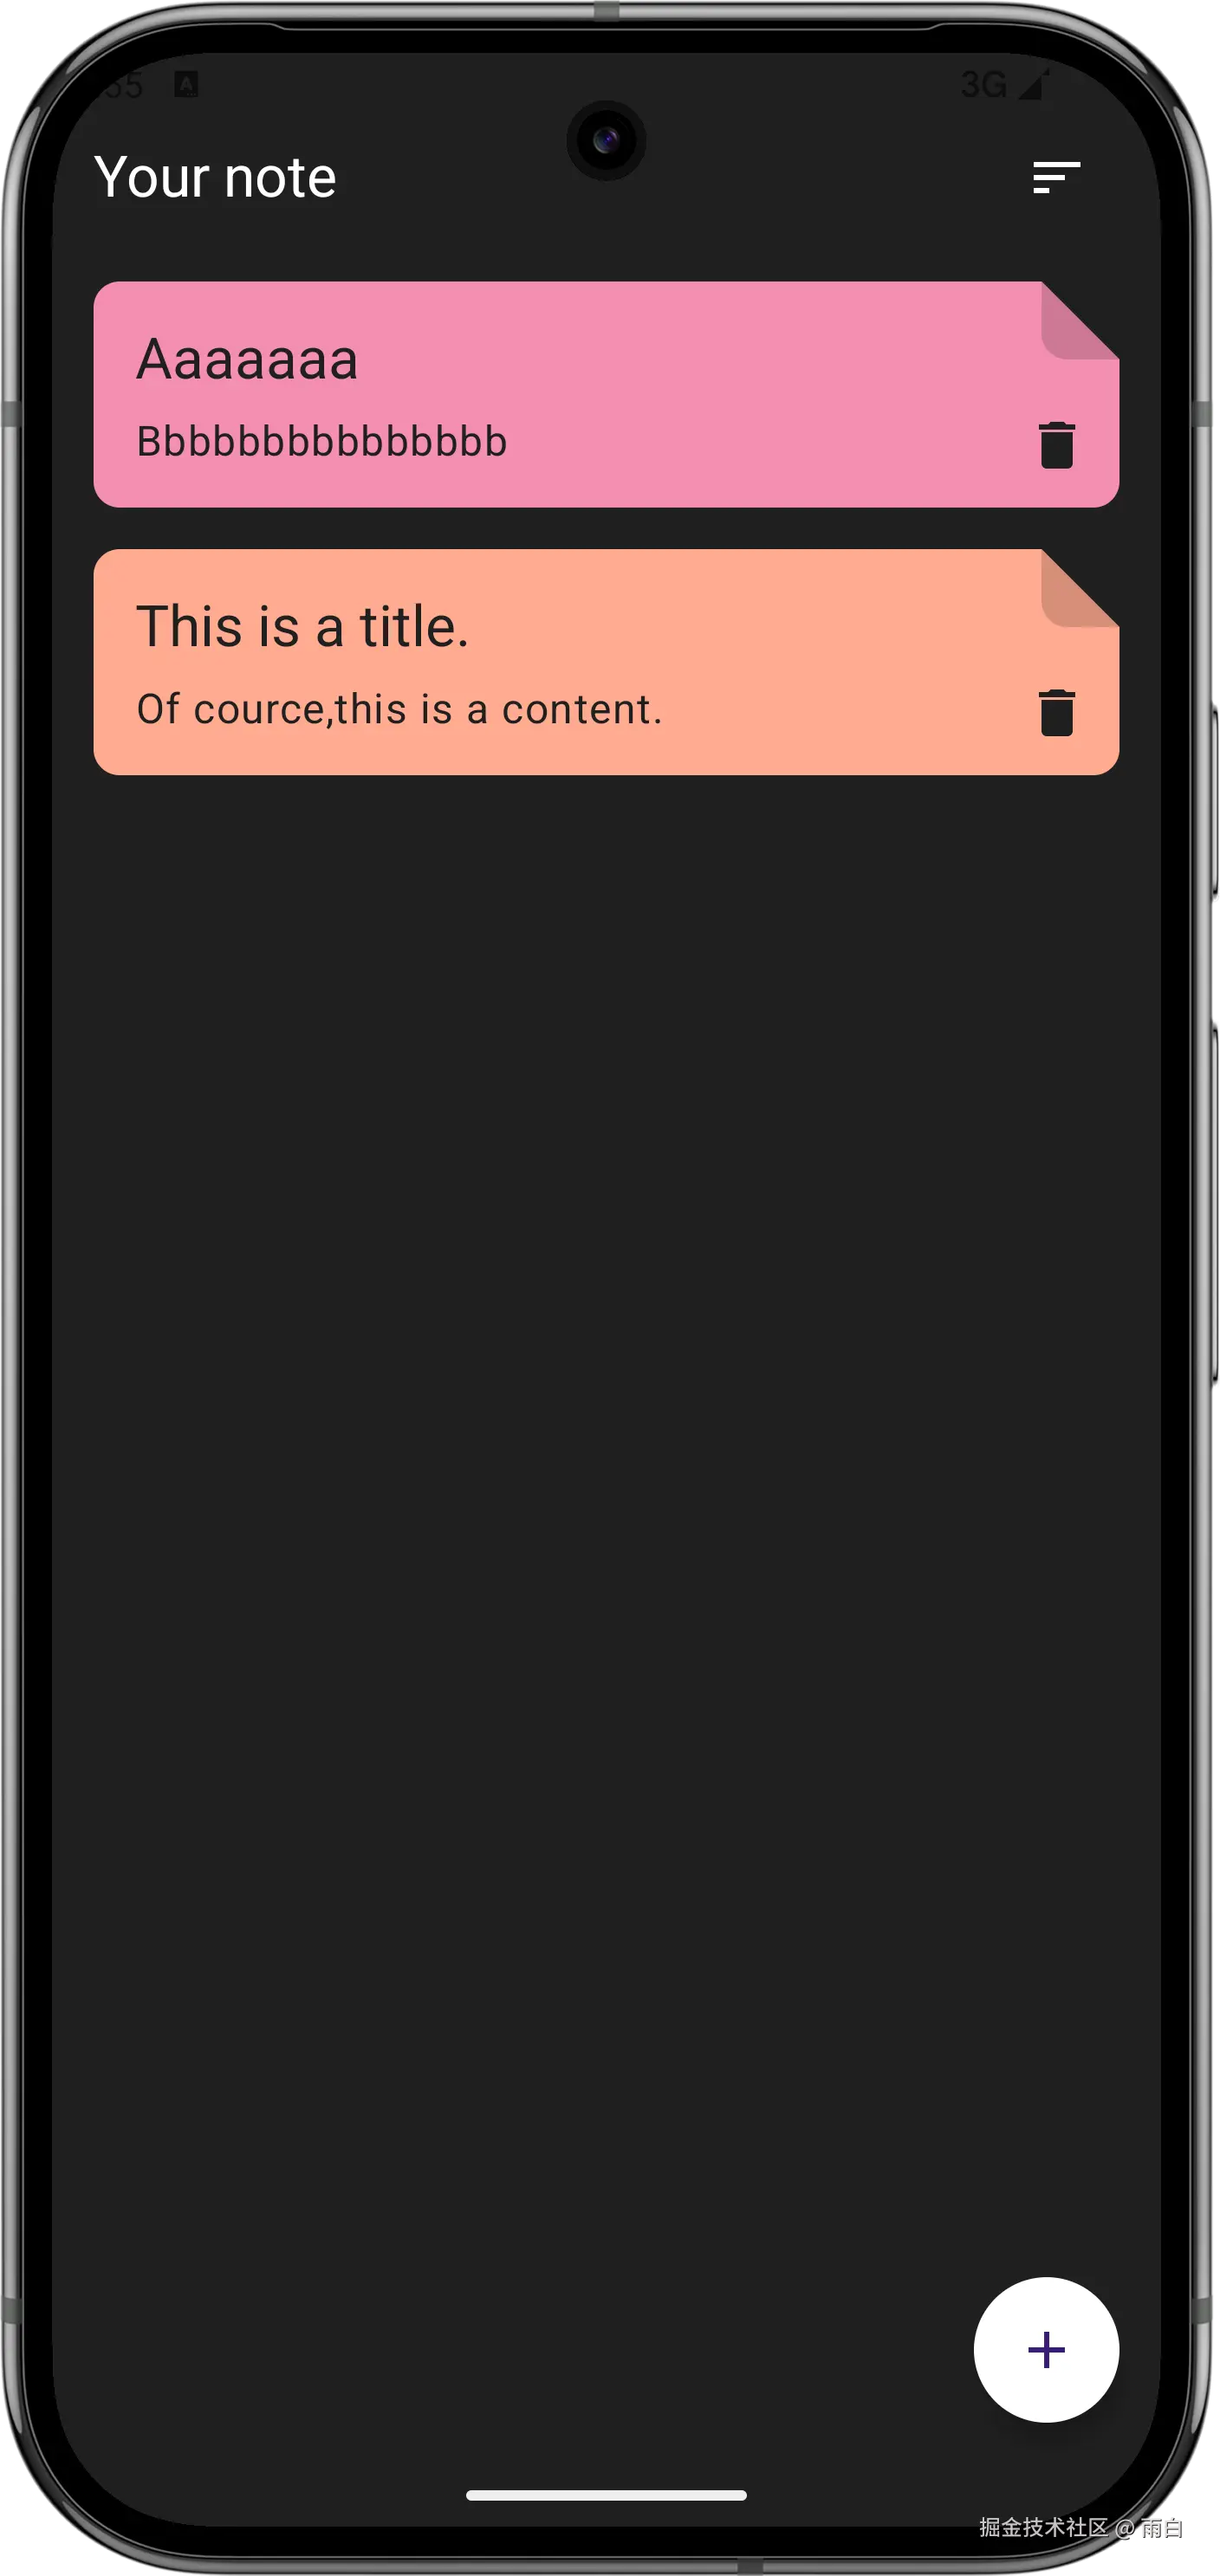
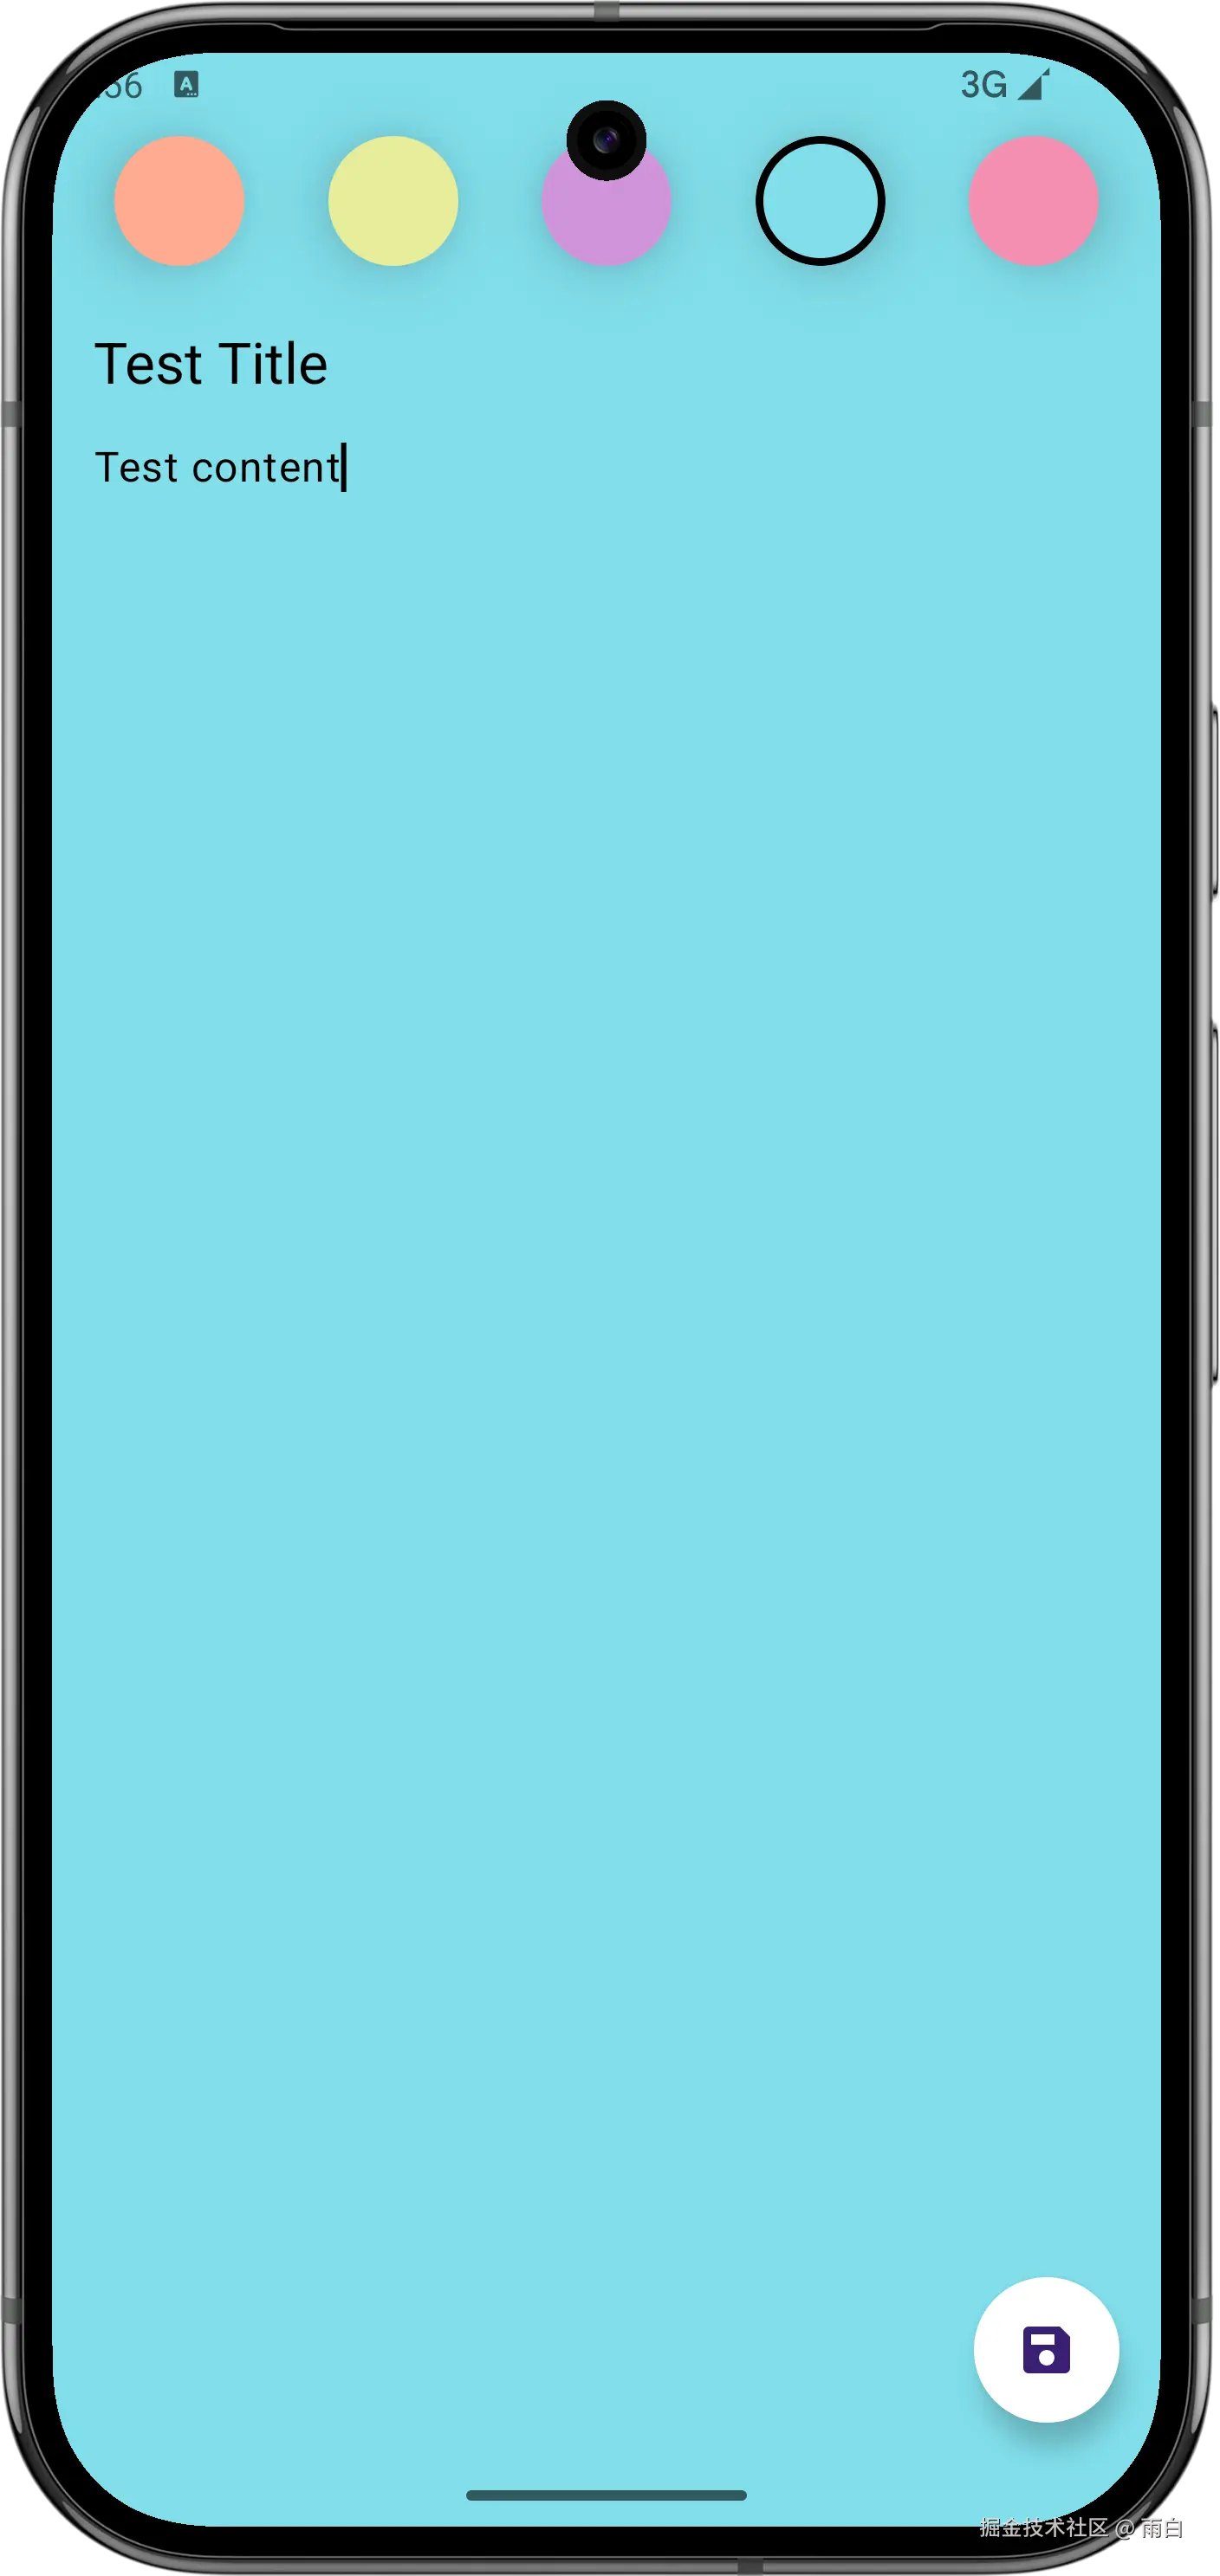
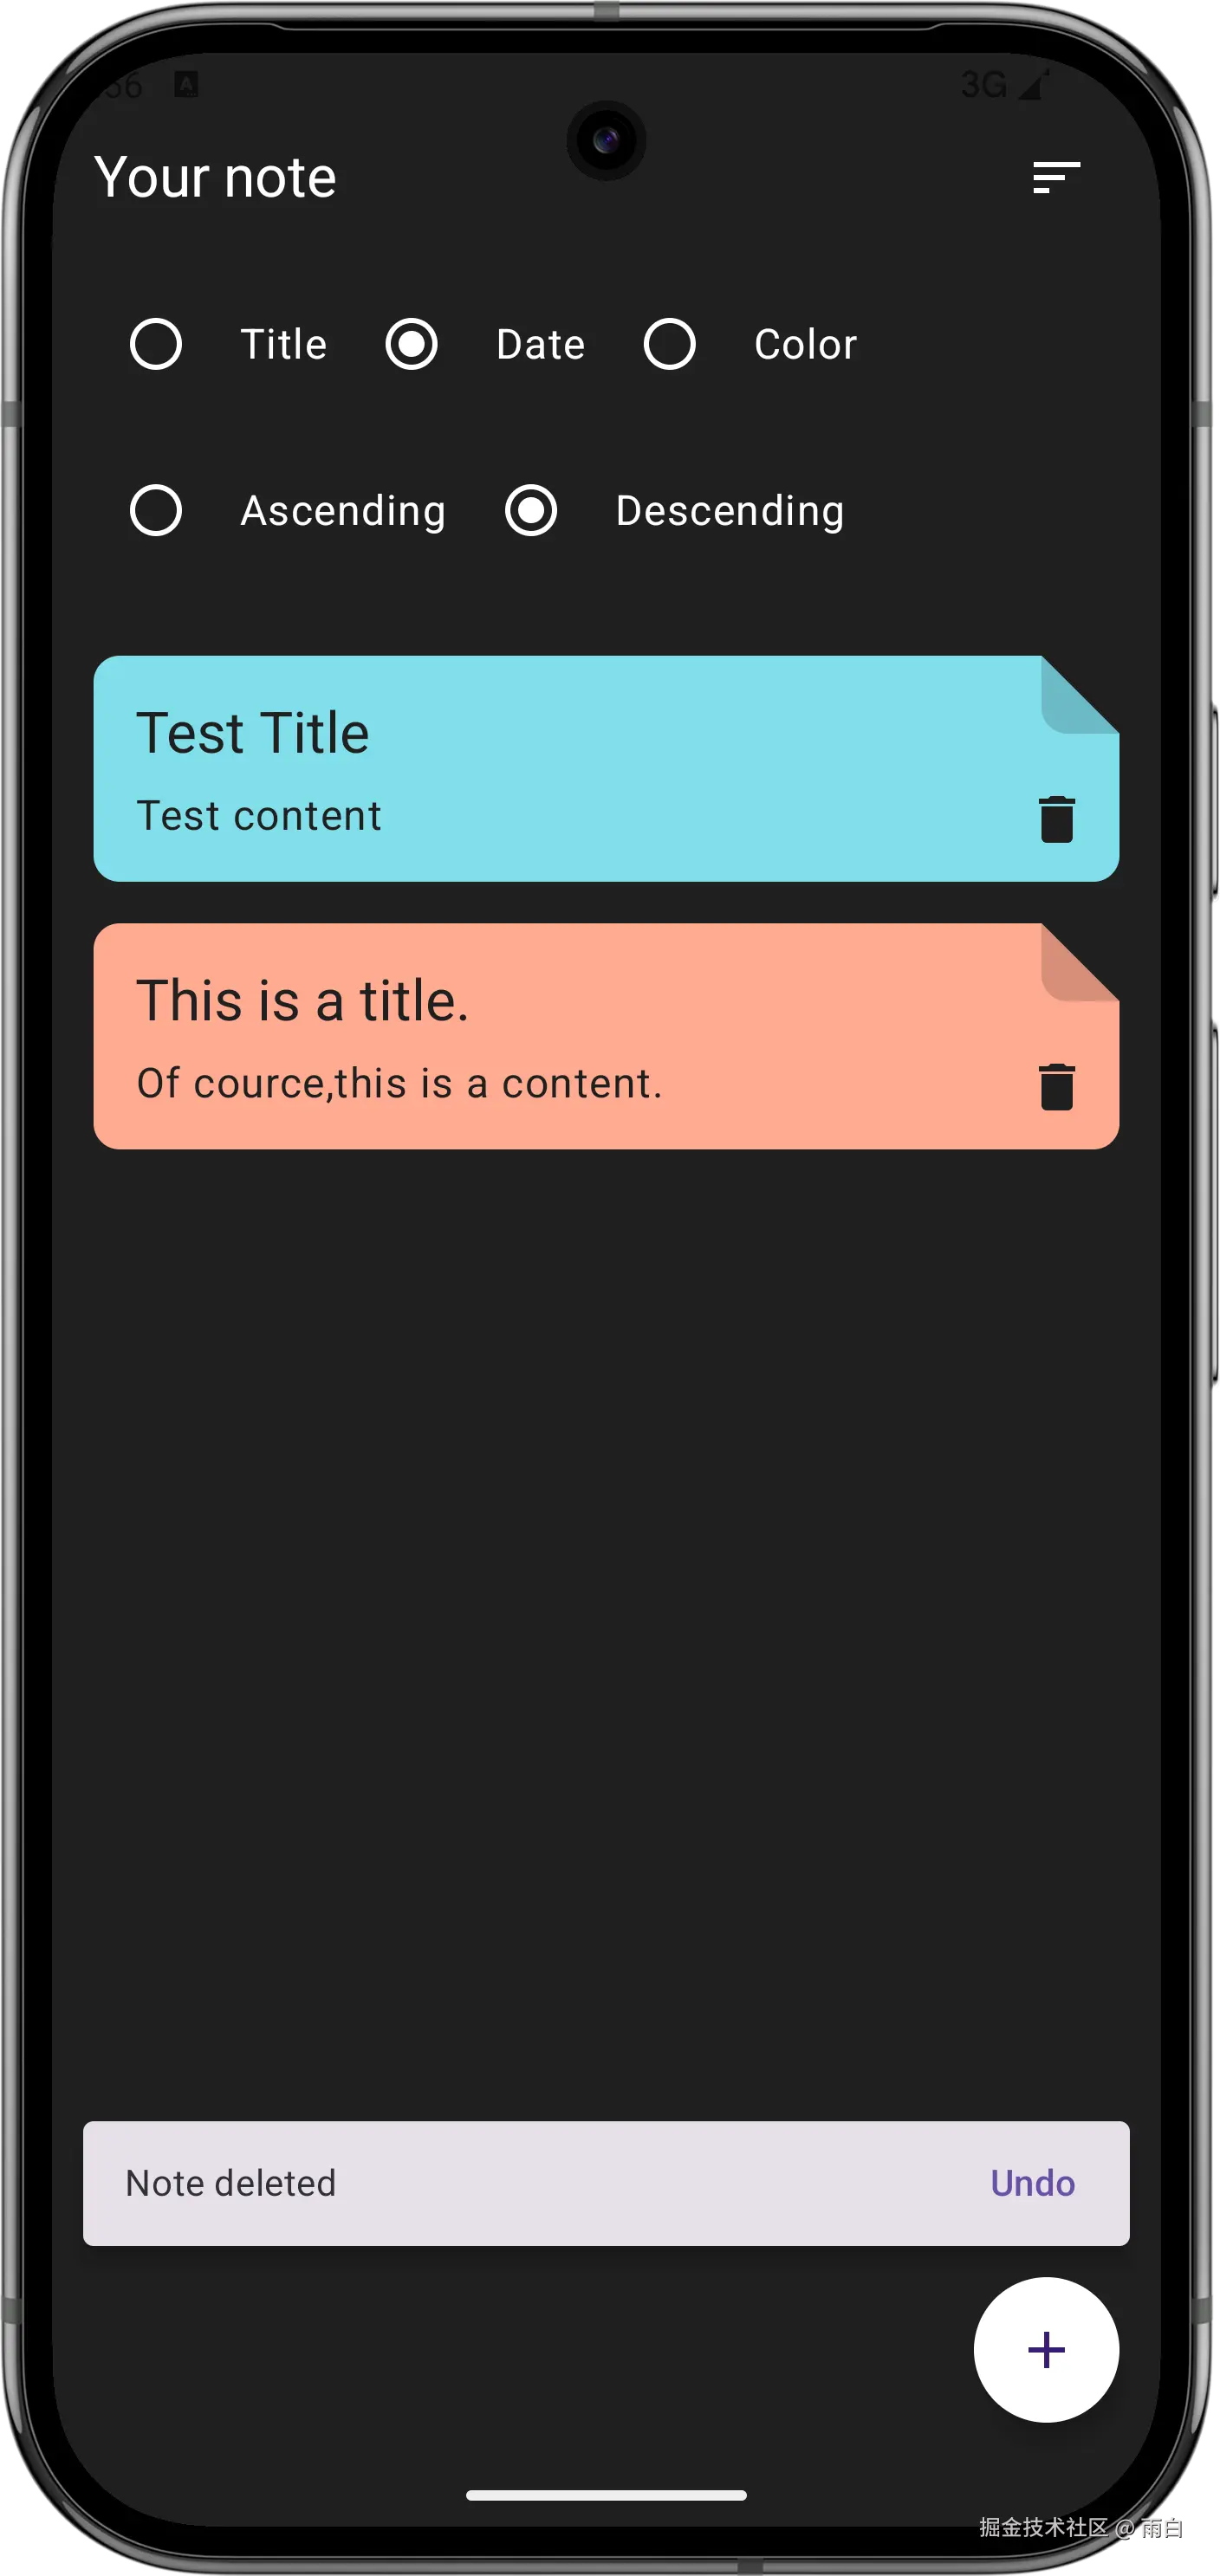
现在就全部完成了,来看看运行效果:
最后,虽然很多逻辑你现在不能够立马写出来,但只要理解架构、理解它们的协作方式,我相信你还是能够完成的。
当然,你也可以去观看原视频,获得更好的体验。