在 ArkUI 中实现点击涟漪效果(带渐变与粒子效果)
在现代 UI 动效设计中,涟漪效果(Ripple Effect) 是常见的一种交互反馈方式。用户点击屏幕时,界面会从点击点扩散出一圈柔和的波纹,让交互更有「触感」。
本文将带你基于 鸿蒙 ArkUI(ArkTS) 的 Canvas 组件实现一个带有 径向渐变 和 边缘粒子特效 的涟漪效果。
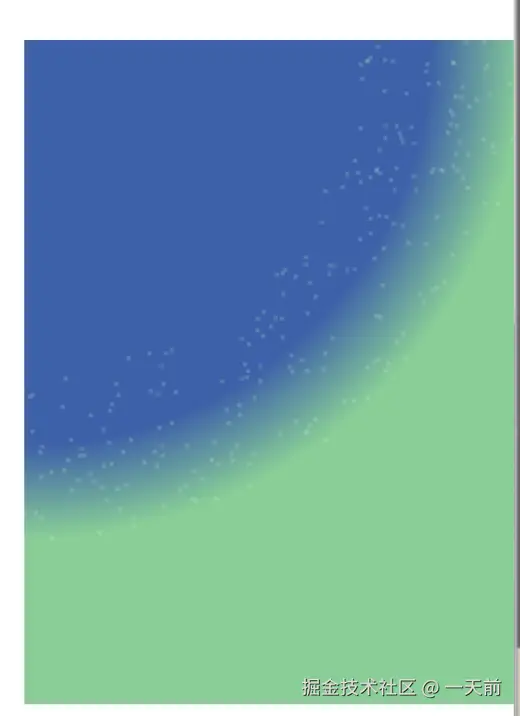
✨ 效果预览
最终效果包括以下几个特点:
- 点击区域会生成一个圆形波纹。
- 波纹内部采用 径向渐变(中心深蓝 → 外圈浅绿)。
- 波纹边缘带有 随机粒子,增强扩散的视觉效果。
- 波纹会伴随 缩放 + 渐隐动画 消失。
(此处可插入效果截图/动图)
📐 涟漪参数结构体
首先,我们定义一个接口 IRipple 来描述涟漪需要的参数:
ts
interface IRipple {
  w: number,   // 宽度
  h: number,   // 高度
  s: number,   // 缩放比例
  o: number,   // 透明度
  x: number,   // 点击位置 X
  y: number,   // 点击位置 Y
}
这些参数会被传入涟漪绘制组件,用于控制绘制位置、大小和动画。
🎨 涟漪绘制组件
核心组件 RippleEffect 使用 Canvas 绘制涟漪:
kotlin
@Component
struct RippleEffect {
  @Prop params: IRipple
  private settings: RenderingContextSettings = new RenderingContextSettings(true);
  private context: CanvasRenderingContext2D = new CanvasRenderingContext2D(this.settings);

  build() {
    Canvas(this.context)
      .opacity(this.params.o)  // 控制透明度
      .width('100%')
      .height('100%')
      .translate({
        x: this.params.x - this.params.w / 2,
        y: this.params.y - this.params.h / 2,
      })
      .scale({
        x: this.params.s,
        y: this.params.s,
        z: this.params.s,
      })
      .onReady(() => {
        // 1. 绘制径向渐变圆
        let gradient = this.context.createRadialGradient(
          this.params.w / 2, this.params.h / 2, 80,
          this.params.w / 2, this.params.h / 2, 150
        );
        gradient.addColorStop(0, '#2233aa'); // 深蓝
        gradient.addColorStop(1, '#99cc99'); // 绿色背景
        this.context.fillStyle = gradient;
        this.context.beginPath();
        this.context.arc(this.params.w / 2, this.params.h / 2, 150, 0, Math.PI * 2);
        this.context.closePath();
        this.context.fill();

        // 2. 在边缘添加粒子
        let particleCount = 1000;
        this.context.fillStyle = "rgba(255, 255, 255, 0.2)";
        for (let i = 0; i < particleCount; i++) {
          let angle = Math.random() * Math.PI * 2;
          let radius = 100 + 100 / 2 * Math.random();
          let px = 200 + Math.cos(angle) * radius;
          let py = 200 + Math.sin(angle) * radius;
          this.context.fillRect(px, py, 1.2, 1.2);
        }
      })
  }
}
关键点:
createRadialGradient:实现渐变圆心到边缘的色彩过渡。arc:绘制圆形波纹。- 粒子绘制:通过随机角度和半径,生成大量小点分布在圆环边缘,模拟扩散的碎光效果。
🎬 点击交互与动画
在页面 Ceshi 中,我们监听点击事件,并使用 animateTo 实现 缩放扩散 + 渐隐消失 动效:
kotlin
@Entry
@ComponentV2
struct Ceshi {
  @Local w: number = 400;
  @Local h: number = 400;
  @Local s: number = 0;
  @Local o: number = 0;
  @Local x: number = 0;
  @Local y: number = 0;

  build() {
    Stack() {
      Column() {
        RippleEffect({
          params: {
            w: this.w,
            h: this.h,
            s: this.s,
            o: this.o,
            x: this.x,
            y: this.y,
          }
        })
      }
      .clip(true)
      .backgroundColor('#99cc99')
      .width(this.w)
      .height(this.h)
      .margin({ left: 200 })
      .onClick((e) => {
        this.getUIContext()?.animateTo({
          curve: Curve.Linear,
          duration: 1,
          onFinish: () => {
            this.getUIContext().animateTo({
              curve: Curve.Linear,
              duration: 500,
              onFinish: () => {
                this.s = 0;
                this.o = 0;
              }
            }, () => {
              this.s = 5;   // 放大
              this.o = 0.6; // 半透明
            })
          }
        }, () => {
          this.x = e.x; // 点击位置
          this.y = e.y;
        })
      })
    }
    .width('100%')
    .height('100%')
  }
}
这里的动画逻辑是:
- 点击时获取点击坐标 (
x,y)。 - 将波纹初始化为 透明 + 缩小。
- 触发动画,让波纹 放大到指定大小并渐显。
- 动画结束后,再次触发一个 渐隐动画,让波纹消失。
✅ 总结
通过 Canvas + animateTo,我们在 ArkUI 中实现了一个完整的点击涟漪效果:
- 径向渐变 提升了视觉层次感。
- 粒子扩散 增加了动感与氛围。
- 动画控制 保证了波纹的自然扩散与消失。