目录
一.表情识别
1.实现方法思路
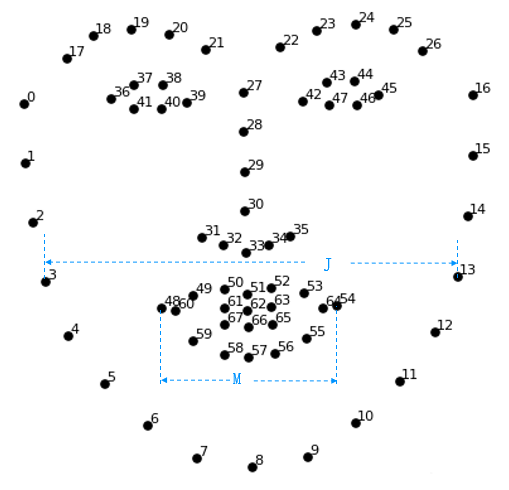
人在微笑时,嘴角会上扬,嘴的宽度和与整个脸颊(下颌)的宽度之比变大和嘴部的高度比等。


2.代码实现
①计算嘴的宽高比
python
from sklearn.metrics.pairwise import euclidean_distances
def MAR(shape):# 计算嘴的宽高比
    A = euclidean_distances(shape[50].reshape(1,2),shape[58].reshape(1,2))
    B= euclidean_distances(shape[51].reshape(1,2),shape[57].reshape(1, 2))
    C=euclidean_distances(shape[52].reshape(1,2),shape[56].reshape(1, 2))
    D= euclidean_distances(shape[48].reshape(1,2),shape[54].reshape(1, 2))
    return((A+B+C)/3)/D
注意:使用euclidean_distances()方法计算距离必须是二维数据
②计算嘴宽度、脸颊宽度的比值
python
def MJR(shape):#计算嘴宽度、脸颊宽度的比值
    M=euclidean_distances(shape[48].reshape(1,2), shape[54].reshape(1, 2))#嘴宽度#下颌的宽度
    J= euclidean_distances(shape[3].reshape(1,2),shape[13].reshape(1, 2))
    return M/J
③构造脸部位置检测器,读取人脸关键点定位模型
python
detector = dlib.get_frontal_face_detector()# 构造脸部位置检测器
predictor = dlib.shape_predictor("../关键点定位/shape_predictor_68_face_landmarks.dat")#读取人脸关键点定位模型
④循环对每一帧操作,获取关键点
python
cap=cv2.VideoCapture('test3.mp4')
while True:
    ret,frame = cap.read()
    # 获取图片中全部人脸位置
    faces = detector(frame,0)
    for face in faces:
        shape = predictor(frame,face) #获取关键点
⑤将关键点转换为坐标(x,y)的形式 并计算嘴部的高宽比和嘴宽/脸颊宽
python
# 将关键点转换为坐标(x,y)的形式
        shape = np.array([[p.x,p.y] for p in shape.parts()])
        mar = MAR(shape)#计算嘴部的高宽比
        mjr = MJR(shape)#计算"嘴宽/脸颊宽"
⑥根据条件判断表情
python
        result="正常"#默认是正常表情
        print("mar",mar,"\tmjr",mjr) #测试一下实际值,可以根据该值确定#可更具项目要求调整阀值。
        if mar > 0.5:
            result="大笑"
        elif mjr>0.45: # 超过闽值为微笑
            result="微笑"
⑦构建嘴部凸包并画出
python
        mouthHull =cv2.convexHull(shape[48:61]) # 嘴型构造凸包
        frame =cv2_put_text_cn(frame,result,mouthHull[0,0])#多人脸
        cv2.drawContours(frame,[mouthHull],-1,(0,255,0), 1)
    cv2.imshow("Frame",frame)
    if cv2.waitKey(1)== 27:
        break
⑧释放资源
python
cv2.destroyAllWindows()
cap.release()
二.年龄性别预测
网络结构图像首先被裁剪为227*227输入网络。
卷积核1:96×3×7×7+ReLU+max pooling3 × 3,stride=2,normalization,输出为96×28×28 。
卷积核2: 256×96×5×5+ReLU+max pooling3×3,stride=2,normalization,输出为256×14×14 。
卷积核3: 384×256×14×14+ReLU+max pooling3×3。
4、全连接:512个神经元+ReLU+dropout
5、全连接:512个神经元+ReLU+dropout
6、output:根据年龄或性别映射到最后的类。
模型下载地址:https://github.com/GilLevi/AgeGenderDeepLearning和
https://github.com/spmallick/learnopencv/blob/master/AgeGender/opencv_face_detector_uint8.pb

1.加载下载后的网络
python
import cv2
from PIL import Image, ImageDraw, ImageFont
import numpy as np
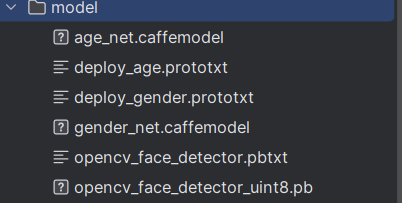
faceProto ="model/opencv_face_detector.pbtxt"
faceModel ="model/opencv_face_detector_uint8.pb"
ageProto ="model/deploy_age.prototxt"
ageModel ="model/age_net.caffemodel"
genderProto ="model/deploy_gender.prototxt"
genderModel ="model/gender_net.caffemodel"
#加载网络
ageNet=cv2.dnn.readNet(ageModel,ageProto)
genderNet=cv2.dnn.readNet(genderModel,genderProto)
faceNet=cv2.dnn.readNet(faceModel,faceProto)
2.变量初始化
python
ageList=['0-2岁','4-6岁','8-12岁','15-20岁','25-32岁','38-43岁','48-53岁','60-100岁']
genderList=['男性','女性']
mean =(78.4263377603,87.7689143744,114.895847746)#模型均焦
3.自定义函数,获取人脸包围框
python
def getBoxes(net,frame):
    frameHeight,frameWidth=frame.shape[:2]
    blob=cv2.dnn.blobFromImage(frame,1.0,(300,300),[104,117,123],True,False)
    net.setInput(blob)
    detections=net.forward()

    faceBoxes=[]
    for i in range(detections.shape[2]):
        confidence=detections[0,0,i,2]
        if confidence>0.7:#筛选一下,将置信度大于0.7侧保留,其余不要了
            x1=int(detections[0,0,i,3]*frameWidth)
            y1 = int(detections[0, 0, i, 4] * frameHeight)
            x2 = int(detections[0, 0, i, 5] * frameWidth)
            y2 = int(detections[0, 0, i, 6] * frameHeight)
            faceBoxes.append([x1,x2,y1,y2])
            # 绘制人脸框
            cv2.rectangle(frame,(x1,y1),(x2,y2),(0,255,0),int(round(frameHeight/150)),6)
    # 返回绘制了人脸框的帧frame、人脸包围框faceBoxes
    return frame, faceBoxes
4.获取人脸包围框、绘制人脸包围框(可能多个)
python
cap = cv2.VideoCapture(0)#装载摄像头
while True:
    _,frame = cap.read()
    frame = cv2.flip(frame,1)#镜像处理
    # 获取人脸包围框、绘制人脸包围框(可能多个)
    frame, faceBoxes = getBoxes(faceNet,frame)
    if not faceBoxes:  # 没有人脸时检测下一帧,后续循环操作不再继续。print("当前镜头中没有人")
continue没有人脸时检测下一帧,后续循环操作不再继续、5.遍历每一个人脸包围框
处理frame,将其处理为符合DNN输入的格式
python
    for faceBox in faceBoxes:
    # 处理frame,将其处理为符合DNN输入的格式
        x1, y1, x2, y2 = faceBox
        face = frame[y1:y2, x1: x2]
        blob = cv2.dnn.blobFromImage(face, 1.0, (227,227), mean)  # 模型输入为227*277,参考论文
6.调用模型,预测性别
python
# 调用模型,预测性别
        genderNet.setInput(blob)
        genderOuts = genderNet.forward()
        gender = genderList[genderOuts[0].argmax()]
7.调用模型,预测年龄
python
# 调用模型,预测年龄
        ageNet.setInput(blob)
        ageOuts = ageNet.forward()
        age = ageList[ageOuts[0].argmax()]
8.展示结果
python
        result = "{},{}".format(gender,age)  # 格式化文本(年龄、性别)
        frame =cv2_put_text_cn(frame,result, (x1,y1-30)) #输出中文性别和年龄
        cv2.imshow("result",frame)
    if cv2.waitKey(1)== 27:# 按下ESC键,退出程序
        break
cv2.destroyAllWindows()
cap.release()