官方文档:kotlinlang.org/docs/corout...
一、Scope 的 launch 流程
Scope:协程的作用域
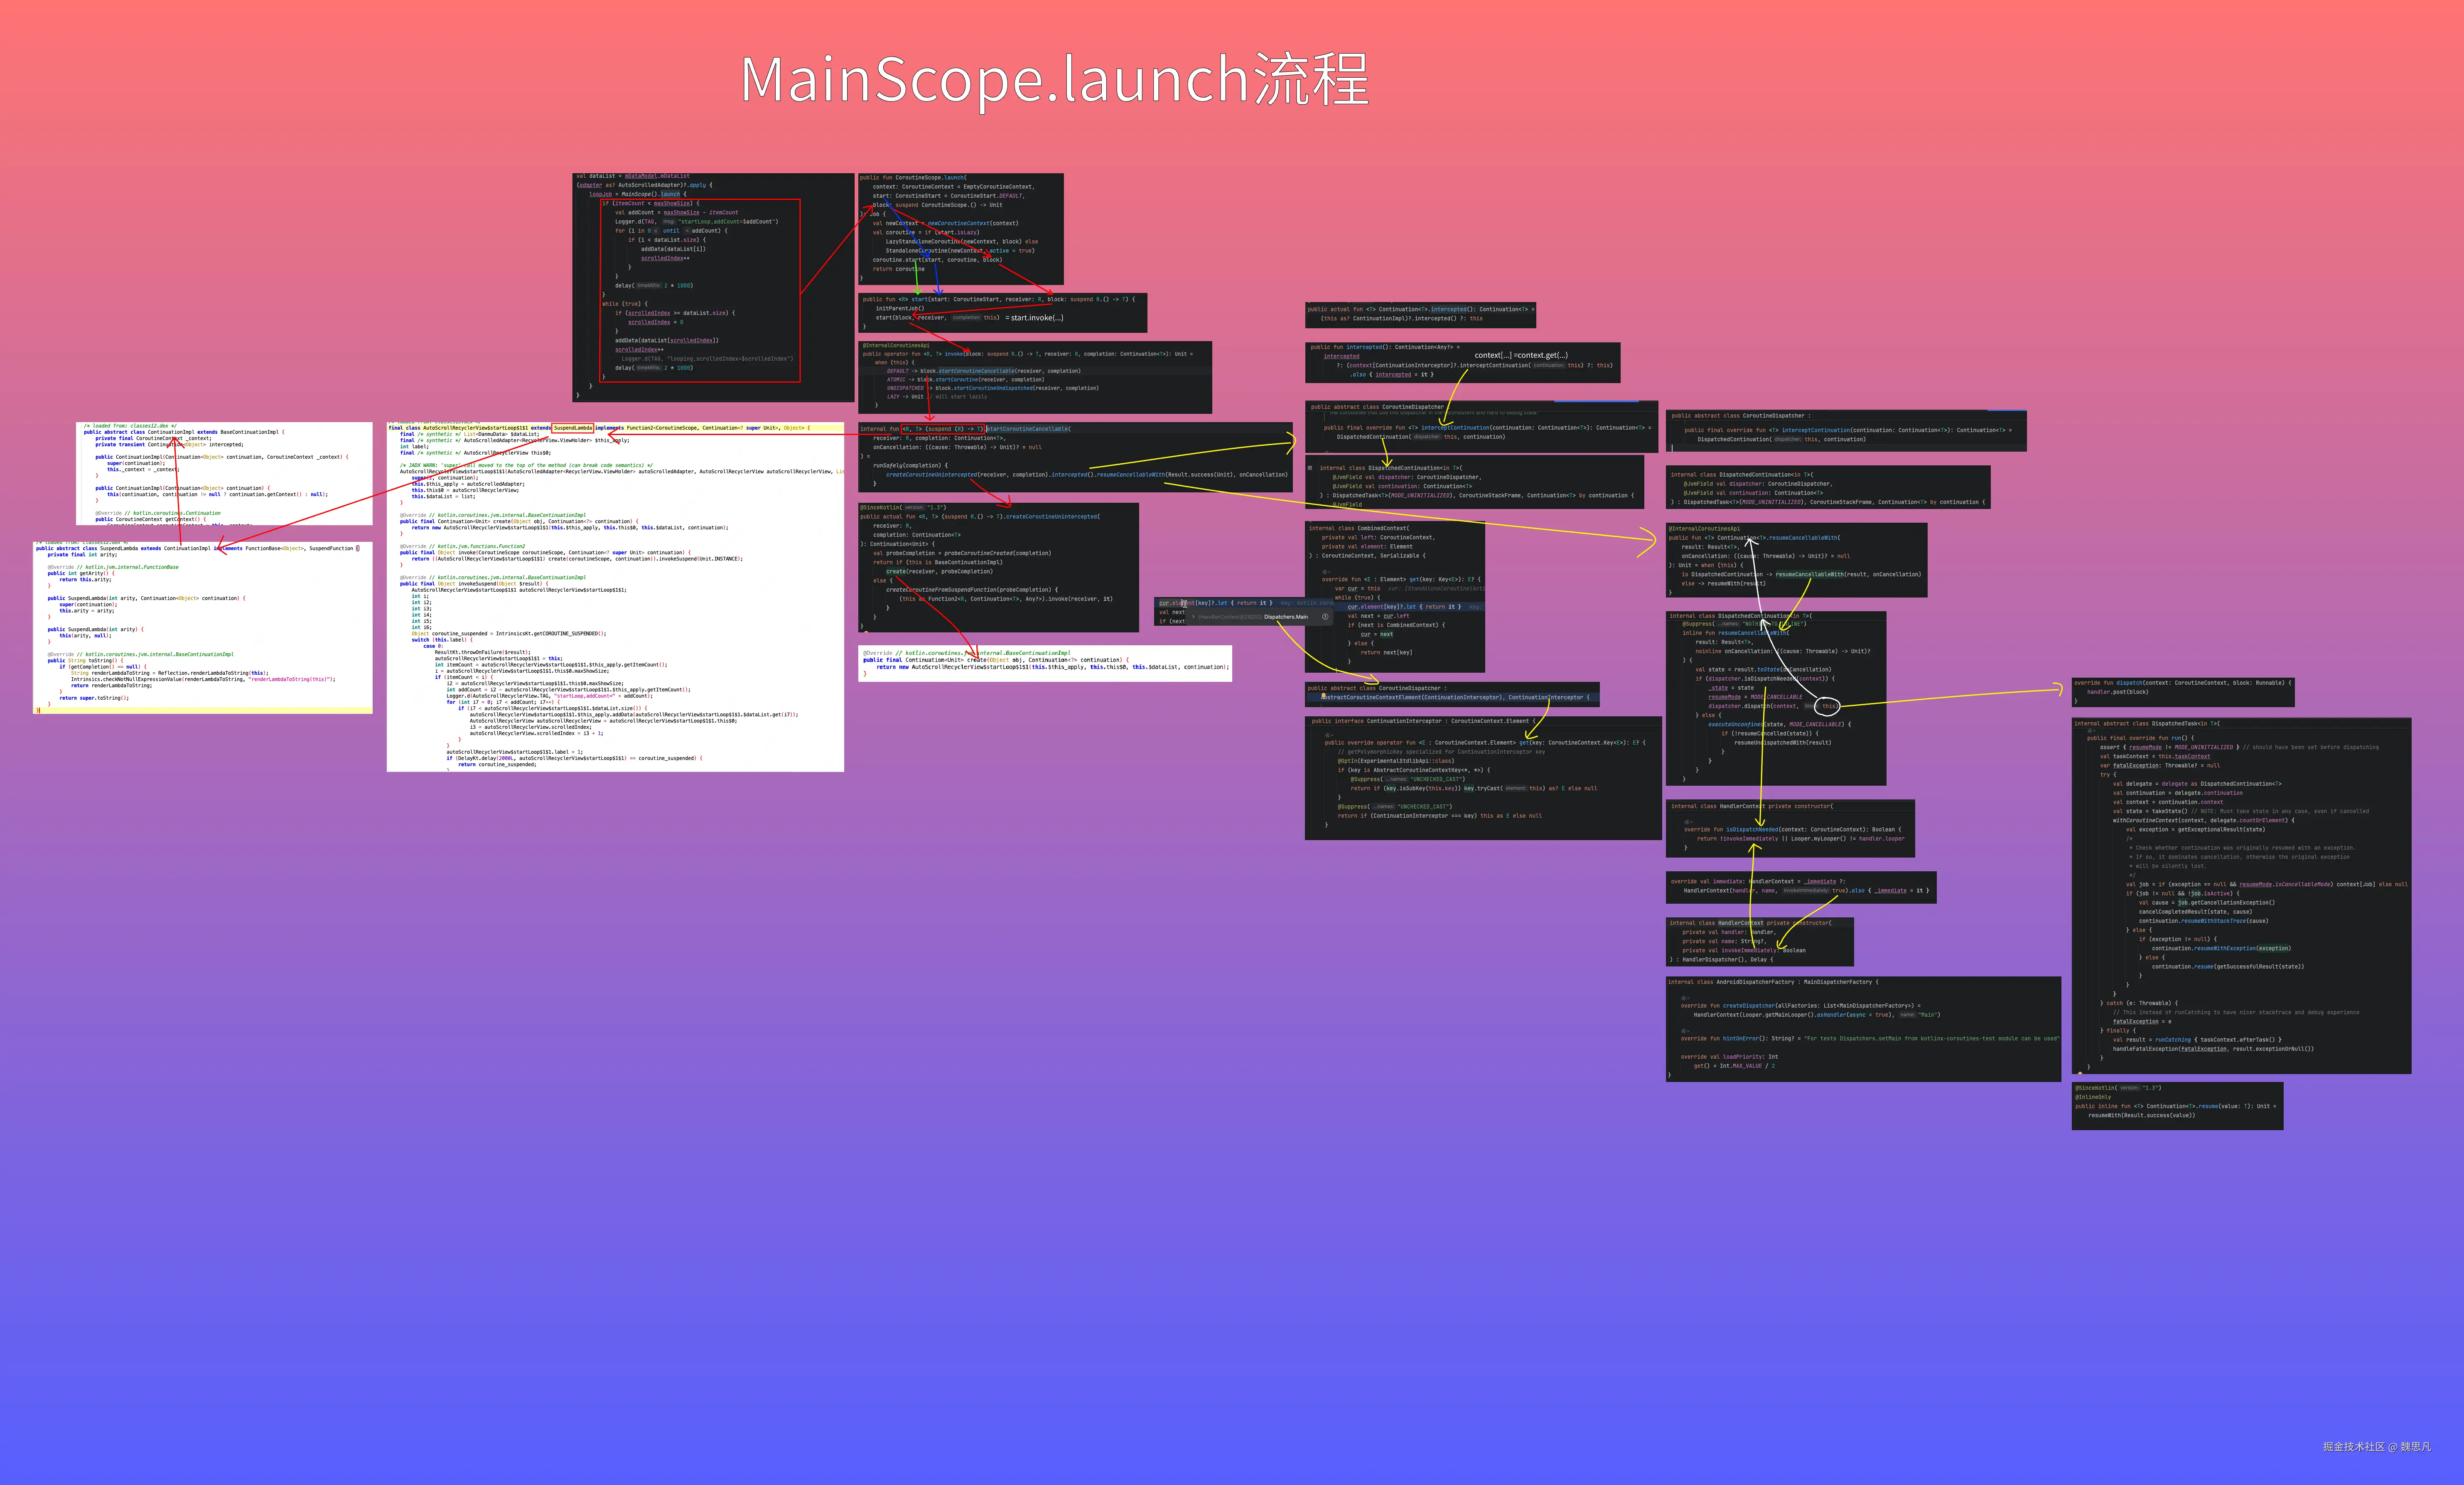
- CoroutineScope.launch{}
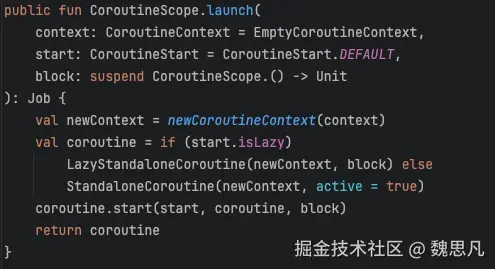
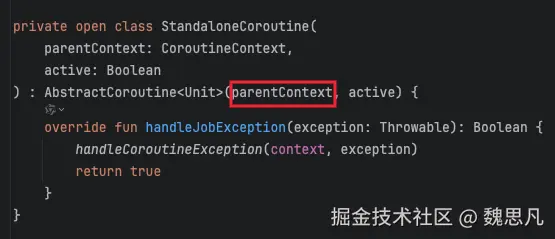
调用 launch 之后,我们的业务代码作为参数 block 传入,根据协程的启动模式创建一个 coroutine,再次将 block 透传进入到 coroutine 中,start==CoroutineStart.DEFAULT,这里创建的协程就是 StandaloneCoroutine。进入StandaloneCoroutine#start
- StandaloneCoroutine#start

这里相对有一些绕,start 方法内有一个启动模式的 start 变量,方法内部的 start(...)是调用了启动模式 start 变量的 invoke()方法,即 CoroutineStart#invoke。注意第二个参数 receiver 是第一步中传入的 StandaloneCoroutine,第三个参数传入的 this,即 StandaloneCoroutine。
在 kotlin 中,
对象.invoke(a..)的写法等于对象(a..)。类似的还有对象.get(a)等于对象[a],很像数组的取值。这个得益于 kotlin 的运算符重载(operator fun)特性,运算符重载含义就是将运算符起一个别名,这个别名在 kotlin 的语法中是固定的,括号就对应与 invoke。
- CoroutineStart#invoke
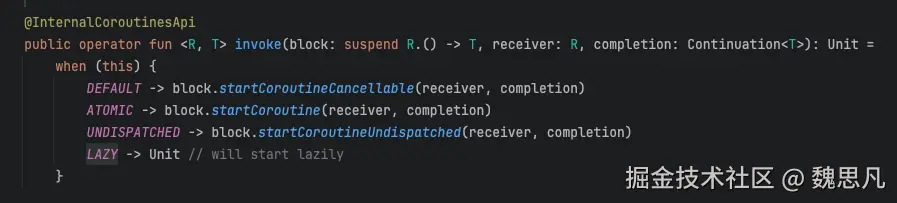
启动模式为 default,进入 block 的 startCoroutineCancellable,这里 startCoroutineCancellable 是一个扩展函数,即对象类型为suspend () -> T的一个扩展方法方法。
suspend () -> T 也能称为一个 Class???其实在 kotlin -> Java 的过程,suspend () -> T 编译完成后就是一个 Class,SuspendLamada,这个是编译后才有的一个产物,而我们写的业务代码 block 则是继承这个 SuspendLamada。
- (suspend () -> T)#startCoroutineCancellable

这里需要分成三步分析,先看 createCoroutineUnintercepted
4.1 (suspend () -> T)#createCoroutineUnintercepted
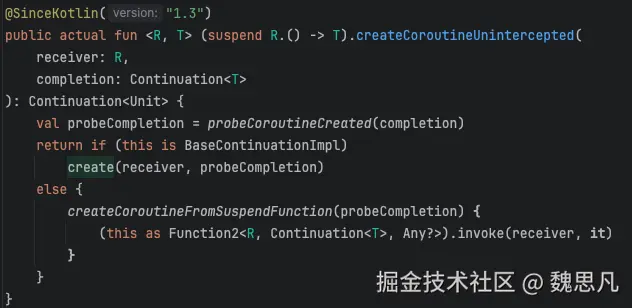
4.1.1 根据前面的分析,可以知道这个方法传参都是 StandaloneCoroutine,this 即我们最初写的 block。这个地方单纯看 kotlin 代码已经看不明白了,反编译后之后可以看到 block 被编译为一个匿名对象,且继承自 SuspendLamda。
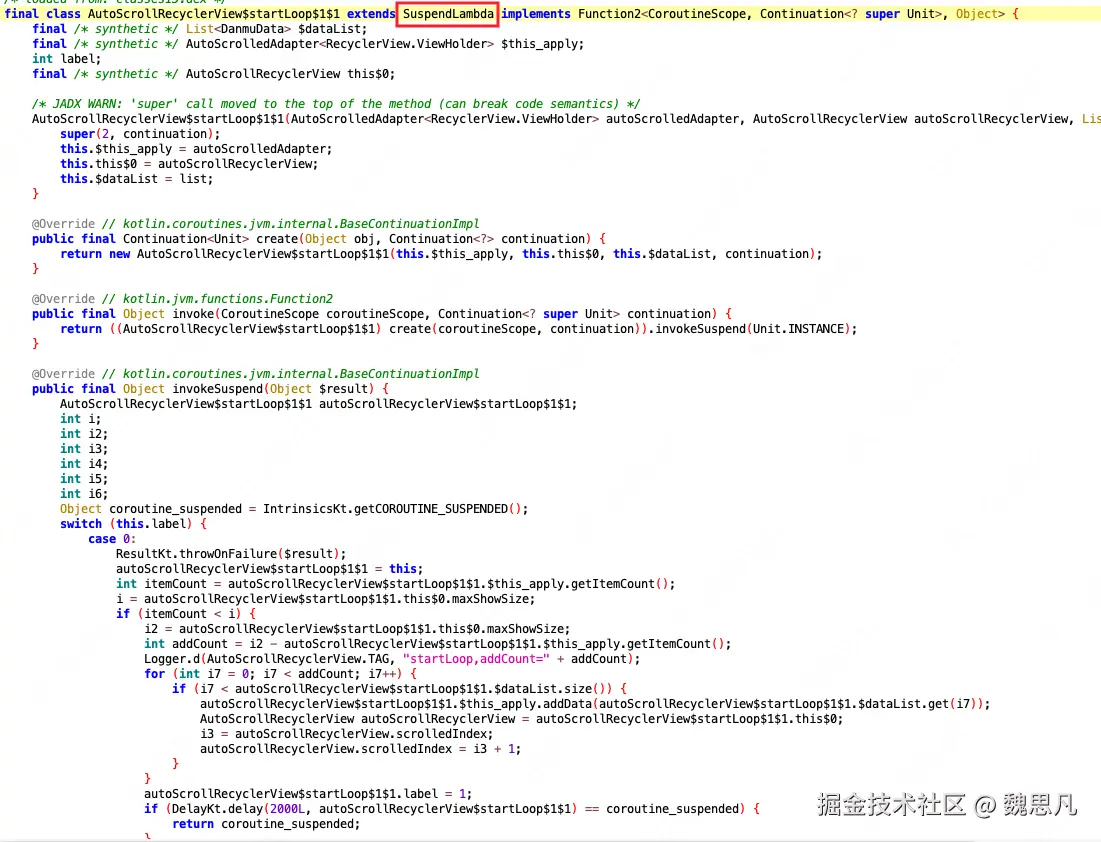
SuspendLamda 继承自 ContinuationImpl,ContinuationImpl 又继承自 BaseContinuationImpl,所以 block 满足 is BaseContinuationImpl 的条件。最后调用了block#create。
4.1.2 这个 create 方法是匿名对象重写的方法。

最后又创建了一个匿名对象。

用自己创建了一个自己?不谈设计模式,如果只从实际运行效果出发的角度解释的话是这样的 ⬇️

这个是在 Scope#launch 之前创建的 block 对象,第四个参数为 null。即协程字段为空,当前对象只是一个 TaskContainer。而第二次再次 create 创建出来的对象是有协程对象的,相当于一个 setContinuation 的含义,是一个真正的协程体。
4.2 (suspend () -> T)#intercept()

根据 4.1 的分析,this 对象满足 is ContinuationImpl 的条件。

这里类似于
kotlin
val intercepted by lazy{
    context[ContinuationInterceptor]?.interceptContinuation(this)
}

public fun intercepted() : Continuation<Any?>= intercepted


所以 context 即协程 StandaloneCoroutine 绑定的 context。回到 launch 中,查看 Context 的创建过程
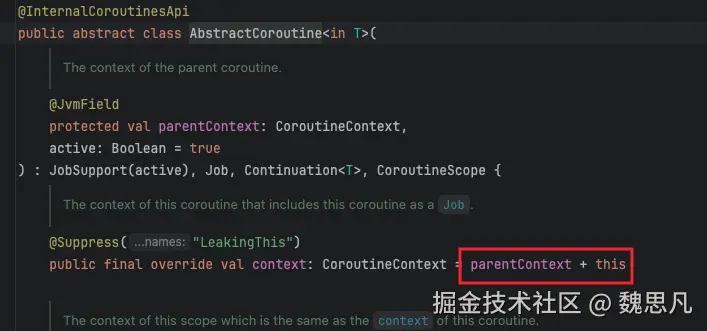
4.3 StandaloneCoroutine#context
4.3.1 CoroutineScope#newCoroutineContext

以 CoroutineScope(Dispatchers.Main) 举例创建协程,coroutineContext 即当前 Scope 的上下文,而这个上下文是在跟随创建 Scope 的时候创建的。
4.3.1.1 CoroutineScope#newInstance
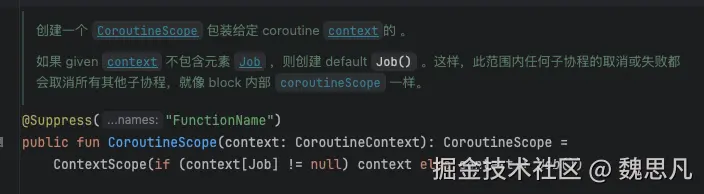
举例为以 CoroutineScope(Dispatchers.Main) 举例,所以由于传入的 context 为 Dispatchers.Main 为新创建的调度器,所以内部没有 Job 元素,会走到 else 分支和一个 Job 对象做运算。
4.3.1.2 CoroutineContext#plus
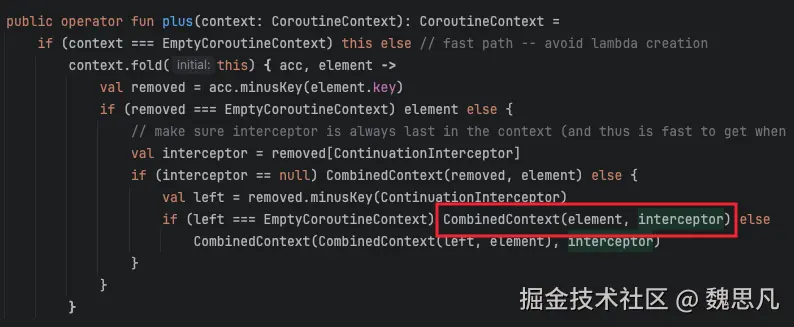
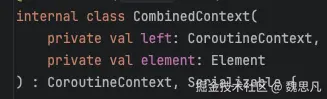
走到这里时,this 是 Dispatchers.Main,传入的 context 是 JobImpl 实例,最终会返回一个 CombinedContext 实例,CombinedContext 采用树形结构来存储组合的元素。每个 CombinedContext 实例包含两个部分:一个左子元素和一个右子元素,左节点可能是多个 context,但右节点通常来说是一个 context。
1. 快速路径判断
如果要合并的 context 是 EmptyCoroutineContext(空上下文),则直接返回当前的 CoroutineContext 实例。这是一种优化手段,避免不必要的 lambda 表达式创建和后续的合并操作。
2. 遍历待合并的上下文
使用 fold 方法遍历待合并的 context 中的每个元素。acc 是累积的上下文,初始值为当前的 CoroutineContext 实例;element 是当前正在处理的 CoroutineContext 元素。
3. 移除相同 Key 的元素
调用 minusKey 方法从累积上下文 acc 中移除与当前元素 element 具有相同 Key 的元素。minusKey 方法会递归查找并移除指定 Key 的元素。
4. 处理移除结果
- 移除后为空上下文:如果移除操作后
removed是EmptyCoroutineContext,说明累积上下文acc中只有与当前元素element相同Key的元素,移除后只剩下空上下文,此时直接返回当前元素element。 - 移除后不为空上下文:继续处理,确保
ContinuationInterceptor元素位于上下文的末尾。
5. 处理 ContinuationInterceptor 元素
-
没有
ContinuationInterceptor元素:如果removed中不包含ContinuationInterceptor元素,直接将removed和当前元素element组合成一个新的CombinedContext。 -
存在
ContinuationInterceptor元素:- 先从
removed中移除ContinuationInterceptor元素,得到left。 - 如果
left是EmptyCoroutineContext,则将当前元素element和ContinuationInterceptor元素组合成新的CombinedContext。 - 否则,将
left、当前元素element和ContinuationInterceptor元素组合成嵌套的CombinedContext,确保ContinuationInterceptor元素位于最外层。
- 先从
回到4.3.1.1
4.3.1.3 CoroutineScope#newInstance
那么当前 Scope 的上下文便是这个 CombinedContext,由此回到4.3.1
coroutineContext 即 CombinedContext,然后和 EmptyCoroutineContext 继续做加运算,由于context 是 EmptyCoroutineContext,所以直接返回 this,即 combined 还是 CombinedContext,因为当前上下文有 Dispatchers.Main 作为 element 元素,所以当前上下文是有 ContinuationIntercept 的,所以最终返回的还是 CombinedContext。回到4.3

根据 plus 的逻辑,本次加法为最终的计算结果是 CombinedContext(StandaloneCoroutine, Dispatchers.Main)。由此我们已经知道了4.2中的 context 为 CombinedContext(StandaloneCoroutine, Dispatchers.Main),且有 ContinuationIntercept,为 Dispatchers.Main。然后继续 4.2 往下,进入 interceptContinuation,Dispatchers.Main的本质是一个 HandlerContext,HandlerContext 并未重写这个方法,最终追到CoroutineDispatcher#interceptContinuation。
4.4 CoroutineDispatcher#interceptContinuation
传参 continuation 为(suspend () -> T)


回到 4 中最开始 intercepted() 后返回了一个可 dispatched 的协程 DispatchedContinuation

4.5 Continuation#resumeCancellableWith
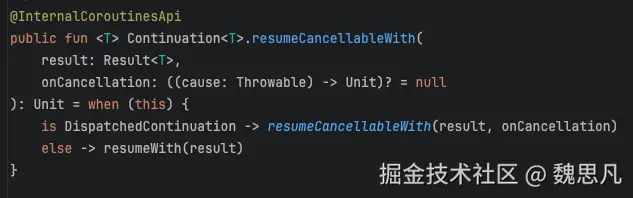
根据上面的分析可以知道 this 符合 is DispatchedContinuation 的条件,进入 DispathedContinuation 的 resumeCancellableWith
4.6 DispatchedContinuation#resumeCancellableWith
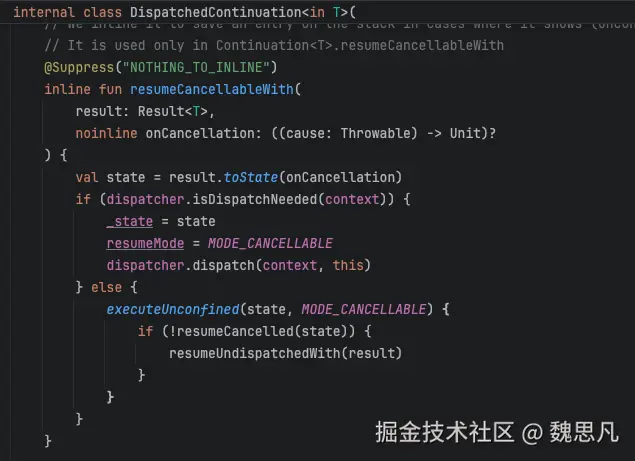
这里涉及到一个关键的逻辑,if (dispatcher.isDispatchNeeded(context)) ,具体执行的效果跟不同的 Dispatcher有关。对于 Dispatchers.Main 的逻辑是这样的,非立刻执行 或者 当前运行线程的 looper 和 dispatcher 的不同。 结合下表和下图代码理解,第一行和第二行对应于 Dispatchers.Main,第三行和第四行对应于Dispatchers.Main.immediate,dispatch 结果为 true 则走调度器分发,即 post{}。总结表格可得,只有在主线程用 immediate 创建的协程才会阻塞当前线程。
| invokeImmediately | 主线程创建,即 handler 相同 | dispatch | |
|---|---|---|---|
| false | true | true | false = true |
| false | false | true | true = true |
| true | true | false | false = false |
| true | false | false | true = true |
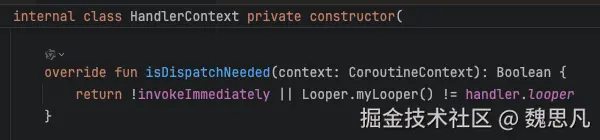
返回值的含义就是立刻执行(false) or 用 handler 去分发执行(true),Main 命中分发的情况会使用 Handler.post。

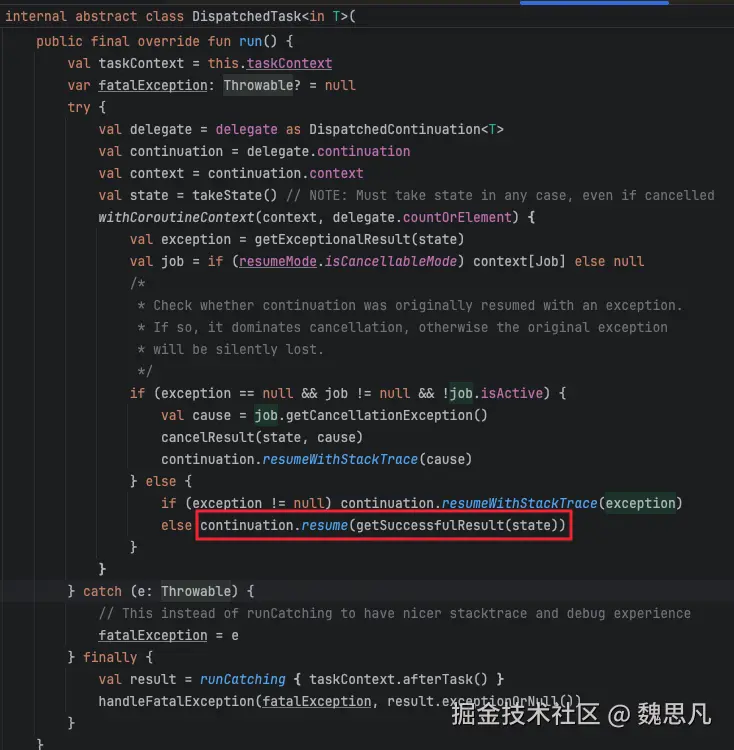
根据 DispatchedContinuation 的构造参数和上述分析,delegate.continuation 即 (suspend () -> T),没有 exception 的情况下正常走到 (suspend () -> T)#resume。
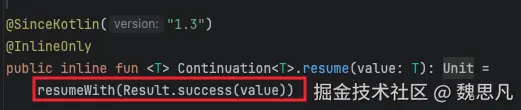
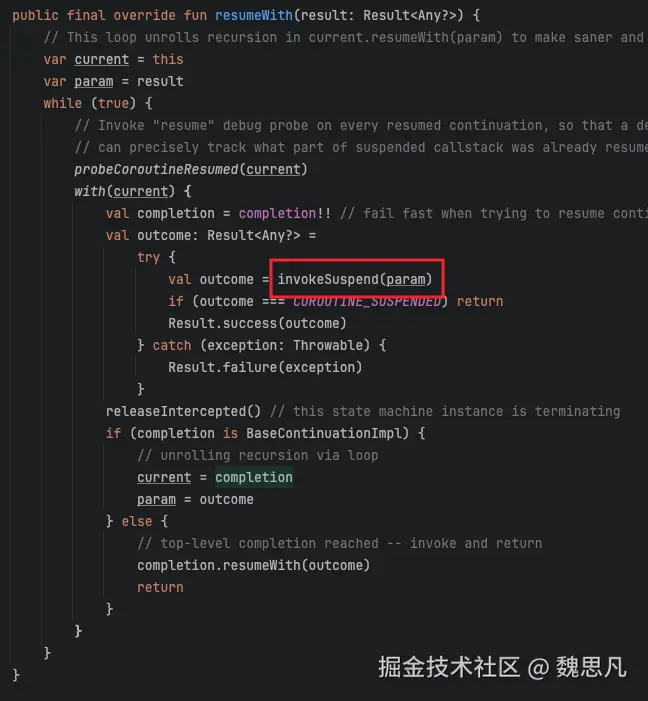
然后走到 BaseContinuationImpl#resumeWith 中,调用 invokeSuspend 方法,进而走到我们写的 block 对象中去。
至此 launch 流程分析结束。
二、协程挂起与恢复的秘密------状态机
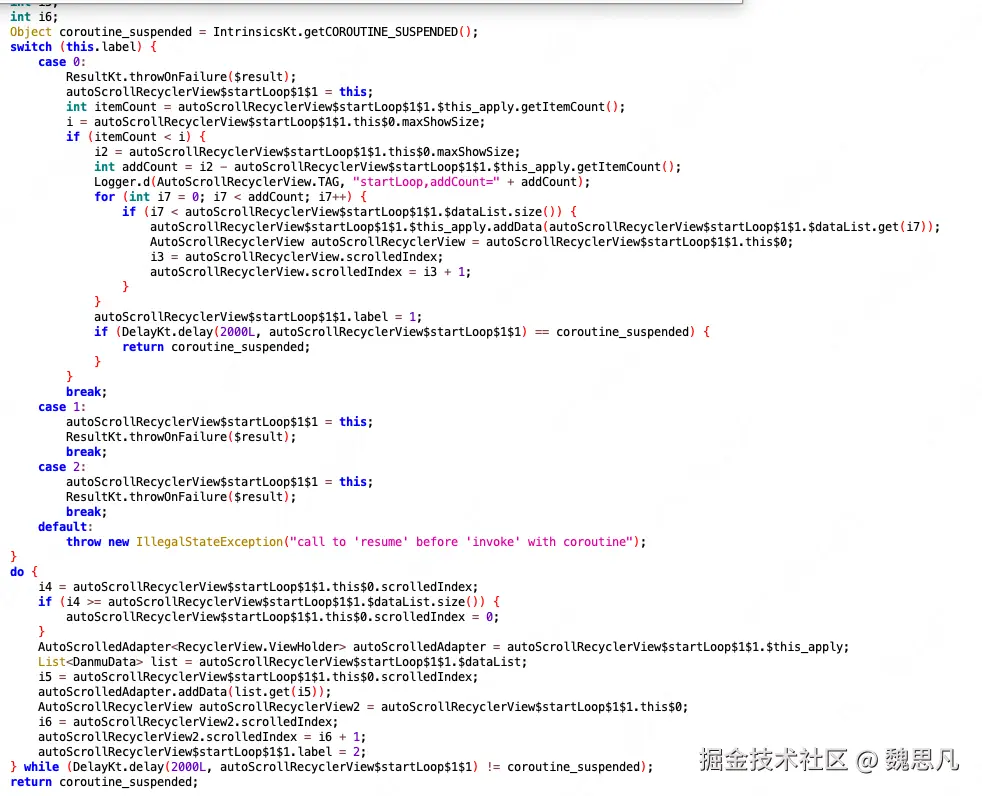
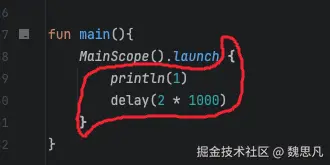
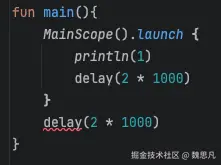
真正让协程挂起与恢复的秘密就是协程中这块状态机代码,它就在 invokeSuspend 方法中,跟随编译生成。
每一个 suspend 修饰的方法都隐含持有一个隐藏参数 Continuation,即 上/父层 协程。
比如 delay 的一个隐藏参数就有外部这个环境,而我们在非 suspend 的环境写 delay 的话,会直接编译出错。
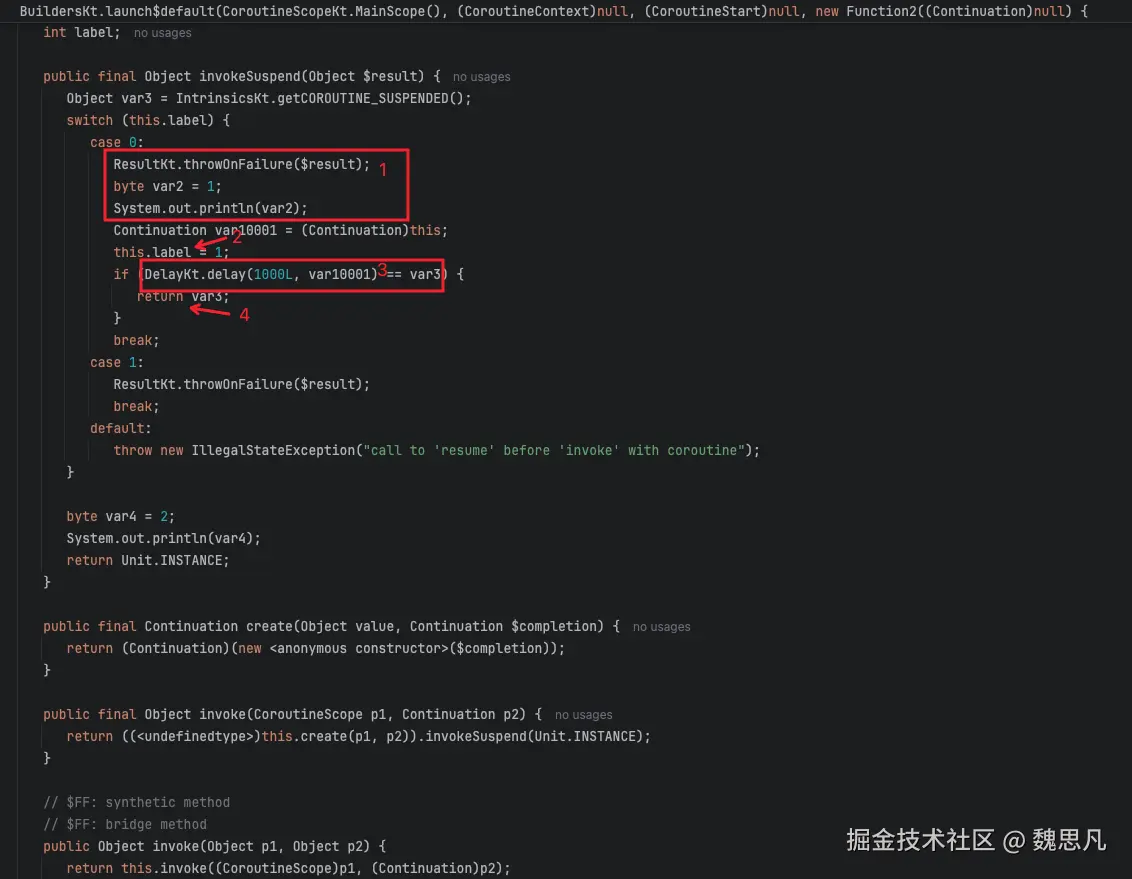
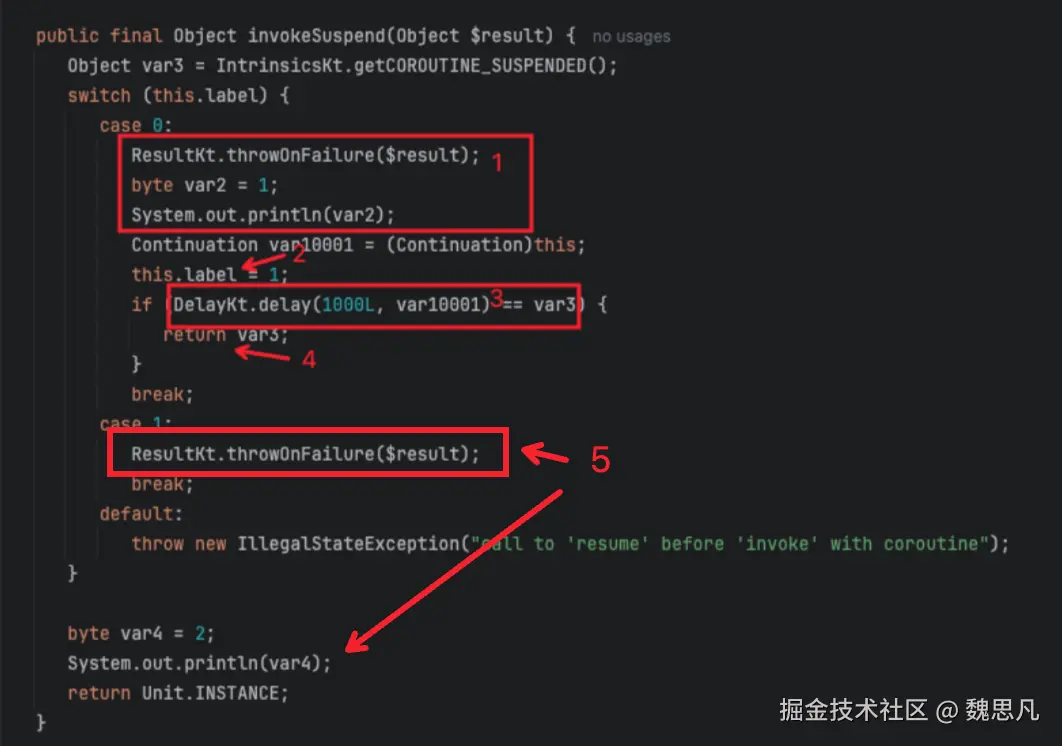
编译魔法 1


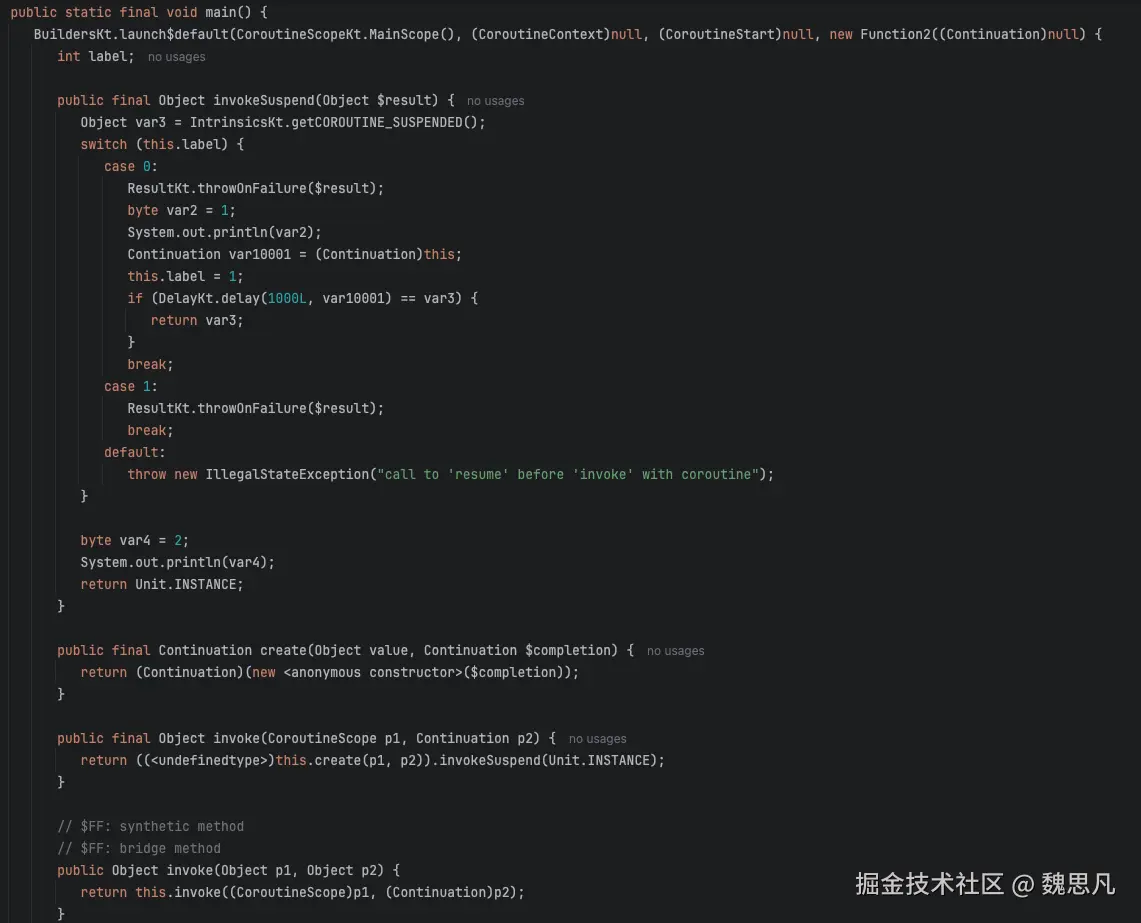
第一步,执行 delay 前的业务代码。
第二步,修改状态机的状态流转为 1。
第三步,调用 delay 方法,并把父协程传进入,该方法会返回一个 suspend 的挂起标识符,判断将为 true,则挂起,挂起即 return。
第四步,把挂起标识符一并返回。
标识符就是一个静态对象。

何时恢复? 编译魔法 2
进入 delay 方法
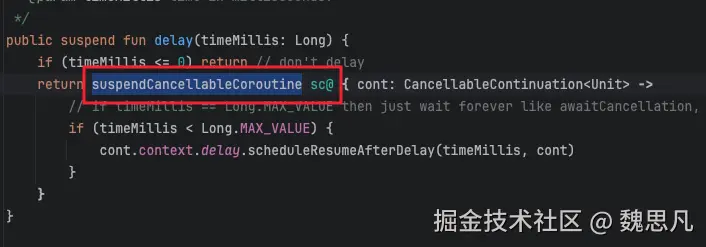
suspendCancellableCoroutine其是就是挂起,cont 是调用处的 Continuation。使用例子
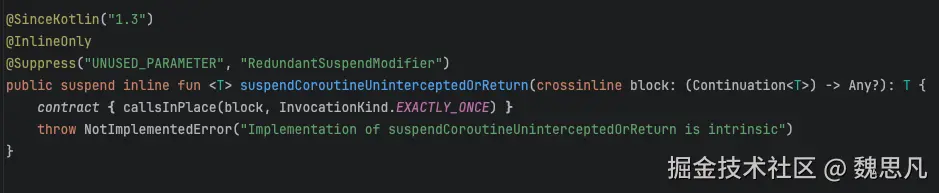
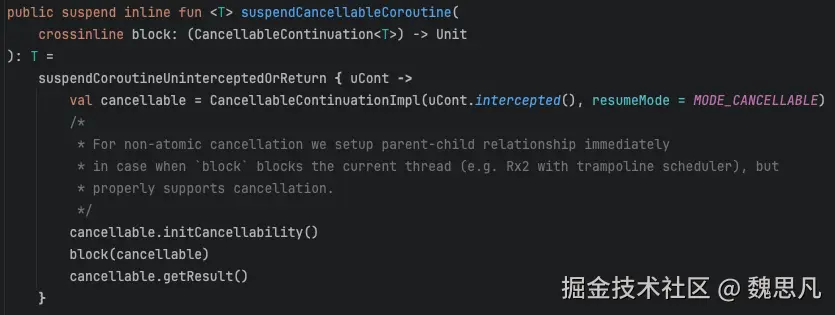
由于后面两个方法都是 inline 的,所以这三个方法合起来编译之后是这样的
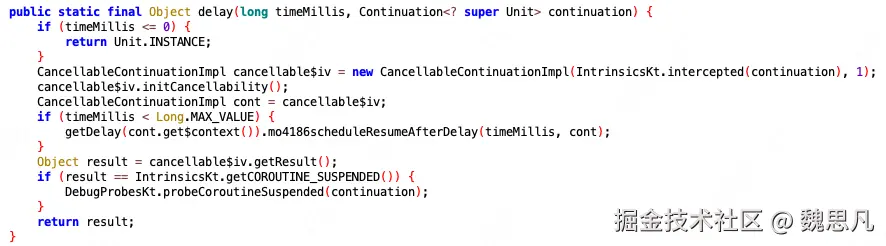
所以执行顺序是这样的,下方图二的 uCont 即父协程,图 1 中的 cont 是 包裹了父协程的 cancellable 协程。
猜测 suspendCoroutineUninterceptedOrReturn 的意义就是在 kt 层显式增加父协程的引用 uCont,提醒编译器这里需要编译魔法。
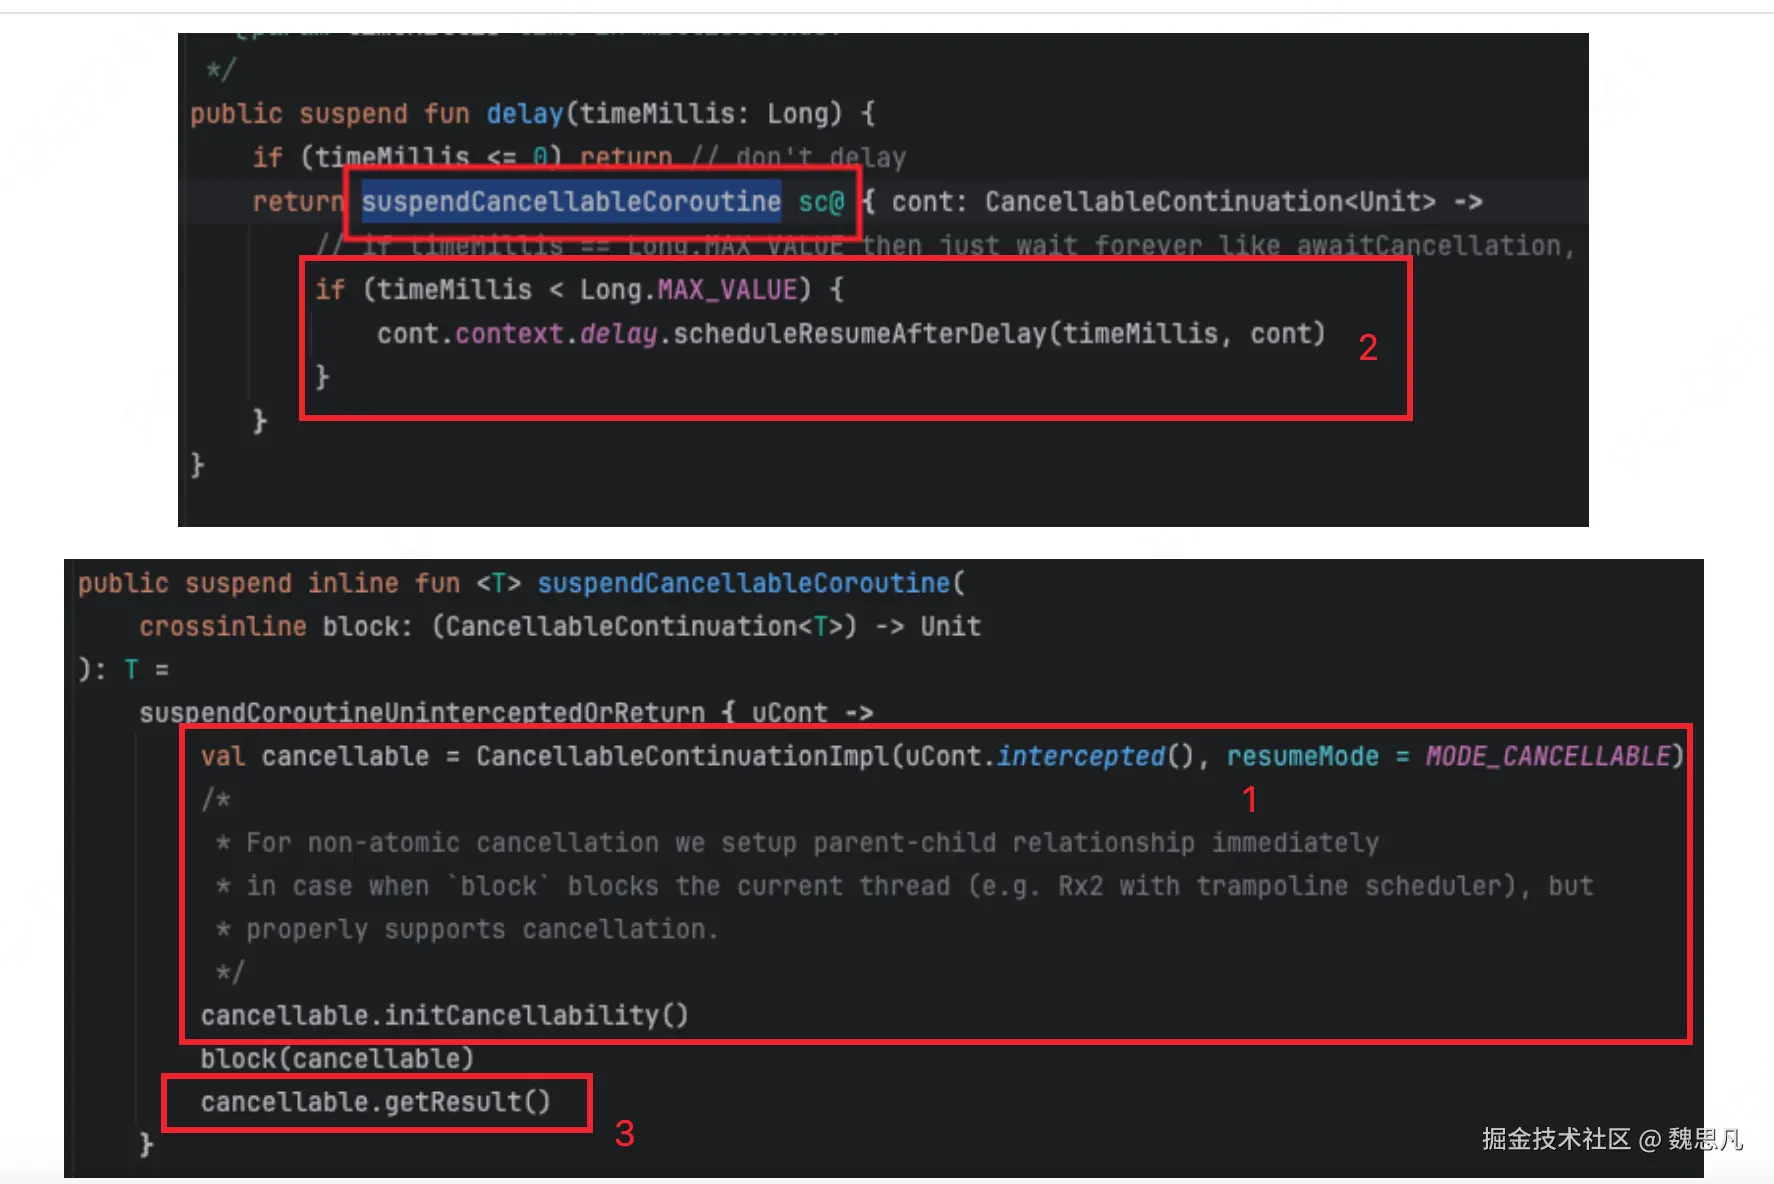
根据第一节的分析,可知 Continuation.intercepted() 的作用是把当前代码块创建一个可分发的协程 DispatchedContinuation,继承自 DispatchedTask。同样 CancellableContinuationImpl 也是继承自 DispatchedTask,实现具有可取消的特性。

执行 cont.context.delay 的 scheduleResumeAfterDelay 方法,cont 为包裹了父协程的 cancellable 协程,context 中即启动父协程的上下文,delay get 到的即 HandlerContext------Dispatchers.Main。
解释为什么 get(ContinuationInterceptor)为什么就是 Dispatchers.Main,这个操作更像是判断自己 instanceof T 似的。


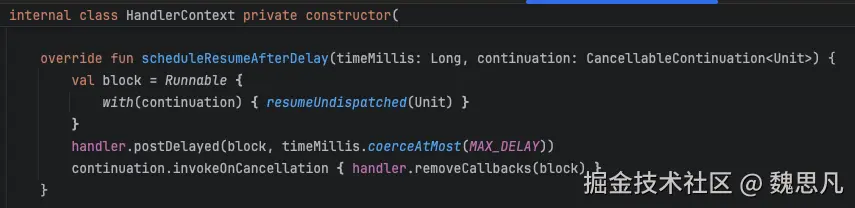
HandlerContext 的 scheduleResumeAfterDelay 实现如下。通过 postDelay 的方式将协程中需要运行的代码用 Runnable 包裹抛了出去,进而实现了协程的"恢复"。
最终会继续执行同一个 ContinuationImpl 的 invokeSuspend 方法,但由于状态机的状态已经自增,所以会运行第 5 块代码,由于这个状态不需要 return,所以状态机结束后执行了状态机的最终代码,即业务代码,至此状态机的生命周期结束。
这里拿了 delay 函数作为例子来讲解协程的挂起 与恢复, 其他的挂起恢复场景与这个的底层原理思维都大致相同,都是通过返回一个协程标识符来挂起当前的协程,再将父协程传递给子协程,由子协程回调父协程从而实现恢复协程,这一切都归功于协程的编译魔法。
三、协程是怎么切换线程的
协程中切换线程就离不开 withContext 这个方法了。
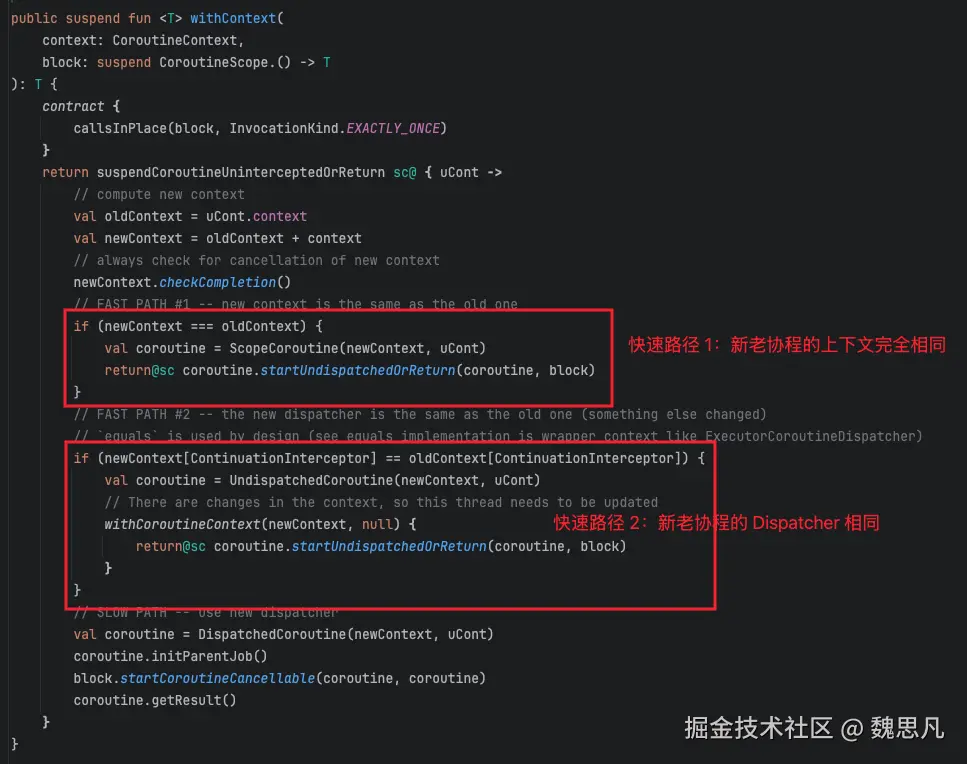
切线程的情况下,newContext 和 oldContext 不会相同,而会使用 CombinedContext 将上下文链接起来,如图。

忽略两个快速路径,分析下面部分。
如第二章分析,uCont 为父协程。val coroutine = DispatchedCoroutine(newContext, uCont)创建一个包含父协程和新 Context 的可分发协程。block.startCoroutineCancellable (coroutine, coroutine)启动一个可取消的协程任务。coroutine.getResult()判断是否需要挂起,需要挂起则返回标识符,否则已经有结果会返回结果。
第一章中我们知道 Dispatchers.Main 是 HandlerContext 的实例。如果想要继续分析,我们还需要了解 Dispatchers.IO 是什么。

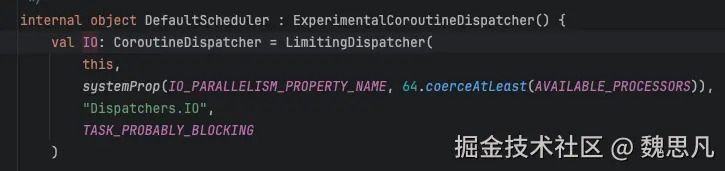
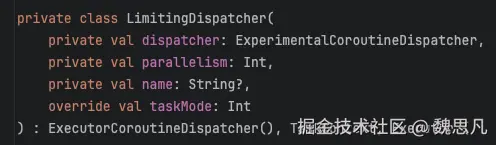
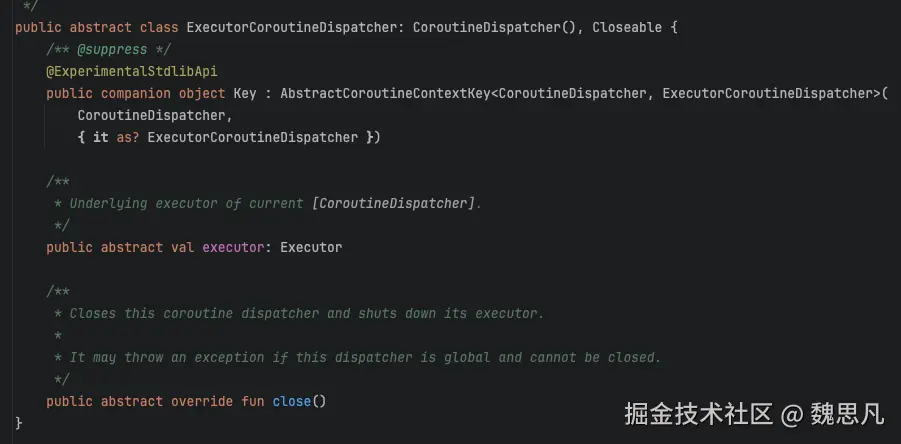
LimitingDispatcher 实现了 Executor,IO 更像是一个自行维护一系列任务的线程池。同第一章 4.4 - 4.6,先判断是否需要分发,需要分发的话,走进 Dispatcher的 dispatch()。Dispatchers.IO 并未重写 isDispatchNeeded()。默认就是需要分发的,进入LimitingDispatcher#dispatch

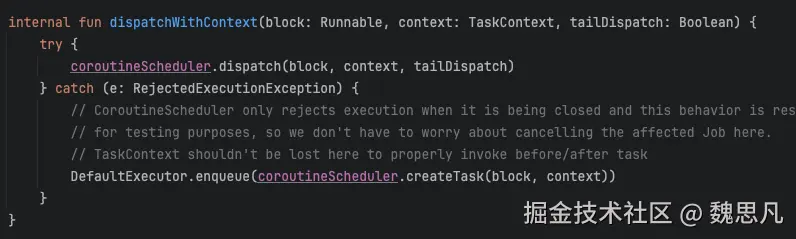
Dispatchers.IO 是一个单例,使用 ExperimentalCoroutineDispatcher 作为真正的任务分发,自身内部维护了同时分发的任务数和任务集,像线程池的拒绝策略,保证了不会 OOM 以及 CPU 良好的性能。真正调用到了 ExperimentalCoroutineDispatcher 的 dispatchWithContext。
四、协程中的错误处理机制
协程的父子关系
一个协程是什么?
当我们这么写
kotlin
scope.launch {

}
或者这么写
kotlin
scope.async  {

}
我们都称之为启动一个新的协程。launch 和 async 都是 Scope 的一个扩展函数,同时这个 lamada 中还有一个 Receiver,就是 Scope 本身。所以我们就可以在一个协程中,再启动一个协程。此时,内部的协程就是外部协程的儿子。
kotlin
scope.launch {
 launch {

}
}
这里有一个隐藏的机制,创建 Scope 的时候,Scope 的 context 内部需要一个 Job,如果外面传入,则用外面的,否则使用内部默认的 JobImpl,通过 scope 创建的协程跟这个 Job 都是父子关系。
kotlin
public fun CoroutineScope(context: CoroutineContext): CoroutineScope =
    ContextScope(if (context[Job] != null) context else context + Job())

public fun Job(parent: Job? = null): CompletableJob = JobImpl(parent)
这里多说一句,Scope 内部的 Job 是 JobImpl 或者外面传入的协程中 Context 的 key 为 Job 的一个对象(即继承 JobSupport,通常我们都用*SupervisorJob*)这些会在《协程中的 Context》 中会讲

协程中捕获异常
一般分两种,一种是给 Scope 设置*CoroutineExceptionHandler* , 另一种是在协程体中自己写 try catch
kotlin
CoroutineScope(Dispatchers.Main + CoroutineExceptionHandler { coroutineContext, throwable -> } ).launch { }
kotlin
CoroutineScope(Dispatchers.Main).launch {
    try {

    } catch (e: Throwable) {

    }
}
协程中的错误传递机制
协程中规定,父协程如果取消,子协程也会取消。子协程如果出现异常,父协程也会被取消。
业务意义(为什么父协程要取消?)
kotlin
import kotlinx.coroutines.*
import retrofit2.HttpException // 模拟网络请求异常

// 模拟网络请求工具类
object GoodsRepository {
    // 1. 加载商品基础信息(核心接口)
    suspend fun loadGoodsBaseInfo(goodsId: String): GoodsBaseInfo {
        delay(300) // 模拟网络耗时
        // 模拟异常:如服务器返回500错误
        throw HttpException("商品基础信息接口请求失败")
        // return GoodsBaseInfo("iPhone 15", 5999, 100) // 正常返回(注释掉模拟异常)
    }

    // 2. 加载商品图片列表
    suspend fun loadGoodsImages(goodsId: String): List<String> {
        delay(500) // 模拟网络耗时
        return listOf("https://img1.com/1.jpg", "https://img1.com/2.jpg")
    }

    // 3. 加载商品评价摘要
    suspend fun loadGoodsReviewSummary(goodsId: String): ReviewSummary {
        delay(400) // 模拟网络耗时
        return ReviewSummary(98, "物流快,质量好") // 好评率98%
    }
}

// 数据模型(简化)
data class GoodsBaseInfo(val name: String, val price: Int, val stock: Int)
data class ReviewSummary(val goodRate: Int, val latestComment: String)

// 业务层:商品详情页ViewModel(模拟)
class GoodsDetailViewModel : CoroutineScope by MainScope() {
    // 加载详情页所有数据
    fun loadGoodsDetail(goodsId: String) {
        launch { // 父协程(默认作用域,无Supervisor)
            println("【父协程】开始加载商品详情页数据")

            // 子协程1:加载基础信息(核心)
            val baseInfoDeferred = async { GoodsRepository.loadGoodsBaseInfo(goodsId) }
            // 子协程2:加载图片列表
            val imagesDeferred = async { GoodsRepository.loadGoodsImages(goodsId) }
            // 子协程3:加载评价摘要
            val reviewDeferred = async { GoodsRepository.loadGoodsReviewSummary(goodsId) }

            try {
                // 等待所有子协程完成,合并数据
                val baseInfo = baseInfoDeferred.await()
                val images = imagesDeferred.await()
                val review = reviewDeferred.await()

                // 合并数据并更新UI(正常场景)
                println("【父协程】所有数据加载完成,更新UI:${baseInfo.name} + ${images.size}张图 + 好评率${review.goodRate}%")
            } catch (e: Exception) {
                // 捕获异常,展示错误UI
                println("【父协程】加载失败,展示错误页:${e.message}")
                // 实际业务中:弹出"加载失败,请重试"弹窗 + 显示空白页
            }
        }
    }

    // 清理协程(避免内存泄漏)
    fun clear() {
        cancel()
    }
}

// 调用入口(模拟用户打开详情页)
fun main() = runBlocking {
    val viewModel = GoodsDetailViewModel()
    viewModel.loadGoodsDetail("goods_1001")
    delay(1000) // 等待业务执行
    viewModel.clear()
}- 避免无效资源消耗:子协程 1(基础信息)300ms 时抛出异常,父协程立即取消 ------ 此时子协程 2(图片,需 500ms)和子协程 3(评价,需 400ms)还在执行,但已无意义,取消后能释放网络连接、线程资源。
- 保障用户体验一致性:若父协程不取消,即使图片和评价加载完成,因缺少核心的 "商品名称 / 价格",页面也无法正常使用,反而会让用户看到 "有图但无价格" 的混乱 UI,不如直接展示 "加载失败" 更清晰。
- 快速失败,减少用户等待:300ms 就发现核心错误,立即提示用户重试,而非让用户等待 500ms(图片加载完)才发现页面不可用,减少无效等待时间。
但这样就有一个问题,一个任务失败会导致其他兄弟任务一起失败。如果不想兄弟任务之间互相影响,需要在 Scope 创建时传入*SupervisorJob*(),它和默认的 Job 唯一区别就是阻止异常传递,然后用这一个 Scope 启动的所有协程之间就不互相影响了。
kotlin
val scope = CoroutineScope(Dispatchers.Main + SupervisorJob() + CoroutineExceptionHandler { coroutineContext, throwable ->

} )
scope.launch {
delay(1000)
    println("1000ms执行")
    throw RuntimeException("1000ms 崩溃测试")
}
scope.launch {
delay(2000)
    println("2000ms执行")
}
以上代码会输出
1000ms执行
2000ms执行
五、协程中的 Context
协程中的几个元素
Scope
协程运行所在的作用域,作用域限定了协程的最小边界,管理了协程的生命周期,传递着 context。
-
CoroutineScope(context: CoroutineContext)
- 最常规的使用方式,
CoroutineScope(Dispatchers.Main).launch{}****在主线程启动协程
- 最常规的使用方式,
-
MainScope
- 内部实现:
CoroutineScope(SupervisorJob() + Dispatchers.Main),在主线程启动一个不影响其他协程的协程。正常来说,同一个 scope 启动的协程,只要其中一个崩溃,其他的都要连带着崩溃,因为我们给 scope 设置了*CoroutineExceptionHandler* , 所以崩溃最终传递给了 scope 并捕获了起来。
- 内部实现:
-
GlobalScope
- GlobalScope 是一个静态的 Scope 对象,本身没有绑定线程,可以在 launch 时传一个 Dispatcher,像这样
GlobalScope.launch(Dispatchers.Main)。默认会在 Dispatchers.Default 上运行。
- GlobalScope 是一个静态的 Scope 对象,本身没有绑定线程,可以在 launch 时传一个 Dispatcher,像这样
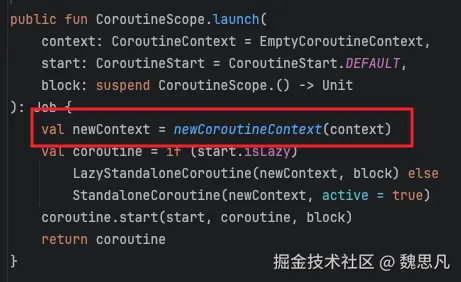
解释如下:Dispatcher 是协程的必要元素之一,在启动协程时,传入的 CoroutineContext 对象可以包含也可以不包含 Dispatcher 的信息,如果没有的话,newCoroutineContext 会增加一个Dispatchers.Default 对象进去。(CoroutineContext 如何存储协程的必要元素后面会讲)
kotlin
public fun CoroutineScope.launch(
    context: CoroutineContext = EmptyCoroutineContext,
    start: CoroutineStart = CoroutineStart.DEFAULT,
    block: suspend CoroutineScope.() -> Unit
): Job {
    val newContext = newCoroutineContext (context)
    val coroutine = if (start.isLazy)
        LazyStandaloneCoroutine(newContext, block) else
        StandaloneCoroutine(newContext, active = true)
    coroutine.start(start, coroutine, block)
    return coroutine
}

public actual fun CoroutineScope.newCoroutineContext(context: CoroutineContext): CoroutineContext {
    val combined = coroutineContext + context
    val debug = if (DEBUG) combined + CoroutineId(COROUTINE_ID.incrementAndGet()) else combined
    return if (combined !== Dispatchers.Default && combined[ContinuationInterceptor] == null)
        debug + Dispatchers.Default else debug
}-
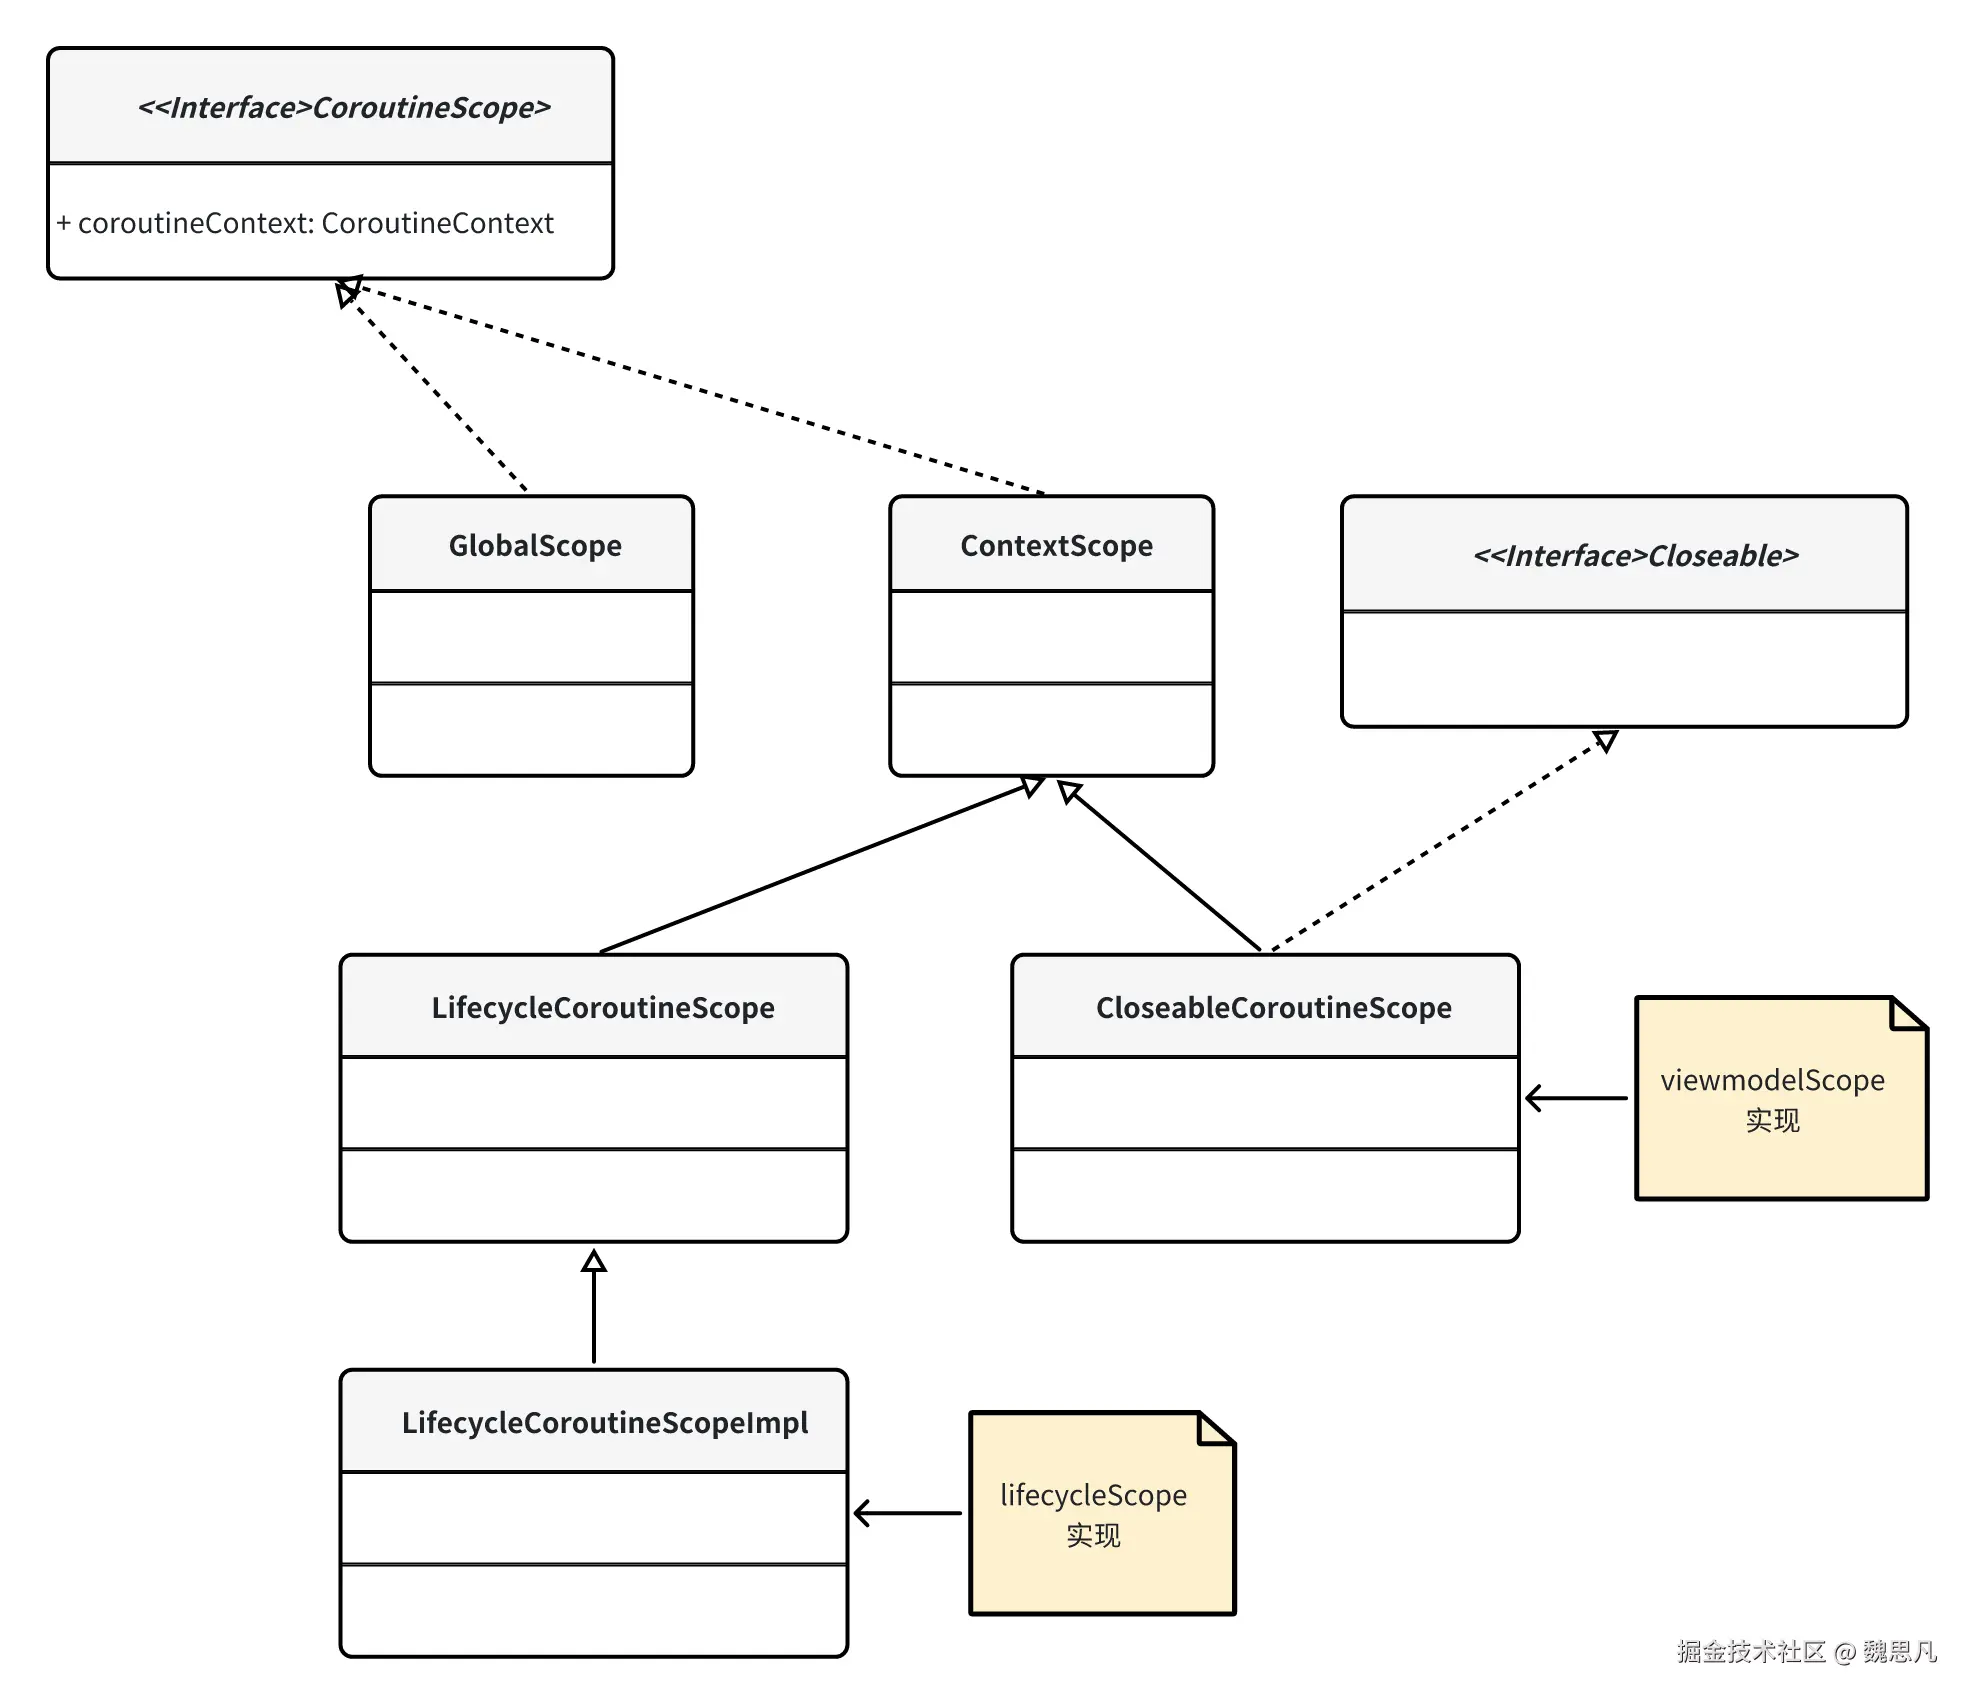
viewModelScope
- viewModelScope 是 lifecycle-viewmodel-ktx 包下的一个针对 ViewModel 的扩展方法,它实际上就是把一个 Scope 对象存放在了 viewmodel 中。实现如下:
CloseableCoroutineScope(SupervisorJob() + Dispatchers.Main.immediate),含义是此 Scope 创建的协程之间发生错误互不影响,且如果在主线程中启动则在主线程中立刻执行,而非mainHandler.post{},CloseableCoroutineScope没啥特别特殊的地方,就是 实现了 Closeable 接口,让 viewmodel 销毁时自动取消 Scope 下所有协程的含义。
- viewModelScope 是 lifecycle-viewmodel-ktx 包下的一个针对 ViewModel 的扩展方法,它实际上就是把一个 Scope 对象存放在了 viewmodel 中。实现如下:
-
lifecycleScope
- lifecycleScope 是 lifecycle-runtime-ktx 包下的一个针对 LifecycleOwner 的扩展方法,它为 Lifecycle 的 Scope 成员变量赋值,真正的实现是
LifecycleCoroutineScopeImpl(this,SupervisorJob() +Dispatchers.Main.immediate),实现了 CoroutineScope 接口,相较于其他 Scope,Scope 的启动和终止受到了 lifecycle 生命周期的约束。
- lifecycleScope 是 lifecycle-runtime-ktx 包下的一个针对 LifecycleOwner 的扩展方法,它为 Lifecycle 的 Scope 成员变量赋值,真正的实现是
kotlin
internal class LifecycleCoroutineScopeImpl(
    override val lifecycle: Lifecycle,
    override val coroutineContext: CoroutineContext
) : LifecycleCoroutineScope(), LifecycleEventObserver {
    init {
        if (lifecycle.currentState == Lifecycle.State.DESTROYED) {
            coroutineContext.cancel()
        }
    }

    fun register() {
        launch(Dispatchers.Main.immediate) {
        if (lifecycle.currentState >= Lifecycle.State.INITIALIZED) {
                lifecycle.addObserver(this@LifecycleCoroutineScopeImpl)
            } else {
                coroutineContext.cancel()
            }
        }
}

    override fun onStateChanged(source: LifecycleOwner, event: Lifecycle.Event) {
        if (lifecycle.currentState <= Lifecycle.State.DESTROYED) {
            lifecycle.removeObserver(this)
            coroutineContext.cancel()
        }
    }
}
Job
一个 Job 通常就可以称之为一个协程任务。当调用 launch 或者 async 的时候,返回值都是一个 Job,async 还有一个特殊的地方,这个会放在《协程的应用》里面讲。
kotlin
public interface Job : CoroutineContext.Element {
    // Key 会放在《CoroutineContext》中讲
    public companion object Key : CoroutineContext.Key<Job> {
        init {
            CoroutineExceptionHandler
        }
    }

    public val isActive: Boolean

    public val isCompleted: Boolean

    public val isCancelled: Boolean

    @InternalCoroutinesApi
    public fun getCancellationException(): CancellationException

    public fun start(): Boolean

    public fun cancel(cause: CancellationException? = null)

    public fun cancel(): Unit = cancel(null)

    public fun cancel(cause: Throwable? = null): Boolean

    public val children: Sequence<Job>

    @InternalCoroutinesApi
    public fun attachChild(child: ChildJob): ChildHandle

    public suspend fun join()

    public val onJoin: SelectClause0

    public fun invokeOnCompletion(handler: CompletionHandler): DisposableHandle

    @InternalCoroutinesApi
    public fun invokeOnCompletion(
        onCancelling: Boolean = false,
        invokeImmediately: Boolean = true,
        handler: CompletionHandler): DisposableHandle


    public operator fun plus(other: Job): Job = other
}- 协程的状态
像线程一样,协程启动之后也有状态。协程主要是三种:Incomplete、Cancelling、Complete。当协程启动后即进入 Incomplete,当协程被取消时进入 Cancelling,当协程中的方法体执行完成时或者 Cancelling 完成时进入 Complete。isActive、isCompleted、isCancelled 分别就是协程是否存活、是否完成、是否是被取消了。
- cancel
取消协程的运行,协程的取消的是协程挂起恢复的时候检查,当某个恢复点发现协程 cancelling 状态时,终止后续的执行。比如下面这个代码,当执行 cancel 之后,println("100ms执行")会立马终止,因为 innerJob 协程在 delay 100ms后恢复的时候检查了最新状态,从而让协程中断。而如果把 delay(100) 改为 Thread.sleep(100),那么控制台依旧会不停的打印 100ms执行。
kotlin
lifecycleScope.launch {
val innerJob = launch(Dispatchers.IO) {
    while (true) {
            delay(100)
            println("100ms执行")
        }
    }
    delay(1000)
    println("cancel执行")
    innerJob.cancel()
} - join
跟 Thread 一样,协程也有 join 方法,innerJob join 执行完成会在1000ms执行后输出。
kotlin
lifecycleScope.launch {
val innerJob = launch(Dispatchers.IO) {
    delay(1000)
        println("1000ms执行")
    }
    innerJob.join()
    println("innerJob join 执行完成")
} - invokeOnCompletion
invokeOnCompletion 需要一个回调,其是通知协程执行结束的含义。
Dispatcher
- Default 内部维护了 CPU 核心数的线程池,所以适合运行 CPU 密集型任务,比如一些长时间任务。
- Main 运行在主线程,内部还有一个 immediate,区分为是否立刻执行。详见➡️
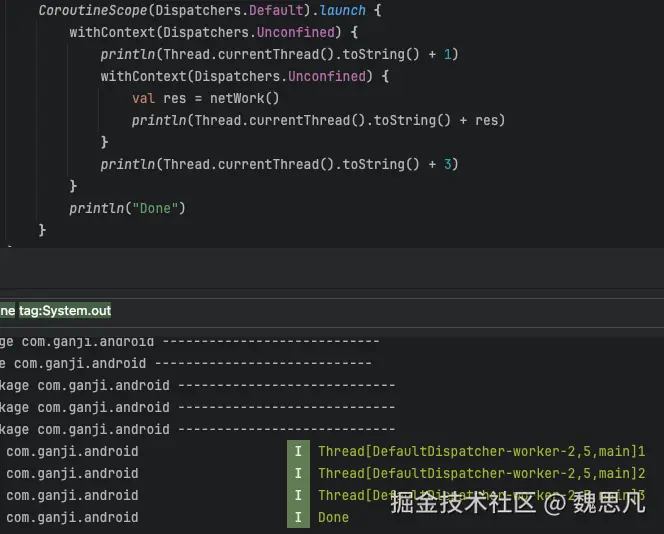
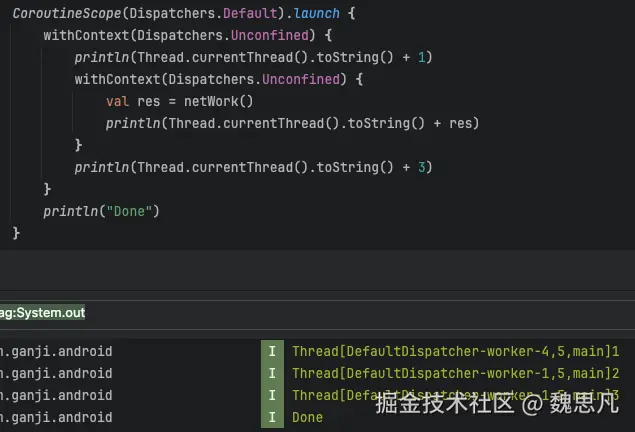
- Unconfined 线程和调用帧保持一致,这是一个很神奇,且几乎没有使用场景的调度器。
- IO 也是子线程,适用于网络请求这种 I/O 密集型任务,与 Default Dispatcher 共享线程。所以在 Default 如果切到 IO,不会导致切换线程。
kotlin
public actual object Dispatchers {
    @JvmStatic
    public actual val Default: CoroutineDispatcher = createDefaultDispatcher()

    @JvmStatic
    public actual val Main: MainCoroutineDispatcher get() = MainDispatcherLoader.dispatcher

    @JvmStatic
    public actual val Unconfined: CoroutineDispatcher = kotlinx.coroutines.Unconfined


    @JvmStatic
    public val IO: CoroutineDispatcher = DefaultScheduler.IO
}
CoroutineContext
Context 是一种设计模式,这个是我在工作第二年我的导师告诉我的,在此之前我一度认为 Android 设计的 Context 纯粹是吃太饱了,后来发现是我吃太少了。
通常我们在设计一个系统时,跨模块之间又需要共用一些元素信息,那么就会增加一个 Context 的设计,Context 来持有这些信息,在每个模块创建时传递给对象持有 Context,所有模块就可以直接访问各种需要的元素,所以协程这种大级别工程也有这个设计。
协程中 Context 的设计起源于接口CoroutineContext,而非一个实现类,这是一个很难理解的地方,如果有必要,请反复食用。
Key
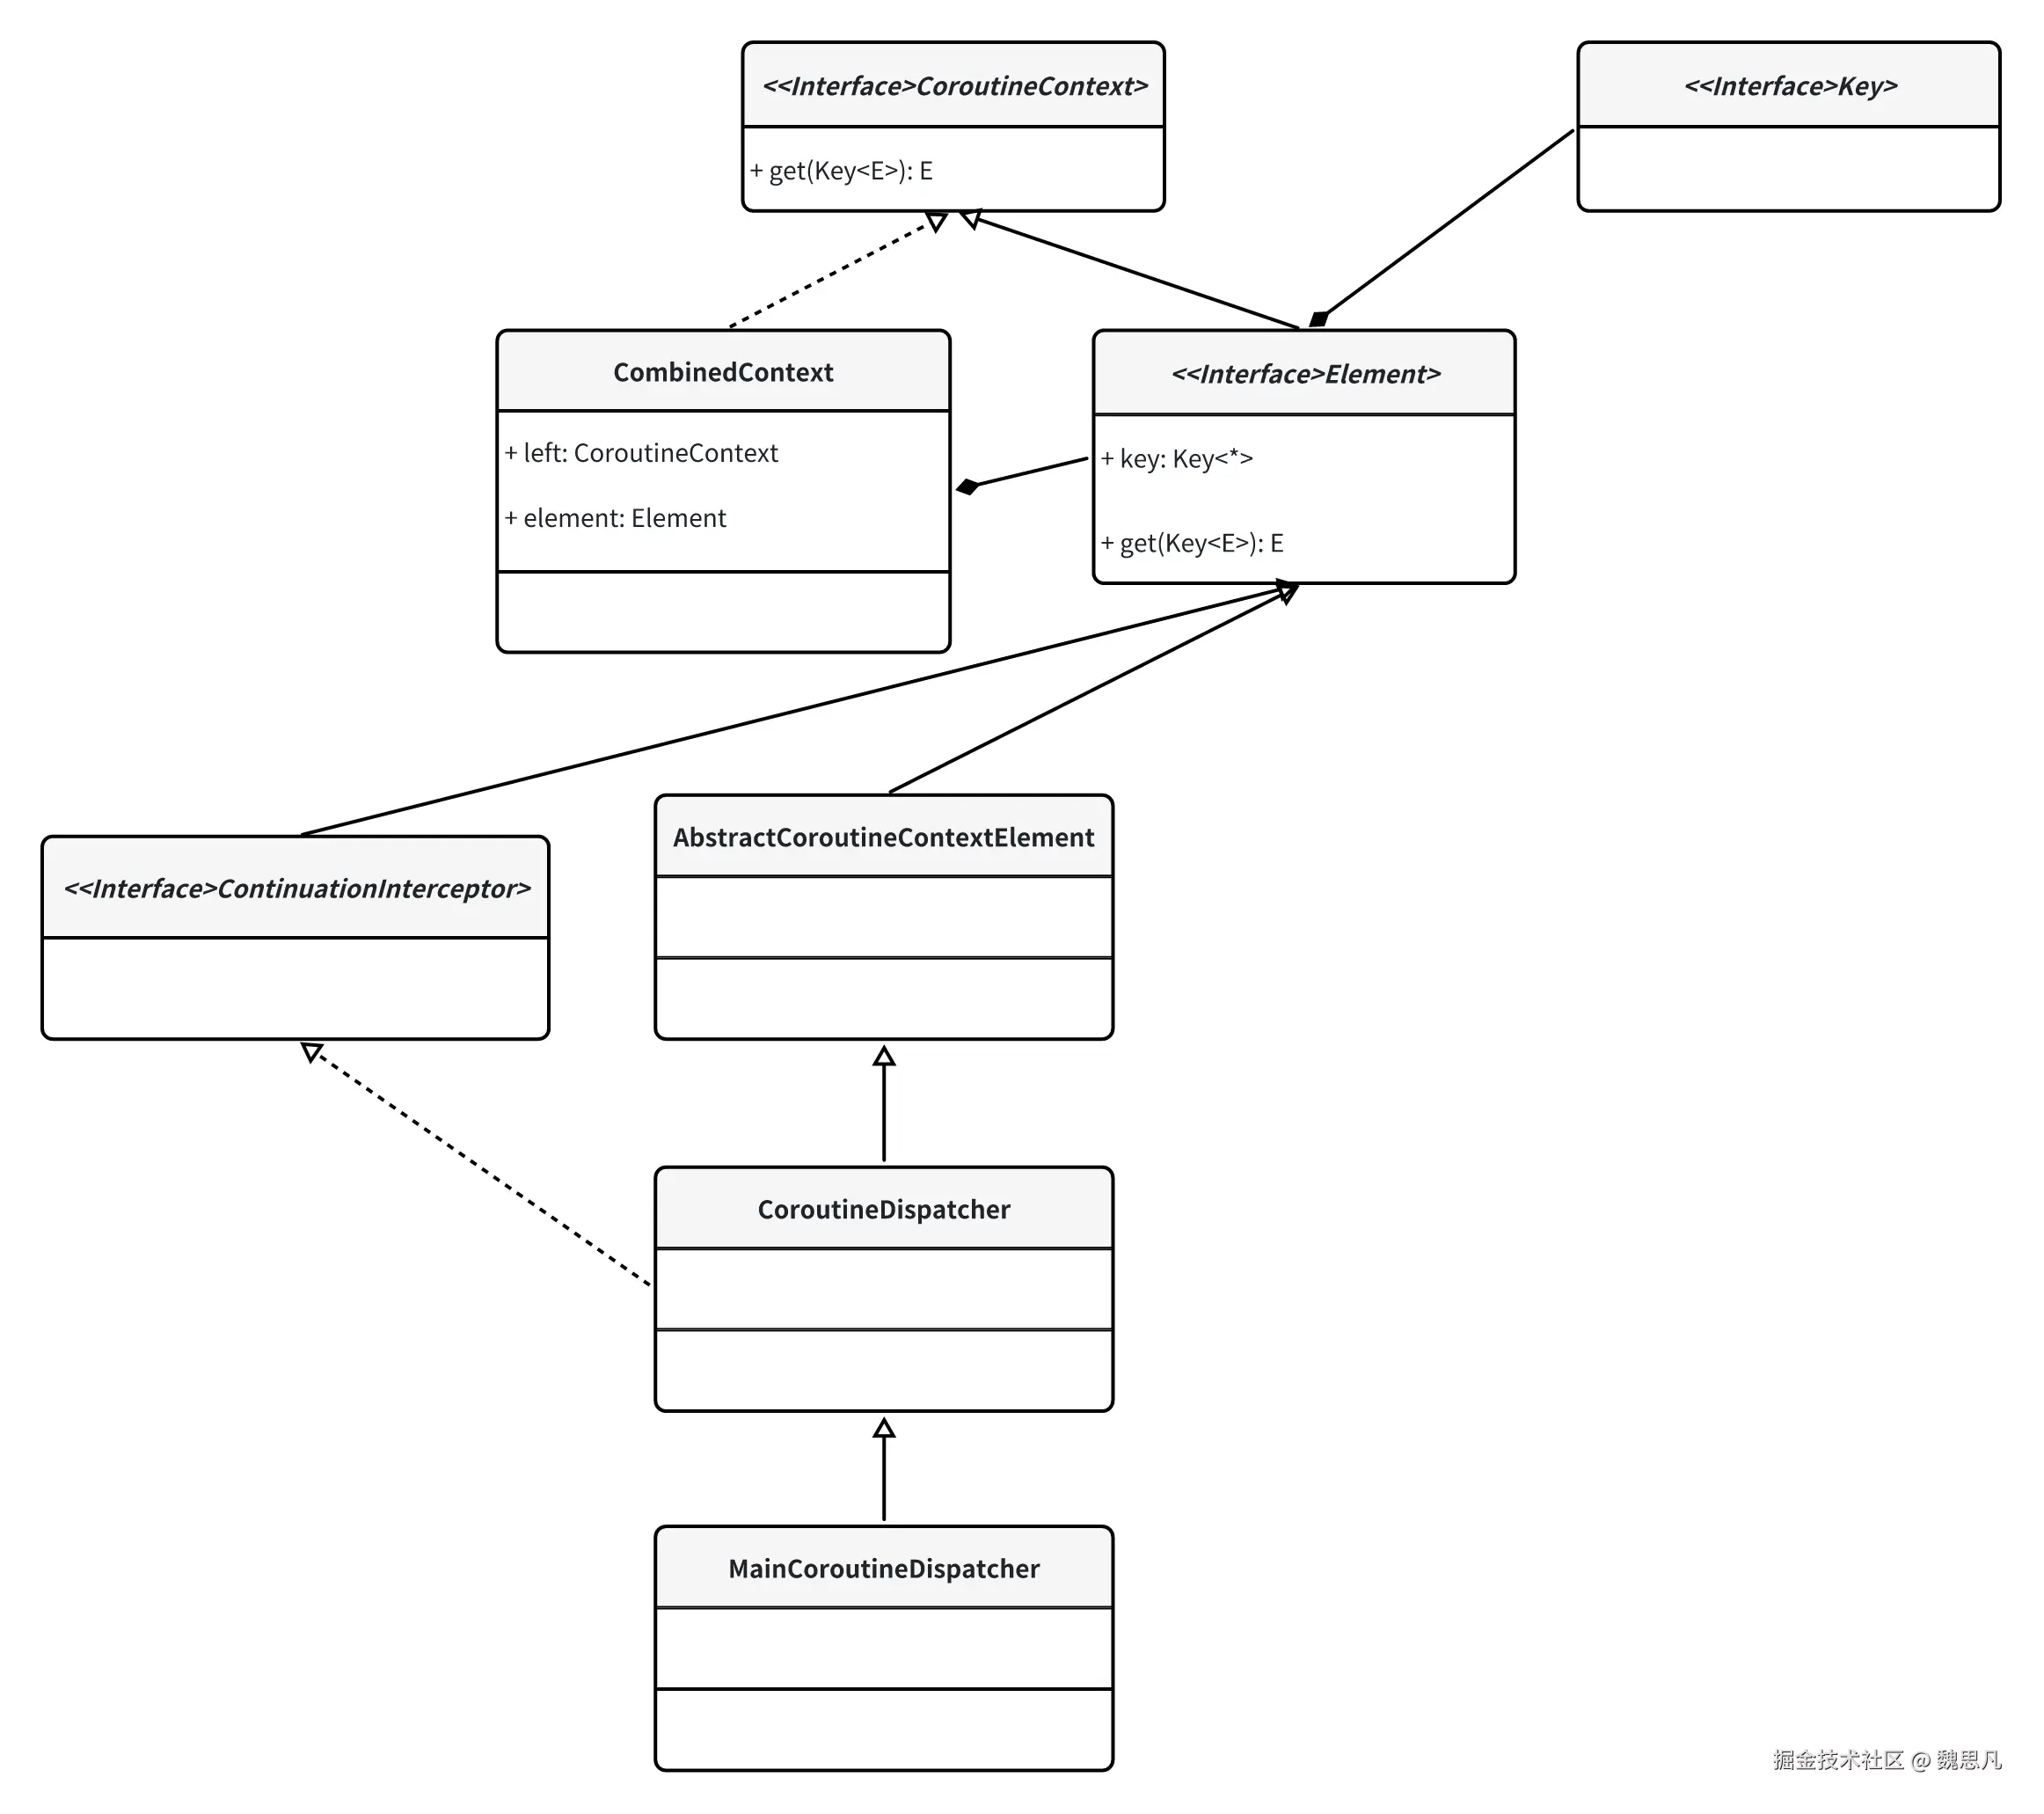
先聊聊 Key 是什么,Key 是一个很简单的接口,甚至都没有方法,只有一个泛型,为 Element 的子类。CoroutineContext 内部的get(key: Key<E>): E? 方法,传进来一个 Key,返回其泛型对象,默认实现是 Element,Element 也是接口,继承自 CoroutineContext,所以协程中有很多这种代码context[ContinuationInterceptor],其实就是看某一个实现了 CoroutineContext 接口的对象context中的 key 是不是ContinuationInterceptor(按照默认实现逻辑)。
总下来 CoroutineContext 的几个方法含义,
- get() 整体含义就是获取 key为 *.Key 的对象。
- fold() 为折叠处理,具体怎么处理还要看传入的 operation。
- plus() 为相加,类似于 map 的 add 的含义。
- minusKey() 为移除 Key 对象,并返回剩余的对象。
kotlin
public interface CoroutineContext {
/**
* Returns the element with the given [key] from this context or `null`.
*/
public operator fun <E : Element> get(key: Key<E>): E?
/**
* Accumulates entries of this context starting with [initial] value and applying [operation]
* from left to right to current accumulator value and each element of this context.
*/
public fun <R> fold(initial: R, operation: (R, Element) -> R): R
/**
* Returns a context containing elements from this context and elements from other [context].
* The elements from this context with the same key as in the other one are dropped.
*/
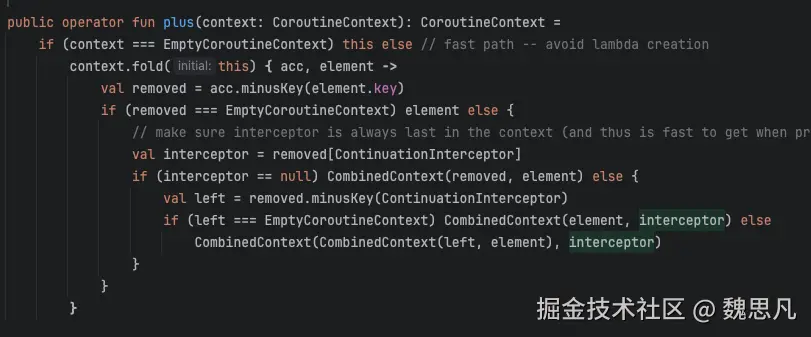
public operator fun plus(context: CoroutineContext): CoroutineContext =
if (context === EmptyCoroutineContext) this else // fast path -- avoid lambda creation
context.fold(this) { acc, element ->
val removed = acc.minusKey(element.key)
if (removed === EmptyCoroutineContext) element else {
// make sure interceptor is always last in the context (and thus is fast to get when present)
val interceptor = removed[ContinuationInterceptor]
if (interceptor == null) CombinedContext(removed, element) else {
val left = removed.minusKey(ContinuationInterceptor)
if (left === EmptyCoroutineContext) CombinedContext(element, interceptor) else
CombinedContext(CombinedContext(left, element), interceptor)
}
}
}
/**
* Returns a context containing elements from this context, but without an element with
* the specified [key].
*/
public fun minusKey(key: Key<*>): CoroutineContext
/**
* Key for the elements of [CoroutineContext]. [E] is a type of element with this key.
*/
public interface Key<E : Element>
/**
* An element of the [CoroutineContext]. An element of the coroutine context is a singleton context by itself.
*/
public interface Element : CoroutineContext {
/**
* A key of this coroutine context element.
*/
public val key: Key<*>
public override operator fun <E : Element> get(key: Key<E>): E? =
@Suppress("UNCHECKED_CAST")
if (this.key == key) this as E else null
public override fun <R> fold(initial: R, operation: (R, Element) -> R): R =
operation(initial, this)
public override fun minusKey(key: Key<*>): CoroutineContext =
if (this.key == key) EmptyCoroutineContext else this
}
}截至目前为止

重写了 CoroutineContext 的 get 方法的子类有 CombinedContext,它是 context 中存储各种数据的关键类之一。
CombinedContext
CombinedContext 是一个类似链表的数据结构,继承自 CoroutineContext,有两个成员变量,分别是 left(左链)和 element(当前元素),left 中还可以继续放 CoroutineContext,这样就达成了链条的效果。
kotlin
internal class CombinedContext(
    private val left: CoroutineContext,
    private val element: Element
) : CoroutineContext, Serializable {
}
- get(key: Key): E?
根据上面的结构图一起理解,从最外层开始判断当前元素是否是要找的元素,如果没找到继续像内层遍历,直到最里面,其他方法也差不多是这个思路,这里就不一一说了。
kotlin
override fun <E : Element> get(key: Key<E>): E? {
    var cur = this
    while (true) {
        cur.element[key]?.let { return it }
        val next = cur.left
        if (next is CombinedContext) {
            cur = next
        } else {
            return next[key]
        }
    }
}
Context 创建和绑定的过程
启动一个协程需要一个 Scope,Scope 内部必然持有 Context,看看 Scope 的 Context 来源。
- Scope 的 Context
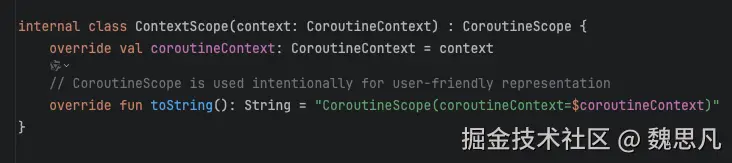
Scope 共同实现了一个接口 CoroutineScope,内部就有一个 CoroutineContext 的 context 成员变量。
kotlin
public interface CoroutineScope {
    public val coroutineContext: CoroutineContext
}
再次拿出 Scope 构造的方法,此时就能看出,context 来源于外面传入的 Dispatcher,刚好 Dispatcher 本身就是实现了 CoroutineContext 的,ContinuationInterceptor 就是 Dispatcher 在 Context 中的 Key。

kotlin
public fun CoroutineScope(context: CoroutineContext): CoroutineScope =
    ContextScope(if (context[Job] != null) context else context + Job())
Scope 创建时看了下是否有 Key 为 Job 的元素,没有的话把 Job() 放进了 Context 中,添加过程涉及到 CoroutineContext 的 plus 方法,除了 EmptyCoroutineContext 之外,其他元素的 plus 都是这个默认实现。
kotlin
public interface Element : CoroutineContext {
    /**
     * A key of this coroutine context element.
     */
    public val key: Key<*>

    public override operator fun <E : Element> get(key: Key<E>): E? =
        @Suppress("UNCHECKED_CAST")
        if (this.key == key) this as E else null

    public override fun <R> fold(initial: R, operation: (R, Element) -> R): R =
        operation(initial, this)

    public override fun minusKey(key: Key<*>): CoroutineContext =
        if (this.key == key) EmptyCoroutineContext else this
}
CombinedContext#fold
kotlin
public override fun <R> fold(initial: R, operation: (R, Element) -> R): R =
    operation(left.fold(initial, operation), element)
CoroutineContext#plus
kotlin
public operator fun plus(context: CoroutineContext): CoroutineContext =
    if (context === EmptyCoroutineContext) this else // fast path -- avoid lambda creation
        context.fold(this) { acc, element ->
            val removed = acc.minusKey(element.key)
            if (removed === EmptyCoroutineContext) element else {
                // make sure interceptor is always last in the context (and thus is fast to get when present)
                val interceptor = removed[ContinuationInterceptor]
                if (interceptor == null) CombinedContext(removed, element) else {
                    val left = removed.minusKey(ContinuationInterceptor)
                    if (left === EmptyCoroutineContext) CombinedContext(element, interceptor) else
                        CombinedContext(CombinedContext(left, element), interceptor)
                }
            }
} - 第二行,任意 Context + EmptyCoroutineContext,结果依旧是自己,因为 EmptyCoroutineContext 只是一个占位的空内容的 Context 类。
- 第三行,context.fold 开始折叠处理,因为 context 可能是 CombinedContext,需要逐层判断,acc 是 left 节点的 operation 的结果,element 是当前的 element 节点,operation 就是 fold 里面这个 lamada。由于
operation(left.fold(initial, operation), element),那么直接走到最内层分析,acc,也就是最一开始的 this ,element 也就是 left 节点的 element。走到最内层时 acc 就是 fold 中的 this,element 就是最内层的 left 节点。 - 第四行,直接走进最内层分析,所以含义就变成了 left 是否是 element 的 Key 的对象。看下图分析,假定有两张图,左图定义为 A,右图定义为 B,假设
ContextA + ContextB,此时就是判断 ContextA 中是否有ContextB最内层 Element 相同 Key,如果有,ContextA去掉这个 Key。这里ContextB是靠迭代走进去的,然后依次退栈判断外层是否也有,相同的,有的话ContextA就去掉这个 Key。
- minusKey() 为移除 Key 对象,并返回剩余的对象。
如果 removed === EmptyCoroutineContext,说明里面没东西了,说明 this 就是element,又因为要计算 this+element,所以直接返回 element。否则看下移除完 Key 的 Context 中是否还有 ContinuationInterceptor,如果没有的话,直接用 CombinedContext 包装剩下的 Context 和要添加的 Context 并返回,如果有的话跟刚才一样,去掉,但是发现去掉之后变成空的了,那就让 ContinuationInterceptor 作为最内层的右节点 element 和要添加的 Context 包装起来返回。如果发现不是空的话,那就把剩下的和要添加的包装起来作为一个整体后再和 ContinuationInterceptor 包装起来返回,所以这么一通操作下去,就是为了保证 ContinuationInterceptor 在 Context 的最外层的右节点 element。
此时刚刚处理完最内层的 left 节点,然后依次退栈,刚才计算了left,那么拿 left 计算的结果和 element 再比较,以此类推直到返回最上层,完成所有元素的递归遍历。
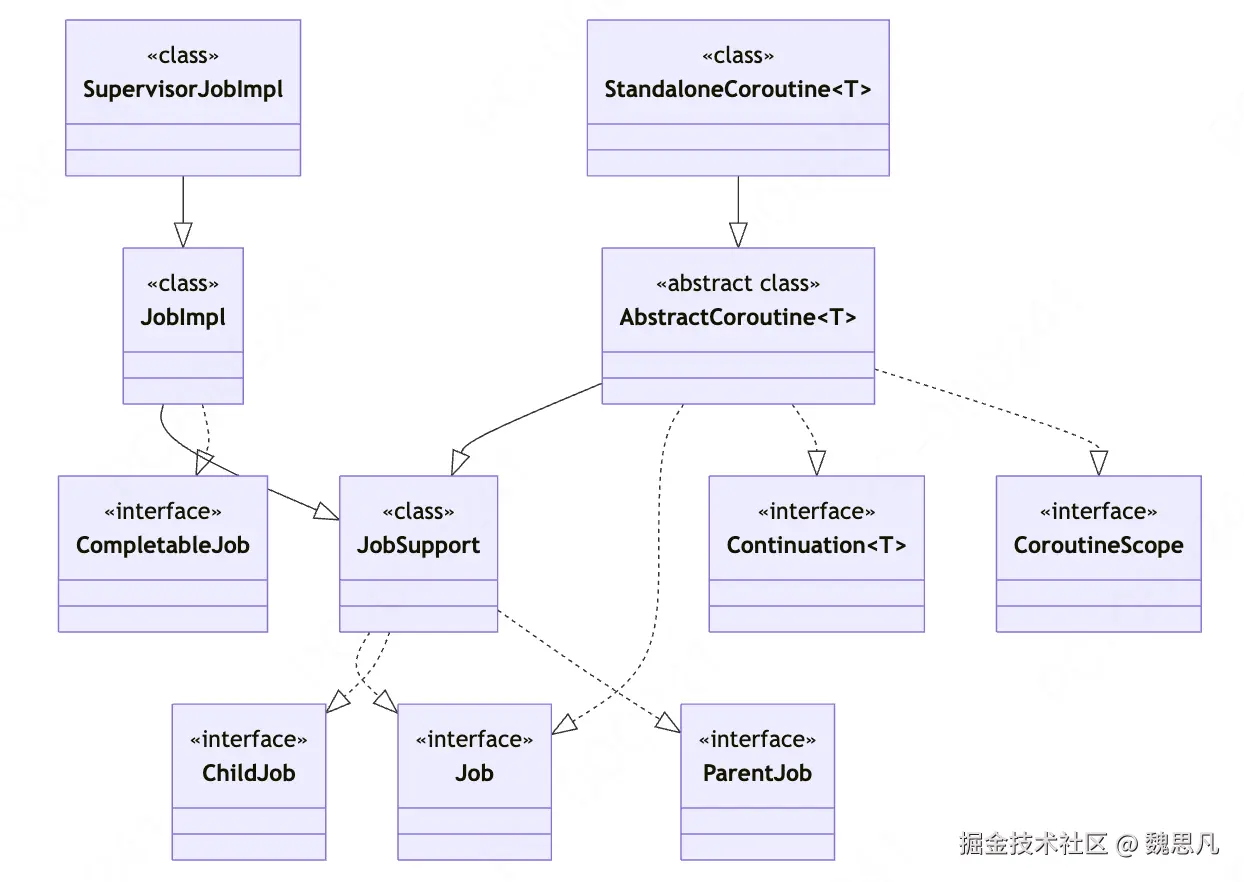
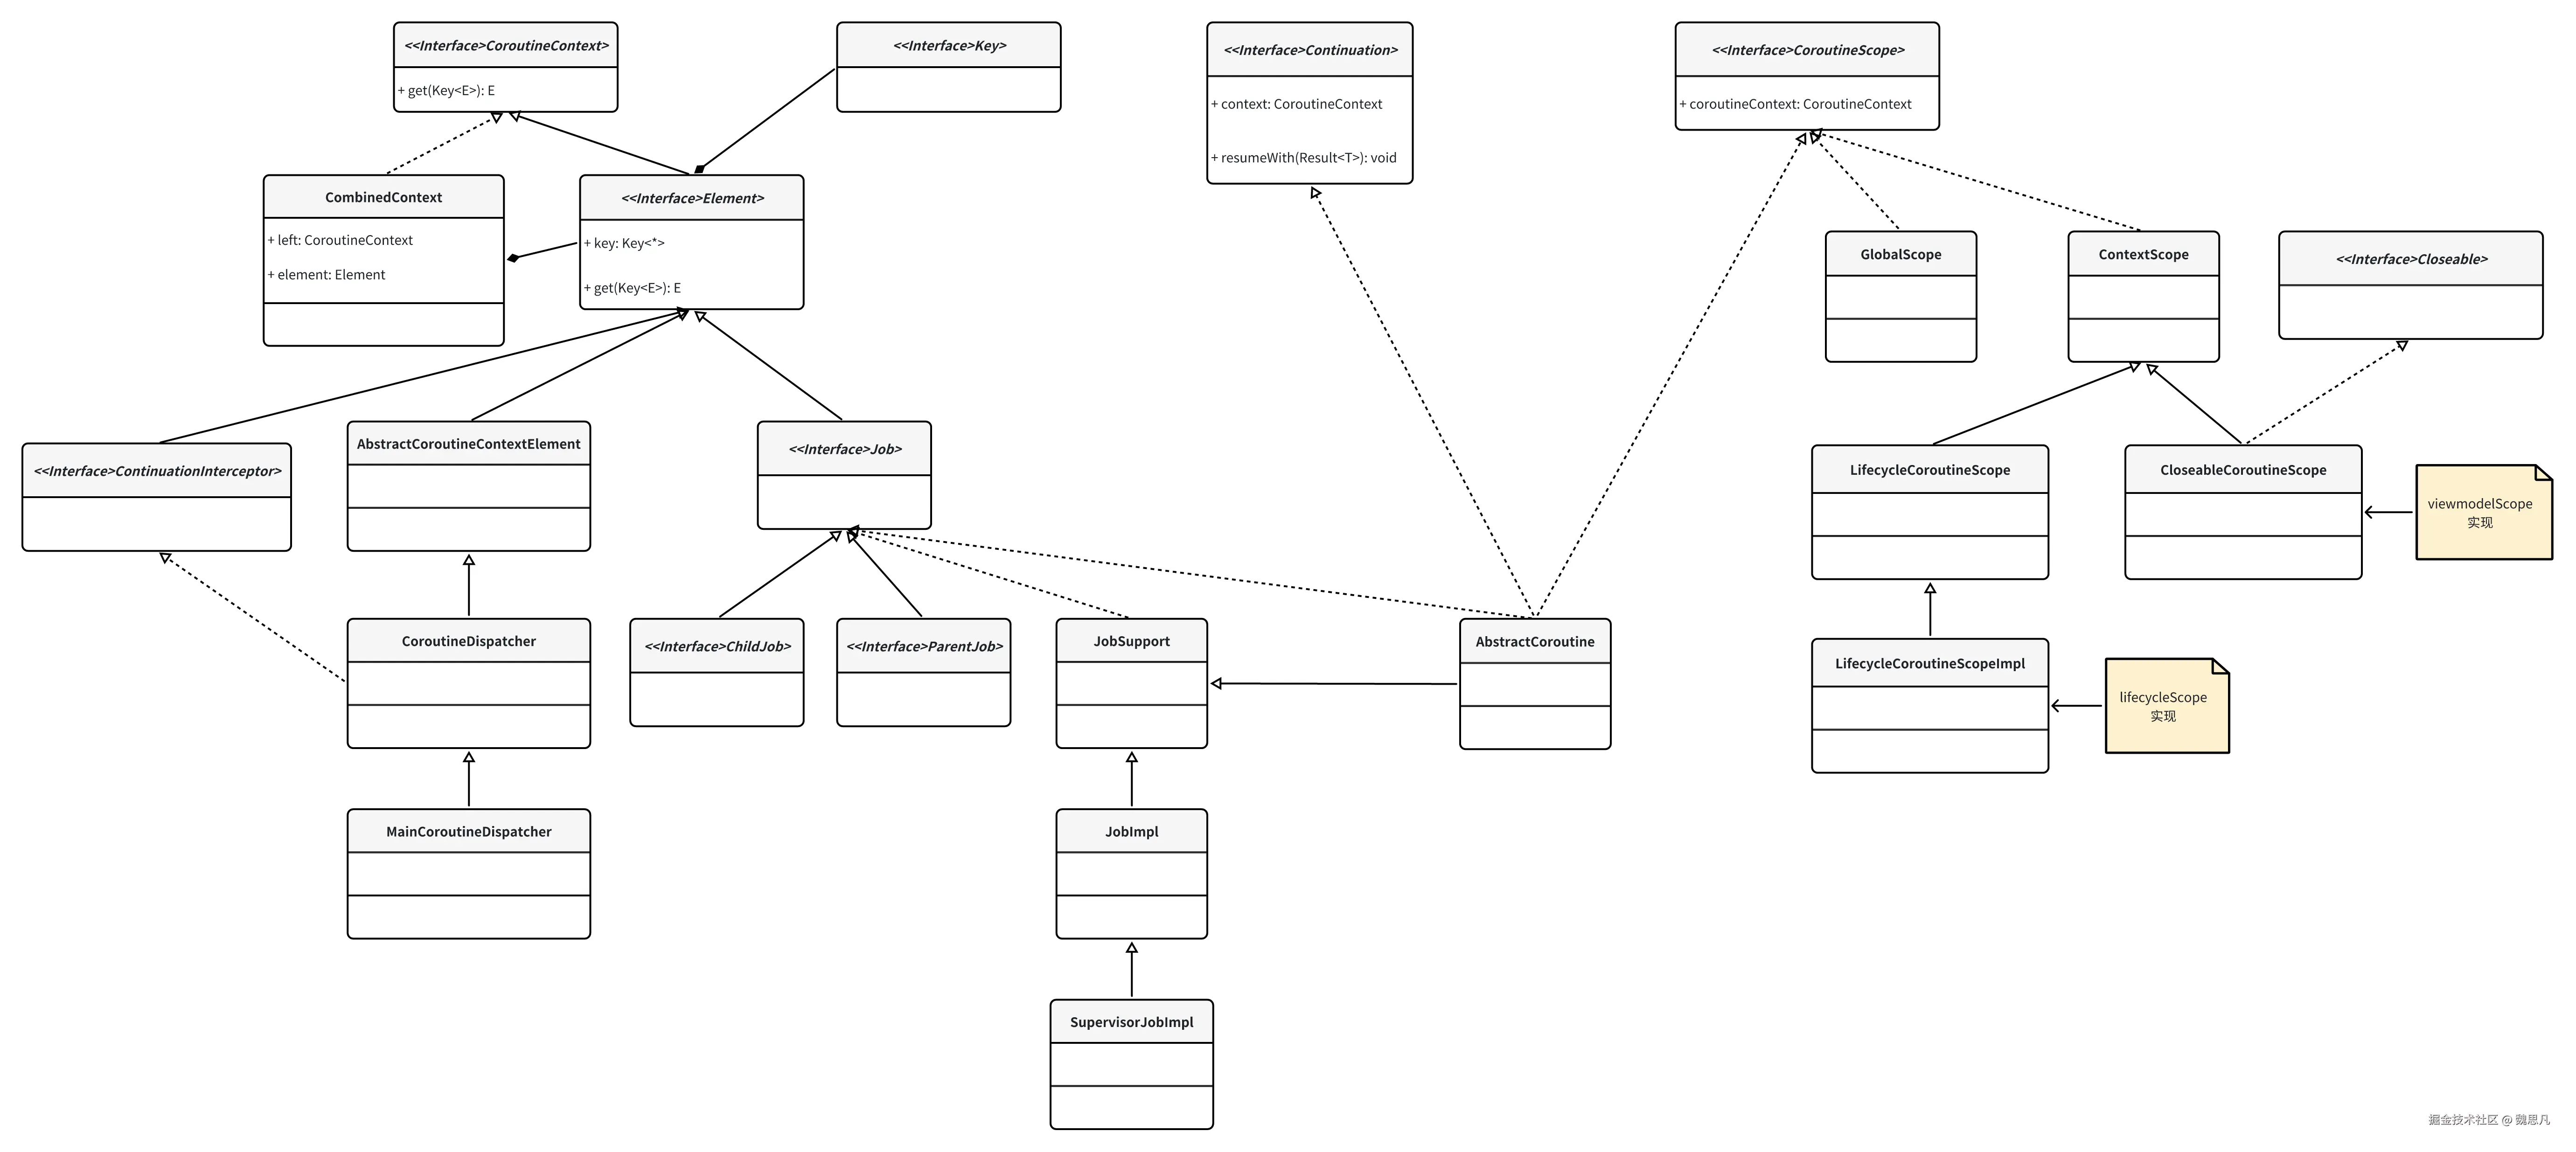
让我们把《协程中的错误处理机制》中整理的 Job 的类图关系和 Scope 的类图关系也加进来。
六、协程的应用
需要你先了解的 suspend
kotlin 的协程引入了一个全新的方法修饰符 suspend,意为可挂起的函数,挂起的理论可参考第二章。被 suspend 修饰的方法必须写在协程的作用域内,否则编译报错。
启动协程的"一万"种方式
kotlin
runBlocking {
}

CoroutineScope(Dispatchers.IO).launch {
}

GlobalScope.launch {
}

GlobalScope.launch {
    val res1 = async {
        return@async 1
    }
    val res2 = async {
        return@async 2
    }
    println("${res1.await()} ${res2.await()}")
}

lifecycleScope.launch {
}

viewModelScope.launch {
}
与其他 API 不同,runBlocking 会阻断当前线程,blocking 内部的代码块会立刻执行,其他调度器启动的协程会交给调度器去分发任务。有两个特殊的Dispatcher,Dispatchers.Main.immediate,如果在主线程使用这个调度器,也会立刻执行。其他启动方式都是延迟型的任务。另一个是 Dispatchers.UnConfined,这个后面会讲。
协程的取消
由于协程的机制,某些情况下协程是一个延时任务,如果要终止协程状态机的运行。可以这样:
kotlin
val job = CoroutineScope(Dispatchers.Main).launch {
    println("main thread-main1 execute")
}

job.cancel()
又或者你有一个全局的 scope,你可以这样:
kotlin
val scope = CoroutineScope(Dispatchers.Main)
scope.launch {
    println("main thread-main1 execute")
}

scope.cancel()
launch 的返回值是一个 job,可以理解为一个协程工作\任务,调用 job 的 cancel 会把当前任务取消,包括这个任务中启动的子协程任务,因为子协程依赖于这个任务。
而调用 scope 的 cancel,则会把当前 scope 启动的所有协程任务取消。
这里需要注意每次调用这个CoroutineScope(Dispatchers.Main),都会创建一个 scope 对象,即使它们的调度器相同。假如有两个 scope,那么取消 scope1,scope2 启动的协程则不会受到影响。
另外,通常我们会自动绑定有生命周期的 scope------使用 Viewmodel 的 viewModelScope 或者 LifecycleOwner 的 lifecycleScope 来启动一个协程,这两个 scope 都是扩展函数,效果都和 Dispatchers.Main.immediate 表现一致,分别在"androidx.lifecycle:lifecycle-runtime-ktx:2.3.0"、"androidx.lifecycle:lifecycle-viewmodel-ktx:2.3.0"仓库下。
lifecycleScope 需要在实现了 LifecycleOwner 接口的组件下使用,因为其自动绑定了 LifecycleOwner 的生命周期,如 Activity 和 Fragment。viewModelScope 需要在 Viewmodel 中使用,自动绑定了 viewmodel 的生命周期。在生命周期结束的时候,协程会被自动取消。
协程中切换线程
除了使用 Dispatchers.Main之外,还有Default、Unconfined、IO三个调度器可以启动协程。你可以这样:
kotlin
CoroutineScope(Dispatchers.Main).launch {
    //做一些主线程的事
    //然后
    val networkResponse = withContext(Dispatchers.IO){
        return model.getInfo()//api res
    }
    println(networkResponse)
}
withContext 是一个 suspend 函数,可挂起的。根据第二章《挂起与恢复的秘密》,遇到该方法后,会有一个新的状态机来等待网络接口的返回,当数据返回之后,更新状态机状态后,继续走 println 的代码。
你也可以这样,但一般不这么做:
kotlin
CoroutineScope(Dispatchers.IO).launch {
    val networkResponse = model.getInfo()
    withContext(Dispatchers.Main){
        doUIRefresh(networkResponse)
    }
}
并行任务 async
kotlin
GlobalScope.launch {
    println("start async1")
    val res1 = async {
        Thread.sleep(1000)
        return@async 1
    }
    println("start async2")
    val res2 = async {
        Thread.sleep(1000)
        return@async 2
    }
    println("${res1.await()} ${res2.await()}")
}
async 是与 launch 平级的方法,所以没有挂起之说。与 launch 不同的地方,launch 返回一个 Job,而async 返回一个 Deferred。Deferred 可以视为有结果值的 Job,通过调用 Deferred 的 await 方法,可以获取这个协程的结果。所以无论是否调用 await,async 中的代码都会运行,和 launch 基于效果一样。async 不是一个挂起函数,但 await 是,所以 async 一般都写在有协程环境里面,不作为最外层来启动协程。
await 的含义是获取返回值,如果值没有返回,会依照代码顺序在内部挂起,直到结果返回。
适用场景:例如,多个结果返回回来之后才去做某一件事情。不直接用 withContext 的原因是 withContext本身就是一个挂起函数,后面代码的运行需要等待 withContext 运行完成才走,多个 withContext 并行写,运行效果是串行的。而多个 async 并行写,运行效果则是并行的。
其他常用 API
- Delay
延时,效果同 postDelay。示例:
kotlin
CoroutineScope(Dispatchers.Main).launch {
    println("before delay")
    delay(10*1000L)
    println("after delay")
}

    //等价于

println("before delay")
mainHandler.postDelayed(10*1000L) {
    println("after delay")
}- repeatOnLifecycle
这个方法是一个扩展方法,它能将协程感知生命周期,在某个生命周期才启动,并在对应的生命周期自动取消,例如 start 对应于 stop,就像 livedata 一样。这个方法在 androidx.lifecycle:lifecycle-runtime-ktx:2.6.0 仓库中,低版本没有,2.6.0 需要项目升级 compileSdkVersion 到 33。
kotlin
lifecycleScope.launch {
    repeatOnLifecycle(Lifecycle.State.STARTED) {

    }
} - 邪修
suspendCancellableCoroutine
首先,关键是要理解 suspendCancellableCoroutine 的工作原理:
kotlin
suspendCancellableCoroutine<Unit> { cont ->
    // 这里的 cont 是自动传入的!
    val node = JobNode(this, cont)
    // ...
}
suspendCancellableCoroutine 是一个编译器内置的挂起函数,它的作用是:
捕获当前执行位置的 Continuation,并将其作为 lambda 参数传递。
应用场景------回调转值返回
以下例子的 cont 就是调用 filterSearchKey 方法时这个地方的 Continuation,所以就能手动将挂起的协程恢复。
kotlin
val searchHitResultPositionItemList = try {
    filterSearchKey(searchKey)
} catch (e: Exception) {
    mutableListOf()
}

private suspend fun filterSearchKey(
    searchKey: String
): List<AllDetailPositionItem> = withContext(Dispatchers.IO) {
    return@withContext suspendCancellableCoroutine { cont ->
        AllJobSearchTask(searchKey)
            .exec()
            .subscribe( {
                if (cont.isCancelled.not()) {
                    cont.resumeWith(Result.success(it?.data?.searchList?.filterNotNull() ?: mutableListOf()))
                }
            }, {
                if (cont.isCancelled.not()) {
                    cont.resumeWith(Result.failure(it))
                }
            })

    }
}
七、Flow
flow 依赖于协程的运行环境,flow 又分为冷流和热流两个概念。两者的核心区别在于:冷流在订阅时才会创建数据流,而热流在创建时就已经开始发射数据,与是否有订阅者无关。
冷热流核心区别
- 冷流通过 上游构建器(如
flow、flowof等) 定义数据发射逻辑,只有当下游调用collect开始收集时,上游逻辑才会执行。
如 flow闭包,flowof 闭包,当有地方 collect 时上游的 emit 的数据才会往下走。
- 热流通过 状态共享的构建器(如
StateFlow、SharedFlow) 实现。
StateFlow
- 始终持有一个 当前状态值,新订阅者会立即接收到最新值。
SharedFlow
- 可以缓存一定数量的 历史数据,新订阅者可获取缓存的旧数据。
- 支持配置缓存大小(
replay参数)
使用
flow 强依赖与协程的环境,除了变量的声明,数据提交和接收都需要写在协程的作用域中。
定义一个 Flow
kotlin
val flow = flowOf(1, 2, 3)这是最简单定义一个不可变的 flow 的一种方式。
从 Flow 接收数据
kotlin
lifecycleScope.launch {
    flow.collect {
        println(it)
    }
} 
Tips:flow 的 collect 最好搭配 repeatOnLifecycle 使用,因为通常注册 collect 事件都写在 onCreate 中用来刷新 UI 的,手动生命启动声明周期可防止协程的过早启动,同时也可以自动停止在无需刷新 UI 时暂停 flow 的接收。需要注意的协程暂停之后,如果是冷流, 在此期间 emit 的数据都将被丢弃,这个问题可以使用StateFlow 或者 SharedFlow 来解决。
细说 collect
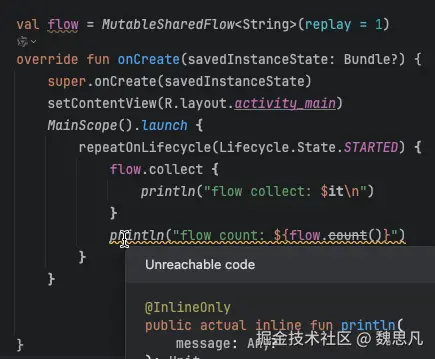
Flow 看起来跟 livedata 很像,仿佛就是一个观察者模式?
当声明一个 MutableSharedFlow,并在 collect 之后继续做一些业务,就像在 initListener 注册一堆事件,然后神奇的事情就是"Unreachable code"。所以走到这里,你会发现 collect{} 好像跟我们理解的观察者模式中的 addListener 并不一样。
逐一分析不同 flow 的 collect 方法
- MutableSharedFlow
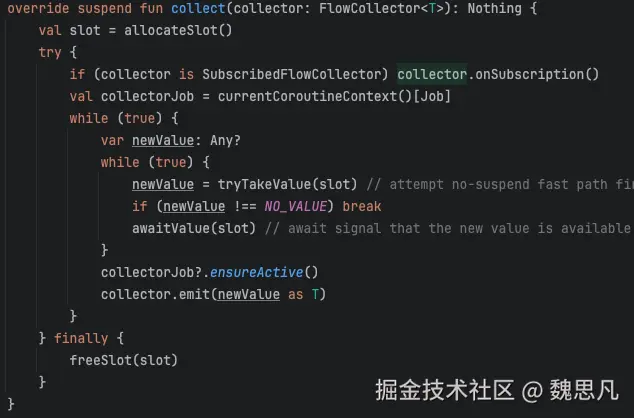
MutableSharedFlow 的真正实现类是 SharedFlowImpl,它的 collect 方法如下图。内部有两个 while 循环,如果没有新的值就会挂起等待,否则发送出去,是一个阻断型 API。

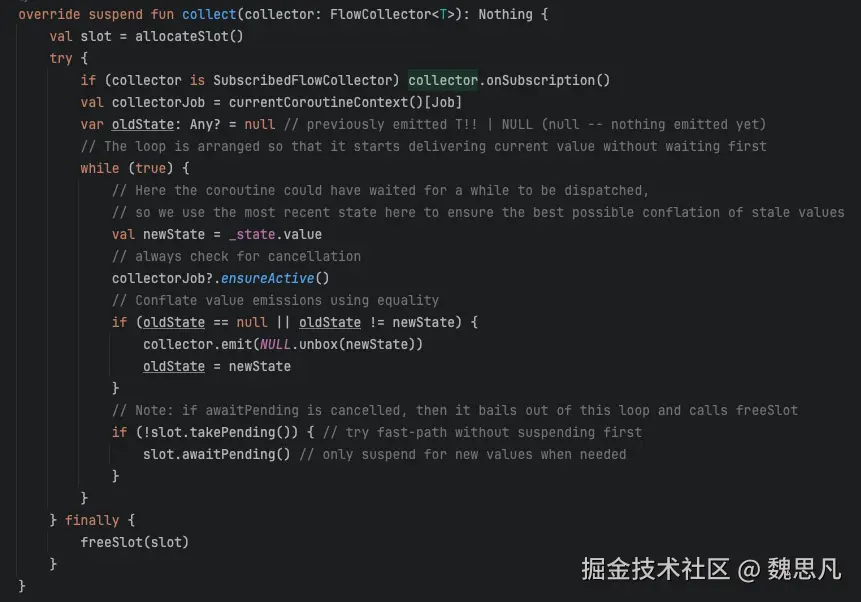
- MutableStateFlow
MutableStateFlow 的实现类是 StateFlowImpl,实现原则大致和 MutableSharedFlow 一致,用 while 循环挂起和恢复,除此之外,当订阅者除此 collect 时,会将当前的状态值发射过去。
- flow{}
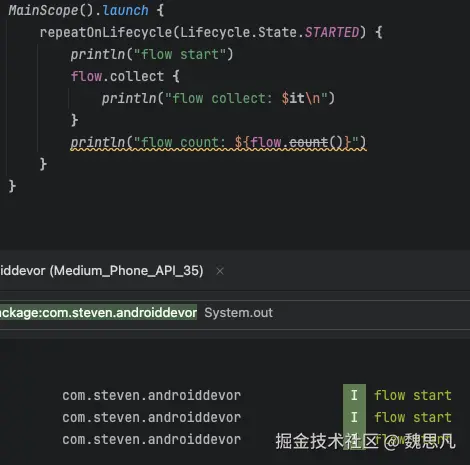
但不能以看待 livedata 的视角看待 Flow,尤其 MutableSharedFlow 这种动态流的 collect 是一个阻断方法,在一个协程中,写在 collect 之后的代码都是不可达的句柄。因为 collect 方法是一个 suspend 方法,内部有一个while 循环等待新值,在没有新数据的时候会把协程挂起等待,并非简单的 addListener。图 2 中多次切换前后台,只会打印"flow start"。
像 RxJava 一样操作 Flow
Flow 也有很多像 rxjava 的操作符,以下示例为创建一个冷流 flow{},在 block 中提交数据后,用 map 做一层过滤的操作,当然这个 map 也可以写在 collect 的前面。
kotlin
// 方式 1
val flow = flow<String> {
    while (true) {
        delay(1000)
        emit("hello")
    }
} .map {
    it.substring(0, 1)
}

MainScope().launch {
    repeatOnLifecycle(Lifecycle.State.STARTED) {
        flow.collect {
             println("flow collect $it")
        }
    }
}
// 方式 2
val flow = flow<String> {
    while (true) {
        delay(1000)
        emit("hello")
    }
}

MainScope().launch {
    repeatOnLifecycle(Lifecycle.State.STARTED) {
        flow.map {
            it.substring(0, 1)
        } .collect {
            println("flow collect $it")
        }
    }
}
flowOn ------改变 Flow 运行的调度器
kotlin
val flow = flow<String> {
    emit("w1")
    emit("w2")
    emit("2")
}.map {
    println("map1 ${currentCoroutineContext()}")
    it
}.flowOn(Dispatchers.IO).filter {
    println("filter ${currentCoroutineContext()}")
    it.substring(0, 1) == "w"
}.flowOn(Dispatchers.Default).map  {
    println("map2 ${currentCoroutineContext()}")
    it
}.catch {
    println("catch ${currentCoroutineContext()}")
}

MainScope().launch {
    repeatOnLifecycle(Lifecycle.State.STARTED) {
        println("flow start")

        flow.collect {
            println("flow collect $it")
        }
    }
} 
flowOn 可以改变上游的协程调度器,而下游的协程调度取决于调用 collect 所处的调用帧。
LiveData 与 Flow 之间的相互转换
LiveData 转 Flow,API:*asFlow() *,Viewmodel 外部只需关注 collect inputFlow,而 viewmodel 内部负责将 livedata 转变为 flow。
kotlin
class MainViewModel : ViewModel() {
    private val _inputLiveData = MutableLiveData<String>()
    val inputFlow: Flow<String> = _inputLiveData.asFlow()

    fun setInput(input: String) {
        _inputLiveData.value = input
    }
}
Flow 转 LiveData,API:*asLiveData() *, 在此基础上增加部分代码,外部 observe outputLiveData 即可。
kotlin
class MainViewModel : ViewModel() {
    private val _inputLiveData = MutableLiveData<String>()
    val inputFlow: Flow<String> = _inputLiveData.asFlow()

    fun setInput(input: String) {
        _inputLiveData.value = input
    }


    private val outputFlow = inputFlow
        .map { it.uppercase() } // 转换操作
        .flowOn(Dispatchers.Default)

    val outputLiveData: LiveData<String> = outputFlow.asLiveData()

}
Flow 的背压
上游的数据发射频率如果高于下游的处理速度,轻则数据丢失、程序卡顿,重则内存溢出、程序崩溃。
flow 解决背压的方式有很多种。
内置背压操作符
缓冲策略(Buffer)
- 作用:存储未处理的数据,生产者继续发射,消费者按节奏处理。
- 实现:
kotlin
flow.buffer(capacity = 10, onBufferOverflow = BufferOverflow.SUSPEND)-
capacity:缓冲区大小(默认64)。 -
onBufferOverflow:溢出策略:SUSPEND(默认):生产者挂起,等待消费者。DROP_OLDEST:丢弃最旧数据。DROP_LATEST:丢弃最新数据。
默认情况下,当缓冲区溢出时,发射器会暂停,以便收集器能够跟上。此策略可以通过可选的 onBufferOverflow 参数来覆盖,从而使发射器永不暂停。在这种情况下,缓冲区溢出时,要么采用 DROP_OLDEST 策略丢弃缓冲区中最早的值,并将最新发射的值添加到缓冲区中,要么采用 DROP_LATEST 策略丢弃正在发射的最新值,保持缓冲区不变。要实现这两种自定义策略中的任何一种,都需要使用至少包含一个元素的缓冲区。
合并策略(Conflate)
- 作用:只保留最新值,丢弃中间数据,适合 UI 状态更新。
- 实现:
kotlin
flow.conflate() // 等价于 buffer(0, DROP_OLDEST)取消旧任务(CollectLatest)
- 作用:新值到来时,立即取消正在处理的旧任务,开始处理新值。这里的旧任务指的是 collectLatest 的子协程。假如 100 毫秒以内来了一个新的值,那么旧的值只会打印 "Collected: value",没有"Collecteddelay:value"。
- 实现:
kotlin
fastProducer.collectLatest { value ->
    println("Collected: $value")
    delay(100) // 处理耗时
    println("Collected delay: $value")
}
主动控制流速
延迟发射(Delay)
- 作用:人为降低生产者速度,避免压垮消费者。
- 实现:
kotlin
flow.onEach {
     delay(100)
} // 每发射一个元素后延迟 100ms
debounce 防抖
- 作用:防止数据快速提交导致频繁的刷新。
- 实现:举个例子,搜索框输入文字后自动搜索,通常要输入一定时间后才去走模糊请求,这个场景就很适合使用这个扩展方法。从第一次 emit 开始,只有过了 debounce 中的时间后才去 collect,如果这个时间中间又触发 emit,则重新计时。甚至在网上见过有人基于这个来做点击防抖,其实有一些牛刀杀鸡的做法了。
kotlin
val fastProducer = flow {
for (i in 1..100) {
        println("Fast Producer: $i")
        emit(i)
    }
    println("Fast Producer: 1000")
    emit(1000)
    delay(2000)
    println("Fast Producer: 1001")
    emit(1001)

}

lifecycleScope.launch {
    repeatOnLifecycle(Lifecycle.State.STARTED) {
        fastProducer.debounce(1000).collect {
        println("--Slow Consumer: $it")
            delay(2000) // 模拟消费者处理数据的延迟
        }
    }
} 
转换为 Channel 手动管理
使用 Channel 作为缓冲区
- 作用:通过 Channel 的缓冲特性处理背压,手动控制收发。
- 实现:
kotlin
val channel = Channel<Int>(Channel.BUFFERED) // 默认 64 缓冲// 生产者
launch {
    for (i in 1..100) {
        channel.send(i)}
    }// 消费者
    launch {
        for (value in channel) {
        // 处理数据
        }
    }
}-
Channel 容量参数:
-
RENDEZVOUS(默认):无缓冲,发送方需等待接收方。 -
BUFFERED:默认 64 缓冲。 -
UNLIMITED:无界缓冲(慎用!可能 OOM)。 -
CONFLATED:只保留最新值。
-
其他常用 API
first()
kotlin
val sharedFlow = MutableSharedFlow<String>()
MainScope().launch  {
    sharedFlow.emit( "第一条" )
}
MainScope().launch  {
    val value = sharedFlow.first()
    println( "value $value " )
}
MainScope().launch  {
    sharedFlow.emit( "第二条" )
}
以上代码输出结果是"value 第二条"。first() 会让协程挂起,直到有地方 emit 才会恢复协程,虽然内部也是通过 collect 来实现的,但 first 却不是一个阻断操作。需要注意的是,这个规则取决于 flow 本身,因为 SharedFlow 如果 replay = 1,在注册 collect 时,内部会自动 emit,虽然看起来自己并没有调用 emit,但这是 SharedFlow 的内部机制。如果改为*val sharedFlow = MutableSharedFlow<String>(replay = 1)* ,则会输出"value 第一条"。
这个秘密在 SharedFlow 的 collect 方法中,内层的 while 循环判断有没有新的值,如果没有则挂起,如果有则发送出去,其中 awaitValue 是一个挂起函数。另外,外层的 while 循环便可以解释为什么 collect 是一个阻断操作,因为要么循环执行,要么协程挂起,永远跳不出去。
first(predicate: suspend (T) -> Boolean)
kotlin
MainScope().launch {
    sharedFlow.emit("第一条")
}
MainScope().launch {
    val value = sharedFlow.first {
        return@first it.length > 4
    }
    println("value $value")
}
MainScope().launch {
    sharedFlow.emit("第二条")
}
MainScope().launch {
    sharedFlow.emit("第三条11")
}
上述代码会打印"第三条11"。first 中也可以传入一个 lambda 表达式,整体的意义就是获取第一个符合条件的值。
asSharedFlow()、asStateFlow()
这两个 API 功能相同,分别作用于 MutableSharedFlow、MutableStateFlow,目的都是将可变的 flow 变为不可变的 flow,通常用于封装,比如 viewmodel 中只对外暴露可收集数据的 flow 对象,仅内部维护数据源的提交。
kotlin
private val _uiState = MutableSharedFlow<UiState>(replay = 1)
val uiState: SharedFlow<UiState> = _uiState.asSharedFlow() // 暴露只读接口

// 更新状态suspend
fun updateState(newState: UiState) {
    _uiState.emit(newState)
}

// 多个协程收集状态
lifecycleScope.launch {
    viewModel.uiState.collect { state ->
        updateUI(state)
    }
}