目录
[2.1 Vue技术栈介绍](#2.1 Vue技术栈介绍)
[2.1.1 STOMP 协议](#2.1.1 STOMP 协议)
[2.1.2 webstomp-client插件](#2.1.2 webstomp-client插件)
[2.1.3 sockjs-client插件](#2.1.3 sockjs-client插件)
[2.2 Java技术栈介绍](#2.2 Java技术栈介绍)
[2.2.1 Redis的发布/订阅模式](#2.2.1 Redis的发布/订阅模式)
[3.1 Java实现](#3.1 Java实现)
[3.2 Vue实现](#3.2 Vue实现)
[3.3 Nginx配置websocket代理](#3.3 Nginx配置websocket代理)
[3.4 Websocket实现跨服务消息推送](#3.4 Websocket实现跨服务消息推送)
[3.4.1 商城端发布消息](#3.4.1 商城端发布消息)
[3.4.2 供应商、运营端订阅消息](#3.4.2 供应商、运营端订阅消息)
一、需求概述
商城用户订单留言或者意见反馈时,消息可以实时提醒给后台员。
二、功能设计
技术选型:
- 前端:Vue2 + WebSocket (websocket 插件)
- 后端:Spring WebSocket (基于 STOMP 协议) + Redis发布订阅模式
2.1 Vue技术栈介绍
2.1.1 STOMP 协议
STOMP (Simple Text-Oriented Messaging Protocol) 是一种简单、基于文本的通信协议,专为消息传递设计,常用于 WebSocket 之上。它提供了一种标准化的消息格式和通信模式,适合实时应用场景,如聊天、通知和实时数据推送。
1.主要 特点
1、简单性:STOMP 基于文本,易于阅读和调试,消息格式类似于 HTTP 请求/响应。
2、帧结构:消息以"帧"(Frame)为单位,每帧包含命令、头部和正文。例如:
bash
SEND
destination:/topic/messages
content-type:text/plain
Hello, this is a message!- 命令:如 SEND(发送消息)、SUBSCRIBE(订阅)、MESSAGE(接收消息)。
- 头部:键值对,定义消息元数据,如 destination 指定消息通道。
- 正文:实际消息内容。
3、发布-订阅模型:支持客户端订阅特定通道(destination),接收服务器推送的消息。
4、跨平台:STOMP 不依赖特定编程语言,支持 Java、JavaScript、Python 等多种客户端。
5、与 WebSocket 集成:STOMP 通常运行在 WebSocket 之上,利用 WebSocket 的全双工通信能力,实现低延迟实时消息传递。
6、与 Spring Boot 等框架集成良好,通过 @EnableWebSocketMessageBroker 可快速配置。
2. 工作原理
1、客户端通过 WebSocket 连接到服务器的 STOMP 端点。
2、客户端发送 SUBSCRIBE 帧订阅某个通道(如 /topic/messages)。
3、服务器通过 MESSAGE 帧向订阅该通道的客户端推送消息。
4、客户端可通过 SEND 帧向特定通道发送消息,服务器处理后广播。
2.1.2 webstomp-client 插件
1. 介绍
webstomp-client 是一个 JavaScript 库,用于在浏览器或 Node.js 环境中通过 WebSocket 或类似协议实现 STOMP(Simple Text Oriented Messaging Protocol)协议的客户端功能。STOMP 是一种基于文本的轻量级消息协议,广泛用于消息队列和实时通信。
2. 主要特点
1、STOMP 协议支持:提供 STOMP 帧的发送和接收,支持订阅(SUBSCRIBE)、发送(SEND)、连接(CONNECT)等命令。
2、WebSocket 封装:基于 WebSocket 或其他传输协议(如 SockJS),在 WebSocket 之上实现 STOMP 协议。
3、简单 API:
bash
connect(headers, connectCallback, errorCallback):建立 STOMP 连接。
subscribe(destination, callback):订阅消息主题。
send(destination, headers, body):发送消息。
disconnect(callback):断开连接。
4、心跳检测:支持心跳机制(heartbeatIncoming 和 heartbeatOutgoing),确保连接活跃。
5、调试支持:通过 debug 属性输出详细日志,便于调试。
6、轻量级:专注于 STOMP 协议,体积小,适合前端集成。
2.1.3 sockjs-client 插件
1. 介绍
sockjs-client 是一个 JavaScript 库,提供 WebSocket 的浏览器端实现,并支持回退机制以兼容不支持 WebSocket 的环境。它通过 HTTP 协议建立连接,优先尝试 WebSocket,若失败则回退到其他传输方式(如 XHR 流、长轮询)。
2. 主要特点
1、WebSocket 兼容性:优先使用原生 WebSocket(ws://),若不可用,自动回退到 XHR 流、JSONP 或长轮询。
2、HTTP 协议入口:通过 HTTP 端点(如 http://localhost:8081/ws)发起连接,适合与后端 SockJS 服务配合。
3、事件驱动:
bash
onopen:连接建立时触发。
onmessage:收到消息时触发。
onerror:发生错误时触发。
onclose:连接关闭时触发。
4、跨浏览器支持:支持旧版浏览器(如 IE8+),通过回退机制确保兼容性。
5、与 STOMP 集成:常与 webstomp-client 结合,提供 STOMP 协议的传输层。
6、轻量级:专注于实时通信,API 简单。
3. Vue SockJS → Java WebSocket链路
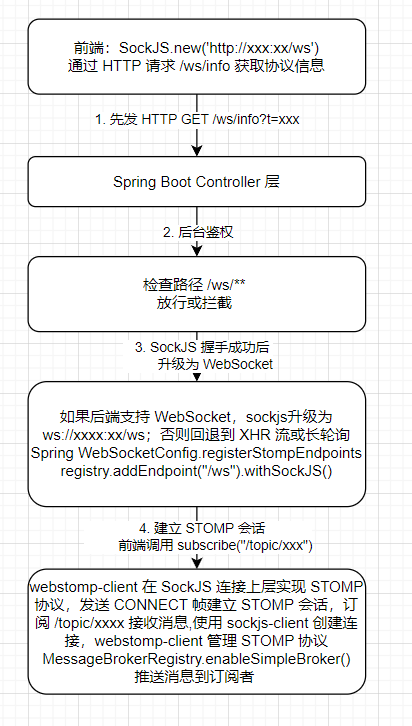
- webstomp-client:提供 STOMP 协议支持,用于订阅和处理消息。
- sockjs-client:提供 WebSocket 连接和回退机制,通过 http://ip:port/ws 建立连接。
- 如果浏览器都是支持 WebSocket 的,可以不用 .withSockJS(),这样可以直接用
- ws://127.0.0.1:8081/ws。但如果还要支持 IE 之类的老浏览器就不适合。
2.2 Java技术栈介绍
后端需要考虑消息如何存储、消息存活问题、消息的稳定性、是否影响服务性能登问题。
2.2.1 Redis的发布/订阅模式
在 Redis 中,通过 PUBLISH 命令或 redisTemplate.convertAndSend 发布到频道的消息(Pub/Sub 机制)不会被持久化存储,因此消息的存活时间取决于以下几个因素:
1. Redis Pub/Sub 消息的特性
1、瞬时性:Redis 的 Pub/Sub 机制是基于发布/订阅模式的,消息发布到频道后,会立即发送给所有订阅该频道的客户端。如果没有订阅者在线,消息会立即被丢弃,不会存储在 Redis 中。
2、存活时间:消息的"存活时间"实际上是瞬时的,仅在发布时传递给当前订阅者。一旦传递完成,消息就不再存在于 Redis 中。
3、无持久化:Redis Pub/Sub 不提供消息的持久化存储功能,频道本身不保存历史消息。
2. 影响消息"存活"的因素
1、订阅者状态:如果有客户端订阅了频道(例如通过 SUBSCRIBE message-channel 或 RedisMessageListenerContainer),消息会实时传递给这些订阅者。如果没有订阅者,消息会立即被丢弃,不会存储。
2、网络延迟:消息传递受网络延迟影响,但通常在毫秒级别完成。
3、Redis 配置:默认情况下,Redis 不对 Pub/Sub 消息进行持久化存储,除非使用额外的机制(如自定义存储)。
3. 如何延长消息存活时间
1、代替 Pub/Sub,使用 Redis 列表(LPUSH/RPOP)或 Redis Streams(XADD/XREAD)存储消息。这些数据结构支持持久化,消息会保存直到被显式删除或过期。
- 示例(使用列表)
redisTemplate.opsForList().leftPush("message-queue", notice);
- 接收端:
Notice notice = (Notice) redisTemplate.opsForList().rightPop("message-queue");
Redis Streams 更适合高吞吐量场景,支持消费者组和消息确认。
2、使用 Redis AOF/RDB 持久化:Redis 的 AOF(追加文件)或 RDB(快照)持久化仅对键值数据有效,对 Pub/Sub 消息无效。如果需要持久化,必须结合其他数据结构(如列表或流)。
4. 总结
1、默认行为:通过 redisTemplate.convertAndSend("message-channel", notice) 发布的消息是瞬时的,仅在发布时传递给订阅者,不会存储在 Redis 中,存活时间接近于 0 秒(仅受网络延迟影响)。
2、无订阅者:如果没有客户端订阅 message-channel,消息会立即被丢弃。
3、延长存活时间:若需要消息持久化或延迟处理,建议使用 Redis 列表、流或数据库存储,并可设置 TTL过期时间。如果消息仅实时传递,当前 Pub/Sub 机制已足够,无需额外存储。
三、功能实现
3.1 Java实现
1.添加依赖
XML
<dependency>
	<groupId>org.springframework.boot</groupId>
	<artifactId>spring-boot-starter-websocket</artifactId>
</dependency>
2.配置 WebSocket
java
@Configuration
@EnableWebSocketMessageBroker
public class WebSocketConfig implements WebSocketMessageBrokerConfigurer {
    @Override
    public void configureMessageBroker(MessageBrokerRegistry config) {
        // 启用简单消息代理,订阅路径以 /topic 开头
        config.enableSimpleBroker("/topic");
        // 客户端发送消息的路径前缀
        config.setApplicationDestinationPrefixes("/app");
    }
    @Override
    public void registerStompEndpoints(StompEndpointRegistry registry) {
        // 注册 WebSocket 端点,客户端通过此端点连接
        registry.addEndpoint("/ws").setAllowedOrigins("*").withSockJS();
    }
}
3.推送消息
java
@Service
public class MessageService {
    @Autowired
    private SimpMessagingTemplate messagingTemplate;
    public void saveAndNotify(Message message) {
        // 保存到数据库。。。
        // 通过 WebSocket 推送消息到 /topic/messages
        messagingTemplate.convertAndSend("/topic/messages", message);
    }
}
消息体
java
@Schema(description = "消息通知")
@Data
public class Message implements Serializable{
    @Schema(name = "主键")
    private Integer id;
    @Schema(name = "发送人ID")
    private String senderId;
    @Schema(name = "发送人姓名")
    private String senderName;
    @Schema(name = "接收人ID")
    private String receiverId;
    @Schema(name = "接收人姓名")
    private String receiverName;
    @Schema(name = "消息内容")
    private String content;
    @Schema(name = "消息类型")
    private Integer type;

}
3.2 Vue实现
1.依赖安装
javascript
npm cache clean --force 清除npm缓存并尝试重新安包
npm install sockjs-client@1.6.1 webstomp-client@1.2.6 安装sockjs与webstomp依赖
npm list sockjs-client webstomp-client 验证sockjs与webstomp依赖是否安装成功
npm uninstall sockjs-client webstomp-client 卸载sockjs与webstomp依赖
2.请求代理配置
在 vue.config.js 中配置 WebSocket请求代理:
javascript
proxy: {
  //访问 ip:port/ws,Vue devServer 会代理到 VUE_APP_BASE_URL/ws,绕过 CORS。
  '/ws': {
	target: getBaseUrl(),  // 使用处理后的URL
	ws: true,
	changeOrigin: true,
	onProxyReqWs(proxyReq, req, socket) {
	  // 添加错误处理防止代理崩溃
	  socket.on('error', (err) => {
		console.warn('WebSocket 代理连接错误:', err.message); // 不要抛出错误,防止进程退出
	  });
	},
	onError(err, req, socket) {
	  console.warn('WebSocket 代理错误:', err.message);
	  if (socket && socket.writable) {
		socket.end();
	  }
	}
  }
}
3.订阅消息
在App.vue主组件中订阅 WebSocket 消息:
html
<template>
  <div id="app">
    <router-view />
    <!--  消息提示弹框  -->
    <notice ref="notice" />
  </div>
</template>

<script>
import Notice from './components/Messaging/Notice.vue';
import SockJS from 'sockjs-client';
import Stomp from 'webstomp-client';
import { mapGetters } from 'vuex';
export default {
  name: 'App',
  //初始版本导出只有name属性,如果禁用websocket,把以下代码全部注释
  data() {
    return {
      stompClient: null,
      connected: false,
    };
  },
  components: { Notice },
  computed: {
    ...mapGetters(['user']),
  },
  mounted() {
    this.initWebSocket();
  },

  methods: {
    initWebSocket() {
      if (typeof window === 'undefined') return;
      try {
        // 清理现有连接
        if (this.stompClient) {
          this.stompClient.disconnect();
          this.stompClient = null;
        }
        // 建立连接
        const socket = new SockJS("/ws");
        socket.onerror = (e) => {
          console.warn('WebSocket 连接失败(不再重连)', e);
          this.connected = false;
          this.stompClient = null;
        };
        //用 webstomp-client 封装
        this.stompClient = Stomp.over(socket);
        this.stompClient.debug = () => {};

        this.stompClient.connect({}, (frame) => {
              console.log('WebSocket 连接成功');
              this.connected = true;
              this.subscribeToChannels();
            },
            (error) => {
              console.warn('STOMP 连接失败', error);
              this.connected = false;
              this.stompClient = null;
            }
        );
        socket.onclose = () => {
          console.warn('WebSocket 连接关闭');
          this.connected = false;
          this.stompClient = null;
        };
      } catch (err) {
        console.error('WebSocket 初始化失败', err);
        this.connected = false;
        this.stompClient = null;
      }
    },
    subscribeToChannels() {
      if (!this.stompClient || !this.connected) return;
      this.stompClient.subscribe('/topic/messages', message => {
        try {
          const msg = JSON.parse(message.body);
          console.log('sellerId:'+this.user.sellerUser.sellerId)
          //消息类型,1-留言,2-意见反馈,3-通知公告
          if (String(this.user.sellerUser.sellerId) !== msg.receiverId) {
            return;
          }
          if (this.$refs.notice) this.$refs.notice.showMessage(msg);
          console.log("收到消息"+message.body)
        } catch (e) {
          console.error('消息解析错误:', e);
        }
      });
    }
  },
  beforeDestroy() {
    if (this.stompClient && this.connected) {
      this.stompClient.disconnect(() => {
        console.log('WebSocket 已断开');
      });
    }
  }
};
</script>
权限框架,如shiro需要把/ws/** 和 /ws/info 设置为 anon,允许匿名访问,防止 Shiro 拦截 WebSocket 连接。
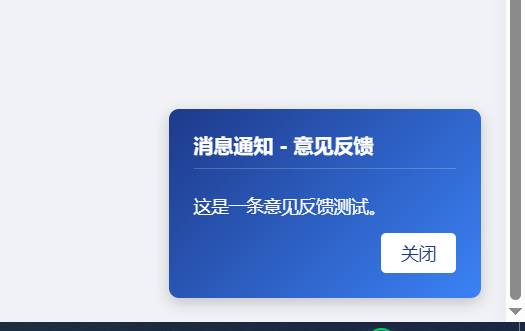
4.消息弹框实现
消息提示框子组件Notice.vue:
html
<template>
  <transition name="notification">
    <div class="notification" v-if="showNotification" @mouseenter="pauseAutoClose" @mouseleave="resumeAutoClose">
      <div class="notification-content">
        <!-- 标题:动态显示消息类型 -->
        <p class="notification-title">
          <strong>消息通知 - {{ messageTypeText }}</strong>
        </p>
        <!-- 消息内容 -->
<!--        <p class="notification-item">订单ID: {{ message.orderSn || '无' }}</p>
        <p class="notification-item">买家ID: {{ message.userId || '无' }}</p>-->
        <p class="notification-item">{{ message.content || '暂无内容' }}</p>
        <!-- 关闭按钮 -->
        <button class="notification-button" @click="closeNotification">关闭</button>
      </div>
    </div>
  </transition>
</template>

<script>
export default {
  data() {
    return {
      showNotification: false,
      message: {},
      autoCloseTimer: null, // 存储自动关闭定时器
      isPaused: false, // 标记是否暂停自动关闭
      notificationSound: new Audio('/static/sounds/notification.mp3'), // 预加载音频
    };
  },
  computed: {
    // 根据消息类型动态生成标题
    messageTypeText() {
      const typeMap = {
        1: '留言',
        2: '意见反馈',
        3: '通知公告',
      };
      return typeMap[this.message.type] || '未知类型';
    },
  },
  methods: {
    // 显示消息并播放声音
    showMessage(message) {
      // 防止重复显示时定时器冲突
      this.clearAutoClose();
      this.message = message;
      this.showNotification = true;
      // 播放提示音
      this.playNotificationSound();
      // 设置10秒自动关闭
      this.setAutoClose();
    },
    // 播放通知声音
    playNotificationSound() {
      this.notificationSound.play().catch(error => {
        console.error('音频播放失败:', error);
        // 可选:显示错误提示
        this.$message.error('无法播放通知音,请检查浏览器设置');
      });
    },
    // 设置自动关闭定时器
    setAutoClose() {
      if (!this.isPaused) {
        this.autoCloseTimer = setTimeout(() => {
          this.showNotification = false;
        }, 3000);
      }
    },
    // 清除自动关闭定时器
    clearAutoClose() {
      if (this.autoCloseTimer) {
        clearTimeout(this.autoCloseTimer);
        this.autoCloseTimer = null;
      }
    },
    // 鼠标悬停时暂停自动关闭
    pauseAutoClose() {
      this.isPaused = true;
      this.clearAutoClose();
    },
    // 鼠标离开时恢复自动关闭
    resumeAutoClose() {
      this.isPaused = false;
      this.setAutoClose();
    },
    // 手动关闭提示框
    closeNotification() {
      this.clearAutoClose();
      this.showNotification = false;
    },
  },
  beforeDestroy() {
    // 组件销毁前清理定时器
    this.clearAutoClose();
    // 停止音频播放
    this.notificationSound.pause();
    this.notificationSound.currentTime = 0;
  },
};
</script>

<style scoped>
.notification {
  position: fixed;
  bottom: 20px;
  right: 20px;
  background: linear-gradient(135deg, #1e3a8a, #3b82f6); /* 科技蓝渐变背景 */
  border-radius: 8px;
  padding: 20px;
  box-shadow: 0 4px 12px rgba(0, 0, 0, 0.2);
  z-index: 1000;
  color: #ffffff; /* 白色文字 */
  max-width: 320px;
  min-width: 250px;
  animation: slideIn 0.3s ease-out; /* 入场动画 */
  cursor: default; /* 鼠标悬停时显示默认光标 */
}

/* 内容容器 */
.notification-content {
  display: flex;
  flex-direction: column;
  gap: 10px;
}

/* 标题样式 */
.notification-title {
  font-size: 16px;
  font-weight: 600;
  margin: 0 0 10px 0;
  border-bottom: 1px solid rgba(255, 255, 255, 0.2); /* 标题下划线 */
  padding-bottom: 8px;
}

/* 消息项样式 */
.notification-item {
  font-size: 14px;
  margin: 0;
  line-height: 1.5;
  word-break: break-word; /* 防止长内容溢出 */
}

/* 关闭按钮 */
.notification-button {
  align-self: flex-end;
  background-color: #ffffff;
  color: #1e3a8a; /* 按钮文字颜色与背景协调 */
  border: none;
  border-radius: 4px;
  padding: 8px 16px;
  cursor: pointer;
  font-size: 14px;
  transition: background-color 0.2s;
}

.notification-button:hover {
  background-color: #e5e7eb; /* 按钮悬停效果 */
}

/* 入场动画 */
@keyframes slideIn {
  from {
    transform: translateX(100%);
    opacity: 0;
  }
  to {
    transform: translateX(0);
    opacity: 1;
  }
}

/* 退出动画 */
.notification-leave-active {
  animation: slideOut 0.3s ease-in;
}

@keyframes slideOut {
  from {
    transform: translateX(0);
    opacity: 1;
  }
  to {
    transform: translateX(100%);
    opacity: 0;
  }
}
</style>
3.3 Nginx配置websocket代理
html
server {
   ....
location /ws/ {
    ....
        # 必需的核心配置
        proxy_http_version 1.1;
        proxy_set_header Upgrade $http_upgrade;
        proxy_set_header Connection "upgrade";
    }
}
3.4 Websocket实现跨服务消息推送
商城服务、供应商服务、运营服务属于三个独立的服务,前后端各自分开,怎么实现消息共享,需要借助redis的发布订阅模式实现消息传递。
- 商城服务:买家通过前端发送消息,商城端服务发布消息到 Redis 的指定频道(message-channel)。
- 供应商端、运营端服务:订阅 Redis 的 message-channel,接收消息后通过 WebSocket 推送到订阅了 /topic/messages 的供应商或运营前端。
3.4.1 商城端发布消息
java
public void sendMessage(Message message) {
	....
	// 发布消息到 Redis 频道
	redisTemplate.convertAndSend("message-channel", message);
}
3.4.2 供应商、运营端订阅消息
1.Redis订阅配置
java
@Slf4j
@Configuration
public class RedisSubscriberConfig {
    @Autowired
    private MessageListener messageListener;
    @Bean
    public RedisMessageListenerContainer redisContainer(RedisConnectionFactory connectionFactory) {
        RedisMessageListenerContainer container = new RedisMessageListenerContainer();
        container.setConnectionFactory(connectionFactory);
        container.addMessageListener(messageListenerAdapter(), new ChannelTopic(MessageUtil.MSG_CHANNEL));
        container.setErrorHandler(t -> log.error("Redis 监听器错误", t));
        log.info("RedisMessageListenerContainer 已初始化并订阅了消息通道。");
        return container;
    }
    @Bean
    public MessageListenerAdapter messageListenerAdapter() {
        MessageListenerAdapter adapter = new MessageListenerAdapter(messageListener, "onMessage");
        adapter.setSerializer(new Jackson2JsonRedisSerializer<>(Object.class));
        return adapter;
    }
}
2.消息监听与推送
java
@Component
public class MessageListener {
    private static final Logger log = LoggerFactory.getLogger(MessageListener.class);

    @Autowired
    private SimpMessagingTemplate messagingTemplate;

    @Autowired
    private ObjectMapper objectMapper; // 注入 ObjectMapper 以复用配置
    /**
     *因为redis的Jackson2JsonRedisSerializer 在序列化时,由于启用了 enableDefaultTyping,会将对象包装为 [type, data] 格式的数组,是接收的是一个数组而非Message对象
     */
    public void onMessage(Object object) {
        try {
            // 检查消息是否为 ArrayList
            if (!(object instanceof List)) {
                log.error("无效的消息格式,预期为列表,但实际得到的是: {}", object != null ? object.getClass() : "null");
                return;
            }
            List<?> messageList = (List<?>) object;
            // 验证列表长度和内容
            if (messageList.size() < 2) {
                log.error("无效的消息列表大小: {}", messageList.size());
                return;
            }

            // 第一个元素应为类型信息(如 "com.yixiekeji.entity.messaging.Message")
            if (!(messageList.get(0) instanceof String)) {
                log.error("无效的类型信息,预期为字符串,实际为: {}", messageList.get(0) != null ? messageList.get(0).getClass() : "null");
                return;
            }
            // 第二个元素应为 Message 数据
            Object data = messageList.get(1);
            if (data == null) {
                log.error("消息数据为空");
                return;
            }
            // 转换为 Message 对象
            Message message = objectMapper.convertValue(data, Message.class);
            log.info("收到通知: {}", message);

            // 推送消息到 WebSocket 主题
            messagingTemplate.convertAndSend(MessageUtil.WS_TOPIC, message);
        } catch (Exception e) {
            log.error("消息处理失败: {}", object, e);
        }
    }
}