目录:
-
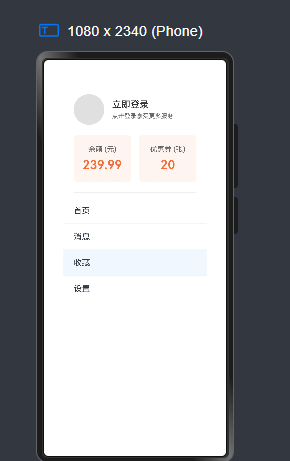
- 1、侧边抽屉栏效果以及实现伪代码
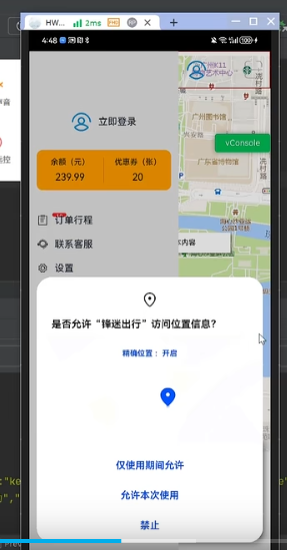
- 2、定位权限开启
-
- [Step 1:声明定位权限(module.json5)](#Step 1:声明定位权限(module.json5))
- [Step 2:动态申请定位权限(触发系统弹窗)](#Step 2:动态申请定位权限(触发系统弹窗))
- [Step 3:获取定位数据(权限获取后)](#Step 3:获取定位数据(权限获取后))
- [Step 4:在页面中集成(完整流程)](#Step 4:在页面中集成(完整流程))
- 3、获取定位以及监听定位
- 4、地位数据和地图交互
- 5、终点搜索定位
1、侧边抽屉栏效果以及实现伪代码
typescript
@Entry
@Component
struct SideBarDemo {
  @State showSideBar: boolean = false;
  @State selectedIndex: number = 0;
  private menuList: string[] = ["首页", "消息", "收藏", "设置"];
  @State userBalance: number = 239.99;
  @State userCoupons: number = 20;

  build() {
    // 根容器:层叠布局
    Stack() {
      // 1. 主内容区域
      Column() {
        Text(`当前选中:${this.menuList[this.selectedIndex]}`)
          .fontSize(24)
          .margin(30);

        Button("打开侧边栏")
          .width(150)
          .height(40)
          .onClick(() => {
            this.showSideBar = true; // 点击按钮显示侧边栏
          });
      }
      .width('100%')
      .height('100%')
      .backgroundColor('#FFFFFF')
      // 点击主内容区关闭侧边栏
      .gesture(
        TapGesture()
          .onAction(() => {
            if (this.showSideBar) this.showSideBar = false;
          })
      );

      // 2. 侧边栏(条件渲染)
      if (this.showSideBar) {
        Column() {
          // 用户信息区域
          Column() {
            // 用户头像和登录状态
            Row() {
              // 用户头像
              Circle({ width: 60, height: 60 })
                .fill('#E0E0E0')
                .margin({ right: 15 });

              Column() {
                Text("立即登录")
                  .fontSize(18)
                  .fontWeight(500)
                  .fontColor('#333333')
                  .margin({ bottom: 5 });

                Text("点击登录享受更多服务")
                  .fontSize(12)
                  .fontColor('#666666');
              }
              .alignItems(HorizontalAlign.Start);
            }
            .width('100%')
            .padding({ top: 30, bottom: 20, left: 20, right: 20 })
            .alignItems(VerticalAlign.Center);

            // 余额和优惠券区域
            Row() {
              // 余额区域
              Column() {
                Text("余额 (元)")
                  .fontSize(14)
                  .fontColor('#666666')
                  .margin({ bottom: 8 });
                Text(this.userBalance.toString())
                  .fontSize(24)
                  .fontWeight(600)
                  .fontColor('#FF6B35');
              }
              .layoutWeight(1)
              .alignItems(HorizontalAlign.Center)
              .padding({ top: 20, bottom: 20 })
              .backgroundColor('#FFF5F0')
              .borderRadius(8)
              .margin({ right: 8 });

              // 优惠券区域
              Column() {
                Text("优惠券 (张)")
                  .fontSize(14)
                  .fontColor('#666666')
                  .margin({ bottom: 8 });
                Text(this.userCoupons.toString())
                  .fontSize(24)
                  .fontWeight(600)
                  .fontColor('#FF6B35');
              }
              .layoutWeight(1)
              .alignItems(HorizontalAlign.Center)
              .padding({ top: 20, bottom: 20 })
              .backgroundColor('#FFF5F0')
              .borderRadius(8)
              .margin({ left: 8 });
            }
            .width('100%')
            .padding({ left: 20, right: 20, bottom: 20 });

            // 分割线
            Divider()
              .color('#EEEEEE')
              .strokeWidth(1)
              .margin({ left: 20, right: 20 });

            // 菜单列表
            List() {
              ForEach(this.menuList, (item: string, index: number) => {
                ListItem() {
                  Text(item)
                    .fontSize(16)
                    .width('100%')
                    .height(50)
                    .textAlign(TextAlign.Start)
                    .padding({ left: 20 })
                    .backgroundColor(this.selectedIndex === index ? '#F0F8FF' : 'transparent')
                    .onClick(() => {
                      this.selectedIndex = index;
                      this.showSideBar = false;
                    });
                }
              }, (item: string) => item);
            }
            .width('100%')
            .divider({ strokeWidth: 1, color: '#F0F0F0' })
            .margin({ top: 10 });
          }
        }
        .width(280) // 侧边栏宽度
        .height('100%')
        .backgroundColor('#FFFFFF')
        .align(Alignment.Start) // 内容左对齐
        // 侧边栏滑动关闭手势(向左滑动)
        .gesture(
          PanGesture()
            .onActionUpdate((event) => {
              // 使用event.offsetX获取手势坐标
              if (event.offsetX < 50) { // 滑动到左侧50px外关闭
                this.showSideBar = false;
              }
            })
        )
        // API 9过渡动画:使用基本淡入淡出+位移(避免TransitionType)
        .transition({
          opacity: 0, // 透明度从0到1
          translate: { x: -280 } // X轴从-280px(左侧外)移动到0
        });
      }
    }
    .width('100%')
    .height('100%')
    // 主内容区滑动打开手势(左侧边缘向右滑动)
    .gesture(
      PanGesture()
        .onActionStart((event) => {
          // 使用event.offsetX获取手势起始坐标
          if (event.offsetX < 30 && !this.showSideBar) { // 左侧30px内触发
            this.showSideBar = true;
          }
        })
    );
  }
}
2、定位权限开启
Step 1:声明定位权限(module.json5)
在 main/module.json5 中声明定位相关权限(决定系统弹窗显示的权限类型):
typescript
{
  "module": {
    "requestPermissions": [
      {
        "name": "ohos.permission.LOCATION", // 基础定位权限(必选)
        "reason": "用于获取您的位置以提供出行服务", // 权限申请理由(用户可见)
        "usedScene": {
          "abilities": ["EntryAbility"], // 关联的Ability
          "when": "inuse" // 仅在应用使用时申请
        }
      },
      {
        "name": "ohos.permission.ACCESS_FINE_LOCATION", // 精确定位权限(可选,API 10+)
        "reason": "用于获取精确位置以推荐附近车辆",
        "usedScene": { "abilities": ["EntryAbility"], "when": "inuse" }
      }
    ]
  }
}
Step 2:动态申请定位权限(触发系统弹窗)
通过鸿蒙的 abilityAccessCtrl 模块动态申请权限,系统会自动弹出原生弹窗(无需自定义UI):
typescript
// utils/LocationPermission.ts
import abilityAccessCtrl from '@ohos.abilityAccessCtrl';
import { BusinessError } from '@ohos.base';
import promptAction from '@ohos.promptAction';

export class LocationPermission {
  private atManager: abilityAccessCtrl.AtManager = abilityAccessCtrl.createAtManager();

  /**
   * 申请定位权限(触发系统原生弹窗)
   * @param context 当前Ability上下文
   * @returns 是否获取权限
   */
  async request(context: any): Promise<boolean> {
    const permissions = ['ohos.permission.LOCATION'];
    try {
      // 1. 检查权限状态
      const tokenId = context.accessTokenInfo.tokenId;
      const status = await this.atManager.checkPermissions(tokenId, permissions);

      if (status[0] === abilityAccessCtrl.GrantStatus.PERMISSION_GRANTED) {
        // 2. 已授权:直接返回true
        return true;
      } else {
        // 3. 未授权:动态申请权限(系统自动弹出弹窗)
        const result = await this.atManager.requestPermissionsFromUser(context, permissions);
        // 4. 返回申请结果(0=授权,-1=拒绝)
        return result.authResults[0] === 0;
      }
    } catch (err) {
      console.error('定位权限申请失败:', err);
      return false;
    }
  }
}
Step 3:获取定位数据(权限获取后)
使用鸿蒙 @ohos.geolocation 模块 获取用户实时位置(经纬度):
typescript
// services/LocationService.ts
import geolocation from '@ohos.geolocation';
import { BusinessError } from '@ohos.base';

export class LocationService {
  /**
   * 获取当前位置(单次定位)
   * @returns 经纬度坐标 { latitude: number, longitude: number }
   */
  async getCurrentLocation(): Promise<{ latitude: number; longitude: number }> {
    return new Promise((resolve, reject) => {
      // 定位参数配置
      const options: geolocation.LocationRequest = {
        timeout: 5000, // 超时时间(ms)
        coordinateType: geolocation.CoordinateType.COORDINATE_TYPE_WGS84, // WGS84坐标系(国际标准)
        needAddress: false // 是否需要详细地址(选填)
      };

      // 调用系统定位API
      geolocation.getCurrentLocation(options, (err: BusinessError, location: geolocation.Location) => {
        if (err) {
          reject(`定位失败: ${err.message}`);
          return;
        }
        // 返回经纬度
        resolve({
          latitude: location.latitude, // 纬度
          longitude: location.longitude // 经度
        });
      });
    });
  }
}
Step 4:在页面中集成(完整流程)
在出行项目的首页(如"立即登录"所在页面)中,按以下流程调用:
typescript
// pages/HomePage.ets
import { LocationPermission } from '../utils/LocationPermission';
import { LocationService } from '../services/LocationService';
@Entry
@Component
struct HomePage {
private permissionManager: LocationPermission = new LocationPermission();
private locationService: LocationService = new LocationService();
@State userLocation: string = '获取位置中...';
async aboutToAppear() {
// 页面加载时触发定位流程
await this.startLocationProcess();
}
/**
* 完整定位流程:申请权限 → 获取位置 → 显示结果
*/
private async startLocationProcess() {
// 1. 申请定位权限(触发系统弹窗)
const hasPermission = await this.permissionManager.request(getContext(this));
if (!hasPermission) {
this.userLocation = '定位权限被拒绝,请手动开启';
return;
}
// 2. 获取当前位置
try {
const location = await this.locationService.getCurrentLocation();
this.userLocation = `当前位置:(${location.latitude.toFixed(6)}, ${location.longitude.toFixed(6)})`;
// 3. 将位置传递给地图组件显示(如截图中的地图界面)
this.updateMapLocation(location);
} catch (err) {
this.userLocation = '获取位置失败,请重试';
}
}
/**
* 更新地图显示(需结合地图组件,如百度地图/高德地图鸿蒙SDK)
*/
private updateMapLocation(location: { latitude: number; longitude: number }) {
// 示例:调用地图组件API设置中心坐标
// MapComponent.setCenterLocation(location.latitude, location.longitude);
}
build() {
Column() {
// 地图组件(此处省略,需集成第三方地图SDK或自定义地图)
Text(this.userLocation).fontSize(16).margin(20);
Button('立即登录').width(200).height(40).margin(10);
// ... 其他UI元素
}
.width('100%')
.height('100%');
}
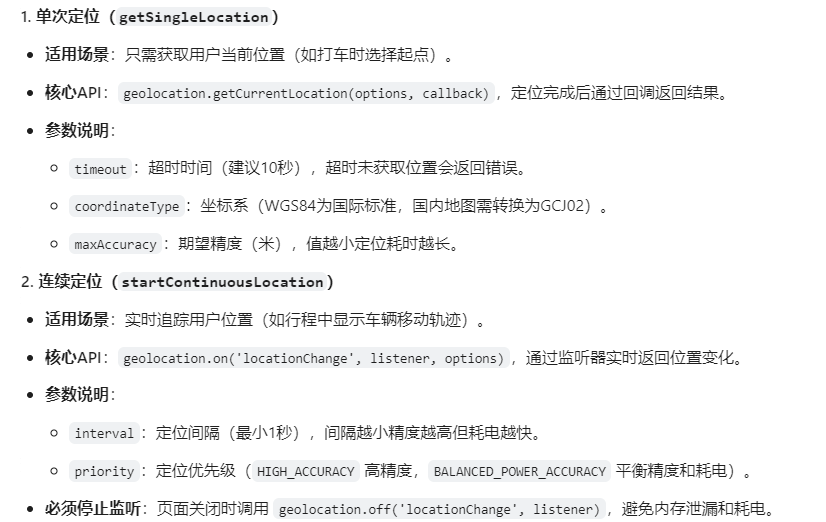
}3、获取定位以及监听定位
3.1、使用场景
3.2、实现步骤
一、基础准备
- 声明权限(module.json5)
在 main/module.json5 中声明定位权限(必选):
typescript
{
  "module": {
    "requestPermissions": [
      {
        "name": "ohos.permission.LOCATION", // 基础定位权限(必选)
        "reason": "获取位置信息以提供服务",
        "usedScene": { "abilities": ["EntryAbility"], "when": "inuse" }
      },
      {
        "name": "ohos.permission.ACCESS_FINE_LOCATION", // 精确定位(可选,API 10+)
        "reason": "获取精确位置",
        "usedScene": { "abilities": ["EntryAbility"], "when": "inuse" }
      }
    ]
  }
}- 导入定位模块
typescript
import geolocation from '@ohos.geolocation'; // 定位核心模块
import { BusinessError } from '@ohos.base';
二、实现定位工具类(封装单次/连续定位)
创建 LocationManager.ets 封装定位功能,包含权限检查、单次定位、连续监听:
typescript
// utils/LocationManager.ets
import geolocation from '@ohos.geolocation';
import abilityAccessCtrl from '@ohos.abilityAccessCtrl';
import { BusinessError } from '@ohos.base';

export class LocationManager {
  private static instance: LocationManager | null = null;
  private locationListener: geolocation.LocationChangeListener | null = null; // 连续定位监听器

  // 单例模式(避免重复创建)
  static getInstance(): LocationManager {
    if (!this.instance) {
      this.instance = new LocationManager();
    }
    return this.instance;
  }

  /**
   * 检查定位权限(内部调用,无需外部关注)
   */
  private async checkPermission(context: any): Promise<boolean> {
    try {
      const atManager = abilityAccessCtrl.createAtManager();
      const tokenId = context.accessTokenInfo.tokenId;
      const status = await atManager.checkPermissions(tokenId, ['ohos.permission.LOCATION']);
      return status[0] === abilityAccessCtrl.GrantStatus.PERMISSION_GRANTED;
    } catch (err) {
      console.error('权限检查失败:', err);
      return false;
    }
  }

  /**
   * 1. 单次定位(获取当前位置)
   * @param context 上下文(Ability实例)
   * @returns 位置信息 { latitude: 纬度, longitude: 经度, accuracy: 精度 }
   */
  async getSingleLocation(context: any): Promise<{
    latitude: number;
    longitude: number;
    accuracy?: number;
  }> {
    // 检查权限
    if (!await this.checkPermission(context)) {
      throw new Error('定位权限未授权');
    }

    return new Promise((resolve, reject) => {
      // 定位参数配置
      const options: geolocation.LocationRequest = {
        timeout: 10000, // 超时时间(ms)
        coordinateType: geolocation.CoordinateType.COORDINATE_TYPE_WGS84, // WGS84坐标系
        needAddress: false, // 是否需要地址信息(选填)
        maxAccuracy: 100 // 期望精度(米,可选)
      };

      // 发起单次定位
      geolocation.getCurrentLocation(options, (err: BusinessError, location: geolocation.Location) => {
        if (err) {
          reject(`单次定位失败: ${err.message}`);
          return;
        }
        resolve({
          latitude: location.latitude,
          longitude: location.longitude,
          accuracy: location.accuracy // 定位精度(米)
        });
      });
    });
  }

  /**
   * 2. 连续定位(监听位置变化)
   * @param context 上下文(Ability实例)
   * @param onLocationChange 位置变化回调(实时返回新位置)
   */
  async startContinuousLocation(
    context: any,
    onLocationChange: (location: { latitude: number; longitude: number }) => void
  ): Promise<void> {
    // 检查权限
    if (!await this.checkPermission(context)) {
      throw new Error('定位权限未授权');
    }

    // 停止已有监听(避免重复监听)
    if (this.locationListener) {
      this.stopContinuousLocation();
    }

    // 创建监听器
    this.locationListener = (location: geolocation.Location) => {
      onLocationChange({
        latitude: location.latitude,
        longitude: location.longitude
      });
    };

    // 配置连续定位参数
    const options: geolocation.LocationRequest = {
      interval: 5000, // 定位间隔(ms,最小1000ms)
      fastestInterval: 3000, // 最快响应间隔(ms)
      priority: geolocation.LocationRequestPriority.HIGH_ACCURACY, // 高精度优先
      coordinateType: geolocation.CoordinateType.COORDINATE_TYPE_WGS84
    };

    // 开始连续定位监听
    geolocation.on('locationChange', this.locationListener, options);
  }

  /**
   * 3. 停止连续定位(页面关闭时调用,避免内存泄漏)
   */
  stopContinuousLocation(): void {
    if (this.locationListener) {
      geolocation.off('locationChange', this.locationListener);
      this.locationListener = null;
      console.log('连续定位已停止');
    }
  }
}
三、在页面中使用(完整示例)
在出行项目的页面(如行程页)中调用 LocationManager,实现单次定位和连续监听:
typescript
// pages/RidePage.ets
import { LocationManager } from '../utils/LocationManager';
import promptAction from '@ohos.promptAction';
@Entry
@Component
struct RidePage {
private locationManager: LocationManager = LocationManager.getInstance();
@State currentLat: number = 0; // 当前纬度
@State currentLng: number = 0; // 当前经度
@State isTracking: boolean = false; // 是否正在连续定位
// 页面加载时获取单次定位
async aboutToAppear() {
await this.getSingleLocation();
}
// 页面退出时停止连续定位(必须调用,否则耗电)
aboutToDisappear() {
this.locationManager.stopContinuousLocation();
}
/**
* 单次定位:获取初始位置
*/
async getSingleLocation() {
try {
const location = await this.locationManager.getSingleLocation(getContext(this));
this.currentLat = location.latitude;
this.currentLng = location.longitude;
promptAction.showToast({ message: `已获取位置: ${location.latitude}, ${location.longitude}` });
} catch (err) {
promptAction.showToast({ message: `定位失败: ${err.message}` });
}
}
/**
* 连续定位:开始/停止监听位置变化
*/
async toggleContinuousLocation() {
if (!this.isTracking) {
// 开始连续定位
try {
await this.locationManager.startContinuousLocation(
getContext(this),
(newLocation) => {
// 实时更新UI
this.currentLat = newLocation.latitude;
this.currentLng = newLocation.longitude;
console.log(`位置更新: ${newLocation.latitude}, ${newLocation.longitude}`);
}
);
this.isTracking = true;
promptAction.showToast({ message: '开始连续定位' });
} catch (err) {
promptAction.showToast({ message: `连续定位失败: ${err.message}` });
}
} else {
// 停止连续定位
this.locationManager.stopContinuousLocation();
this.isTracking = false;
promptAction.showToast({ message: '停止连续定位' });
}
}
build() {
Column() {
Text(`当前位置: ${this.currentLat.toFixed(6)}, ${this.currentLng.toFixed(6)}`)
.fontSize(16)
.margin(20);
Button(this.isTracking ? '停止连续定位' : '开始连续定位')
.width(200)
.height(40)
.margin(10)
.onClick(() => this.toggleContinuousLocation());
Button('重新获取单次定位')
.width(200)
.height(40)
.onClick(() => this.getSingleLocation());
}
.width('100%')
.height('100%')
.justifyContent(FlexAlign.Center);
}
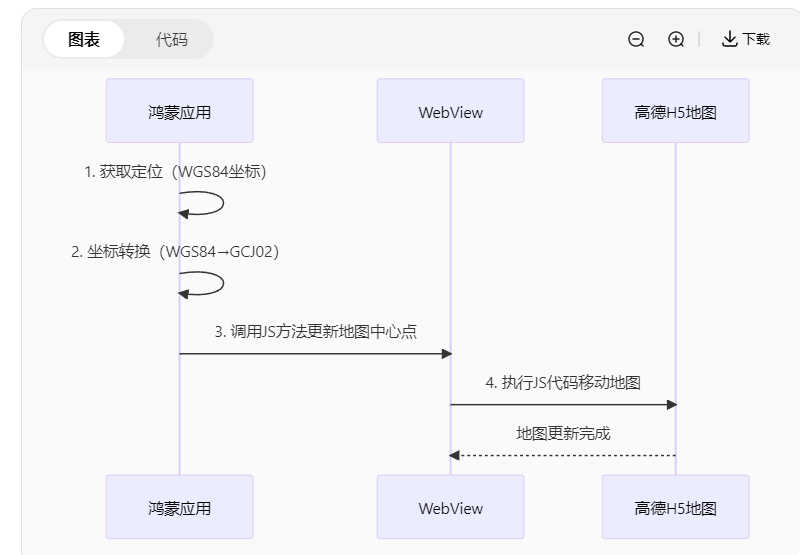
}4、地位数据和地图交互
4.1、效果图
4.2、关键代码
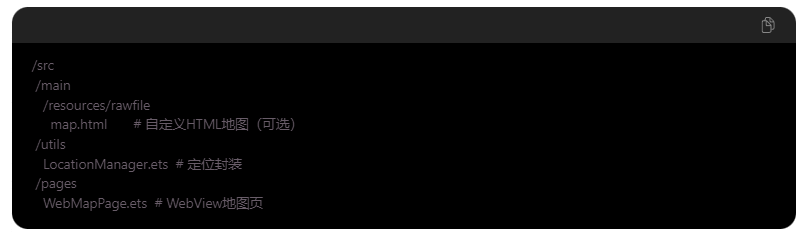
- 创建 WebView 页面(加载高德H5地图)
typescript
// pages/WebMapPage.ets
import webview from '@ohos.web.webview';
import promptAction from '@ohos.promptAction';
import { LocationManager } from '../utils/LocationManager';

@Entry
@Component
struct WebMapPage {
  private webController: webview.WebviewController = new webview.WebviewController();
  private locationManager: LocationManager = LocationManager.getInstance();

  build() {
    Column() {
      // WebView组件(加载高德H5地图)
      Web({
        src: 'https://uri.amap.com/marker', // 高德H5地图URL(可替换为自定义HTML)
        controller: this.webController
      })
      .width('100%')
      .height('100%')
      .onPageEnd(() => {
        // 页面加载完成后开始定位
        this.startLocationAndUpdateMap();
      })
    }
    .width('100%')
    .height('100%')
  }

  // 开始定位并更新地图
  private async startLocationAndUpdateMap() {
    // 1. 获取定位权限
    const context = getContext(this);
    if (!await this.locationManager.checkPermission(context)) {
      promptAction.showToast({ message: '请授予定位权限' });
      return;
    }

    // 2. 获取当前位置(单次定位)
    try {
      const location = await this.locationManager.getSingleLocation(context);
      // 3. 坐标转换(WGS84→GCJ02)
      const gcj02 = coordtransform.wgs84togcj02(location.longitude, location.latitude);
      // 4. 调用WebView的JS方法更新地图
      this.updateWebMap(gcj02[0], gcj02[1]);
    } catch (err) {
      promptAction.showToast({ message: `定位失败: ${err.message}` });
    }
  }

  // 通过JS更新H5地图中心点
  private updateWebMap(longitude: number, latitude: number) {
    const jsCode = `
      // 高德H5地图API:移动中心点到新位置
      if (window.AMap) {
        const map = new AMap.Map('container', {
          center: [${longitude}, ${latitude}],
          zoom: 16
        });
        new AMap.Marker({
          position: [${longitude}, ${latitude}],
          map: map
        });
      } else {
        console.error('高德地图JS未加载');
      }
    `;
    // 执行JS代码
    this.webController.executeJs({
      script: jsCode,
      callback: (result) => {
        console.log('地图更新结果:', result);
      }
    });
  }
}
总结:
通过 WebView + 高德H5地图API 实现定位与地图交互的流程如下:
-
获取定位:使用 @ohos.geolocation 获取WGS84坐标。
-
坐标转换:通过 coordtransform 转换为GCJ02坐标。
-
更新地图:调用 webController.executeJs() 执行高德地图的JS API。
-
优化体验:处理权限、错误及性能问题。
-
此方案适合快速集成地图功能,无需原生SDK,但需注意 网络依赖 和 坐标偏移问题。
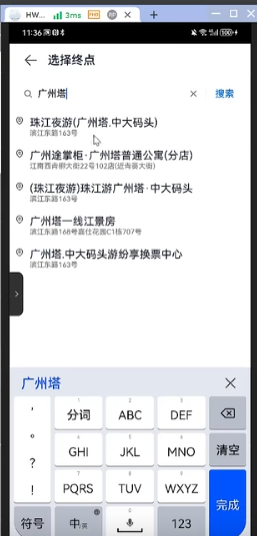
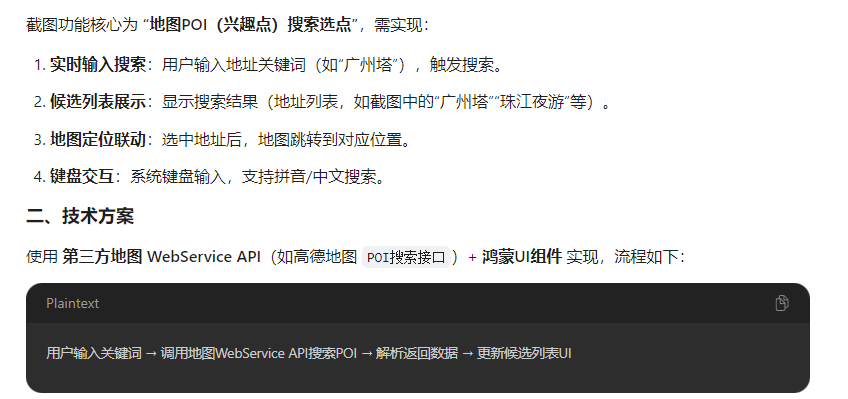
5、终点搜索定位
5.1、效果图
5.2、实现伪代码
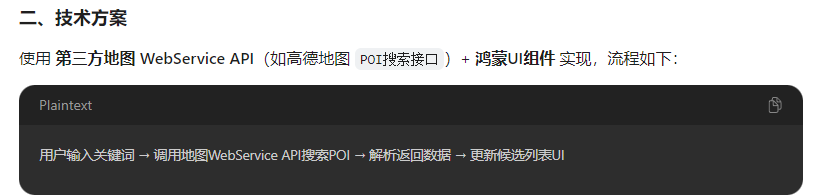
typescript
// services/MapApiService.ets
import http from '@ohos.net.http';
import { BusinessError } from '@ohos.base';
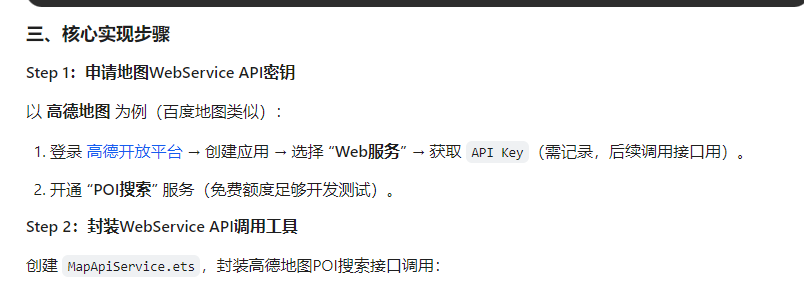
export class MapApiService {
private apiKey: string = '你的高德WebService API Key'; // 替换为实际Key
private baseUrl: string = 'https://restapi.amap.com/v3/place/text'; // 高德POI搜索接口
/**
* 搜索POI(兴趣点)
* @param keyword 搜索关键词(如"广州塔")
* @param city 城市(如"广州",可选,缩小搜索范围)
* @returns 候选地址列表
*/
async searchPoi(keyword: string, city?: string): Promise<Array<{
name: string; // 地址名称
address: string; // 详细地址
longitude: number; // 经度
latitude: number; // 纬度
}>> {
return new Promise((resolve, reject) => {
// 1. 构建请求参数
const params = new Map<string, string>();
params.set('key', this.apiKey);
params.set('keywords', keyword);
params.set('offset', '10'); // 最多返回10条结果(如截图中的列表长度)
params.set('page', '1');
if (city) params.set('city', city);
// 2. 拼接请求URL
const queryString = Array.from(params.entries())
.map(([k, v]) => `${k}=${encodeURIComponent(v)}`)
.join('&');
const requestUrl = `${this.baseUrl}?${queryString}`;
// 3. 发起HTTP GET请求
let httpRequest = http.createHttp();
httpRequest.request(
requestUrl,
{ method: http.RequestMethod.GET },
(err: BusinessError, data: http.HttpResponse) => {
httpRequest.destroy(); // 销毁请求实例
if (err) {
reject(`搜索失败: ${err.message}`);
return;
}
// 4. 解析返回数据(高德POI接口返回格式)
if (data.responseCode === 200) {
const result = JSON.parse(data.result as string);
if (result.status === '1' && result.pois) {
// 提取需要的字段(名称、地址、经纬度)
const pois = result.pois.map((poi: any) => ({
name: poi.name,
address: poi.address || poi.adname, // 若address为空,用区域名
longitude: parseFloat(poi.location.split(',')[0]),
latitude: parseFloat(poi.location.split(',')[1])
}));
resolve(pois);
} else {
reject(`搜索无结果: ${result.info}`);
}
} else {
reject(`HTTP错误: ${data.responseCode}`);
}
}
);
});
}
}Step 3:实现搜索页面UI(候选列表+输入框)
创建 PoiSearchPage.ets,实现截图中的搜索框、候选列表、键盘交互:
typescript
// pages/PoiSearchPage.ets
import { MapApiService } from '../services/MapApiService';
import promptAction from '@ohos.promptAction';

@Entry
@Component
struct PoiSearchPage {
  @State keyword: string = ''; // 搜索关键词
  @State poiList: Array<{ name: string; address: string; longitude: number; latitude: number }> = [];
  private mapApi: MapApiService = new MapApiService();
  private searchDebounceTimer: number | null = null; // 防抖定时器(避免输入过快频繁调用API)

  build() {
    Column() {
      // 1. 搜索栏(输入框+清除按钮)
      Row() {
        Image($r('app.media.ic_search')) // 搜索图标(需添加本地资源)
          .width(20)
          .height(20)
          .margin(10);

        TextInput({ placeholder: '搜索地址' })
          .width('flex')
          .height(40)
          .onChange((value: string) => {
            this.keyword = value;
            this.debounceSearch(); // 防抖处理后调用搜索
          })
          .placeholderColor('#999999');

        if (this.keyword.length > 0) {
          Button({ type: ButtonType.Circle, stateEffect: true }) {
            Image($r('app.media.ic_clear')) // 清除图标(需添加本地资源)
              .width(18)
              .height(18);
          }
          .width(40)
          .height(40)
          .onClick(() => this.keyword = ''); // 清空输入
        }
      }
      .width('100%')
      .padding(10)
      .backgroundColor('#FFFFFF')
      .borderBottom({ width: 0.5, color: '#EEEEEE' });

      // 2. 候选地址列表(如截图中的地址列表)
      List() {
        ForEach(this.poiList, (item) => {
          ListItem() {
            Column() {
              Text(item.name)
                .fontSize(16)
                .fontWeight(FontWeight.Medium)
                .textAlign(TextAlign.Start)
                .width('100%');

              Text(item.address)
                .fontSize(14)
                .color('#666666')
                .textAlign(TextAlign.Start)
                .width('100%')
                .margin({ top: 2 });
            }
            .padding(15)
            .backgroundColor('#FFFFFF');
          }
          .onClick(() => {
            // 3. 选中地址:返回上一页并传递坐标(假设通过router返回)
            router.back({
              params: {
                selectedPoi: item // 传递选中的地址信息(名称、经纬度等)
              }
            });
          });
        }, (item) => item.name);
      }
      .width('100%')
      .backgroundColor('#F5F5F5')
      .divider({ strokeWidth: 0.5, color: '#EEEEEE' }); // 列表项分隔线
    }
    .width('100%')
    .height('100%')
    .backgroundColor('#F5F5F5');
  }

  /**
   * 防抖处理:用户输入停止500ms后再调用搜索接口(避免频繁请求)
   */
  private debounceSearch() {
    if (this.searchDebounceTimer) {
      clearTimeout(this.searchDebounceTimer);
    }
    this.searchDebounceTimer = setTimeout(async () => {
      if (this.keyword.trim().length < 2) {
        this.poiList = []; // 关键词过短,清空列表
        return;
      }
      // 调用POI搜索API
      try {
        const result = await this.mapApi.searchPoi(this.keyword, '广州'); // 限定城市为"广州"
        this.poiList = result;
      } catch (err) {
        promptAction.showToast({ message: `搜索失败: ${err.message}` });
      }
    }, 500); // 500ms防抖
  }
}
Step 4:地图页面接收选中地址并定位
在地图页面(如 MapPage.ets)中,接收从搜索页返回的地址信息,调用地图API定位到选中位置:
typescript
// pages/MapPage.ets
import router from '@ohos.router';

@Entry
@Component
struct MapPage {
  @State selectedPoi: { name: string; longitude: number; latitude: number } | null = null;

  aboutToAppear() {
    // 获取从搜索页返回的选中地址
    const params = router.getParams();
    if (params?.selectedPoi) {
      this.selectedPoi = params.selectedPoi;
      this.navigateToSelectedPoi(); // 定位到选中地址
    }
  }

  // 定位到选中地址
  private navigateToSelectedPoi() {
    if (!this.selectedPoi) return;
    // 调用地图API,移动到选中地址的经纬度(以高德地图SDK为例)
    mapController.setCenter({
      longitude: this.selectedPoi.longitude,
      latitude: this.selectedPoi.latitude
    }, true); // true:带动画
    // 添加选中标记(参考前面章节的Marker代码)
  }

  build() {
    Column() {
      // 地图组件(省略,参考前面章节)
      Button('选择地址')
        .onClick(() => {
          router.pushUrl({ url: 'pages/PoiSearchPage' }); // 跳转到搜索页
        });
    }
  }
}