当Python的灵动遇见.NET的稳健,AI智能体开发进入了一个全新纪元。
引子:为什么我们需要又一个Agent框架?
在AI Agent框架如雨后春笋般涌现的2025年,AutoGen、LangChain、LangGraph等已经占据了大量市场份额。此时微软推出Agent Framework,是又一次"重复造轮子"吗?
答案是否定的。**Agent Framework最大的创新在于:它是首个真正实现Python和.NET双语言原生支持,且API设计高度一致的AI智能体框架。**这不是简单的"翻译",而是深度理解两种语言生态后的精心设计。
让我们用一组对比数据来感受这种设计哲学:
| 特性 | AutoGen | LangGraph | Agent Framework |
|---|---|---|---|
| 语言支持 | Python | Python | Python + .NET (原生) |
| API一致性 | N/A | N/A | 98%+ 跨语言一致 |
| 工作流引擎 | 隐式 | 显式图 | Pregel模型超步执行 |
| 检查点恢复 | 有限 | 支持 | 跨进程持久化 |
| 企业集成 | 中等 | 中等 | 深度Azure生态 |
第一章:架构哲学------同一个灵魂,两副躯壳
1.1 核心抽象:Agent的统一语义
在Agent Framework中,**Agent不是一个具体的类,而是一种协议(Protocol)**。这是理解整个框架的关键。
Python实现:
from agent_framework import AgentProtocol, ChatAgent, AgentRunResponse

# AgentProtocol是一个结构化协议(duck typing)
# 任何实现了run()和run_stream()的类都是Agent
class CustomAgent:
    @property
    def id(self) -> str:
        return "my-agent-001"

    @property
    def name(self) -> str:
        return "Custom Agent"

    async def run(self, messages=None, *, thread=None, **kwargs) -> AgentRunResponse:
        # 自定义实现
        return AgentRunResponse(messages=[], response_id="resp-001")

    def run_stream(self, messages=None, *, thread=None, **kwargs):
        async def _stream():
            yield AgentRunResponseUpdate()
        return _stream()

    def get_new_thread(self, **kwargs):
        return AgentThread()

# 验证协议兼容性
assert isinstance(CustomAgent(), AgentProtocol)
.NET实现:
// AIAgent是抽象基类,定义了强类型契约
public abstract class AIAgent
{
    public virtual string Id { get; }
    public virtual string? Name { get; }
    public virtual string DisplayName => Name ?? Id;

    // 核心方法:同步运行
    public abstract Task<AgentRunResponse> RunAsync(
        IEnumerable<ChatMessage> messages,
        AgentThread? thread = null,
        AgentRunOptions? options = null,
        CancellationToken cancellationToken = default);

    // 流式运行
    public abstract IAsyncEnumerable<AgentRunResponseUpdate> RunStreamingAsync(
        IEnumerable<ChatMessage> messages,
        AgentThread? thread = null,
        AgentRunOptions? options = null,
        CancellationToken cancellationToken = default);

    // 线程管理
    public abstract AgentThread GetNewThread();
}
设计洞察:
-
Python采用Protocol: 利用Python的duck typing,最大化灵活性,允许开发者完全自定义Agent实现
-
.NET采用抽象类: 利用静态类型系统,提供编译时检查和IntelliSense支持
-
语义等价性: 尽管实现机制不同,两者的行为契约完全一致
1.2 响应模型:Primary vs Secondary内容的哲学思考
Agent执行过程中会产生大量输出:最终答案、工具调用、推理过程、状态更新等。如何组织这些信息?Agent Framework借鉴了OpenAI Agent SDK和AutoGen的设计,将输出分为:
-
Primary内容: 面向最终用户的响应(文本、图片、结构化数据)
-
Secondary内容: 中间过程信息(工具调用、日志、状态变化)
Python响应结构:
@dataclass
class AgentRunResponse:
    messages: list[ChatMessage]      # Primary内容
    response_id: str
    created_at: datetime | None = None
    usage_details: UsageDetails | None = None
    raw_representation: Any = None   # Secondary内容(完整响应)

    @property
    def text(self) -> str:
        """聚合所有TextContent,始终返回Primary内容"""
        return "".join(
            content.text
            for msg in self.messages
            for content in msg.contents
            if isinstance(content, TextContent)
        )
.NET响应结构:
public class AgentRunResponse
{
    public IList<ChatMessage> Messages { get; set; }  // Primary内容
    public string Text { get; }  // 自动聚合TextContent
    public string? ResponseId { get; set; }
    public DateTimeOffset? CreatedAt { get; set; }
    public UsageDetails? Usage { get; set; }
    public object? RawRepresentation { get; set; }  // Secondary内容
}
关键决策: 根据ADR-0001,框架选择了"Option 1.1a"方案:
-
非流式调用 : 返回包含Primary+Secondary的完整响应,但
Text属性智能过滤,仅返回Primary -
流式调用: 返回混合流,由开发者按需过滤
-
理由: 平衡简单性与灵活性,避免强制区分导致的API复杂度
1.3 工作流:从消息传递到图执行
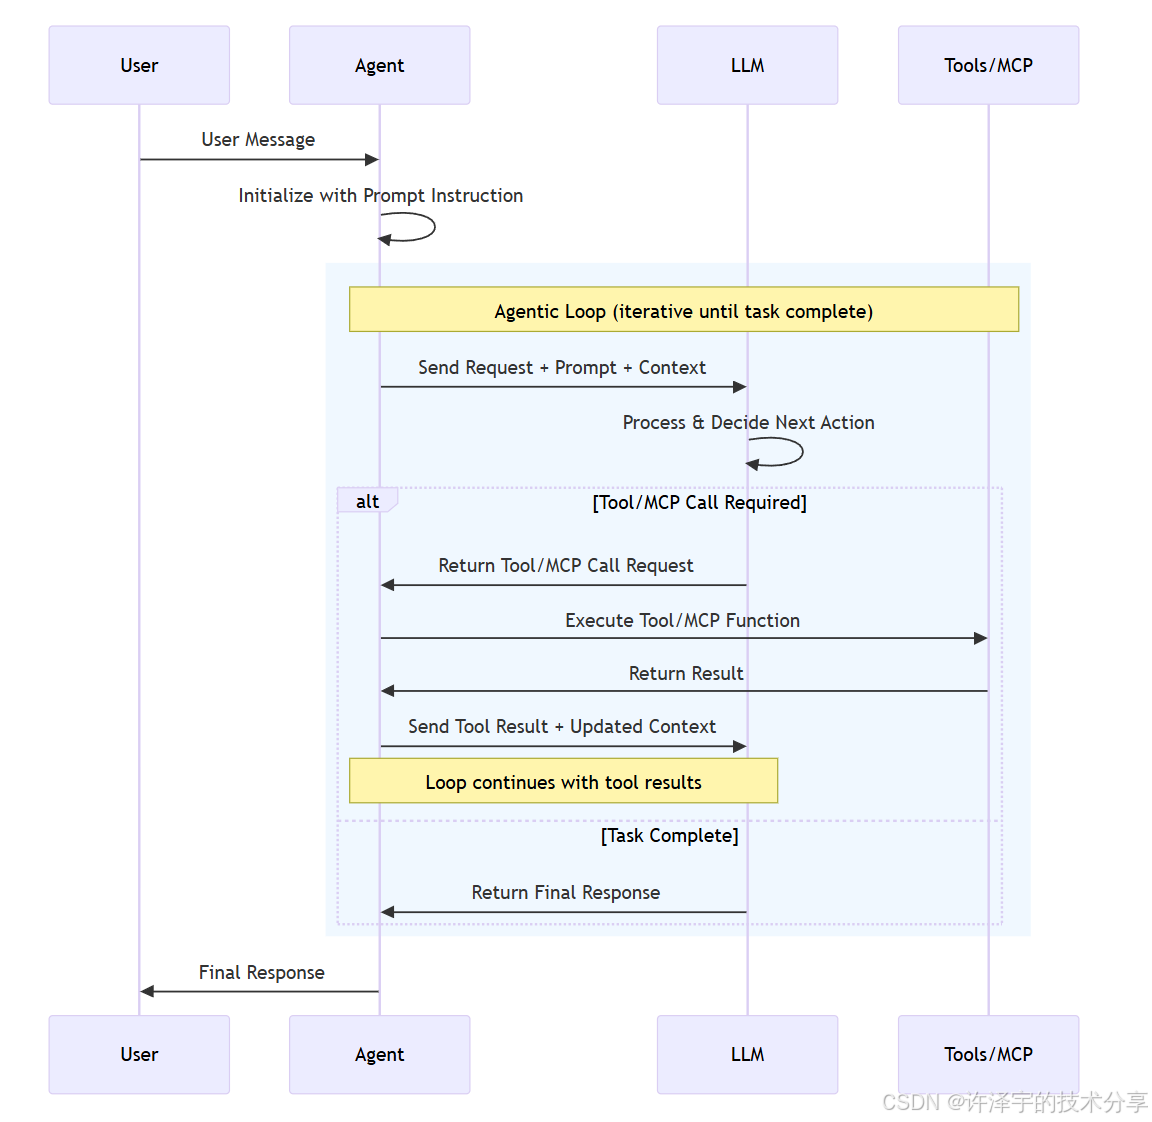
Agent Framework的工作流不是简单的Agent链式调用,而是基于Pregel模型的超步(Superstep)执行。这是一个鲜为人知但极其强大的设计。
什么是Pregel模型?
-
起源于Google的图计算框架
-
核心思想:以顶点为中心进行批量同步并行(BSP)计算
-
执行模式:Think-Send-Receive的超步循环
Python工作流实现:
from agent_framework import Executor, WorkflowBuilder, WorkflowContext, handler

class UpperCase(Executor):
    def __init__(self, id: str):
        super().__init__(id=id)

    @handler
    async def to_upper_case(self, text: str, ctx: WorkflowContext[str]) -> None:
        """
        WorkflowContext[str]表示此节点会向下游发送str类型消息
        """
        result = text.upper()
        await ctx.send_message(result)  # 发送到下游节点

@executor(id="reverse_text_executor")
async def reverse_text(text: str, ctx: WorkflowContext[Never, str]) -> None:
    """
    WorkflowContext[Never, str]表示:
    - Never: 不向下游发送消息
    - str: 产生str类型的工作流输出
    """
    result = text[::-1]
    await ctx.yield_output(result)  # 产生最终输出

# 构建工作流
workflow = (WorkflowBuilder()
    .add_edge(UpperCase(id="upper"), reverse_text)
    .set_start_executor(upper)
    .build())

# 执行
result = await workflow.run("hello world")
print(result.get_outputs())  # ['DLROW OLLEH']
.NET工作流实现:
// 定义Executor节点
public class UpperCaseExecutor : Executor<string, string>
{
    public override async Task ExecuteAsync(
        string input,
        WorkflowContext<string> context)
    {
        var result = input.ToUpper();
        await context.SendMessageAsync(result);
    }
}

public class ReverseExecutor : Executor<string>
{
    public override async Task ExecuteAsync(
        string input,
        WorkflowContext context)
    {
        var result = new string(input.Reverse().ToArray());
        await context.YieldOutputAsync(result);
    }
}

// 构建工作流
var workflow = new WorkflowBuilder()
    .AddEdge(new UpperCaseExecutor(), new ReverseExecutor())
    .SetStartExecutor<UpperCaseExecutor>()
    .Build<string>();

// 执行
var result = await workflow.RunAsync("hello world");
Console.WriteLine(string.Join(", ", result.GetOutputs())); // DLROW OLLEH
超步执行的魔力:
-
消息隔离: 超步内的消息发送不会立即送达,而是在超步结束时批量传递
-
状态一致性: 每个节点在超步内看到的是上一超步的稳定状态
-
检查点友好: 每个超步结束都是一个自然的检查点边界
-
并行执行: 同一超步内没有依赖的节点可以并行执行
第二章:实战对比------同一场景,两种实现
2.1 场景:多Agent协作的市场研究系统
需求:
-
WebAgent: 从互联网搜索信息
-
AnalystAgent: 分析数据并生成洞察
-
CoderAgent: 将洞察转化为可视化代码
-
ManagerAgent: 协调三者并汇总报告
Python实现
import asyncio
from agent_framework import ChatAgent, WorkflowBuilder, Executor, handler
from agent_framework.openai import OpenAIChatClient
from agent_framework.workflows import WorkflowContext

# 定义四个Agent
web_agent = ChatAgent(
    chat_client=OpenAIChatClient(),
    name="WebAgent",
    instructions="You search the web for market data and trends.",
    tools=[web_search_tool]  # 假设已定义
)

analyst_agent = ChatAgent(
    chat_client=OpenAIChatClient(),
    name="AnalystAgent",
    instructions="You analyze market data and provide strategic insights."
)

coder_agent = ChatAgent(
    chat_client=OpenAIChatClient(),
    name="CoderAgent",
    instructions="You generate Python visualization code based on insights."
)

# 定义协调器Executor
class ManagerExecutor(Executor):
    def __init__(self):
        super().__init__(id="manager")

    @handler
    async def coordinate(
        self,
        results: list[str],  # Fan-in接收多个输入
        ctx: WorkflowContext[Never, str]
    ) -> None:
        # 汇总所有Agent的输出
        final_report = f"""
        Market Research Report
        ======================
        Web Research: {results[0]}
        Analysis: {results[1]}
        Visualization: {results[2]}
        """
        await ctx.yield_output(final_report)

# 构建工作流
workflow = (WorkflowBuilder()
    # WebAgent -> AnalystAgent -> CoderAgent
    .add_chain([web_agent, analyst_agent, coder_agent])
    # 三个Agent的输出汇聚到ManagerExecutor
    .add_fan_in_edges(
        [web_agent, analyst_agent, coder_agent],
        ManagerExecutor()
    )
    .set_start_executor(web_agent)
    .build()
)

# 执行
result = await workflow.run("Analyze the AI chip market in 2025")
print(result.get_outputs()[0])
Python实现亮点:
-
隐式Agent包装 : WorkflowBuilder自动将
ChatAgent包装为AgentExecutor -
类型推断 :
WorkflowContext[list[str]]自动处理fan-in聚合 -
链式API :
add_chain()一行代码定义顺序执行
.NET实现
using Microsoft.Agents.AI;
using Microsoft.Agents.AI.Workflows;

// 定义四个Agent
var webAgent = new AzureOpenAIClient(endpoint, credential)
    .GetChatClient(deploymentName)
    .CreateAIAgent("You search the web for market data.", "WebAgent");

var analystAgent = new AzureOpenAIClient(endpoint, credential)
    .GetChatClient(deploymentName)
    .CreateAIAgent("You analyze market data.", "AnalystAgent");

var coderAgent = new AzureOpenAIClient(endpoint, credential)
    .GetChatClient(deploymentName)
    .CreateAIAgent("You generate visualization code.", "CoderAgent");

// 定义协调器Executor
public class ManagerExecutor : Executor<List<string>, string>
{
    public override async Task ExecuteAsync(
        List<string> results,
        WorkflowContext<string> context)
    {
        var finalReport = $@"
        Market Research Report
        ======================
        Web Research: {results[0]}
        Analysis: {results[1]}
        Visualization: {results[2]}
        ";

        await context.YieldOutputAsync(finalReport);
    }
}

// 构建工作流
var workflow = new WorkflowBuilder<string>()
    .AddChain(new[] { webAgent, analystAgent, coderAgent })
    .AddFanInEdges(
        new[] { webAgent, analystAgent, coderAgent },
        new ManagerExecutor()
    )
    .SetStartExecutor(webAgent)
    .Build();

// 执行
var result = await workflow.RunAsync("Analyze the AI chip market in 2025");
Console.WriteLine(result.GetOutputs()[0]);
.NET实现亮点:
-
强类型泛型 :
Executor<List<string>, string>明确输入输出类型,编译时检查 -
扩展方法 :
.CreateAIAgent()是ChatClient的扩展方法,链式调用 -
LINQ风格: 流畅的API设计符合.NET开发者习惯
2.2 高级特性:Checkpoint与Human-in-the-Loop
这是Agent Framework相比其他框架的杀手级功能。
Python检查点实现
from agent_framework.workflows import InMemoryCheckpointStorage, WorkflowBuilder

# 启用检查点
checkpoint_storage = InMemoryCheckpointStorage()

workflow = (WorkflowBuilder()
    .add_edge(web_agent, analyst_agent)
    .add_edge(analyst_agent, approval_executor)  # 人工审批节点
    .with_checkpointing(checkpoint_storage)
    .build()
)

# 第一次运行:执行到需要审批的地方
result = await workflow.run_stream("Research AI market")
async for event in result:
    if isinstance(event, RequestInfoEvent):
        checkpoint_id = event.checkpoint_id
        request_id = event.request_id
        print(f"Checkpoint saved: {checkpoint_id}")
        print(f"Awaiting approval for: {event.data}")
        break

# ... 应用程序可以关闭 ...

# 稍后恢复:从检查点继续,带上人工批准
responses = {request_id: "Approved"}
resumed_result = await workflow.run_from_checkpoint(
    checkpoint_id,
    checkpoint_storage,
    responses=responses
)

print(resumed_result.get_outputs())
.NET检查点实现
using Microsoft.Agents.AI.Workflows.Checkpointing;

// 启用检查点
var checkpointStorage = new InMemoryCheckpointStorage();

var workflow = new WorkflowBuilder<string>()
    .AddEdge(webAgent, analystAgent)
    .AddEdge(analystAgent, approvalExecutor)
    .WithCheckpointing(checkpointStorage)
    .Build();

// 第一次运行
string checkpointId = null;
string requestId = null;

await foreach (var evt in workflow.RunStreamingAsync("Research AI market"))
{
    if (evt is RequestInfoEvent requestEvent)
    {
        checkpointId = requestEvent.CheckpointId;
        requestId = requestEvent.RequestId;
        Console.WriteLine($"Checkpoint saved: {checkpointId}");
        Console.WriteLine($"Awaiting approval for: {requestEvent.Data}");
        break;
    }
}

// ... 应用程序重启 ...

// 从检查点恢复
var responses = new Dictionary<string, object>
{
    { requestId, "Approved" }
};

var resumedResult = await workflow.RunFromCheckpointAsync(
    checkpointId,
    checkpointStorage,
    responses
);

Console.WriteLine(string.Join(", ", resumedResult.GetOutputs()));
检查点机制深度解析:
Agent Framework的检查点不是简单的"快照",而是包含:
-
图拓扑签名: 防止用不兼容的工作流恢复检查点
-
Executor状态 : 每个节点的内部状态(如果实现了
IResettableExecutor) -
飞行消息: 超步间传递但尚未处理的消息
-
共享状态 :
SharedState中的全局数据Python: 图签名计算
def _compute_graph_signature(self) -> dict[str, Any]:
executors_signature = {
executor_id: f"{executor.class.module}.{executor.class.name}"
for executor_id, executor in self.executors.items()
}edge_groups_signature = [ { "group_type": group.__class__.__name__, "sources": sorted(group.source_executor_ids), "targets": sorted(group.target_executor_ids), "edges": sorted([ { "source": e.source_id, "target": e.target_id, "condition": getattr(e, "condition_name", None) } for e in group.edges ]) } for group in self.edge_groups ] return { "start_executor": self.start_executor_id, "executors": executors_signature, "edge_groups": edge_groups_signature, "max_iterations": self.max_iterations }计算SHA256哈希
canonical = json.dumps(signature, sort_keys=True, separators=(",", ":"))
return hashlib.sha256(canonical.encode()).hexdigest()
第三章:技术创新------超越现有框架的三大突破
3.1 Microsoft.Extensions.AI集成:统一的抽象层
Agent Framework不是孤立的框架,而是深度集成了微软的Microsoft.Extensions.AI(MEAI)抽象层。
MEAI是什么?
-
类似于Python的
langchain-core,但更接近.NET生态 -
定义了
IChatClient、IEmbeddingsGenerator等统一接口 -
所有主流LLM提供商都有MEAI实现
Python中的等价物:
from agent_framework import BaseChatClient, ChatResponse

class CustomLLMClient(BaseChatClient):
    """任何实现此协议的类都可用作ChatClient"""
    async def get_response(
        self,
        messages: list[ChatMessage],
        chat_options: ChatOptions
    ) -> ChatResponse:
        # 调用自定义LLM API
        response = await my_llm_api(messages)
        return ChatResponse(messages=[...])

    async def get_streaming_response(
        self,
        messages: list[ChatMessage],
        chat_options: ChatOptions
    ) -> AsyncIterator[ChatResponseUpdate]:
        async for chunk in my_llm_api_stream(messages):
            yield ChatResponseUpdate(contents=[TextContent(chunk)])

# 直接使用
agent = ChatAgent(chat_client=CustomLLMClient(), ...)
.NET中的实现:
// 任何IChatClient实现都可以用于Agent
public class CustomLLMClient : IChatClient
{
    public async Task<ChatResponse> CompleteChatAsync(
        IEnumerable<ChatMessage> messages,
        ChatOptions? options = null,
        CancellationToken cancellationToken = default)
    {
        // 调用自定义LLM API
        var response = await MyLlmApi.SendAsync(messages);
        return new ChatResponse
        {
            Messages = [new ChatMessage(ChatRole.Assistant, response.Text)]
        };
    }

    public async IAsyncEnumerable<ChatResponseUpdate> CompleteStreamingChatAsync(
        IEnumerable<ChatMessage> messages,
        ChatOptions? options = null,
        CancellationToken cancellationToken = default)
    {
        await foreach (var chunk in MyLlmApi.StreamAsync(messages))
        {
            yield return new ChatResponseUpdate
            {
                Contents = [new TextContent(chunk)]
            };
        }
    }
}

// 直接使用
var agent = customClient.CreateAIAgent(instructions, name);
关键洞察: 这种设计让Agent Framework成为提供商中立的框架:
-
支持OpenAI、Azure OpenAI、Anthropic、Google、本地Ollama等
-
无需修改Agent代码即可切换后端
-
自定义LLM集成只需实现统一接口
3.2 中间件架构:AOP范式进入Agent领域
Agent Framework首创性地将**面向切面编程(AOP)**引入AI Agent开发。
Python中间件实现:
from agent_framework import Middleware

class LoggingMiddleware(Middleware):
    """记录所有Agent调用"""
    async def on_agent_run(
        self,
        next_handler,
        agent,
        messages,
        thread,
        options
    ):
        print(f"[LOG] Agent {agent.name} starting...")
        start_time = time.time()

        try:
            result = await next_handler(agent, messages, thread, options)
            elapsed = time.time() - start_time
            print(f"[LOG] Agent {agent.name} completed in {elapsed:.2f}s")
            return result
        except Exception as e:
            print(f"[LOG] Agent {agent.name} failed: {e}")
            raise

class CostTrackingMiddleware(Middleware):
    """追踪Token使用成本"""
    def __init__(self):
        self.total_cost = 0.0

    async def on_agent_run(self, next_handler, agent, messages, thread, options):
        result = await next_handler(agent, messages, thread, options)

        if result.usage_details:
            input_cost = result.usage_details.input_tokens * 0.00001
            output_cost = result.usage_details.output_tokens * 0.00002
            self.total_cost += input_cost + output_cost

        return result

# 应用中间件
agent = ChatAgent(
    chat_client=client,
    middleware=[LoggingMiddleware(), CostTrackingMiddleware()],
    ...
)
.NET中间件实现:
public class LoggingMiddleware : IAgentMiddleware
{
    public async Task<AgentRunResponse> OnAgentRunAsync(
        Func<AgentRunResponse> next,
        AIAgent agent,
        IEnumerable<ChatMessage> messages,
        AgentThread? thread,
        AgentRunOptions? options)
    {
        _logger.LogInformation("Agent {Name} starting...", agent.Name);
        var stopwatch = Stopwatch.StartNew();

        try
        {
            var result = await next();
            stopwatch.Stop();
            _logger.LogInformation(
                "Agent {Name} completed in {Elapsed}ms",
                agent.Name,
                stopwatch.ElapsedMilliseconds
            );
            return result;
        }
        catch (Exception ex)
        {
            _logger.LogError(ex, "Agent {Name} failed", agent.Name);
            throw;
        }
    }
}

// 应用中间件
var agent = chatClient
    .CreateAIAgent(instructions, name)
    .WithMiddleware(new LoggingMiddleware())
    .WithMiddleware(new CostTrackingMiddleware());
中间件的威力:
-
横切关注点分离: 日志、监控、限流、缓存等逻辑与业务代码解耦
-
组合性: 多个中间件可以形成管道,按顺序执行
-
可测试性: 每个中间件可以独立测试
-
企业级功能: 轻松实现审计、合规、性能监控
3.3 OpenTelemetry原生集成:可观测性从第一天就内建
在生产环境中,**可观测性(Observability)**是成败的分水岭。Agent Framework在这方面远超同类框架。
Python OpenTelemetry集成:
from agent_framework import ChatAgent, use_agent_observability
from opentelemetry import trace
from opentelemetry.sdk.trace import TracerProvider
from opentelemetry.sdk.trace.export import ConsoleSpanExporter, BatchSpanProcessor

# 配置追踪器
provider = TracerProvider()
provider.add_span_processor(BatchSpanProcessor(ConsoleSpanExporter()))
trace.set_tracer_provider(provider)

# Agent自动注入追踪
@use_agent_observability  # 装饰器自动启用
class TracedAgent(ChatAgent):
    pass

agent = TracedAgent(chat_client=client, name="ObservableAgent")

# 每次调用自动生成Span
result = await agent.run("Analyze market")

# 输出Span信息:
# Span: agent.run
#   - agent.id: observable-agent
#   - agent.name: ObservableAgent
#   - input.message_count: 1
#   - output.message_count: 1
#   - usage.input_tokens: 25
#   - usage.output_tokens: 150
.NET OpenTelemetry集成:
using OpenTelemetry;
using OpenTelemetry.Resources;
using OpenTelemetry.Trace;

// 配置追踪
var tracerProvider = Sdk.CreateTracerProviderBuilder()
    .SetResourceBuilder(ResourceBuilder.CreateDefault()
        .AddService("MyAgentApp"))
    .AddSource("Microsoft.Agents.AI")  // Agent Framework的Trace Source
    .AddConsoleExporter()
    .Build();

// Agent自动注入追踪
var agent = chatClient.CreateAIAgent(instructions, name);
var result = await agent.RunAsync("Analyze market");

// 自动生成的Trace结构:
// Span: agent.run
//   ├─ Span: chat_client.complete
//   │   ├─ Attribute: model.name = "gpt-4"
//   │   ├─ Attribute: input.tokens = 25
//   │   └─ Attribute: output.tokens = 150
//   ├─ Span: tool.invoke (if tools called)
//   └─ Event: agent.completed
工作流追踪更强大:
from agent_framework.workflows import WorkflowBuilder

workflow = (WorkflowBuilder(name="Market Research Workflow")
    .add_edge(web_agent, analyst_agent)
    .add_edge(analyst_agent, coder_agent)
    .build()
)

# 工作流执行自动生成嵌套Span
result = await workflow.run("Analyze AI chip market")

# Trace结构:
# Span: workflow.run [name=Market Research Workflow]
#   ├─ Span: workflow.superstep [iteration=1]
#   │   ├─ Span: executor.execute [id=web_agent]
#   │   │   └─ Span: agent.run [name=WebAgent]
#   │   │       └─ Span: tool.invoke [name=web_search]
#   │   └─ Event: superstep.completed [messages_sent=1]
#   ├─ Span: workflow.superstep [iteration=2]
#   │   └─ Span: executor.execute [id=analyst_agent]
#   │       └─ Span: agent.run [name=AnalystAgent]
#   └─ Event: workflow.completed [total_supersteps=3]
可观测性的商业价值:
-
故障诊断: 精确定位哪个Agent/Executor出错
-
性能优化: 识别瓶颈节点和超时调用
-
成本管理: 追踪每个Agent的Token消耗和API调用次数
-
合规审计: 完整记录AI决策过程
第四章:生态系统------不仅是框架,更是平台
4.1 Azure AI Foundry深度集成
Agent Framework与Azure AI Foundry的集成不是简单的"支持",而是原生对接。
Python Azure AI Agent:
from agent_framework.azure_ai import AzureAIChatClient
from azure.identity import DefaultAzureCredential

# 使用Azure AI Foundry托管Agent
client = AzureAIChatClient(
    endpoint=os.environ["AZURE_AI_PROJECT_ENDPOINT"],
    credential=DefaultAzureCredential(),
    deployment_name="my-foundry-agent"
)

agent = ChatAgent(chat_client=client, name="FoundryAgent")

# Azure AI特性:
# 1. 服务端Tool执行(Code Interpreter, File Search)
# 2. 持久化线程(跨会话)
# 3. 企业级安全和合规
result = await agent.run(
    "Analyze sales.csv and generate insights",
    thread=agent.get_new_thread(service_thread_id="persistent-123")
)
.NET Azure AI Agent:
using Azure.AI.Projects;
using Azure.Identity;

var projectClient = new AIProjectClient(
    new Uri(Environment.GetEnvironmentVariable("AZURE_AI_PROJECT_ENDPOINT")),
    new DefaultAzureCredential()
);

var agentClient = projectClient.GetAgentClient();
var agent = await agentClient.CreateAgentAsync(
    deploymentName: "my-foundry-agent",
    instructions: "You analyze data and provide insights."
);

// 使用服务端工具
var thread = await agentClient.CreateThreadAsync();
await agentClient.CreateMessageAsync(
    thread.Id,
    MessageRole.User,
    "Analyze sales.csv"
);

var run = await agentClient.CreateRunAsync(thread.Id, agent.Id);
Azure AI Foundry的独特价值:
-
托管Agents: 无需管理基础设施,按需扩展
-
安全沙盒: Code Interpreter在隔离容器中执行
-
企业治理: RBAC、数据驻留、审计日志
-
Evaluation: 内置评估工具评估Agent质量
4.2 Model Context Protocol (MCP) 支持
Agent Framework是首批支持MCP的框架之一,这将改变Agent与外部系统交互的方式。
Python MCP集成:
from agent_framework import MCPTool

# 连接到MCP服务器(如文件系统、数据库)
mcp_server = MCPTool(
    server_params=StdioServerParameters(
        command="uvx",
        args=["mcp-server-filesystem", "/workspace"]
    )
)

# Agent自动获得MCP服务器的所有工具
agent = ChatAgent(
    chat_client=client,
    tools=[mcp_server]  # MCP服务器的工具会自动注入
)

async with agent:  # 上下文管理器自动启动/关闭MCP连接
    result = await agent.run("List files in /workspace and read config.json")
.NET MCP集成:
// 目前.NET的MCP支持通过Azure AI Foundry Hosted MCP
var agent = chatClient.CreateAIAgent(
    instructions: "You help with file operations",
    name: "FileAgent"
);

// 在Azure AI Foundry中配置MCP服务器
// Agent自动获得文件系统、Git、Slack等能力
MCP的革命性意义:
-
标准化: 不再需要为每个API写自定义工具
-
动态发现: Agent运行时自动发现MCP服务器的能力
-
生态系统: 社区共享MCP服务器(已有100+)
4.3 DevUI:Agent开发的"Chrome DevTools"
Python独有的agent-framework-devui包提供了可视化开发体验。
pip install agent-framework[devui]

from agent_framework import ChatAgent
from agent_framework.workflows import WorkflowBuilder

# 1. 标记要调试的Agent/Workflow
agent = ChatAgent(..., name="DebugAgent")
workflow = WorkflowBuilder(name="DebugWorkflow").build()

# 2. 启动DevUI服务器
# $ python -m agent_framework.devui

# 3. 浏览器打开 http://localhost:8000
# - 实时查看Workflow图形
# - 单步执行Executor
# - 查看消息流
# - 修改Agent参数并重新运行
DevUI功能:
-
可视化: 工作流图形化展示,实时更新节点状态
-
交互式调试: 在RequestInfoExecutor处暂停,手动提供输入
-
Trace查看器: 集成OpenTelemetry,可视化Span树
-
性能分析: 识别慢节点和热路径
第五章:抉择时刻------何时选择Agent Framework?
5.1 适用场景
高度推荐:
-
.NET生态企业: 已有大量C#代码和.NET基础设施
-
Azure深度用户: 使用Azure OpenAI、Azure AI等服务
-
复杂工作流: 需要分支、循环、人工审批的多Agent系统
-
长时间运行: 工作流需要跨天运行,需要检查点恢复
-
企业级需求: 需要审计、合规、OpenTelemetry集成
谨慎考虑:
-
简单脚本: 如果只是"发一个LLM请求",直接用SDK可能更简单
-
Python纯粹主义: 如果不需要.NET互操作性,LangGraph可能更轻量
-
特定框架绑定: 如果深度使用LangChain生态(LangSmith、LangServe),迁移成本高
5.2 与竞品对比
| 维度 | Agent Framework | AutoGen | LangGraph | Semantic Kernel |
|---|---|---|---|---|
| 多语言支持 | ⭐⭐⭐⭐⭐ Python/.NET原生 | ⭐⭐⭐ Python为主 | ⭐⭐⭐ Python+JS | ⭐⭐⭐⭐ Python/.NET |
| 工作流复杂度 | ⭐⭐⭐⭐⭐ Pregel+图 | ⭐⭐⭐ 群聊编排 | ⭐⭐⭐⭐⭐ StateGraph | ⭐⭐⭐ 函数链 |
| 检查点恢复 | ⭐⭐⭐⭐⭐ 跨进程持久化 | ⭐⭐ 有限 | ⭐⭐⭐⭐ SQLite/Postgres | ⭐⭐ 内存状态 |
| 企业集成 | ⭐⭐⭐⭐⭐ Azure全栈 | ⭐⭐⭐ 开源中立 | ⭐⭐⭐ LangSmith | ⭐⭐⭐⭐ Azure |
| 学习曲线 | ⭐⭐⭐ 中等 | ⭐⭐⭐⭐ 较陡 | ⭐⭐⭐ 中等 | ⭐⭐ 较平 |
| 可观测性 | ⭐⭐⭐⭐⭐ OTel原生 | ⭐⭐⭐ 自定义日志 | ⭐⭐⭐⭐ LangSmith | ⭐⭐⭐ 日志 |
| 社区生态 | ⭐⭐⭐ 新兴(2024) | ⭐⭐⭐⭐⭐ 成熟 | ⭐⭐⭐⭐ 活跃 | ⭐⭐⭐⭐ 微软支持 |
5.3 迁移建议
从Semantic Kernel迁移:
# Semantic Kernel (旧)
from semantic_kernel import Kernel
from semantic_kernel.connectors.ai.open_ai import AzureChatCompletion

kernel = Kernel()
kernel.add_service(AzureChatCompletion(...))
result = await kernel.invoke_prompt("Hello")

# Agent Framework (新)
from agent_framework import ChatAgent
from agent_framework.azure import AzureOpenAIChatClient

agent = ChatAgent(
    chat_client=AzureOpenAIChatClient(...),
    instructions="System prompt here"
)
result = await agent.run("Hello")
从AutoGen迁移:
# AutoGen (旧)
from autogen import ConversableAgent, GroupChat

assistant = ConversableAgent(name="Assistant", llm_config={...})
user_proxy = ConversableAgent(name="User", llm_config={...})
group_chat = GroupChat(agents=[assistant, user_proxy], messages=[])

# Agent Framework (新)
from agent_framework import ChatAgent, WorkflowBuilder

assistant = ChatAgent(name="Assistant", ...)
user_proxy = ChatAgent(name="User", ...)
workflow = WorkflowBuilder().add_edge(user_proxy, assistant).build()
第六章:未来展望------2025年的Agent Framework路线图
根据GitHub Issues和社区讨论,Agent Framework的未来方向包括:
6.1 声明式工作流 (Declarative Workflows)
.NET已支持,Python即将到来:
# workflow.yaml
name: Market Research Workflow
description: Multi-agent market analysis pipeline

agents:
  - id: web_agent
    type: AzureOpenAIChatClient
    config:
      deployment: gpt-4o
      instructions: "Search the web for market data"

  - id: analyst
    type: AzureOpenAIChatClient
    config:
      deployment: gpt-4o
      instructions: "Analyze data and provide insights"

workflow:
  start: web_agent
  edges:
    - from: web_agent
      to: analyst
      condition: "lambda x: 'data' in x"

  outputs:
    - from: analyst
      type: structured
      schema: MarketReport

from agent_framework.workflows import DeclarativeWorkflow

workflow = DeclarativeWorkflow.from_yaml("workflow.yaml")
result = await workflow.run("Analyze AI chip market")
6.2 多模态Agent
视觉理解、语音交互:
from agent_framework import ChatAgent, ImageContent, AudioContent

# 多模态输入
image_message = ChatMessage(
    role=Role.USER,
    contents=[
        TextContent("What's in this image?"),
        ImageContent(url="https://example.com/chart.png")
    ]
)

audio_message = ChatMessage(
    role=Role.USER,
    contents=[AudioContent(data=audio_bytes, format="wav")]
)

agent = ChatAgent(chat_client=client, ...)
result = await agent.run([image_message, audio_message])
6.3 分布式工作流 (Distributed Workflows)
跨机器、跨数据中心的Agent协作:
from agent_framework.workflows import DistributedWorkflowBuilder

# Executor可以运行在不同的机器上
workflow = (DistributedWorkflowBuilder()
    .add_edge(
        local_agent,
        remote_agent,
        execution_location="https://worker-01.example.com"
    )
    .build()
)
6.4 AutoGen兼容模式
无缝迁移,降低切换成本:
from agent_framework.legacy import AutoGenAdapter

# 包装现有AutoGen Agent
autogen_agent = ConversableAgent(...)
af_agent = AutoGenAdapter(autogen_agent)

# 在Agent Framework工作流中使用
workflow = WorkflowBuilder().add_edge(af_agent, native_agent).build()
结语:双语言时代的AI Agent开发哲学
Agent Framework的出现标志着一个转折点:AI Agent不再是Python的专利。企业级.NET应用可以与前沿AI技术无缝融合,而Python开发者也能享受到强类型和工具支持带来的生产力提升。
这不是两个框架的简单并存,而是同一个设计哲学在两种语言中的精致表达:
-
Protocol vs Abstract Class: 鸭子类型与静态类型的优雅平衡
-
Decorator vs Extension Method: 元编程与流畅API的各自精彩
-
AsyncIterator vs IAsyncEnumerable: 异步流的殊途同归
当你的团队既有Python数据科学家又有.NET架构师,当你的系统既需要快速原型又需要企业级稳定性,当你的AI应用既要调用开源模型又要深度集成Azure------Agent Framework就是为这样的复杂现实而生。
或许在不久的将来,我们会看到用Python定义Agent原型,用.NET部署生产环境;或者Python处理实时推理,.NET管理长时间运行工作流。这种混合架构不再是妥协,而是两种语言优势的化学反应。
AI Agent的未来,是多语言、多模态、多云的。Agent Framework已经迈出了第一步。
附录:快速开始清单
Python环境 (3分钟启动)
# 1. 安装
pip install agent-framework --pre

# 2. 设置环境变量
export AZURE_OPENAI_ENDPOINT="https://your-endpoint.openai.azure.com"
export AZURE_OPENAI_DEPLOYMENT_NAME="gpt-4o"

# 3. 运行第一个Agent
python -c "
import asyncio
from agent_framework import ChatAgent
from agent_framework.azure import AzureOpenAIChatClient
from azure.identity import DefaultAzureCredential

async def main():
    agent = ChatAgent(
        chat_client=AzureOpenAIChatClient(credential=DefaultAzureCredential()),
        name='FirstAgent'
    )
    print(await agent.run('Hello, Agent Framework!'))

asyncio.run(main())
"
.NET环境 (3分钟启动)
# 1. 创建项目
dotnet new console -n MyFirstAgent
cd MyFirstAgent

# 2. 安装包
dotnet add package Microsoft.Agents.AI.OpenAI --prerelease
dotnet add package Azure.Identity

# 3. 编辑Program.cs
cat > Program.cs << 'EOF'
using Azure.AI.OpenAI;
using Azure.Identity;
using Microsoft.Agents.AI;

var endpoint = Environment.GetEnvironmentVariable("AZURE_OPENAI_ENDPOINT")!;
var deployment = Environment.GetEnvironmentVariable("AZURE_OPENAI_DEPLOYMENT_NAME")!;

var agent = new AzureOpenAIClient(new Uri(endpoint), new DefaultAzureCredential())
    .GetChatClient(deployment)
    .CreateAIAgent(name: "FirstAgent", instructions: "You are a helpful assistant");

Console.WriteLine(await agent.RunAsync("Hello, Agent Framework!"));
EOF

# 4. 运行
dotnet run
学习资源
官方文档:
示例代码:
社区: