先说说基本原理吧。react是如何实现suspense和lazy的?
当我们使用lazy加载一个远程的模块,如
TypeScript
const remoteComp = lazy(()=>import("模块URL"))此时 remoteComp 是一个Promise对象,由于真正的模块内容可能还没有被请求回来,React无法直接渲染,这个时候就需要回退到最近的Suspense节点,并且展示 fallback的内容。
我们知道,在一个Javascipt同步的函数中,没有办法在一个位置上等待(类似于await)某个异步的任务完成后继续运行,而React的函数组件都是同步函数,我们没办法为其增加async改成异步函数,怎么办? 如何等待这个远程组件请求回来后再继续渲染?
有一种技术叫,消除异步的传染性,也就是说,由于await只能用在async函数内,如果想要在一个函数内使用await等待异步事件,就必须把这个函数也变成async,而外层调用这个函数的函数如果需要等待结果,也必须得变成async函数,这就造成了异步的传染!
为了解决这个问题,我们可以让函数在等待的位置暂停,并且在结果返回之后,重新执行函数。 注意 这里并不是从断点位置继续执行函数,是从头重新执行函数,这并不违反 JS的语法。
那么如何让函数在某个位置暂停呢? 用throw抛出异常即可!
通过以上思路,我们就可以实现一个 runAsync函数,如下:
TypeScript
        const mockFetch = (url) => new Promise(r => setTimeout(() => {
            r(url)
        }, 1000))

        function runAsync(fn) {
            const results = [];
            const errors = [];
            let fetchIndex = 0;
            const SyncFetch = (url) => {
                if (results[fetchIndex]) {
                    return results[fetchIndex++];
                } else if (errors[fetchIndex]) {
                    throw errors[fetchIndex];
                } else {
                    throw mockFetch(url);
                }
            };

            const _runFn = () => {
                try {
                    fetchIndex = 0
                    fn(SyncFetch);
                } catch (err) {
                    if (err instanceof Promise) {
                        err.then(
                            (val) => {
                                results[fetchIndex++] = val;
                                _runFn()
                            },
                            (reason) => {
                                errors[fetchIndex++] = reason;
                                _runFn()
                            }
                        );
                    } else {
                        throw err
                    }
                }
            }

            _runFn()

        }


        runAsync((SyncFetch) => {
            const res1 = SyncFetch("url1")
            const res2 = SyncFetch("url2")
            const res3 = SyncFetch("url3")

            console.log(res1, res2, res3)
        })
这个函数接收一个 fn函数作为入参,并且在调用的过程中,传入一个内部实现的 syncFetch函数。
fn函数在实现时,就需要用这个SyncFetch函数来请求数据,并且不用写任何的 async await 标记
这就实现了消除 async await标记的作用,防止异步传染。
实现原理也很简单,用一个数组 results 和 errors 分别记录每个syncFetch函数调用返回的结果,每次遇到syncFetch函数时,都会先 请求远程数据 然后把返回的Promise作为"错误对象" thorw出去。catch到这个promise后,可以对其设置then回调,并且把请求结果放到results或errors内,并且重新触发fn函数的执行。
当fn再次执行时,遇到刚才执行过的syncFetch,就可以直接从results或者 errors中取得结果并且返回,这样在fn函数的内部,就可以用同步的方式获取请求数据了,达到了模拟同步等待的效果!
这种做法被称为 "代数效应" 指通过引入新的代数符号(这里是 SyncFetch)来实现新的功能!
看到这,你有没有发现整个逻辑很像是React的hooks!
没错,hooks就是使用代数效应的原理为同步的纯函数组件引入副作用处理的, 比如 useState useMemo useCallback 这些函数都是React引入的 代数符号,用来增强函数组件的功能。
这样就可以解释上面lazy的原理了,当遇到一个Promise时,React会把这个Promise作为一个异常抛出,此时react的渲染将会被暂停。在catch到这个Promise之后,会监听这个Promise的状态,当决策后,缓存请求回的远程组件,并且重新开启渲染,当再次渲染到这个远程组件时,拿到的就是已经请求回的结果了!
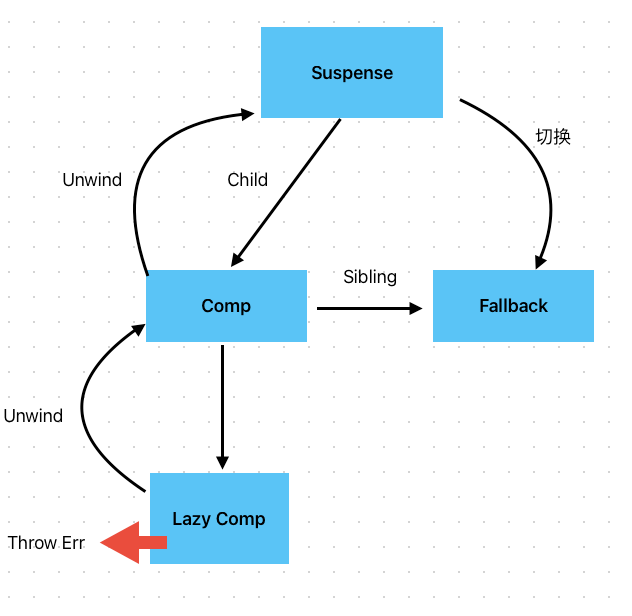
那么unWind是什么呢?当由于远程组件导致渲染终止后,我们需要显示一些提示信息,比如 "loading"或者 "组件加载中" 此时我们就需要Suspense组件来包裹远程组件的部分。 unwind的作用就是在渲染中断时,向上回溯到最近的suspense组件,并且展示fallback内容。
Suspense 和 Offscreen组件
Suspense的基础用法就不多说了,说一下Offscreen组件。
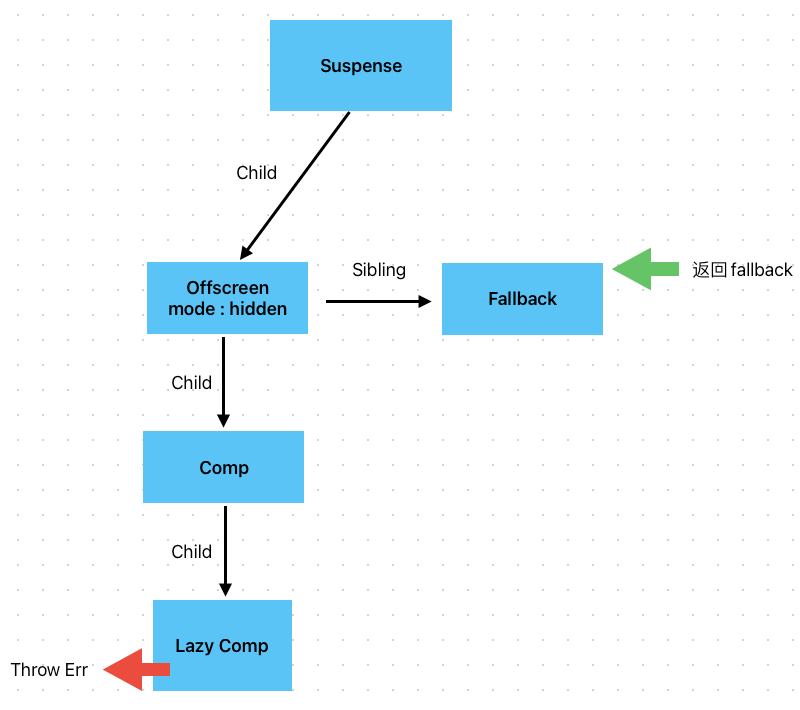
我们知道,当Suspense切换到展示fallback时,如果直接把child指向fallback,就会导致已经渲染的节点因为组件挂起而丢失,可能会导致丢失状态或者性能下降。
为了解决,引入了Offscreen组件,不论当前是否有组件挂起,Offscreen组件都会作为Suspense组件的child节点,如下:
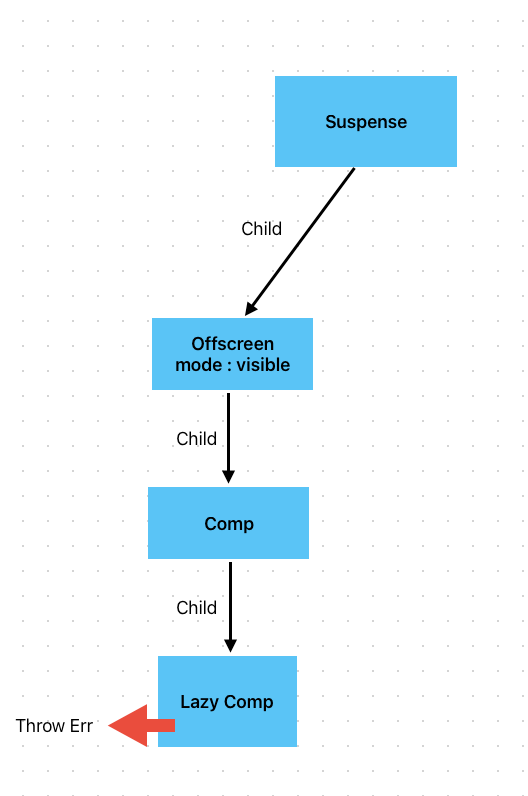
当第一次渲染到Suspense节点时,由于此时不知道是否有需要挂起的子节点,Suspense会创建一个Offscreen节点,注意 Offscreen节点只可以由Suspense节点创建,使用者无法手动创建!
Offscreen节点需要接受2个Prop 一个为mode: visible | hidden 一个为children 为子节点,定义:
TypeScript
export interface OffscreenProps {
  /** offscreen组件是否可见 */
  mode: "visible" | "hidden";
  /** 其下绑定的primaryChildren */
  children: any;
}

/** 创建Offscreen组件的Fiber OffScreen没有对应的Element 需要通过这个函数创建 */
export function createFiberFromOffscreen(props: OffscreenProps) {
  const fiber = new FiberNode(OffscreenComponent, props, null);
  return fiber;
}
当第一次渲染Suspense时,此时创建的Offscreen的mode为visible,表示当前Offscreen节点及其子节点都能正常显示!此时继续往下渲染。
当遇到节点挂起的时候, react会开启unwind流程,回溯到Suspense节点,此时Suspense节点会创建一个 fallback节点,并且作为sibling挂载到offscreen节点上。 同时把offscreen节点的mode改成hidden,并且返回fallback节点。react会继续从fallback节点开始渲染。
当beginwork阶段结束后,进入completework阶段,此时在处理到Offscreen节点时,会检查其mode状态,如果是mount阶段或者发生改变,则会打上Visibility标记,如下:
TypeScript
    case SuspenseComponent:
      // 处理Suspense的逻辑
      /** 为什么不在Offscreen中处理? 因为fallback的情况下 completeWork不会走offscreenComponent */
      /** 检查 mode是否变化 */
      const current = wip.alternate;
      const offscreenFiber = wip.child;
      if (current) {
        // update
        const currentOffscreenFiber = current.child;
        // 新Fiber的Offscreen是否隐藏
        const isHidden =
          (offscreenFiber.pendingProps as OffscreenProps).mode === "hidden";
        // 当前Fiber的Offscreen是否隐藏 注意这里不能用 memorizedsProps 因为如果中断 上一步就没有设置 wip.memorizedProps = wip.pendingProps
        const wasHidden =
          (currentOffscreenFiber.pendingProps as OffscreenProps)?.mode ===
          "hidden";
        // mode变化,打标记
        if (isHidden !== wasHidden) {
          offscreenFiber.flags |= Visibility;
          bubbleProperties(offscreenFiber);
        }
      } else {
        // mount, 打标记
        offscreenFiber.flags |= Visibility;
        bubbleProperties(offscreenFiber);
      }
在Muation Commit阶段,CommitMutationEffects函数会检查每个节点是否包含Visibility标记,如果存在,则会根据其mode熟悉,为其设置 display: none / unset 标记
TypeScript
// commitMutationEffects
  // 处理 offscreenComponent
  if (
    finishedWork.tag === OffscreenComponent &&
    (flags & Visibility) !== NoFlags
  ) {
    hideOrUnhideAllChilden(
      finishedWork,
      finishedWork.pendingProps?.mode === "hidden"
    );
    finishedWork.flags &= ~Visibility;
  }

/** 隐藏 / 不隐藏 所有的offscreen的子children */
function hideOrUnhideAllChilden(wip: FiberNode, hidden: boolean) {
  let child = wip.child;
  while (child !== null) {
    if (child.tag === HostComponent) {
      if (hidden) {
        (child.stateNode as HTMLElement).style?.setProperty(
          "display",
          "none",
          "important"
        );
      } else {
        (child.stateNode as HTMLElement).style?.setProperty("display", "");
      }
    } else if (child.tag === HostText) {
      if (hidden) {
        (child.stateNode as HTMLElement).nodeValue = "";
      } else {
        (child.stateNode as HTMLElement).nodeValue =
          child.memorizedProps.content;
      }
    } else {
      // 都不是 Host节点 递归处理
      hideOrUnhideAllChilden(child, hidden);
    }
    child = child.sibling;
  }
这样,就完成了挂起元素的隐藏,而不是直接卸载掉挂起元素。
当promise决策,远程组件返回,再次执行render,就会把offscreen对应子组件的display: none 消除掉,恢复显示! 所以其本质上就是利用css样式来隐藏掉挂载的内容。
beginwork阶段代码解析
beginwork阶段,suspense主要由updateSuspenseComponent 更新,其源代码如下
TypeScript
/** 更新 Suspense组件 */
function updateSuspenseComponent(wip: FiberNode, renderLane: Lane) {
  const pendingProps = wip.pendingProps;
  const current = wip.alternate;
  // 是否展示 fallback
  let showFallback = false;

  /** 判断当前flag是否存在 DidCapture的flag 如果是则走fallback */
  if ((wip.flags & DidCapture) !== NoFlags) {
    // 设置 showFallback
    showFallback = true;
    // 去掉DisCapture
    wip.flags &= ~DidCapture;
  }

  // 获得 PrimaryChildren
  const nextPrimaryChildren = pendingProps.children;
  // 获得 FallbackChildren
  const nextFallbackChildren = pendingProps.fallback;

  // 维护Suspense Stack
  pushSuspenseFiber(wip);

  if (!current) {
    if (showFallback) {
      /** 首次挂载时展示 fallback */
      return mountSuspenseFallbackChildren(
        wip,
        nextPrimaryChildren,
        nextFallbackChildren
      );
    } else {
      /** 首次挂载时展示PrimaryChildren */
      return mountSuspensePrimaryChildren(wip, nextPrimaryChildren);
    }
  } else {
    if (showFallback) {
      /** 更新时展示 fallback */
      return updateSuspenseFallbackChildren(
        wip,
        nextPrimaryChildren,
        nextFallbackChildren
      );
    } else {
      /** 更新时展示 PrimaryChildren */
      return updateSuspensePrimaryChildren(wip, nextPrimaryChildren);
    }
  }
}
React会维护一个SuspenseContext,可以理解为一个Stack,每次经过一个Suspense,都会调用pushSuspenseFiber将Fiber对象推入栈,在CompleteWork经过每个Suspense时,会popSuspenseFiber
TypeScript
/** 用来记录Suspense上下文 */
const SUSPENSE_CONTEXTS: FiberNode[] = [];

/** 获取最近的Suspense */
export function getNearestSuspenseFiber() {
  if (SUSPENSE_CONTEXTS.length === 0) return null;
  return SUSPENSE_CONTEXTS[SUSPENSE_CONTEXTS.length - 1];
}

/** 推入 suspense [beginWork] */
export function pushSuspenseFiber(suspense: FiberNode) {
  SUSPENSE_CONTEXTS.push(suspense);
}
/** 弹出 suspense [completeWork , unwindWork] */
export function popSuspenseFiber() {
  SUSPENSE_CONTEXTS.pop();
}
可以看到,Suspense通过挂载其fiber上的 DidCapture flag来判断当前suspense节点,是否有挂起的子节点。 Didcapture的flag是unwind流程的产物,其会在unwind到最近距离的suspense时,为其挂载Didcapture标记。
如果存在这个标记,说明此时应该展示fallback。
对于 mount 和 update , 展示子节点还是fallback,suspense分成了四个渲染路径
mountSuspensePrimaryChildren 用来挂载正常的子节点
mountSuspenseFallbackChildren 用来挂载Fallback节点
updateSuspensePrimaryChildren 用来更新正常的子节点
updateSuspenseFallbackChildren 用来更新Fallback节点
对应如下:
TypeScript
/** 挂载Suspense组件的PrimaryChildren */
function mountSuspensePrimaryChildren(
  wip: FiberNode,
  primaryChildren: ReactElementChildren
) {
  const offscreenFiber = createFiberFromOffscreen({
    mode: "visible",
    children: primaryChildren,
  });

  offscreenFiber.sibling = null;
  wip.child = offscreenFiber;
  offscreenFiber.return = wip;
  // 返回 offscreenFiber 作为child
  return offscreenFiber;
}

/** 挂载 Suspense组件的FallbackChildren */
function mountSuspenseFallbackChildren(
  wip: FiberNode,
  primaryChildren: ReactElementChildren,
  fallbackChildren: ReactElementChildren
) {
  // offscreen的fiber
  const offscreenFiber = createFiberFromOffscreen({
    mode: "hidden",
    children: primaryChildren,
  });

  // fallback的Fragment
  const fallbackFragmentFiber = createFiberFromFragment(
    [fallbackChildren],
    null
  );

  // 连接
  wip.child = offscreenFiber;
  offscreenFiber.sibling = fallbackFragmentFiber;
  offscreenFiber.return = wip;
  fallbackFragmentFiber.return = wip;

  // 由于没有调用 reconcileChild 协调 所以
  // 当一开始挂载offscreen 后因为挂起重新渲染 fallback 此时fallback为新增的Fiber 需要手动标记Placement
  fallbackFragmentFiber.flags |= Placement;

  return fallbackFragmentFiber;
}

/** 更新Suspense的PrimaryChildren  */
function updateSuspensePrimaryChildren(
  wip: FiberNode,
  primaryChildren: ReactElementChildren
) {
  const currentFiber = wip.alternate;
  // 找到当前的OffscreenFiber
  const currentOffscreenFiber = currentFiber.child;
  // 找到当前的FallbackChildren
  const currentFallbackFiber = currentOffscreenFiber.sibling;

  // 创建 / 复用 OffscreenFiber
  const offscreenFiber = createWorkInProgress(currentOffscreenFiber, {
    mode: "visiable",
    children: primaryChildren,
  });

  wip.child = offscreenFiber;
  offscreenFiber.return = wip;
  offscreenFiber.sibling = null;

  // 删除掉fallback
  if (currentFallbackFiber !== null) {
    if (!wip.delections) {
      wip.delections = [currentFallbackFiber];
    } else {
      wip.delections.push(currentFallbackFiber);
    }

    wip.flags |= ChildDeletion;
  }

  return offscreenFiber;
}

/** 更新Suspense的FallbackChildren */
function updateSuspenseFallbackChildren(
  wip: FiberNode,
  primaryChildren: ReactElement,
  fallbackChildren: ReactElement
) {
  const current = wip.alternate;
  const currentOffscreenFiber = current.child;
  const currentFallbackFiber = currentOffscreenFiber.sibling;

  const offscreenFiber = createWorkInProgress(currentOffscreenFiber, {
    mode: "hidden",
    children: primaryChildren,
  });

  let fallbackFiber: FiberNode | null = null;
  if (currentFallbackFiber === null) {
    // 之前没有fallback
    fallbackFiber = createFiberFromFragment([fallbackChildren], null);
  } else {
    //之前有 fallbackack 复用Fiber节点
    fallbackFiber = createWorkInProgress(currentFallbackFiber, [
      fallbackChildren,
    ]);
  }

  /** 连接 */
  wip.child = offscreenFiber;
  offscreenFiber.return = wip;
  offscreenFiber.sibling = fallbackFiber;
  fallbackFiber.return = wip;
  // 当一开始挂载offscreen 后因为挂起重新渲染 fallback 此时fallback为新增的Fiber 需要手动标记Update
  fallbackFiber.flags |= Placement;

  return fallbackFiber;
}
其原理很简单,就是我上面说的挂载步骤。
需要注意的是,由于这四个过程都不走 reconcileChild,所以在挂载fallback的时候,需要手动增加 Placement的标记!
对于offscreen组件的更新,就和普通的节点一样,拿到子节点并且Diff
TypeScript
/** 更新离屏组件 updateOffscreenComponent */
function updateOffscreenComponent(wip: FiberNode, renderLane: Lane) {
  const children = wip.pendingProps.children;
  reconcileChildren(wip, children);
  return wip.child;
}
需要注意的是,为什么completeWork阶段,在SuspenseComponent上拿到Offscreen组件并且处理Visibility的标记,而不是在Offscreen组件上直接处理,是因为在fallback状态下,CompleteWork的递归操作是不会走Offscreen组件的!
挂起的触发
我们上面说了,挂起是通过抛出一个thenable的异常来完成的,React中可以用来触发挂起的方式有几种
-
传统的 lazy组件
-
新增的 use 钩子
-
抛出普通异常结合ErrorBoundary
我们先来看 use钩子,这个官方推荐的方式
use钩子可以接受一个thenable对象,或者Context对象, 也就是说,我们可以把use钩子作为useContext使用
TypeScript
 const { data } = use(fetchData(id, timeout));
 或者
 const { data } = use(MyContext);
其内部实现原理也很简单如下:
TypeScript
export function use<T>(usable: Usable<T>) {
  if (usable !== null && typeof usable === "object") {
    // duck test
    if (typeof (usable as Thenable<T>).then === "function") {
      // thenable
      // 跟踪传入的thenable对象,包装成内部Thenable
      return tractUseThenable(usable as Thenable<T>);
    } else if ((usable as Context<T>).$$typeof === REACT_CONTEXT_TYPE) {
      // context
      return readContext<T>(usable as Context<T>);
    }
  }
}
当接受的对象为 Context时,就调用readContext函数获取Context内容
当接受对象为Thenable时(此处为鸭子检测)就调用TrackUseThenable对Thenable进行包装
Thenable 是什么?
Promise就是满足Thenable的,在官方推出Promise标准之前,有很多的类似于Promise的社区实现,这些实现虽然不是 instanceOf Promise,但是本质上都有Promise类似的作用。
为了兼容这些实现,出现了较为宽泛的定义,即 一个对象,这个对象包含一个 then函数,那么这个对象就是thenable的,可以用来处理异步事件。 这种检测方式叫 鸭子检测 具体可以看我前面的文章 为什么需要Promise?&Promise全面总结
https://blog.csdn.net/weixin_40710412/article/details/135439420?spm=1001.2014.3001.5501
只要是满足了Thenbale的鸭子检测,这个对象就可以实现类似于Promise的功能,Promise.resolve函数也可以将这些Thenable的对象,转换成标准的 Promise对象!
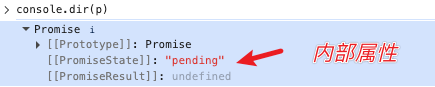
Thenable对象(包括Promise)有个缺点,你不能直接通过 thenableObj.state或者 promise.state获取其决策状态
我们通常只能调用其then方法才能获取其决策状态和值/错误原因,为了方便使用,我们需要对thenable对象包装一层,让其可以自动在自身对象上添加一个状态属性,这就有了React内部定义的 Thenable对象
Thenable对象的ts定义如下,你别看看上去很复杂,但是本质上就是对Promise A+规范扩展了state状态和value,让我们不需要通过注册 then 就能获取状态和值
我们一步一步说,首先定义一个 基础的,满足Prmiose A+规范的ThenableImpe类型如下
TypeScriptinterface ThenableImpl<T, Result, Err> { then( onFulfill: (value: T) => Result, onReject: (error: Err) => Result ): void | ThenableImpl<Result>; }这个很好理解,不必多说,就是按照 Thenable定义实现的
接下来,我们需要给这个类型扩展 status 状态 , 值 / 失败原因
我们分析,status由以下状态
未跟踪 untrack状态,还未进行包装
pending 未决策
fulfilled 成功
rejected 拒绝
对应实现了四种状态的类型,都继承 ThenableImpl
TypeScriptinterface UntrackedThenable<T, Result, Err> extends ThenableImpl<T, Result, Err> { status?: void; } export interface PendingThenable<T, Result, Err> extends ThenableImpl<T, Result, Err> { status: 'pending'; } export interface FulfilledThenable<T, Result, Err> extends ThenableImpl<T, Result, Err> { status: 'fulfilled'; value: T; } export interface RejectedThenable<T, Result, Err> extends ThenableImpl<T, Result, Err> { status: 'rejected'; reason: Err; }最后,将这几种状态联合,就形成了包裹之后的 Thenable类型,我们可以直接通过 Thenable.status获取状态
TypeScriptexport type Thenable<T, Result = void, Err = any> = | UntrackedThenable<T, Result, Err> | PendingThenable<T, Result, Err> | FulfilledThenable<T, Result, Err> | RejectedThenable<T, Result, Err>;
有了ts定义,我们就能实现一个trackThenable的方法把一个thenable对象包装成 Thenable对象了,其原理就是
查看一个 thenable对象是否包含 status属性,如果没有就通过 then方法对其进行包装,在回调中为其本身设置 status和value/reason 属性
如果存在 status, 说明本身已经被包装过,并且已经决策了,直接返回即可
React 的 use钩子内部,使用了一个 trackUsedThenable函数来处理Thenable对象,其利用了最上面说的 抛出异常中断执行并重试的方式来多次调用获取thenable的结果,如下
TypeScript
/**
 * 用来包装 thenable对象,把满足Promise协议的对象,包装成Thenable类型的内部对象
 */

// 注意,抛出错误的时候 需要使用内部定义的错误,避免和用户定义错误混淆,取得错误内容通过导出的变量获取
export const SuspenseException = new Error(
  "Suspense内部Error,请将本错误向外抛出以保证Suspense正常工作!"
);

// 真正的 thenable
let suspendedThenable: Thenable<any> = null;

// 获取suspendedThenable
export function getSuspendedThenable() {
  const thenable = suspendedThenable;
  suspendedThenable = null;
  return thenable;
}

/** 处理 thenable相关 */
export function tractUseThenable(thenable: Thenable) {
  switch (thenable.status) {
    case "fulfilled":
      // 包装过 且fulfilled
      return thenable.value;
    case "rejected":
      // 包装过 且rejected
      return thenable.reason;
    default:
      // 没包装过 需要包装
      (thenable as unknown as FulfilledThenable).status = 'pending'
      thenable.then(
        (value) => {
          (thenable as unknown as FulfilledThenable).status = "fulfilled";
          (thenable as unknown as FulfilledThenable).value = value;
        },
        (reason) => {
          (thenable as unknown as RejectedThenable).status = "rejected";
          (thenable as unknown as RejectedThenable).reason = reason;
        }
      );
      suspendedThenable = thenable;
      // throw出 thenable
      throw SuspenseException;
  }
}
第一次调用的时候,此时传入的thenable还是没有包装的状态,走default,给thenable设置默认pending状态,并且注册then回调,将包装后的 Thenable 保存并且抛出。
此时由于异常抛出,React会开启unwind到最近的suspense并且展示fallback,此时的渲染任务被挂起。
当Thenable决策之后,再次执行trackUsedThenable,此时由于已经决策,thenable.status 一定有值,就会根据是 fulfilled还是rejected 直接返回结果 或者是抛出错误异常,此时use钩子就能获得返回值(远程组件)并且继续运行!
【当然了,你不一定非得用use函数来处理远程组件以达到lazy的效果,你可以用其挂起渲染来等待请求等等任何异步事件】
注意, 包装之后会将thenable对象保存到一个模块内部的suspenseThenable对象,并且抛出一个SuspenseExcetion的内部对象。需要注意,为了避免内置对象和用户抛出的对象产生影响,这里抛出一个固定的对象,当catch到异常时,只有对比得到的异常为 SuspenseException对象本身时,才开启对use的挂起流程,通过模块内部暴露的getSuspenseThenable函数来获取真正被抛出的Thenable对象!
除了官方推荐的 use方式进行挂起,我们还可以使用传统的方式抛出一个thenable对象来挂起渲染
我们常用的 lazy 组件,就是采用这种抛出传统的thenable来触发挂起的。
我们来看一下 lazy函数的实现:
TypeScript
// react/lazy.ts

import { Thenable, Wakeable } from 'shared/ReactTypes';
import { REACT_LAZY_TYPE } from 'shared/ReactSymbols';

const Uninitialized = -1;
const Pending = 0;
const Resolved = 1;
const Rejected = 2;

type UninitializedPayload<T> = {
	_status: typeof Uninitialized;
	_result: () => Thenable<{ default: T }>;
};

type PendingPayload = {
	_status: typeof Pending;
	_result: Wakeable;
};

type ResolvedPayload<T> = {
	_status: typeof Resolved;
	_result: { default: T };
};

type RejectedPayload = {
	_status: typeof Rejected;
	_result: any;
};

type Payload<T> =
	| UninitializedPayload<T>
	| PendingPayload
	| ResolvedPayload<T>
	| RejectedPayload;

export type LazyComponent<T, P> = {
	$$typeof: symbol | number;
	_payload: P;
	_init: (payload: P) => T;
};

function lazyInitializer<T>(payload: Payload<T>): T {
	if (payload._status === Uninitialized) {
		const ctor = payload._result;
		const thenable = ctor();
		thenable.then(
			(moduleObject) => {
				// @ts-ignore
				const resolved: ResolvedPayload<T> = payload;
				resolved._status = Resolved;
				resolved._result = moduleObject;
			},
			(error) => {
				// @ts-ignore
				const rejected: RejectedPayload = payload;
				rejected._status = Rejected;
				rejected._result = error;
			}
		);
		if (payload._status === Uninitialized) {
			// @ts-ignore
			const pending: PendingPayload = payload;
			pending._status = Pending;
			pending._result = thenable;
		}
	}
	if (payload._status === Resolved) {
		const moduleObject = payload._result;
		return moduleObject.default;
	} else {
		throw payload._result;
	}
}

export function lazy<T>(
	ctor: () => Thenable<{ default: T }>
): LazyComponent<T, Payload<T>> {
	const payload: Payload<T> = {
		_status: Uninitialized,
		_result: ctor
	};

	const lazyType: LazyComponent<T, Payload<T>> = {
		$$typeof: REACT_LAZY_TYPE,
		_payload: payload,
		_init: lazyInitializer
	};

	return lazyType;
}
当我们调用 layz(()=>import("url"))时, lazy函数接收一个ctor函数作为入参,用来运行得到 thenable对象,也就是对应() => import()
lazy函数会创建一个payload对象,保存当前的状态和值,和use的处理不同的是,lazy将这些附加信息存到了一个payload对象中,而不是直接挂载在原thenable对象上,避免对thenable的污染。
_init 函数和上面track方法的功能类似,不再赘述,最后在beginwork阶段,处理到lazy组件时,调用_init(_payload) 完成挂起
TypeScript
function mountLazyComponent(wip: FiberNode, renderLane: Lane) {
	const LazyType = wip.type;
	const payload = LazyType._payload;
	const init = LazyType._init;
	const Component = init(payload);
	wip.type = Component;
	wip.tag = FunctionComponent;
	const child = updateFunctionComponent(wip, Component, renderLane);
	return child;
}
workLoop 流程处理挂起
我们知道,React Fiber引入了渲染过程的可打断机制,renderRoot 函数每次执行结束,并不一定代表本轮渲染结束了。其可能性有
-
时间片结束,此时需要把主线程交给渲染引擎,并且查看有没有更高优先级的渲染任务到达,即RootInComplete 状态,即渲染还没有完成
-
渲染完成 即 RootCompleted 渲染完成
-
RootInProgress 渲染任务还在进行中,此时renderoot还没有推出,属于默认状态
-
RootDidNotComplete 任务无法完成,表示当前渲染任务出错了,并且没有包裹错误处理,任务停止,报错,比如说没有用suspense包住挂起组件,或者抛出错误并且没有包裹error Boundary, 此时错误会直接被抛出。
workLoop.ts 模块设置了一个全局变量 workInProgressRootExitStatus 来标记当前renderRoot结束之后渲染任务的状态,默认值为RootInProgress
perform(Sync)WorkOnRoot 函数获得renderRoot返回结果之后,根据返回值来决定下面的处理
-
RootCompleted 开启commit流程
-
RootInComplete 返回一个新的任务,下个事件片调度运行
-
RootDidNotComplete 抛出异常
TypeScript
export function performConcurrentWorkOnRoot(
  root: FiberRootNode,
  didTimeout: boolean
) {
  const lane = getNextLane(root);
  if (lane === NoLane) {
    // 没有任务需要处理了 这里也不需要调度了 用来完成批处理
    return;
  }
  const needSync = lane === SyncLane || didTimeout;
  // 开始生成fiber 关闭并发模式 ,在没有超时的情况下,可以开启并发中断
  const exitStatus = renderRoot(root, lane, !needSync);
  switch (exitStatus) {
    case RootInComplete:
      // 中断的情况 需要返回subTask 重新注册任务
      return performConcurrentWorkOnRoot.bind(null, root);
    case RootCompleted:
      //任务完成 收尾 commit
      // 设置root.finishedWork
      root.finishedWork = root.current.alternate;
      root.finishedLane = lane;
      // 设置wipRootRenderLane = NoLane;
      wipRootRenderLane = NoLane;
      commitRoot(root);
      break;
    case RootDidNotComplete:
      /** 挂起lane */
      markRootSuspended(root, wipRootRenderLane);
      ensureRootIsScheduled(root)
      const _thrownValue = workInProgressSuspenedValue;
      workInProgressSuspenedValue = null;
      if (
        _thrownValue !== null &&
        typeof _thrownValue === "object" &&
        typeof _thrownValue.then === "function"
      ) {
        throw new Error("你或许需要一个Suspense来包裹Use或Lazy");
      } else {
        /** 由于错误挂起  ERR boundary方式 */
        throw _thrownValue;
      }
    default:
  }
}
你也许会问,那当我们使用use或者lazy抛出thenable导致挂起走哪个状态和 RootDidNotComplete吗? 其实不是的,RootDidnotComplete代表错误,无法继续渲染下去了,但是挂起并不是错误,只是需要暂停等待异步返回而已,在renderRoot内部有一套重试机制,当遇到thenable挂起时,会先启动unwind流程向上找有没有suspense或errorBoundary,如果有就展示fallback,此时的渲染依旧是成功的!如下
TypeScript
/**
 * 渲染root 生成fiber对象
 * @param root  当前根节点
 * @param lane  当前车道
 * @param shouldTimeSlice 是否开启并发
 */
export function renderRoot(
  root: FiberRootNode,
  lane: Lane,
  shouldTimeSlice: boolean
) {
  let workLoopRetryTimes = 0;
  if (wipRootRenderLane !== lane) {
    // 避免重新进行初始化
    /** 先进行准备初始化 */
    prepareRefreshStack(root, lane);
  }
  while (true) {
    try {
      // 处理错误
      if (
        workInProgressSuspendedReason !== NotSuspended &&
        workInProgress !== null
      ) {
        workInProgressSuspendedReason = NotSuspended;
        const thrownValue = workInProgressSuspenedValue;

        // 处理 被抛出的异常 并且 开启 unwind 流程 到最近的 Suspense
        handleThrownAndUnwind(
          root,
          workInProgress,
          thrownValue,
          wipRootRenderLane
        );
      }

      if (workInProgressRootExitStatus === RootDidNotComplete) {
        return RootDidNotComplete;
      }

      // 开启时间片 scheduler调度
      shouldTimeSlice ? workConcurrentLoop() : workLoop();
      break;
    } catch (e) {
      /** 使用try catch保证workLoop顺利执行 多次尝试 */
      workLoopRetryTimes++;
      if (workLoopRetryTimes > 20) {
        console.warn("workLoop执行错误!", e);
        break;
      }
      handleThrow(e);
    }
  }

  /** 判断任务是否执行完成 如果执行完成RootCompleted 否则 返回RootInCompleted*/
  if (shouldTimeSlice && workInProgress !== null) {
    return RootInComplete;
  }

  // 任务完成
  return RootCompleted;
}
我们可以看到,renderRoot使用一个无限循环来包裹workLoop流程,并且设置了一个错误次数的边界条件,当抛出错误之后,还可以重新运行workLoop来尝试回溯,找到suspense/error boundary节点。
对于挂起,React也定义了几个挂起的状态,如下:
TypeScript
/** == 挂起状态 ==  */
/** 没有被挂起 */
const NotSuspended = 0;
/** 因为错误被挂起 */
const SuspendedOnError = 1;
/** 因为请求数据被挂起 */
const SuspendedOnData = 2;
/** 因为旧的 Promise抛出方式引起的刮起  旧的 对比之下就是 使用 use hooks的方式 官方推荐的新的挂起方式
 *  注意,React.lazy走的也是 SuspendedOnDeprecatedThrowPromise
 *  你可以用 use钩子 代替 lazy
 */
const SuspendedOnDeprecatedThrowPromise = 4;
分别对应,
-
默认状态下的 未挂起
-
由于抛出非thenable而挂起的 SuspenseOnError 此时需要ErrorBoundary进行包裹
-
由于use钩子而挂起的 SuspenseOnData
-
通过非usehook导致的因普通thenable对象而挂起的SuspendedOnDeprecatedThrowPromise比如Lazy 或者我们直接 throw一个promise
OnDeprecated也就意味这是一个即将弃用的方式,官方建议统一使用 use方法来处理挂起!
React内置了2个全局变量,分别记录 挂起原因和挂起值,即
TypeScript
/** 挂起原因 */
type SuspenedReason =
  | typeof NotSuspended
  | typeof SuspendedOnError
  | typeof SuspendedOnData
  | typeof SuspendedOnDeprecatedThrowPromise;

/** wip被suspense的原因 */
let workInProgressSuspendedReason: SuspenedReason = NotSuspended;
/** 挂起时 获取的真正的抛出的值 */
let workInProgressSuspenedValue: any = null;
handleThrow函数用来辨别当前挂起的状态,实现如下,我们刚说了,use方法调用了trackUsedThenable方法,抛出的是一个内置的 SuspenseException对象,只要收到的不是这个对象,就都不是use方法触发的挂起!实现如下:
TypeScript
/** 处理异常抛出 */
function handleThrow(thrownValue: any) {
  if (thrownValue === SuspenseException) {
    // wakeable
    workInProgressSuspendedReason = SuspendedOnData;
    workInProgressSuspenedValue = getSuspendedThenable();
  } else {
    // SuspendedOnDeprecatedThrowPromise 旧的挂起方式
    if (
      thrownValue !== null &&
      typeof thrownValue === "object" &&
      typeof thrownValue.then === "function"
    ) {
      workInProgressSuspendedReason = SuspendedOnDeprecatedThrowPromise;
      workInProgressSuspenedValue = thrownValue;
    } else {
      /** 由于错误挂起  ERR boundary方式 */
      workInProgressSuspendedReason = SuspendedOnError;
      workInProgressSuspenedValue = thrownValue;
    }
  }
}
处理完挂起原因,会重新进入while循环开启重试渲染,重试开始,会先检查当前是否处于挂起状态,如果是会先进行unwind流程,到达最近的suspense或errorBoundary
TypeScript
// renderRoot函数

  while (true) {
    try {
      // 处理错误
      if (
        workInProgressSuspendedReason !== NotSuspended &&
        workInProgress !== null
      ) {
        workInProgressSuspendedReason = NotSuspended;
        const thrownValue = workInProgressSuspenedValue;
        // 标记lanes为suspended
        markRootSuspended(root, lane);
        // 处理 被抛出的异常 并且 开启 unwind 流程 到最近的 Suspense
        handleThrownAndUnwind(
          root,
          workInProgress,
          thrownValue,
          wipRootRenderLane
        );
      }

      if (workInProgressRootExitStatus === RootDidNotComplete) {
        return RootDidNotComplete;
      }

  // 执行 workLoop
其中,handleThrownAndUnwind 就是处理抛出的异常并且开启unwind流程,区分handleThrow,这里的Thrown是完成时,即处理已经被抛出的异常,实现如下:
TypeScript
/** 处理 hook重置 唤醒 调用unwind */
function handleThrownAndUnwind(
  root: FiberRootNode,
  wip: FiberNode,
  thrownValue: Thenable,
  lane: Lane
) {
  // 重置hooks
  resetHookOnUnwind();
  // 注册 抛出异常
  handleThrownException(root, wip, thrownValue, lane);
  // unwindwork
  const next = unwindWork(wip);
  if (next) {
    workInProgress = next;
  } else {
    // 没有命中边界
    workInProgress = null;
    // render没有完成
    workInProgressRootExitStatus = RootDidNotComplete;
  }
}
第一步,由于当前的渲染还没有完成,所以需要把当前的 hook运行上下文恢复,具体的就是把 fiberHook模块的 currentlyRenderingFiber 和 workInProgressHook CurrentHook指针恢复为 null
第二部,注册唤醒回调,当挂起发生后,我们需要检讨thenable的状态,并且在thenable决策之后,重新开启渲染。
第三步, 开启unwind流程回溯,找到最近的suspense并且赋给next,如果没找到,说明当前挂起的组件没有被suspense包裹,此时发生错误,给workInProgressRootExitStatus赋值RootDidNotComplete,表示渲染不能继续下去了,告知调用者错误!
注册唤醒
你可能会发现一个问题,虽然某个组件由于异步挂起了,但是由于unwind流程的存在,当前render的过程实际上还是完成了(只不过展示了fallback)此时顺利进入commit流程,commit处理完flag之后,会把当前的lane从pendingLanes上remove,那么后面即便我们想重试唤醒这个任务,由于没有lane,也无法唤醒了!
为了解决,react在root节点上定义了另外2个属性,即
suspendedLanes: Lane
pingedLanes: Lanes
前者表示当前被挂起的Lane,后者表示已经决策的Lane
- 当出现错误,走到RootDidNotComplete时,会调用markRootSuspended 在root.suspendedLanes上增加lane, 表示当前渲染的lane出错,不能调度
TypeScript
/** 把某个Lane标记为挂起状态 */
export function markRootSuspended(root: FiberRootNode, lane: Lane) {
  root.suspendedLanes = mergeLane(root.suspendedLanes, lane);
  root.pingedLanes = removeLanes(root.pingedLanes, lane);
}- 当正常挂起时,在handleThrownAndUnwind之前,调用MarkRootSuspended,表示当前lane被挂起,暂时不能调度

当某个lane被正常挂起,此时handleThrownAndUnwind中会调用handleThrownException来注册唤醒事件,并且在唤醒事件中把挂起的lane挂到pingedLanes上
TypeScript
/** 处理异常抛出,给最近的Suspense 设置 */
export function handleThrownException(
  root: FiberRootNode,
  wip: FiberNode,
  thrownValue: any,
  lane: Lane
) {
  if (thrownValue !== null && typeof thrownValue === "object") {
    if (typeof thrownValue.then === "function") {
      // 处理 thenbale异常
      // 标记最近的suspense ShouldCapture
      const nearsetSuspenseFiber = getNearestSuspenseFiber();
      if (nearsetSuspenseFiber) {
        nearsetSuspenseFiber.flags |= ShouldCapture;
      }
      // 注册listener
      attachPingListener(root, wip, thrownValue as Wakeable, lane);
    }
  }
}
这个函数会找到最近的 suspense,并且在其上挂载ShouldCapture标记,表示unwind回溯的目标,unwind流程在检测到回溯的节点上有shouldCapture后,就表示找到目标,停止继续向上回溯
添加完flag 就会通过 attachPingListener给thenable注册事件, 对于一个thenable对象,我们希望一个lane任务只能注册一次,比如看下面例子
TypeScript
/** 同一个lane会多次进入 attachPingListener吗? 考虑:*/
function Component() {
  const data = use(promise);  // 同一个 promise,同一个 lane
  return <div>{data}</div>;
}

function App() {
  return (
    <>
      <Suspense fallback="Loading1">
        <Component />  {/* 第一次 throwException */}
      </Suspense>
      <Suspense fallback="Loading2">
        <Component />  {/* 第二次 throwException,同一个 lane */}
      </Suspense>
    </>
  );
}
对于同一个thenable对象,由于存在2个Component节点,所以可能会重复注册一次唤醒事件,但是多个lane对应多个优先级的任务,可以注册多个唤醒事件,所以我们使用如下结构:
设置一个全局的 pingCache Map,这个Map的key为thenable对象,value为这个thenable对象上的所有lanes,为一个集合Set。
由于key为复杂类型,我们可以用weakMap来存储优化性能!然后每次来一个lane就add到set中,如果set中存在当前lane,就代表已经注册过当前lane的唤醒事件了,忽略,如下:
TypeScript
/** 保证 一个thenable的一个lane 之对应一个任务监听 */
function attachPingListener(
  root: FiberRootNode,
  wip: FiberNode,
  wakeable: Wakeable,
  lane: Lane
) {
  let wakeableLanes: Set<Lane> = null;

  if (!root.pingCache) {
    // 没有 pingChache就创建
    wakeableLanes = new Set<Lane>();
    root.pingCache = new WeakMap();
    root.pingCache.set(wakeable, wakeableLanes);
  } else {
    // 有 pingCache 查找wakeable 是否存在,如果不存在就加入
    wakeableLanes = root.pingCache.get(wakeable);
    if (!wakeableLanes) {
      wakeableLanes = new Set<Lane>();
      root.pingCache.set(wakeable, wakeableLanes);
    }
  }

  // 只有一个lane的第一次 才能注册 不同lane对应一个wakeable可以多次注册 注册多个 唤醒
  if (!wakeableLanes.has(lane)) {
    wakeableLanes.add(lane);
    // 第一次进入才listen
    const ping = () => {
      if (root.pingCache?.has(wakeable)) {
        root.pingCache.delete(wakeable);
      }
      markRootUpdated(root, lane);
      markRootPinged(root, lane);
      /** 由于不需要改变 childLanes 只需要ensureRootIsSchedule即可 */
      ensureRootIsScheduled(root);
    };

    wakeable.then(ping, ping);
  }
}
唤醒事件中,我们需要吧已经唤醒的lane加入到pendingLanes(因为挂起时,commit过程已经完成,已经把挂起的lane从pendingLanes中删除了!)同时也加入到PingedLanes,并开启下一轮渲染任务。
当下次循环通过getNextLane获取最高优先级事件时,我们需要
优先调用没被挂起过的lane(即便此时已经pinged也要等待)
当没被挂起过的lanes都执行完成后,在调用已经决策的pingedLanes,改造getNextLane如下:
TypeScript
/** 和root操作相关 */
/**
 * 获取当前root优先级最高的lan
 * 已经挂起的lane优先级比没挂起的低 即便已经 pinged
 * @param lanes
 */
export function getNextLane(root: FiberRootNode): Lane {
  const pendingLanes = root.pendingLanes;
  const suspendedLanes = root.suspendedLanes;
  /** 先去掉suspenedLanes 要确保没被挂起的lane优先级更高执行 */
  const unSuspendedLanes = removeLanes(pendingLanes, suspendedLanes);
  if (unSuspendedLanes !== NoLane) {
    /** 调用getHighestPriorityLane 获取最高优先级lane */
    return getHighestPriorityLane(pendingLanes);
  } else {
    /** 说明所有的lane都挂起了 看一下哪个lane已经决策了 (pinged) */
    const pingedLanes = root.pingedLanes & suspendedLanes;
    if (pingedLanes !== NoLane) {
      const higestPingedLine = getHighestPriorityLane(pingedLanes);
      /** 去掉 suspenedLane */
      root.suspendedLanes = removeLanes(root.suspendedLanes, higestPingedLine);
      /** 去掉pingedLane */
      root.pingedLanes = removeLanes(root.pingedLanes, higestPingedLine);
      return higestPingedLine;
    }
  }
  return NoLane;
}
unwind 流程
最后说一下unwind流程,就是从当前节点想上寻找,找到某个Suspense节点并且包含ShouldCapture 就到达终点,去掉上面的ShouldCapture标记 换成DidCapture 并且返回。
下一轮beginwork在走到这个suspense节点时,会根据是否有DidCapture来判断是否展示fallback如下:
TypeScript
import { FiberNode } from "./fiber";
import { popContext } from "./fiberContext";
import { DidCapture, NoFlags, ShouldCapture } from "./flags";
import { popSuspenseFiber } from "./suspenseContext";
import { ContextProvider, SuspenseComponent } from "./workTag";

export function unwindWork(wip: FiberNode) {
  let parent = wip.return;
  while (parent !== null) {
    switch (parent.tag) {
      case SuspenseComponent:
        // 向上走 处理suspense
        popSuspenseFiber();
        if ((parent.flags & ShouldCapture) !== NoFlags) {
          parent.flags &= ~ShouldCapture;
          parent.flags |= DidCapture;
          return parent;
        }
        break;
      case ContextProvider:
        // 向上走 需要处理context
        popContext(wip.type._context);
        break;
    }
    parent = parent.return;
  }
}
这样,整个unwind和suspense流程就走完了!React原理所有内容基本完结!