appium学习
文章目录
- appium学习
-
- [1. 环境搭建](#1. 环境搭建)
-
- [1. command line tools](#1. command line tools)
- [2. appium安装配置](#2. appium安装配置)
- [3. 小测试](#3. 小测试)
- [2. 常用方法](#2. 常用方法)
-
- [1. 元素定位](#1. 元素定位)
- [2. 元素操作](#2. 元素操作)
- [3. 应用和设备管理](#3. 应用和设备管理)
- [4. 手势和触摸操作](#4. 手势和触摸操作)
- [5. 系统交互](#5. 系统交互)
- [6. 上下文处理](#6. 上下文处理)
- 参考
1. 环境搭建
各软件版本参考如下:
node js v24.6.0
jdk 17.0.12
command line tools win-13114758
platforms;android-31 (对应android 12)
build-tools;31.0.0
appium v3.1.0
python 3.13
mumu模拟器 v5.7.0
node js,jdk,python等自行配置记得配环境变量
1. command line tools
https://developer.android.com/studio
下载command line tools
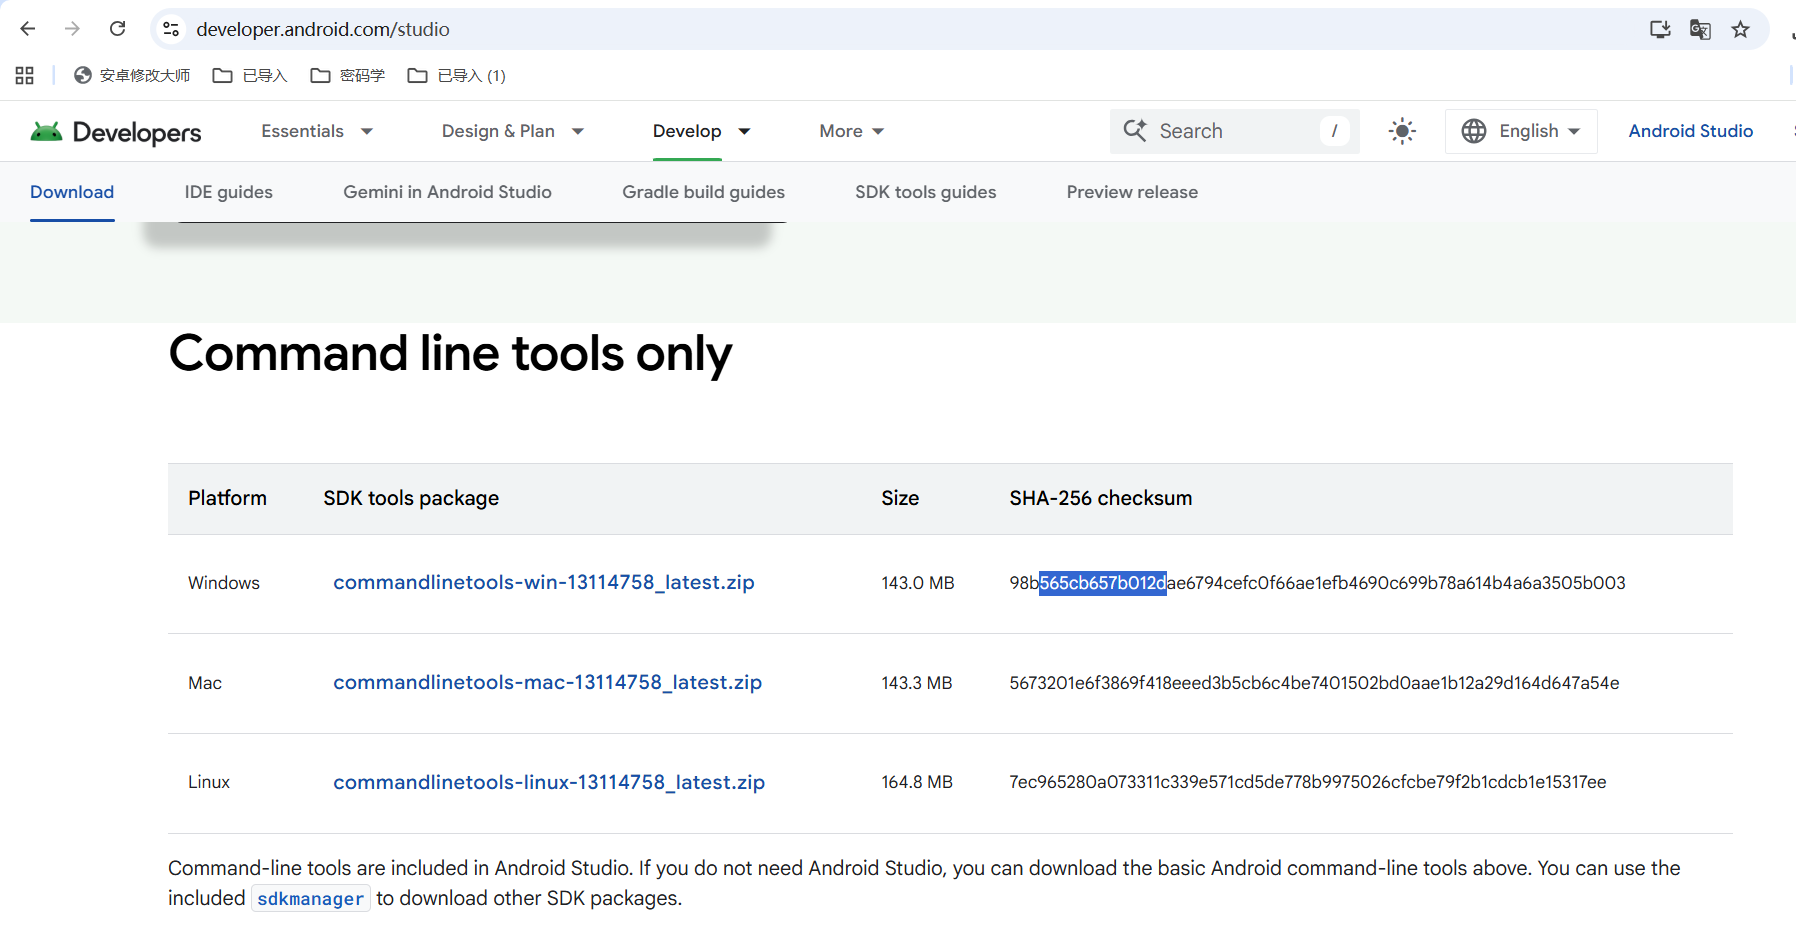
新建C:\Users\21609\Downloads\AndroidSDK文件夹,将cmdline-tools文件夹复制到到文件夹下。
新建C:\Users\21609\Downloads\AndroidSDK\cmdline-tools\latest文件夹。
将bin文件夹和lib文件夹移动到C:\Users\21609\Downloads\AndroidSDK\cmdline-tools\latest文件夹中。
查看android版本对应API版本
https://developer.android.com/guide/topics/manifest/uses-sdk-element?hl=zh-cn#ApiLevels
android 12对应API 31
bash
#安装platform-tools
C:\Users\21609\Downloads\AndroidSDK\cmdline-tools\latest\bin>sdkmanager "platform-tools"

#安装android平台
C:\Users\21609\Downloads\AndroidSDK\cmdline-tools\latest\bin>sdkmanager "platforms;android-31"

#安装build-tools
C:\Users\21609\Downloads\AndroidSDK\cmdline-tools\latest\bin>sdkmanager "build-tools;31.0.0"

#安装其他工具
sdkmanager "tools"
sdkmanager "emulator"
#sdkmanager "patcher;v4"

# Android 12 镜像(Google APIs)gou
sdkmanager "system-images;android-31;google_apis;x86_64"

# Android 12 镜像(默认版本)
sdkmanager "system-images;android-31;default;x86_64"设置ANDROID_HOME环境变量
值为 C:\Users\21609\Downloads\AndroidSDK
path新增
%ANDROID_HOME%\tools
%ANDROID_HOME%\build-tools\31.0.0
%ANDROID_HOME%\platform-tools
2. appium安装配置
appium安装
bash
npm i -g appiumappium驱动安装
bash
# 安装 Android 驱动 (UiAutomator2)
appium driver install uiautomator2

# 安装 iOS 驱动 (XCUITest)
appium driver install xcuitest

# 查看已安装的驱动
appium driver list

# 更新所有已安装的驱动
appium driver update --installed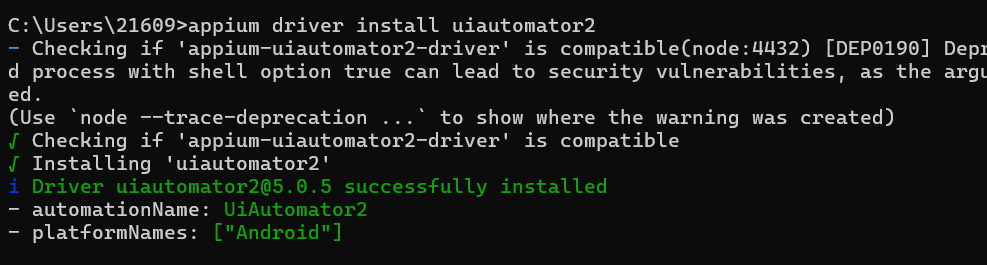
常用插件安装
bash
# 安装元素查找插件
appium plugin install images
appium plugin install execute-driver

# 查看已安装的插件
appium plugin list

# 基本启动
# appium
# 或指定端口启动
# appium -p 4723
# 带日志输出启动
# appium --log-level debug
将"C:\Users\21609\Downloads\AndroidSDK\platform-tools\adb.exe"替换掉mumu模拟器的adb.exe
C:\Program Files\NetEase\MuMu\nx_device\12.0\shell\adb.exe
C:\Program Files\NetEase\MuMu\nx_main\adb.exe
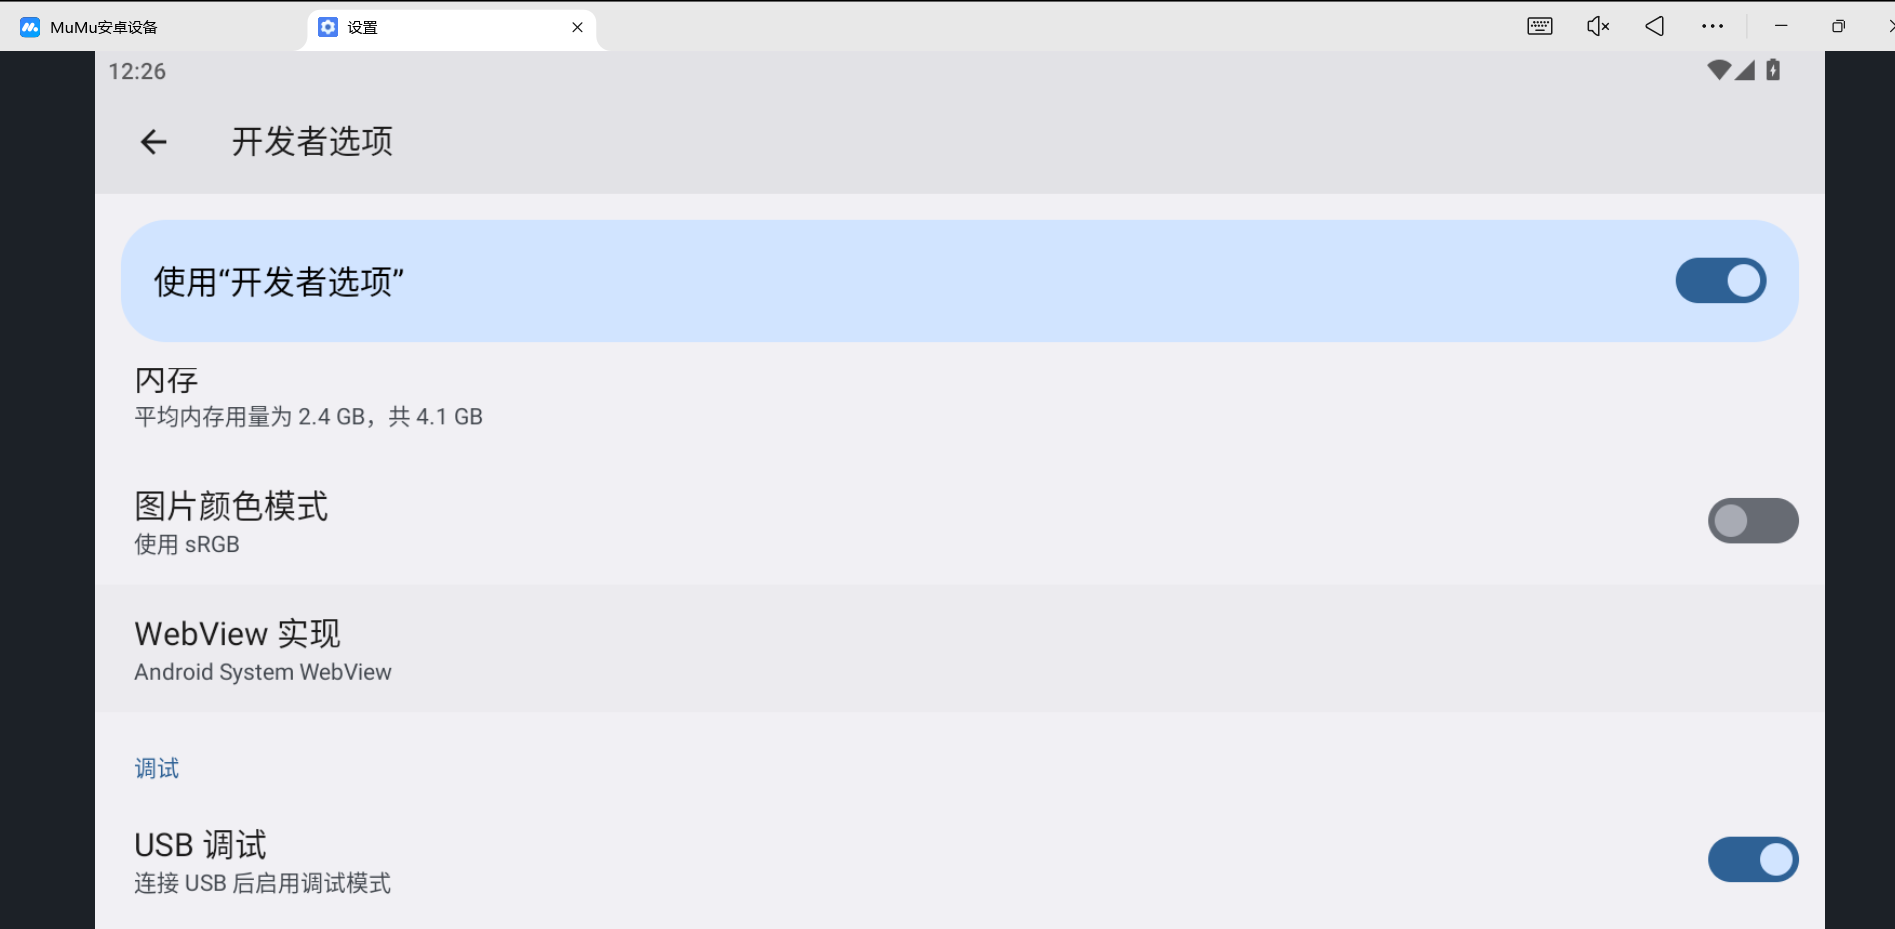
启动mumu模拟器,多次点击设置中的版本号进入开发者模式。

在系统->开发者选项中开启USB调试
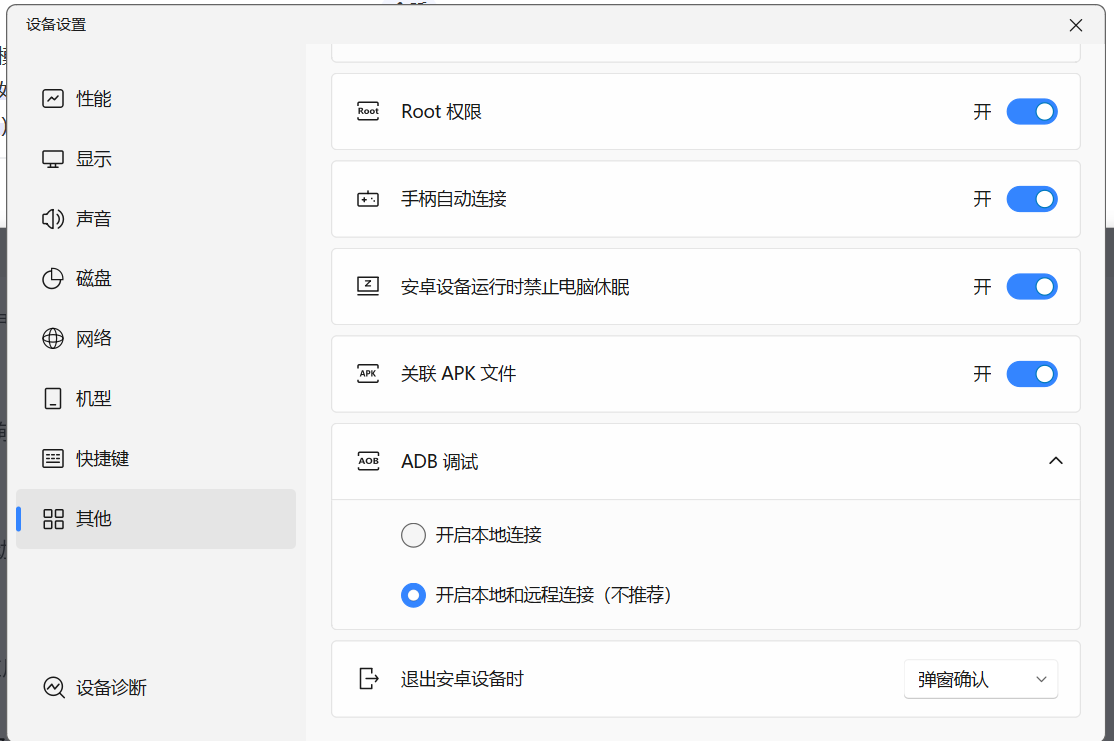
设备设置开启root权限和adb调试本地和远程连接。
bash
adb connect 127.0.0.1:5555
adb connect 127.0.0.1:16384
adb devices

#获取手机版本号
adb -s 127.0.0.1:16384 shell getprop ro.build.version.release
12

# 使用 adb 命令直接获取当前app和界面
adb -s emulator-5554 shell "dumpsys window displays | grep -E 'mCurrentFocus|FocusedApp'"
#  mCurrentFocus=Window{cd12584 u0 com.mumu.store/com.mumu.store.MainActivity}
#  mFocusedApp=ActivityRecord{a02b66 u0 com.mumu.store/.MainActivity t27}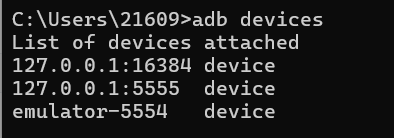
python 13
pip install Appium-Python-Client==5.2.43. 小测试
电脑appium客户端会创建一个服务器(ADB服务器)
手机连接上电脑之后,会自动检测服务进行连接
需要操作手机,是先appium接受脚本代码,然后转化为adb命令,最后通过命令执行手机对应的操作
启动appium服务器
appium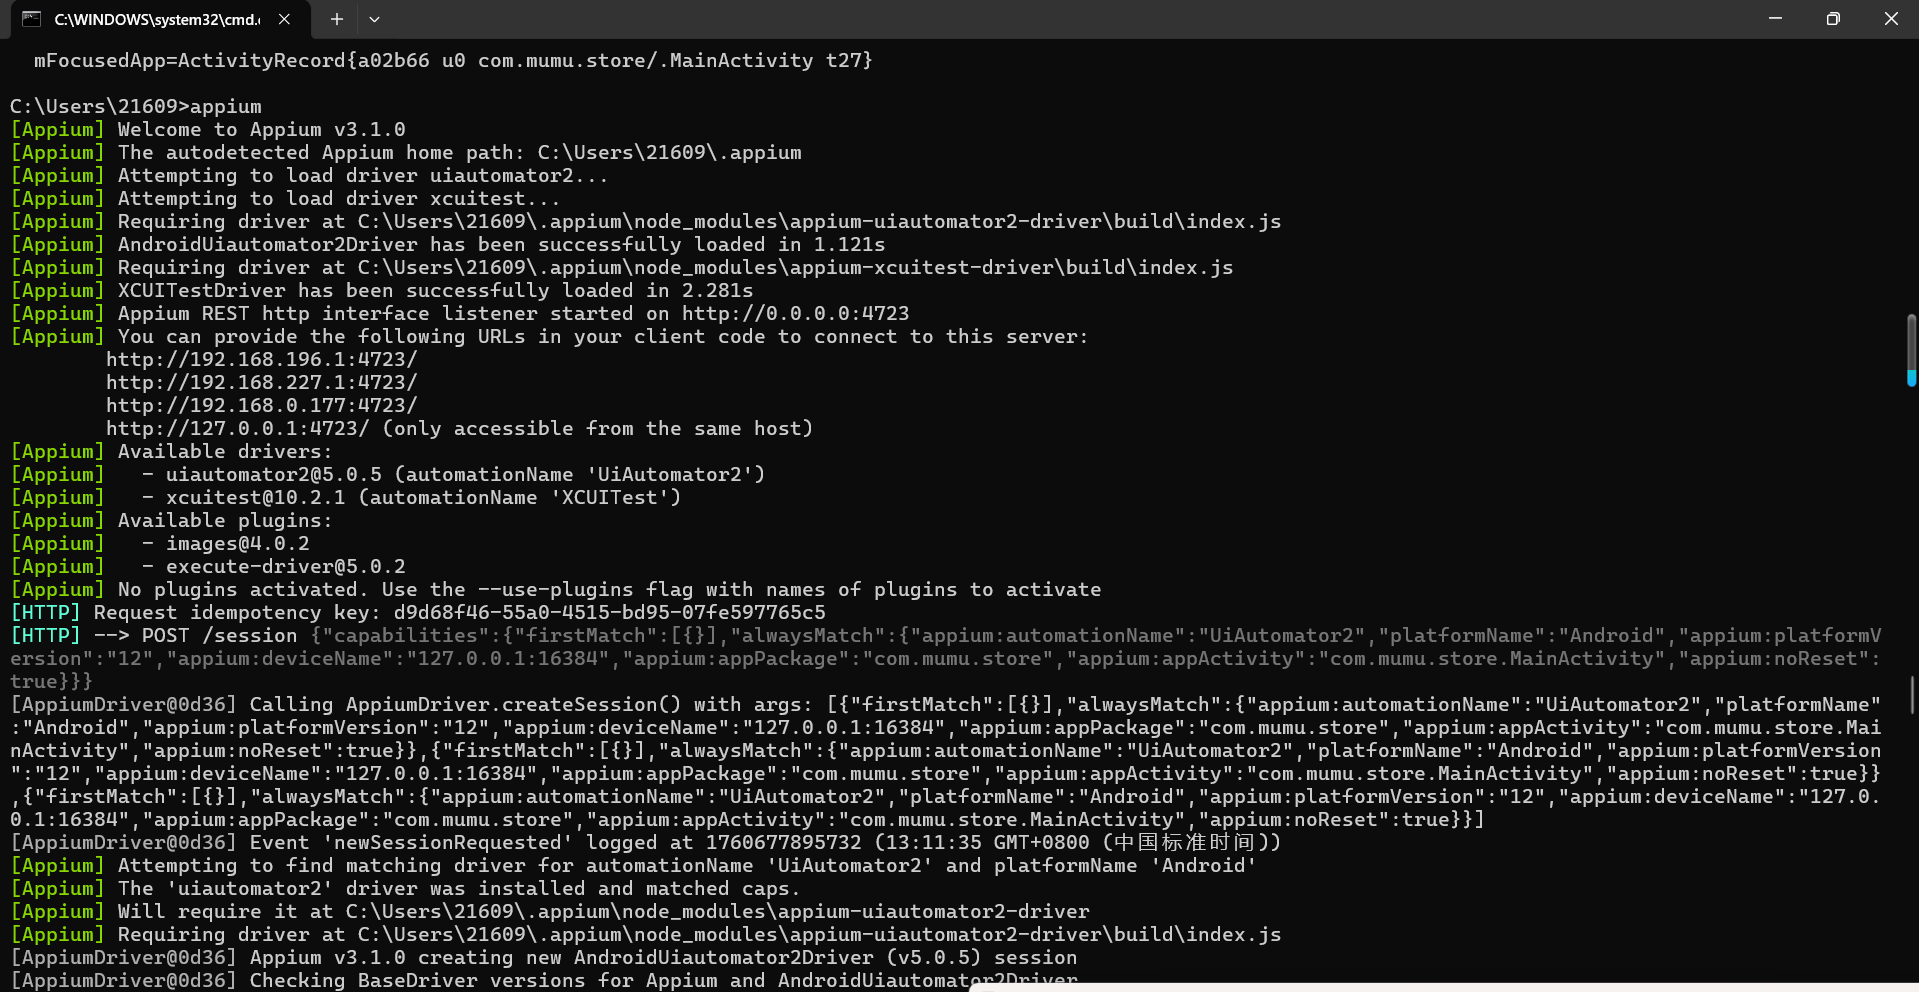
python
import time

from appium import webdriver
from appium.options.android import UiAutomator2Options

#配置连接手机和参数信息
desired_caps = {
    'platformName': 'Android',
    'platformVersion': '12', #手机版本号
    'deviceName': '127.0.0.1:16384', #设备名
    'appPackage': 'com.mumu.store', #应用包名
    'appActivity': 'com.mumu.store.MainActivity', #主活动名
    'automationName': 'UiAutomator2', #必须指定自动化引擎
    'noReset': True  # 不重置应用状态
}

# 正确创建 options 对象
options = UiAutomator2Options().load_capabilities(desired_caps)


driver = webdriver.Remote('http://127.0.0.1:4723', options=options)
time.sleep(3)
driver.quit()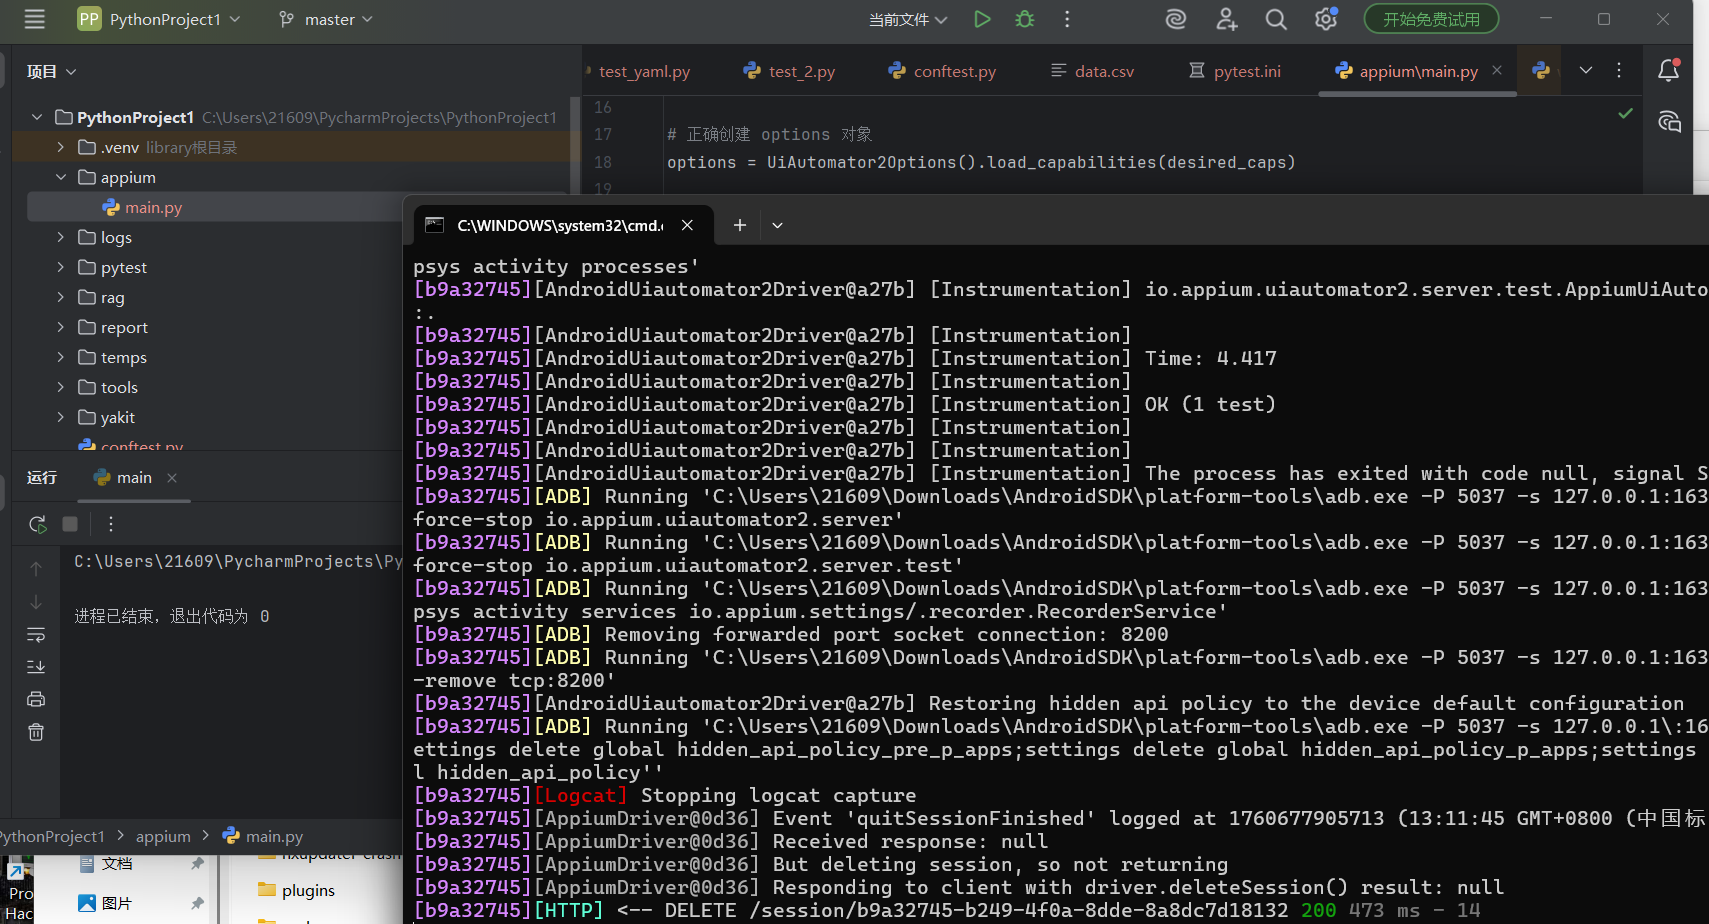
可以截个图
python
try:
    time.sleep(3)
    # 1. 截图
    driver.save_screenshot("app_screenshot.png")
    print("截图已保存: app_screenshot.png")
finally:
    driver.quit()
2. 常用方法
Appium Inspector 是官方提供的图形化界面工具,用于检查应用元素、录制操作和生成代码。
https://github.com/appium/appium-inspector/releases
json
{
  "platformName": "Android",
  "appium:platformVersion": "12",
  "appium:deviceName": "127.0.0.1:16384",
  "appium:appPackage": "com.mumu.store",
  "appium:appActivity": "com.mumu.store.MainActivity",
  "appium:automationName": "UiAutomator2",
  "appium:noReset": true
}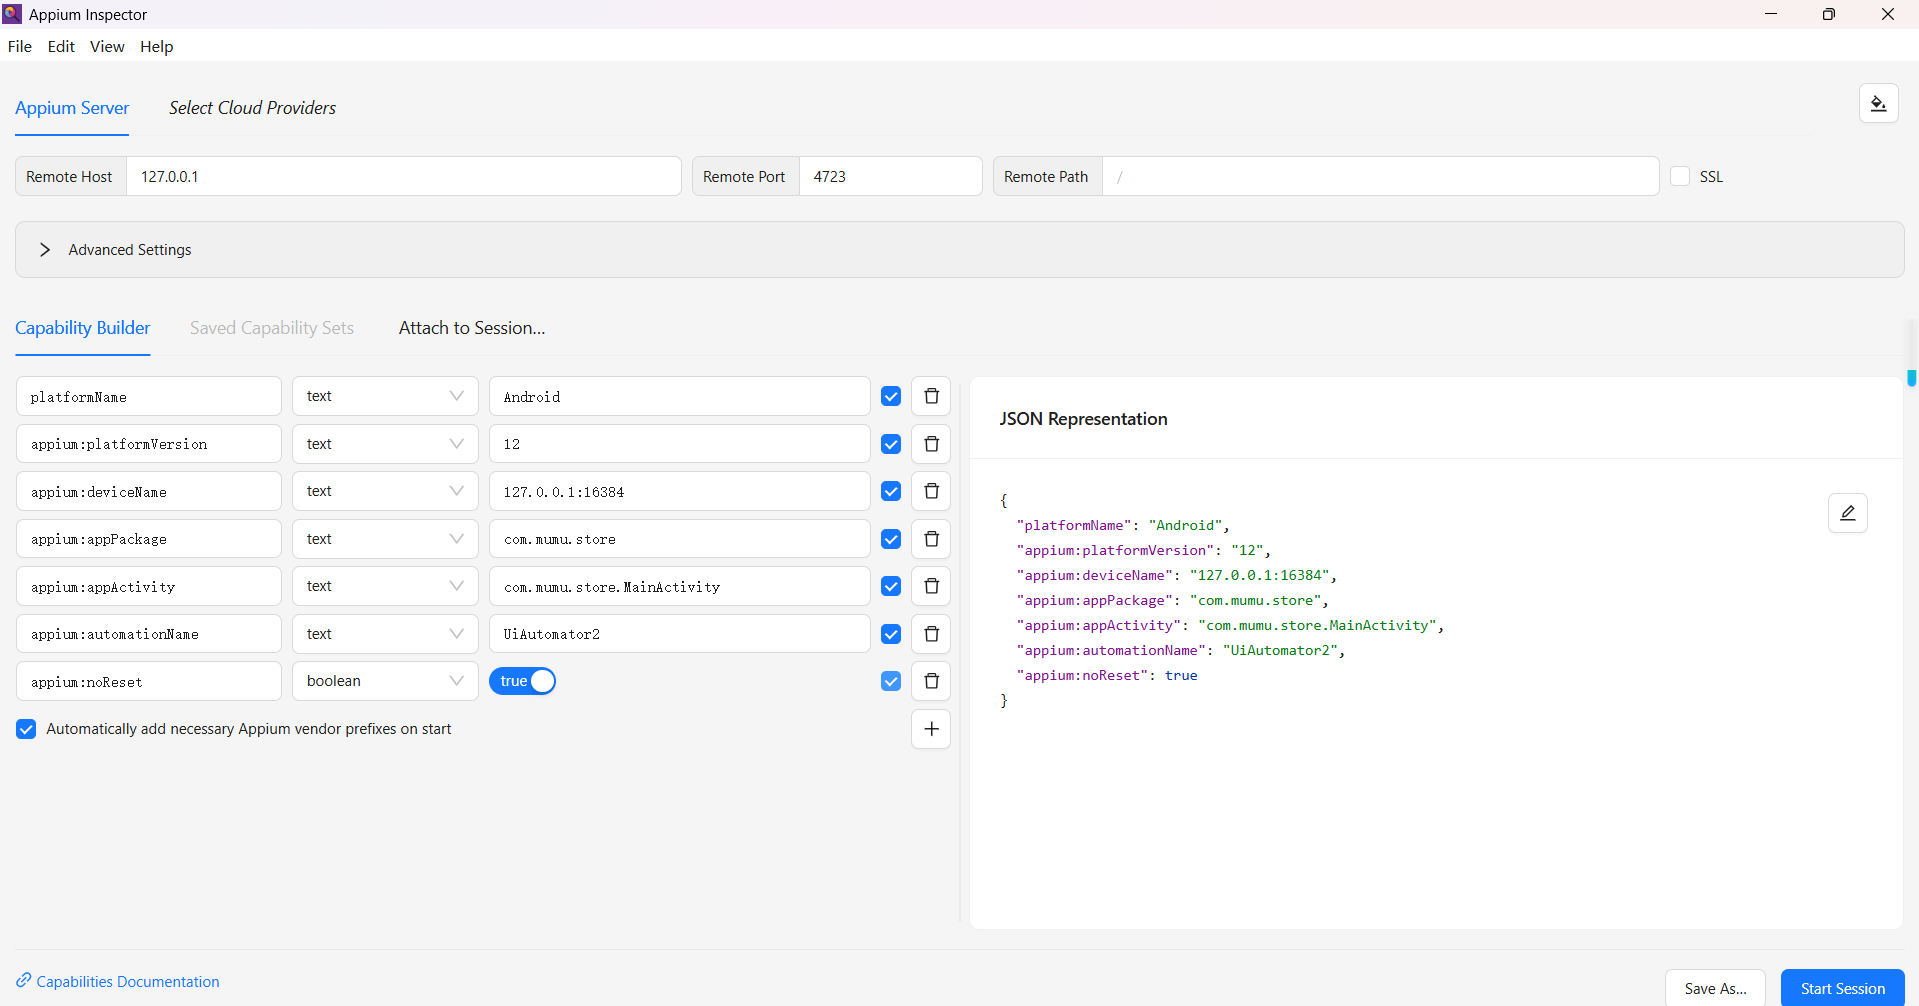
start session就可以看到游戏中心
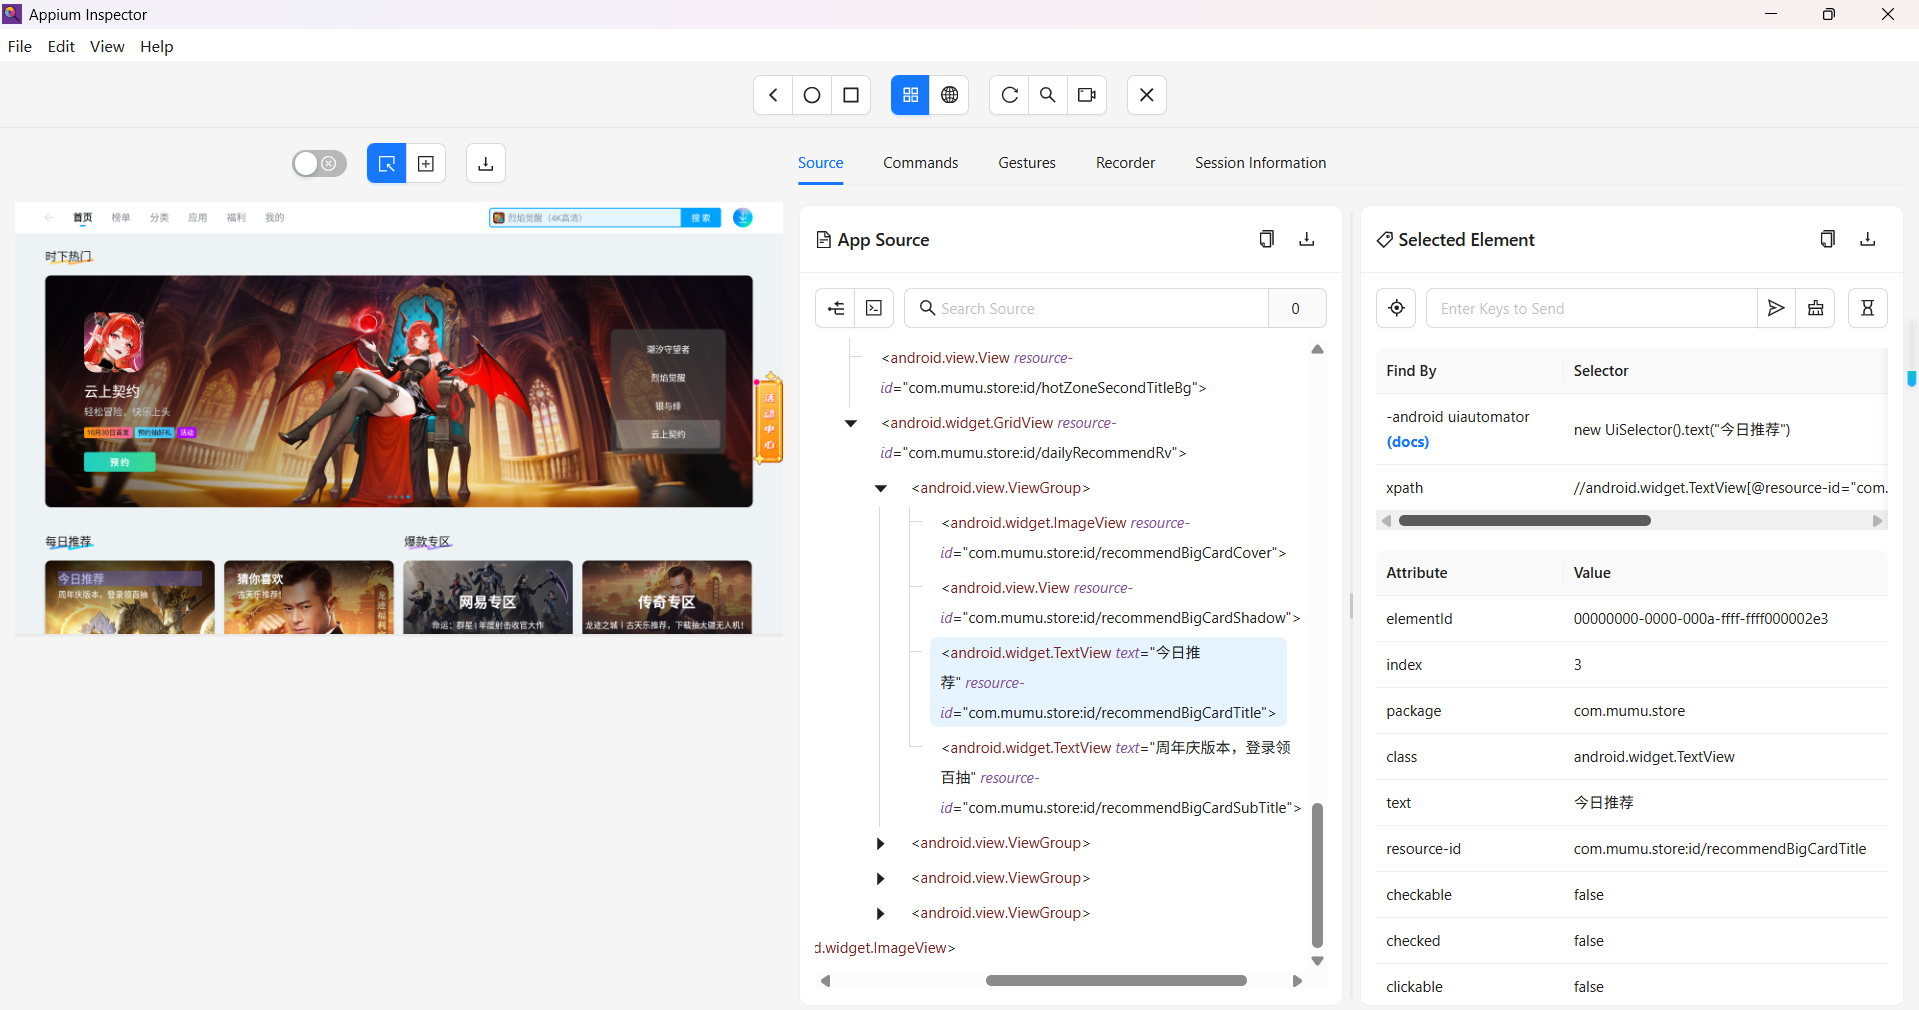
1. 元素定位
python
from appium.webdriver.common.appiumby import AppiumBy

# 通过 ID 定位 (通常是 resource-id)
element_by_id = driver.find_element(AppiumBy.ID, "com.mumu.store:id/recommendBigCardTitle")

# 通过 Accessibility ID 定位 (对于 iOS 是 accessibilityIdentifier, 对于 Android 是 content-desc)
# 游戏中心没看到这个属性
element_by_accessibility = driver.find_element(AppiumBy.ACCESSIBILITY_ID, "login_button")

# 通过 XPath 定位 (功能强大但可能较慢)
element_by_xpath = driver.find_element(AppiumBy.XPATH, '//android.widget.TextView[@resource-id="com.mumu.store:id/recommendBigCardTitle" and @text="今日推荐"]')

# 通过 Class Name 定位 (通常用于找同类元素)
elements_by_class = driver.find_elements(AppiumBy.CLASS_NAME, "android.widget.TextView")

# 通过 Android UIAutomator2 定位 (仅 Android, 非常强大)
element_by_ui2 = driver.find_element(AppiumBy.ANDROID_UIAUTOMATOR, 'new UiSelector().text("今日推荐")')

# 通过 iOS UIAutomation 定位 (仅 iOS)
# element_by_ios = driver.find_element(AppiumBy.IOS_UIAUTOMATION, ".buttons()[\"Continue\"]")

# 等待元素出现 (非常重要,避免因元素未加载而报错)
from selenium.webdriver.support.ui import WebDriverWait
from selenium.webdriver.support import expected_conditions as EC

wait = WebDriverWait(driver, 10)
element = wait.until(EC.presence_of_element_located((AppiumBy.ID, "com.mumu.store:id/recommendBigCardTitle")))
2. 元素操作
定位到元素后,就可以对其进行操作。
python
from appium.webdriver.common.appiumby import AppiumBy
from selenium.webdriver.support.ui import WebDriverWait
from selenium.webdriver.support import expected_conditions as EC

wait = WebDriverWait(driver, 10)
element = wait.until(EC.presence_of_element_located((AppiumBy.ID, "com.mumu.store:id/search_bar")))

# 点击元素
element.click()

# 输入文本
text_field = driver.find_element(AppiumBy.ID, "com.mumu.store:id/search_bar")
text_field.send_keys("Hello Appium!")

# 清空输入框
text_field.clear()

# 获取元素文本
text = element.text
print(f"元素的文本是: {text}")

# 获取元素属性 (例如获取 resource-id, content-desc, class 等)
attr = element.get_attribute("resource-id")
print(f"元素的 resource-id 是: {attr}")

# 检查元素是否启用、是否可见、是否被选中
is_enabled = element.is_enabled()
is_displayed = element.is_displayed()
# is_selected 常用于复选框、单选框等
is_selected = element.is_selected()
3. 应用和设备管理
控制应用和设备的生命周期。
python
# 启动一个 App (通过 Capabilities 中定义的 appPackage 和 appActivity)
# 这通常在初始化驱动时完成

# 获取当前 Activity
current_activity = driver.current_activity

# 获取当前包名
current_package = driver.current_package

# 将 App 置于后台运行一段时间,然后切回
driver.background_app(5) # 后台运行 5 秒

# 关闭当前 App
driver.close_app()

# 启动一个 App (需要提前在 Capabilities 中定义)
driver.launch_app()

# 重置 App (相当于清除数据并重启)
driver.reset()

# 安装 App
driver.install_app('/path/to/new_app.apk')

# 卸载 App
driver.remove_app('com.example.app')

# 判断 App 是否已安装
is_installed = driver.is_app_installed('com.example.app')
4. 手势和触摸操作
对于复杂的交互,需要使用触摸操作。
注意新版appium client不支持TouchAction
旧的appium-python-client==2.11.1支持TouchAction
python
from appium.webdriver.common.touch_action import TouchAction

actions = TouchAction(driver)

# 点击
actions.tap(element).perform()

# 长按
actions.long_press(element).wait(2000).release().perform() # 长按 2 秒

# 滑动/拖拽
actions.press(x=100, y=500).wait(100).move_to(x=100, y=100).release().perform()

# 多点触控 (使用 MultiAction)
from appium.webdriver.common.multi_action import MultiAction

action1 = TouchAction(driver).tap(element1)
action2 = TouchAction(driver).tap(element2)

multi_actions = MultiAction(driver)
multi_actions.add(action1, action2)
multi_actions.perform()
自己实现一下
python
from appium import webdriver
from appium.options.android import UiAutomator2Options
from selenium.webdriver.common.actions.action_builder import ActionBuilder
from selenium.webdriver.common.actions import interaction
import time


class AppiumTouchActions:
    def __init__(self, driver):
        self.driver = driver

    def tap_coordinate(self, x, y):
        """点击指定坐标"""
        self.driver.tap([(x, y)])

    def tap_element(self, element):
        """点击元素"""
        element.click()

    def long_press(self, x, y, duration=2000):
        """长按指定坐标"""
        actions = ActionBuilder(self.driver)
        actions.add_pointer_input(kind=interaction.POINTER_TOUCH,name="touch")

        actions.pointer_action.move_to_location(x, y)
        actions.pointer_action.pointer_down()
        actions.pointer_action.pause(duration / 1000)
        actions.pointer_action.pointer_up()
        actions.perform()

    def long_press_element(self, element, duration=2000):
        """长按元素"""
        location = element.location
        size = element.size
        x = location['x'] + size['width'] // 2
        y = location['y'] + size['height'] // 2
        self.long_press(x, y, duration)

    def swipe(self, start_x, start_y, end_x, end_y, duration=1000):
        """滑动操作"""
        self.driver.swipe(start_x, start_y, end_x, end_y, duration)

    def drag_and_drop(self, start_x, start_y, end_x, end_y, duration=1000):
        """拖拽操作"""
        actions = ActionBuilder(self.driver)
        actions.add_pointer_input(interaction.POINTER_TOUCH, "touch")

        actions.pointer_action.move_to_location(start_x, start_y)
        actions.pointer_action.pointer_down()
        actions.pointer_action.pause(duration / 1000)
        actions.pointer_action.move_to_location(end_x, end_y)
        actions.pointer_action.pointer_up()
        actions.perform()


# 配置连接手机和参数信息
desired_caps = {
    'platformName': 'Android',
    'platformVersion': '12',
    'deviceName': '127.0.0.1:16384',
    'appPackage': 'com.mumu.store',
    'appActivity': 'com.mumu.store.MainActivity',
    'automationName': 'UiAutomator2',
    'noReset': True,
    'autoGrantPermissions': True,
    'adbExecTimeout': 30000,
}

# 正确创建 options 对象
options = UiAutomator2Options().load_capabilities(desired_caps)
driver = webdriver.Remote('http://127.0.0.1:4723', options=options)

try:
    # 使用示例
    touch = AppiumTouchActions(driver)

    #长按元素
    #from appium.webdriver.common.appiumby import AppiumBy
    #from selenium.webdriver.support.ui import WebDriverWait
    #from selenium.webdriver.support import expected_conditions as EC
    #wait = WebDriverWait(driver, 10)
    #element = wait.until(EC.presence_of_element_located((AppiumBy.ID, "com.mumu.store:id/search_bar")))
    #touch.long_press_element(element)

    # 点击坐标
    touch.tap_coordinate(100, 100)
    time.sleep(1)
    # 长按
    touch.long_press(200, 200, 2000)
    time.sleep(1)
    # 滑动
    touch.swipe(100, 500, 100, 100, 100)
    time.sleep(1)
    # 拖拽
    touch.drag_and_drop(100, 500, 100, 100, 100)

finally:
    driver.quit()
多点触控
python
from appium import webdriver
from appium.options.android import UiAutomator2Options
import time
import math


class StableMultiTouchActions:
    def __init__(self, driver):
        self.driver = driver

    def multi_tap(self, coordinates):
        """多点点击 - 使用简单的顺序点击"""
        print(f"执行多点点击: {coordinates}")
        for i, (x, y) in enumerate(coordinates):
            # 使用点击手势
            self.driver.execute_script('mobile: clickGesture', {
                'x': x,
                'y': y
            })
            if i < len(coordinates) - 1:
                time.sleep(0.2)

    def pinch_zoom(self, center_x, center_y, start_radius=100, end_radius=50):
        """缩小 - 使用移动手势"""
        print(f"执行缩小操作: 中心({center_x}, {center_y})")
        try:
            self.driver.execute_script('mobile: pinchCloseGesture', {
                'left': center_x - start_radius,
                'top': center_y - start_radius,
                'width': start_radius * 2,
                'height': start_radius * 2,
                'percent': 0.5,
                'speed': 1000
            })
        except Exception as e:
            print(f"缩小手势失败: {e}")
            self._simple_pinch_zoom(center_x, center_y, start_radius, end_radius)

    def spread_zoom(self, center_x, center_y, start_radius=50, end_radius=100):
        """放大 - 使用移动手势"""
        print(f"执行放大操作: 中心({center_x}, {center_y})")
        try:
            self.driver.execute_script('mobile: pinchOpenGesture', {
                'left': center_x - start_radius,
                'top': center_y - start_radius,
                'width': start_radius * 2,
                'height': start_radius * 2,
                'percent': 0.5,
                'speed': 1000
            })
        except Exception as e:
            print(f"放大的手势失败: {e}")
            self._simple_spread_zoom(center_x, center_y, start_radius, end_radius)

    def rotate(self, center_x, center_y, radius=100, angle=90):
        """旋转手势"""
        print(f"执行旋转操作: 中心({center_x}, {center_y}), 角度{angle}度")
        try:
            # 使用滑动手势模拟旋转
            if angle > 0:
                # 顺时针旋转
                self.driver.execute_script('mobile: swipeGesture', {
                    'left': center_x - radius,
                    'top': center_y - radius,
                    'width': radius * 2,
                    'height': radius * 2,
                    'direction': 'left',
                    'percent': 0.5,
                    'speed': 1000
                })
            else:
                # 逆时针旋转
                self.driver.execute_script('mobile: swipeGesture', {
                    'left': center_x - radius,
                    'top': center_y - radius,
                    'width': radius * 2,
                    'height': radius * 2,
                    'direction': 'right',
                    'percent': 0.5,
                    'speed': 1000
                })
        except Exception as e:
            print(f"旋转手势失败: {e}")
            self._simple_rotate(center_x, center_y, radius, angle)

    def _simple_pinch_zoom(self, center_x, center_y, start_radius, end_radius):
        """简单的缩小实现"""
        # 使用点击手势
        self.driver.execute_script('mobile: clickGesture', {
            'x': center_x - start_radius,
            'y': center_y - start_radius
        })
        time.sleep(0.5)
        self.driver.execute_script('mobile: clickGesture', {
            'x': center_x + start_radius,
            'y': center_y + start_radius
        })

    def _simple_spread_zoom(self, center_x, center_y, start_radius, end_radius):
        """简单的放大实现"""
        self.driver.execute_script('mobile: clickGesture', {
            'x': center_x - start_radius,
            'y': center_y - start_radius
        })
        time.sleep(0.5)
        self.driver.execute_script('mobile: clickGesture', {
            'x': center_x + start_radius,
            'y': center_y + start_radius
        })

    def _simple_rotate(self, center_x, center_y, radius, angle):
        """简单的旋转实现"""
        # 使用滑动手势
        if angle > 0:
            direction = 'left'
        else:
            direction = 'right'

        self.driver.execute_script('mobile: swipeGesture', {
            'left': center_x - radius,
            'top': center_y - radius,
            'width': radius * 2,
            'height': radius * 2,
            'direction': direction,
            'percent': 0.3,
            'speed': 1000
        })

    def swipe_up(self, x=None, y=None, distance=300):
        """向上滑动"""
        window_size = self.driver.get_window_size()
        if x is None:
            x = window_size['width'] // 2
        if y is None:
            y = window_size['height'] - 100

        end_y = y - distance
        self.driver.execute_script('mobile: swipeGesture', {
            'left': x - 50,
            'top': y - 50,
            'width': 100,
            'height': distance + 100,
            'direction': 'up',
            'percent': 1.0,
            'speed': 1000
        })

    def swipe_down(self, x=None, y=None, distance=300):
        """向下滑动"""
        window_size = self.driver.get_window_size()
        if x is None:
            x = window_size['width'] // 2
        if y is None:
            y = 100

        end_y = y + distance
        self.driver.execute_script('mobile: swipeGesture', {
            'left': x - 50,
            'top': max(0, y - 50),
            'width': 100,
            'height': distance + 100,
            'direction': 'down',
            'percent': 1.0,
            'speed': 1000
        })


# 配置连接手机和参数信息
desired_caps = {
    'platformName': 'Android',
    'platformVersion': '12',
    'deviceName': '127.0.0.1:16384',
    'appPackage': 'com.mumu.store',
    'appActivity': 'com.mumu.store.MainActivity',
    'automationName': 'UiAutomator2',
    'noReset': True,
    'autoGrantPermissions': True, #注意得给权限
    'adbExecTimeout': 30000,
}

# 正确创建 options 对象
options = UiAutomator2Options().load_capabilities(desired_caps)
driver = webdriver.Remote('http://127.0.0.1:4723', options=options)

try:
    # 等待应用加载
    time.sleep(5)

    # 获取屏幕尺寸
    window_size = driver.get_window_size()
    width = window_size['width']
    height = window_size['height']

    center_x = width // 2
    center_y = height // 2

    print(f"屏幕尺寸: {width} x {height}")

    # 使用稳定的多点触控
    multi_touch = StableMultiTouchActions(driver)

    print("1. 执行双指点击...")
    # 双指点击(使用相对坐标)
    multi_touch.multi_tap([
        (center_x - 50, center_y - 50),
        (center_x + 50, center_y + 50)
    ])
    time.sleep(2)

    print("2. 执行缩小操作...")
    # 缩小
    multi_touch.pinch_zoom(center_x, center_y, 100, 50)
    time.sleep(2)

    print("3. 执行放大操作...")
    # 放大
    multi_touch.spread_zoom(center_x, center_y, 50, 100)
    time.sleep(2)

    print("4. 执行旋转操作...")
    # 旋转
    multi_touch.rotate(center_x, center_y, 80, 45)  # 旋转45度
    time.sleep(2)

    print("5. 执行滑动操作...")
    # 滑动
    multi_touch.swipe_up()
    time.sleep(2)
    multi_touch.swipe_down()
    time.sleep(2)

    print("所有操作完成!")

except Exception as e:
    print(f"执行过程中出错: {e}")
    import traceback

    traceback.print_exc()

finally:
    driver.quit()
5. 系统交互
与设备本身进行交互。
python
# 获取设备屏幕尺寸
window_size = driver.get_window_size()
screen_width = window_size['width']
screen_height = window_size['height']

# 获取设备时间
device_time = driver.device_time

# 获取设备方向
orientation = driver.orientation # 可以是 LANDSCAPE 或 PORTRAIT

# 设置设备方向
driver.orientation = "LANDSCAPE"

# 隐藏键盘
driver.hide_keyboard()

# 按物理按键
driver.press_keycode(4) # 4 是 Android 的返回键
# driver.press_keycode(KEYCODE_BACK) # 也可以使用定义好的常量

# 打开通知栏 (Android)
driver.open_notifications()
6. 上下文处理
主要用于混合应用或 WebView。
python
# 获取所有可用的上下文
contexts = driver.contexts
# 例如: ['NATIVE_APP', 'WEBVIEW_com.example.app']

# 获取当前上下文
current_context = driver.current_context

# 切换到 WebView 上下文
driver.switch_to.context('WEBVIEW_com.example.app')

# 切换回原生 App 上下文
driver.switch_to.context('NATIVE_APP')
参考
【B站最新最详细Appium自动化测试教程,零基础也能轻松掌握App自动化,环境搭建+框架封装一小时速通!】 https://www.bilibili.com/video/BV1445Xz1Ejg/?p=4\&share_source=copy_web\&vd_source=aeb4f89b7c74bd892c2a834774309409