概念:GridView 是 Flutter 中用于创建网格布局的滚动组件,类似于表格但支持滚动。
GridView有四种创建方式
①GridView.count - 固定列数
②GridView.extent - 固定最大宽度
③GridView.builder - 动态创建(推荐用于大量数据)
④GridView.custom - 完全自定义
这里主要分享第一种GridView.count
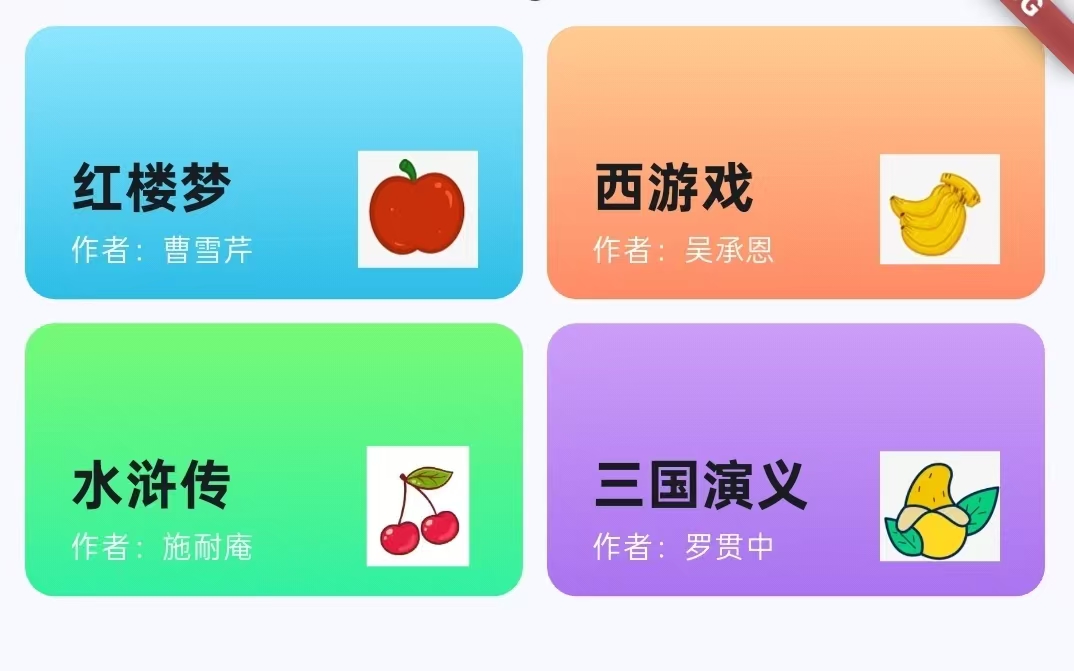
效果图,如果要看滚动的效果,就把数据多复制几次
步骤:
这个项目的点击事件用到了fluttertoast,所以需要导入fluttertoast外部类。
1.在pubspec.yaml中导入依赖(注意空格的缩进)。
Dart
dependencies:
  fluttertoast: ^8.2.2  # 检查最新版本
2.在需要的页面导入这个类
Dart
import 'package:fluttertoast/fluttertoast.dart';3.自定义控件
Dart
//自定义控件
  Widget buildItem({
    required String icon, //图片1
    required String title, //文本1
    required String subtitle,//文本2
    required List<Color> colors,//颜色1
    required VoidCallback callback,//VoidCallback:无参数无返回值的函数类型
}){
    return Container(
      //容器基础样式
      height: 85,
      width: 155,
      decoration: BoxDecoration(
        borderRadius: BorderRadius.circular(10),//圆角
          gradient: LinearGradient(//垂直渐变
            begin: Alignment.topCenter,
              end: Alignment.bottomCenter,
              colors: colors
          ),
      ),

      //使用Material Ink InkWell 组合 点击波纹效果
      //点击效果实现
      child: Material( //提供材质
        color: Colors.transparent,
        child: Ink(//墨水效果容器
          child: InkWell(//实际产生波纹效果的组件
            borderRadius: BorderRadius.circular(10),
            onTap: callback,//点击时传入的回调函数

            //内部布局结构
            child: Padding(
              padding: const EdgeInsets.only(left: 15,top: 12.5,bottom:10,right:15),
              child: Column(
                crossAxisAlignment: CrossAxisAlignment.start,//子组件左对齐
                children: [
                  const Expanded(child: SizedBox()),//弹性撑开空间,Expanded会占据所有可用空间,将后面的Row推向底部
                  Row(
                    mainAxisAlignment: MainAxisAlignment.spaceBetween,//两端对齐
                    children: [
                      //左侧文本列
                      Column(
                        crossAxisAlignment: CrossAxisAlignment.start,
                        children: [
                          Text(title,style: const TextStyle(fontSize:18,fontWeight: FontWeight.bold),),//使用传入的文字1
                          Text(subtitle,style: const TextStyle(color: Colors.white,fontSize: 10),),//使用传入的文字2
                        ],
                      ),
                      //右侧图标
                      Image.asset(icon,width: 40,height: 40,),//使用传入的图片1
                    ],
                  ),
                ],
              ),
            ),
          ),
        ),
      ),
    );
  }
自定义框架的整体布局层级
Padding (内边距)
└── Column (垂直布局)
└── Expanded (弹性空间)
└── Row (水平布局)
├── Column (文本列)
│ ├── Text (主标题)
│ └── Text (副标题)
└── Image.asset (图标)
4.在UI中使用自定义控件
Dart
return Scaffold(
      body: Center(
        child: Column(

          mainAxisAlignment: MainAxisAlignment.start,
          children: [
            Expanded(
              child: Padding(
                padding: EdgeInsets.symmetric(horizontal: 10),
                child: GridView.count(
                  crossAxisCount: 2,//固定列数
                  crossAxisSpacing: 8,//列间距
                  mainAxisSpacing: 8,//行间距
                  childAspectRatio: 1.823,//子项的宽高比

                  children: [
                    buildItem(
                      icon: "assets/images/apple.png",
                      title: "红楼梦",
                      subtitle: "作者:曹雪芹",
                      colors: const [Color(0xFF8EE6FE),Color(0xFF2BBDE7)],
                      callback: (){
                        Fluttertoast.showToast(msg: "你点击了红楼梦!!!");
                      }
                    ),

                    buildItem(
                      icon: "assets/images/banana.png",
                      title: "西游戏",
                      subtitle: "作者:吴承恩",
                      colors: const [Color(0xFFFFCC91),Color(0xFFFF8a65)],
                        callback: (){
                          Fluttertoast.showToast(msg: "你点击了西游记!!!");
                        }
                    ),

                    buildItem(
                      icon: "assets/images/cherry.png",
                      title: "水浒传",
                      subtitle: "作者:施耐庵",
                      colors: const [Color(0xFF77FA76),Color(0xFF31F0A3)],
                        callback: (){
                        print("点击事件触发");
                          Fluttertoast.showToast(
                            msg: "你点击了水浒传!!!",

                          );
                        }
                    ),

                    buildItem(
                      icon: "assets/images/mango.png",
                      title: "三国演义",
                      subtitle: "作者:罗贯中",
                      colors: const [Color(0xFFCC9EF7),Color(0xFFA973F0)],
                        callback: (){
                          Fluttertoast.showToast(msg: "你点击了三国演义!!!");
                        }
                    ),


                  ],
                ),
              ),


            ),
          ],
        ),


      ),
    );
点击效果的流程
用户点击 → InkWell检测点击 → 产生波纹动画 → 执行callback函数
代码实例
Dart
import 'package:flutter/cupertino.dart';
import 'package:flutter/material.dart';
import 'package:fluttertoast/fluttertoast.dart';


class HomePage extends StatefulWidget{
  const HomePage({super.key});

  @override
  State<StatefulWidget> createState() => _HomePageState();

}

class _HomePageState extends State<HomePage>{

  //自定义控件
  Widget buildItem({
    required String icon, //图片1
    required String title, //文本1
    required String subtitle,//文本2
    required List<Color> colors,//颜色1
    required VoidCallback callback,//VoidCallback:无参数无返回值的函数类型
}){
    return Container(
      //容器基础样式
      height: 85,
      width: 155,
      decoration: BoxDecoration(
        borderRadius: BorderRadius.circular(10),//圆角
          gradient: LinearGradient(//垂直渐变
            begin: Alignment.topCenter,
              end: Alignment.bottomCenter,
              colors: colors
          ),
      ),

      //使用Material Ink InkWell 组合 点击波纹效果
      //点击效果实现
      child: Material( //提供材质
        color: Colors.transparent,
        child: Ink(//墨水效果容器
          child: InkWell(//实际产生波纹效果的组件
            borderRadius: BorderRadius.circular(10),
            onTap: callback,//点击时传入的回调函数

            //内部布局结构
            child: Padding(
              padding: const EdgeInsets.only(left: 15,top: 12.5,bottom:10,right:15),
              child: Column(
                crossAxisAlignment: CrossAxisAlignment.start,//子组件左对齐
                children: [
                  const Expanded(child: SizedBox()),//弹性撑开空间,Expanded会占据所有可用空间,将后面的Row推向底部
                  Row(
                    mainAxisAlignment: MainAxisAlignment.spaceBetween,//两端对齐
                    children: [
                      //左侧文本列
                      Column(
                        crossAxisAlignment: CrossAxisAlignment.start,
                        children: [
                          Text(title,style: const TextStyle(fontSize:18,fontWeight: FontWeight.bold),),//使用传入的文字1
                          Text(subtitle,style: const TextStyle(color: Colors.white,fontSize: 10),),//使用传入的文字2
                        ],
                      ),
                      //右侧图标
                      Image.asset(icon,width: 40,height: 40,),//使用传入的图片1
                    ],
                  ),
                ],
              ),
            ),
          ),
        ),
      ),
    );
  }

  //UI构建
  @override
  Widget build(BuildContext context) {
    return Scaffold(
      body: Center(
        child: Column(

          mainAxisAlignment: MainAxisAlignment.start,
          children: [
            Expanded(
              child: Padding(
                padding: EdgeInsets.symmetric(horizontal: 10),
                child: GridView.count(
                  crossAxisCount: 2,//固定列数
                  crossAxisSpacing: 8,//列间距
                  mainAxisSpacing: 8,//行间距
                  childAspectRatio: 1.823,//子项的宽高比

                  children: [
                    buildItem(
                      icon: "assets/images/apple.png",
                      title: "红楼梦",
                      subtitle: "作者:曹雪芹",
                      colors: const [Color(0xFF8EE6FE),Color(0xFF2BBDE7)],
                      callback: (){
                        Fluttertoast.showToast(msg: "你点击了红楼梦!!!");
                      }
                    ),

                    buildItem(
                      icon: "assets/images/banana.png",
                      title: "西游戏",
                      subtitle: "作者:吴承恩",
                      colors: const [Color(0xFFFFCC91),Color(0xFFFF8a65)],
                        callback: (){
                          Fluttertoast.showToast(msg: "你点击了西游记!!!");
                        }
                    ),

                    buildItem(
                      icon: "assets/images/cherry.png",
                      title: "水浒传",
                      subtitle: "作者:施耐庵",
                      colors: const [Color(0xFF77FA76),Color(0xFF31F0A3)],
                        callback: (){
                        print("点击事件触发");
                          Fluttertoast.showToast(
                            msg: "你点击了水浒传!!!",

                          );
                        }
                    ),

                    buildItem(
                      icon: "assets/images/mango.png",
                      title: "三国演义",
                      subtitle: "作者:罗贯中",
                      colors: const [Color(0xFFCC9EF7),Color(0xFFA973F0)],
                        callback: (){
                          Fluttertoast.showToast(msg: "你点击了三国演义!!!");
                        }
                    ),


                  ],
                ),
              ),


            ),
          ],
        ),


      ),
    );
  }

}