对无线热点的IP局域网段无要求
在这种情况下,只需要使用nmcli命令创建一个无线AP热点即可:
nmcli device wifi hotspot ifname wlan0 con-name MyHostspot ssid MyHostspotSSID password 12345678说明:
-
con-name:连接名称:这里设置为MyHostspot(可自定义)
-
ssid:创建的AP热点的名称:这里设置为MyHostspotSSID(可自定义)
-
password:创建的AP热点的密码:这里设置为12345678(可自定义)
6.4.2. 对无线热点的IP局域网段有要求
请阅读章节《创建桥接无线AP》
6.5. 创建桥接无线AP热点
6.5.1. 功能需求
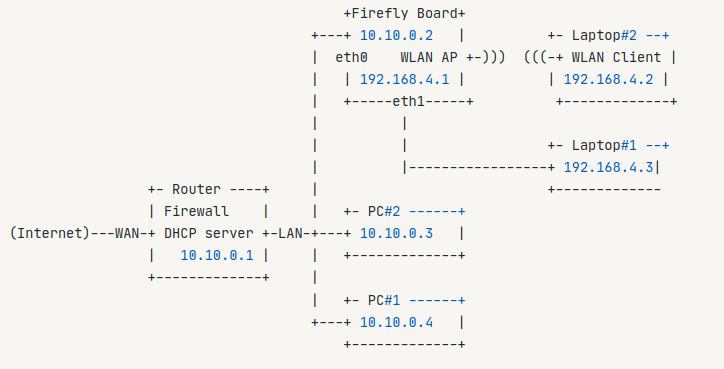
假设有一局域网,网段为10.10.0.0,掩码为255.255.255.0。Firefly的开发板,以下简称Firefly Board,其网口通过路由器Router,获取到本局域网内的动态IP地址:为10.10.0.2。
需求:将系统配置成软路由,具体要求如下:
(1)Firefly Board开启一个无线AP热点,平板和手机等外设通过该无线AP热点访问网络,进行上网。
(2)Firefly Board开启的无线热点局域网为:192.168.4.1
(3)Firefly Board如果有多个网口,要求eth0作为WAN口功能,自动从路由器获取IP地址,eth1作为LAN口功能,能够为接入的设备分配192.168.4.0/24网段的IP地址。
网络拓扑如下:
6.5.2. 安装管理AP热点必要的软件包
安装hostapd:hostapd可以用来模拟软AP,所以是实现该功能必须的:
apt install hostapd允许hostapd开机启动,这样重启之后无线AP热点会自动打开
systemctl unmask hostapd
systemctl enable hostapd安装isc-dhcp-server:isc-dhcp-server用于为接入无线AP的设备自动分配IP地址和DNS服务器地址
apt install isc-dhcp-server 允许isc-dhcp-server开启启动
systemctl enable isc-dhcp-server 安装netfilter-persistent iptables-persistent:用于保存防火墙规则
apt install netfilter-persistent iptables-persistent安装bridge-utils:用于创建虚拟网桥
apt install bridge-utils6.5.3. 配置Netplan
目的是创建网桥br0,网桥IP为192.168.4.1。允许系统eth0网卡分配IP地址,禁止系统为eth1网卡分配IP地址,将eth1网卡绑定到网桥br0。
假设netplan的配置文件为:/etc/netplan/netplan.yaml,内容如下所示:
network:
        version: 2
        renderer: networkd
        ethernets:
                eth0:
                        dhcp4: yes
                eth1:
                        dhcp4: no

        bridges:
                br0:
                        dhcp4: no
                        addresses:
                                - 192.168.4.1/24
                        interfaces:
                                - eth1
接着运行如下命令启用网络配置:
netplan apply6.5.4. 配置hostapd
创建一个hostapd.conf配置文件,用来设置无线热点的名称,密码,信道等属性
vim /etc/hostapd.conf在其中写入如下内容:
country_code=CN
interface=wlan0
bridge=br0
ssid=Example-Wifi-Name
hw_mode=g
channel=11
macaddr_acl=0
auth_algs=1
ignore_broadcast_ssid=0
wpa=2
wpa_passphrase=12345678
wpa_key_mgmt=WPA-PSK
wpa_pairwise=TKIP
rsn_pairwise=CCMP
重要参数说明:
-
country_code:国家码,中国使用CN -
interface:开启无线AP热点的无线网卡 -
bridge:绑定到br0网桥,使得无线AP热点和以太网口在同一个局域网内 -
hw_mode:设置无线模式 -
channel:信道 -
ssid:无线AP名称,这里设置Example-Wifi-Name -
wpa_passphrase:无线AP密码,这里设置为12345678
关于更多,hostapd.conf的配置无疑是非常复杂的,hw_mode支持的模式有a,g,channel信道与hw_mode,country_code等都有关系,这里不再展开。如果需要对这些无线参数进行更自动化且紧密的配置,可以使用OpenWRT软路由系统来代替Ubuntu系统。
接下来,需要配置hostapd的全局配置文件
vim /etc/default/hostapd取消DAEMON_CONF的注释,设置它的值为上面创建的/etc/hostapd.conf
# Defaults for hostapd initscript
#
# See /usr/share/doc/hostapd/README.Debian for information about alternative
# methods of managing hostapd.
#
# Uncomment and set DAEMON_CONF to the absolute path of a hostapd configuration
# file and hostapd will be started during system boot. An example configuration
# file can be found at /usr/share/doc/hostapd/examples/hostapd.conf.gz
#
DAEMON_CONF="/etc/hostapd.conf"

# Additional daemon options to be appended to hostapd command:-
# -d show more debug messages (-dd for even more)
# -K include key data in debug messages
# -t include timestamps in some debug messages
#
# Note that -B (daemon mode) and -P (pidfile) options are automatically
# configured by the init.d script and must not be added to DAEMON_OPTS.
#
#DAEMON_OPTS=""重启hostapd服务
systemctl restart hostapd到此,已经可以通过手机等设备,查看到有一个无线AP热点开启,名称为"Example-Wifi-Name",但是连接之后无法为设备分配IP地址,设备会立即断开。
6.5.5. 配置isc-dhcp-server
isc-dhcp-server 作为一个dhcp服务器,为接入无线AP节点的设备,比如拓扑图中的Laptop1和Laptop2自动分配IP地址和DNS服务器地址。
编辑/etc/dhcp/dhcpd.conf,
vim /etc/dhcp/dhcpd.conf用如下内容进行替换:
# 为设备指定DNS地址,多个DNS使用","隔开
option domain-name-servers 202.96.128.86,202.96.128.166,8.8.8.8,114.114.114.114;
default-lease-time 600;
max-lease-time 7200;
ddns-update-style none; ddns-updates off;

subnet 192.168.4.0 netmask 255.255.255.0 {
    range 192.168.4.2 192.168.4.200;
    option routers 192.168.4.1;
    option broadcast-address 192.168.4.255;
    option subnet-mask 255.255.255.0;
}
重要参数说明:
-
domain-name-servers:DNS服务器地址列表,为接入192.168.4.0/24网段的设备,分配DNS -
subnet 192.168.4.0 netmask 255.255.255.0:定义子网网段192.168.4.0/24 -
range 192.168.4.2 192.168.4.200:分配的IP地址范围 -
option routers 192.168.4.1:默认路由 -
option broadcast-address 192.168.4.255:广播地址 -
option subnet-mask 255.255.255.0:子网掩码
重启isc-dhcp-server,让配置生效:
systemctl restart isc-dhcp-server6.5.6. 开启IP转发
经过如上内容的配置,接入eth1的设备,和连接入无线AP热点的设备,都能获取到192.168.4.0/24网段的IP,且都能ping通192.168.4.1,也可以查看到设备获取到的DNS服务器地址。但是设备还无法访问internet。
开启IP转发
sysctl -w net.ipv4.ip_forward=1设置MASQUERADE(地址欺骗)。MASQUERADE与SNAT作用大致一样,MASQUERADE不用指定明确的IP,会动态的将报文的源地址修改为指定网卡上可用的IP地址。
iptables -t nat -A POSTROUTING -o eth0 -j MASQUERADE注意,这里指定为eth0,让Firefly Board所有的IP包全部转发到eth0,让外设能够进行上网,这里也可以指定为任何能访问外网的网卡,比如4G网卡usb0,wwan0,举一反三。
现在保存 IPv4(包括上面的规则)和 IPv6 的当前防火墙规则,以便在启动时由 netfilter-persistent 服务加载:
netfilter-persistent save