理解ray cluster
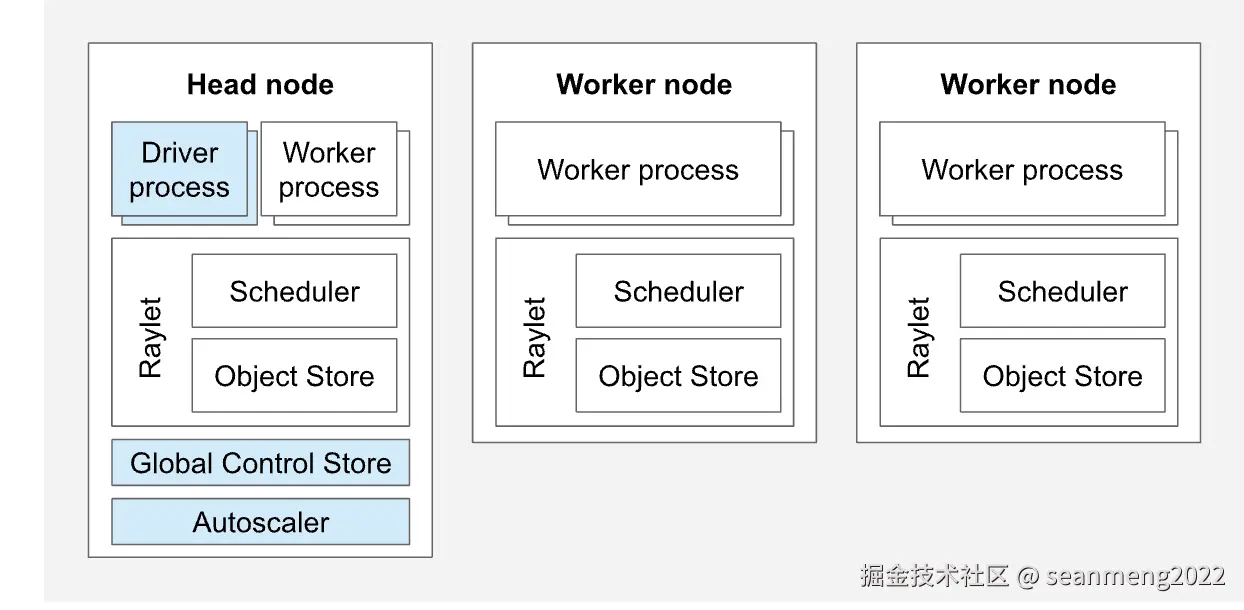
Head Node
每个 Ray 集群都有一个节点被指定为集群的头节点。头节点与其他工作节点相同,不同之处在于它还运行负责集群管理的单例进程,例如自动缩放器、GCS 以及运行 Ray 作业的 Ray 驱动程序进程。
Worker Node
工作节点不运行任何头节点管理进程,仅用于运行 Ray 任务和 Actor 中的用户代码。它们参与分布式调度,以及 Ray 对象在集群内存中的存储和分发。
Autoscaling
Ray Autoscaler是一个在头节点上运行的进程(如果使用 Kubernetes,则作为头 Pod 中的 Sidecar 容器运行)。当 Ray 工作负载的资源需求超过集群的当前容量时,自动扩缩器将尝试增加工作节点的数量。当工作节点处于空闲状态时,自动扩缩器将从集群中移除工作节点。
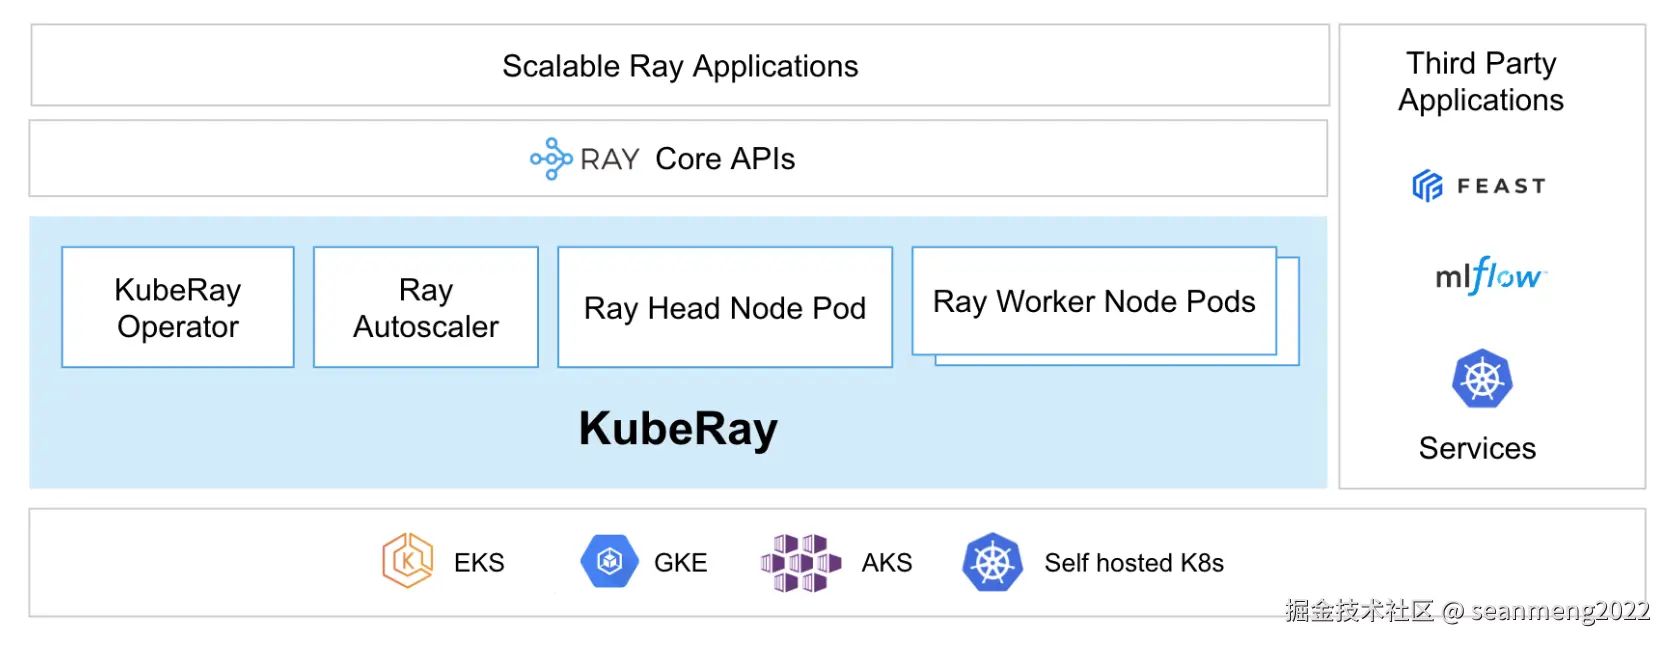
Ray on K8s
推荐使用 KubeRay Operator 来实现这一点。该 Operator 提供了一种 Kubernetes 原生的方式来管理 Ray 集群。每个 Ray 集群由一个头节点 Pod 和一组工作节点 Pod 组成。可选的自动扩缩支持允许 KubeRay Operator 根据 Ray 工作负载的需求调整 Ray 集群的大小,并根据需要添加和删除 Ray Pod。KubeRay 支持异构计算节点(包括 GPU),并且支持在同一个 Kubernetes 集群中运行多个使用不同 Ray 版本的 Ray 集群。
部署KubeRay
安装operator
csharp
helm repo add kuberay https://ray-project.github.io/kuberay-helm/
helm install kuberay-operator kuberay/kuberay-operator --version 1.4.0
验证安装
arduino
kubectl get pod

NAME                                READY   STATUS    RESTARTS   AGE
kuberay-operator-67c6897444-pswq9   1/1     Running   0          33m
为cpu和gpu资源创建karpenter node pool
yaml
apiVersion: karpenter.sh/v1
kind: NodePool
metadata:
  name: cpu-pool
spec:
  template:
    spec:
      requirements:
        - key: kubernetes.io/arch
          operator: In
          values: ["amd64"]
        - key: kubernetes.io/os
          operator: In
          values: ["linux"]
        - key: karpenter.sh/capacity-type
          operator: In
          values: ["on-demand"]
        - key: karpenter.k8s.aws/instance-category
          operator: In
          values: ["c", "m", "r"]
        - key: karpenter.k8s.aws/instance-generation
          operator: Gt
          values: ["2"]
        - key: NodeGroupType
          operator: In
          values: ["x86-cpu-karpenter"]
        - key: type
          operator: In
          values: ["karpenter"]
      nodeClassRef:
        group: karpenter.k8s.aws
        kind: EC2NodeClass
        name: cpu-node-class
      taints: []
      expireAfter: 720h # 30 * 24h = 720h
  limits:
    cpu: 100
    memory: 200Gi
  disruption:
    consolidationPolicy: WhenEmptyOrUnderutilized
    consolidateAfter: 30m
---
apiVersion: karpenter.sh/v1
kind: NodePool
metadata:
  name: gpu-pool
spec:
  template:
    spec:
      requirements:
        - key: kubernetes.io/arch
          operator: In
          values: ["amd64"]
        - key: kubernetes.io/os
          operator: In
          values: ["linux"]
        - key: karpenter.sh/capacity-type
          operator: In
          values: ["on-demand"]
        - key: karpenter.k8s.aws/instance-family
          operator: In
          values: ["g5"]
        - key: karpenter.k8s.aws/instance-size
          operator: In
          values: ["2xlarge", "4xlarge", "8xlarge", "12xlarge", "16xlarge", "24xlarge"]
        - key: NodeGroupType
          operator: In
          values: ["g5-gpu-karpenter"]
        - key: type
          operator: In
          values: ["karpenter"]
      nodeClassRef:
        group: karpenter.k8s.aws
        kind: EC2NodeClass
        name: gpu-node-class
      taints:
        - key: "nvidia.com/gpu"
          effect: "NoSchedule"
      expireAfter: 720h # 30 * 24h = 720h
  limits:
    cpu: 200
    memory: 400Gi
    nvidia.com/gpu: 10
  disruption:
    consolidationPolicy: WhenEmptyOrUnderutilized
    consolidateAfter: 30m
---
apiVersion: karpenter.k8s.aws/v1
kind: EC2NodeClass
metadata:
  name: gpu-node-class
spec:
  amiFamily: AL2023
  amiSelectorTerms:
    - tags:
        karpenter.sh/discovery: "ray-on-eks"
    - name: gpu-ami
    - id: ami-0d86ad7fcc6222c91
  role: "KarpenterNodeRole-ray-on-eks" # 替换为您的集群名称
  subnetSelectorTerms:
    - tags:
        karpenter.sh/discovery: "ray-on-eks" # 替换为您的集群名称
  securityGroupSelectorTerms:
    - tags:
        karpenter.sh/discovery: "ray-on-eks" # 替换为您的集群名称
  blockDeviceMappings:
          - deviceName: /dev/xvda
            ebs:
              volumeSize: 900Gi
              volumeType: gp3
---
apiVersion: karpenter.k8s.aws/v1
kind: EC2NodeClass
metadata:
  name: cpu-node-class
spec:
  amiFamily: AL2023
  amiSelectorTerms:
    - tags:
        karpenter.sh/discovery: "ray-on-eks"
    - name: cpu-ami
    - id: ami-0d395232050cbe374
  role: "KarpenterNodeRole-ray-on-eks" # 替换为您的集群名称
  subnetSelectorTerms:
    - tags:
        karpenter.sh/discovery: "ray-on-eks" # 替换为您的集群名称
  securityGroupSelectorTerms:
    - tags:
        karpenter.sh/discovery: "ray-on-eks" # 替换为您的集群名称
  blockDeviceMappings:
    - deviceName: /dev/xvda
      ebs:
        volumeSize: 900Gi
volumeType: gp3可以看到我们分别创建了CPU和GPU的节点池,并为GPU节点打上了"nvidia.com/gpu"的污点标签。
验证创建结果
vbnet
$ kubectl get nodepools
NAME       NODECLASS        NODES   READY   AGE
cpu-pool   cpu-node-class   0       True    5d23h
gpu-pool   gpu-node-class   1       True    5d23h
在集群安装Nvidia插件
bash
kubectl apply -f https://raw.githubusercontent.com/NVIDIA/k8s-device-plugin/v0.14.0/nvidia-device-plugin.yml使用RayService,部署qwen2.5 7B模型。注意将hf_token替换为自己的hugging face token。
yaml
apiVersion: ray.io/v1
kind: RayService
metadata:
  name: ray-serve-llm
spec:
  serveConfigV2: |
    applications:
    - name: llms
      import_path: ray.serve.llm:build_openai_app
      route_prefix: "/"
      args:
        llm_configs:
        - model_loading_config:
            model_id: qwen2.5-7b-instruct
            model_source: Qwen/Qwen2.5-7B-Instruct
          engine_kwargs:
            dtype: bfloat16
            max_model_len: 1024
            device: auto
            gpu_memory_utilization: 0.75
          deployment_config:
            autoscaling_config:
              min_replicas: 1
              max_replicas: 4
              target_ongoing_requests: 64
            max_ongoing_requests: 128
  rayClusterConfig:
    rayVersion: "2.46.0"
    headGroupSpec:
      rayStartParams:
        num-cpus: "0"
        num-gpus: "0"
      template:
        spec:
          tolerations:
          - key: "nvidia.com/gpu"
            operator: "Exists"
            effect: "NoSchedule"
          containers:
          - name: ray-head
            image: rayproject/ray-llm:2.46.0-py311-cu124
            ports:
            - containerPort: 8000
              name: serve
              protocol: TCP
            - containerPort: 8080
              name: metrics
              protocol: TCP
            - containerPort: 6379
              name: gcs
              protocol: TCP
            - containerPort: 8265
              name: dashboard
              protocol: TCP
            - containerPort: 10001
              name: client
              protocol: TCP
            resources:
              limits:
                cpu: 2
                memory: 4Gi
              requests:
                cpu: 2
                memory: 4Gi
    workerGroupSpecs:
    - replicas: 1
      minReplicas: 1
      maxReplicas: 1
      numOfHosts: 1
      groupName: gpu-group
      rayStartParams:
        num-gpus: "4"
      template:
        spec:
          tolerations:
          - key: "nvidia.com/gpu"
            operator: "Exists"
            effect: "NoSchedule"
          containers:
          - name: ray-worker
            image: rayproject/ray-llm:2.46.0-py311-cu124
            env:
            - name: HUGGING_FACE_HUB_TOKEN
              valueFrom:
                secretKeyRef:
                  name: hf-token
                  key: hf_token
            resources:
              limits:
                cpu: 32
                memory: 32Gi
                nvidia.com/gpu: "4"
              requests:
                cpu: 32
                memory: 32Gi
                nvidia.com/gpu: "4"

---

apiVersion: v1
kind: Secret
metadata:
  name: hf-token
type: Opaque
stringData:
  hf_token: xxxxxxxxxxxxxxxxxxxx
该RayService会创建如下Serive资源:
- ray-serve-llm-head-svc
- 该service指向RayCluster的head pod,作为Ray集群的Head节点,负责集群管理、任务调度和资源分配
- ray-serve-llm-serve-svc
- 该Service暴露Ray Serve的http接口,接口通常为8000。该Service用于接收部署的Serve application请求。
测试部署
swift
$ kubectl port-forward svc/ray-serve-llm-serve-svc 8000:8000

$ curl --location 'http://localhost:8000/v1/chat/completions' --header 'Content-Type: application/json' --data '{
    "model": "qwen2.5-7b-instruct",
    "messages": [
        {
            "role": "system",
            "content": "You are a helpful assistant."
        },
        {
            "role": "user",
            "content": "Provide steps to serve an LLM using Ray Serve."
        }
    ]
}'
{"id":"qwen2.5-7b-instruct-8526c24f-0656-4b82-bada-c52b6d5a9894","object":"chat.completion","created":1761200852,"model":"qwen2.5-7b-instruct","choices":[{"index":0,"message":{"role":"assistant","reasoning_content":null,"content":"Sure! Ray Serve is a high-performance and easy-to-use framework for serving machine learning models in Python. Here are the steps to serve an LLM (Large Language Model) using Ray Serve:\n\n### Step 1: Install Ray and Ray Serve\nFirst, you need to install the Ray library and Ray Serve component. You can do this using pip:\n\n```bash\npip install ray[serve]\n```\n\n### Step 2: Import Necessary Libraries\nImport the required libraries in your Python script:\n\n```python\nimport ray\nfrom ray import serve\n```\n\n### Step 3: Initialize Ray and Ray Serve\nInitialize Ray and Ray Serve. This can be done at the beginning of your script:\n\n```python\n# Start Ray\nray.init()\n\n# Initialize Ray Serve\nserve.init()\n```\n\n### Step 4: Define Your LLM Model\nDefine your language model. This could be a pre-trained model from libraries like Hugging Face or any custom model. Here's an example using Hugging Face's `transformers` library:\n\n```python\nfrom transformers import pipeline\n\n# Load your language model\nllm = pipeline(\"text-generation\", model=\"your-model-name\")\n```\n\n### Step 5: Create a Ray Serve Model Class\nCreate a Ray Serve model class using the `ray.remote` decorator to make it a remote class. This class will define the inference method called by the Ray Serve HTTP endpoint.\n\n```python\n@serve.deployment\nclass LLMModel:\n    def __init__(self, llm):\n        self.llm = llm\n\n    def __call__(self, input_text):\n        # Generate text using the LLM\n        return self.llm(input_text, max_length=200)[0]['generated_text']\n```\n\n### Step 6: Deploy the Model as a Ray Serve Endpoint\nDeploy the Ray Serve model as an HTTP endpoint:\n\n```python\n# Deploy the model\nmodel = LLMModel.bind(llm)\n\n# Create a HTTP endpoint\nllm_endpoint = serve.create_endpoint(\"llm-endpoint\", \"/llm\")\n\n# Deploy the model to the endpoint\nserve.create_backend(model, llm_endpoint)\nserve.create_routes(llm_endpoint)\n```\n\n### Step 7: Make Predictions\nYou can now make predictions by sending HTTP requests to the endpoint. Ray Serve can handle large traffic and can scale automatically.\n\nHere's a simple example of how you might use `requests` to send a text request to the endpoint:\n\n```python\nimport requests\n\n# Define the input text\ninput_text = \"Once upon a time\"\n\n# Make a request to the endpoint\nresponse = requests.post(\"http://localhost:8000/llm\", json={\"text\": input_text})\n\n# Print the response\nprint(response.json()[\"predictions\"])\n```\n\n### Step 8: Scale Horizontally (Optional)\nRay Serve can scale your models horizontally. You can add more replicas to your backend to increase throughput:\n\n```python\nserve.scale(llm_endpoint, 4)  # Scale to 4 replicas\n```\n\n### Step 9: Monitor and Adjust (Optional)\nYou can monitor the performance and health of your services using Ray dashboard:\n\n```python\n# Start the Ray dashboard\nray.init(python superhero=True)\n\nimport ray.dashboard.modules.serve.sdk\nserve_dashboard_actor = ray.get_actor(\" ServeDashboardActor\")\nserve_dashboard_url = ray/dashboard/serve\nprint(f\"Browse to {serve_dashboard_url} for more info.\")\n```\n\n### Conclusion\nThis process will set up a Ray Serve endpoint to serve your language model. You can further customize the model, handle different inference tasks, and scale as needed.","tool_calls":[]},"logprobs":null,"finish_reason":"stop","stop_reason":null}],"usage":{"prompt_tokens":30,"total_tokens":775,"completion_tokens":745,"prompt_tokens_details":null},"prompt_logprobs":null}%