一,使用 Line2 创建线框
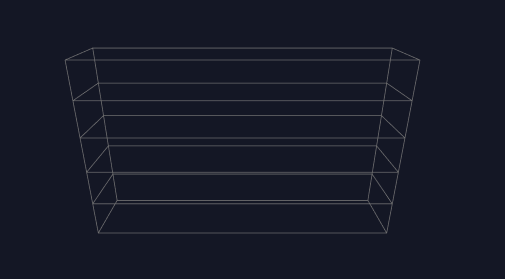
使用 Line2 创建的线段可以修改线段粗细。
javascript
/**
* @description: 根据顶点坐标数组绘制线段
* @return {*}
*/
const createLine = (points: number[], linewidth = 0.8, lineColor = 0x7a7a7a) => {
const geometry = new LineGeometry();
geometry.setPositions(points); // 设置顶点坐标
const material = new LineMaterial({
color: lineColor,
linewidth: linewidth, // 控制粗细
resolution: new THREE.Vector2(canvasRef.value?.offsetWidth, canvasRef.value?.offsetHeight)
});
const line = new Line2(geometry, material);
line.layers.set(0)
state.scene.add(line);
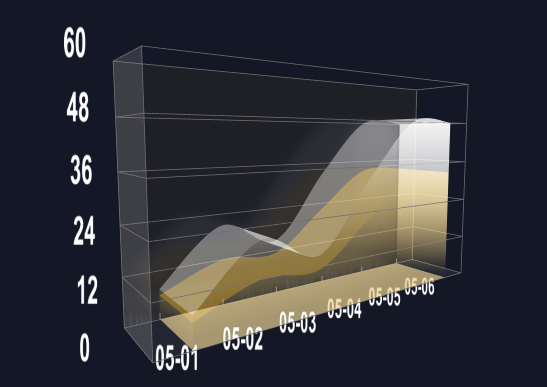
}二,ExtrudeGeometry 创建拉伸几何体
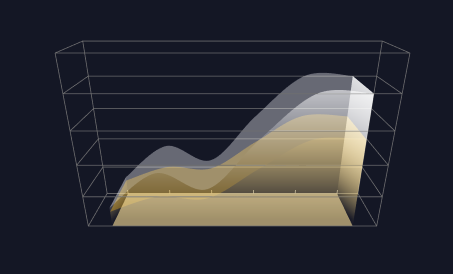
1,获取面积图上方二维点集。
将 y 轴真实数据值转换为三维坐标,其中最重要的是根据真实值获取 y 轴最大值,然后根据 y 轴真实数据最大值和 y 轴分段数计算出 y 轴转换比例。
根据接口返回的数据获取 y 轴最大值 maxValue
根据 y 轴最大值获取 y 轴坐标最大值
javascript
  // 根据当前系列最大值计算坐标轴最大值
    // 获取小数点前面的整数位,字符串
    let tempIntegerStr = '';
    // 先判断最大值是否包含小数
    if(String(maxValue).includes('.')){
      // 包含小数, 向下取整
      tempIntegerStr = String(Math.floor(maxValue));
    }else{
      // 不包含小数, 直接赋值
      tempIntegerStr = String(maxValue);
    }

    // 可以适当缩小tempPower 以控制坐标轴最大值的精确度,分母越大,精确度越高
    // 例如: 默认 tempPower = Math.pow(10, tempIntegerStr.length - 1);
    // 当 tempPower = Math.pow(10, tempIntegerStr.length - 1) / 2 时的坐标轴的最大值精确度就会更高
    // 直到坐标轴的最大值等于数据中的最大值,再增加分母,计算的坐标轴的最大值就不再会改变。
    const tempPower = Math.pow(10, tempIntegerStr.length - 1) / 2;
    // 向上取整,计算坐标轴合适的最大值
    state.yAxisMaxValue = Math.ceil(maxValue / tempPower) * tempPower;
    // 坐标轴最大值保留两位小数
    state.yAxisMaxValue = Number(state.yAxisMaxValue.toFixed(2));
根据 y 轴坐标最大值和三维分段数计算 y 轴转换比例及 x 轴转换比例。
javascript
 // 计算 y 轴三维坐标系与数值转换比例,保留两位小数
    state.yAxisRate = Number(( state.yAxisMaxValue / BoxSize.height).toFixed(2));
    // 计算 x 轴的转换比例,也就是 x 轴每段的长度
    state.xAxisRate = Number((BoxSize.width / state.seriesData[0].data.length).toFixed(2));
获取二维点集
javascript
    // 获取当前系列的二维点集合
    const points = [] as THREE.Vector2[];
    item?.data?.forEach((cItem: DataItem, cIndex: number) => {
      points.push(new THREE.Vector2(cItem.x, cItem.y / state.yAxisRate));
    })
2,生成 shape,使用 shape 创建拉伸几何体
根据 shapeGeometry.boundingBox 可以获取 uv 坐标的取值范围,便于创建渐变 shader
shape 经过拉伸之后形成的几何体共有两个面,一个是前面和后面,一个是经过拉伸形成的面。
javascript
  // 创建二维点集虚线
    const splineCurve = new THREE.SplineCurve(points);
    // 创建 shape
    const shape = new THREE.Shape(splineCurve.getPoints(1000));
    // 连接右平面
    shape.lineTo(points[points.length -1].x, 0);
    // 连接 x 所在的底边
    shape.lineTo(points[0].x, 0);
    // 连接左平面
    shape.lineTo(points[0].x, points[0].y);

    // 拉伸 shape
    const shapeGeometry = new THREE.ExtrudeGeometry(shape, {
      depth: BoxSize.depth,
      step:2,
      bevelEnabled: false,
      curveSegments: 1000,
      bevelThickness: 0.1,
      bevelSegments: 0,
    });

    shapeGeometry.computeBoundingBox();
    console.log('拉伸几何体-----', shapeGeometry.boundingBox, state.scene)

    // 创建材质集合
    const materialList = [gradientShaderMaterial1, gradientShaderMaterial2];
    // const materialList = [colorShaderMaterial, colorShaderMaterial];


    // 创建网格
    const mesh = new THREE.Mesh(shapeGeometry, materialList);
    mesh.name = AreaName.areaGeometryMesh;
    mesh.position.set(0, 0, 0);
    mesh.layers.set(0);
    state.scene.add(mesh);
其中 gradientShaderMaterial1 创建线形渐变,gradientShaderMaterial2 创建居中渐变。
三,使用精灵贴图生成坐标轴文本
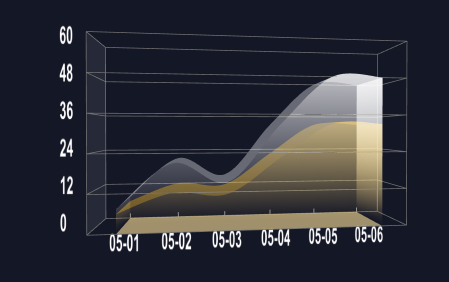
将 canvas 创建的文本作为精灵材质的纹理参数,生成精灵图,会一直面向相机。
javascript
/**
* @description: 创建文本
* @param {*} text
* @param {*} axis
* @return {*}
*/
const createText = (text: string, axis: number[],textPos:number[],scale: number[]) => {
// 创建一个 canvas 元素
const canvas = document.createElement('canvas');
const ctx = canvas.getContext('2d');
ctx.font = 'bold 98px Arial';
ctx.fillStyle = '#ffffff';
// ctx?.fillRect(0, 0, canvas.width, canvas.height);
// ctx.fillStyle = '#ff0000';
ctx.fillText(text, textPos[0], textPos[1]);
// 创建一个纹理
const texture = new THREE.Texture(canvas);
texture.needsUpdate = true;
// 创建一个精灵图材质
const spriteMaterial = new THREE.SpriteMaterial({
map: texture,
// transparent: true,
});
// 创建一个精灵图
const sprite = new THREE.Sprite(spriteMaterial);
sprite.position.set(axis[0], axis[1] - 1, axis[2]);
sprite.scale.set(12, 12, 1);
state.scene.add(sprite);
sprite.layers.set(0);
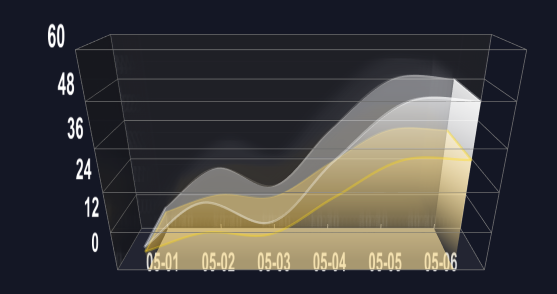
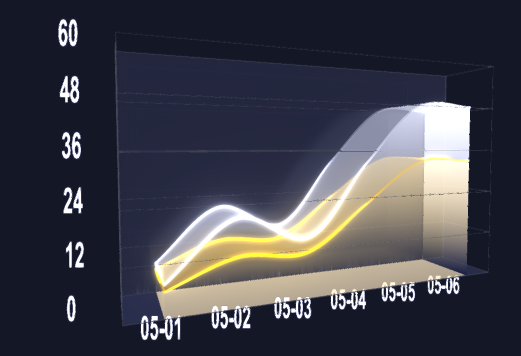
}四,创建带有高斯模糊的镜面反射
在后面、左侧面、底面分别创建镜面
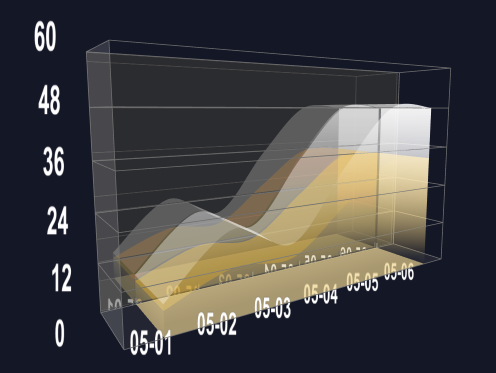
修改 Reflector 源码,添加高斯模糊
javascript
void main() {

			vec4 sum = vec4( 0.0 );

        //纵向高斯模糊
        sum += texture2D( tDiffuse, vec2( vUv.x / vUv.w, ( vUv.y - 4.0 * v) / vUv.w ) ) * (0.051/4.0);
        sum += texture2D( tDiffuse, vec2( vUv.x / vUv.w, ( vUv.y - 3.0 * v ) / vUv.w ) ) * (0.0918/4.0);
        sum += texture2D( tDiffuse, vec2( vUv.x / vUv.w, ( vUv.y - 2.0 * v ) / vUv.w ) ) * (0.12245/4.0);
        sum += texture2D( tDiffuse, vec2( vUv.x / vUv.w, ( vUv.y - 1.0 * v ) / vUv.w ) ) * (0.1531/4.0);
        sum += texture2D( tDiffuse, vec2( vUv.x / vUv.w, vUv.y / vUv.w ) ) * (0.1633/4.0);
        sum += texture2D( tDiffuse, vec2( vUv.x / vUv.w, ( vUv.y + 1.0 * v ) / vUv.w ) ) * (0.1531/4.0);
        sum += texture2D( tDiffuse, vec2( vUv.x / vUv.w, ( vUv.y + 2.0 * v ) / vUv.w ) ) * (0.12245/4.0);
        sum += texture2D( tDiffuse, vec2( vUv.x / vUv.w, ( vUv.y + 3.0 * v ) / vUv.w ) ) * (0.0918/4.0);
        sum += texture2D( tDiffuse, vec2( vUv.x / vUv.w, ( vUv.y + 4.0 * v ) / vUv.w ) ) * (0.051/4.0);

        //横向高斯模糊
        sum += texture2D( tDiffuse, vec2( ( vUv.x - 4.0 * h ) / vUv.w, vUv.y / vUv.w ) ) * (0.051/4.0);
        sum += texture2D( tDiffuse, vec2( ( vUv.x - 3.0 * h ) / vUv.w, vUv.y / vUv.w ) ) * (0.0918/4.0);
        sum += texture2D( tDiffuse, vec2( ( vUv.x - 2.0 * h ) / vUv.w, vUv.y / vUv.w ) ) * (0.12245/4.0);
        sum += texture2D( tDiffuse, vec2( ( vUv.x - 1.0 * h ) / vUv.w, vUv.y / vUv.w ) ) * (0.1531/4.0);
        sum += texture2D( tDiffuse, vec2( vUv.x / vUv.w, vUv.y / vUv.w ) ) * (0.1633/4.0);
        sum += texture2D( tDiffuse, vec2( ( vUv.x + 1.0 * h ) / vUv.w, vUv.y / vUv.w ) ) * (0.1531/4.0);
        sum += texture2D( tDiffuse, vec2( ( vUv.x + 2.0 * h ) / vUv.w, vUv.y / vUv.w ) ) * (0.12245/4.0);
        sum += texture2D( tDiffuse, vec2( ( vUv.x + 3.0 * h ) / vUv.w, vUv.y / vUv.w ) ) * (0.0918/4.0);
        sum += texture2D( tDiffuse, vec2( ( vUv.x + 4.0 * h ) / vUv.w, vUv.y / vUv.w ) ) * (0.051/4.0);
}
五,编写流动 shader
1,获取三维点集使用THREE.CatmullRomCurve3,THREE.TubeGeometry 创建外轮廓
javascript
  /**
     * @description: 根据点集和颜色创建单条外轮廓线,并将网格返回
     * @param {*} points 三维点集
     * @param {*} color 颜色
     * @return {THREE.Mesh}
     */
     const createSingleOutLine = (points:any, color:THREE.Color, name = 'outLine') => {
      // 首先根据点集创建曲线路径
      const outlinePath = new THREE.CatmullRomCurve3(points);
      // 然后根据路径创建管道
      const outlineTubeGeometry = new THREE.TubeGeometry(outlinePath, 100, 0.3, 100, false);
      // 添加材质
      const outlineMaterial = new THREE.MeshBasicMaterial({
        color,
        transparent: true,
        opacity: 0.2,
        side: THREE.DoubleSide, // 两面都可见
        depthWrite: false,
      });
      // 添加网格
      const outlineMesh = new THREE.Mesh(outlineTubeGeometry, outlineMaterial);
      outlineMesh.name = name;
      outlineMesh.layers.set(0);
      // 添加进场景
      state.scene.add(outlineMesh);

      // 返回网格,有助于进行保存,进行显示隐藏操作
      return outlineMesh;
    };
2,编写居中渐变 shander 并传入时间参数使其流动起来
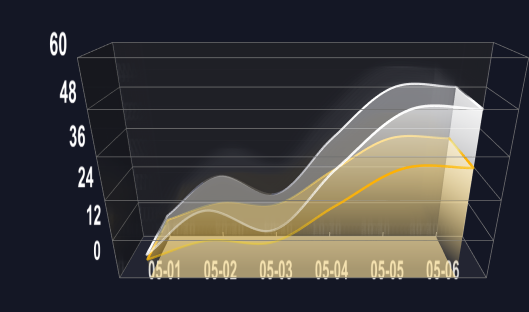
使用 THREE.TubeGeometry 创建管道几何体传入 shader 材质,修改时间参数即可。
javascript
  /**
   * @description: 绘制发光线路
   * @param {*} points   发光路线的三维点集
   * @param {*} material  发光轮廓线材质
   * @return {*}
   */
    const drawLightLine = (points:THREE.Vector3, material:THREE.ShaderMaterial) => {
    const linePath = new THREE.CatmullRomCurve3(points);
    const lineGeometry = new THREE.TubeGeometry(linePath, 100, 0.3, 100, false);
    const lineMesh = new THREE.Mesh(lineGeometry, material);
    // 将发光物体网格设置到图层 1 上
    lineMesh.layers.set(1);
    state.scene.add(lineMesh);
    return lineMesh;
  };
javascript
  state.highlightMaterials[item.key] = new THREE.ShaderMaterial({
      transparent: true,
          side: THREE.DoubleSide,
          // color: 0xcdcccc,
          uniforms: {
            time: { value: 0.0 }, // 运动时间
            len: { value: 0.5 }, // 运动点距离范围
            size: { value: 0.5 }, // 管道增加宽度
            uDirection: { value: 0 },
            uColor: { value: new THREE.Color(item.color) },
            uSpeed: { value: 1.0 },
            uFade: { value: new THREE.Vector2(0, 0.8) },
          },
          vertexShader: `varying vec2 vUv;
                        void main(void) {
                            vUv = uv;
                            gl_Position = projectionMatrix * modelViewMatrix * vec4(position, 1.0);
                        }`,
          // 片元着色器
          fragmentShader: `
            varying vec2 vUv;
              uniform float uSpeed;
              uniform float time;
              uniform vec2 uFade;
              uniform vec3 uColor;
              uniform float uDirection;
              void main() {
                  vec3 color = uColor;

                //流动方向
                  float s = time * uSpeed;
                  float v = 0.0;
                  if(uDirection == 1.0) {
                      v = vUv.x;
                  } else {
                      v = -vUv.x;
                  }

                  float d = mod((v + s), 1.0);
                  if(d > uFade.y){
                  discard;
                  } else {
                      float alpha = 0.0;
                      if( d <= uFade.y / 2.0){
                       //平滑透明度渐变
                      alpha = smoothstep(uFade.x, uFade.y, d*2.0);
                      } else {
                       alpha = smoothstep(uFade.y, uFade.x,  (d - (uFade.y / 2.0)) * 2.0);
                      }

                      //透明度太小时不显示
                      if(alpha < 0.001)
                          discard;
                      gl_FragColor = vec4(color, alpha);
                  }
              }`,
    })
需要注意的是如果使用 requestAnimationFrame 修改时间参数时会出现在不同的显示器中光效流动速度不一致的情况。
因为 requestAnimationFrame 的执行速度和显示器的刷新率保持一致,所以需要根据不同的屏幕刷新率设置合适的时间增加速度。
javascript
    /**
    * @description: 添加动画
    * @return {*}
    */
    const animateAction = () => {
      state.endTime = state.startTime;
      state.startTime = performance.now();
      state.intervalTime = ( state.startTime - state.endTime ) / 1000;
      // 计算每秒执行多少次保留0位小数
      const fps = Math.round(1 / state.intervalTime);
      let tSpeed = 0.005;
      if(fps < 60){
        tSpeed *= 2;
      }
      if (state.highlightMaterials[props.data[0]?.key] && state.highlightMaterials[props.data[1]?.key]) {
        state.highlightMaterials[props.data[0]?.key].uniforms.time.value += tSpeed;
        state.highlightMaterials[props.data[1]?.key].uniforms.time.value += tSpeed;
        if (state.highlightMaterials[props.data[0]?.key].uniforms.time.value > 1) {
          state.highlightMaterials[props.data[0]?.key].uniforms.time.value = 0;
        }

        if (state.highlightMaterials[props.data[1]?.key].uniforms.time.value > 1) {
          state.highlightMaterials[props.data[1]?.key].uniforms.time.value = 0;
        }
      }
    };
六,UnrealBloomPass 实现局部辉光后期效果
通过创建两个后期处理组合器,bloomComposer 负责渲染辉光材质,finallyComposer 负责最后的后期处理渲染。并将辉光网格和普通几何体网格分别放到不同的图层中渲染,从而达到局部辉光效果
javascript
/**
 * @description: 动画
 * @return {*}
 */
 const render = () =>{
  state.controls.update();
  state.renderer.autoClear = false;
  state.renderer.clear();
  state.camera.layers.set(1);
  state.bloomComposer?.render();

  state.renderer.clearDepth();
  state.camera.layers.set(0);
  state.finallyComposer?.render();

  // state.renderer?.render(state.scene, state.camera);
  state.renderer.autoClear = true;

  requestAnimationFrame(animate);
  animateAction()
}
使用 shaderPass 叠加辉光图层和普通图层,需要过滤背景色防止场景设置的背景色被改变
javascript
/**
 * @description: 添加后期处理
 * @return {*}
 */
const createPostProcessing = () => {
  // 添加基础渲染通道
  const renderPass = new  RenderPass(state.scene, state.camera);
  const bloomPass = new UnrealBloomPass(
    new THREE.Vector2(canvasRef.value?.offsetWidth, canvasRef.value?.offsetHeight),
    10,
    12,
    2
  )

  bloomPass.threshold = state.params.threshold;
  bloomPass.strength = state.params.strength;
  bloomPass.radius = state.params.radius;


  const outputPass = new OutputPass();
  // 添加辉光效果组合器
  state.bloomComposer = new EffectComposer(state.renderer);
  state.bloomComposer.setSize(canvasRef.value?.offsetWidth * 2, canvasRef.value?.offsetHeight * 2);
   // 创建最终效果组合器
   state.finallyComposer = new EffectComposer(state.renderer);
   state.finallyComposer.setSize(canvasRef.value?.offsetWidth * 2, canvasRef.value?.offsetHeight * 2);

  const mixPass = new ShaderPass(
        new THREE.ShaderMaterial({
          uniforms: {
            baseTexture: { value: null },
            bloomTexture: { value: state.bloomComposer.renderTarget2.texture },
            bgColor: { value: new THREE.Color(0x14172a) },
          },
          vertexShader: `
         varying vec2 vUv;

        void main() {

          vUv = uv;

          gl_Position = projectionMatrix * modelViewMatrix * vec4( position, 1.0 );

        }`,
          fragmentShader: `
               uniform sampler2D baseTexture;
                uniform sampler2D bloomTexture;
                uniform vec3 bgColor;
                varying vec2 vUv;
                void main() {
                vec4 base_color = texture2D(baseTexture, vUv);
                vec4 bloom_color = texture2D(bloomTexture, vUv);
                // 定义颜色比较阈值
                float threshold = 0.001;

                float lum = 0.21 * bloom_color.r + 0.71 * bloom_color.g + 0.07 * bloom_color.b;
                if(abs(0.078 - base_color.r)< threshold && abs(0.090 - base_color.g)< threshold && abs(0.165 - base_color.b)< threshold){
                  gl_FragColor = vec4(base_color.rgb, max(base_color.a, lum));
                }else{
                   gl_FragColor = vec4(base_color.rgb + bloom_color.rgb, max(base_color.a, lum));
                }

                // if(abs(0.0 - base_color.r)< threshold && abs(0.0 - base_color.g)< threshold && abs(0.0 - base_color.b)< threshold){
                //   // 输出背景色
                //    gl_FragColor = vec4(bloom_color.rgb, 1.0);
                // }else{
                //    gl_FragColor = vec4(base_color.rgb + bloom_color.rgb, 1.0);
                // }

                  // gl_FragColor = vec4(bloom_color.rgb, 1.0);
                }
          `,
          defines: {},
        }),
        'baseTexture',
      );

      mixPass.renderToScreen = true;
      mixPass.needsSwap = true;

  state.bloomComposer.addPass(renderPass);
  state.bloomComposer.addPass(bloomPass);

  state.bloomComposer.addPass(mixPass);
  state.bloomComposer.addPass(outputPass);

  const finallyRenderPass = new RenderPass(state.scene, state.camera);

  state.finallyComposer.addPass( finallyRenderPass);
  // 时域抗锯齿
  const taaRenderPass = new TAARenderPass(state.scene, state.camera);
  // taaRenderPass.accumulate = true;
  taaRenderPass.sampleLevel = 2;
  // state.finallyComposer.addPass(taaRenderPass);

  state.finallyComposer.addPass(mixPass);

  // 增加抗锯齿后期处理通道
  const fxaaPass = new ShaderPass(FXAAShader);
  fxaaPass.uniforms['resolution'].value.set(1 / canvasRef.value?.offsetWidth, 1 / canvasRef.value?.offsetHeight);
  state.finallyComposer.addPass(fxaaPass);

}
七,平面坐标、三维坐标转换
先将鼠标坐标转换为三维坐标,然后使用 THREE.Raycaster 获取鼠标碰撞物体交点的坐标,
javascript
/**
 * @description: 鼠标移动事件
 * @return {*}
 */
const canvasMouseMove = (event: MouseEvent) =>{
  event.preventDefault;

  const bounding = canvasRef.value?.getBoundingClientRect();
  const mouse = new THREE.Vector2();
  // 将鼠标位置转换为归一化设备坐标
  mouse.x = ((event.clientX - bounding.left) / bounding.width) * 2 - 1;
  mouse.y = -((event.clientY - bounding.top) / bounding.height) * 2 + 1;
  const raycaster = new THREE.Raycaster();
  raycaster.setFromCamera(mouse, state.camera);
  const intersects = raycaster.intersectObjects(state.scene.children, true);
  if(intersects.length > 0){
    console.log('鼠标碰撞物体------', intersects)
    const intersect = intersects[0];
      const { point } = intersect;
      if(point.x && intersect){
        let helfStepNums = Math.ceil(point.x / state.xAxisRate * 2);
        if(helfStepNums % 2 == 0){
        helfStepNums -=1;
        }
        if(helfStepNums < 0) return;
        state.leftPlaneMesh.position.x = helfStepNums * state.xAxisRate / 2;
      }
  }
}
八,监听窗口变化,添加响应式设置
javascript
/**
 * @description: 窗口尺寸发生变化时的处理函数
 * @return {*}
 */
const viewResizeHandle = () => {
  if(canvasRef.value){
    // 当窗口改变时调整画布宽高
    canvasRef.value.style.width = '55%';
    canvasRef.value.style.height = '50%';

    state.camera.aspect = canvasRef.value.offsetWidth / canvasRef.value.offsetHeight;
    state.camera.updateProjectionMatrix();
    state.renderer.setSize(canvasRef.value.offsetWidth, canvasRef.value.offsetHeight);
    state.renderer.render(state.scene, state.camera);
  }
}