目录
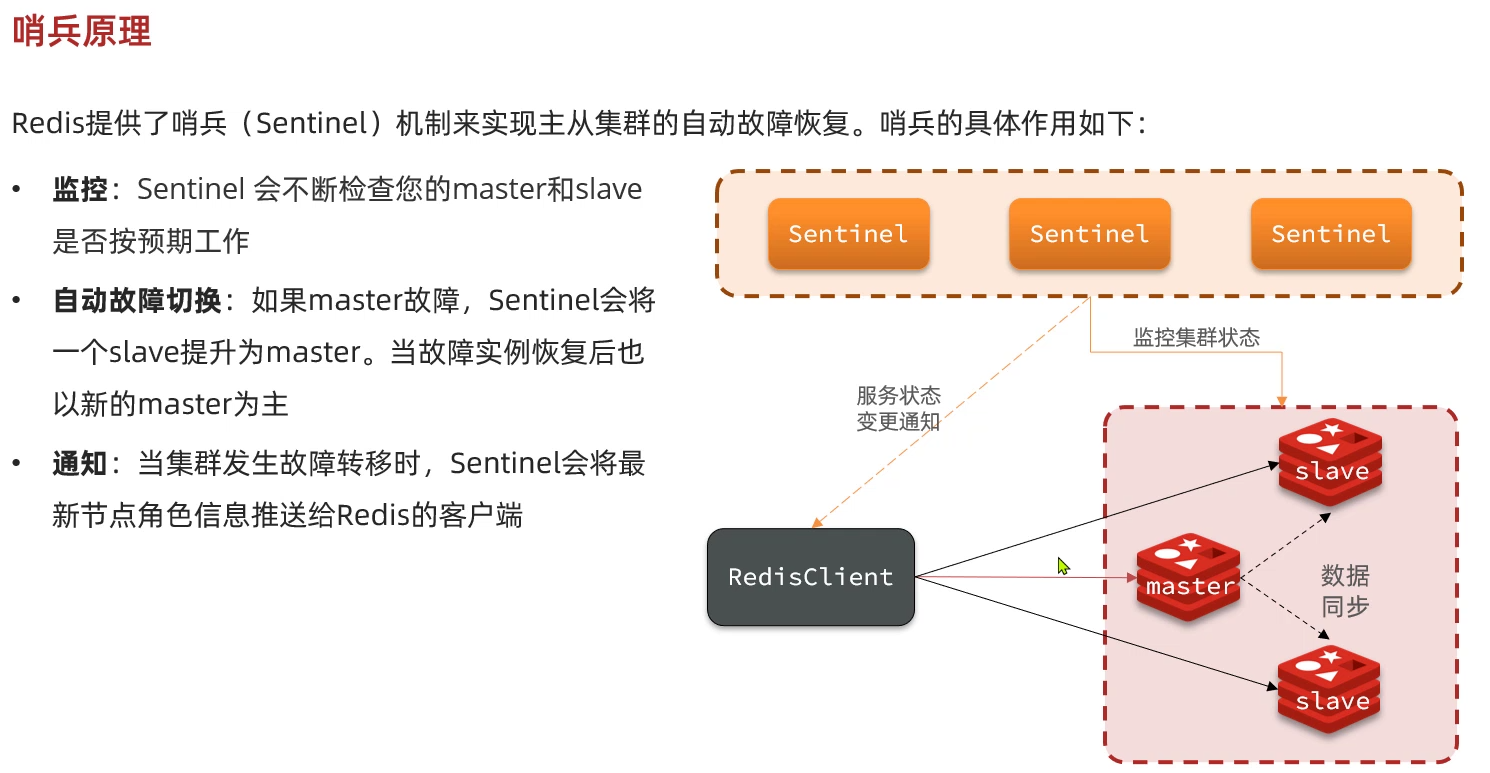
一、哨兵原理
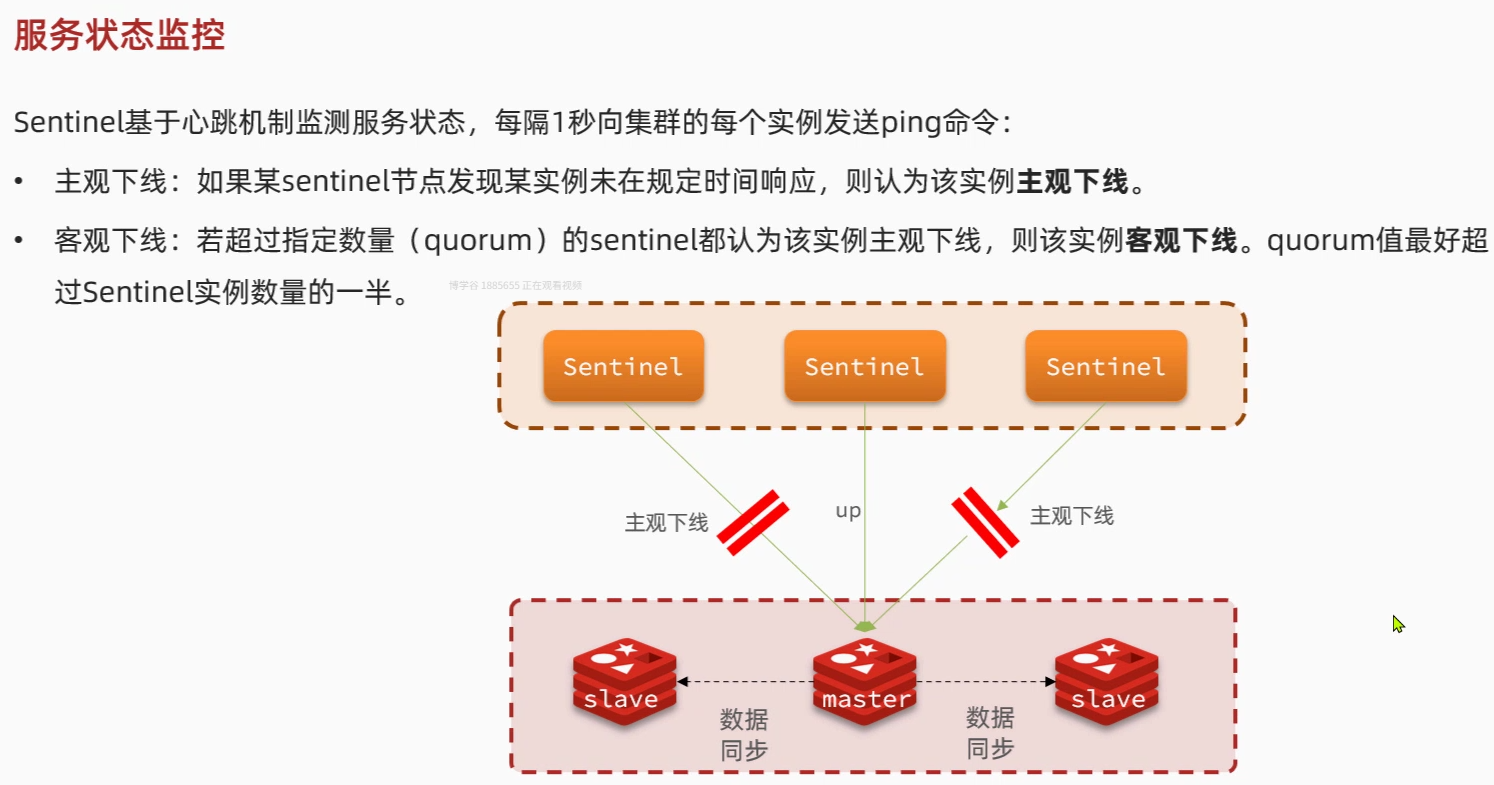
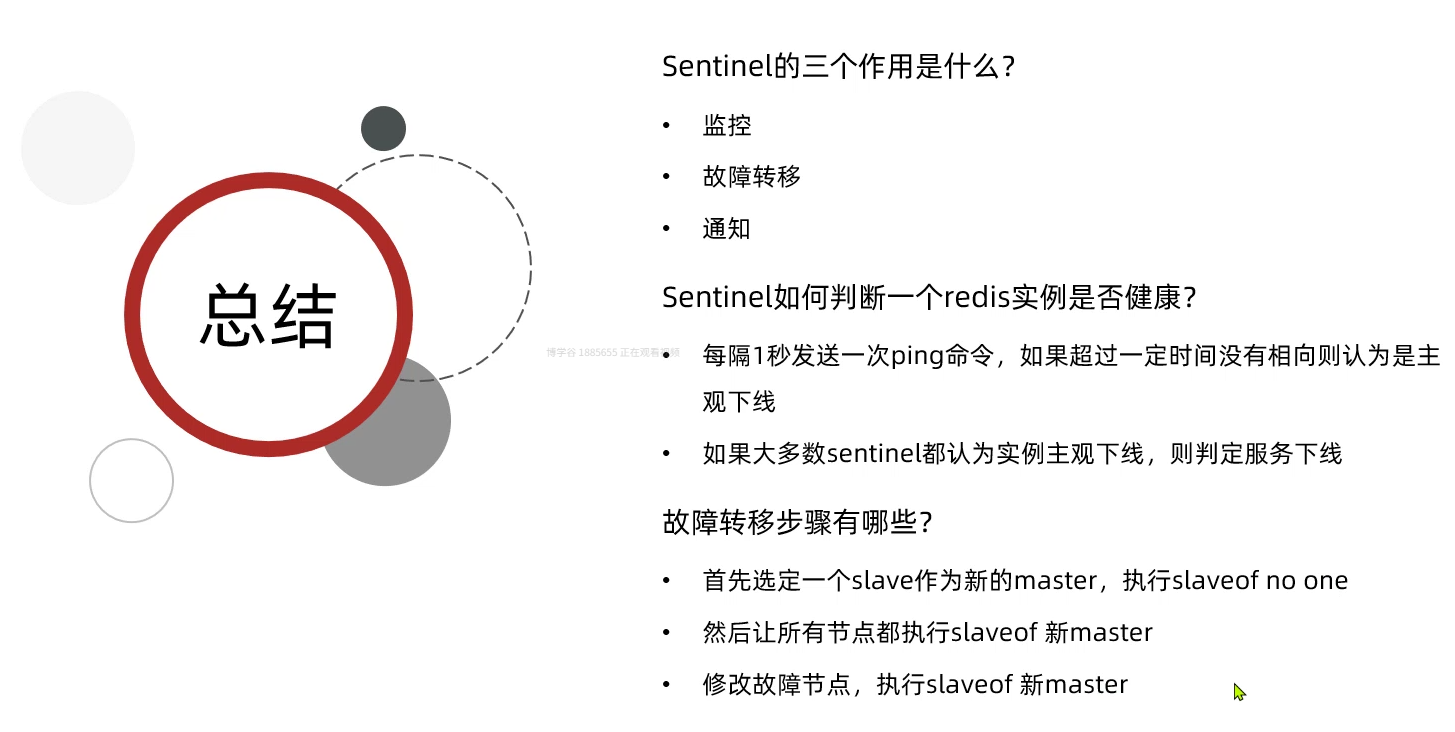
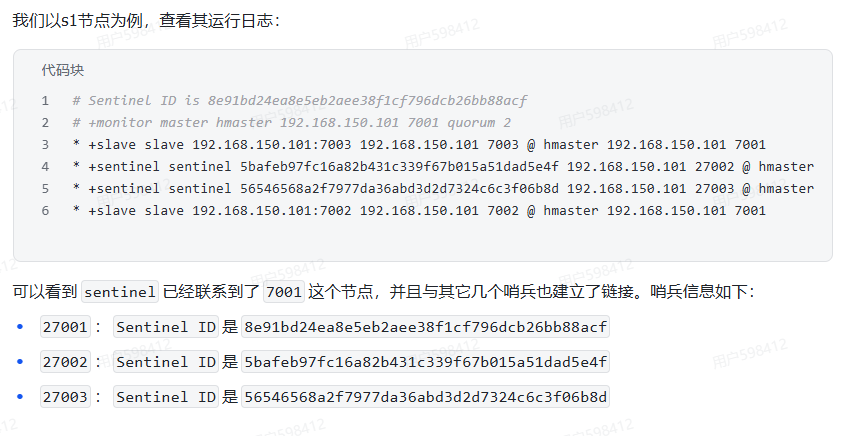
服务状态监控:
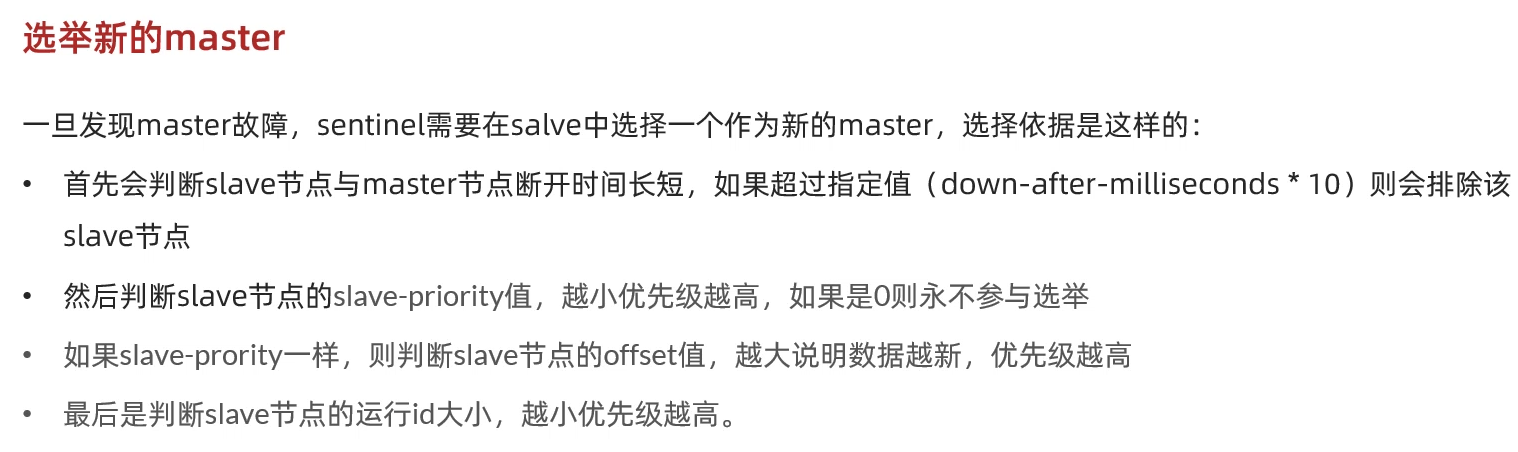
选举新的master:
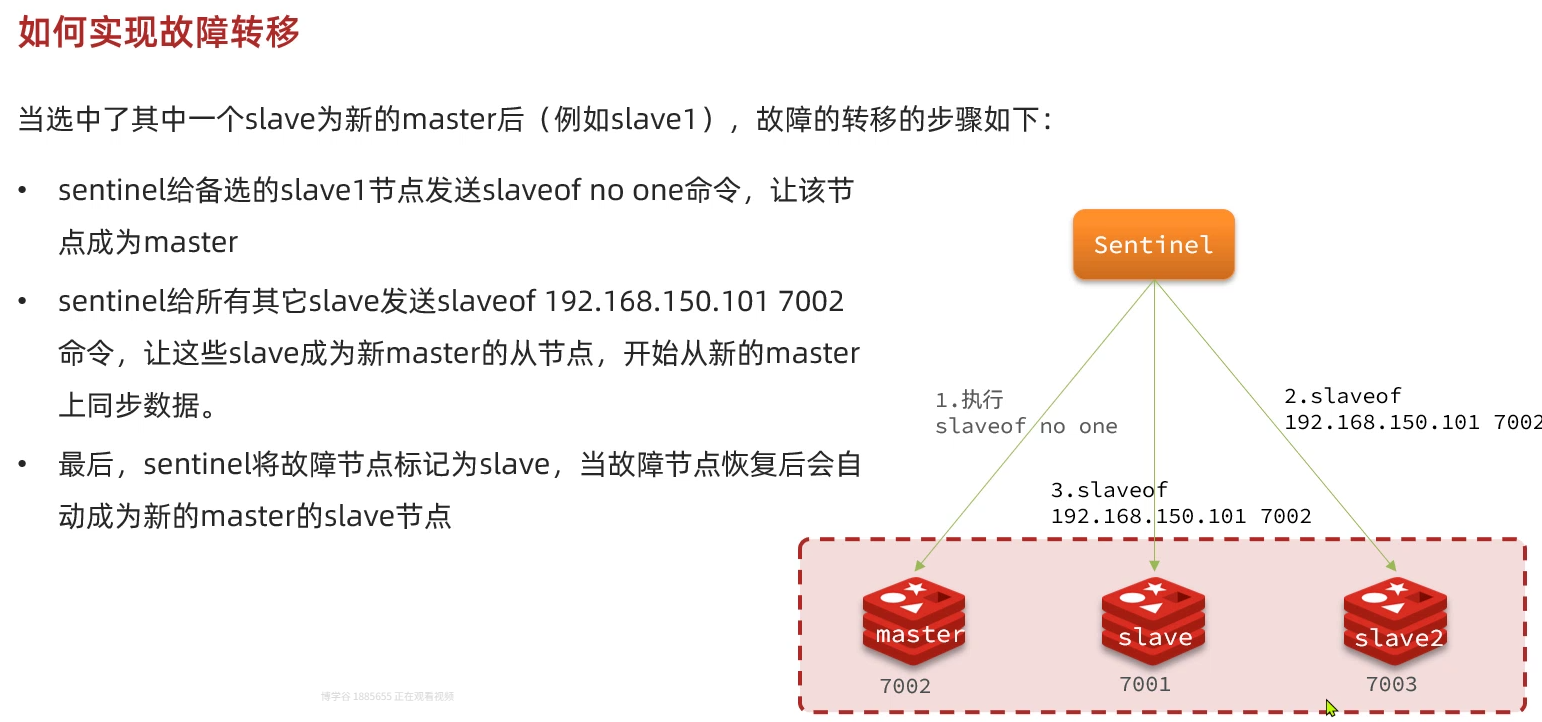
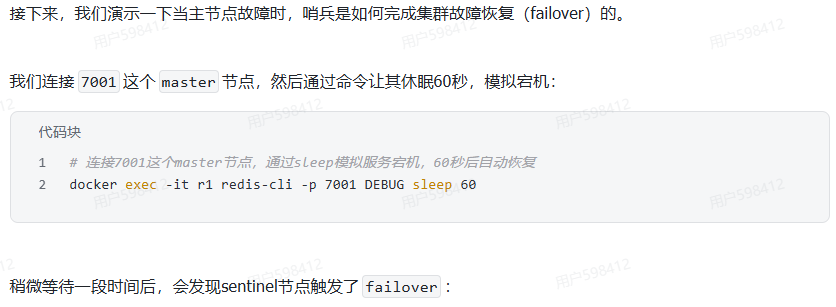
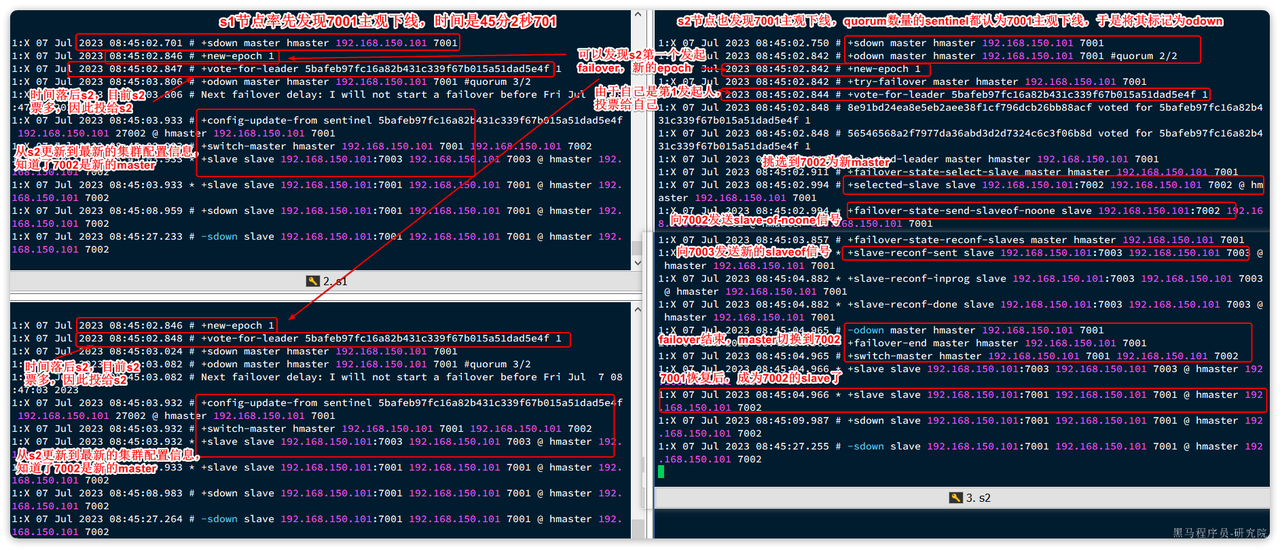
如何实现故障转移:
哨兵原理总结:
二、搭建哨兵集群
接下来我们开始手动搭建哨兵集群:
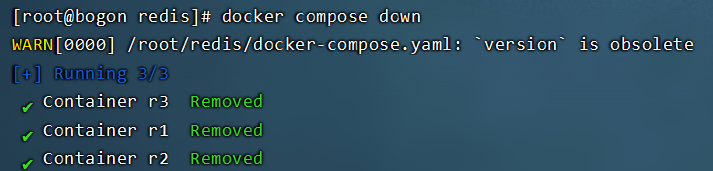
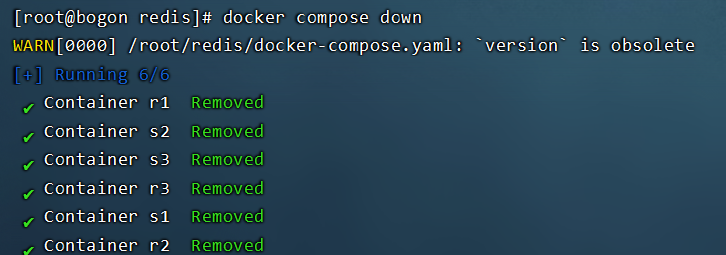
1.通过docker compose down指令关闭redis主从集群:
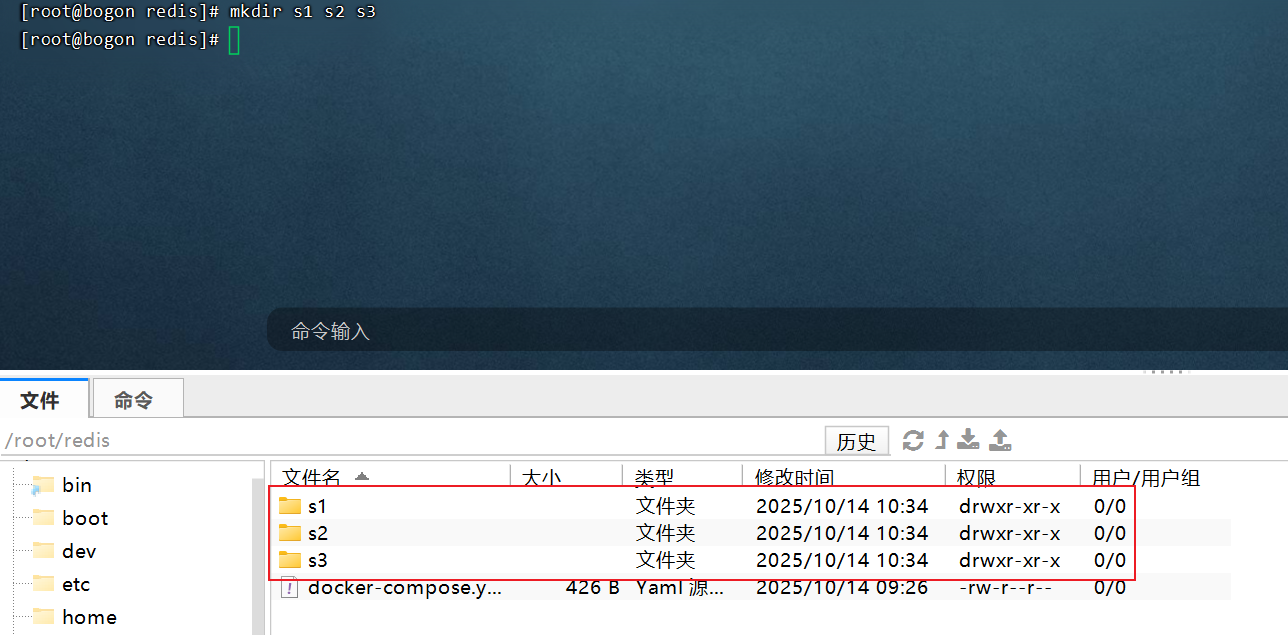
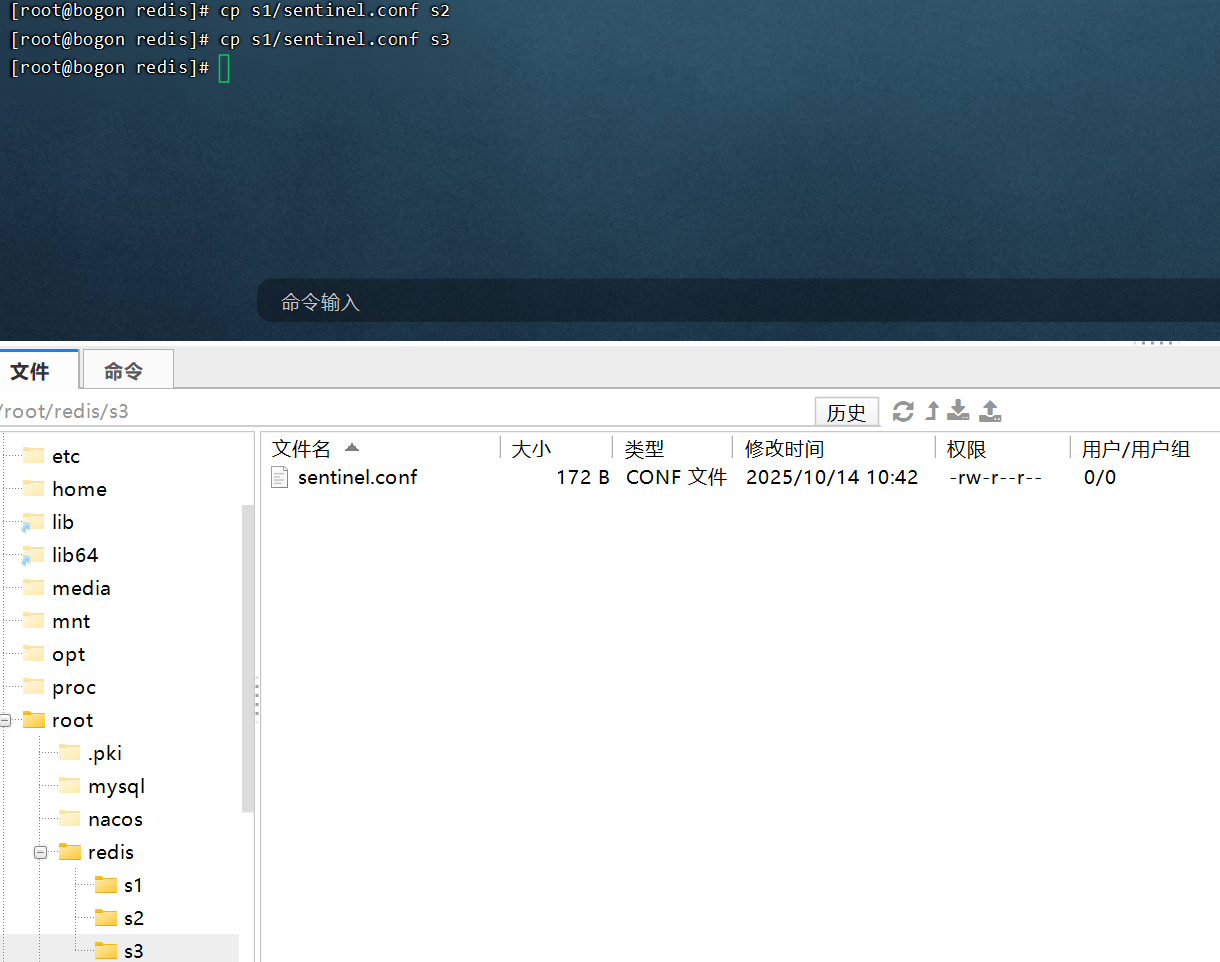
2.为三个哨兵创建各自的文件夹mkdir s1 s2 s3:
3.拷贝sentinel.conf配置文件到虚拟机当中,内容如下:
bash
sentinel announce-ip "192.168.150.101" #虚拟机ip
sentinel monitor hmaster 192.168.150.101 7001 2 #告诉哨兵master的地址端口以及客观下线的quorum值
sentinel down-after-milliseconds hmaster 5000 #哨兵认为master宕机的连接超时时间
sentinel failover-timeout hmaster 60000 #哨兵对死去的master进行故障恢复的间隔时间,即每分钟进行连接重试
4.通过cp s1/sentinel.conf s2来快速拷贝文件:
5.修改原先的yml文件内容:
TypeScript
version: "3.2"

services:
  r1:
    image: redis:6.2.7
    container_name: r1
    network_mode: "host"
    entrypoint: ["redis-server", "--port", "7001"]
  r2:
    image: redis:6.2.7
    container_name: r2
    network_mode: "host"
    entrypoint: ["redis-server", "--port", "7002", "--slaveof", "192.168.150.101", "7001"]
  r3:
    image: redis:6.2.7
    container_name: r3
    network_mode: "host"
    entrypoint: ["redis-server", "--port", "7003", "--slaveof", "192.168.150.101", "7001"]
  s1:
    image: redis:6.2.7
    container_name: s1
    volumes:
      - /root/redis/s1:/etc/redis
    network_mode: "host"
    entrypoint: ["redis-sentinel", "/etc/redis/sentinel.conf", "--port", "27001"]
  s2:
    image: redis:6.2.7
    container_name: s2
    volumes:
      - /root/redis/s2:/etc/redis
    network_mode: "host"
    entrypoint: ["redis-sentinel", "/etc/redis/sentinel.conf", "--port", "27002"]
  s3:
    image: redis:6.2.7
    container_name: s3
    volumes:
      - /root/redis/s3:/etc/redis
    network_mode: "host"
    entrypoint: ["redis-sentinel", "/etc/redis/sentinel.conf", "--port", "27003"]
然后通过docker compose up -d指令启动:

这样我们就搭建好了哨兵集群
接下来我们来分析一下整个过程:
三、Redis分片
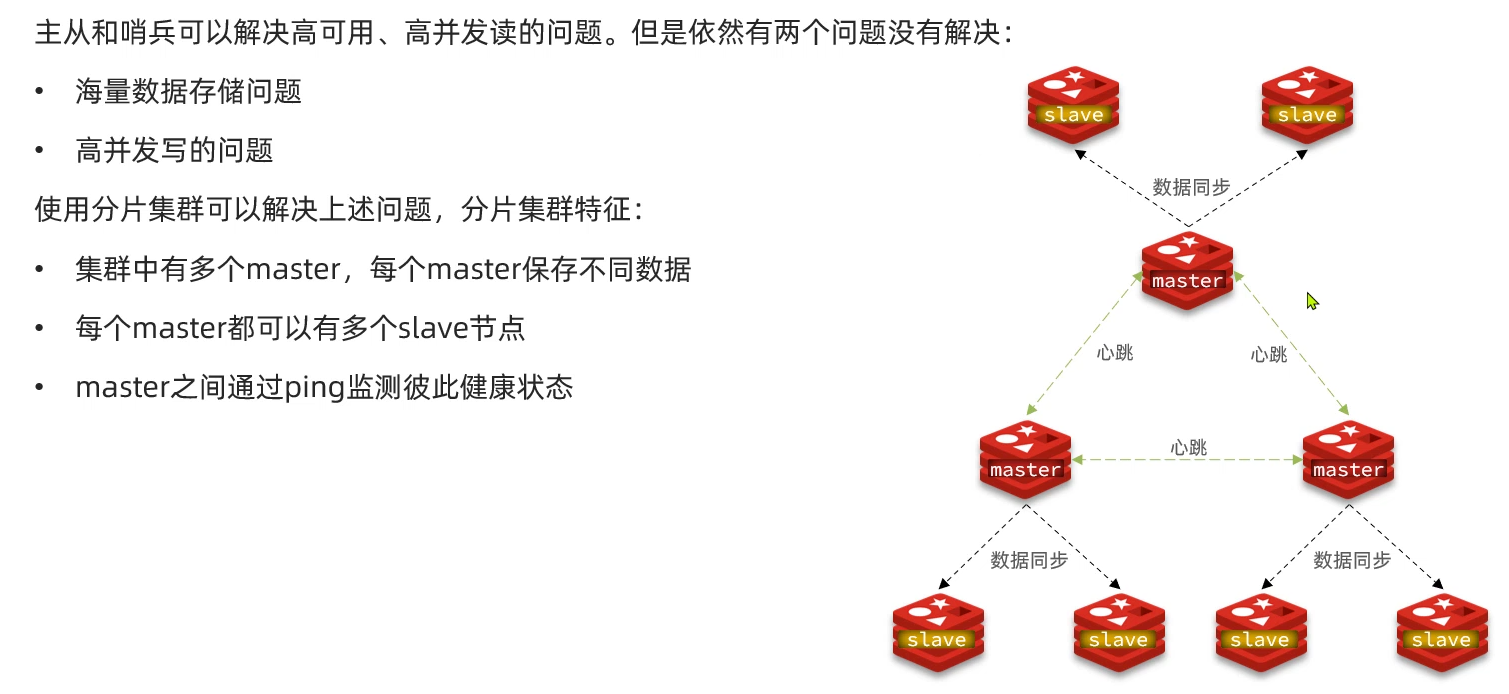
搭建分片集群:
1.在root目录下新建redis-cluster文件夹并添加yml配置文件,内容如下:
TypeScript
version: "3.2"
services:
r1:
image: redis:6.2.7
container_name: r1
network_mode: "host"
entrypoint: ["redis-server", "--port", "7001", "--cluster-enabled", "yes", "--cluster-config-file", "node.conf"]
r2:
image: redis:6.2.7
container_name: r2
network_mode: "host"
entrypoint: ["redis-server", "--port", "7002", "--cluster-enabled", "yes", "--cluster-config-file", "node.conf"]
r3:
image: redis:6.2.7
container_name: r3
network_mode: "host"
entrypoint: ["redis-server", "--port", "7003", "--cluster-enabled", "yes", "--cluster-config-file", "node.conf"]
r4:
image: redis:6.2.7
container_name: r4
network_mode: "host"
entrypoint: ["redis-server", "--port", "7004", "--cluster-enabled", "yes", "--cluster-config-file", "node.conf"]
r5:
image: redis:6.2.7
container_name: r5
network_mode: "host"
entrypoint: ["redis-server", "--port", "7005", "--cluster-enabled", "yes", "--cluster-config-file", "node.conf"]
r6:
image: redis:6.2.7
container_name: r6
network_mode: "host"
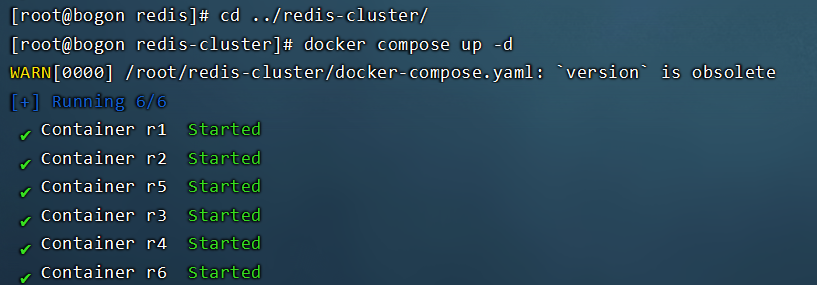
entrypoint: ["redis-server", "--port", "7006", "--cluster-enabled", "yes", "--cluster-config-file", "node.conf"]然后手动关闭原先搭建好的哨兵集群(指令:docker compose down):
接着来到redis-cluster文件夹下通过docker compose up -d指令启动集群:
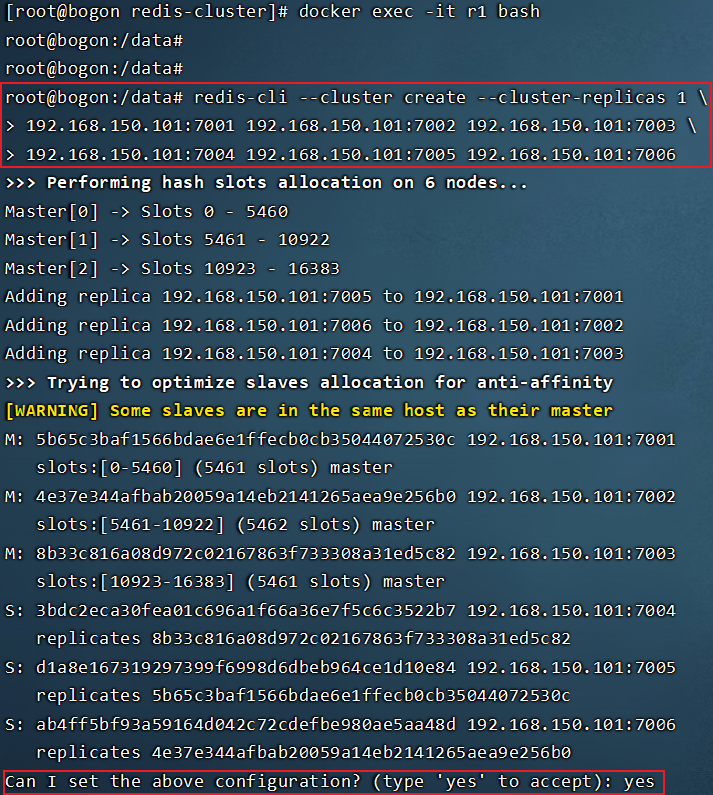
2.此时只是创建好了六个容器,它们之间并没有分片或者集群关系,所以我们接下来要配置分片集群关系:
bash
# 进入任意节点容器
docker exec -it r1 bash
# 然后,执行命令
redis-cli --cluster create --cluster-replicas 1 \
192.168.150.101:7001 192.168.150.101:7002 192.168.150.101:7003 \
192.168.150.101:7004 192.168.150.101:7005 192.168.150.101:7006
命令说明:
-
redis-cli --cluster:代表集群操作命令 -
create:代表是创建集群 -
--cluster-replicas 1:指定集群中每个master的副本个数为1- 此时
节点总数 ÷ (replicas + 1)得到的就是master的数量n。因此节点列表中的前n个节点就是master,其它节点都是slave节点,随机分配到不同master
- 此时
随后,虚拟机会询问你是否接收配置结果,输入yes完成配置:
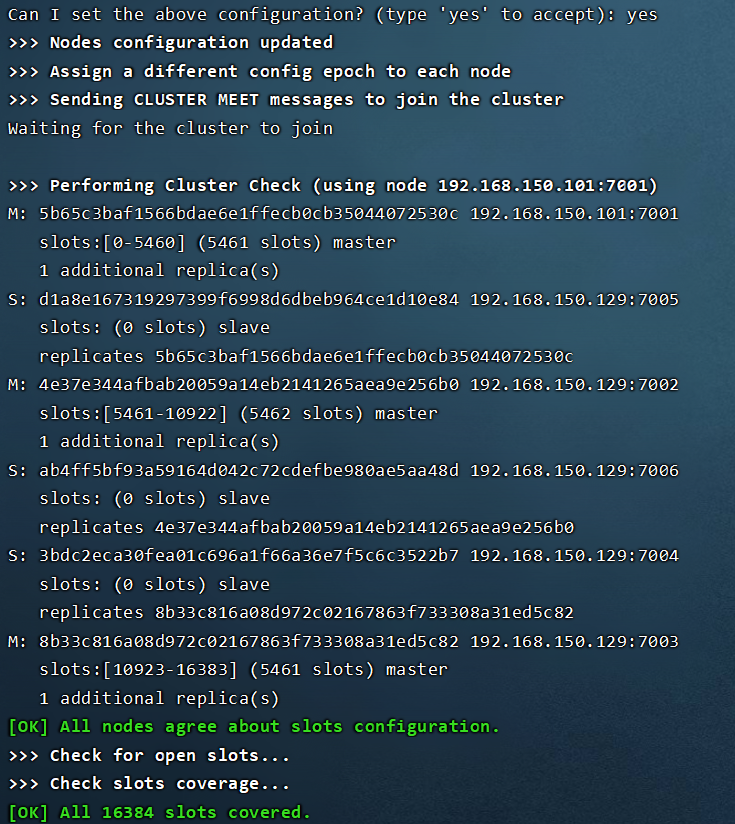
可以通过redis-cli -p 7001 cluster nodes指令查看分片集群部署关系:

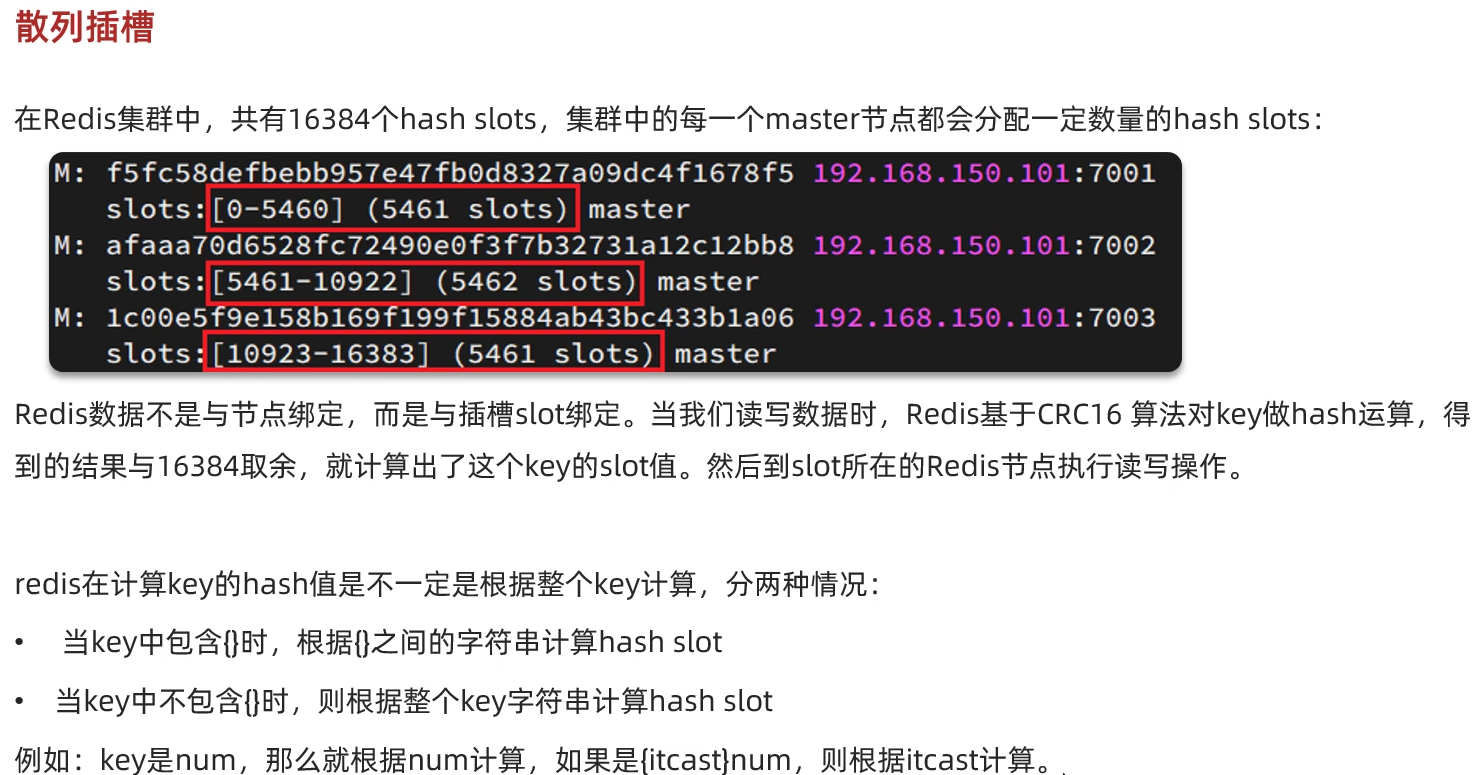
散列插槽:

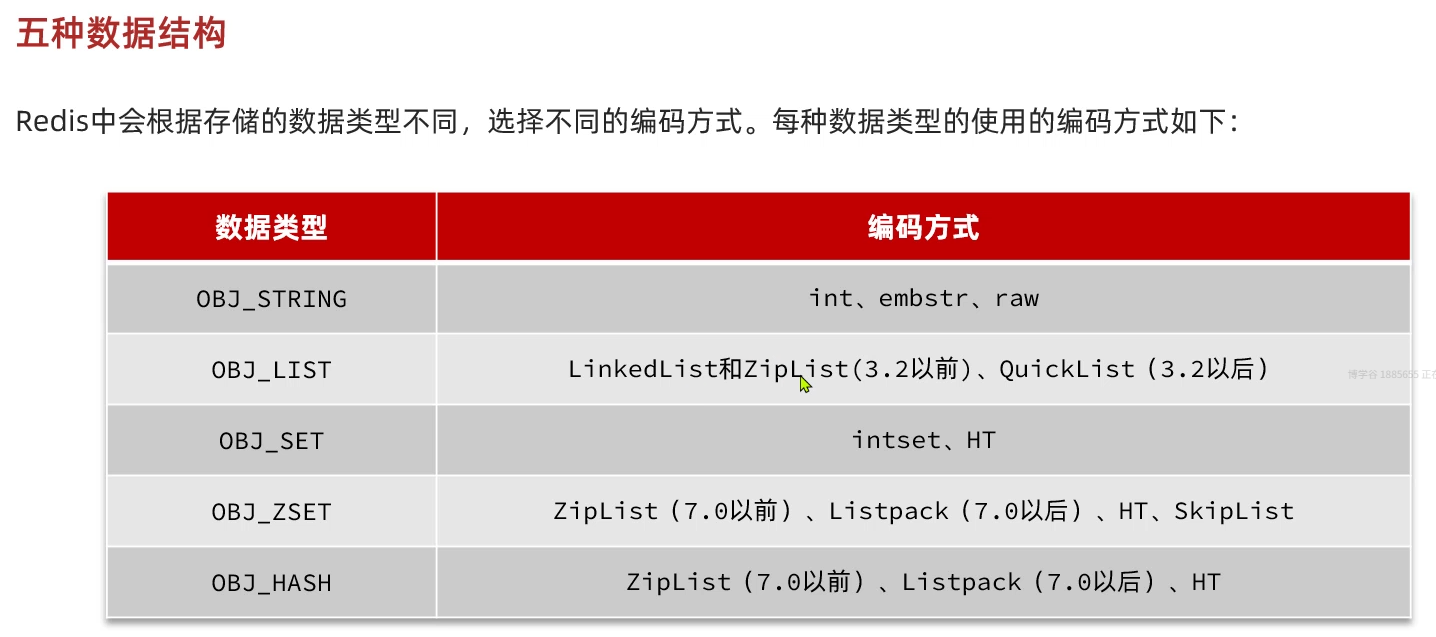
四、Redis数据结构:
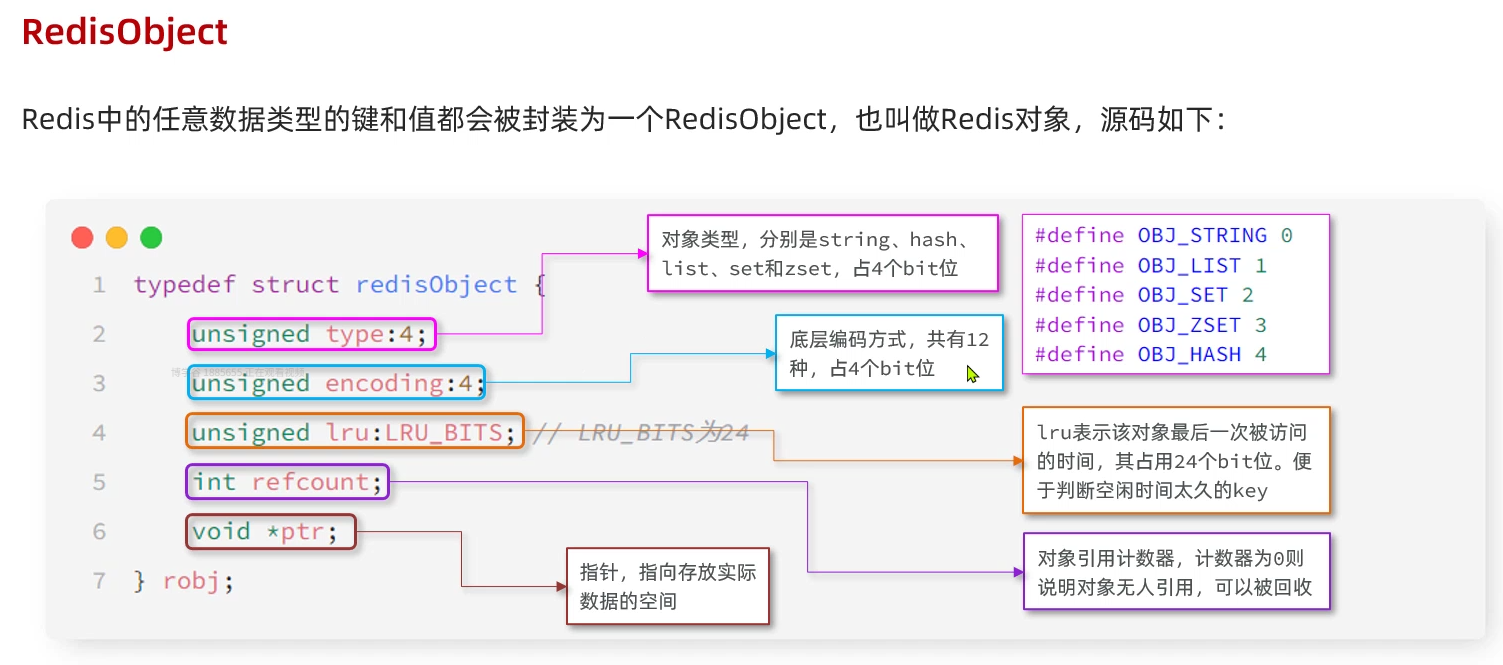
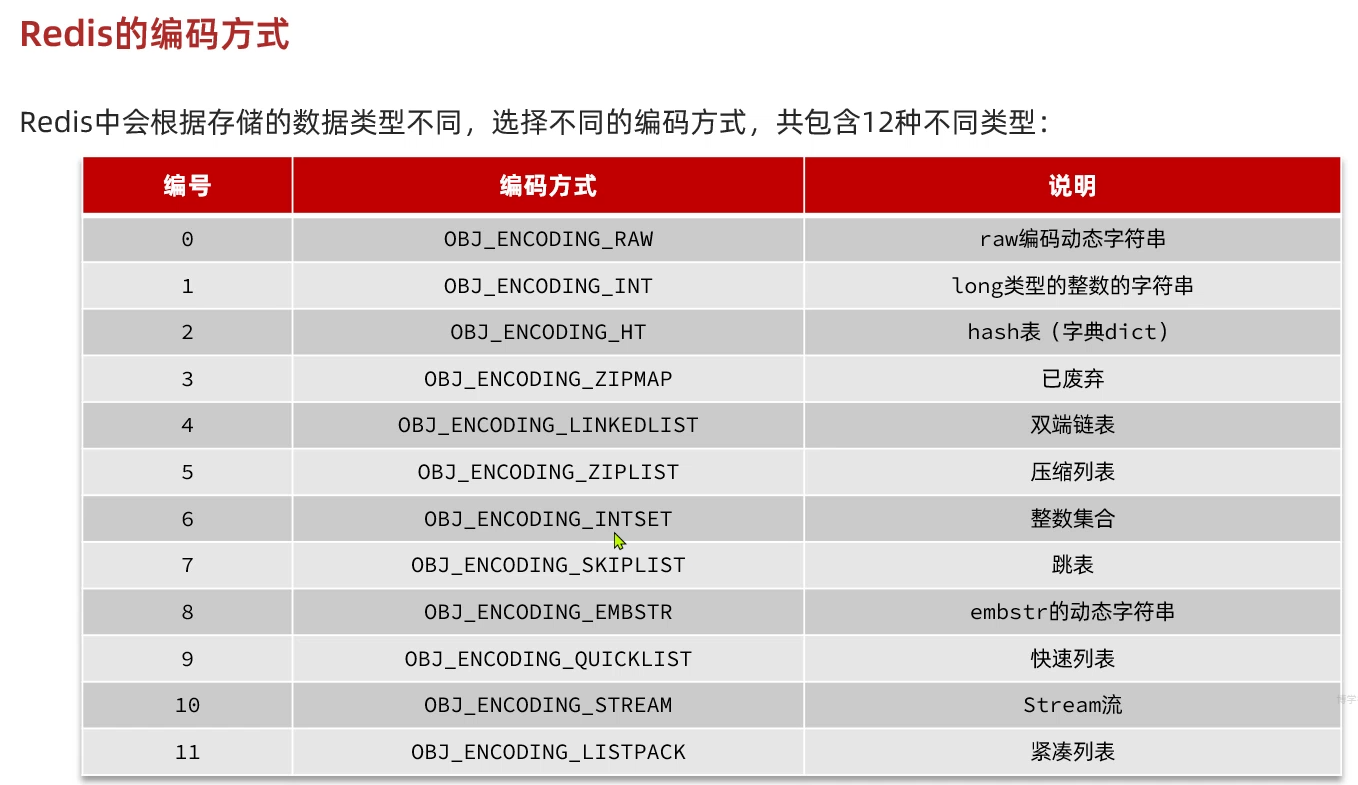
RedisObject:
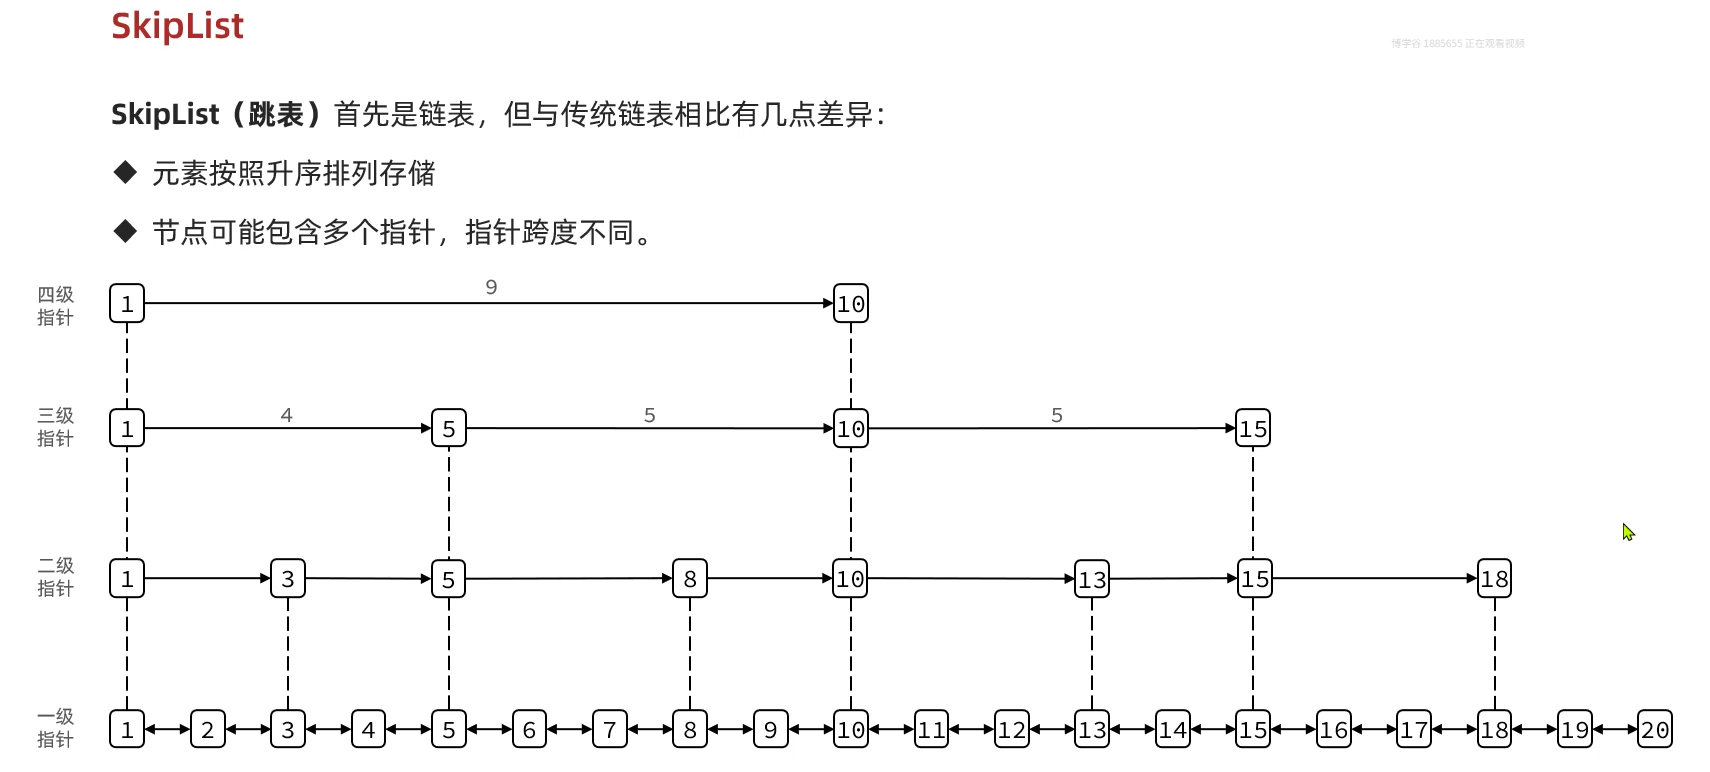
SkipList:

SortedSet:


五、Redis内存回收:

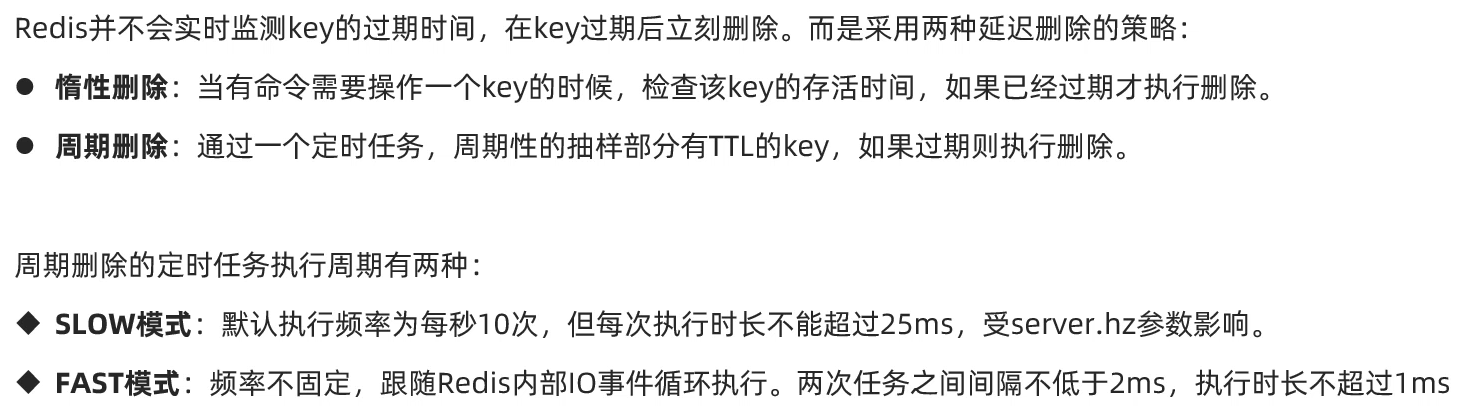
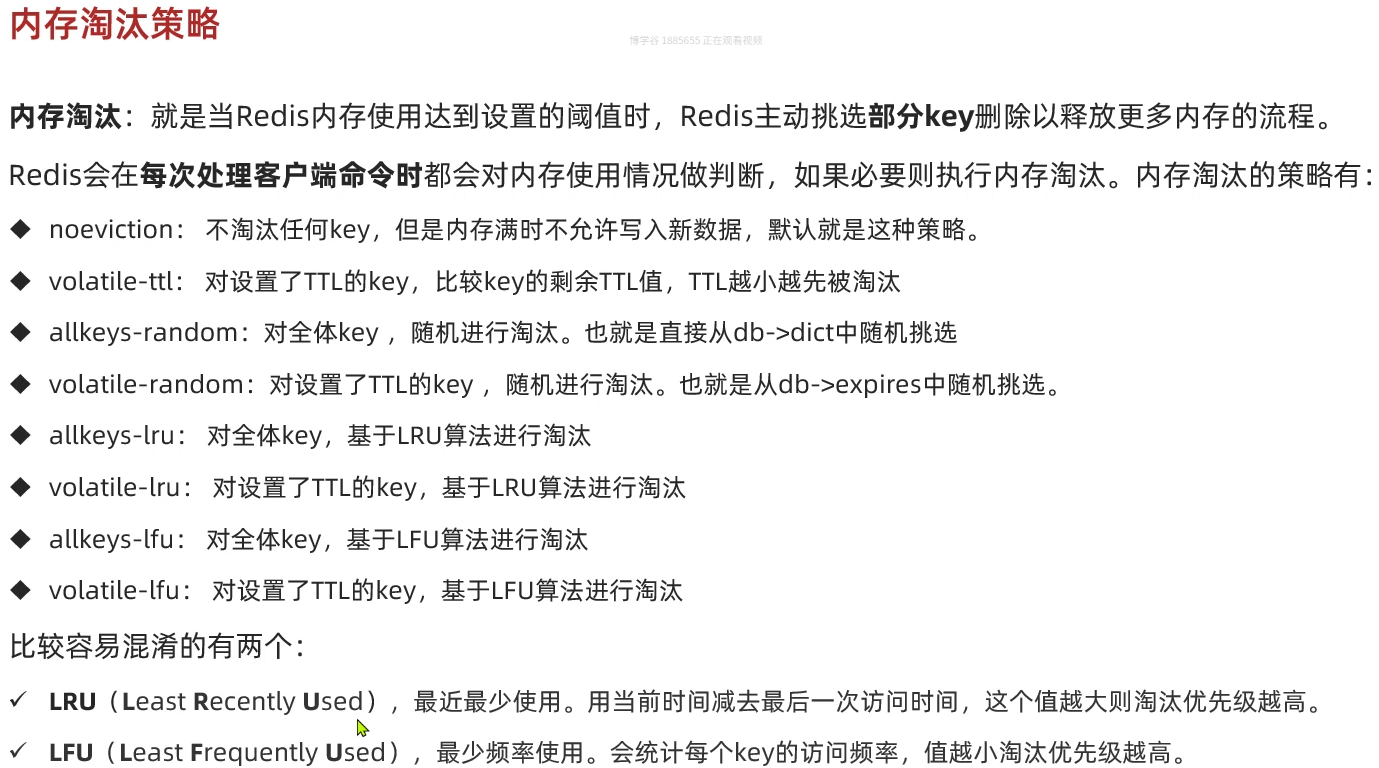
内存淘汰策略:
六、缓存问题
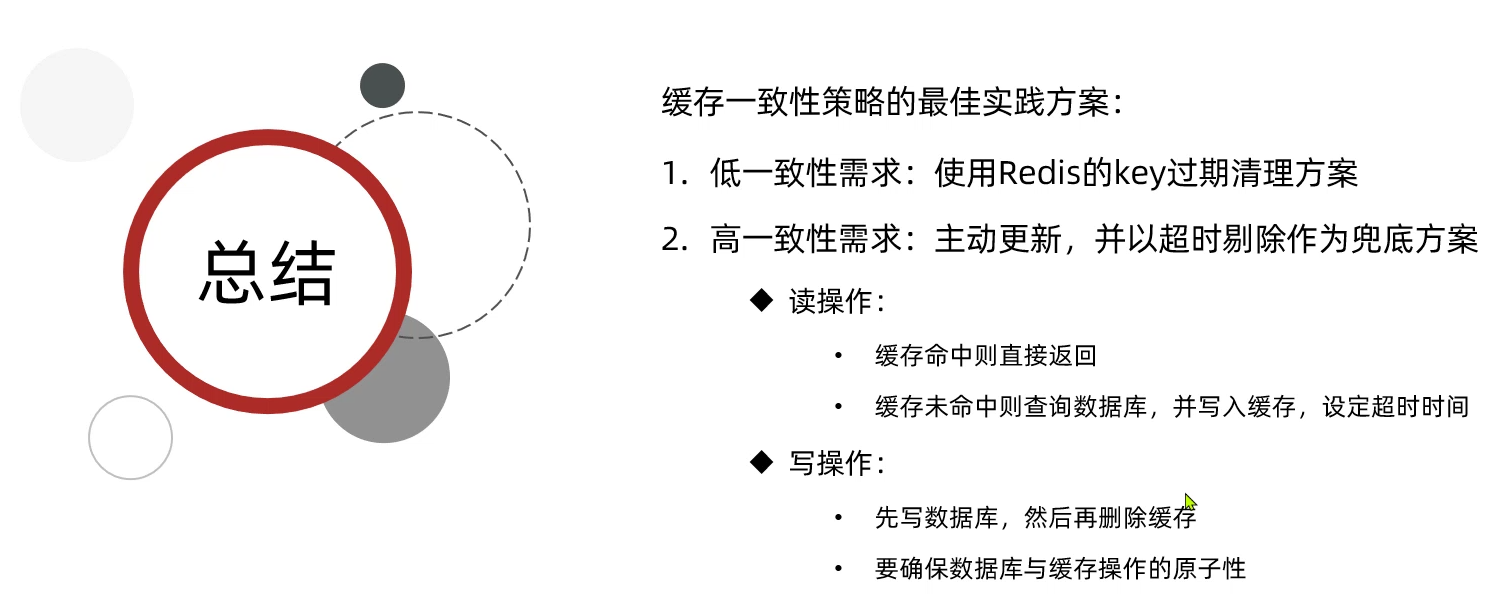
缓存一致性:

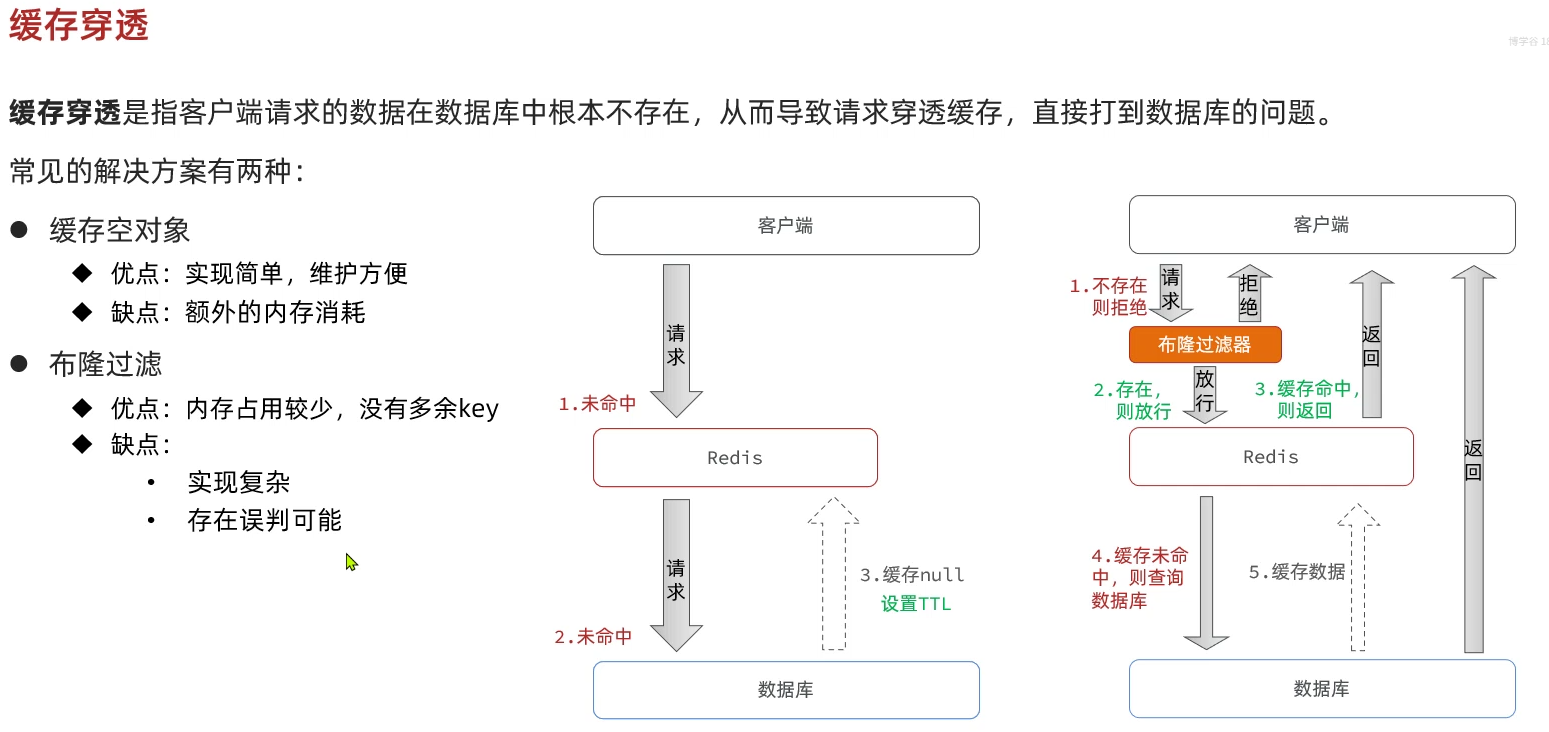
缓存穿透:

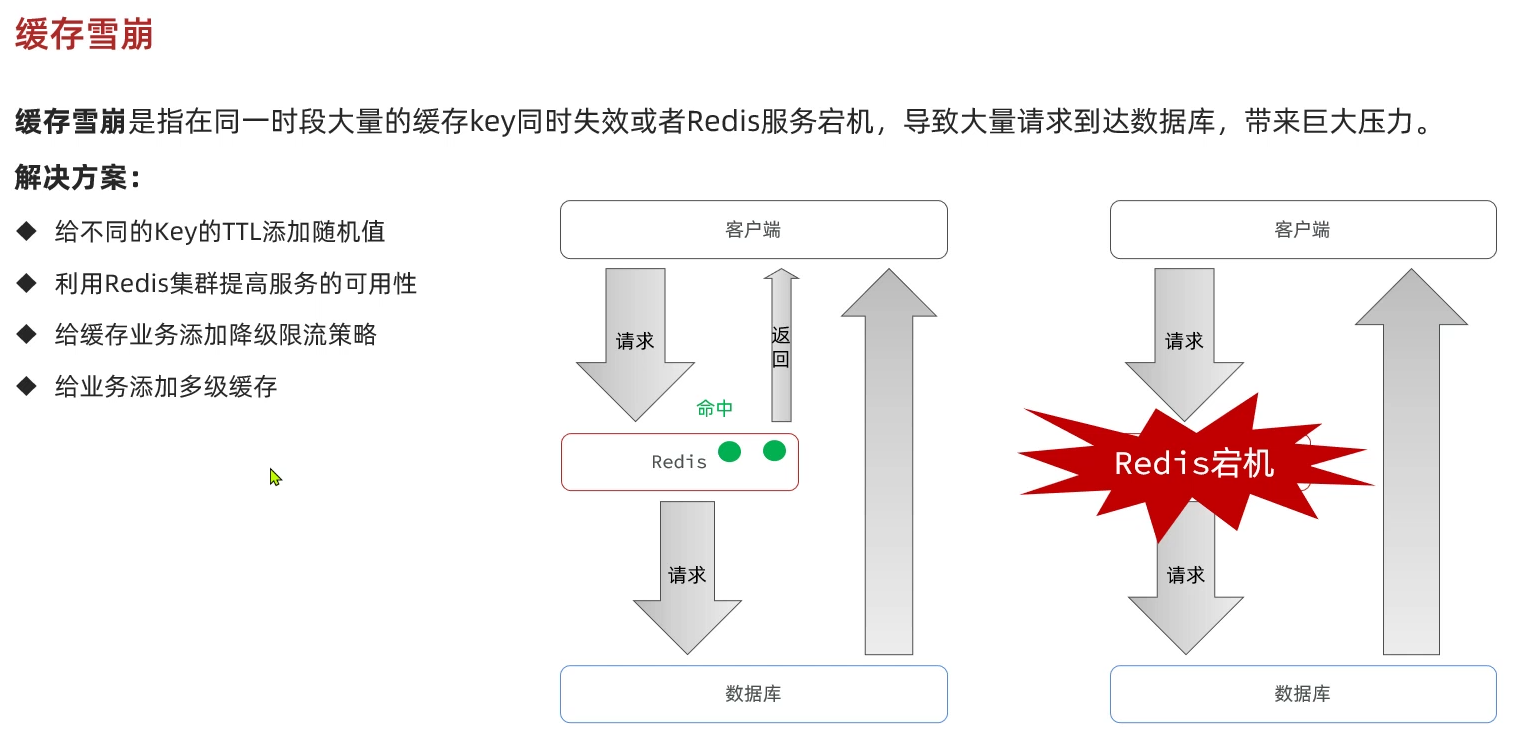
缓存雪崩:
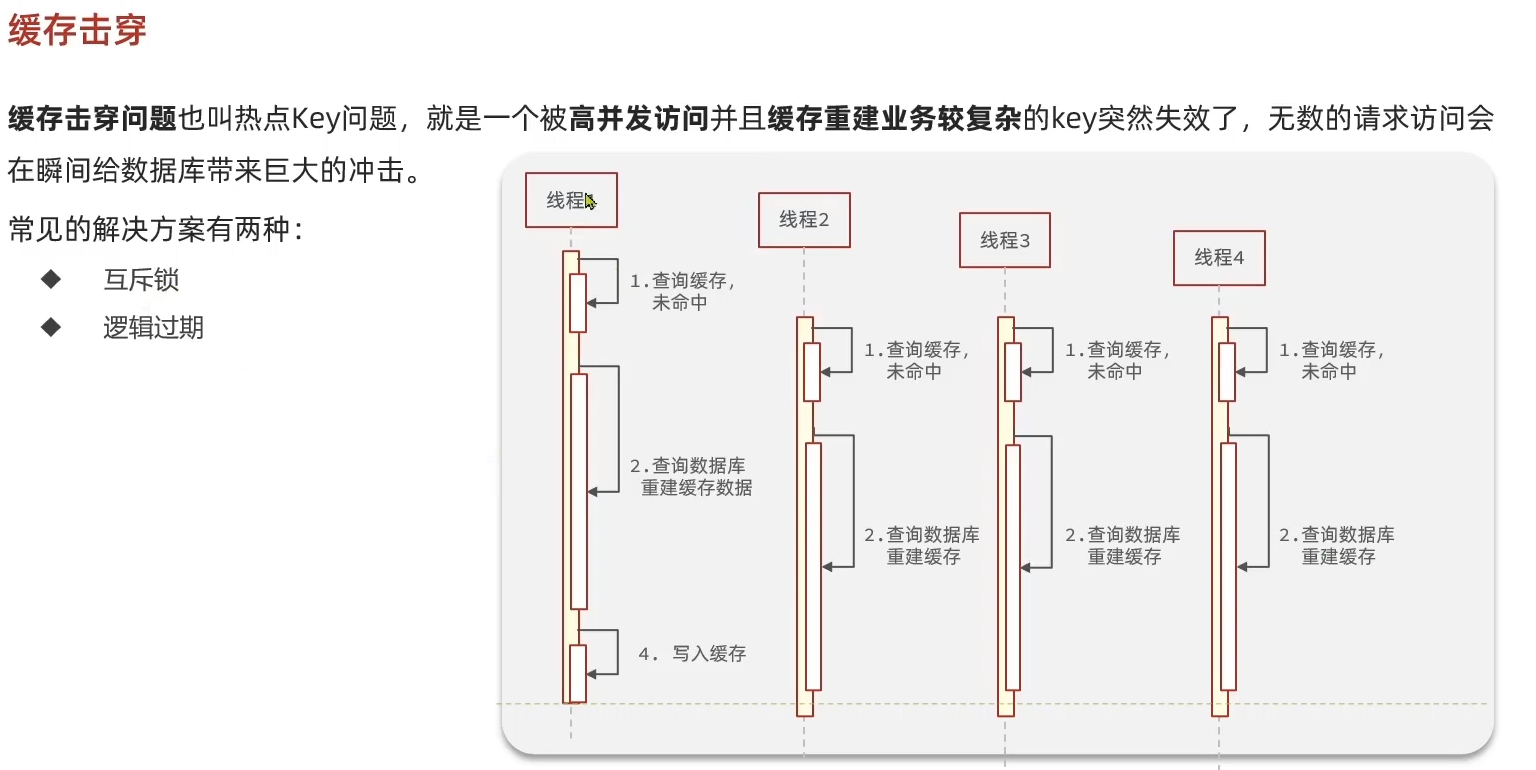
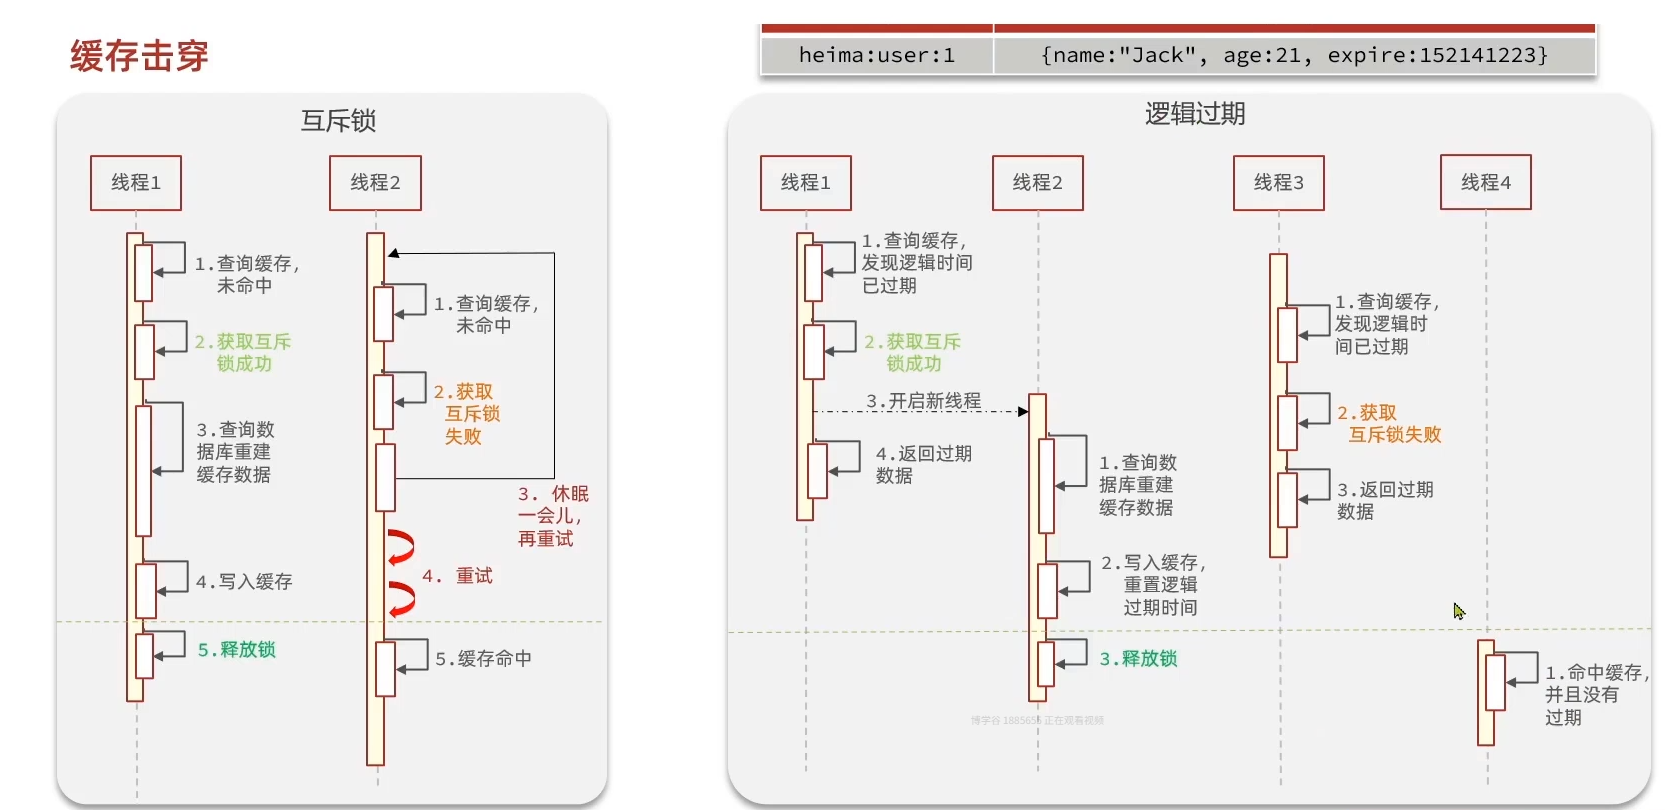
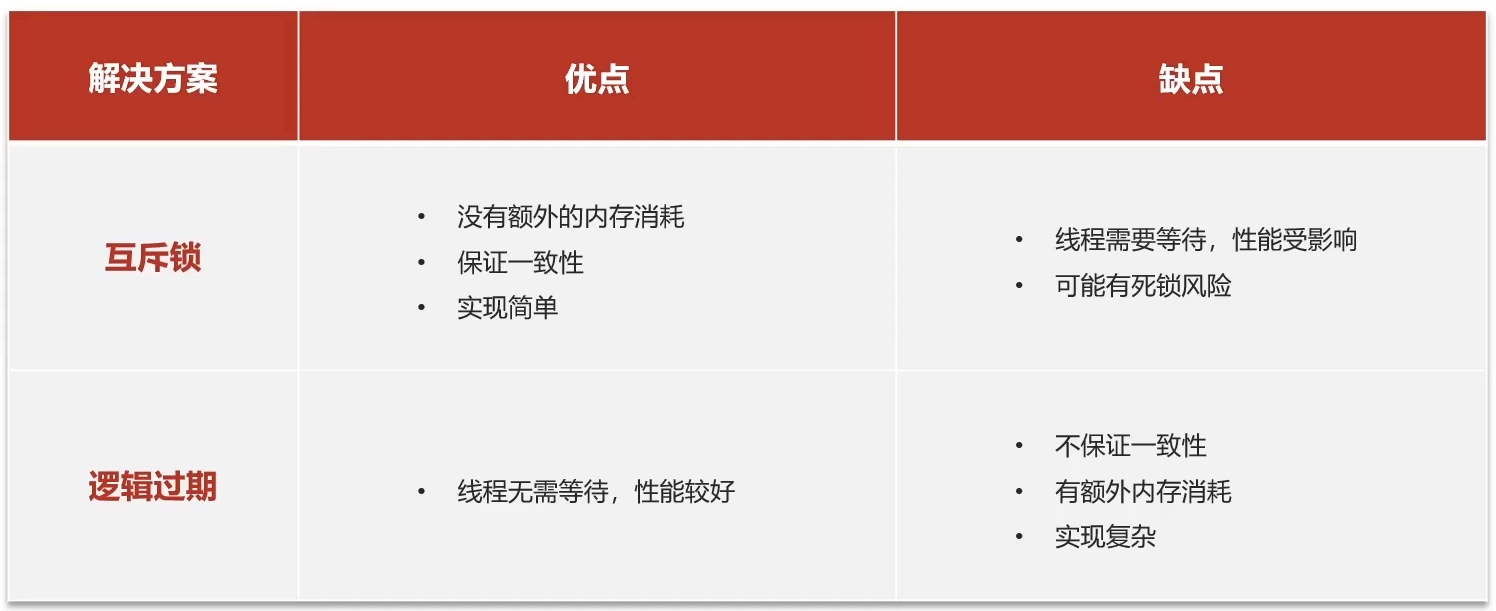
缓存击穿:
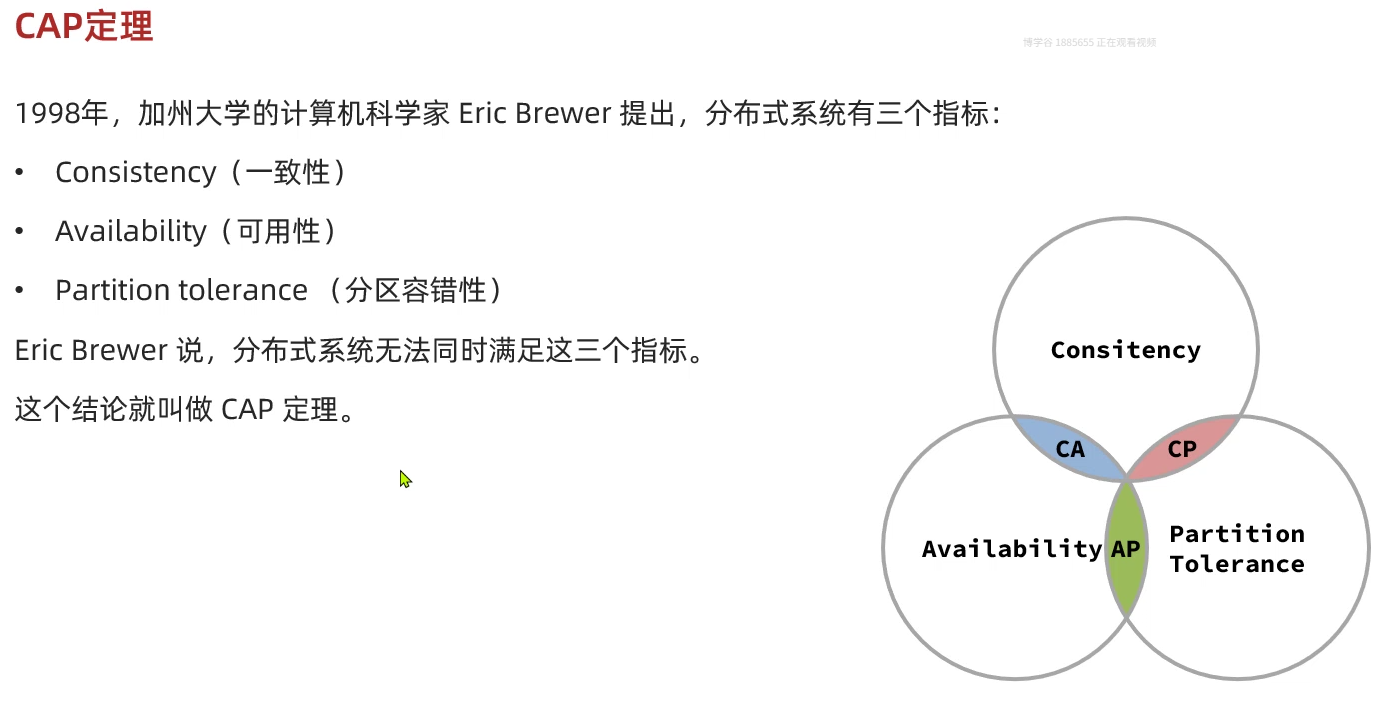
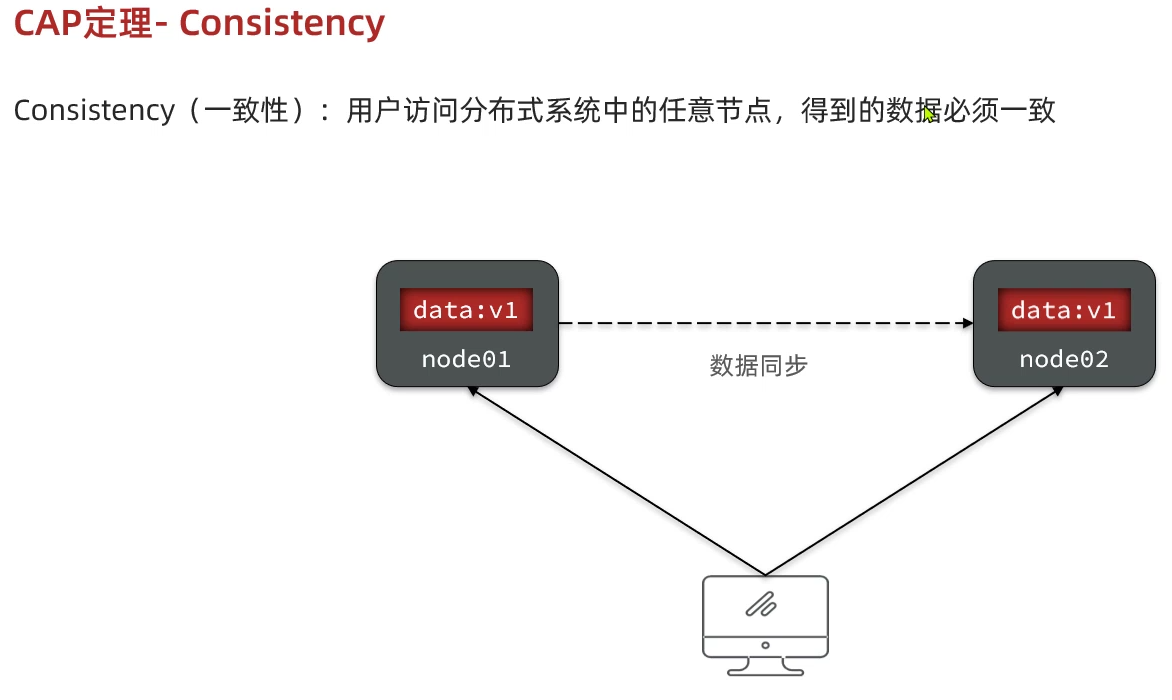
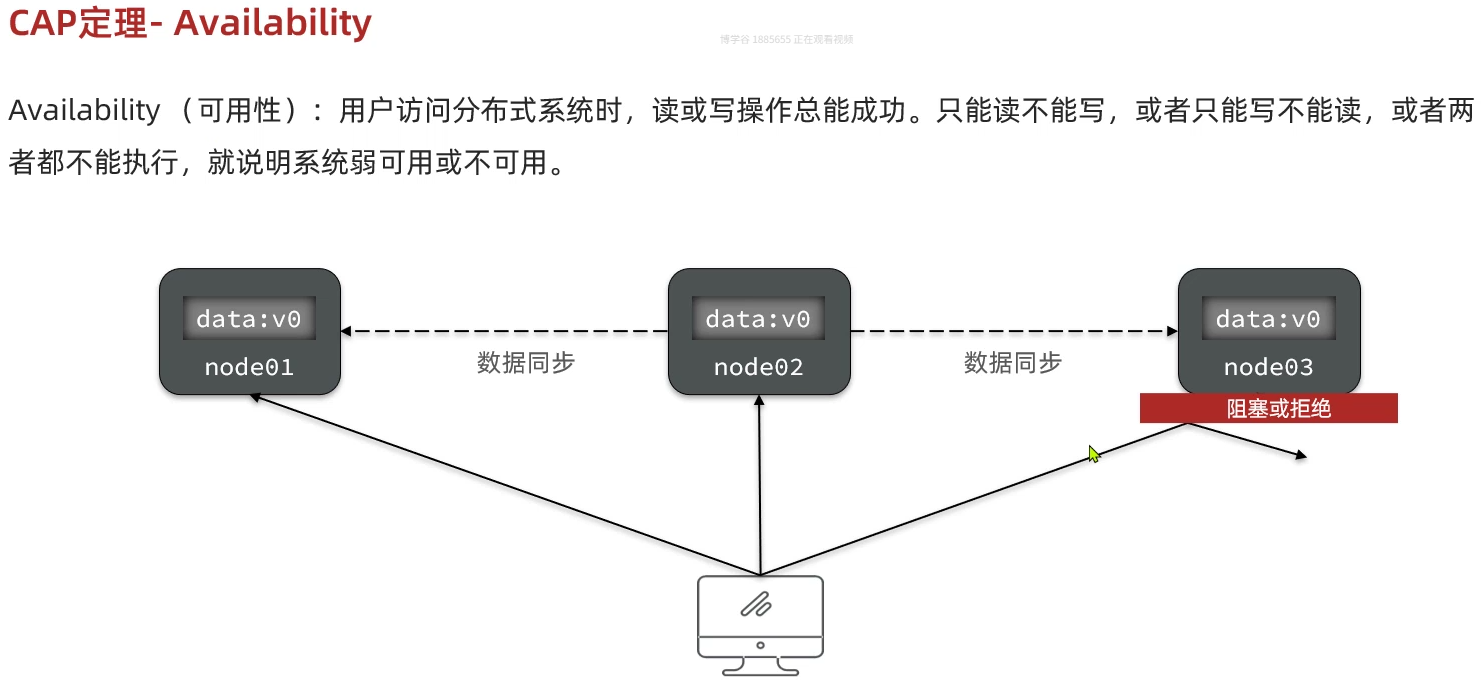
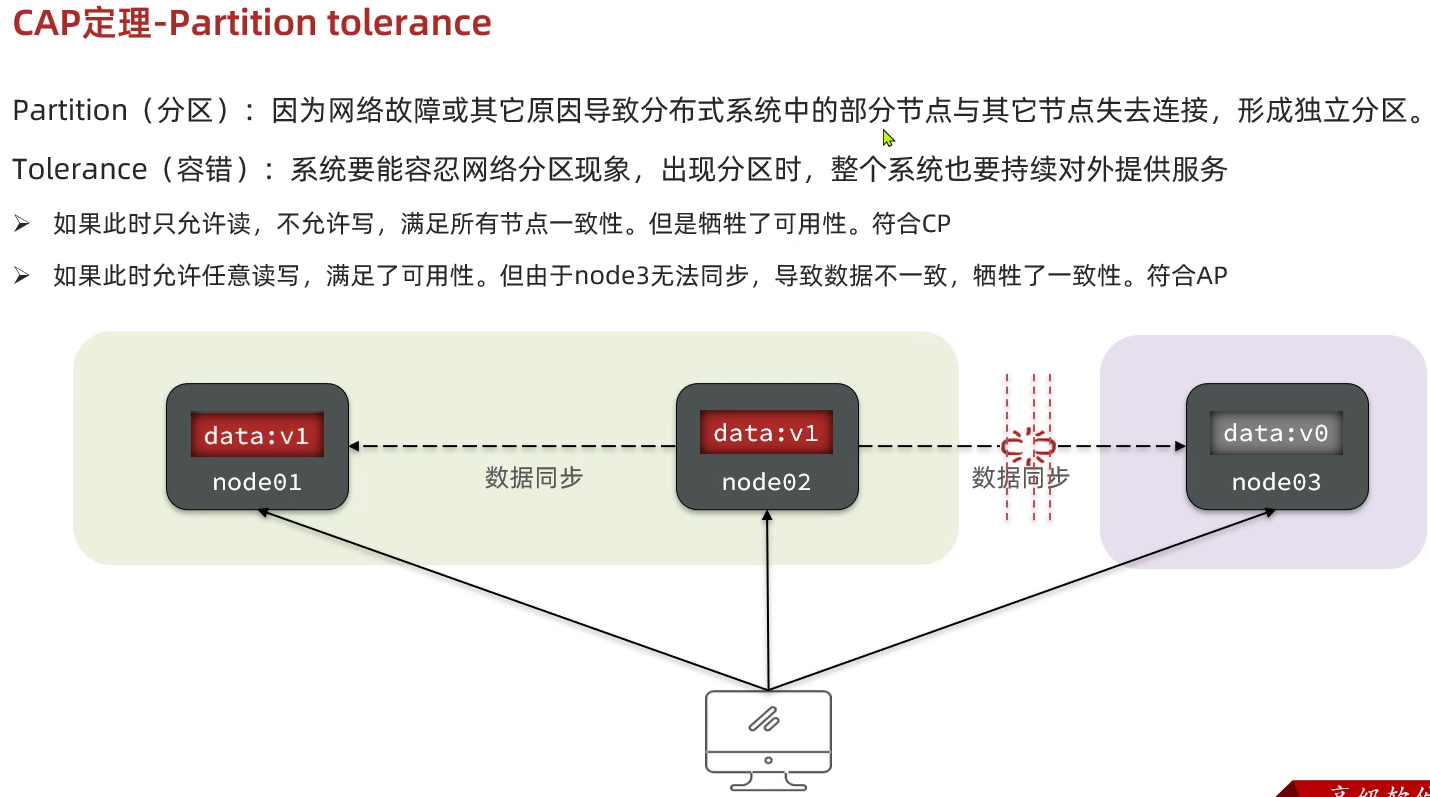
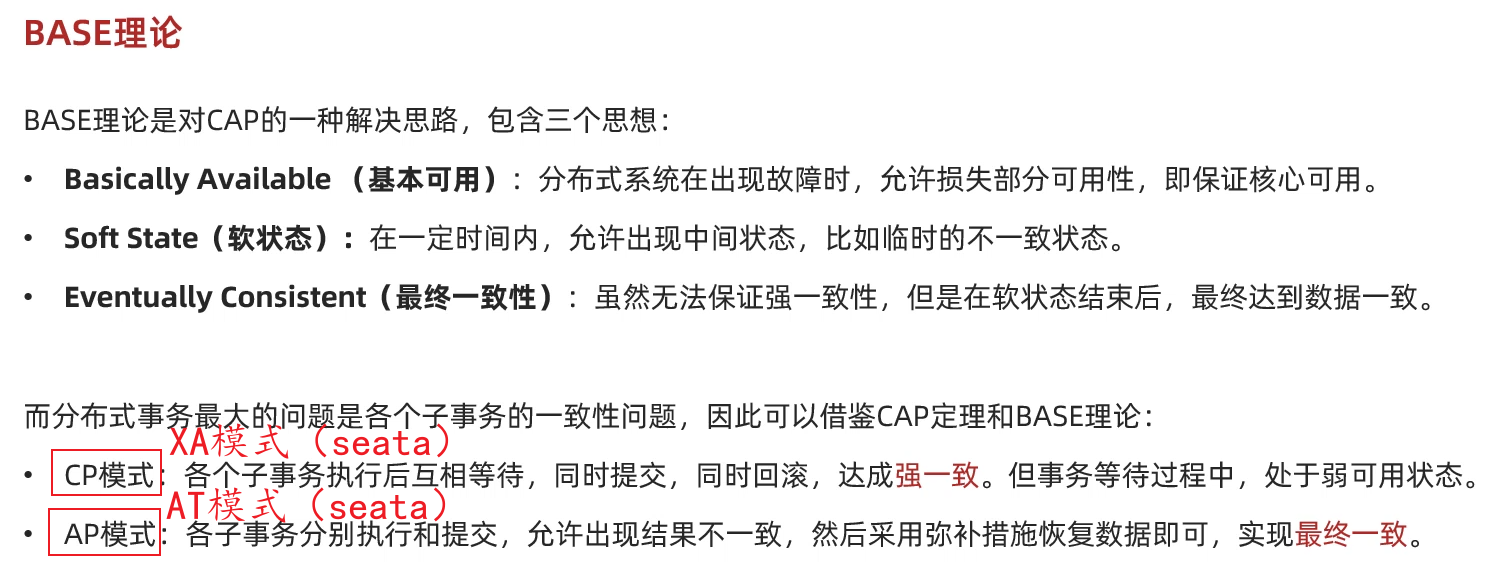
七、分布式事务理论基础------CAP和BASE
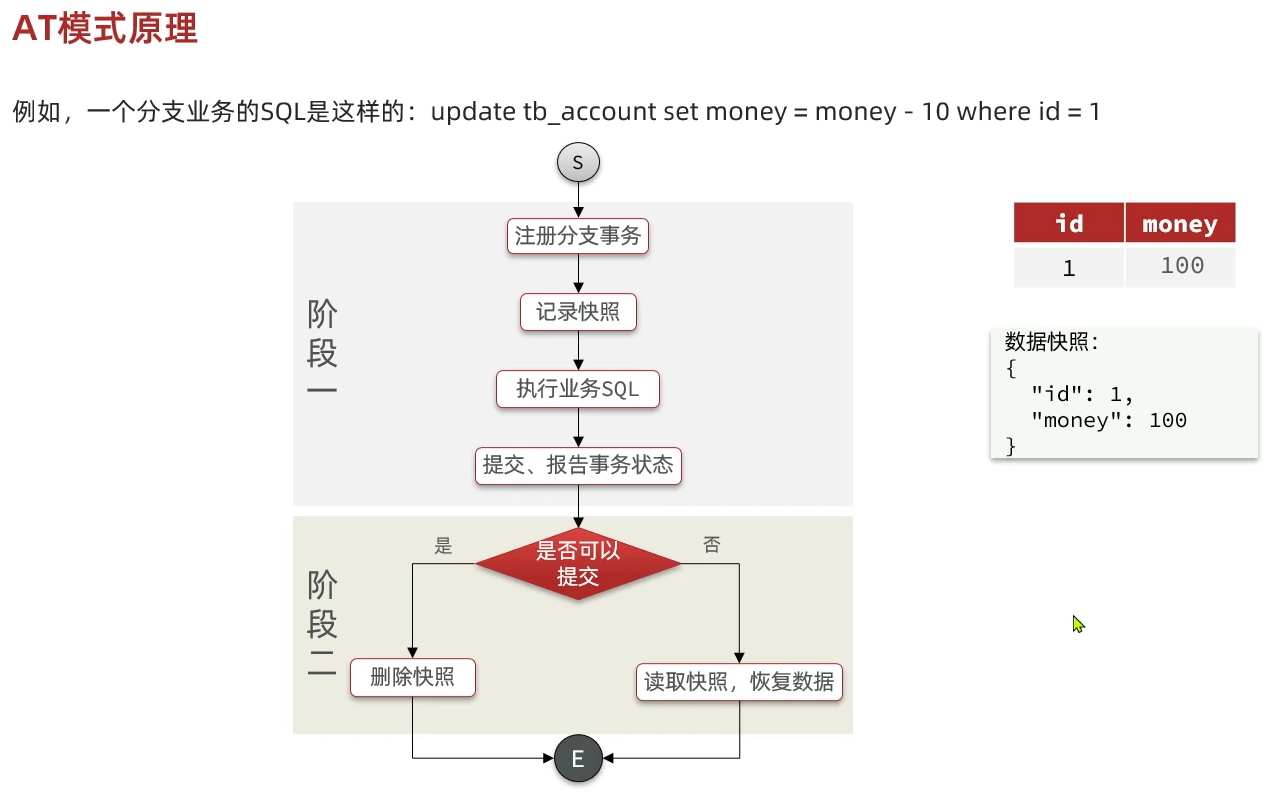
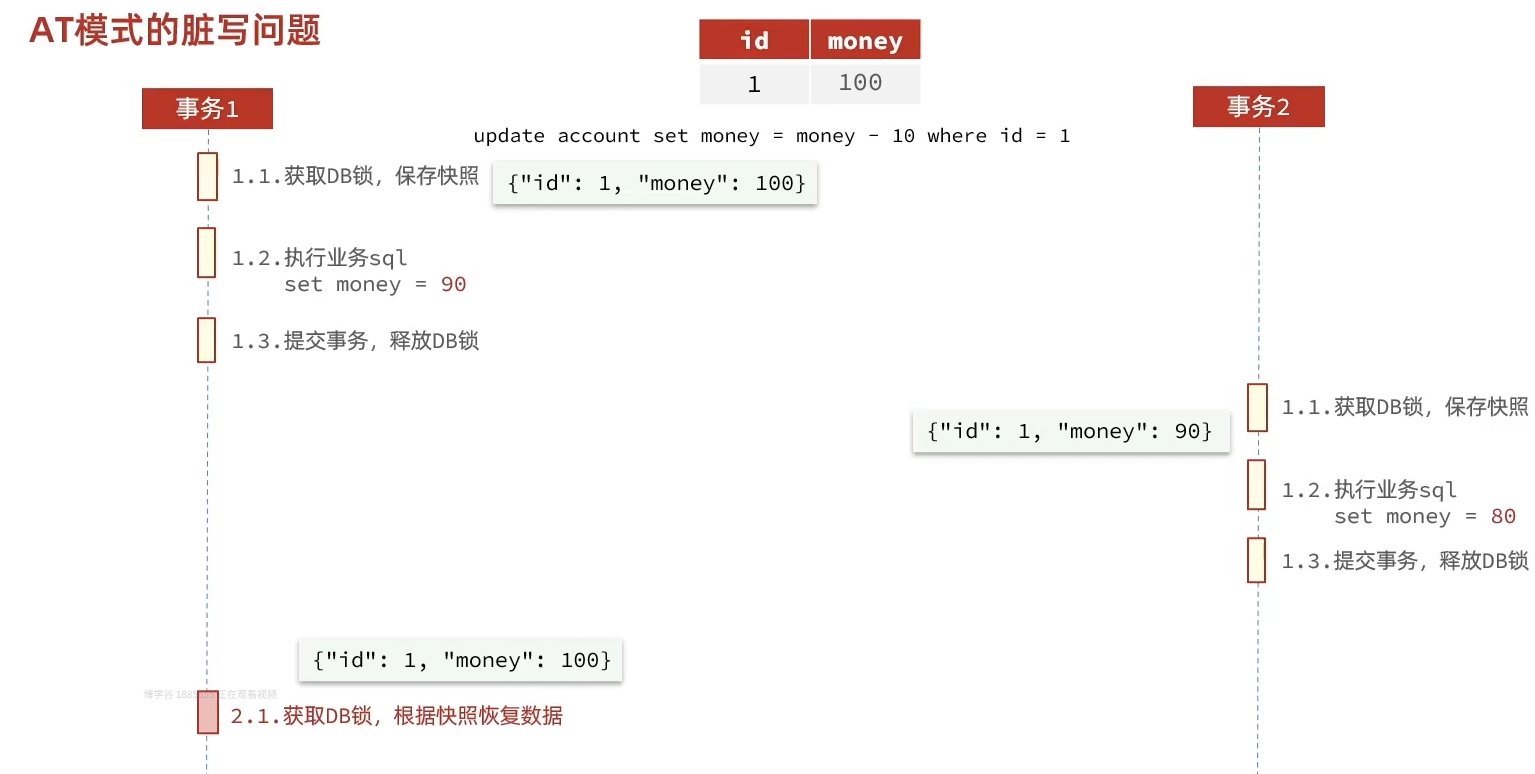
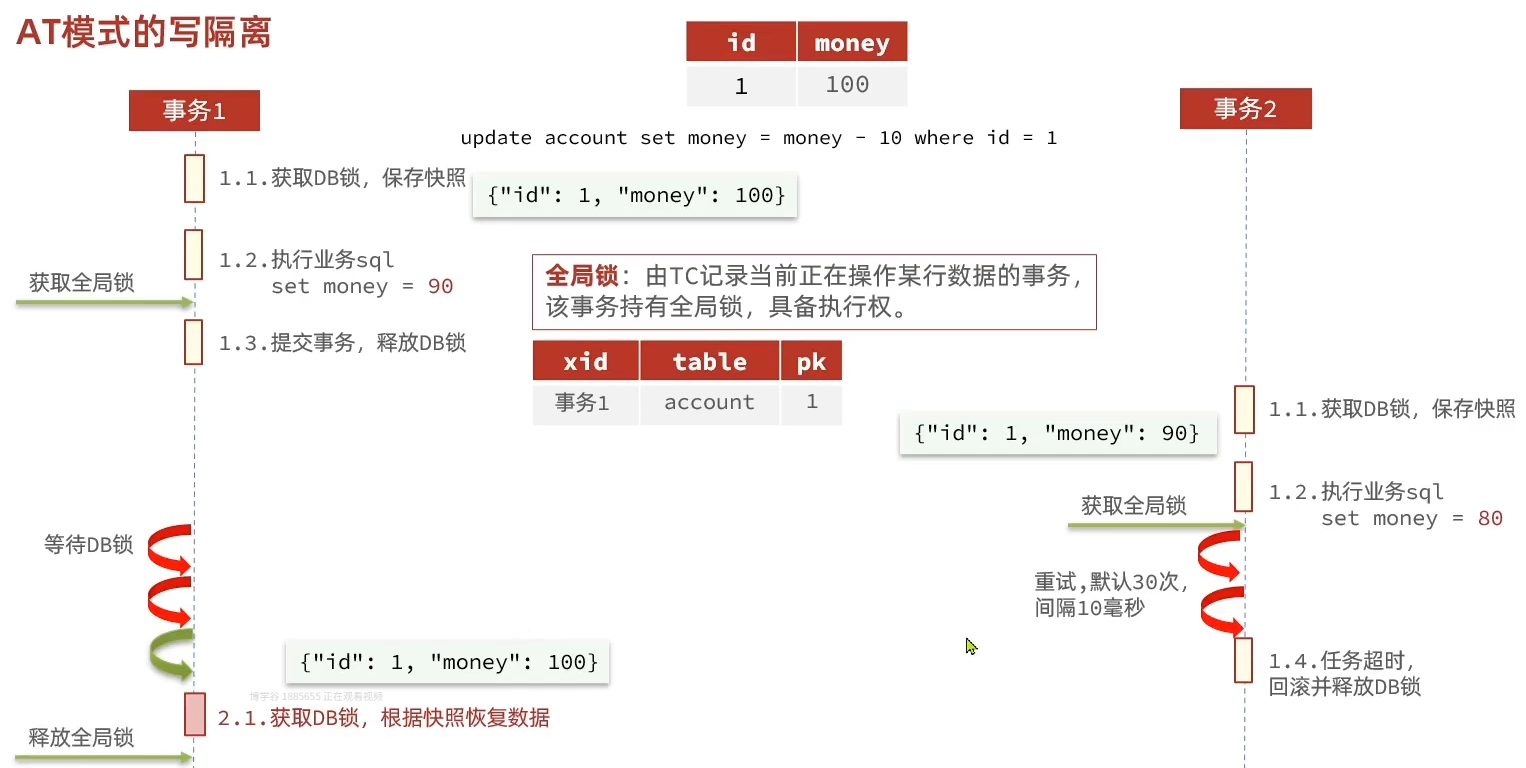
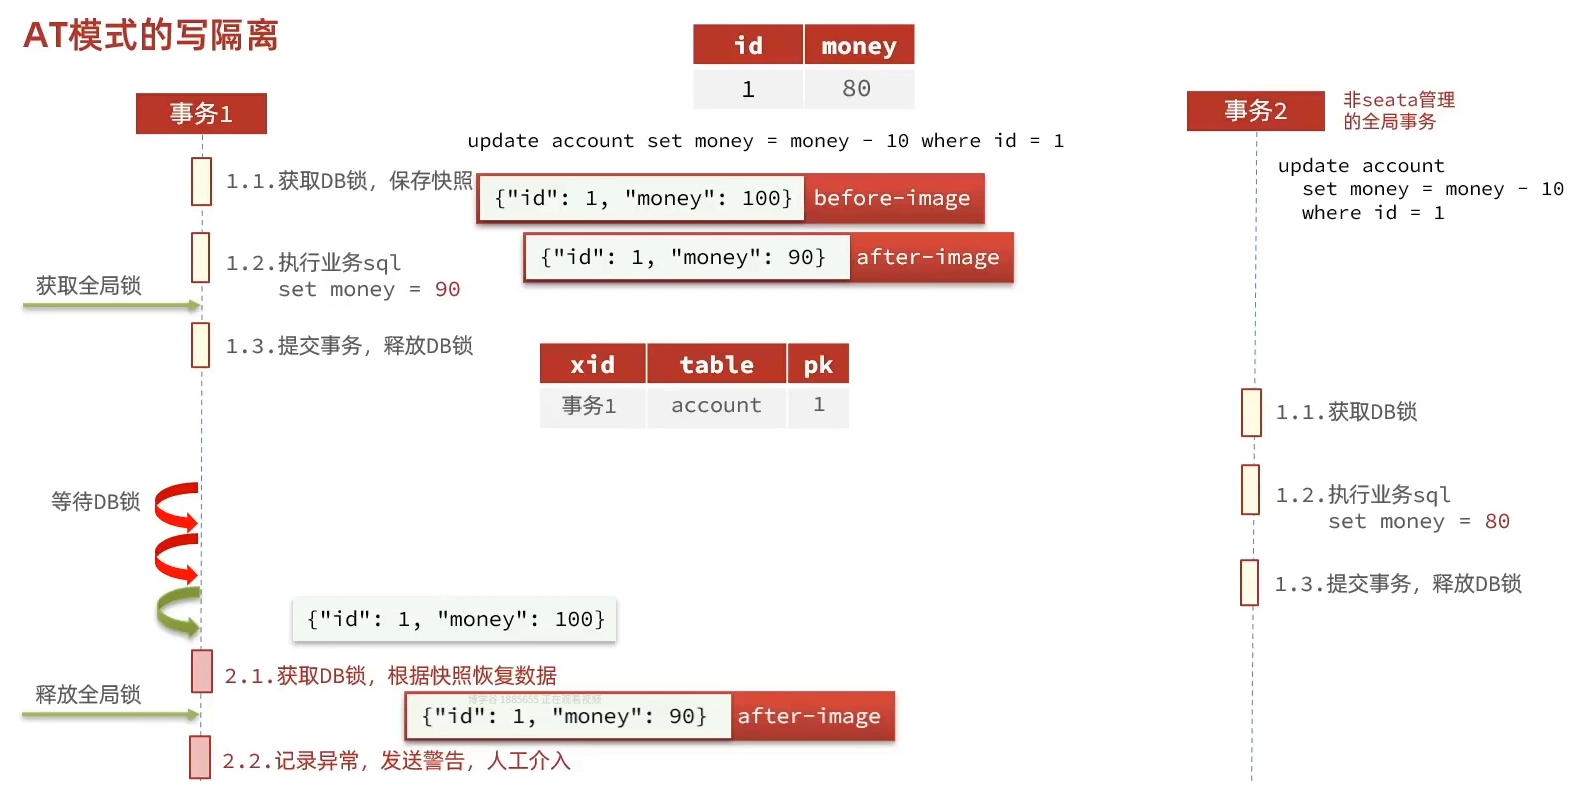
八、AT模式脏写问题
回顾一下AT模式原理:
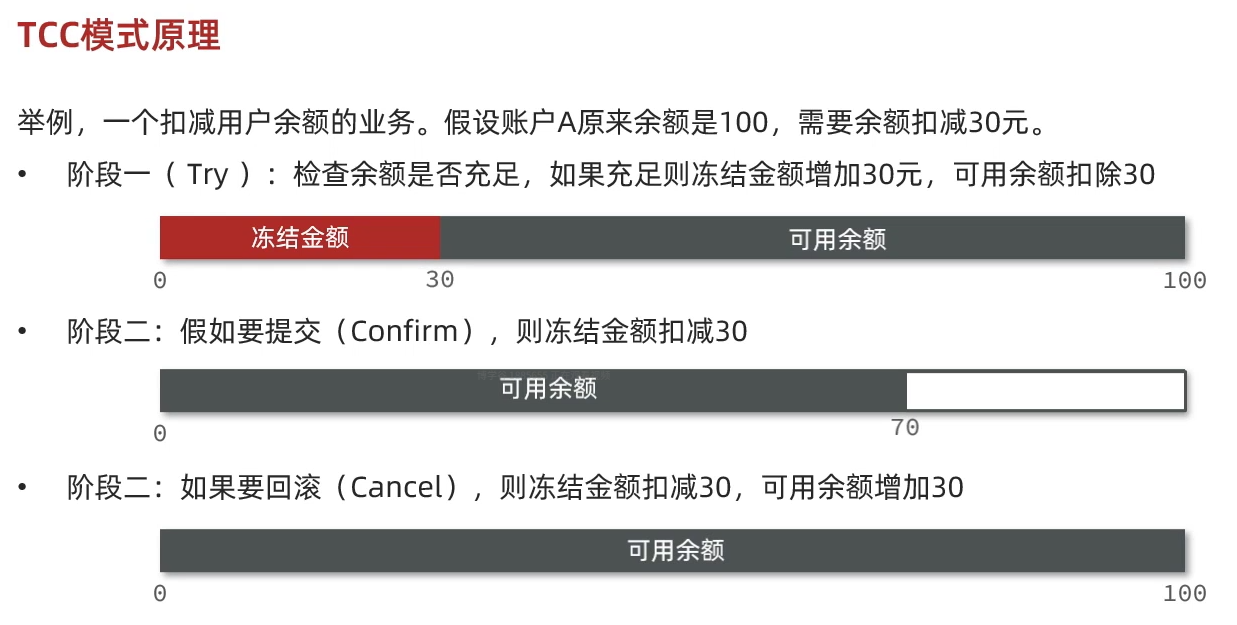
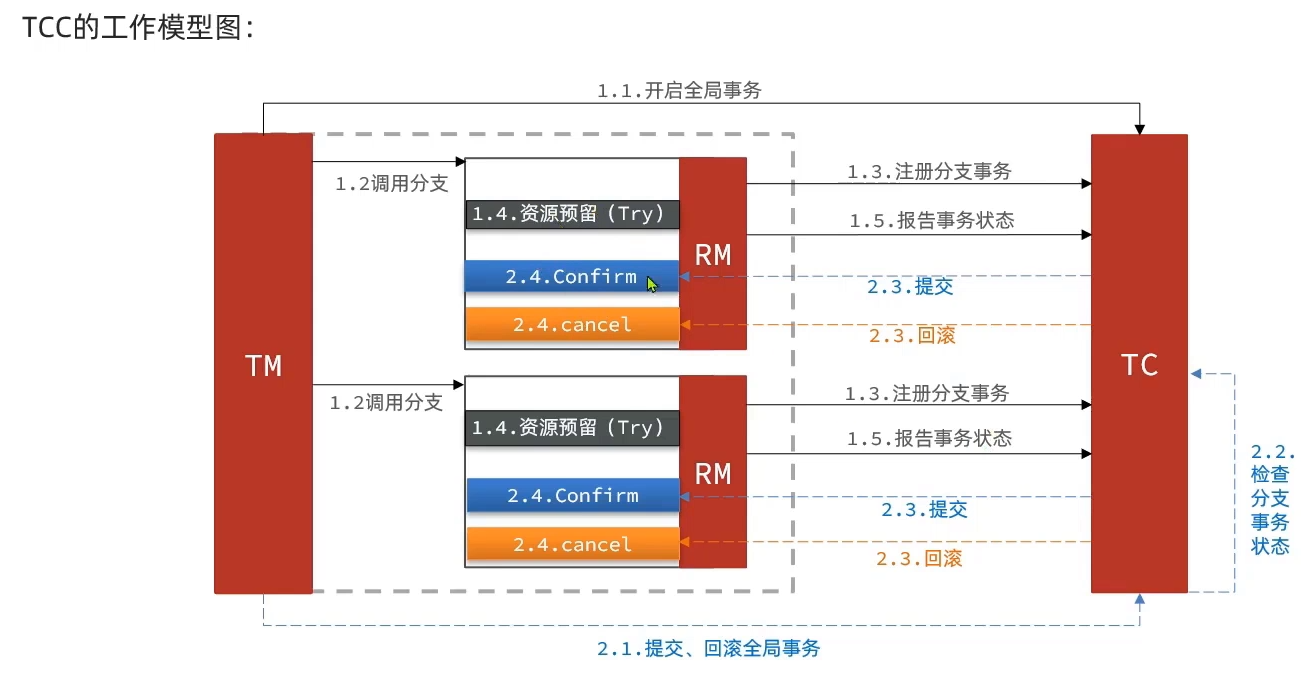
九、TCC模式


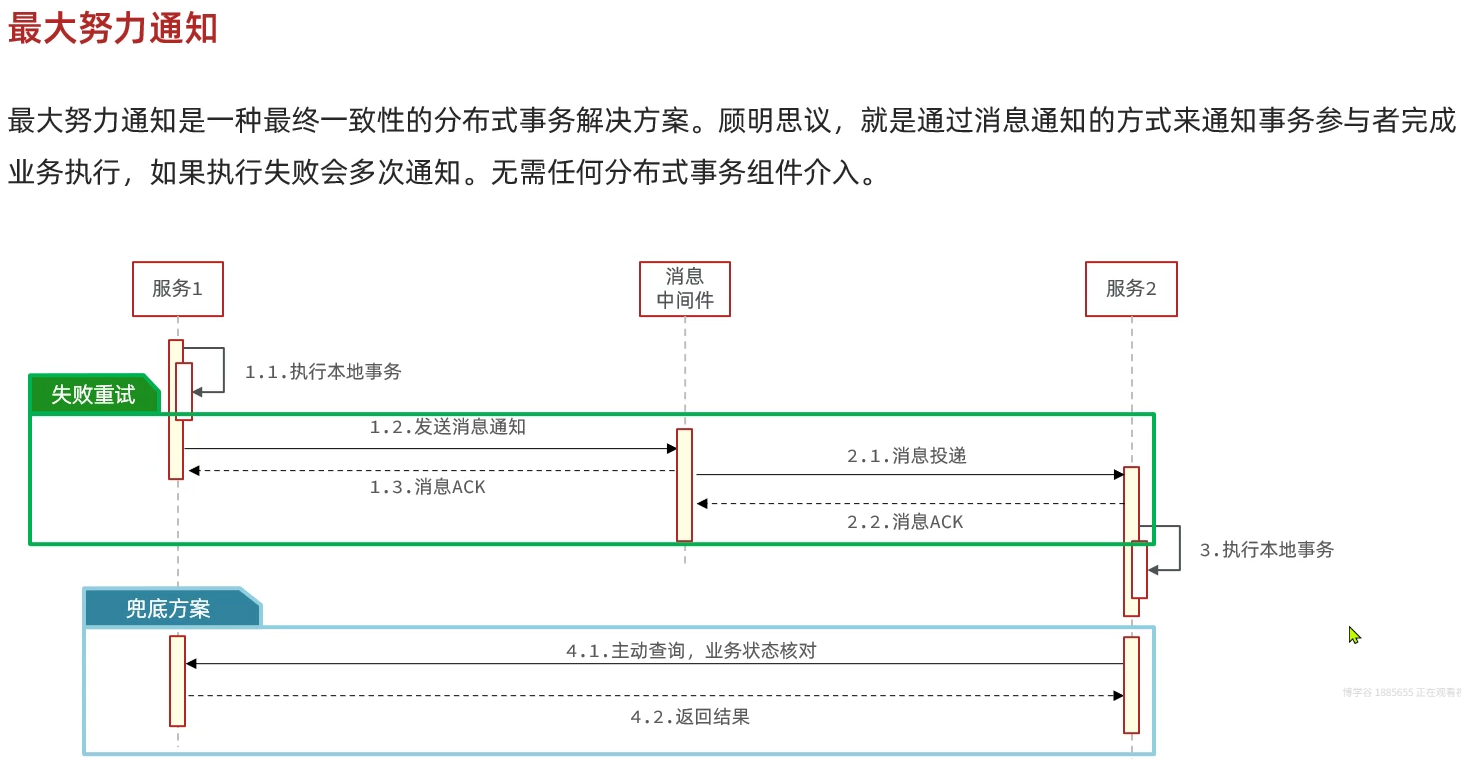
十、最大努力通知: