1. 概述
整体实现的功能为:上传mp3格式的音频资源,将mp3格式的会议内容转为文字,之后提取和整理会议概要,调研后使用以下几类模型:
- speaker-diarization-3.1: 说话人分离模型,核心用于识别音频中不同说话人及其说话时段,适配多场景多说话人场景
- large-v3-turbo: 高性能语音识别模型
- qwen3
2. 单个模型部署及python调用
整体的环境均使用conda create -n py312 python==3.12 进行,且模型来源均来自于huggingface
环境安装参考huggingface的说明,且下载模型前需要支持环境
bash
export HF_ENDPOINT=https://hf-mirror.com2.1 speaker-diarization-3.1 模型部署
speaker-diarization-3.1 是 pyannote 推出的主流说话人分离模型,核心用于识别音频中不同说话人及其说话时段,适配多场景多说话人场景。
- 功能:自动检测音频中说话人数量、标记每个说话人的起止时间(输出 RTTM 格式文件)。
- 适配场景:会议录音、访谈音频、多人大段对话等,支持 2-10 人说话场景。
- 依赖要求:需配合 pyannote.audio 库(推荐 3.1+ 版本),且需 Hugging Face 访问权限。
- 输入输出:输入 16kH
注意:获取Hugging Face token会进不去,我这边是在手机上搭的梯子,翻外网获取token即可,具体可以参考这个链接获取Hugging Face tokenhuggingface注册,获取token(纯小白版)_huggingface token-CSDN博客
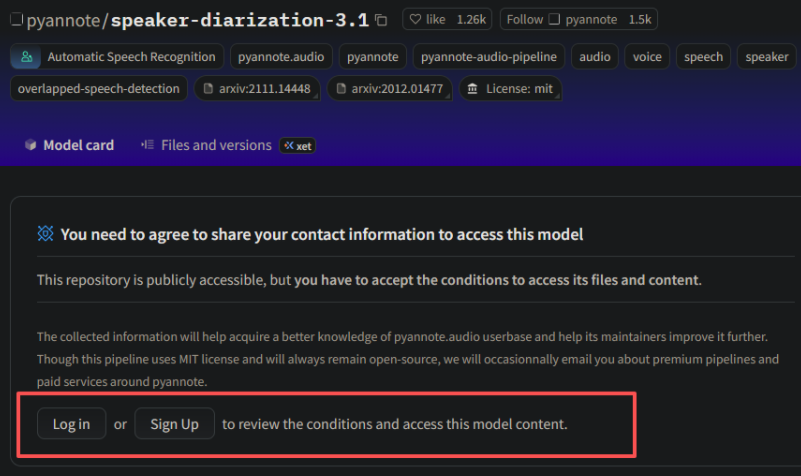
speaker-diarization-3.1模型需要其他模型的支持,即在网页上点击
外链图片转存失败,源站可能有防盗链机制,建议将图片保存下来直接上传
环境则安装
bash
pip install pyannote.audiospeaker-diarization-3.1模型需要的音频资源为wav格式,则首先使用ffmpeg将各种格式(MP3、OGG、FLAC 等)统一转为 WAV,暂时使用命令行格式,后续使用python,安装 ffmpeg
bash
sudo apt update && sudo apt install -y ffmpeg转化命令行为:
bash
ffmpeg -i 输入文件.格式 输出文件.wav例如,这边选择沁园春作为音频资源,且可以通过命令行进行输入,具体的diarization.py内容如下:
python
import os
import argparse  # 用于解析命令行参数
import huggingface_hub
from pyannote.audio import Pipeline

def main():
    # 解析命令行参数:指定音频文件路径
    parser = argparse.ArgumentParser(description="使用 pyannote 进行说话人分离并生成 RTTM 文件")
    parser.add_argument("audio_path", help="音频文件的路径(例如:./qinyuanchun.wav)")
    args = parser.parse_args()
    audio_path = args.audio_path  # 获取用户输入的音频路径

    # 验证音频文件是否存在
    if not os.path.exists(audio_path):
        print(f"❌ 错误:音频文件不存在 - {audio_path}")
        return

    # 你的令牌
    token = "hf_TBTbupvBJJ##################"

    try:
        # 1. 登录验证
        huggingface_hub.login(token=token)
        user_name = huggingface_hub.whoami()["name"]
        print(f"✅ 登录成功!当前账号:{user_name}")

        # 2. 加载模型
        print("🔄 正在加载模型...")
        pipeline = Pipeline.from_pretrained(
            "pyannote/speaker-diarization-3.1",
            token=token
        )
        print("✅ 模型加载成功!")

        # 3. 提取音频文件名(用于 RTTM 标识)
        audio_filename = os.path.splitext(os.path.basename(audio_path))[0]
        print(f"🎧 处理音频文件:{audio_path}(标识:{audio_filename})")

        # 4. 执行说话人分离
        diarization_result = pipeline(audio_path)
        print("✅ 说话人分离完成!")

        # 5. 获取说话人片段
        print("🔍 提取说话人片段...")
        segments = diarization_result.speaker_diarization

        # 6. 生成 RTTM 文件(文件名自动与音频关联)
        rttm_filename = f"{audio_filename}.rttm"  # RTTM 文件名与音频一致(加 .rttm 后缀)
        if segments is not None:
            with open(rttm_filename, "w") as rttm_file:
                for segment, _, speaker in segments.itertracks(yield_label=True):
                    start_time = segment.start
                    duration = segment.end - segment.start
                    rttm_line = f"SPEAKER {audio_filename} 1 {start_time:.3f} {duration:.3f} <NA> <NA> {speaker} <NA> <NA>\n"
                    rttm_file.write(rttm_line)
            print(f"✅ 结果已保存到 {rttm_filename}")
        else:
            print("❌ 无法找到说话人片段数据,请检查 pyannote.audio 版本或模型输出格式")

    except Exception as e:
        error_msg = str(e)
        print(f"❌ 错误:{error_msg}")

if __name__ == "__main__":
    main()
运行
python
python diarization.py ./qinyuanchun.mp3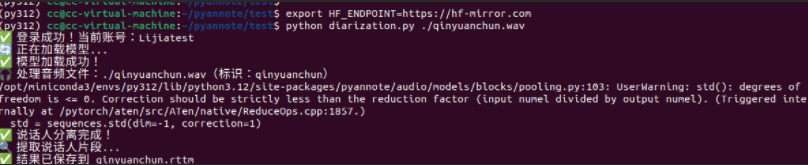
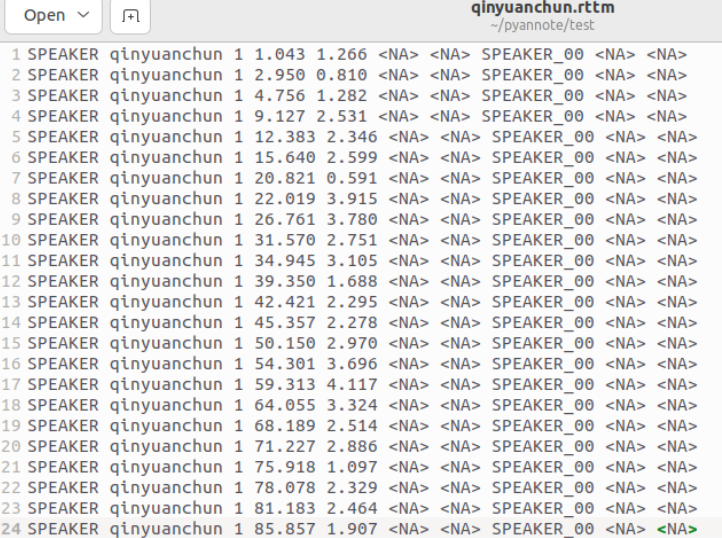
结果中主要包含开始时间和结束时间,以及对象,因为这个音频资源中只有一个人讲话,则为SPEAKER_00
2.2 large-v3-turbo 模型部署
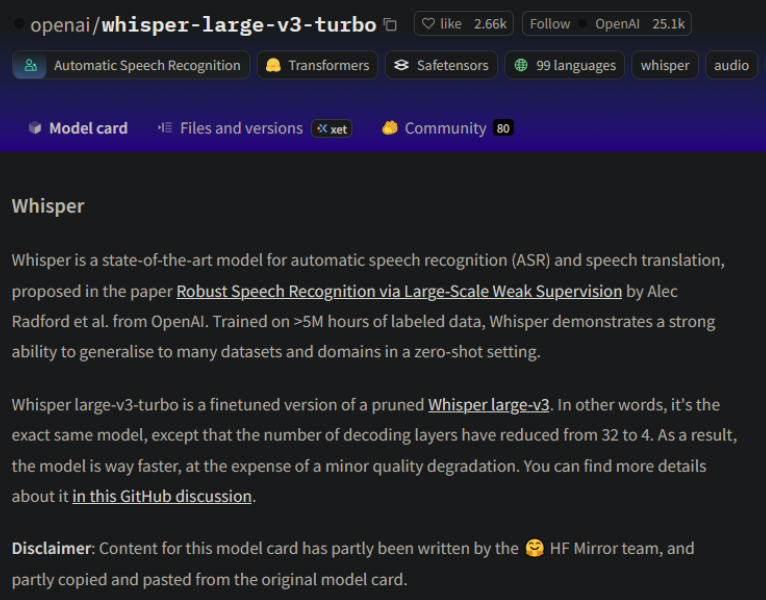
openai/whisper-large-v3-turbo 是 OpenAI 推出的高性能语音识别模型,主打快速识别 + 高准确率,特别适配中文场景,以下是核心信息、使用优化及常见问题解决:
- 速度:比 whisper-large-v3 快 2-3 倍,支持实时识别,1 小时音频可在几分钟内完成处理。
- 准确率:对中文口语、多音字、连读场景优化,识别错误率比 v2 降低 30%+。
- 功能:支持自动断句、时间戳细化(片段级),无需额外训练即可直接使用。
- 依赖要求:需配合 transformers≥4.37.0、torch≥2.0.0(代码中已兼容)。
依赖环境
bash
pip install --upgrade pip
pip install --upgrade transformers datasets[audio] acceleratelarge.py文件内容如下,依旧使用qinyuanchun.mp3资源
python
import torch
import torchaudio
from transformers import AutoModelForSpeechSeq2Seq, AutoProcessor
import numpy as np

# 设备配置
device = "cuda:0" if torch.cuda.is_available() else "cpu"
torch_dtype = torch.float16 if torch.cuda.is_available() else torch.float32

# 加载模型和处理器
model_id = "openai/whisper-large-v3-turbo"
model = AutoModelForSpeechSeq2Seq.from_pretrained(
    model_id, torch_dtype=torch_dtype, low_cpu_mem_usage=True, use_safetensors=True
)
model.to(device)
processor = AutoProcessor.from_pretrained(model_id)

def transcribe_long_audio_native(audio_path):
    """使用 Whisper 原生长格式处理,保持高精度"""

    # 加载音频文件
    audio, sr = torchaudio.load(audio_path)

    # 转换为单声道并重采样到16kHz
    if audio.shape[0] > 1:
        audio = torch.mean(audio, dim=0, keepdim=True)

    if sr != 16000:
        resampler = torchaudio.transforms.Resample(sr, 16000)
        audio = resampler(audio)

    audio_array = audio.squeeze().numpy()
    duration = len(audio_array) / 16000

    print(f"音频总时长: {duration:.2f}秒")

    # 处理整个音频(让 Whisper 内部处理分块)
    inputs = processor(
        audio_array,
        sampling_rate=16000,
        return_tensors="pt",
        return_timestamps=True,  # 关键:启用时间戳
        chunk_length_s=30,       # 使用30秒分块
        stride_length_s=5,       # 重叠5秒防止边界丢失
    )

    inputs = {k: v.to(device) for k, v in inputs.items()}

    # 生成参数 - 优化长音频识别
    generate_kwargs = {
        "language": "chinese",
        "task": "transcribe",
        "num_beams": 1,
        "temperature": 0.0,
        "compression_ratio_threshold": 2.4,
        "logprob_threshold": -1.0,
        "no_speech_threshold": 0.6,
        "condition_on_previous_text": True,
        "return_timestamps": True,  # 返回时间戳
    }

    # 推理
    with torch.no_grad():
        result = model.generate(
            **inputs,
            **generate_kwargs,
        )

    # 解码结果
    transcription = processor.batch_decode(
        result,
        skip_special_tokens=True,
        decode_with_timestamps=True
    )[0]

    return transcription, duration

# 使用原生长格式处理
try:
    result, duration = transcribe_long_audio_native("./test/qinyuanchun.mp3")

    print(f"\n=== 完整识别结果 ({duration:.1f}秒音频) ===")
    print(result)

except Exception as e:
    print(f"处理出错: {e}")

    # 备用方案:使用 pipeline 但优化参数
    from transformers import pipeline

    pipe = pipeline(
        "automatic-speech-recognition",
        model=model,
        tokenizer=processor.tokenizer,
        feature_extractor=processor.feature_extractor,
        torch_dtype=torch_dtype,
        device=device,
        return_timestamps=True,
    )

    generate_kwargs = {
        "language": "chinese",
        "task": "transcribe",
        "num_beams": 1,
        "temperature": 0.0,
        "return_timestamps": True,
    }

    result = pipe("./test/qinyuanchun.mp3", generate_kwargs=generate_kwargs)

    print("\n=== 使用pipeline的识别结果 ===")
    for chunk in result["chunks"]:
        print(f"[{chunk['timestamp'][0]:.1f}s - {chunk['timestamp'][1]:.1f}s]: {chunk['text']}")

    full_text = result["text"]
    print(f"\n完整文本: {full_text}")
运行结果:
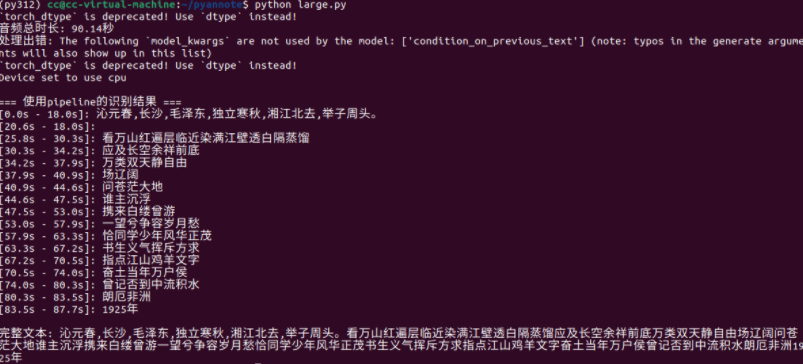
缺点: 语音转文字准确度不高
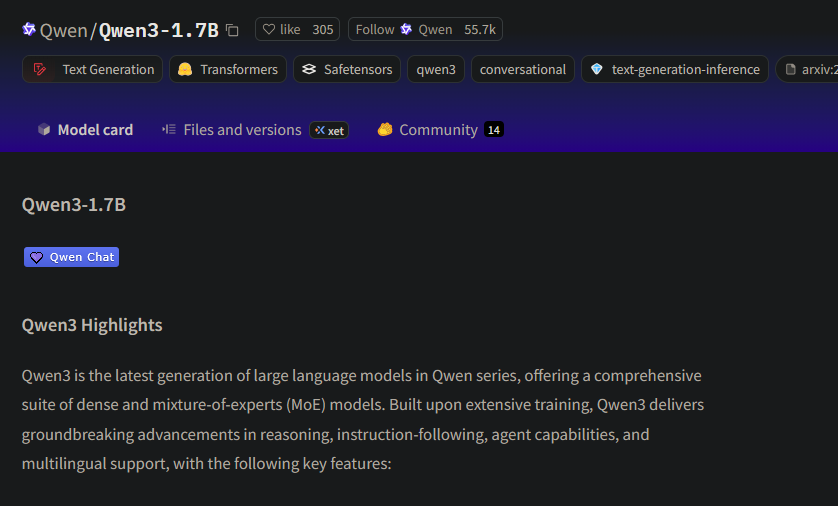
2.3 Qwen3-1.7B部署
Qwen3-1.7B 是阿里云开发的轻量级大语言模型,属于 Qwen3 系列。它在中文理解、文本生成、纠错等任务上表现较好,且参数量小(1.7B),适合在普通 GPU 或 CPU 上运行,推理速度较快。
Qwen3-4B 因为参数更多、架构更复杂,整体性能优于 Qwen3-1.7B,因为当前虚拟机只有cpu的原因,选择Qwen3-1.7B。
可以参考huggingface给的运行示例,下面为修改的python文件,主要为传入json文件,并根据prompt.txt的内容进行分析:
python
from transformers import AutoModelForCausalLM, AutoTokenizer
import json

# 1. 从外部文件读取prompt(核心修改:替换固定prompt为文件输入)
def load_prompt_from_file(file_path="prompt.txt"):
    """从txt文件加载prompt内容"""
    try:
        with open(file_path, "r", encoding="utf-8") as f:
            return f.read().strip()
    except FileNotFoundError:
        # 若文件不存在,返回默认prompt(兜底方案)
        default_prompt = """以下是一段多人朗诵的文本内容,请你完成两项任务:
1. 整理文档的核心主题(不超过10句话);
2. 概括文档大意(分3点简要说明,每点不超过100字);

文本内容:{combined_text}"""
        print(f"提示:未找到{file_path},使用默认prompt")
        return default_prompt

# 2. 从JSON文件读取数据
with open("./three_combined_aligned.json", "r", encoding="utf-8") as f:
    json_data = json.load(f)

# 3. 提取文本并过滤无关信息
irrelevant_keywords = ["点赞", "订阅", "转发", "打赏", "小红书", "抖音", "YoYo Television Series Exclusive", "孔优优独播剧场", "中文字幕志愿者", "李宗盛"]
all_text = []
for item in json_data:
    text = item["text"]
    if not any(keyword in text for keyword in irrelevant_keywords):
        all_text.append(text.strip())
combined_text = " ".join(all_text)

# 4. 加载模型和Tokenizer
model_name = "Qwen/Qwen3-1.7B"
tokenizer = AutoTokenizer.from_pretrained(model_name)
model = AutoModelForCausalLM.from_pretrained(
    model_name,
    torch_dtype="auto",
    device_map="auto"
)

# 5. 加载prompt并替换文本占位符
prompt = load_prompt_from_file("./prompt.txt")  # 可修改文件路径
prompt = prompt.replace("{combined_text}", combined_text)  # 注入处理后的文本

messages = [
    {"role": "user", "content": prompt}
]

# 6. 格式化输入并生成回复
text = tokenizer.apply_chat_template(
    messages,
    tokenize=False,
    add_generation_prompt=True,
    enable_thinking=False
)
model_inputs = tokenizer([text], return_tensors="pt").to(model.device)

generated_ids = model.generate(
    **model_inputs,
    max_new_tokens=512,
    temperature=0.3
)
output_ids = generated_ids[0][len(model_inputs.input_ids[0]):].tolist()
result = tokenizer.decode(output_ids, skip_special_tokens=True).strip()

# 7. 输出结果并保存为txt
output_text = f"=== 文档整理结果 ===\n{result}"
print(output_text)

with open("文档整理结果.txt", "w", encoding="utf-8") as f:
    f.write(output_text)

print("\n结果已保存为:文档整理结果.txt")例如prompt.txt的内容如下:
textile
请分析以下朗诵文本,完成3件事:
1. 提炼核心主题(10句话);
2. 分6点概括大意,每点不超30字;
3. 并且进行延伸,1000字左右
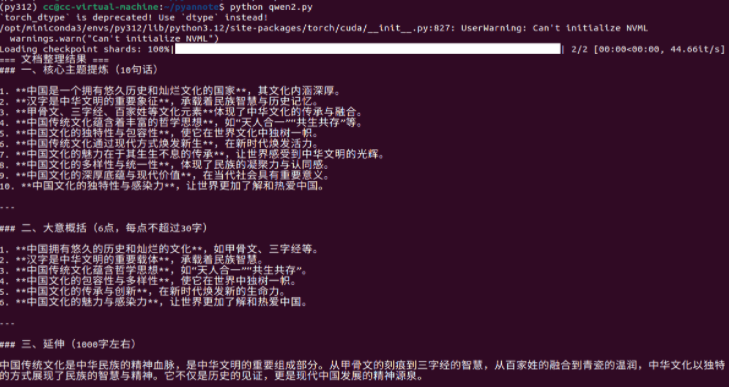
文本内容:{combined_text}运行结果如下:
3. whisper+speaker结合
将上述两个模型结合起来,将音频资源转换为对象、时间戳、及对应的文字,这边使用的音频资源为在网上找的三个人的诗朗诵,three.mp3,将ffmpeg转化也当到脚本中
python
import os
import json
import argparse
import subprocess
import torch
import huggingface_hub
from pyannote.audio import Pipeline
from transformers import AutoModelForSpeechSeq2Seq, AutoProcessor, pipeline

os.environ["HF_ENDPOINT"] = "https://hf-mirror.com"


def combine_results(rttm_file_path, asr_result, min_segment_duration=0.5):
    """优化匹配逻辑:去重+时间戳修正+重叠最优匹配"""
    # 1. 读取并过滤RTTM片段(<0.5秒的噪声片段)
    rttm_data = []
    with open(rttm_file_path, 'r') as rttm_file:
        for line in rttm_file.readlines():
            parts = line.strip().split()
            if len(parts) < 9:
                continue
            start = float(parts[3])
            duration = float(parts[4])
            end = start + duration
            speaker = parts[7]

            if duration >= min_segment_duration:
                rttm_data.append({
                    "start": start,
                    "end": end,
                    "speaker": speaker,
                    "duration": duration
                })
    if not rttm_data:
        print("⚠️ 无有效说话人片段(已过滤过短片段)")
        return []

    # 2. 读取并过滤ASR文本块(去重+时间戳修正)
    asr_chunks = []
    seen_text = set()
    for chunk in asr_result.get("chunks", []):
        if not chunk.get("timestamp") or None in chunk["timestamp"]:
            continue
        chunk_start, chunk_end = chunk["timestamp"]
        # 修正时间戳顺序
        if chunk_start > chunk_end:
            chunk_start, chunk_end = chunk_end, chunk_start
        duration = chunk_end - chunk_start
        if duration < 0.3:
            continue
        text = chunk["text"].strip()
        # 文本去重(忽略空格和标点差异)
        clean_text = text.replace(" ", "").replace(",", "").replace("。", "").replace("!", "")
        if clean_text not in seen_text and len(clean_text) > 1:
            seen_text.add(clean_text)
            asr_chunks.append({
                "start": chunk_start,
                "end": chunk_end,
                "text": text,
                "duration": duration
            })
    if not asr_chunks:
        print("⚠️ 无有效ASR文本块")
        return []

    # 3. 重叠度优先匹配(仅取最优说话人)
    combined_results = []
    for asr in asr_chunks:
        asr_start, asr_end = asr["start"], asr["end"]
        matched_segments = []

        # 计算与所有说话人片段的重叠度
        for seg in rttm_data:
            seg_start, seg_end = seg["start"], seg["end"]
            overlap_start = max(asr_start, seg_start)
            overlap_end = min(asr_end, seg_end)
            overlap_duration = max(0.0, overlap_end - overlap_start)
            overlap_ratio = overlap_duration / asr["duration"]

            if overlap_ratio > 0.1:
                matched_segments.append({
                    "speaker": seg["speaker"],
                    "overlap_start": overlap_start,
                    "overlap_end": overlap_end,
                    "overlap_ratio": overlap_ratio
                })

        # 处理匹配结果
        if not matched_segments:
            combined_results.append({
                "start_time": asr_start,
                "end_time": asr_end,
                "speaker": "UNKNOWN",
                "text": asr["text"]
            })
        else:
            # 按重叠度排序,仅取最高的
            matched_segments.sort(key=lambda x: x["overlap_ratio"], reverse=True)
            top_seg = matched_segments[0]
            combined_results.append({
                "start_time": top_seg["overlap_start"],
                "end_time": top_seg["overlap_end"],
                "speaker": top_seg["speaker"],
                "text": asr["text"]
            })

    # 4. 合并同一说话人连续片段(增强去重)
    if not combined_results:
        return []
    merged = [combined_results[0]]
    for curr in combined_results[1:]:
        last = merged[-1]
        if (curr["speaker"] == last["speaker"] and
            curr["start_time"] - last["end_time"] < 1.0):
            last["end_time"] = curr["end_time"]
            # 文本去重:避免重复添加相同内容
            if curr["text"] not in last["text"]:
                last["text"] += " " + curr["text"]
        else:
            merged.append(curr)

    return merged


def convert_to_wav(input_path):
    """转换音频为16kHz单声道WAV(修复时间戳偏移)"""
    wav_path = os.path.splitext(input_path)[0] + ".wav"
    if os.path.exists(wav_path):
        print(f"ℹ️ WAV文件已存在:{wav_path}")
        return wav_path

    try:
        print(f"🔄 转换音频:{input_path} -> {wav_path}")
        cmd = [
            "ffmpeg", "-y", "-i", input_path,
            "-ar", "16000", "-ac", "1", "-c:a", "pcm_s16le",
            "-avoid_negative_ts", "make_zero",  # 修复时间戳偏移
            wav_path
        ]
        result = subprocess.run(
            cmd, stdout=subprocess.PIPE, stderr=subprocess.PIPE, text=True
        )
        if result.returncode != 0:
            print(f"❌ ffmpeg错误:{result.stderr}")
            return None
        print(f"✅ 转换成功:{wav_path}")
        return wav_path
    except Exception as e:
        print(f"❌ 转换失败:{str(e)}")
        return None


def main():
    parser = argparse.ArgumentParser(description="说话人分离+语音识别(优化去重版)")
    parser.add_argument("audio_path", help="音频文件路径(MP3/WAV等)")
    args = parser.parse_args()
    input_path = args.audio_path

    # 基础校验
    if not os.path.exists(input_path):
        print(f"❌ 音频不存在:{input_path}")
        return
    try:
        subprocess.run(["ffmpeg", "-version"], stdout=subprocess.PIPE, stderr=subprocess.PIPE)
    except FileNotFoundError:
        print("❌ 未找到ffmpeg,安装参考:https://ffmpeg.org/download.html")
        return

    # 转换音频(修复时间戳偏移)
    audio_path = convert_to_wav(input_path)
    if not audio_path:
        return

    # Hugging Face登录与模型加载
    token = "hf_TBTbupvBJJ##################"
    try:
        # 登录验证
        huggingface_hub.login(token=token)
        print(f"✅ 登录成功:{huggingface_hub.whoami()['name']}")

        # 1. 说话人分离
        print("🔄 加载说话人分离模型...")
        diarization_pipeline = Pipeline.from_pretrained(
            "pyannote/speaker-diarization-3.1", token=token
        )
        print("✅ 说话人分离模型加载成功")

        # 执行分离
        audio_filename = os.path.splitext(os.path.basename(audio_path))[0]
        print(f"🎧 处理音频:{audio_path}")
        diarization_result = diarization_pipeline(audio_path)
        print("✅ 说话人分离完成!")

        # 生成RTTM(过滤<0.5秒片段)
        rttm_filename = f"{audio_filename}.rttm"
        speaker_segments = diarization_result.speaker_diarization
        with open(rttm_filename, "w") as rttm_file:
            for segment, _, speaker in speaker_segments.itertracks(yield_label=True):
                duration = segment.end - segment.start
                if duration >= 0.5:
                    rttm_line = (
                        f"SPEAKER {audio_filename} 1 {segment.start:.3f} "
                        f"{duration:.3f} <NA> <NA> {speaker} <NA> <NA>\n"
                    )
                    rttm_file.write(rttm_line)
        print(f"✅ RTTM文件保存(过滤<0.5秒片段):{rttm_filename}")

    except Exception as e:
        print(f"❌ 说话人分离出错:{str(e)}")
        return

    # 2. 语音识别(细化时间戳,确保时间对齐)
    try:
        device = "cuda:0" if torch.cuda.is_available() else "cpu"
        torch_dtype = torch.float16 if torch.cuda.is_available() else torch.float32
        print(f"💻 识别设备:{device}")

        # 加载Whisper模型
        print("🔄 加载语音识别模型...")
        model_id = "openai/whisper-large-v3-turbo"
        model = AutoModelForSpeechSeq2Seq.from_pretrained(
            model_id, torch_dtype=torch_dtype, low_cpu_mem_usage=True, use_safetensors=True
        ).to(device)
        processor = AutoProcessor.from_pretrained(model_id)
        print("✅ 语音识别模型加载成功")

        # 构建ASR流水线
        asr_pipeline = pipeline(
            "automatic-speech-recognition",
            model=model,
            tokenizer=processor.tokenizer,
            feature_extractor=processor.feature_extractor,
            chunk_length_s=10,
            batch_size=4,
            torch_dtype=torch_dtype,
            device=device,
            return_timestamps="segment",
            stride_length_s=[2, 2],
        )

        # 执行识别
        print("🔄 正在语音识别(细化时间戳)...")
        asr_result = asr_pipeline(
            audio_path,
            generate_kwargs={
                "language": "chinese",
                "num_beams": 2,
                "temperature": 0.1,
                "compression_ratio_threshold": 2.0,
                "logprob_threshold": -2.0,
                "no_speech_threshold": 0.6,
            }
        )
        print("✅ 语音识别完成!")

        # ASR结果去重(关键优化步骤)
        deduplicated_chunks = []
        seen_text = set()
        for chunk in asr_result.get("chunks", []):
            text = chunk["text"].strip()
            clean_text = text.replace(" ", "").replace(",", "").replace("。", "").replace("!", "")
            if clean_text not in seen_text and len(clean_text) > 1:
                seen_text.add(clean_text)
                deduplicated_chunks.append(chunk)
        asr_result["chunks"] = deduplicated_chunks

        # 保存ASR细粒度结果
        asr_json_filename = f"{audio_filename}_asr_with_timestamps.json"
        with open(asr_json_filename, "w", encoding="utf-8") as f:
            json.dump(asr_result["chunks"], f, ensure_ascii=False, indent=2)
        print(f"✅ ASR细粒度结果保存:{asr_json_filename}")

        # 保存纯文本结果
        asr_txt_filename = f"{audio_filename}_asr.txt"
        full_text = "".join([c["text"] for c in asr_result.get("chunks", []) if "text" in c])
        with open(asr_txt_filename, "w", encoding="utf-8") as f:
            f.write(full_text)
        print(f"✅ ASR纯文本保存:{asr_txt_filename}")

    except Exception as e:
        print(f"❌ 语音识别出错:{str(e)}")
        return

    # 3. 匹配说话人与文本(时间对齐核心逻辑)
    combined = combine_results(rttm_filename, asr_result)
    if not combined:
        print("⚠️ 未生成有效匹配结果")
        return

    # 输出最终匹配结果
    print("\n📋 说话人-文本匹配结果(时间对齐):")
    for i, item in enumerate(combined, 1):
        print(f"{i:2d}. [{item['start_time']:.2f}s-{item['end_time']:.2f}s] {item['speaker']:10s}: {item['text']}")

    # 保存最终对齐结果
    output_json = f"{audio_filename}_combined_aligned.json"
    with open(output_json, "w", encoding="utf-8") as f:
        json.dump(combined, f, ensure_ascii=False, indent=2)
    print(f"\n✅ 时间对齐结果保存:{output_json}")


if __name__ == "__main__":
    main()
运行结果如下:
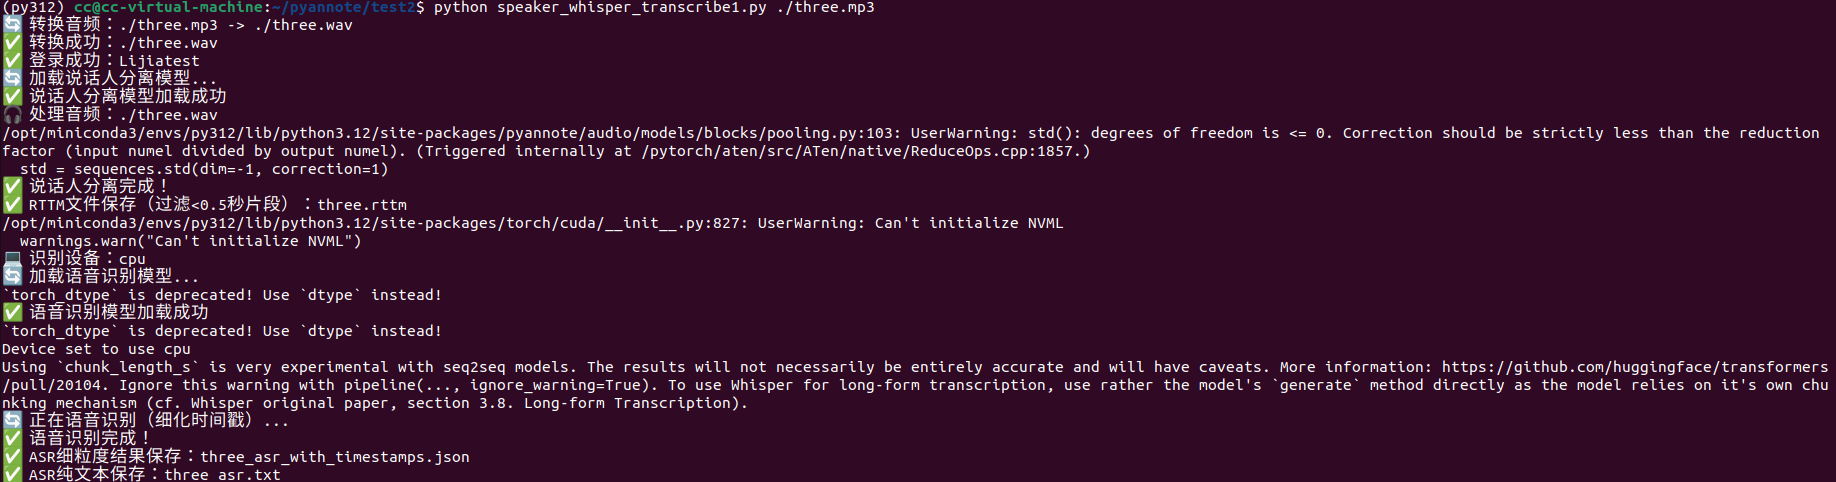
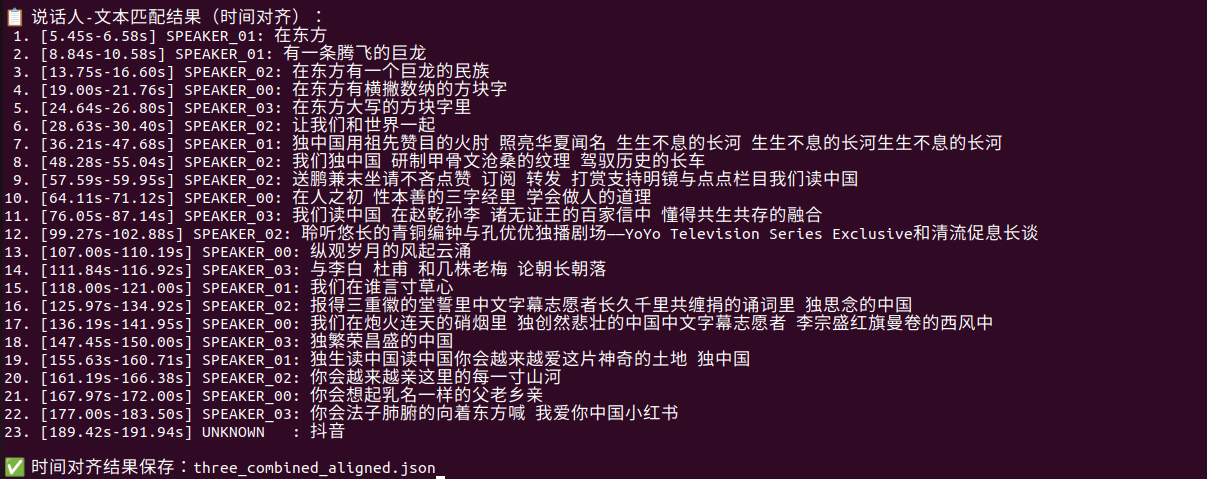
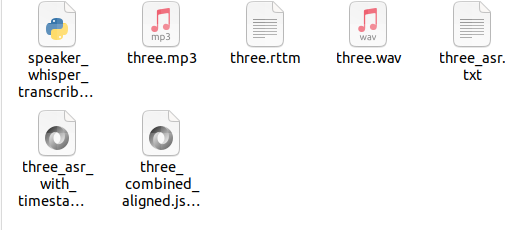
最终生成的文件为:
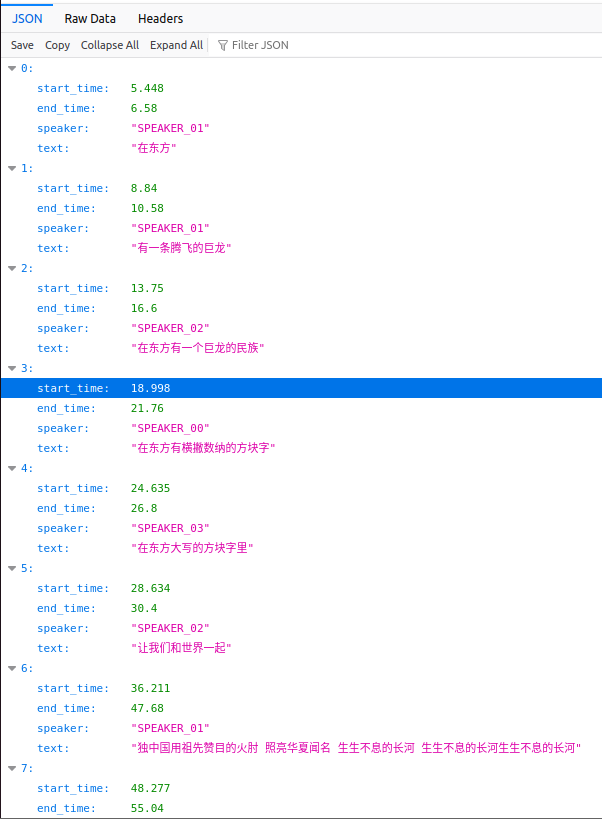
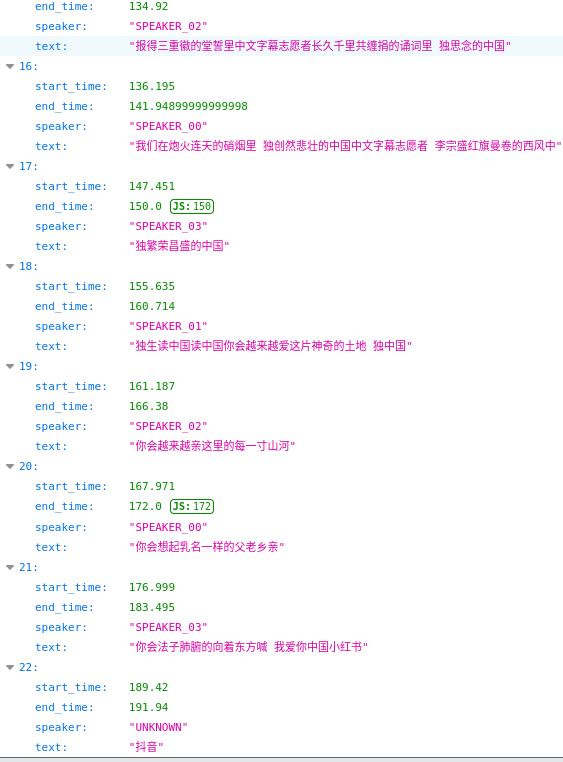
实际最终的结果three_combined_aligned.json为:
问题:依旧是语音识别不准的原因
下篇则通过qwen对语音转文字的内容进行推理和整理