文章目录
-
- 部署开源漏洞扫描工具SiriusScan及问题解决
-
- 1、先决条件
- [2、安装Docker和Docker Compose](#2、安装Docker和Docker Compose)
-
- 2.1、卸载旧版本和冲突包
- 2.2、选择安装方式
-
- [第一种 使用apt存储库安装:](#第一种 使用apt存储库安装:)
- [第二种 使用包安装:](#第二种 使用包安装:)
- 2.3、添加docker源
- [3、Sirius scan系统部署](#3、Sirius scan系统部署)
- 4、登录系统
- 5、部署遇到的问题
-
-
- [报错信息1:go mod download` 步骤无法连接到 Go 模块代理服务器(proxy.golang.org),出现了网络超时问题,报错代码1。](#报错信息1:go mod download` 步骤无法连接到 Go 模块代理服务器(proxy.golang.org),出现了网络超时问题,报错代码1。)
- [报错信息2:unknown field ID in struct literal of type sirius.Port。报错代码1。](#报错信息2:unknown field ID in struct literal of type sirius.Port。报错代码1。)
- 报错信息3:Git在克隆仓库时无法连接到GitHub,报错代码128
-
部署开源漏洞扫描工具SiriusScan及问题解决
SiriusScan的核心代码是全部托管在github上的,而且是开源的可以供大家来二次开发,官方网址https://github.com/SiriusScan/Sirius目前部署是仅支持通过docker来部署,以下是部署过程:
1、先决条件
- Docker 引擎 版本不低于20.10.0+ 与 Docker Compose 版本要V2以上
- 系统要求:至少 4GB RAM,10GB 可用磁盘空间
- 网络访问:用于漏洞数据库更新的互联网连接
- 支持的平台:Linux、macOS、Windows(带 WSL2)
部署SiriusScan就一个软件需求,就是要安装符合版本Docker和Docker Compose,其他都是硬件、网络和系统类要求。
网络方面就是要将电脑的IP地址和DNS要配置好,特别是DNS(根据自己区域配置好用的DNS)。能正常更新系统和访问github等网站。

如果是新系统最好把系统的源也配置好(我是debian12系统,按照自己的系统类型配置好用的源):
bash
 # 配置系统源,配置合适的源,debian源的配置文件是/etc/apt/sources.list
nano /etc/apt/sources.list

# 添加如下内容:
deb https://mirrors.tuna.tsinghua.edu.cn/debian/ trixie main contrib non-free non-free-firmware
# deb-src https://mirrors.tuna.tsinghua.edu.cn/debian/ trixie main contrib non-free non-free-firmware

deb https://mirrors.tuna.tsinghua.edu.cn/debian/ trixie-updates main contrib non-free non-free-firmware
# deb-src https://mirrors.tuna.tsinghua.edu.cn/debian/ trixie-updates main contrib non-free non-free-firmware

deb https://mirrors.tuna.tsinghua.edu.cn/debian/ trixie-backports main contrib non-free non-free-firmware
# deb-src https://mirrors.tuna.tsinghua.edu.cn/debian/ trixie-backports main contrib non-free non-free-firmware

deb https://security.debian.org/debian-security trixie-security main contrib non-free non-free-firmware
# deb-src https://security.debian.org/debian-security trixie-security main contrib non-free non-free-firmware
2、安装Docker和Docker Compose
官方参考文档https://docs.docker.com/engine/install/
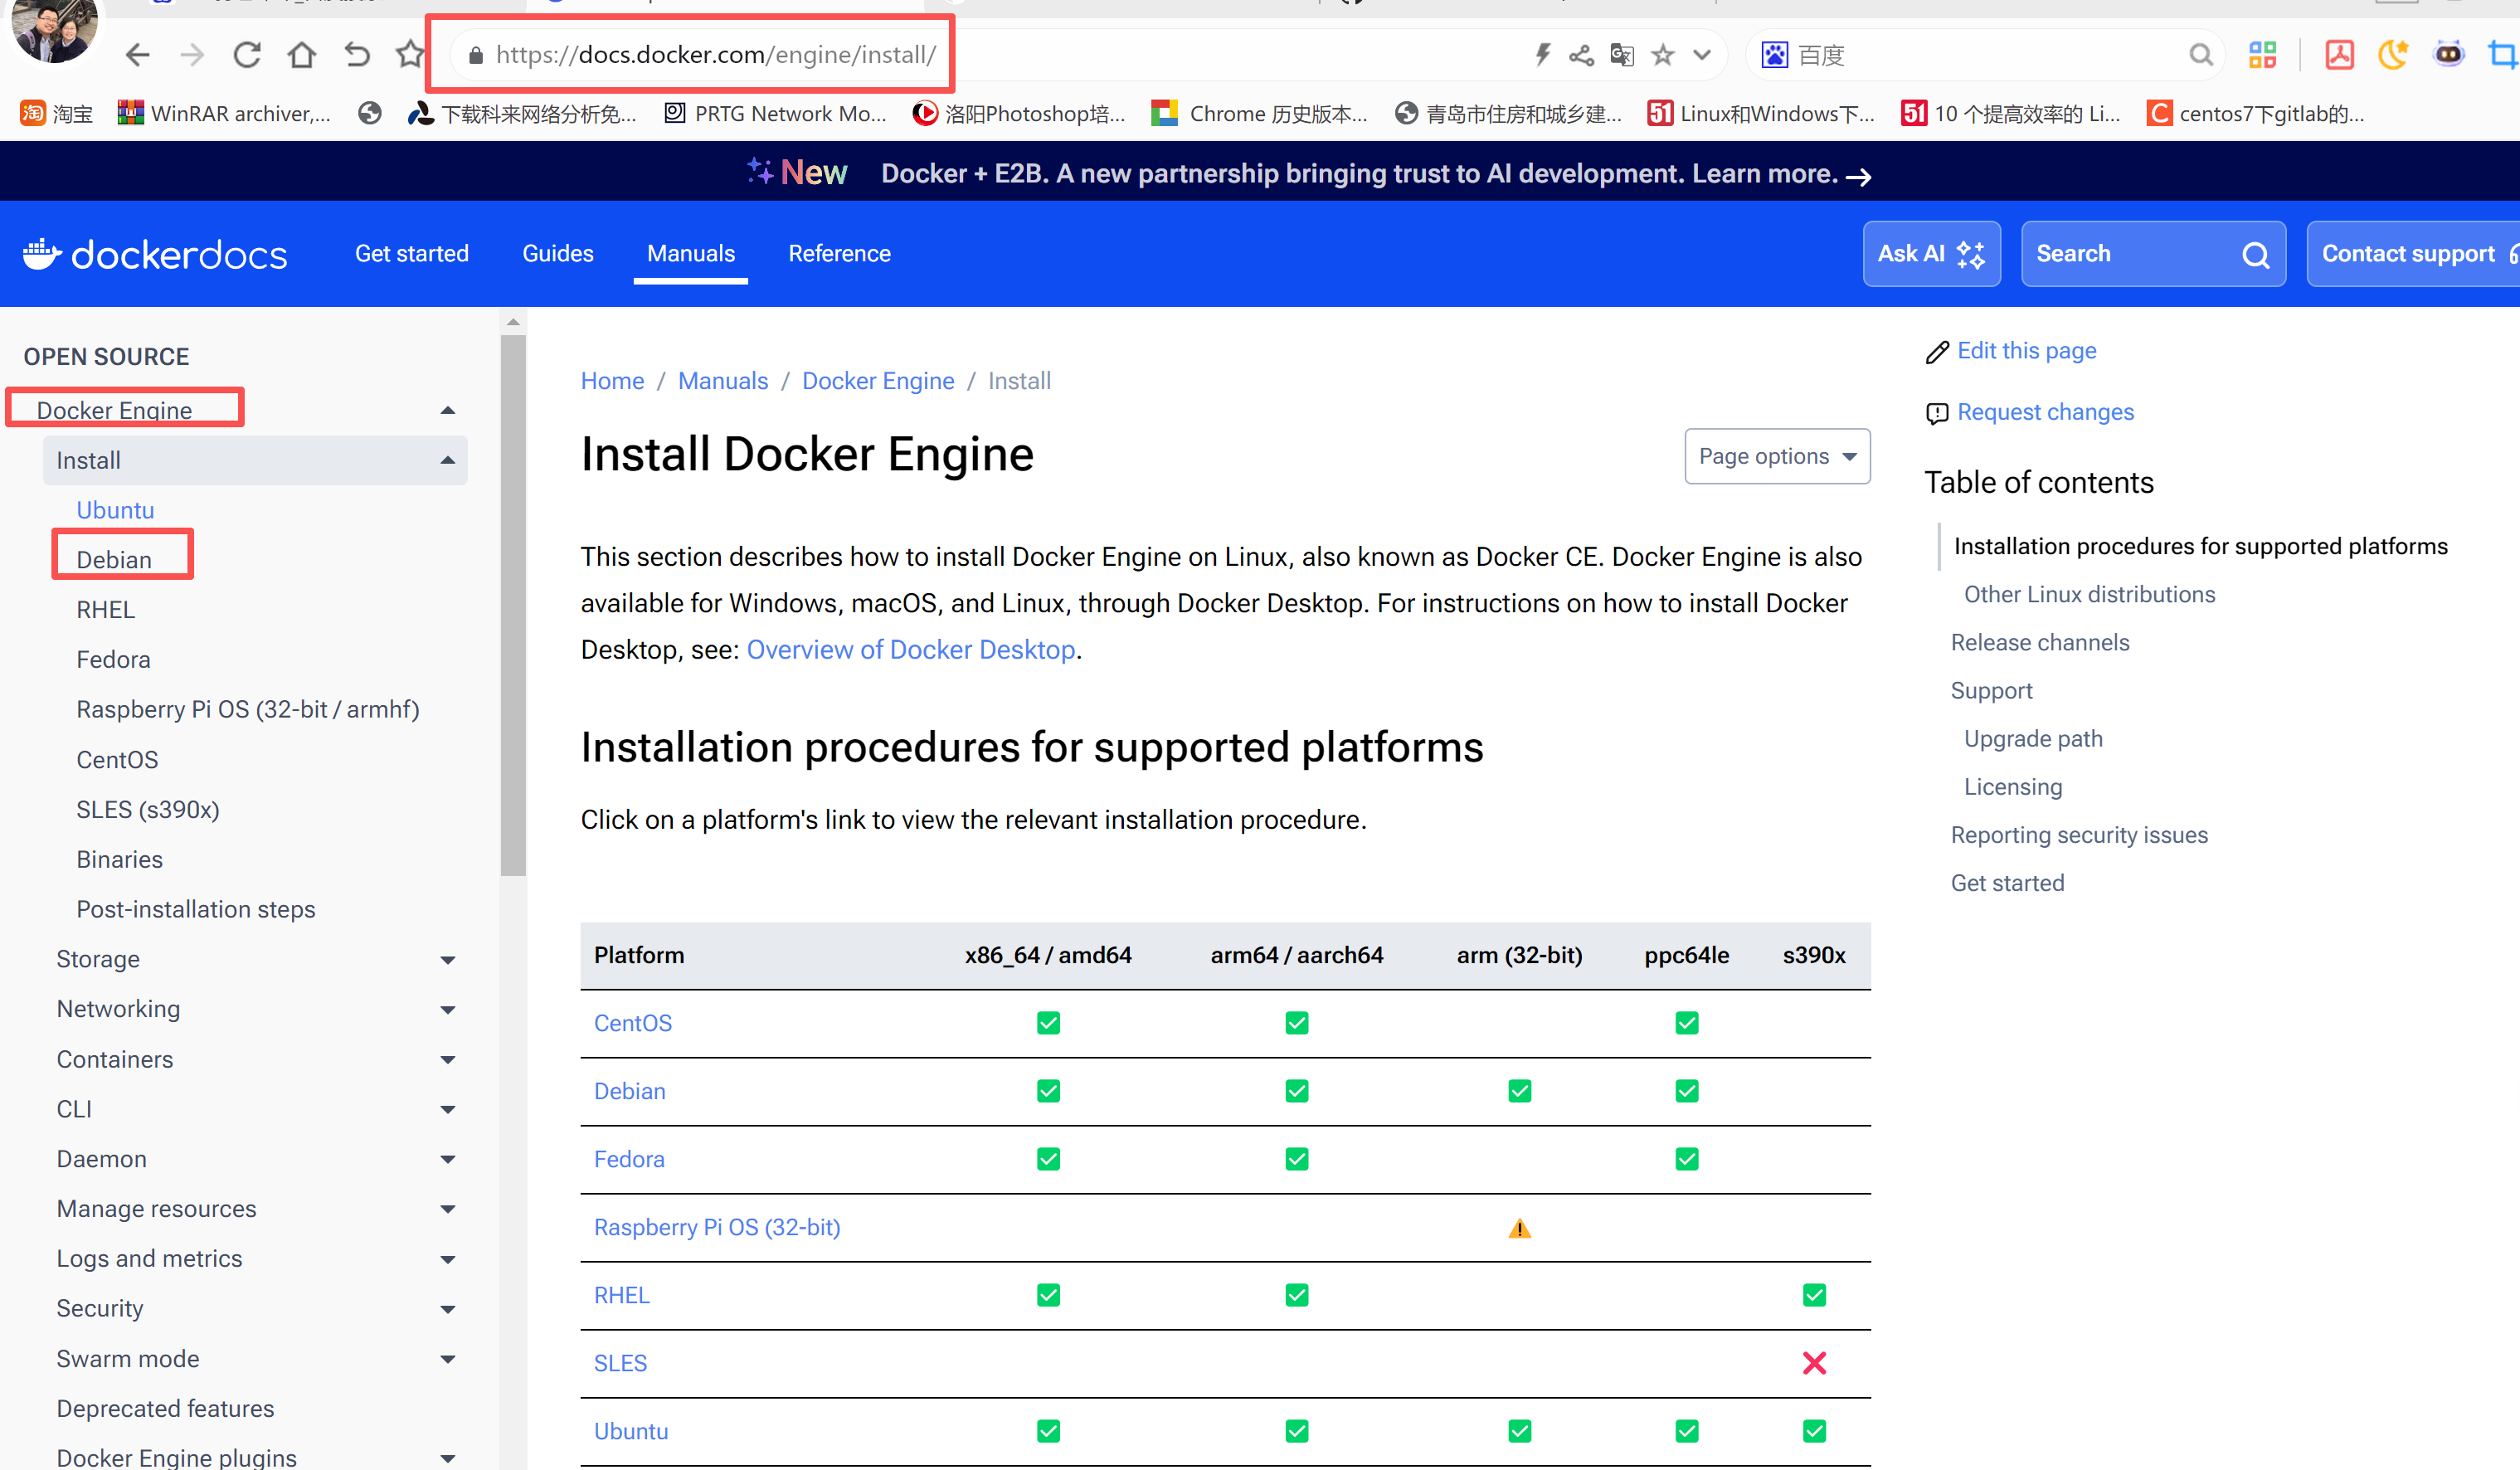
根据自己的系统选择安装方式,我用的debian系统:
2.1、卸载旧版本和冲突包
bash
 # 运行以下命令卸载所有冲突的包
for pkg in docker.io docker-doc docker-compose podman-docker containerd runc; do sudo apt-get remove $pkg; done
2.2、选择安装方式
一般有2种安装方式,根据自己需要选择一种。
第一种 使用apt存储库安装:
在新主机上首次安装 Docker Engine 之前,需要设置 Dockerapt存储库。之后,您可以从存储库安装和更新 Docker。
设置 Docker 的apt存储库
bash
 # Add Docker's official GPG key:

sudo apt-get update
sudo apt-get install ca-certificates curl
sudo install -m 0755 -d /etc/apt/keyrings
sudo curl -fsSL https://download.docker.com/linux/debian/gpg -o /etc/apt/keyrings/docker.asc
sudo chmod a+r /etc/apt/keyrings/docker.asc

# Add the repository to Apt sources:

echo \
  "deb [arch=$(dpkg --print-architecture) signed-by=/etc/apt/keyrings/docker.asc] https://download.docker.com/linux/debian \
  $(. /etc/os-release && echo "$VERSION_CODENAME") stable" | \
  sudo tee /etc/apt/sources.list.d/docker.list > /dev/null
sudo apt-get update
安装 Docker 软件包
安装最新版本(一般推荐这个):
bash
# 如果要安装最新版本,请运行:
sudo apt-get install docker-ce docker-ce-cli containerd.io docker-buildx-plugin docker-compose-plugin
安装指定版本:
如果要安装特定版本的 Docker Engine,请首先列出存储库中的可用版本:
bash
# List the available versions:
root@sirius:~# apt-cache madison docker-ce | awk '{ print $3 }'
5:28.5.1-1~debian.12~bookworm
5:28.5.0-1~debian.12~bookworm
5:28.4.0-1~debian.12~bookworm
5:28.3.3-1~debian.12~bookworm
5:28.3.2-1~debian.12~bookworm
5:28.3.1-1~debian.12~bookworm
5:28.3.0-1~debian.12~bookworm
5:28.2.2-1~debian.12~bookworm
5:28.2.1-1~debian.12~bookworm
5:28.2.0-1~debian.12~bookworm
5:28.1.1-1~debian.12~bookworm
5:28.1.0-1~debian.12~bookworm
5:28.0.4-1~debian.12~bookworm
5:28.0.3-1~debian.12~bookworm
5:28.0.2-1~debian.12~bookworm
5:28.0.1-1~debian.12~bookworm
5:28.0.0-1~debian.12~bookworm
5:27.5.1-1~debian.12~bookworm
5:27.5.0-1~debian.12~bookworm
:
选择所需的版本并安装:
VERSION_STRING=5:28.5.1-1~debian.12~bookworm
sudo apt-get install docker-ce=$VERSION_STRING docker-ce-cli=$VERSION_STRING containerd.io docker-buildx-plugin docker-compose-plugin
验证 Docker 是否正在运行,使用:
bash
sudo systemctl status docker某些系统可能会禁用此行为,并且需要手动启动:
bash
sudo systemctl start docker查看版本:
bash
docker version
dockercompose  version
第二种 使用包安装:
-
在列表中选择您的 Debian 版本。
-
转至
pool/stable/并选择适用的架构(amd64、armhf、arm64或s390x)。 -
deb下载Docker 引擎、CLI、containerd 和 Docker Compose 软件包的以下文件:
bash
- containerd.io_<version>_<arch>.deb

- docker-ce_<version>_<arch>.deb

- docker-ce-cli_<version>_<arch>.deb

- docker-buildx-plugin_<version>_<arch>.deb

- docker-compose-plugin_<version>_<arch>.deb
以上五个文件都要安装。

安装.deb软件包。将以下示例中的路径更新为下载 Docker 软件包的位置。
bash
sudo dpkg -i ./containerd.io_<version>_<arch>.deb \
  ./docker-ce_<version>_<arch>.deb \
  ./docker-ce-cli_<version>_<arch>.deb \
  ./docker-buildx-plugin_<version>_<arch>.deb \
  ./docker-compose-plugin_<version>_<arch>.deb
要验证 Docker 是否正在运行,使用:
bash
sudo systemctl status docker某些系统可能会禁用此行为,并且需要手动启动:
bash
sudo systemctl start docker查看版本:
bash
docker version
dockercompose  version
2.3、添加docker源
在/etc/docker/目录下创建daemon.json文件,并添加源的信息。
编辑daemon.json文件
bash
nano /etc/docker/daemon.json添加如下信息:
bash
{
    "registry-mirrors": [
        "https://do.nark.eu.org",
        "https://dc.j8.work",
        "https://mirror.aliyuncs.com/",
        "https://docker.mirrors.ustc.edu.cn/",
        "https://hub-mirror.c.163.com",
        "https://mirror.baidubce.com",
        "https://docker.m.daocloud.io",
        "https://dockerproxy.com",
        "https://docker.1panel.live",
        "https://docker.1ms.run",
        "https://dytt.online",
        "https://registry.cyou",
        "https://docker.xiaogenban1993.com",
        "https://lispy.org",
        "https://docker-0.unsee.tech",
        "https://docker.mirrors.ustc.edu.cn",
        "https://docker.nju.edu.cn"
    ]
}
载入配置生效
bash
systemctl daemon-reload重启docker服务
bash
systemctl restart docker3、Sirius scan系统部署
bash
# Clone and start Sirius
git clone https://github.com/SiriusScan/Sirius.git
cd Sirius
docker compose up -d
最后成功是这样:

4、登录系统
登录地址 http://服务主机IP:3000
登录凭据:
- 用户名:
admin - 初始密码:
password
5、部署遇到的问题
根据官网步骤就三个命令非常简单
bash
git clone https://github.com/SiriusScan/Sirius.git
cd Sirius
docker compose up -d
在克隆 github上的Sirius项目时一般没什么问题,一遍步行可以多执行几遍就可以了。
大部分的问题都会出现在docker compose up -d(构建、启动容器以及拉取镜像等等方面)。
报错信息1:go mod download` 步骤无法连接到 Go 模块代理服务器(proxy.golang.org),出现了网络超时问题,报错代码1。

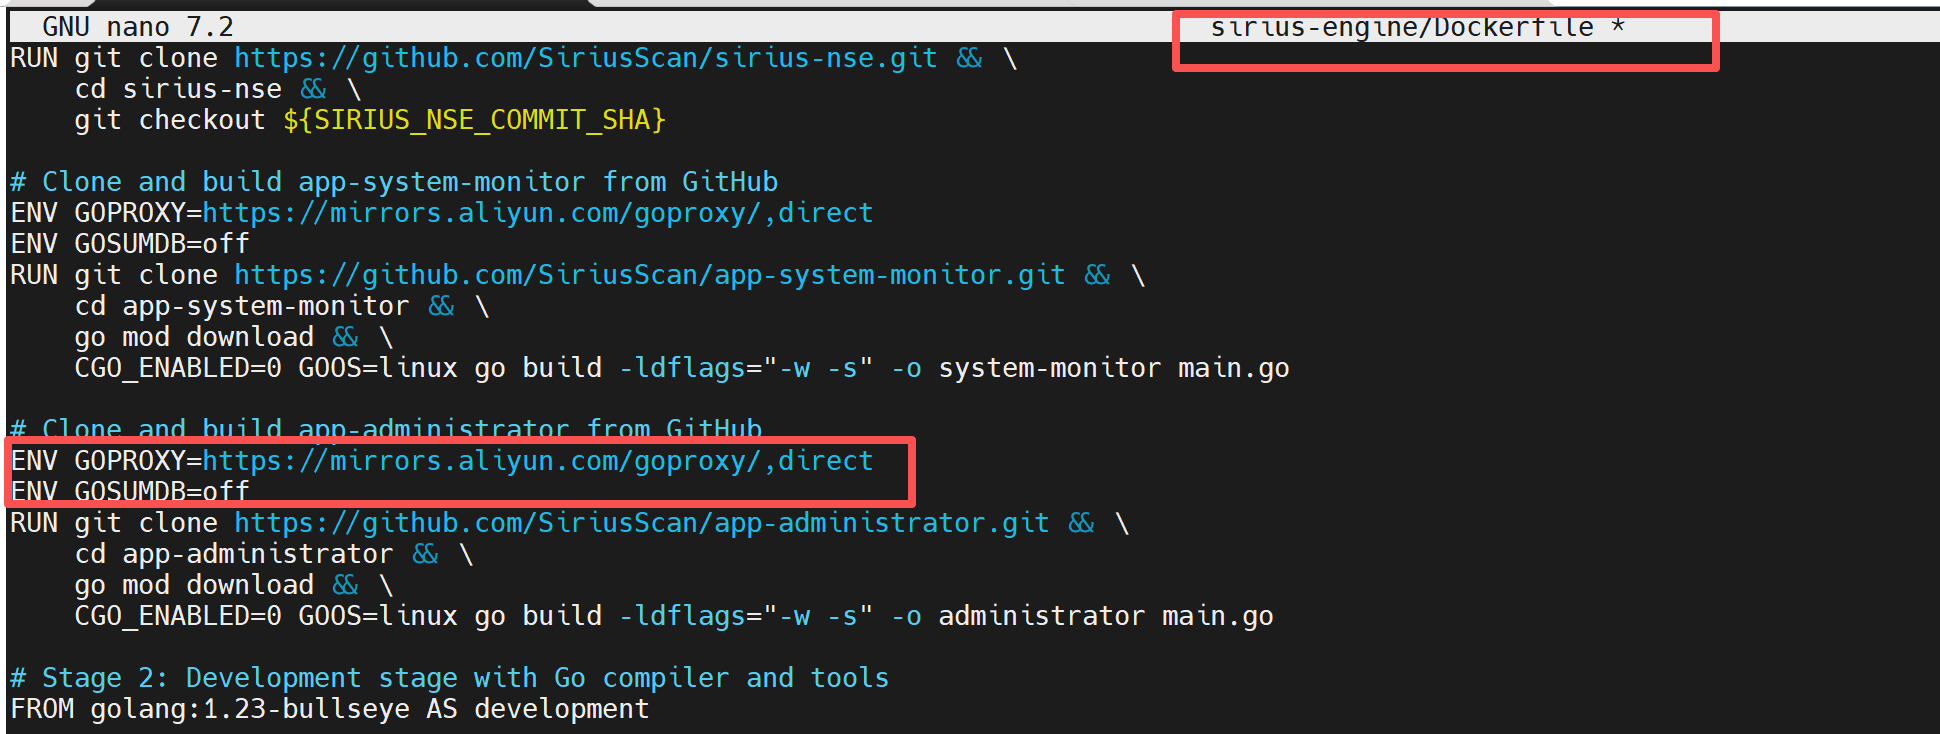
这个错误是因为在 Docker 构建过程中,go mod download 步骤无法连接到 Go 模块代理服务器(proxy.golang.org),出现了网络超时问题。
这种情况下需要编辑相应模块的Dockerfile文件来添加代理,这里出问题的是sirius-ui中的app-system-monitor模块,所以要编辑此模块的Dockerfile文件,凡是要执行go mod download命令的地方都添加代理:
bash
# 编辑Dockerfile命令:
nano sirius-ui/Dockerfile

找到要修改的地方
# Clone and build system monitor
ENV GOPROXY=https://mirrors.aliyun.com/goproxy/,direct      # 这是要添加的信息
ENV GOSUMDB=off                                             # 这也是要添加的信息
RUN git clone https://github.com/SiriusScan/app-system-monitor.git /tmp/system-monitor && \
    cd /tmp/system-monitor && \
    go mod download && \
    CGO_ENABLED=0 GOOS=linux go build -ldflags="-w -s" -o system-monitor main.go && \
    cp system-monitor /system-monitor/ && \
    chmod +x /system-monitor/system-monitor && \
    rm -rf /tmp/system-monitor
为了防止其他模块出现同样问题,可以把其他模块(sirius-api、sirius-postgres、sirius-engine、sirius-rabbitmq 、sirius-valkey)中的Dockerfile都添加了代理。或者那个出错就添加那个。


修改完以上信息后再次执行docker compose up -d命令。
报错信息2:unknown field ID in struct literal of type sirius.Port。报错代码1。
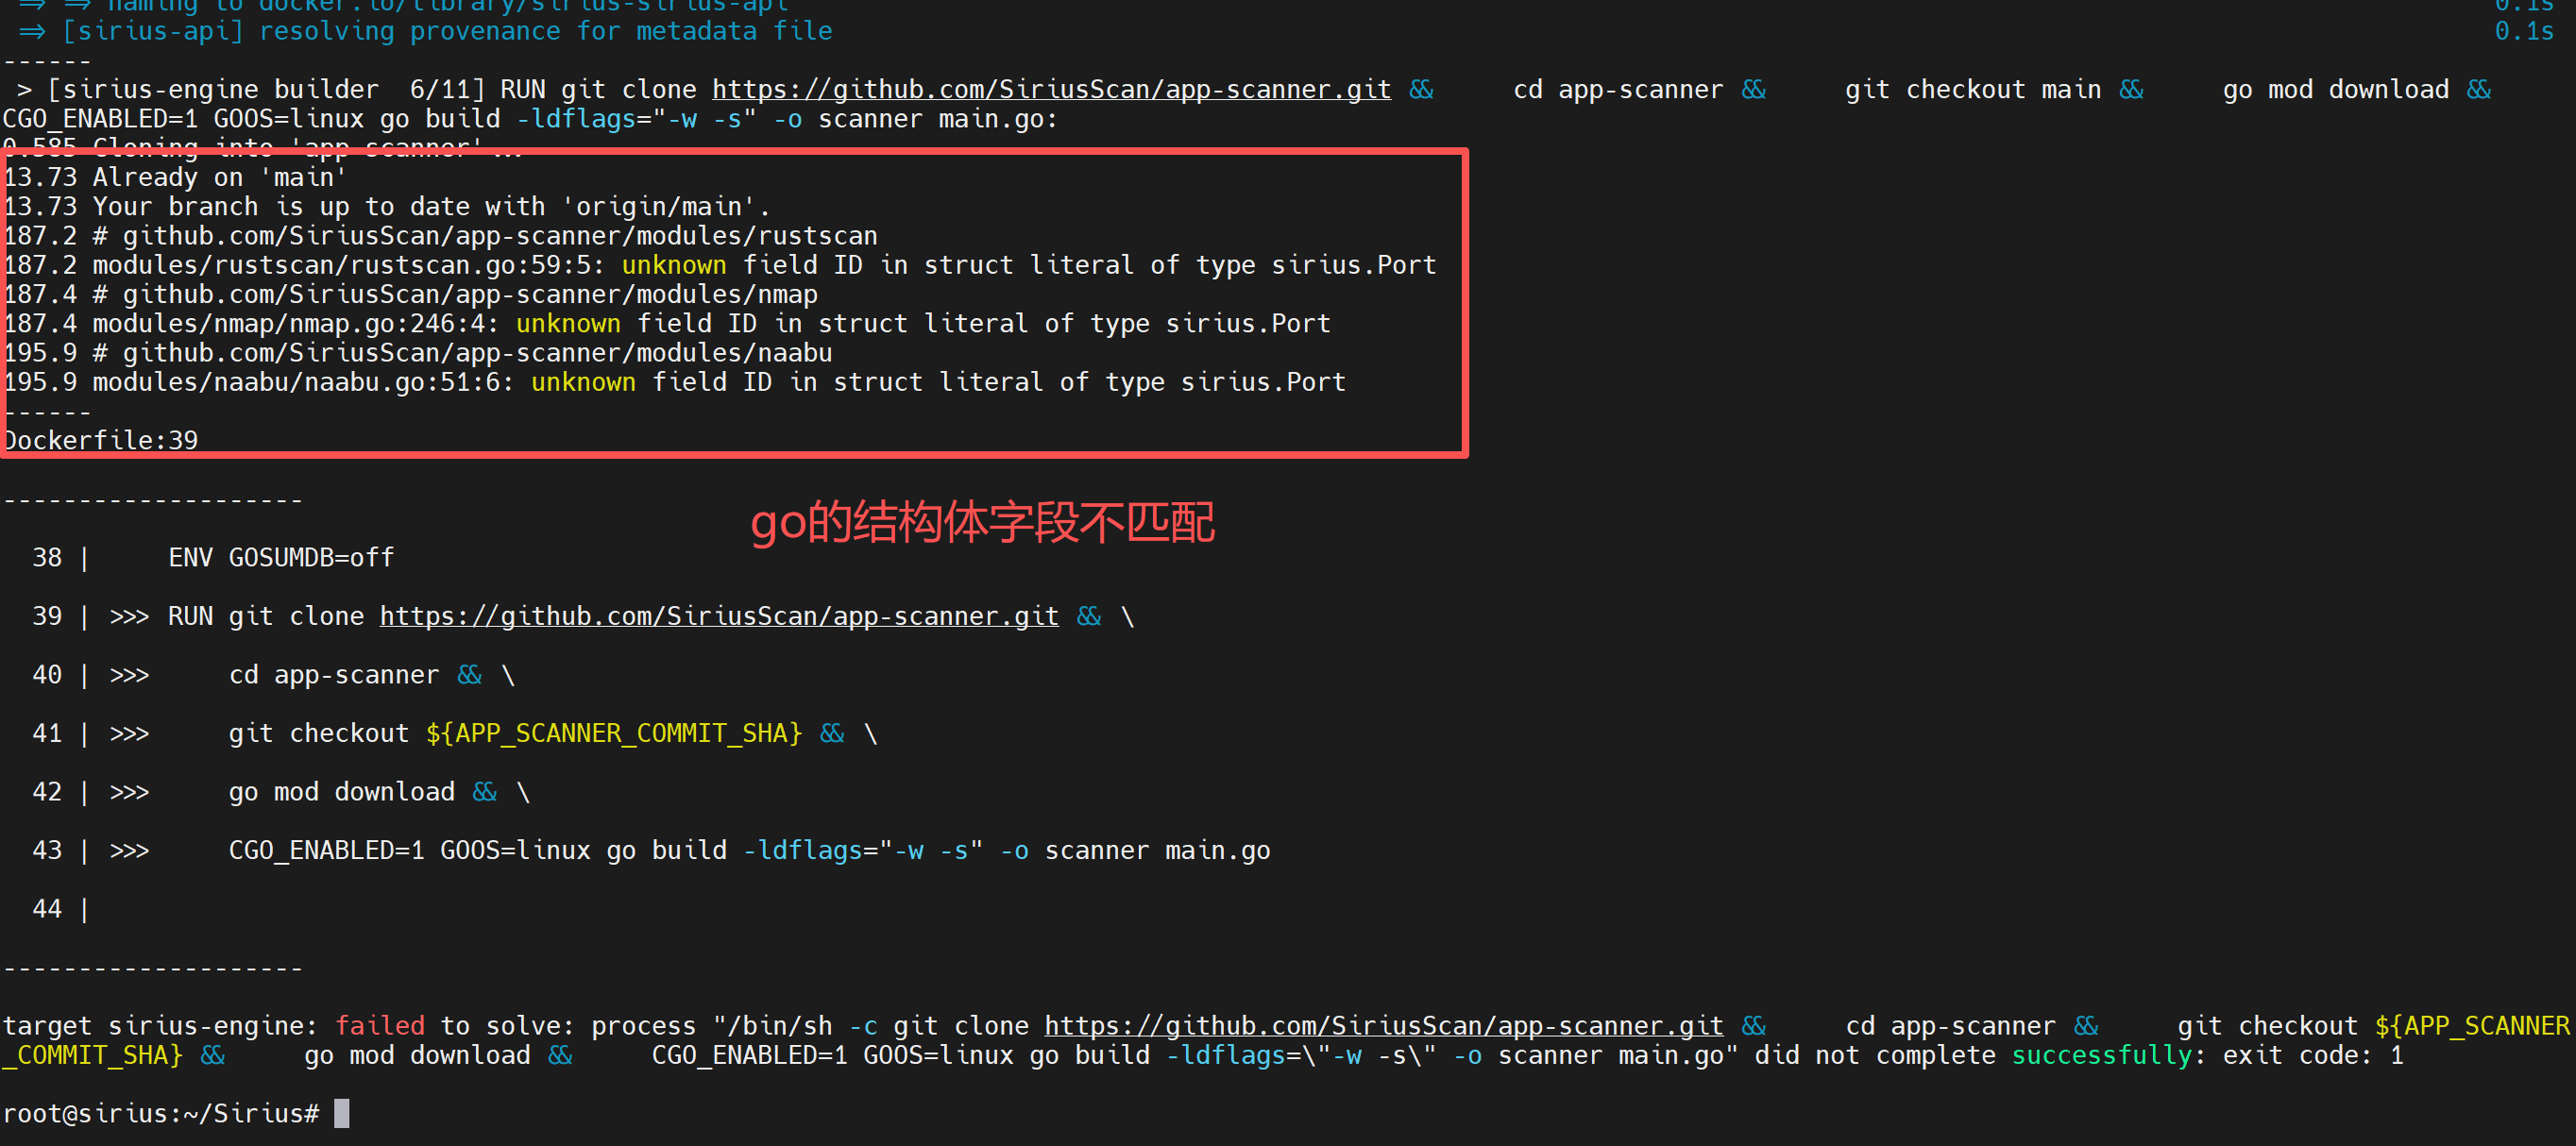
这是一个Go语言编译错误,问题出现在 sirius.Port 结构体的字段不匹配上。
unknown field ID in struct literal of type sirius.Port
这表明 sirius.Port 结构体中没有名为 ID 的字段,但代码中尝试使用这个字段。
解决办法:清理docker缓存
bash
# 命令
docker builder prune -a
清理完毕后再执行构建命令
bash
docker compose up -d再报同样错就清理缓存后,将Sirius 项目删除后,重新拉取。
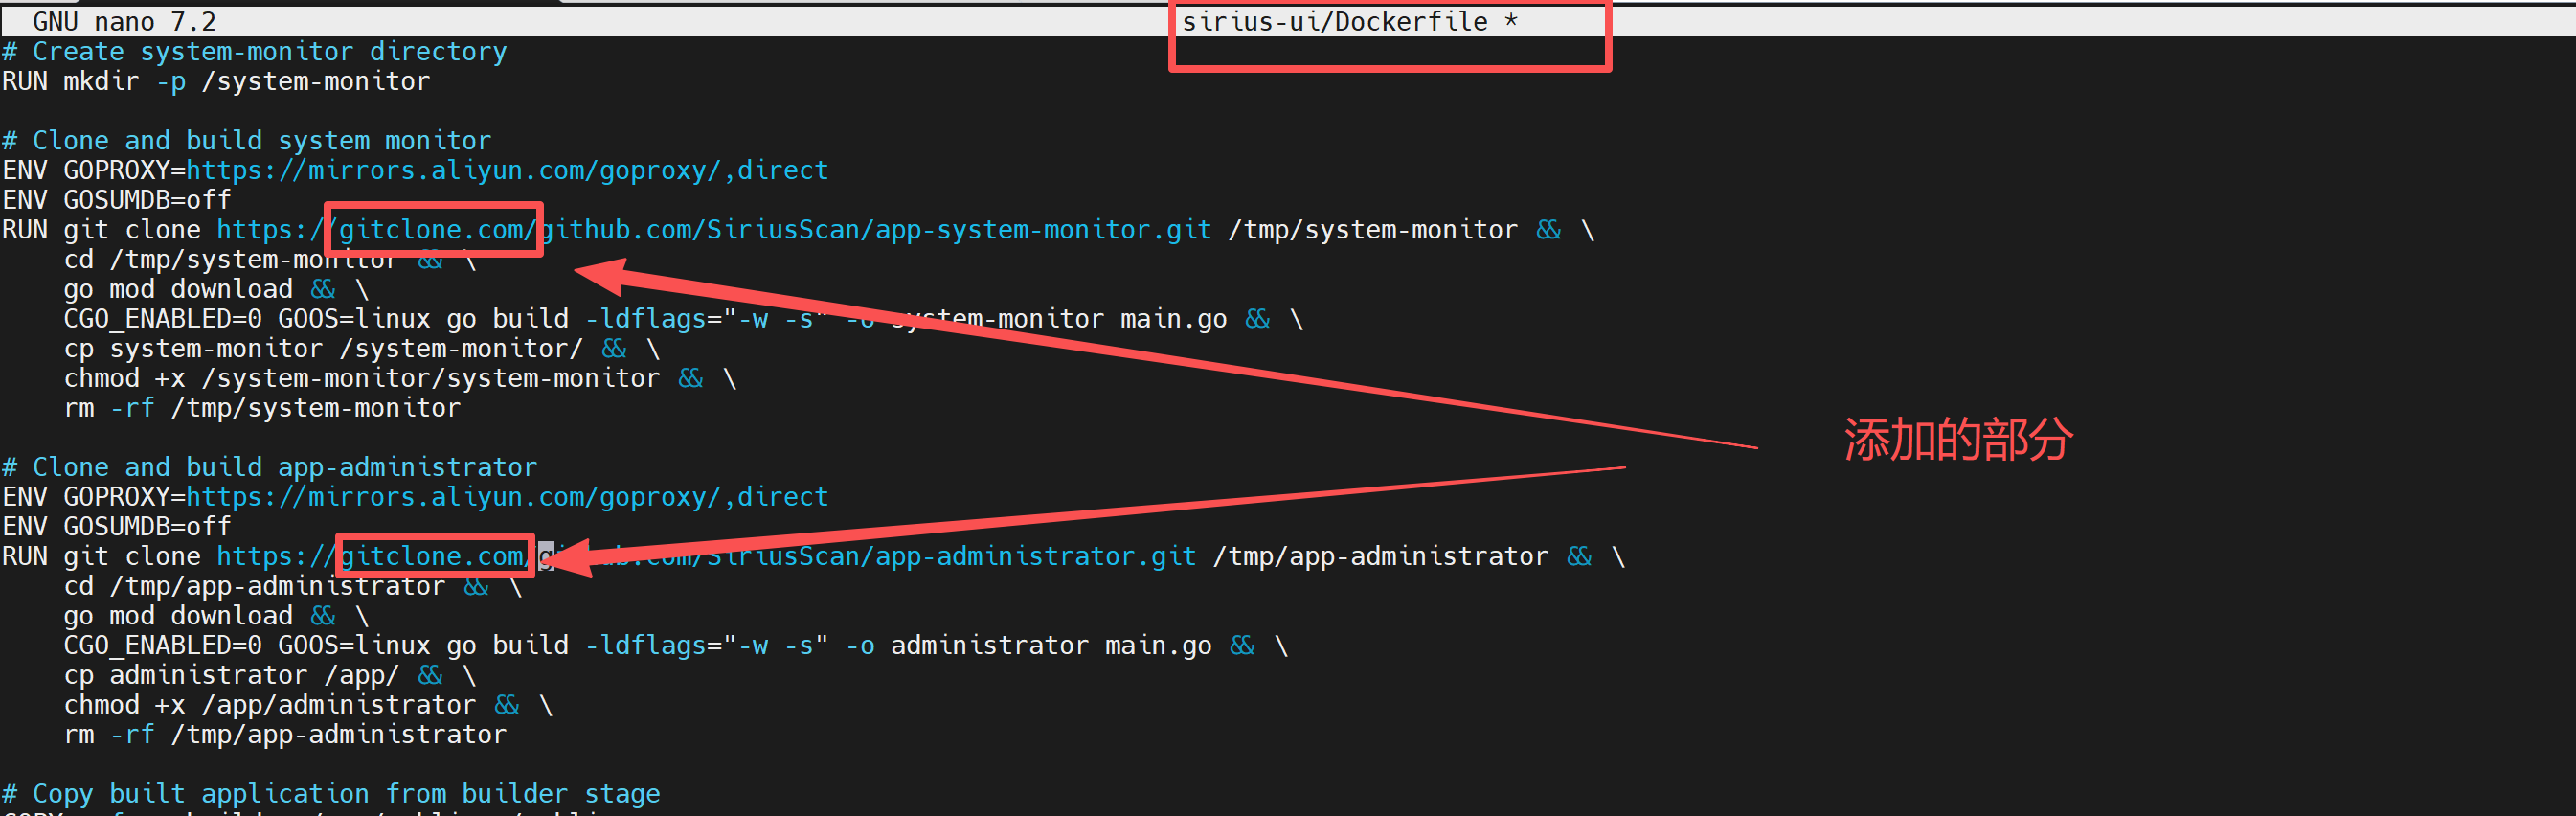
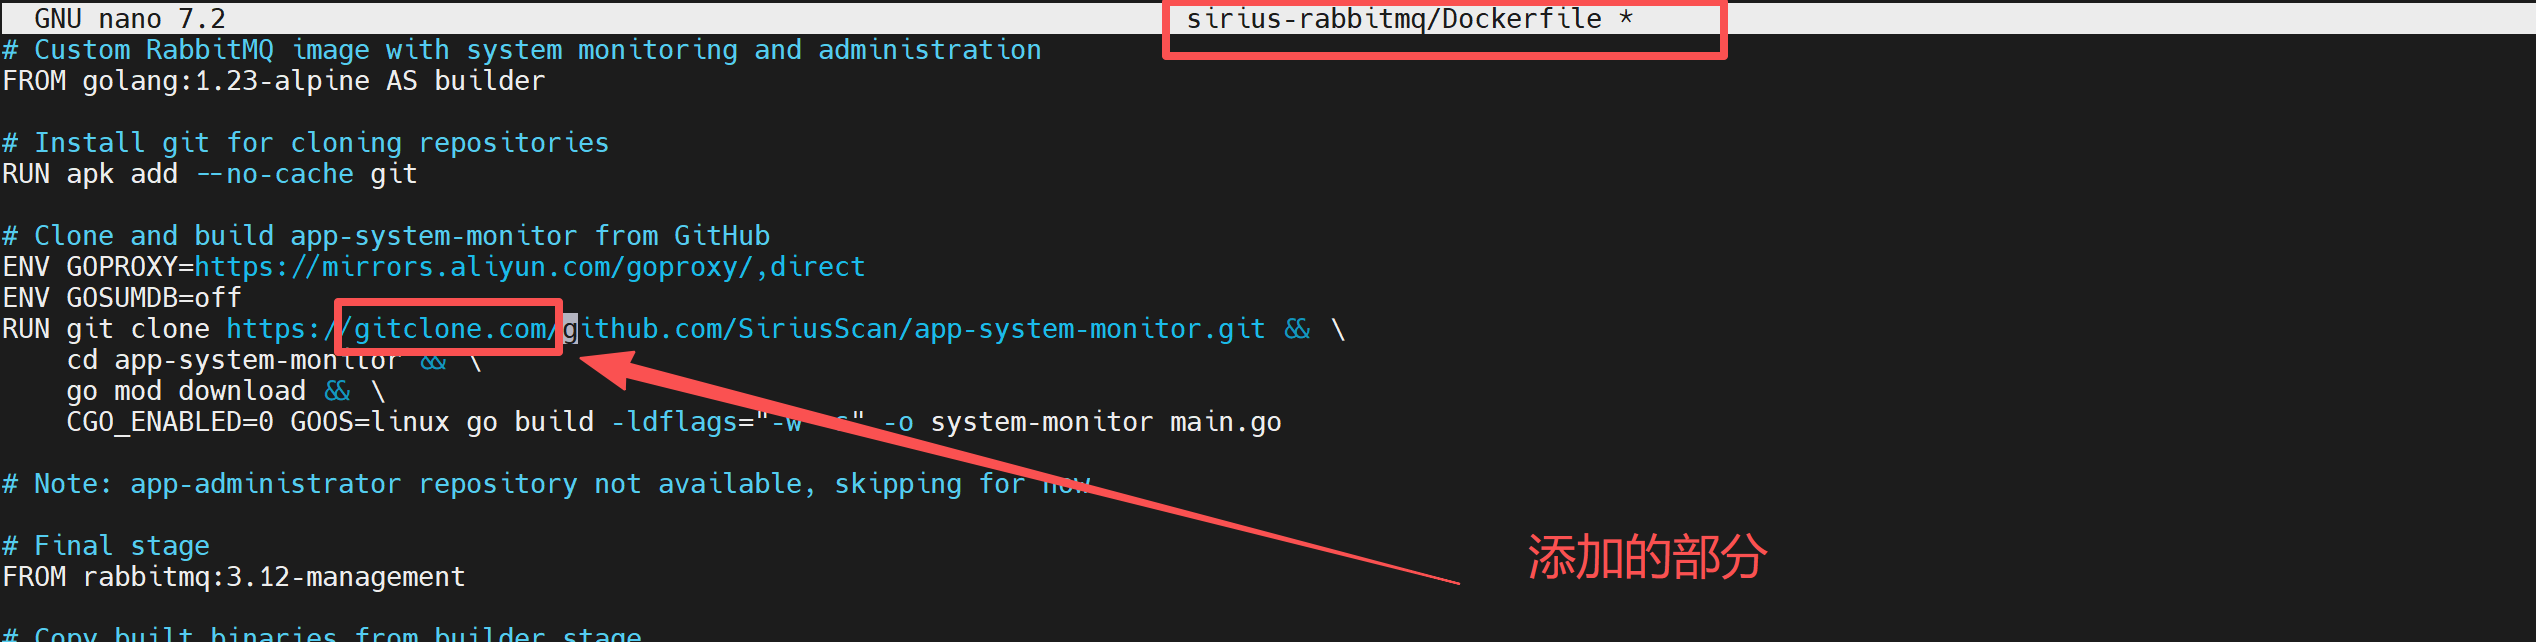
报错信息3:Git在克隆仓库时无法连接到GitHub,报错代码128
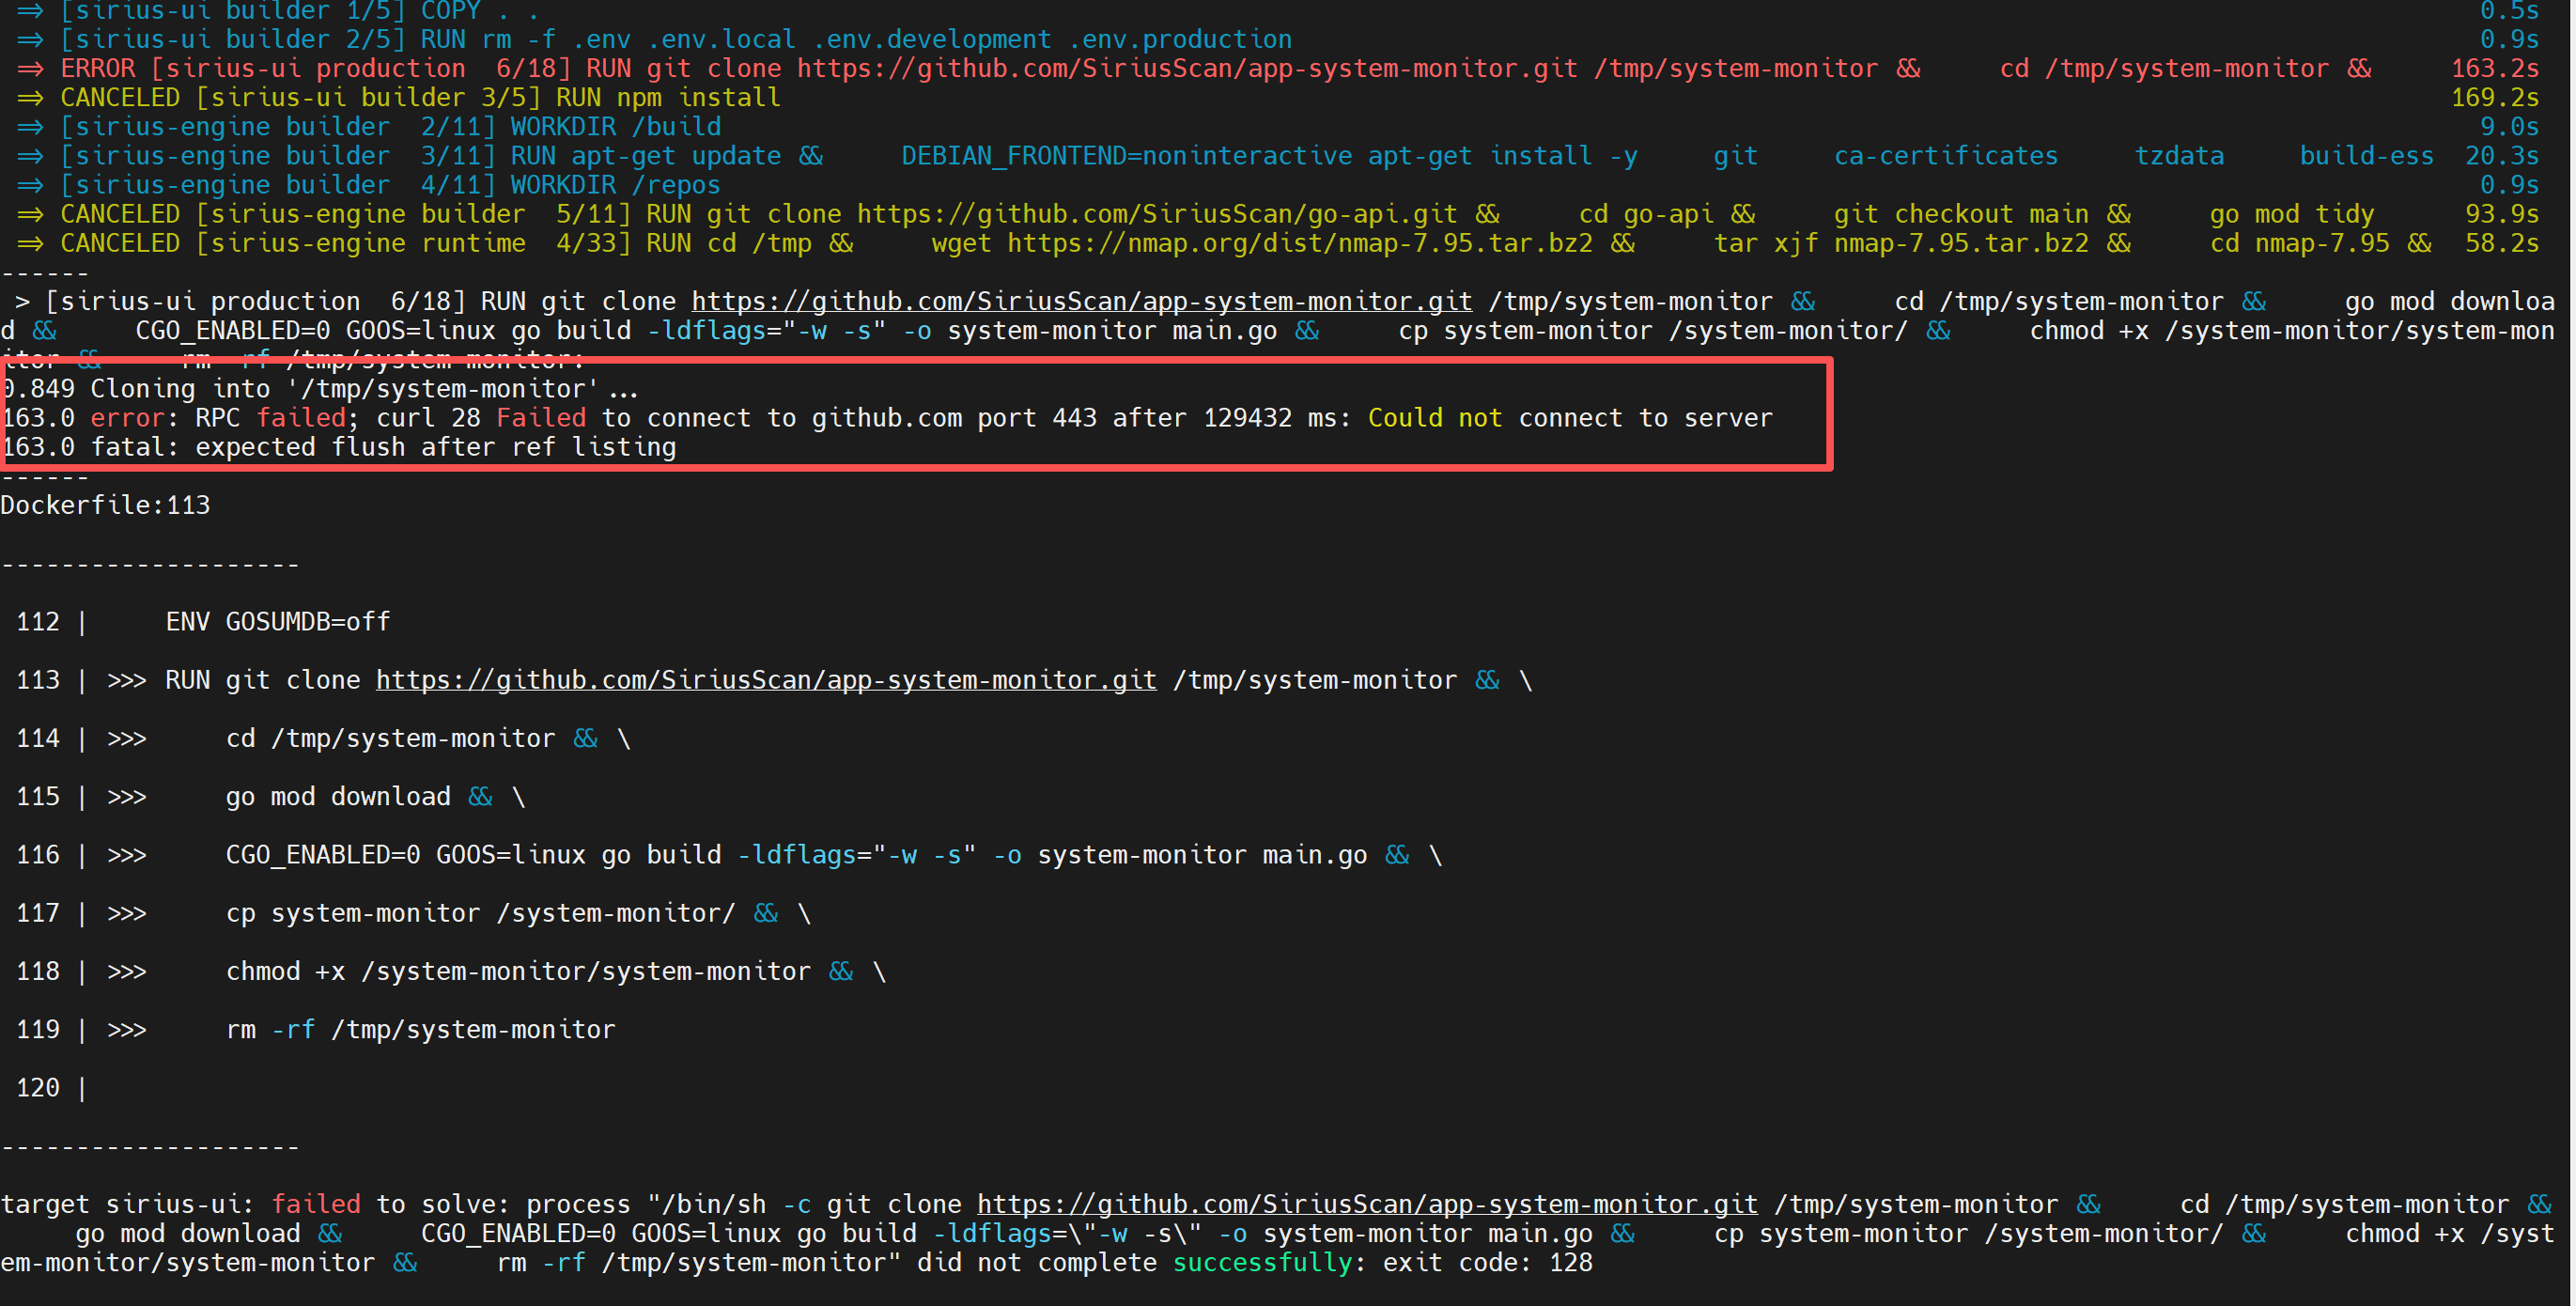
Git在克隆仓库时无法连接到GitHub,基本原因是网络问题。在上面我们都已经添加了代理,所以现在的办法就是使用GitHub代码库的缓存加速站点,需要修改一下克隆的地址,例如将克隆的地址https://github.com/SiriusScan/app-system-monitor.git
修改成https://gitclone.com/github.com/SiriusScan/app-system-monitor.git
修改如下:


清理一下缓存
bash
docker builder prune -a再重新执行构建行命令
bash
docker compose up -d在报相同网络超时的错误时,一般多执行2遍docker compose up -d命令就可以了。
目前我部署完毕后,登录系统,但是找不到任何主机,不知道是构建出现了问题还是网络或者防火墙等原因,正在排查。。。有高手知道的话请指教一下。