快速了解pytest基本框架
- 一、conda创建独立环境
- 二、pytest三种启动方式
- 三、看懂测试结果
- 四、用例规则
-
- [1. 用例发现规则 -- 什么是用例](#1. 用例发现规则 -- 什么是用例)
- [2. 用例内容规则](#2. 用例内容规则)
- [3. 练习 :有函数add接收两个参数,并返回它们相加的结果](#3. 练习 :有函数add接收两个参数,并返回它们相加的结果)
- 五、配置框架
-
- [1. 常用参数](#1. 常用参数)
- 六、标记mark
-
-
- [1. 用户自定义标记](#1. 用户自定义标记)
-
- [a. pycharm创建ini文件标记并查看](#a. pycharm创建ini文件标记并查看)
- [2. 框架内置标记](#2. 框架内置标记)
-
- [b. parametrize:参数化标记](#b. parametrize:参数化标记)
-
- 七、夹具fixture
-
- [1. 创建fixture](#1. 创建fixture)
- [2. 使用fixture](#2. 使用fixture)
- [3. 高级用法⭐](#3. 高级用法⭐)
- 八、插件管理
-
- [1. 常用的第三方插件](#1. 常用的第三方插件)
-
- [1. pytest-html](#1. pytest-html)
- [2. pytest-xdist](#2. pytest-xdist)
- [3. pytest-rerunfailures](#3. pytest-rerunfailures)
- [4. pytest-result-log ❌ -- 仅作学习](#4. pytest-result-log ❌ -- 仅作学习)
- [九、企业级测试报告 -- allure](#九、企业级测试报告 -- allure)
-
- [1. 对用例进行分组和关联(敏捷开发术语)](#1. 对用例进行分组和关联(敏捷开发术语))
- 十、了解web自动化测试工作
- 十一、测试框架需要封装什么
- 十二、YAML文件格式
- 十三、接口测试用例
-
- [1. 设计用例内容](#1. 设计用例内容)
- [2. YMAL表示用例](#2. YMAL表示用例)
- 十四、封装接口自动话框架
-
- [1. 请求接口](#1. 请求接口)
- [2. 断言响应](#2. 断言响应)
- 3.变量提取
- [4. 框架落地封装](#4. 框架落地封装)
一、conda创建独立环境
- 创建新环境pyautotest
shell
conda create -n pyautotest python=3.8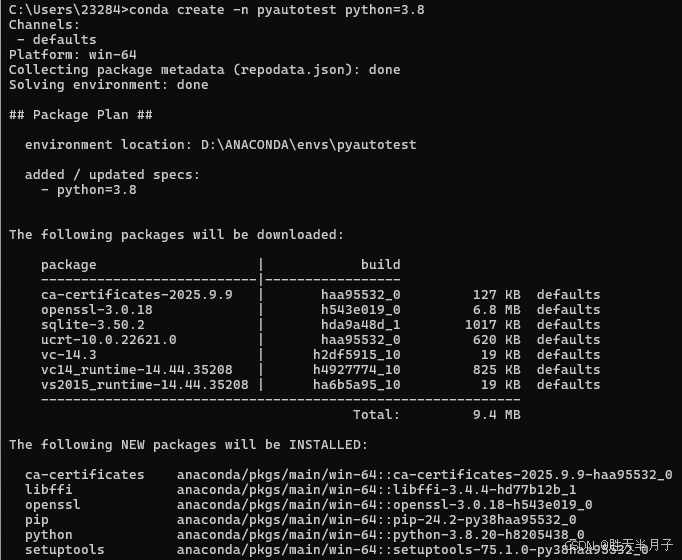
-
安装pytest
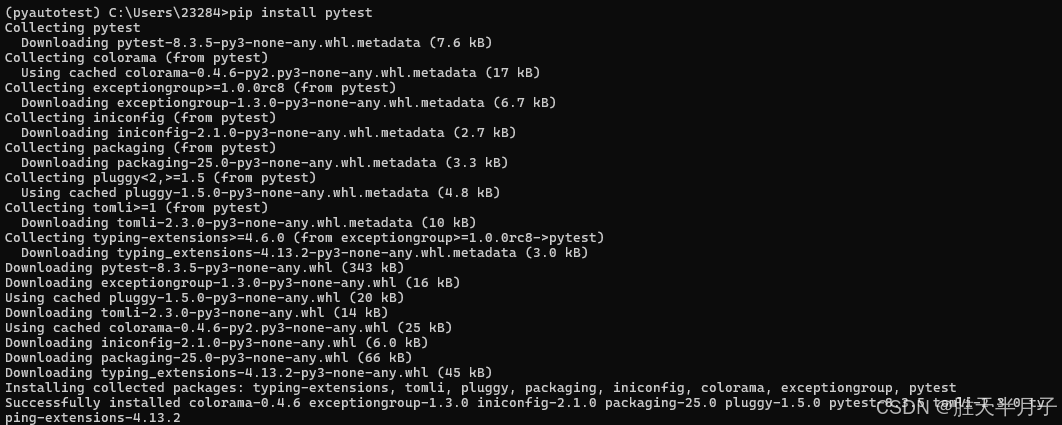
-
查看pytest版本

这说明python3.8对应的pytest的版本是8.3
补充一点的是 pytest 8.4增加了一个强制要求 : 测试用例没有返回值( 默认是None)
二、pytest三种启动方式
- 命令行方式 -- xxx> pytest
- 代码方式
python
import pytest
pytest.main( )- 鼠标启动 ---绿色箭头
pytest在简单的基础上,对断言进行高级封装(AST),对python数据结构断言,非常友好
1.pytest遵循了oython简单的学习方式
2.pytest:实现了很多高级特性
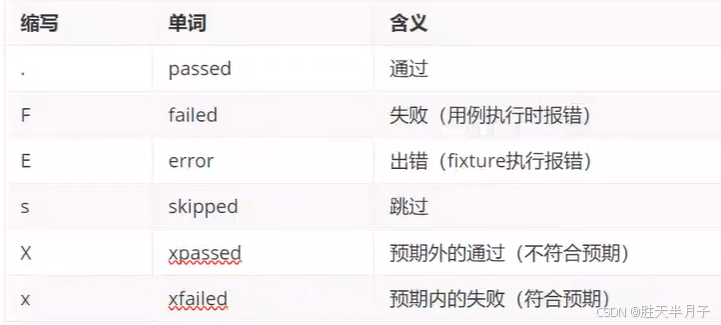
三、看懂测试结果
- 分析
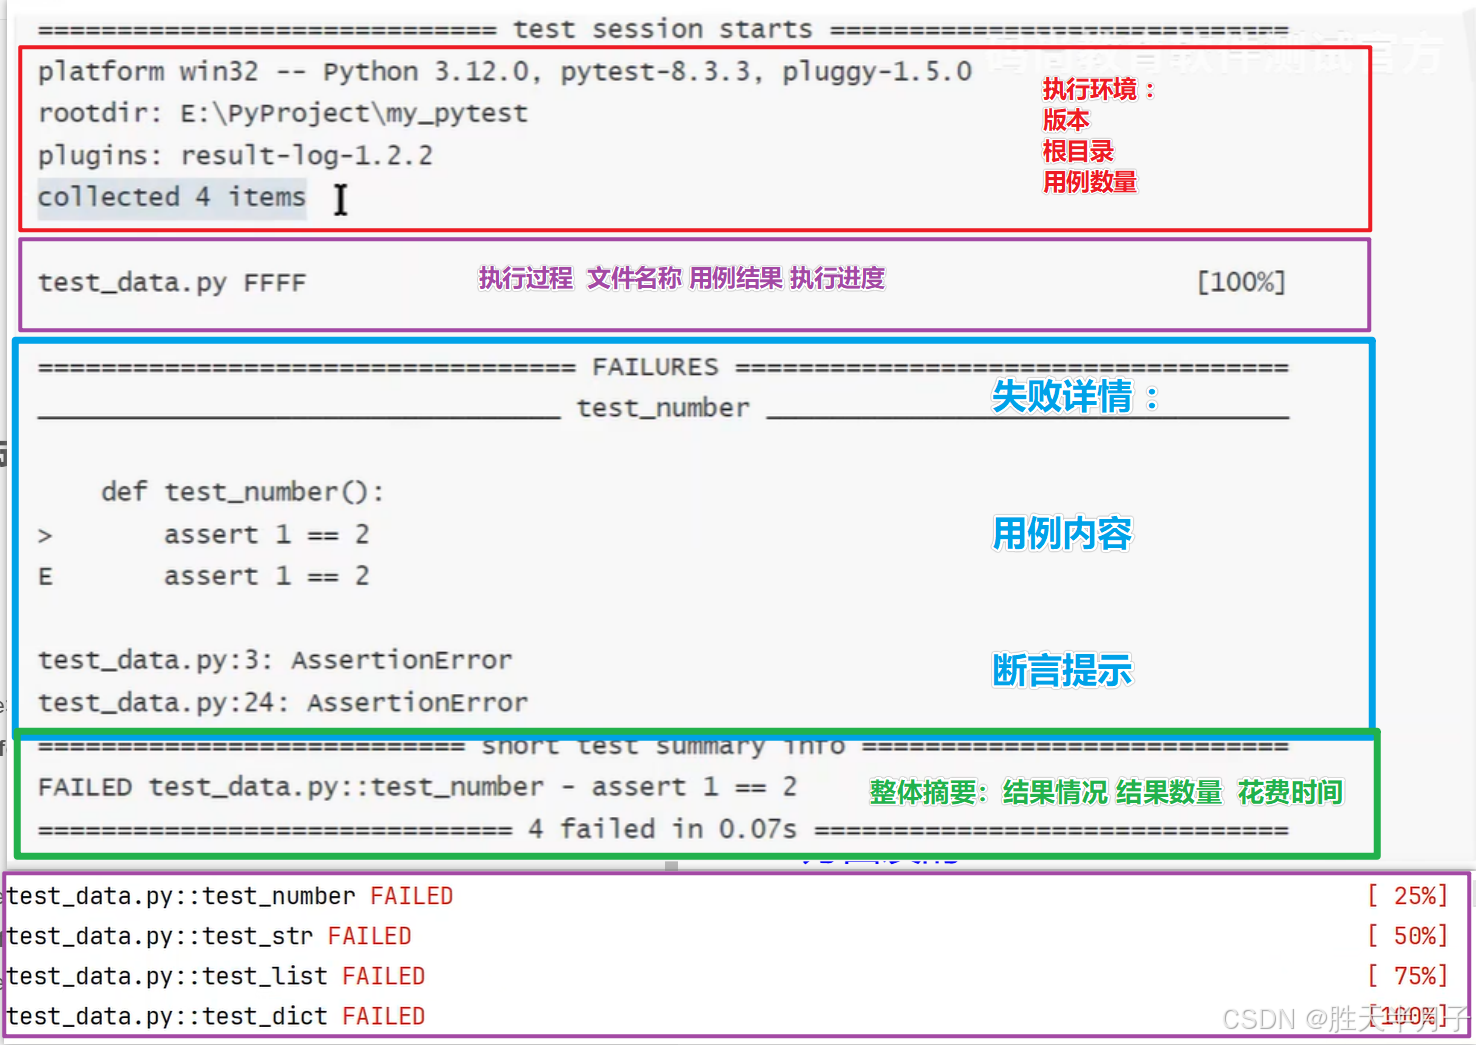
- 用例结果
四、用例规则
1. 用例发现规则 -- 什么是用例
用例发现 : 测试框架在别、加载用例的过程,
pytest 的用例发现的过程:
- 遍历所有的目录
- 排除自带的
- 排除
.开头的隐藏文件
- 打开python文件 【test_开头或者_test结尾的用例文件】
- 遍历所有的Test开头的
类用例 - 收集所有test_开头的函数或者方法 【用例是函数或者类中的方法 不能是类】
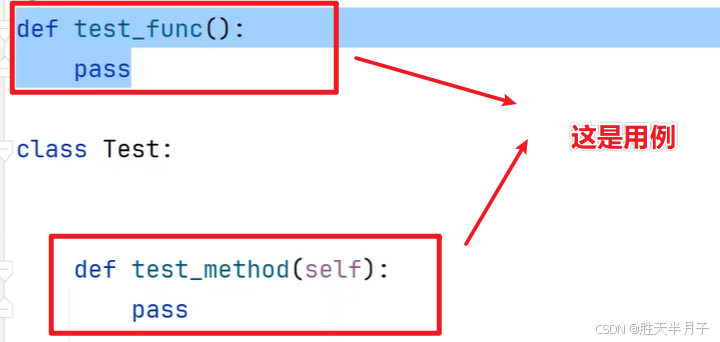
2. 用例内容规则
- pytest对用例的要求
- 可调用的(函数、方法、类、对象)
- 名字test_开头
- 没有参数(参数有另外的含义)
- 没有返回值(默认为None)
3. 练习 :有函数add接收两个参数,并返回它们相加的结果
- 代码
python
def add(a,b):
    return a+b

def test_add():
    res = add (1,3)

    assert res == 4
- 集成到类中 使用方法来测试
python
def add(a,b):
    return a+b

class  TestAdd:

    def test_int(self):
        res = add (1,3)

        assert res == 4

    def test_str(self):
        res = add("1", "3")

        assert res == "13"

    def test_list(self):
        res = add([1], [2,3,4])

        assert res == [1,2,3,4]
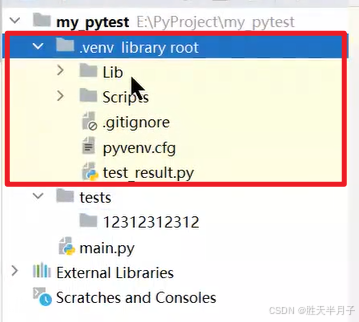
五、配置框架
配置可以改变pytest默认的规则,如上述中所说的用例发现和内容的规则
- 如何做? 两种方式
- 命令行参数
- ini配置文件
- 查看帮助
python
pytest -h- 开头:参数
- 小写字母开头:ini 配置
- 大写字母开头:环境遍历
- 配置文件:pytest.ini
1. 常用参数
- v : 增加详细程度
- s : 允许用例中的输入 和 输出
- x:遇到失败测试用例 停止执行 快速退出 【类似冒烟测试】
- m: 用例筛选
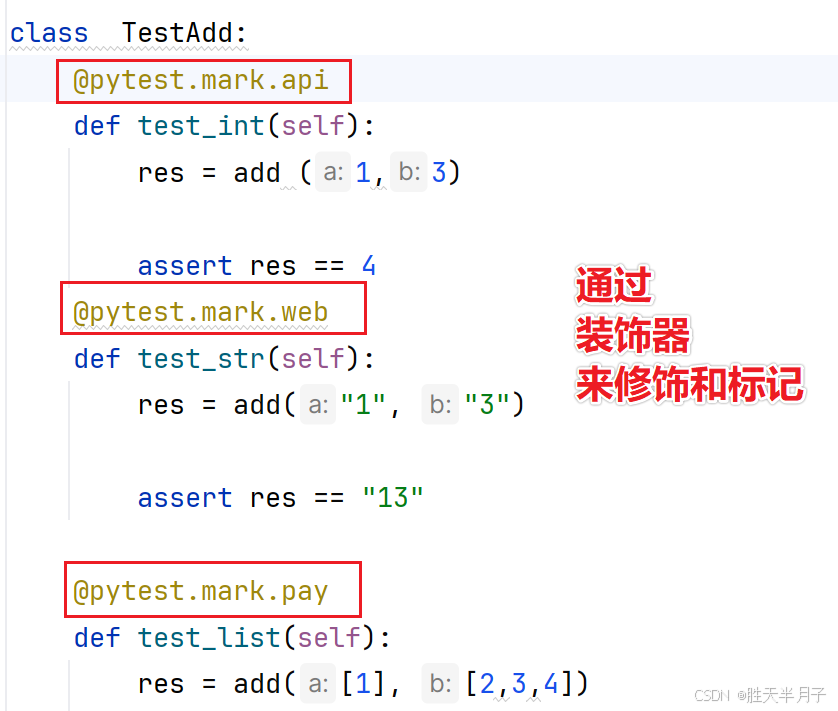
六、标记mark
标记 让用例与众不同,进而可以让用例被区别对待
1. 用户自定义标记
用户自定义标记 只能实现用例筛选
实现步骤
- 先注册
- 再标记
- 后筛选
【ini注册,用例中通过装饰器标记,命令行中实行筛选】
a. pycharm创建ini文件标记并查看
- 命令:
pytest --markers


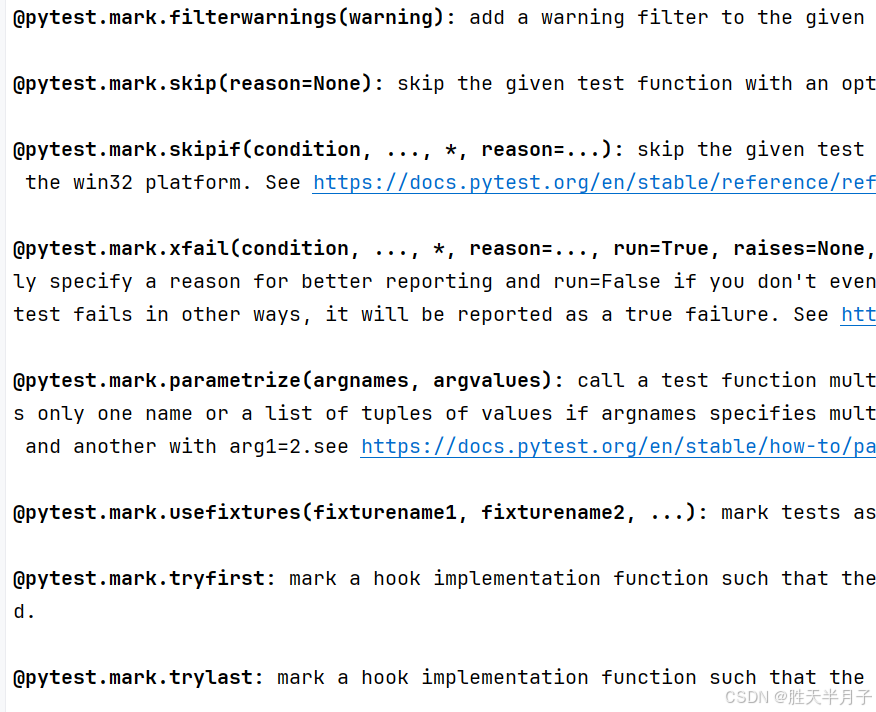
2. 框架内置标记
框架内置标记为用例增加特殊执行效果
- 和用户自定义标记区别:
- 不需注册,可以直接使用
- 不仅可以筛选,还可以增加特殊效果
- 不同的标记,增加不同的特殊效果
- skip:无条件跳过
- skipif:有条件跳过
- xfail:预期失败
- parametrize:参数化
- usefixtures:使用fixtures
- 测试代码
python
import pytest

def add(a,b):
    return a+b

@pytest.mark.skip
def test_print():
    assert 1==2

class  TestAdd:
    @pytest.mark.skip
    @pytest.mark.api
    def test_int(self):
        res = add (1,3)

        assert res == 4

    @pytest.mark.skipif(1 == 2,reason="skipif需要提供reason参数")
    @pytest.mark.web
    def test_str(self):
        res = add("1", "3")

        assert res == "13"

    @pytest.mark.xfail  #xfail 预期失败
    @pytest.mark.pay
    def test_list(self):
        res = add([1], [2,3,4])

        assert res == [1,2,3,4]

    @pytest.mark.xfail
    @pytest.mark.pay
    def test_list1(self):
        res = add([1], [2,3,4])

        assert res != [1,2,3,4]

b. parametrize:参数化标记
数据驱动测试=参数化测试+数据文件
根据数据文件的内容,动态决定用例的数量、内容
- 数据来驱动测试
数据文件,驱动用例执行数量、内容 - 数据文件
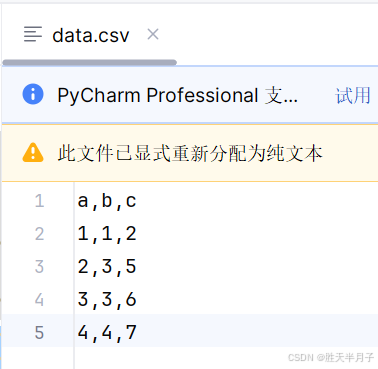
- 代码文件
c
import pytest
import csv

def read_cav(path):
    f = open(path)
    reader = csv.reader(f)
    return list(reader)[1:]

@pytest.mark.skip
def test_print():
    assert 1==2

class  TestAdd:
    ...


	 ...
    @pytest.mark.ddt
    @pytest.mark.parametrize("a,b,c", read_cav('data.csv'))
    def test_ddt(self,a,b,c):
        res = add(int(a),int(b))

        assert res == int(c)
shell
 (pyautotest) PS E:\pythonProject\pytestProject> pytest -m ddt -v
===================================================================================== test session starts =====================================================================================
platform win32 -- Python 3.8.20, pytest-8.3.5, pluggy-1.5.0 -- D:\ANACONDA\envs\pyautotest\python.exe
cachedir: .pytest_cache
rootdir: E:\pythonProject\pytestProject
configfile: pytest.ini
collected 9 items / 5 deselected / 4 selected

tests/test_add.py::TestAdd::test_ddt[1-1-2] PASSED                                                                                                                                       [ 25%]
tests/test_add.py::TestAdd::test_ddt[2-3-5] PASSED                                                                                                                                       [ 50%]
tests/test_add.py::TestAdd::test_ddt[3-3-6] PASSED                                                                                                                                       [ 75%]
tests/test_add.py::TestAdd::test_ddt[4-4-7] FAILED                                                                                                                                       [100%]

========================================================================================== FAILURES ===========================================================================================
___________________________________________________________________________________ TestAdd.test_ddt[4-4-7] ___________________________________________________________________________________

self = <test_add.TestAdd object at 0x0000022A321D93A0>, a = '4', b = '4', c = '7'

    @pytest.mark.ddt
    @pytest.mark.parametrize("a,b,c", read_cav('data.csv'))
    def test_ddt(self,a,b,c):
        res = add(int(a),int(b))

>       assert res == int(c)
E       AssertionError: assert 8 == 7
E        +  where 7 = int('7')

tests\test_add.py:57: AssertionError
=================================================================================== short test summary info ===================================================================================
FAILED tests/test_add.py::TestAdd::test_ddt[4-4-7] - AssertionError: assert 8 == 7
========================================================================== 1 failed, 3 passed, 5 deselected in 0.06s ==========================================================================
(pyautotest) PS E:\pythonProject\pytestProject>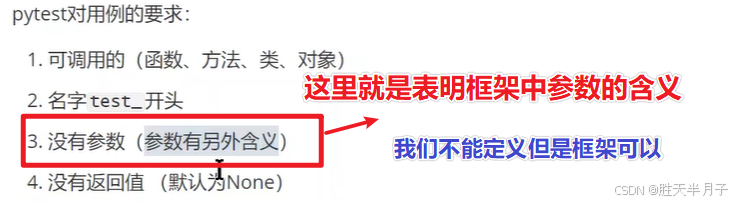
七、夹具fixture
夹具 :在用例执行之前、挤行之后,自动运行代码
- 使用场景
场景:- 之前:加密参数/之后:解密结果
- 之前:启动浏览器/之后:关闭浏览器
- 之前:注册、登录账号/之后:刚除账号
1. 创建fixture
- 创建函数
- 添加装饰器
- 添加yield:关键字
shell
@pytest.fixture
def f():

    # yield  之前是前置操作
    yield

# 之后是后置操作- 测试执行代码
c
@pytest.fixture
def f():
    print(datetime.datetime.now() , '开始执行!!!')
    # yield  之前是前置操作
    yield  #  --->  关键字代表开始执行用例!!!

    print(datetime.datetime.now(), '结束执行!!!')
    #       之后是后置操作

def test_1(f):
    pass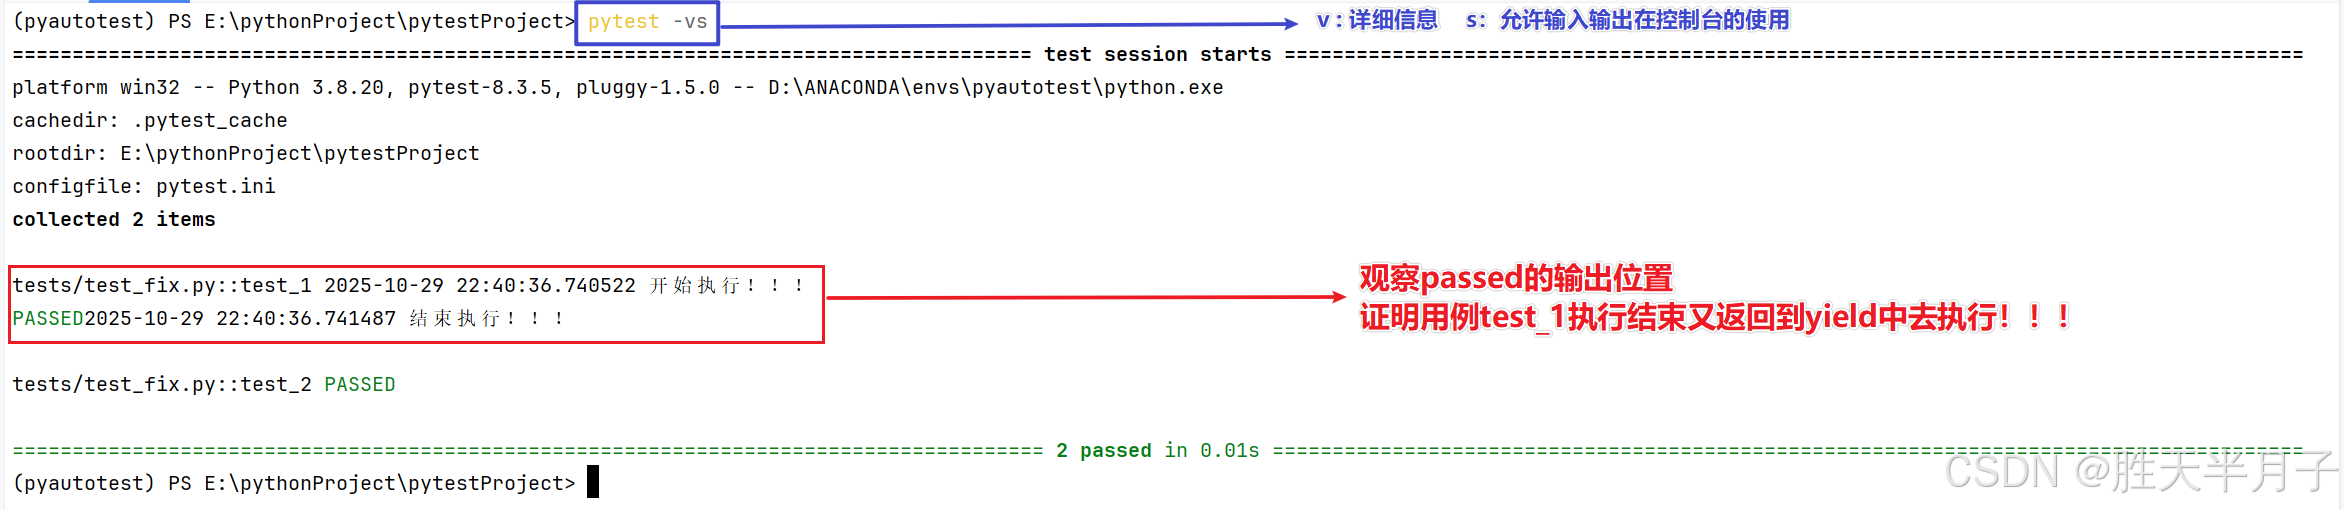
2. 使用fixture
- 两种方式
- 在用例的参数列表中,加入fixture名字即可 【def test_2( fixture名字 ):】
- 给用例加上usefixtures标记
c
@pytest.mark.usefixtures("f")
def test_2():
    pass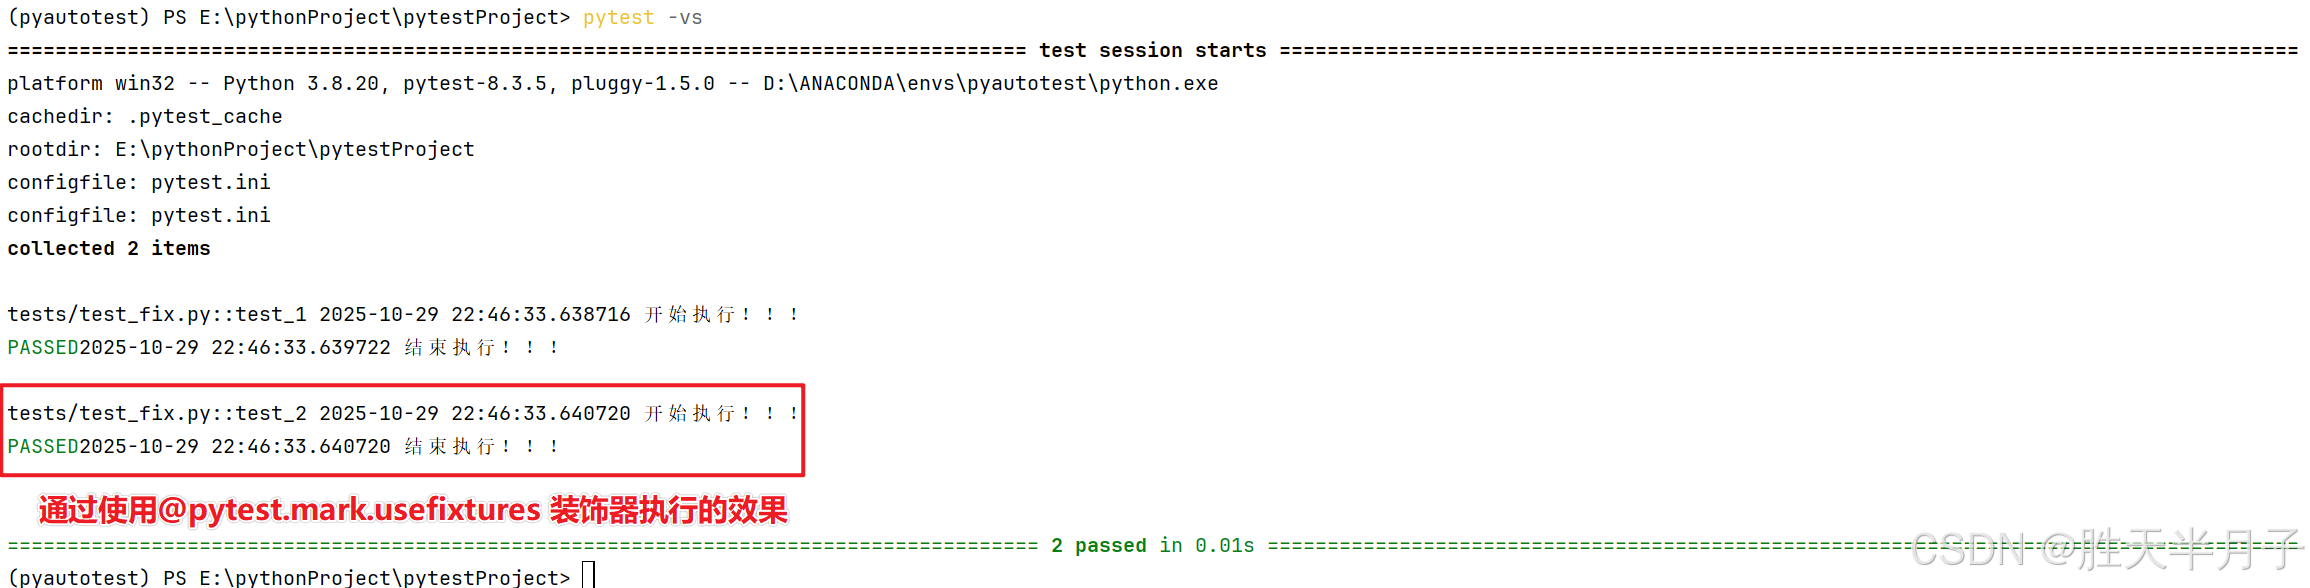
3. 高级用法⭐
- 自动使用
python
import datetime

import pytest

@pytest.fixture(autouse=True)
def f():
    print(datetime.datetime.now() , '开始执行!!!')
    # yield  之前是前置操作
    yield  #  --->  关键字代表开始执行用例!!!

    print(datetime.datetime.now(), '结束执行!!!')
    #       之后是后置操作

def test_1():
    pass

# @pytest.mark.usefixtures("f")
def test_2():
    pass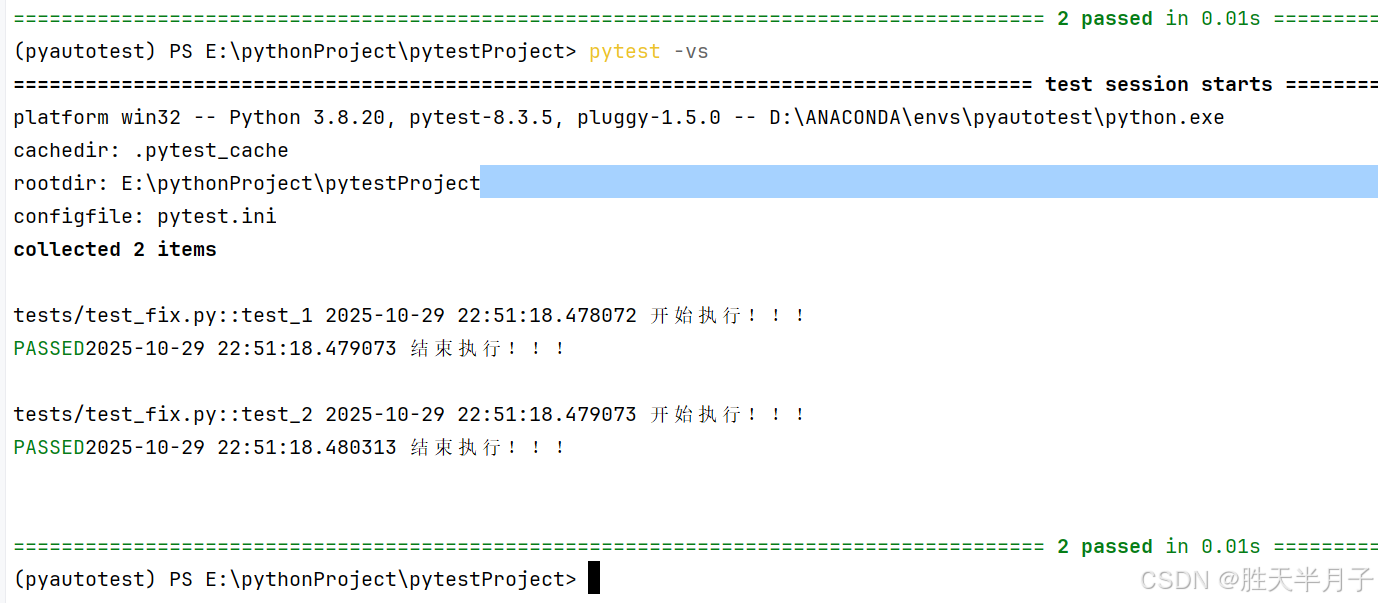
- 依赖使用
这里一定要注意
⚠️用例才可以使用usefixtures标记,fixture夹具间使用如下
shell
import datetime

import pytest

@pytest.fixture
def ff():
    print('我也是fixture ,但是被fixture使用!!!')

@pytest.fixture(autouse=True)
def f(ff):
    print(datetime.datetime.now() , '开始执行!!!')
    # yield  之前是前置操作
    yield  #  --->  关键字代表开始执行用例!!!

    print(datetime.datetime.now(), '结束执行!!!')
    #       之后是后置操作

def test_1():
    pass

# @pytest.mark.usefixtures("f")
def test_2():
    pass
shell
(pyautotest) PS E:\pythonProject\pytestProject> pytest -vs
===================================================================================== test session starts =====================================================================================
platform win32 -- Python 3.8.20, pytest-8.3.5, pluggy-1.5.0 -- D:\ANACONDA\envs\pyautotest\python.exe
cachedir: .pytest_cache
rootdir: E:\pythonProject\pytestProject
configfile: pytest.ini
collected 2 items

tests/test_fix.py::test_1 我也是fixture ,但是被fixture使用!!!
2025-10-29 22:54:23.550320 开始执行!!!
PASSED2025-10-29 22:54:23.551179 结束执行!!!

tests/test_fix.py::test_2 我也是fixture ,但是被fixture使用!!!
2025-10-29 22:54:23.553179 开始执行!!!
PASSED2025-10-29 22:54:23.553179 结束执行!!!


====================================================================================== 2 passed in 0.02s ======================================================================================
(pyautotest) PS E:\pythonProject\pytestProject>
- 返回内容 接口自动化封装:接口关联
yield不仅用于区分前置和后置操作,还能返回数据
python
yield 返回数据- 代码
c
@pytest.fixture(autouse=True)
def f():
    print(datetime.datetime.now() , '开始执行!!!')
    # yield  之前是前置操作
    yield  123 #  --->  关键字代表开始执行用例!!!

    print(datetime.datetime.now(), '结束执行!!!')
    #       之后是后置操作

def test_1(f):     #  写上才会接受
    print('接受来自fiture传递的数据',f)

# @pytest.mark.usefixtures("f")
def test_2():      #   不写不会接受
    pass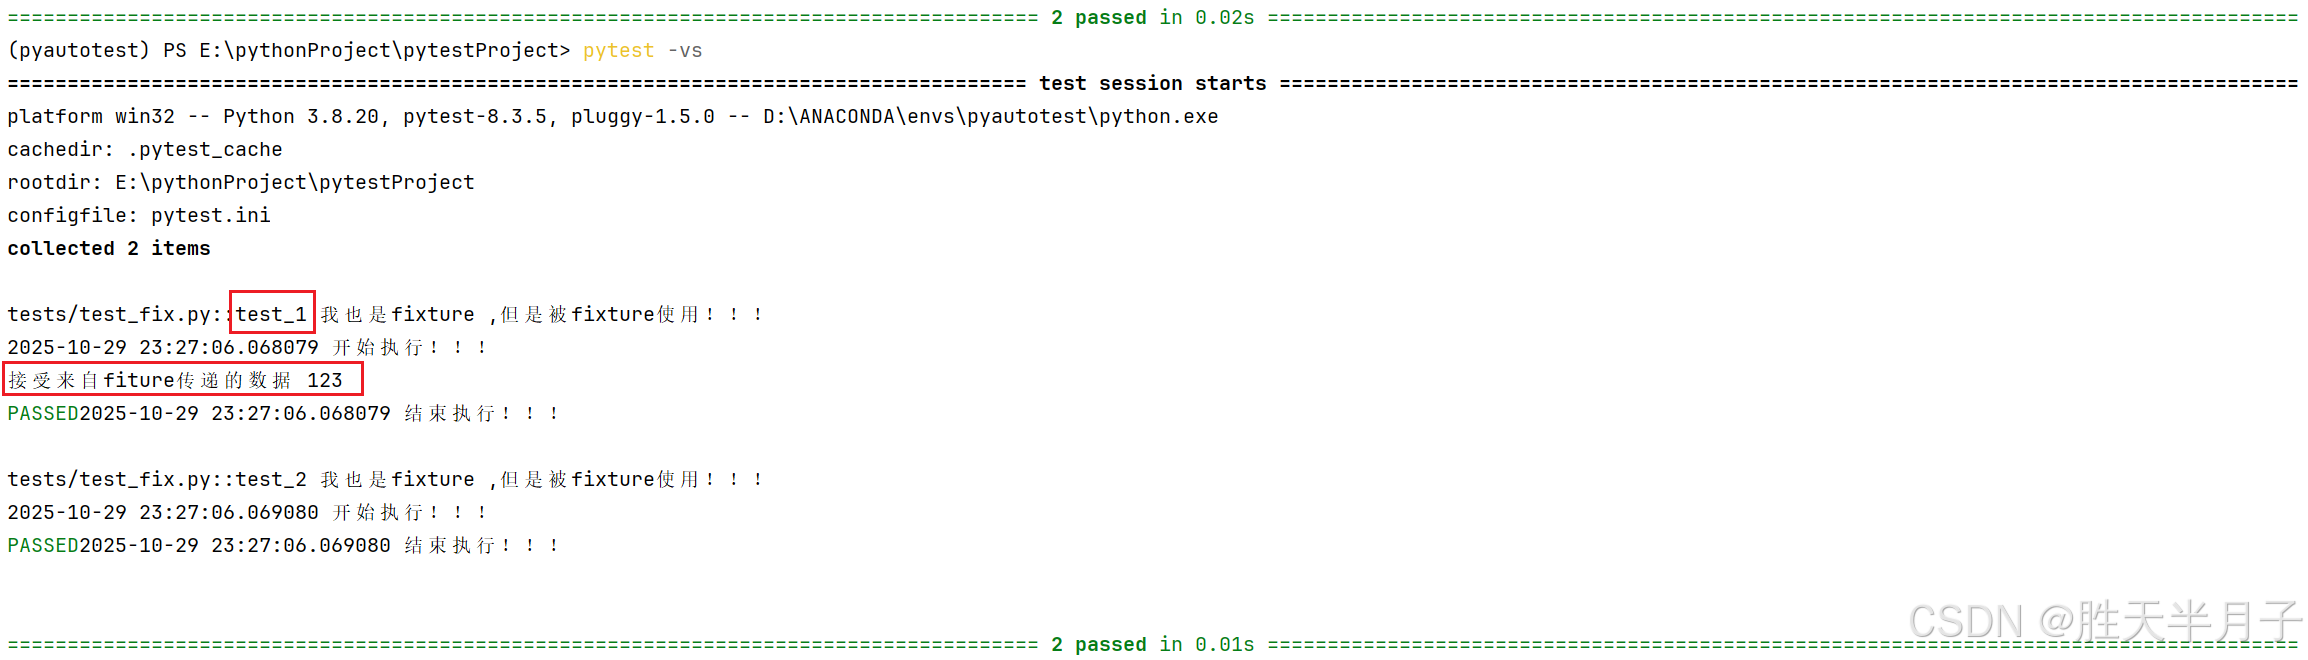
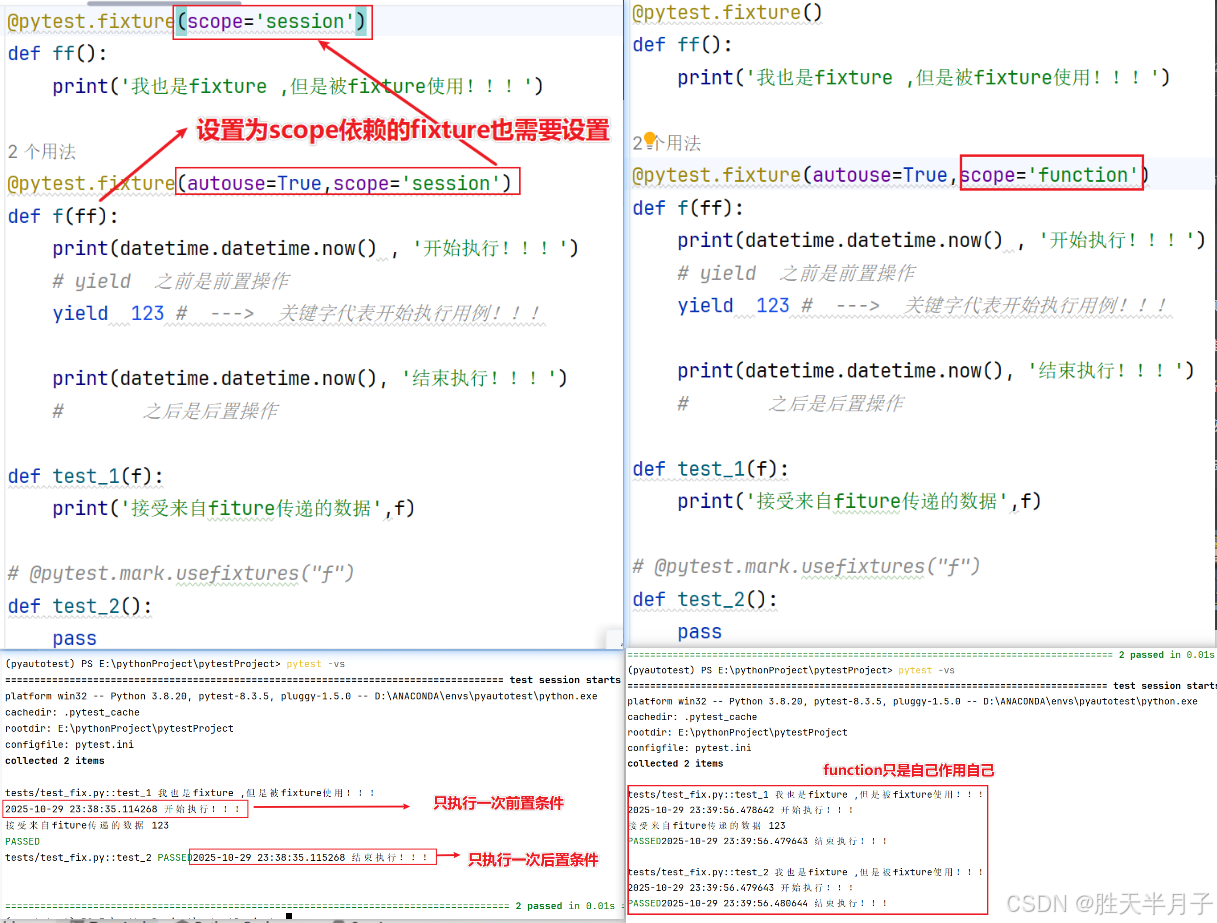
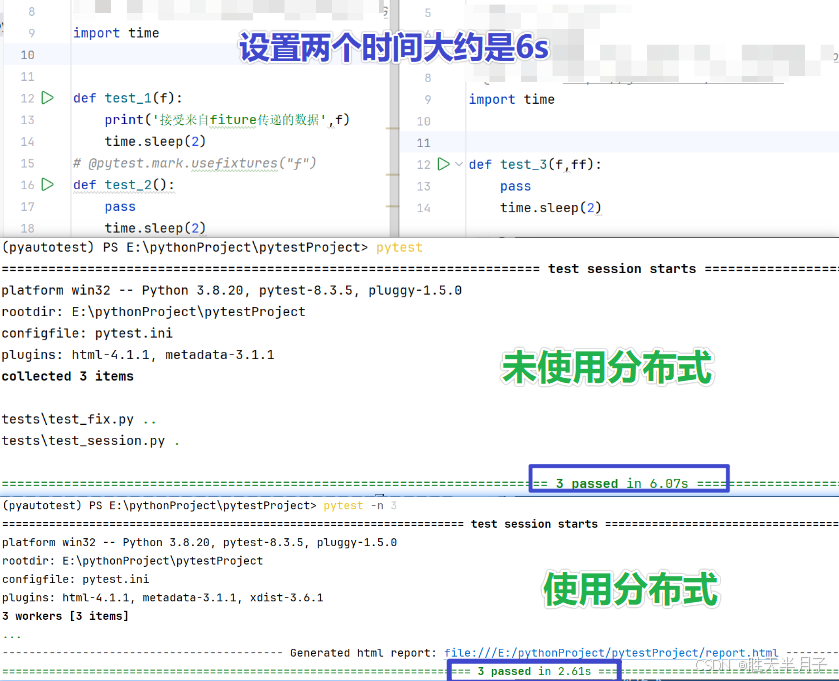
- 范围共享
举例:2000用例需要启动浏览器,若是启动浏览器的时间是5-6s,若是每一个都需要启动这是很大的成本开销,若是使用同一个浏览器,如何做到共享呢?
-
默认范围:function 【自己用自己】
-
全局范围:session 【参数scop="session"】
-
两者区别
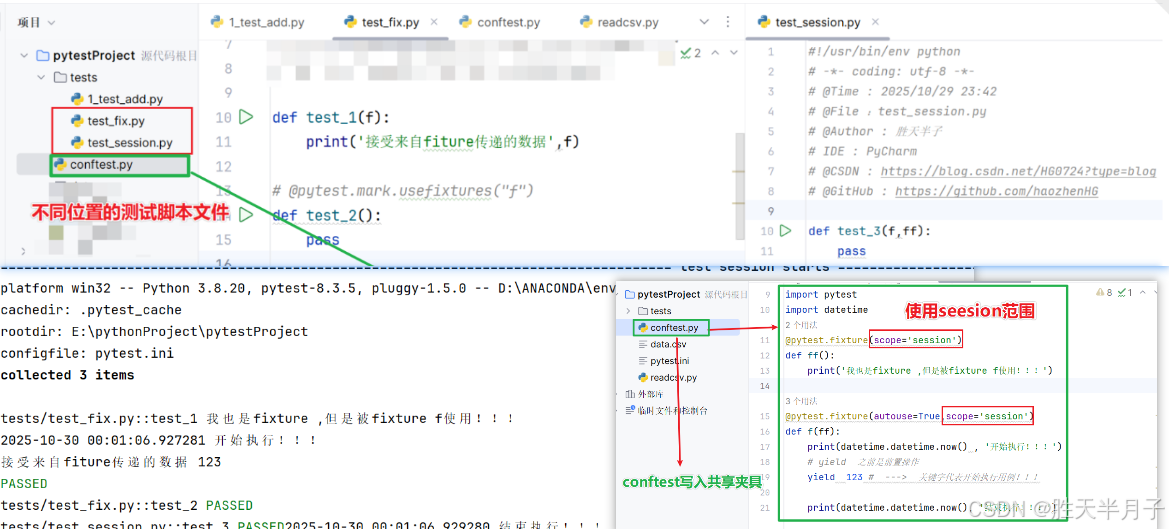
注意⚠️以下测试用例是在同一个test_开头的测试文件中
若是想要全局范围作用在不同的测试脚本文件:使用conftest.py
conftest.py 中存放的就是共享性质的夹具!
思考:python的全局变量都不能够跨文件进行传递,为什么pytest的conftest文件中的共享夹具可以呢?
pytest 的 fixture 能跨文件共享,是因为它是框架层面的 "动态资源管理机制",通过注册表、依赖注入、作用域控制实现;而普通 Python 全局变量是语言层面的模块属性,本质是 "模块内的静态引用",两者设计目的和实现逻辑完全不同。

这里其实有两个条件满足:
- 夹具需要放入到conftest.py文件中
- @pytest.fixture(scope='
session') 需要设置
八、插件管理
pytesta插件牛态是pytest特别的优势!
插件分成两类:
- 不需要安装:内置插件
- 需要安装:第三方插件
插件的启用管理:
- 启用:-p abc
- 禁用:-p no:abc
插件使用方式:
- 参数
- 配置文件
- fixture
- mark
1. 常用的第三方插件
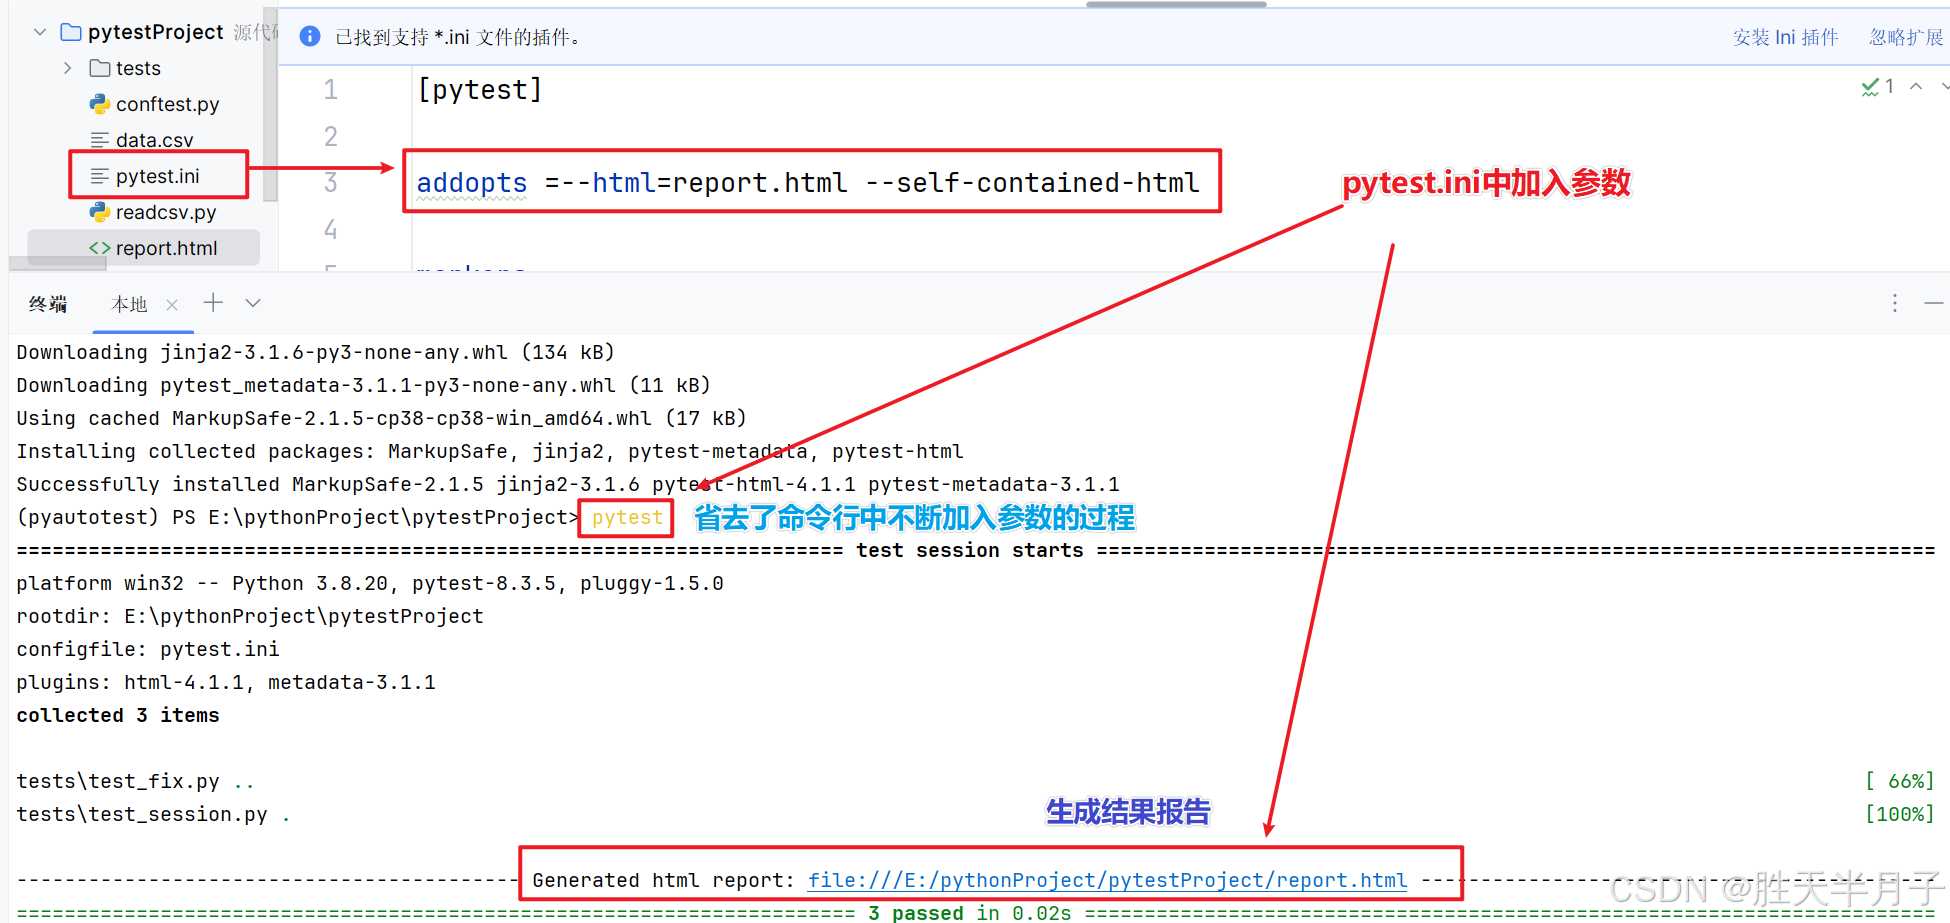
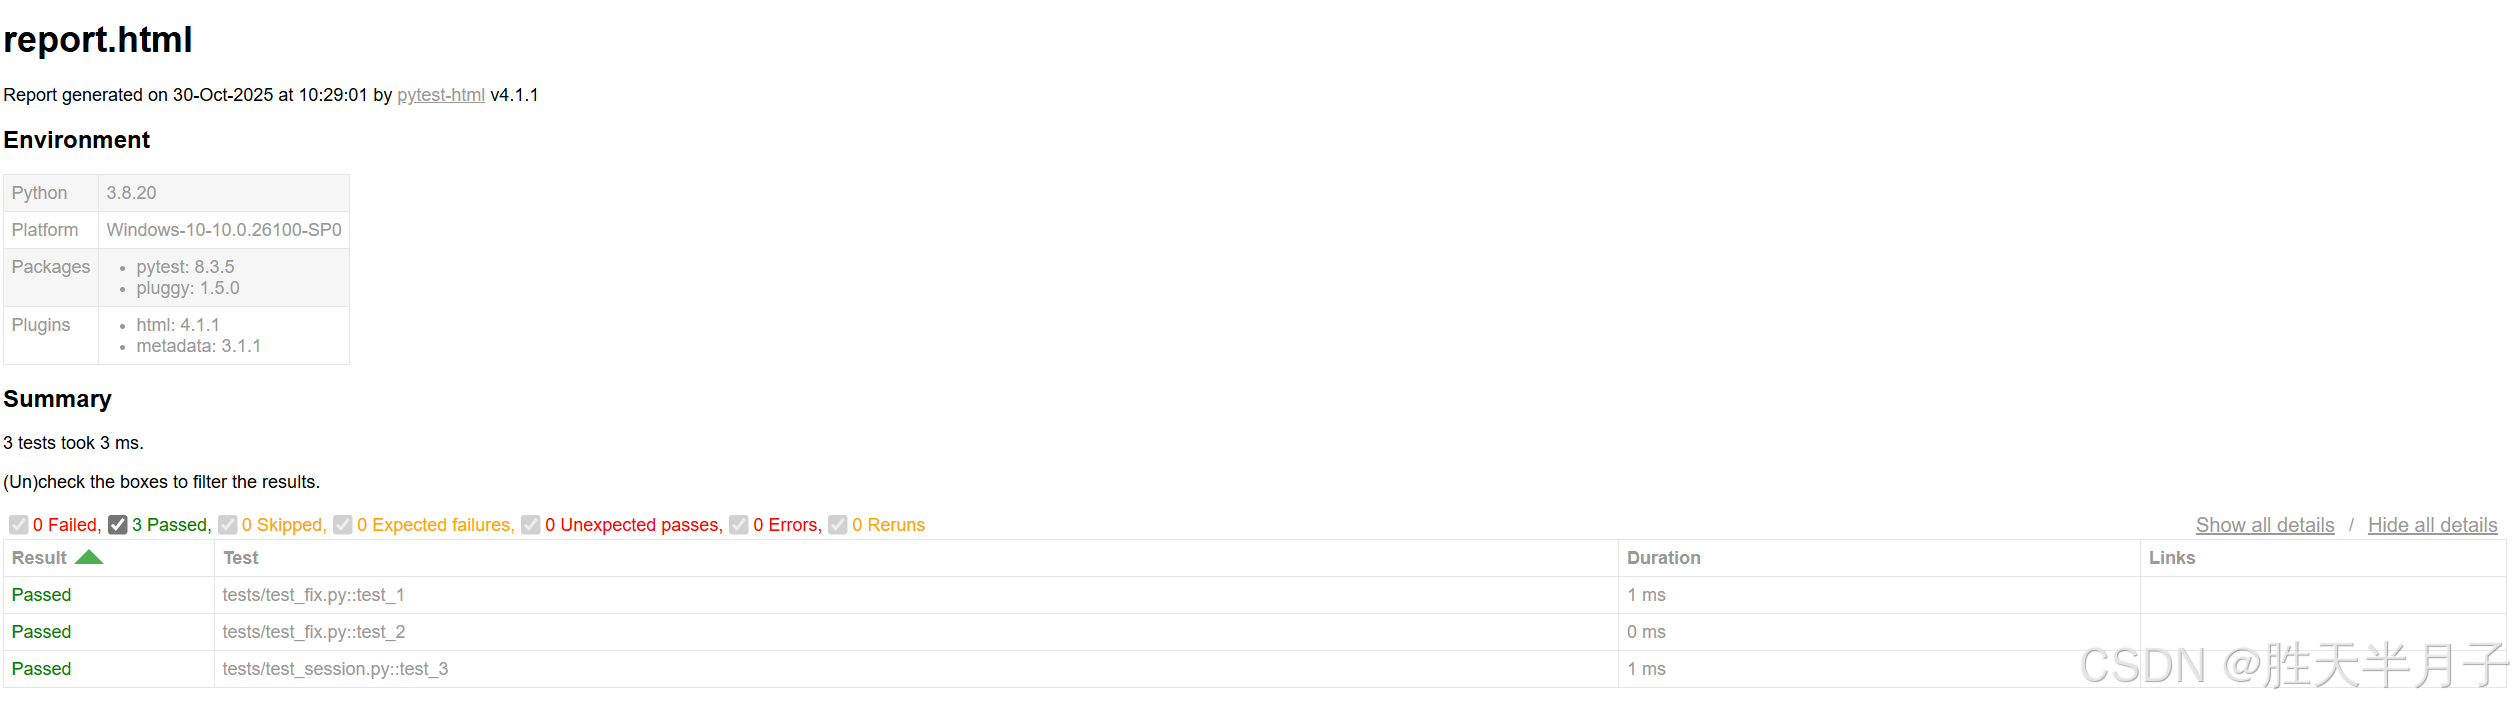
1. pytest-html
用途:生成HTML测试报告
安装:pip install pytest-html
- 使用:
2. pytest-xdist
用途:分布式执行
安装:pip install pytest-xdist
使用:pytest -n number
只有在任务本身耗时较长,超出调用成本很多的时候,才有意义【分布式执行,有并发问题:资源竞争、乱序】
- 不使用
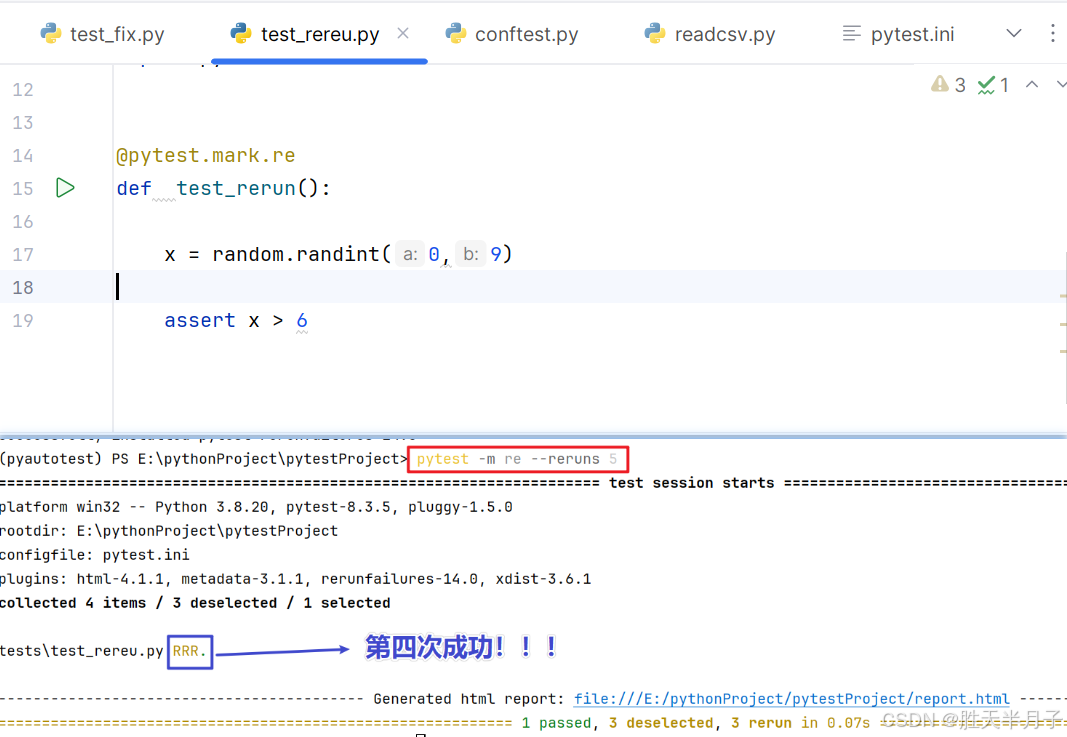
3. pytest-rerunfailures
用途:用例失败之后,重新执行
安装:pip install pytest-rerunfailures
使用:pytest --reruns 5 --reruns-delay 1 【秒级单位】
- 设计一个不稳定用例来测试插件
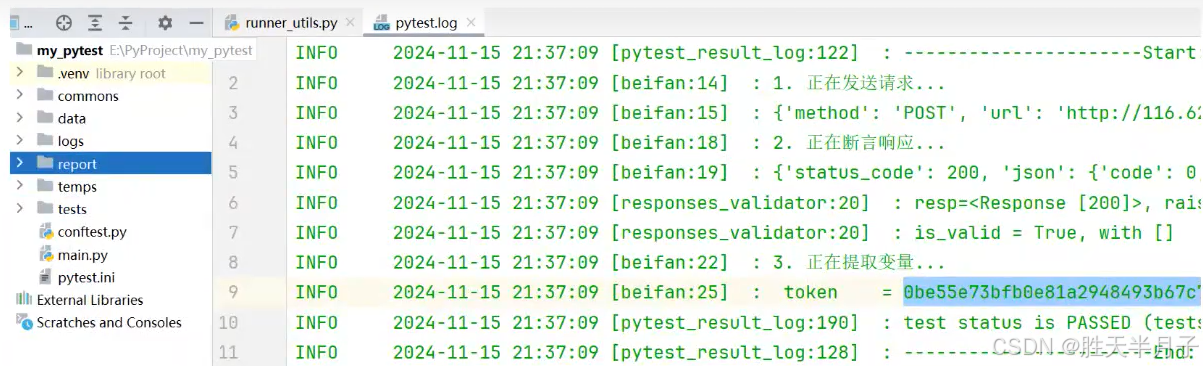
4. pytest-result-log ❌ -- 仅作学习
用途:用途:把用例的执行结果记录到日志文件中
安装:pip install pytest-result-log
使用: 通过配置文件使用
ini
;日志插件的使用配置  如下
log_file =  ./logs/pytest.log
log_file_level =  info
log_file_format = %(levelname)-8s %(asctime)s [%(name)s:%(Lineno)s] : %(message)s
Log_file_date_format =  %Y-%m-%d %H:%M:%S

; :记录用例执行结果
result_log_enable = 1
; :记录用例分割线
result_log_separator =  1
; :分割线等级
result_log_level_separator = warning
; :异常信息等级
result_log_level_verbose =  info
⚠️ 不要再尝试安装 pytest-result-log,它已过时且不兼容现代 pytest。
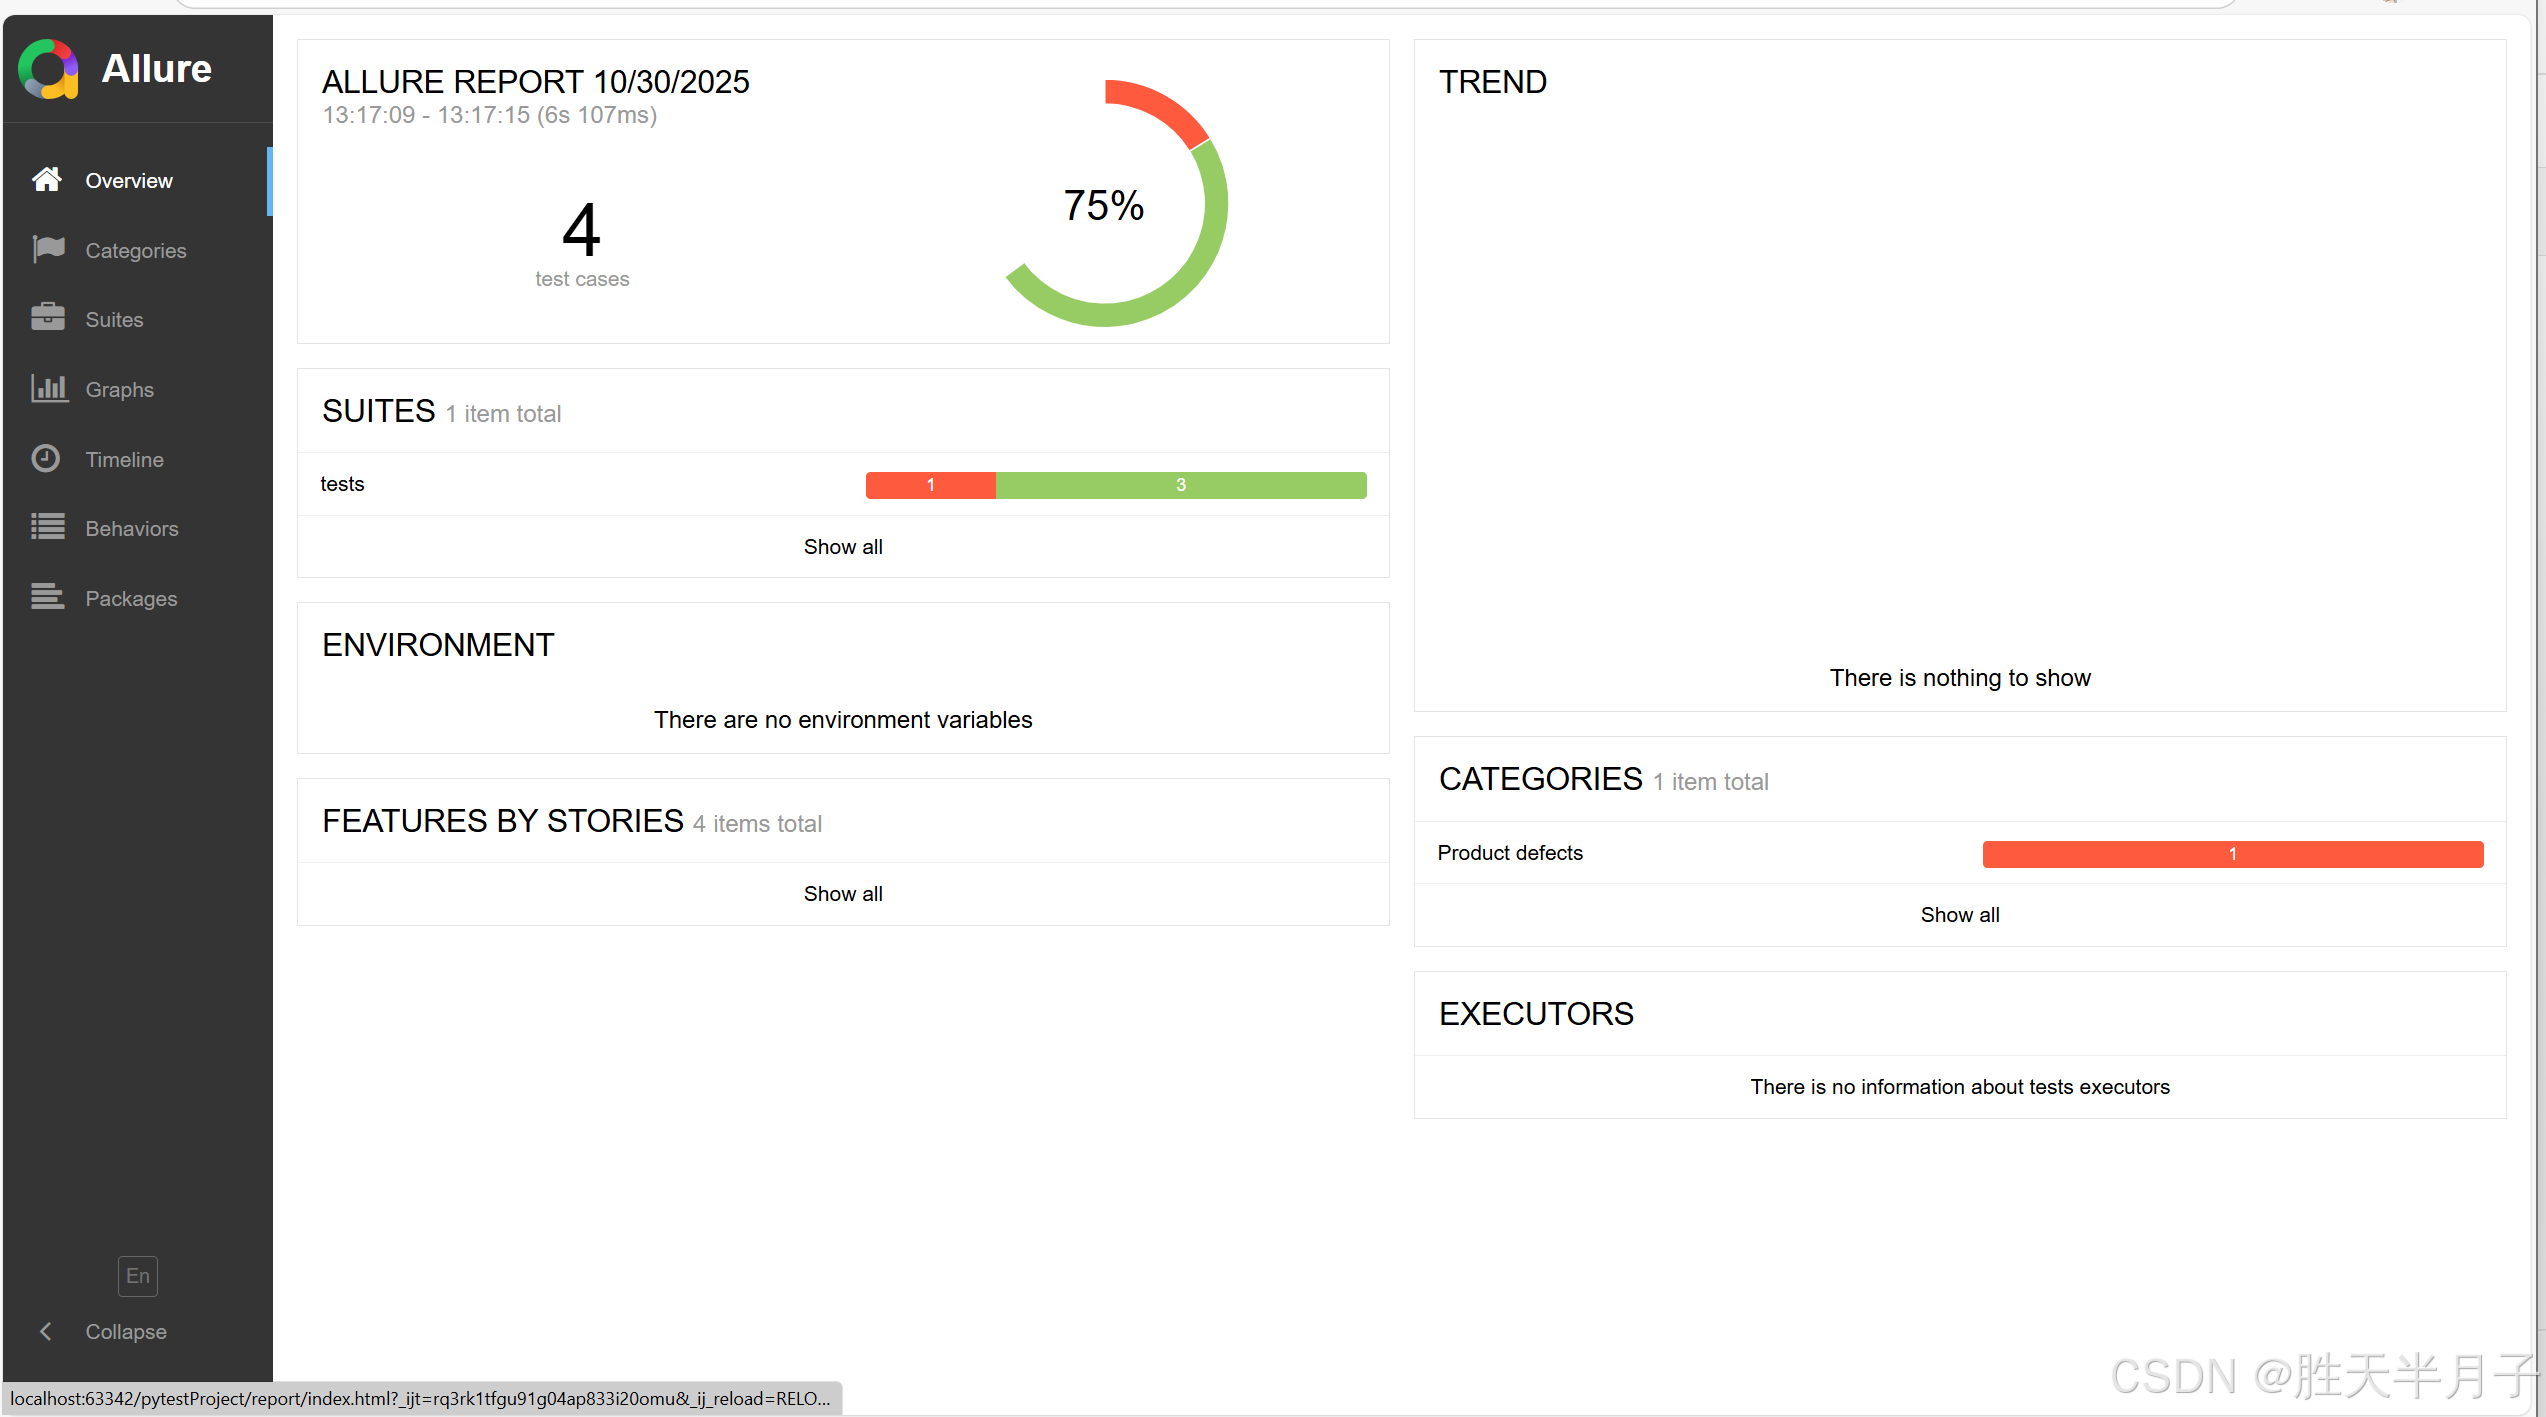
九、企业级测试报告 -- allure
allure : 是一个测设报告框架
c
pip install allure-pytest- 配置
两者选择一个报告类型
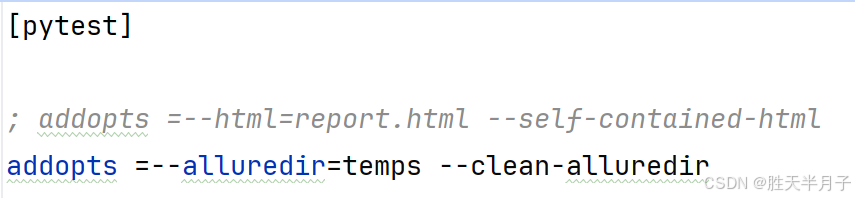
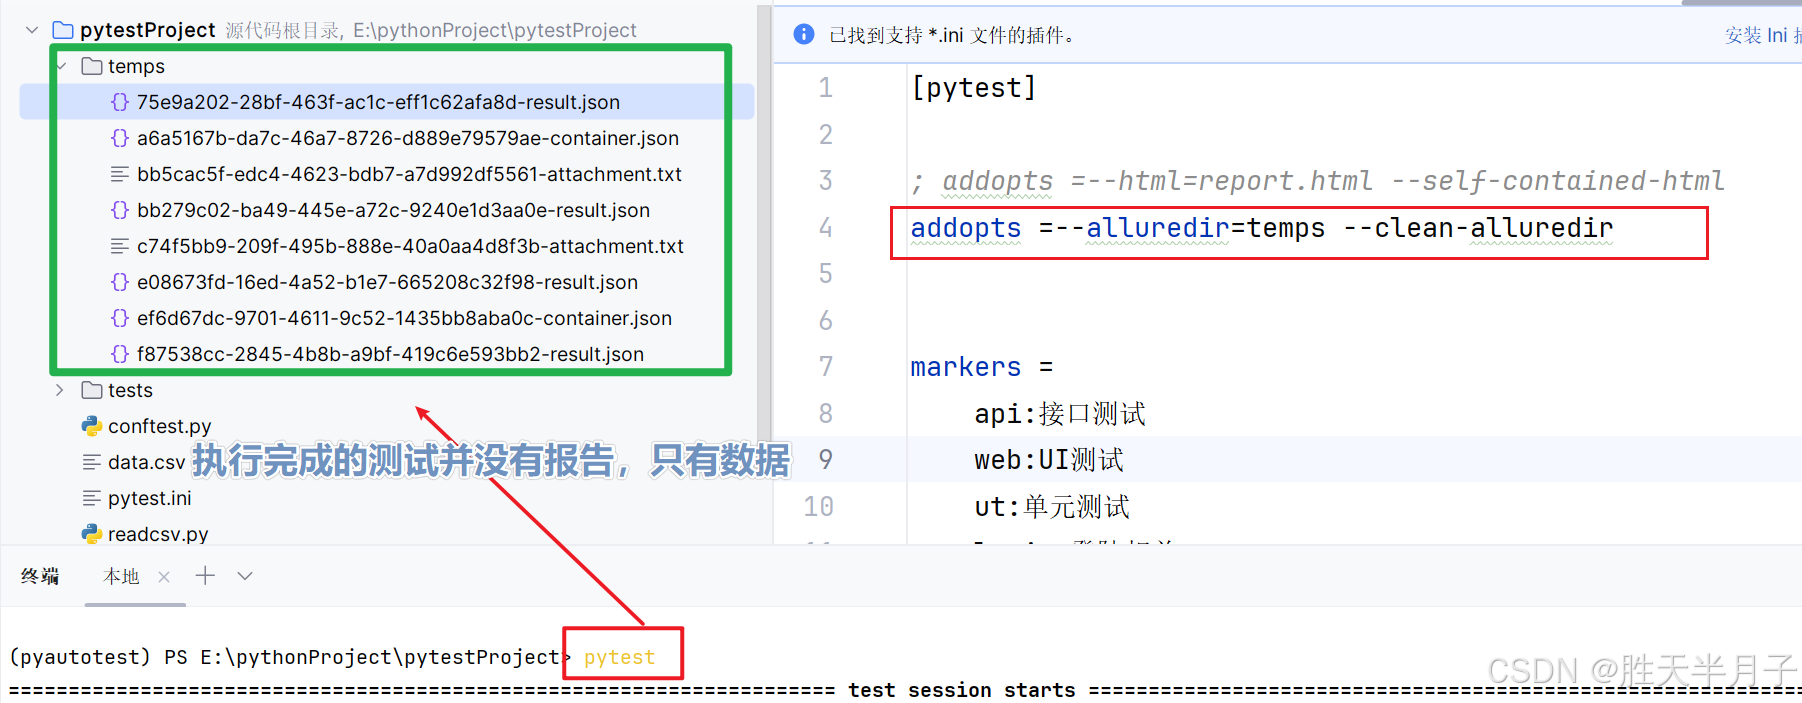
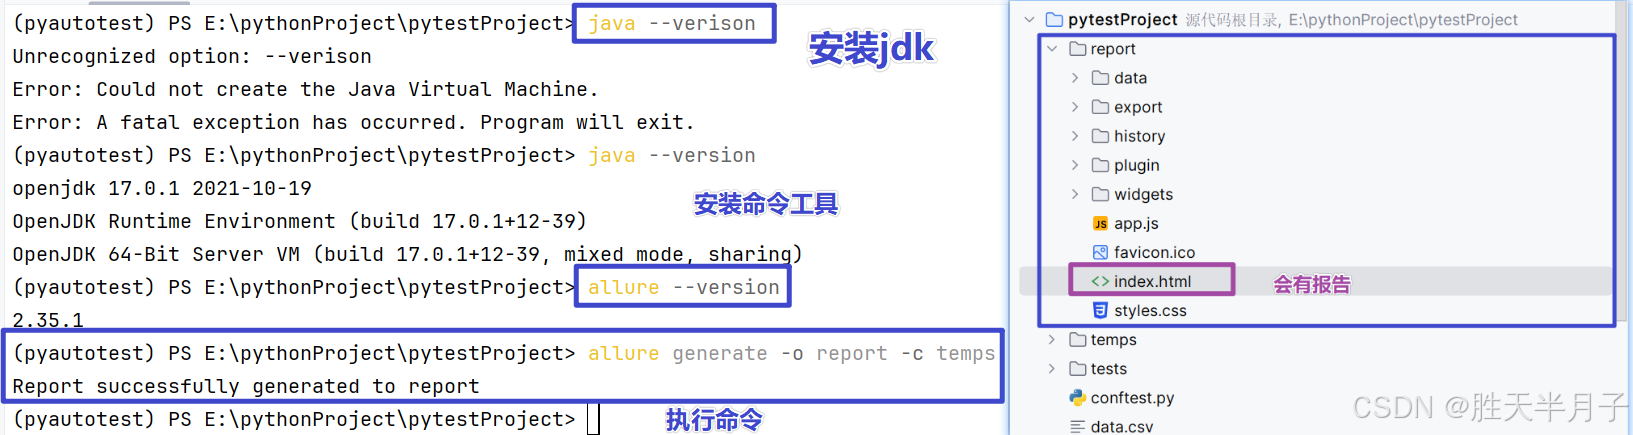
- 生成报告
c
allure generate -o report -c temps⚠️allure generate使用需要安装 Allure 命令行工具
安装过程:
-
安装jdk
-
安装Allure 命令行工具 【依赖jdk】
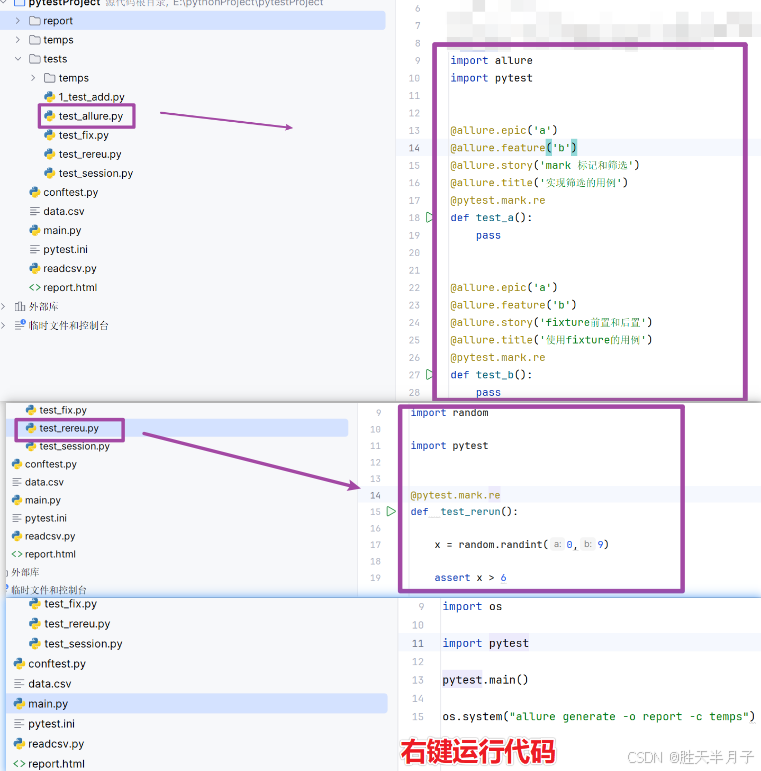
- 通过代码方式代码命令行输入命令执行
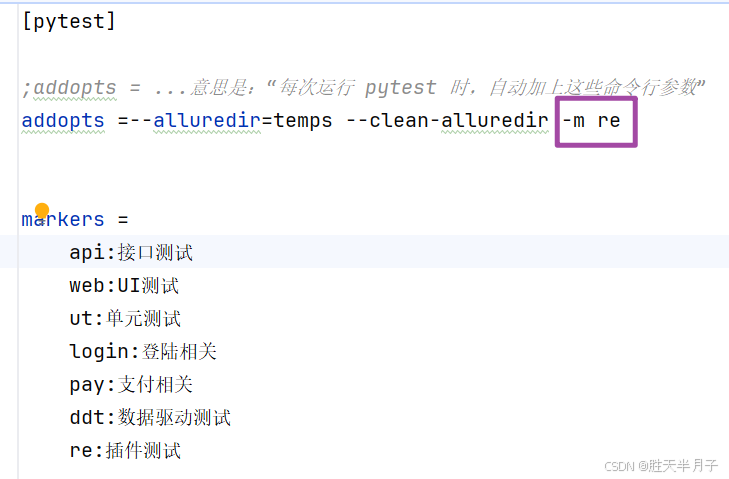
-
修改ini文件
-
修改main.py文件
python
import os

import pytest

pytest.main()

os.system("allure generate -o report -c temps")- 查看结果
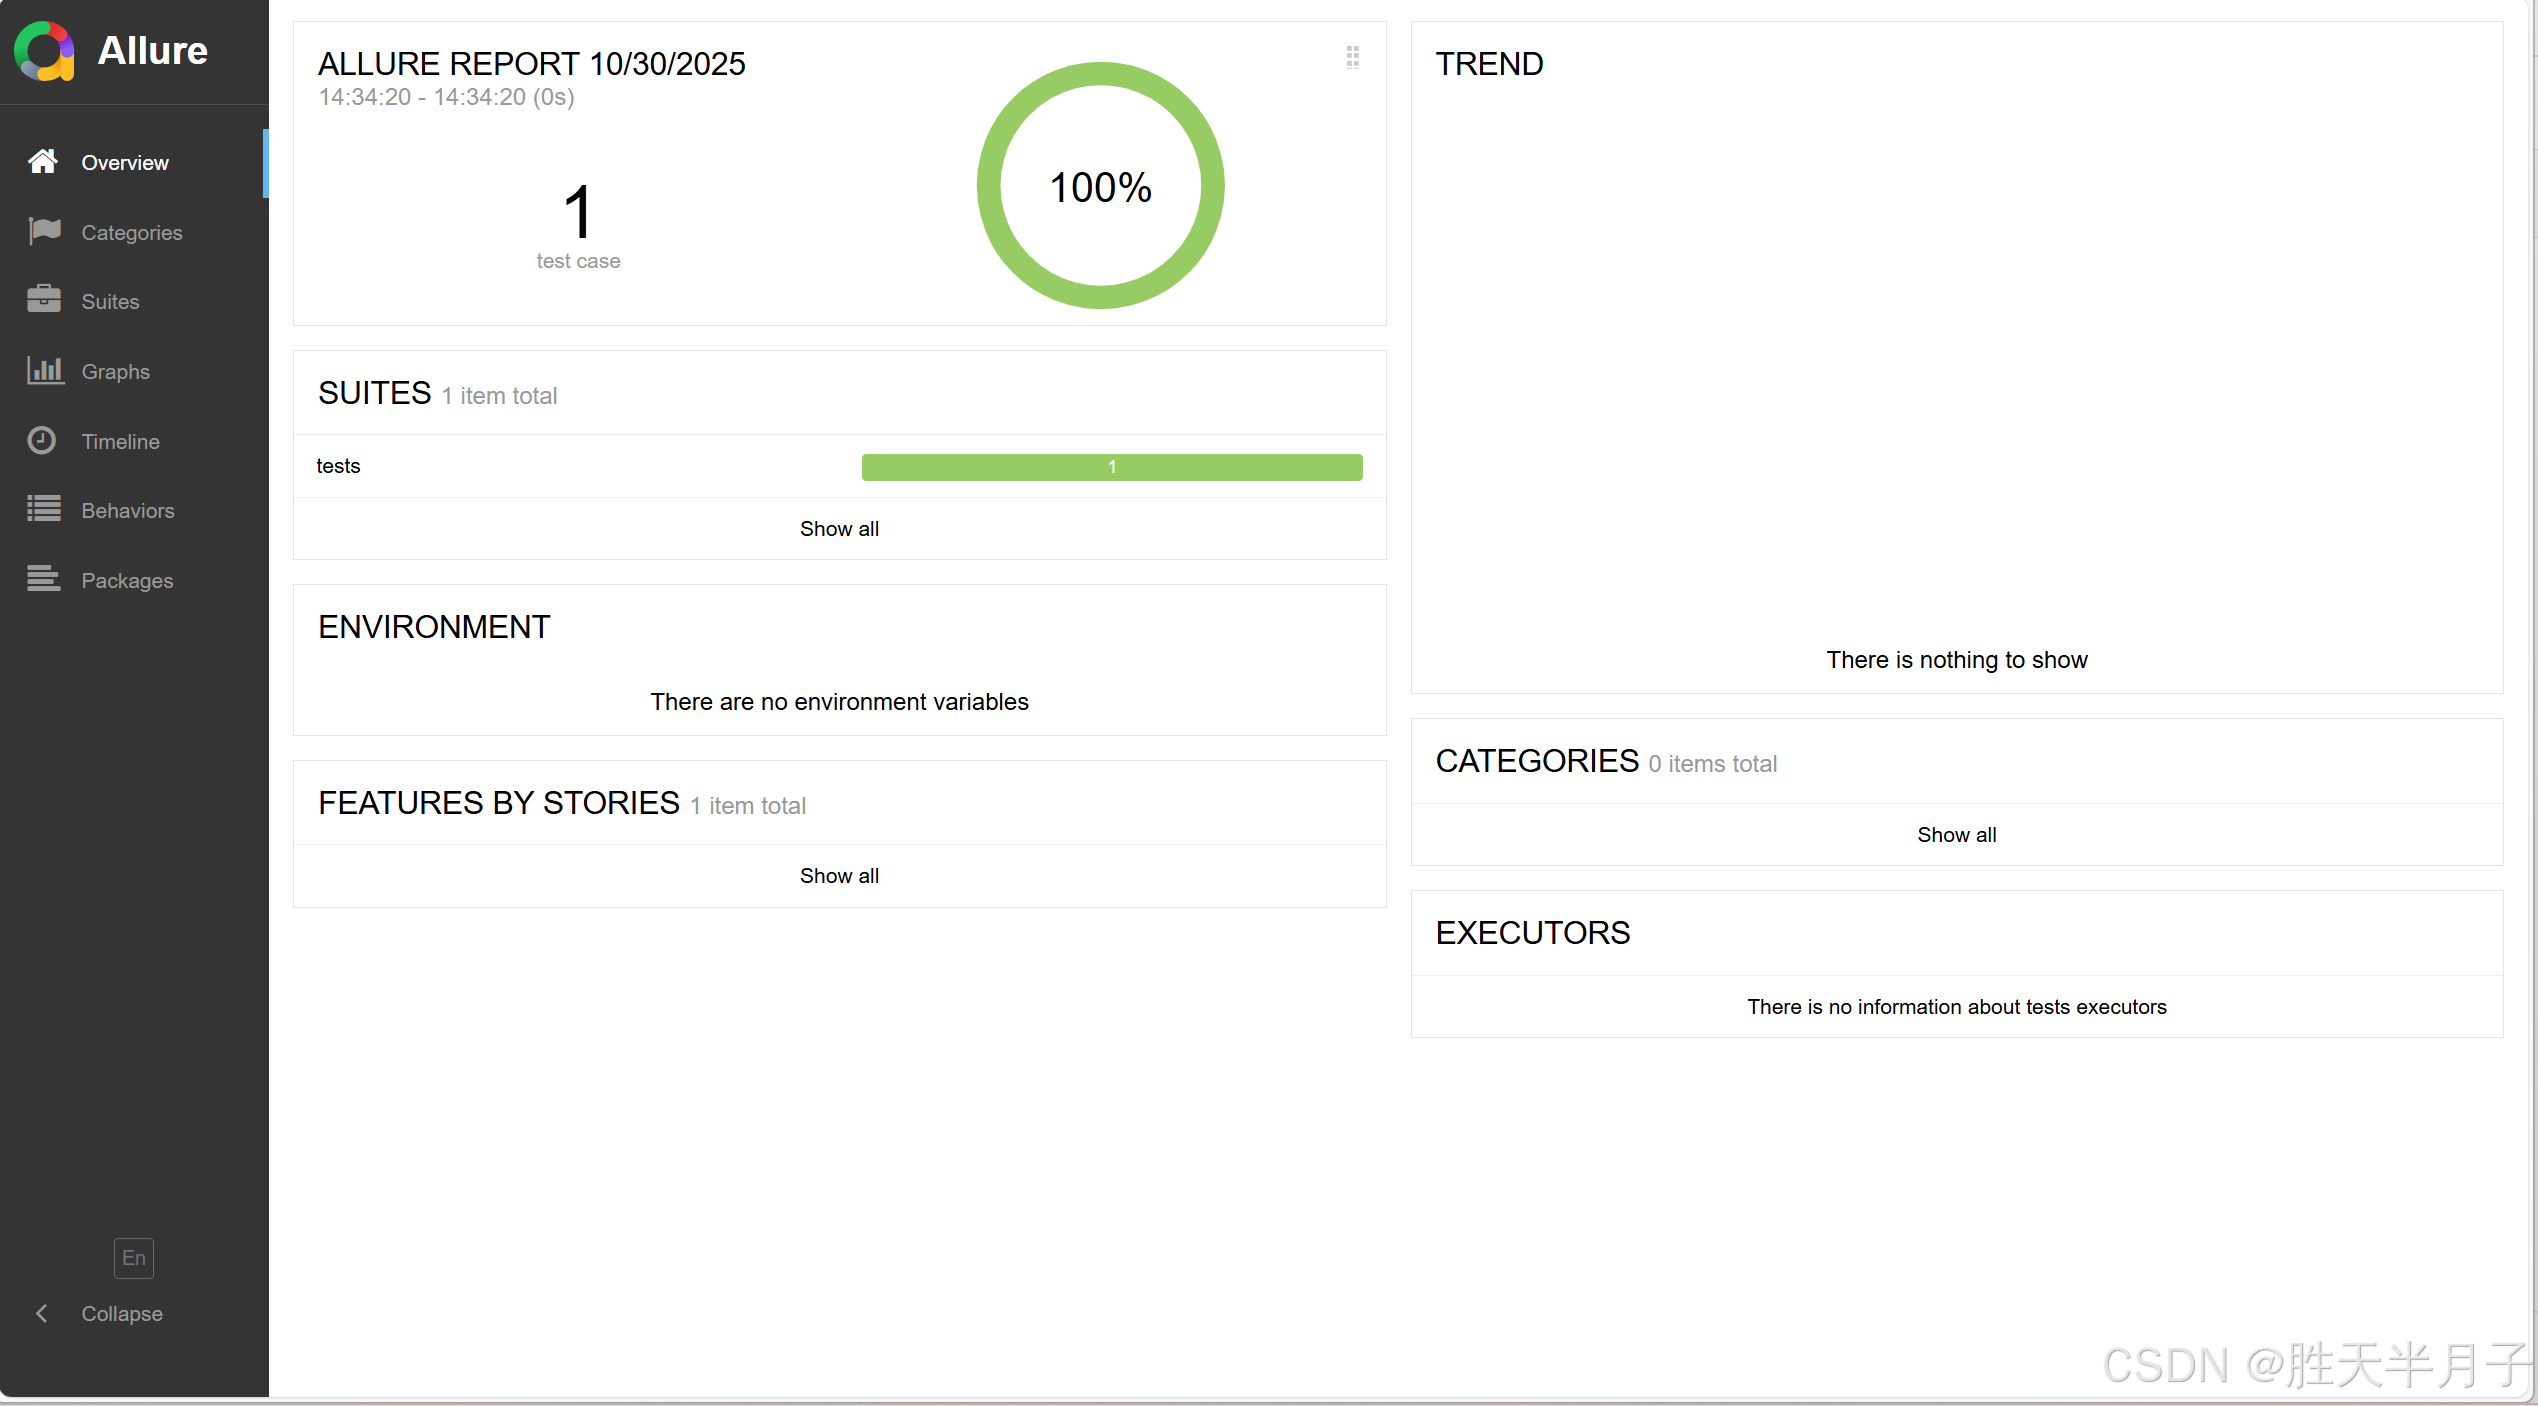
1. 对用例进行分组和关联(敏捷开发术语)
使用相同装饰器的用例,自动并入一组
c
@allure.epic			史诗			项目
@allure.feature		主题			模块
@allure.story			故事			功能
@allure.title 标题 用例- ini文件

- 代码
- 结果
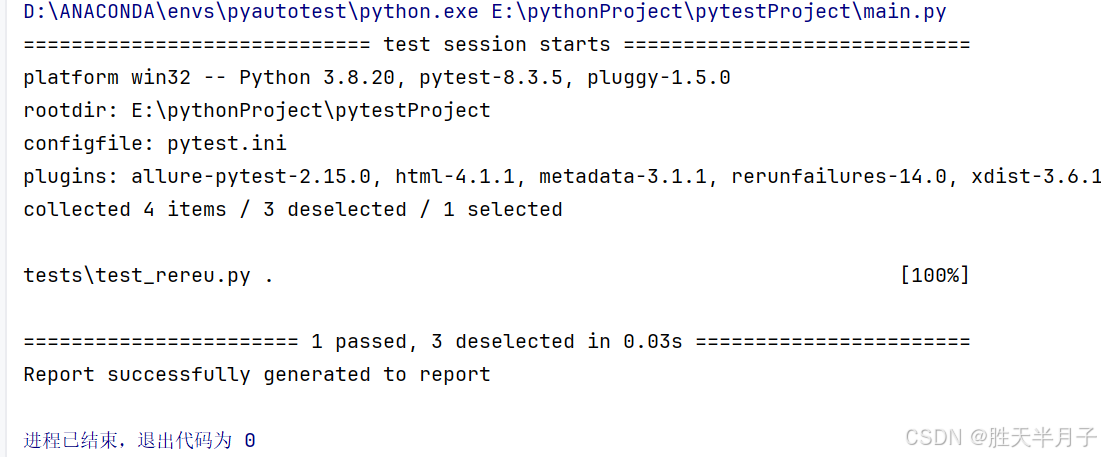
shell
D:\ANACONDA\envs\pyautotest\python.exe E:\pythonProject\pytestProject\main.py
============================= test session starts =============================
platform win32 -- Python 3.8.20, pytest-8.3.5, pluggy-1.5.0
rootdir: E:\pythonProject\pytestProject
configfile: pytest.ini
plugins: allure-pytest-2.15.0, html-4.1.1, metadata-3.1.1, rerunfailures-14.0, xdist-3.6.1
collected 6 items / 3 deselected / 3 selected

tests\test_allure.py ..                                                  [ 66%]
tests\test_rereu.py F                                                    [100%]

================================== FAILURES ===================================
_________________________________ test_rerun __________________________________

    @pytest.mark.re
    def  test_rerun():

        x = random.randint(0,9)

>       assert x > 6
E       assert 2 > 6

tests\test_rereu.py:19: AssertionError
-------------------------- Captured stdout teardown ---------------------------
2025-10-30 14:47:02.391911 结束执行!!!
=========================== short test summary info ===========================
FAILED tests/test_rereu.py::test_rerun - assert 2 > 6
================== 1 failed, 2 passed, 3 deselected in 0.08s ==================
Report successfully generated to report

进程已结束,退出代码为 0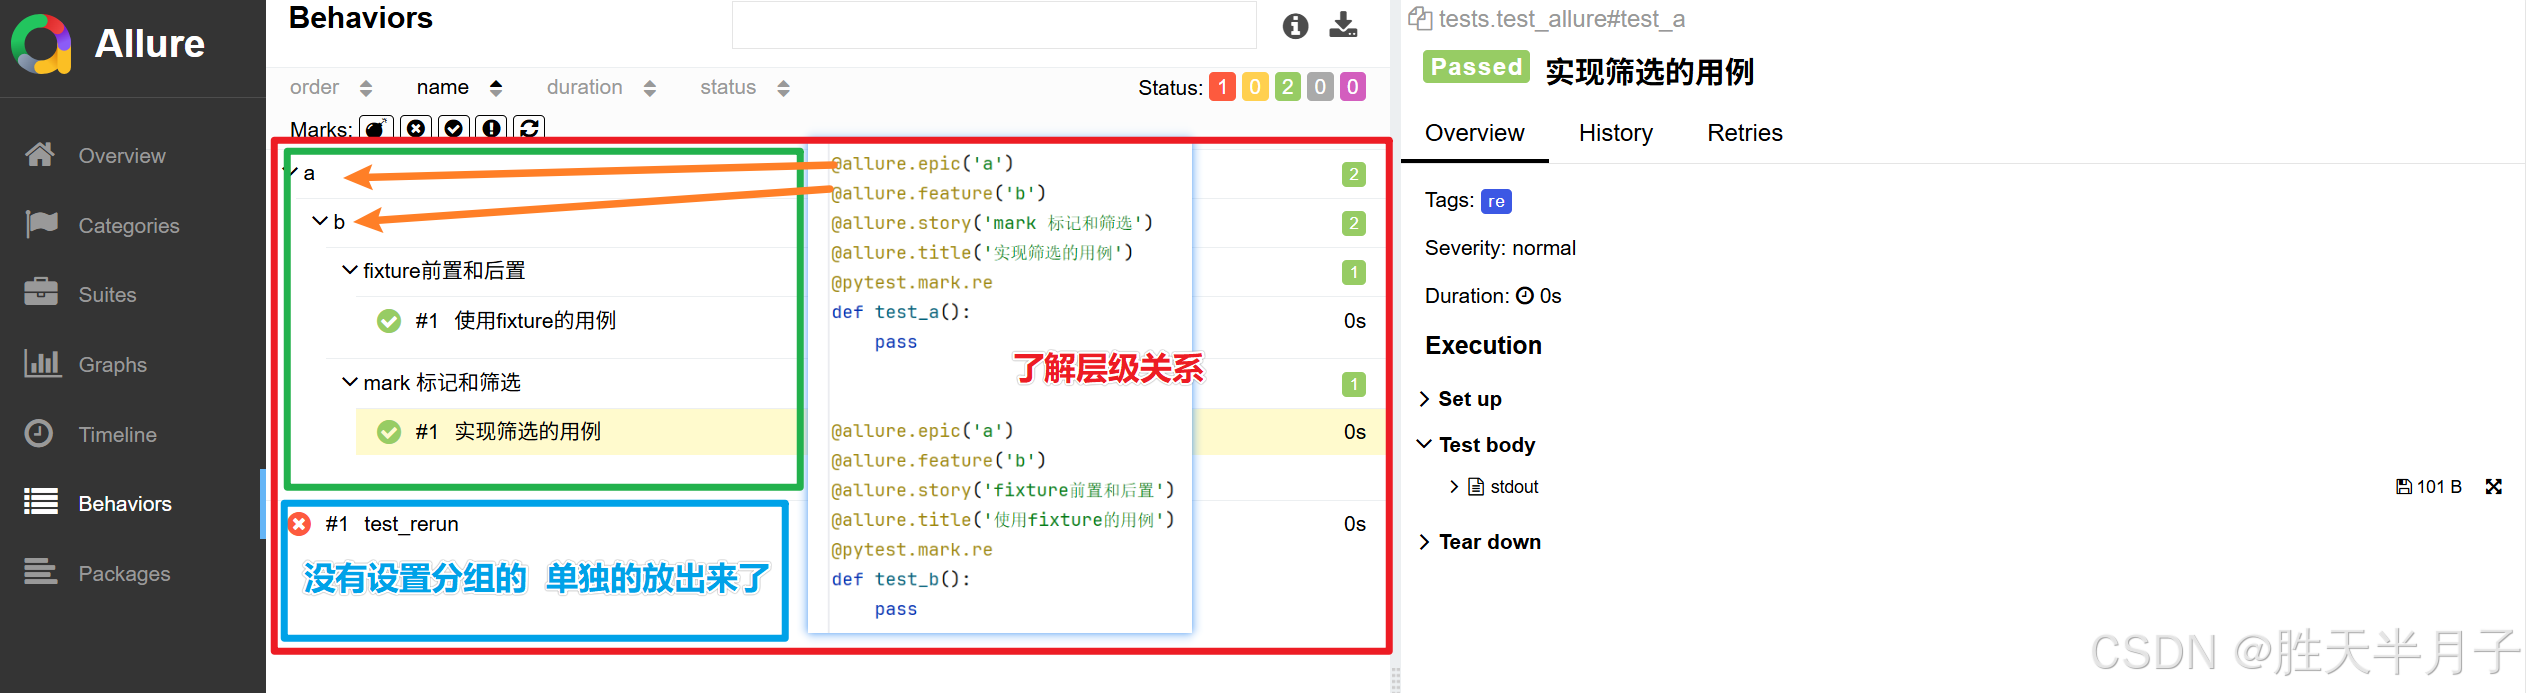
十、了解web自动化测试工作
pytest 仅进行用例管理,不会控制浏览器,需要借助新的工具:selenium
1.只了解selenium
2.搜索关于selenium的pytest插件
- 安装pytest-selenium
c
pip install pytest-selenium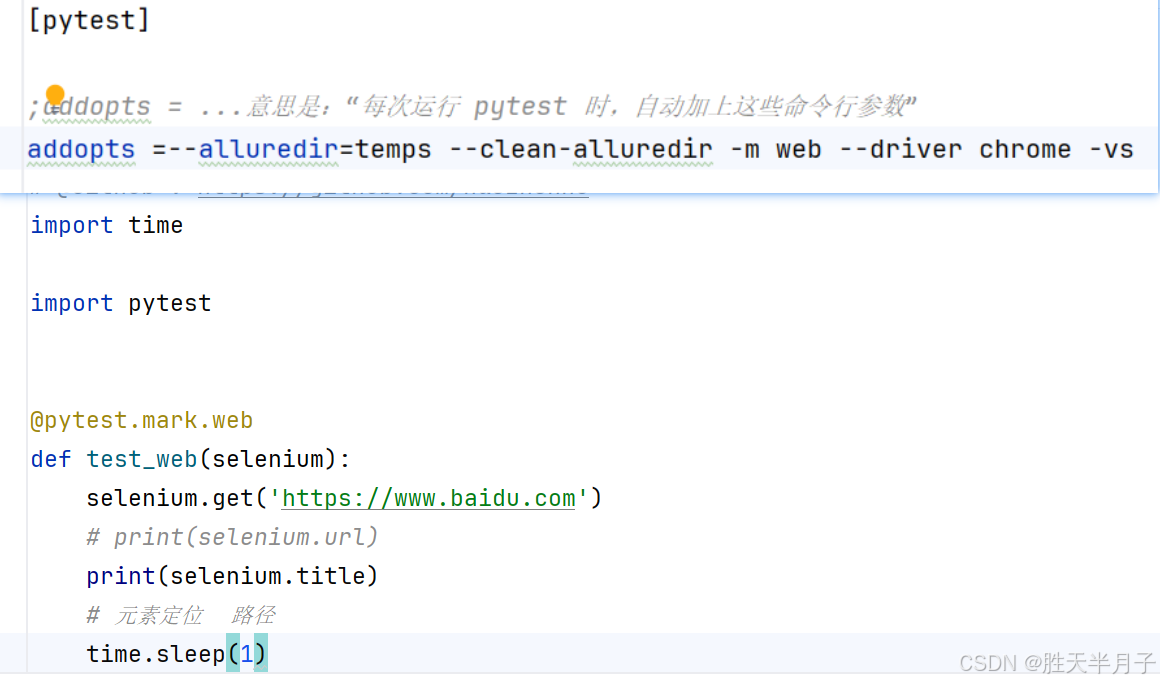
十一、测试框架需要封装什么
- 建议看这个视频了解
12小节 -- 测试框架需要封装什么
封装目的:
- 隐藏细节
- 增加功能
- 优化功能
接口自动化封装:
- 使用yaml作为用例,降低自动化门槛
- 自动请求接口、断言接口
- 自动在日志记录HTTP报文
- 自动生成allure测试报告
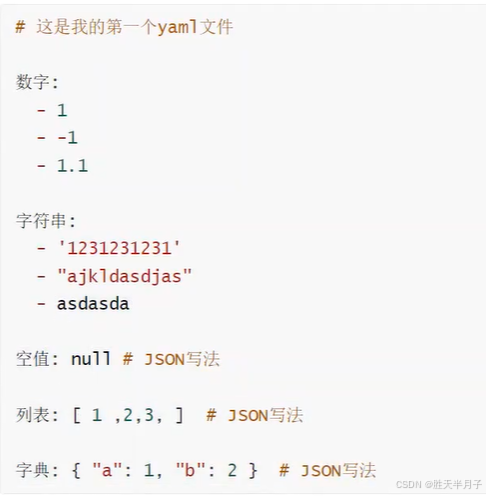
十二、YAML文件格式
一句话:YAML完全兼容SQN格式,并且支持Python相似写法
重点:
- YAML完全兼容SQN
- 是数据格式,不是变成语言
- 像Pytho一样容易编辑和阅读
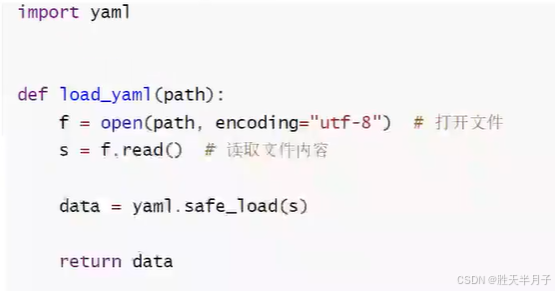
- 需要安装yaml模块
c
pip install pyymal- 编写yaml文件
#作为注释- 缩进 : 两个空格
- 成员
-表示列表成员:表示字典成员
- 加载yaml文件
十三、接口测试用例
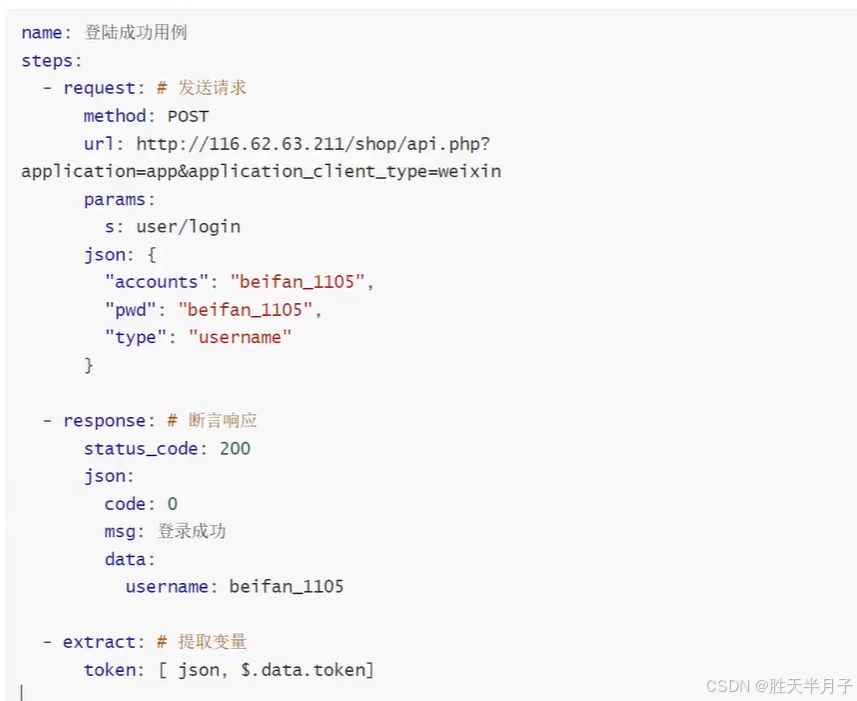
1. 设计用例内容
- 名字 区分和表达、
- 标记【可选】
- 步骤
- 请求接口
- 响应断言
- 提取变量 【postman 和 JMeter等工具都存在这种工具】
2. YMAL表示用例
- testapi.yaml
编写完成上述用例后,使用控制台pytest命令无法使用【肯定的!】,但是我们想做的是可以使用,就是将理论变成现实,这就需要封装!!!
十四、封装接口自动话框架
1. 请求接口
- 安装:
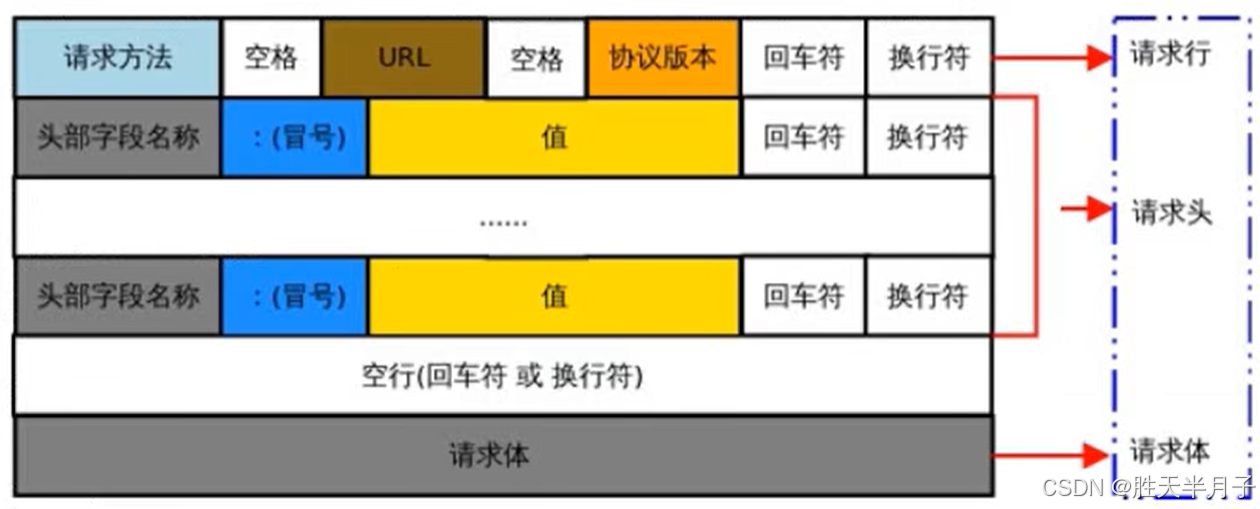
pip install requests - HTTP协议抓包,请求三部分:
- 行 :方法+地址
- 头 :请求头(键值对)
- 体:参数内容
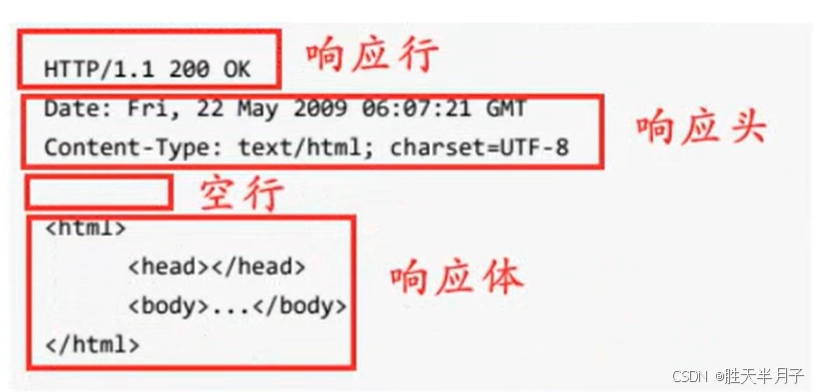
- 从HTP协议抓包角度,响应由三部分组成:
- 行:状态码
- 头:响应头(键值对)
- 体:响应内容
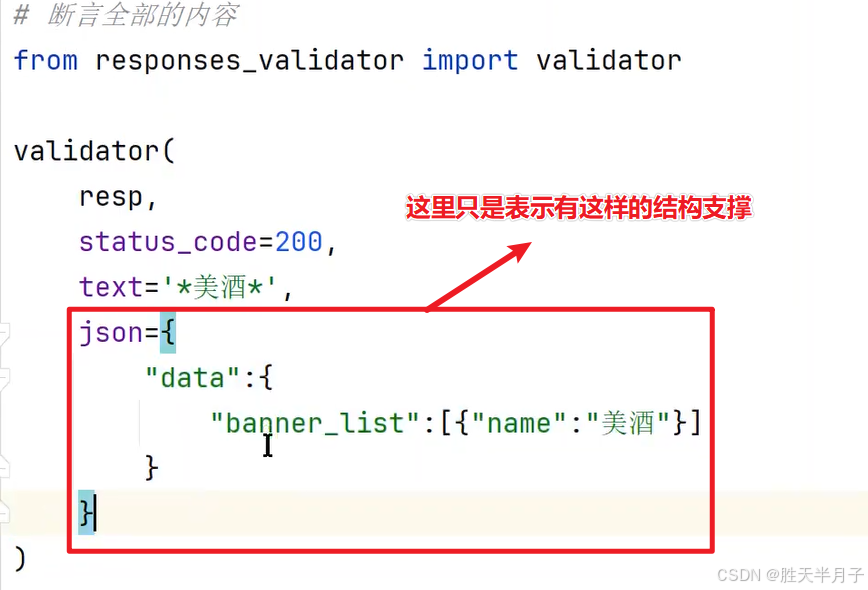
2. 断言响应
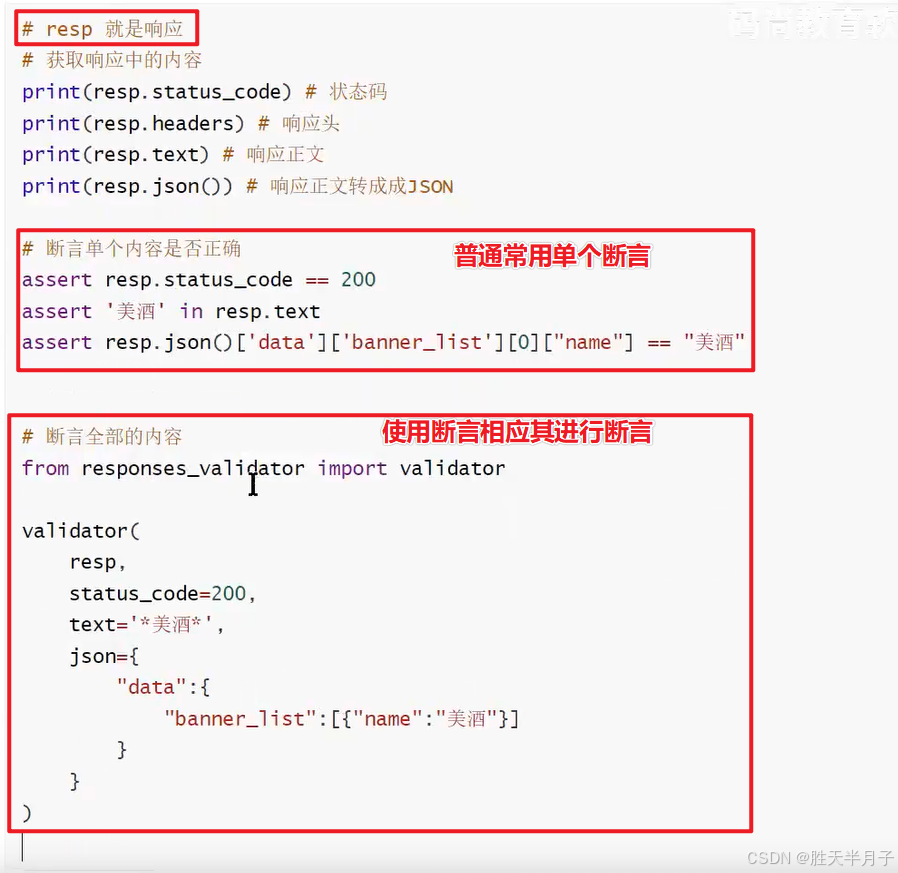
- 响应断言器件
安装:pip install responses_validator
3.变量提取
基本原则
- JSON : JSONPATH
- HTML : XPATH
- 字符串:RE 【兜底】
- JSON测试代码
c
import jsonpath
data = {
	"a":1,
	"b":[-1,-2,-3]
}
print(jsonpath.jsonpath(data,'$.b')[0][1]) # 结果是 -2
- 代码
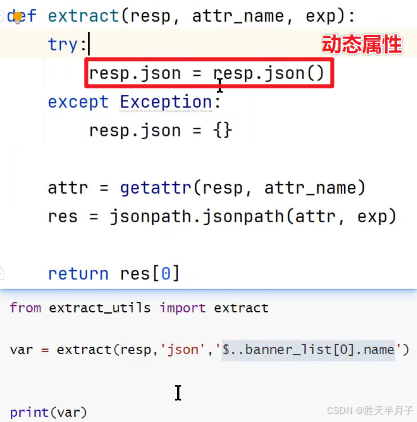
🎯 resp.json = resp.json() 为什么这样做?------ 工程上的好处
- 避免重复解析
resp.json() 每次调用都要解析字符串,耗性能。解析一次存成属性,后续直接用。 - 简化代码
写 resp.json'key' 比 resp.json()'key' 更简洁、可读性更强。 - 统一数据结构
在自动化框架中,你可能从不同来源(JSON、XML、数据库)提取数据,都统一存到 .json 属性里,方便后续处理。
4. 框架落地封装
- 观看视频了解
15.封装接口自动化框架