一、前置条件
在虚拟机中已经安装了RabbitMQ容器并启动,可以通过浏览器正常访问。
RabbitMQ在Linux系统下的Docker Compose安装步骤如下:https://blog.csdn.net/2401_84926677/article/details/152333885

浏览器访问:
二、介绍
RabbitMQ 是一个开源的消息代理软件,实现了高级消息队列协议(AMQP)。它是由 Erlang 语言编写的,以高性能、健壮性和可伸缩性著称。RabbitMQ 作为消息中间件,主要用于在分布式系统中传递消息,实现系统间的异步通信。
下面将通过SpringBoot+SpringAMQP+RabbitMQ实现消息的发送与接收处理。
三、实战操作演示
1. 创建Spring Boot 父项目
创建rabbitmq的微服务父工程,勾选springweb、spring for rabbitmq、lombok起步依赖。

2. 编辑pom.xml文件
包含所需依赖和所有子工程模块,子工程模块后续均要手动创建和配置。
html
<?xml version="1.0" encoding="UTF-8"?>
<project xmlns="http://maven.apache.org/POM/4.0.0" xmlns:xsi="http://www.w3.org/2001/XMLSchema-instance"
xsi:schemaLocation="http://maven.apache.org/POM/4.0.0 https://maven.apache.org/xsd/maven-4.0.0.xsd">
<modelVersion>4.0.0</modelVersion>
<parent>
<groupId>org.springframework.boot</groupId>
<artifactId>spring-boot-starter-parent</artifactId>
<version>3.3.1</version>
<relativePath/> <!-- lookup parent from repository -->
</parent>
<groupId>com.breeze</groupId>
<artifactId>rabbitmq-microservices</artifactId>
<version>0.0.1-SNAPSHOT</version>
<!-- 聚合项目必须声明为pom打包类型 -->
<packaging>pom</packaging>
<name>rabbitmq-microservices</name>
<description>rabbitmq-microservices</description>
<properties>
<java.version>17</java.version>
</properties>
<!-- 子模块列表 -->
<modules>
<module>rabbitmq-direct-producer</module>
<module>rabbitmq-topic-producer</module>
<module>rabbitmq-fanout-producer</module>
<module>rabbitmq-headers-producer</module>
<module>rabbitmq-common-consumer</module>
</modules>
<!-- 依赖版本管理(子模块可直接引用,无需指定版本) -->
<dependencyManagement>
<dependencies>
<dependency>
<groupId>org.springframework.boot</groupId>
<artifactId>spring-boot-starter-web</artifactId>
</dependency>
<dependency>
<groupId>org.springframework.boot</groupId>
<artifactId>spring-boot-starter-amqp</artifactId>
</dependency>
<dependency>
<groupId>org.projectlombok</groupId>
<artifactId>lombok</artifactId>
<version>1.18.24</version>
<optional>true</optional>
</dependency>
</dependencies>
</dependencyManagement>
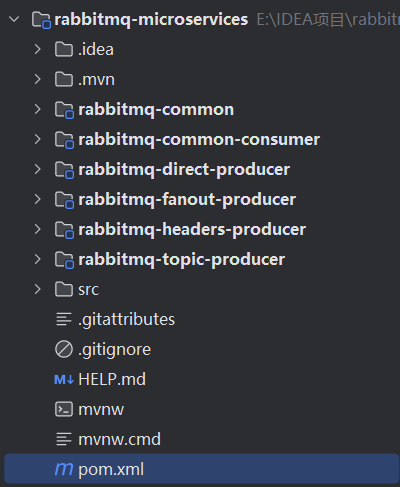
</project>3. 创建各类子工程
总体目录结构如下:
(分为6个微服务:1个公共服务提供实体类、4个不同的生产者服务、1个消费者服务)
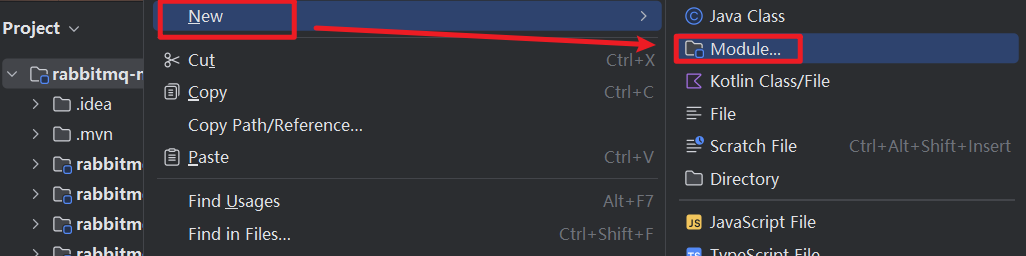
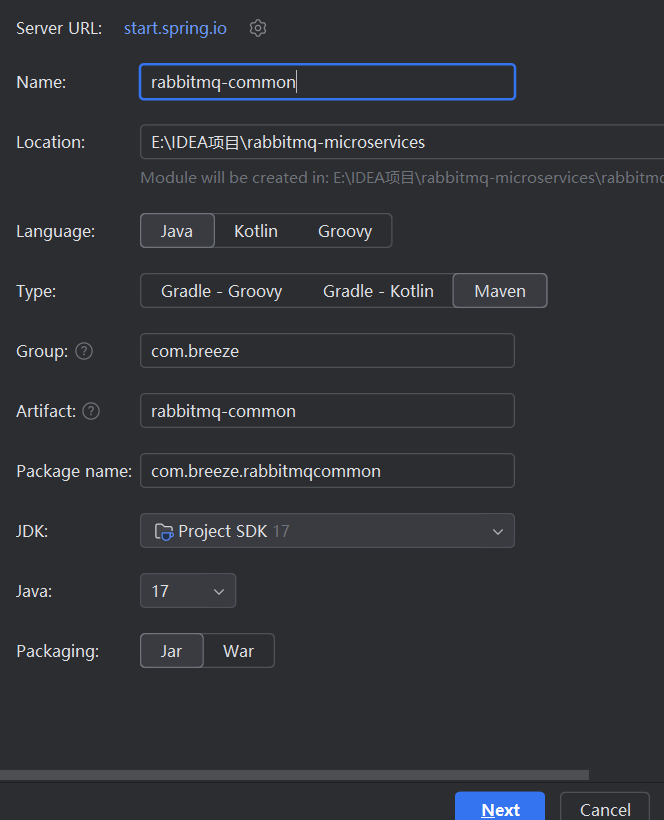
3.1 创建通用工程 rabbitmq-common
右键父工程rabbitmq-microservices,新建Module...
创建rabbitmq-common子工程,勾选Lombok起步依赖。
创建dto包并创建MessageDTO类:
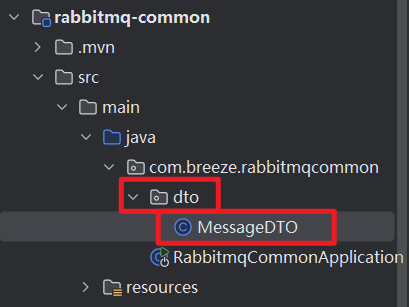
(可以删掉启动类,因为它是存放数据传输对象的模块)
DTO里包含了消息对象所包含的所有字段:
java
package com.breeze.rabbitmqcommon.dto;

import lombok.AllArgsConstructor;
import lombok.Data;
import lombok.NoArgsConstructor;
import java.io.Serializable;
import java.time.LocalDateTime;

@Data
@NoArgsConstructor
@AllArgsConstructor
public class MessageDTO implements Serializable {
    private String id;         // 消息ID
    private String content;    // 消息内容
    private LocalDateTime sendTime; // 发送时间
    private String sender;     // 发送者(微服务名称)
}(如果你的@Lombok存在问题,请前往这个地址解决:https://blog.csdn.net/2401_84926677/article/details/150085698 或者 使用构造函数进行构造等)
此模块主要包含DTO通用的消息实体类,为其他子模块提供调用。
3.2 创建fanout生产者工程 rabbitmq-fanout-producer
a.右键父工程rabbitmq-microservices,新建Module...
b.勾选rabbitmq、lombok、springweb起步依赖。
c.在pom.xml文件中引入rabbitmq-common依赖(通用模块),提供子模块调用。
XML
        <dependency>
            <groupId>com.breeze</groupId>
            <artifactId>rabbitmq-common</artifactId>
            <version>0.0.1-SNAPSHOT</version>
        </dependency>
d.编写application.yml配置文件
bash
server:
  port: 8083

spring:
  rabbitmq:
    host: 192.168.1.129
    port: 5672
    username: admin2
    password: 123456
    virtual-host: /love

fanout:
  exchange: fanout_exchange_love
  routing-key-user: fanout.user.love
  routing-key-order: fanout.order.love
e.创建controller包下的FanoutMessageController类
java
package com.breeze.rabbitmqfanoutproducer.controller;


import com.breeze.rabbitmqfanoutproducer.producer.FanoutMessageProducer;
import lombok.RequiredArgsConstructor;
import org.springframework.web.bind.annotation.GetMapping;
import org.springframework.web.bind.annotation.RequestParam;
import org.springframework.web.bind.annotation.RestController;

@RestController
@RequiredArgsConstructor
public class FanoutMessageController {

    private final FanoutMessageProducer producer;

    @GetMapping("/fanout/send")
    public String sendBroadcast(@RequestParam(defaultValue = "3") int count) {
        producer.sendMultiBroadcast(count);
        return "Fanout广播已发送" + count + "条消息";
    }
}
f.创建producer包下的FanoutMessageProducer类
java
package com.breeze.rabbitmqfanoutproducer.producer;

import com.breeze.rabbitmqcommon.dto.MessageDTO;
import lombok.RequiredArgsConstructor;
import org.springframework.amqp.rabbit.core.RabbitTemplate;
import org.springframework.beans.factory.annotation.Value;
import org.springframework.stereotype.Component;
import java.time.LocalDateTime;
import java.util.UUID;

@Component
//@RequiredArgsConstructor
public class FanoutMessageProducer {

    private final RabbitTemplate rabbitTemplate;

    @Value("${fanout.exchange}")
    private String exchange;

    public FanoutMessageProducer(RabbitTemplate rabbitTemplate) {
        this.rabbitTemplate = rabbitTemplate;
    }

    // 发送多条广播消息(Fanout忽略路由键)
    public void sendMultiBroadcast(int count) {
        for (int i = 0; i < count; i++) {
            MessageDTO message = new MessageDTO(
                    UUID.randomUUID().toString(),
                    "Fanout广播消息" + (i + 1),
                    LocalDateTime.now(),
                    "fanout-producer"
            );
            rabbitTemplate.convertAndSend(exchange, "", message); // 路由键为空
        }
    }
}
3.3 创建direct生产者工程 rabbitmq-direct-producer
a.右键父工程rabbitmq-microservices,新建Module...
b.勾选rabbitmq、lombok、springweb起步依赖。
c.在pom.xml文件中引入rabbitmq-common依赖(通用模块),提供子模块调用。
XML
        <dependency>
            <groupId>com.breeze</groupId>
            <artifactId>rabbitmq-common</artifactId>
            <version>0.0.1-SNAPSHOT</version>
        </dependency>
d.编写application.yml配置文件
bash
server:
  port: 8081

spring:
  rabbitmq:
    host: 192.168.1.129
    port: 5672
    username: admin2
    password: 123456
    virtual-host: /love
    connection-timeout: 5000

direct:
  exchange: direct_exchange_love
  routing-key1: direct.key1.love
  routing-key2: direct.key2.love
e.创建controller包下的DirectMessageController类
java
package com.breeze.rabbitmqdirectproducer.controller;

import com.breeze.rabbitmqdirectproducer.producer.DirectMessageProducer;
import lombok.RequiredArgsConstructor;
import org.springframework.web.bind.annotation.GetMapping;
import org.springframework.web.bind.annotation.RequestParam;
import org.springframework.web.bind.annotation.RestController;

@RestController  // 标识为Web控制器,返回JSON
@RequiredArgsConstructor
public class DirectMessageController {

    private final DirectMessageProducer producer;

    // 提供HTTP接口:发送消息到路由键1
    @GetMapping("/direct/send1")
    public String sendToKey1(@RequestParam(defaultValue = "3") int count) {
        producer.sendMultiToKey1(count);
        return "Direct路由键1已发送" + count + "条消息";
    }

    // 提供HTTP接口:发送消息到路由键2
    @GetMapping("/direct/send2")
    public String sendToKey2(@RequestParam(defaultValue = "3") int count) {
        producer.sendMultiToKey2(count);
        return "Direct路由键2已发送" + count + "条消息";
    }
}
f.创建producer包下的DirectMessageProducer类
java
package com.breeze.rabbitmqdirectproducer.producer;


import com.breeze.rabbitmqcommon.dto.MessageDTO;
import org.springframework.amqp.rabbit.core.RabbitTemplate;
import org.springframework.beans.factory.annotation.Value;
import org.springframework.stereotype.Component;

import java.time.LocalDateTime;
import java.util.UUID;

@Component
public class DirectMessageProducer {

    private final RabbitTemplate rabbitTemplate;

    // 从配置文件读取交换机名称
    @Value("${direct.exchange}")
    private String exchange;

    @Value("${direct.routing-key1}")
    private String routingKey1;

    @Value("${direct.routing-key2}")
    private String routingKey2;

    public DirectMessageProducer(RabbitTemplate rabbitTemplate) {
        this.rabbitTemplate = rabbitTemplate;
    }

    // 发送多条消息到路由键1
    public void sendMultiToKey1(int count) {
        System.out.println("当前交换机:" + exchange);
        System.out.println("当前路由键:" + routingKey1);

        for (int i = 0; i < count; i++) {
            MessageDTO message = new MessageDTO(
                    UUID.randomUUID().toString(),
                    "Direct消息" + (i + 1) + "(路由键1)",
                    LocalDateTime.now(),
                    "direct-producer"
            );

            System.out.println(message);

            rabbitTemplate.convertAndSend(exchange, routingKey1, message);
        }
    }

    // 发送多条消息到路由键2
    public void sendMultiToKey2(int count) {
        System.out.println("当前交换机:" + exchange);
        System.out.println("当前路由键:" + routingKey2);

        for (int i = 0; i < count; i++) {
            MessageDTO message = new MessageDTO(
                    UUID.randomUUID().toString(),
                    "Direct消息" + (i + 1) + "(路由键2)",
                    LocalDateTime.now(),
                    "direct-producer"
            );

            rabbitTemplate.convertAndSend(exchange, routingKey2, message);
        }
    }
}
3.4 创建topic生产者工程 rabbitmq-topic-producer
a.右键父工程rabbitmq-microservices,新建Module...
b.勾选rabbitmq、lombok、springweb起步依赖。
c.在pom.xml文件中引入rabbitmq-common依赖(通用模块),提供子模块调用。
XML
        <dependency>
            <groupId>com.breeze</groupId>
            <artifactId>rabbitmq-common</artifactId>
            <version>0.0.1-SNAPSHOT</version>
        </dependency>
d.编写application.yml配置文件
bash
server:
  port: 8082

spring:
  rabbitmq:
    host: 192.168.1.129
    port: 5672
    username: admin2
    password: 123456
    virtual-host: /love

topic:
  exchange: topic_exchange_love
  routing-key-user: topic.user.love
  routing-key-order: topic.order.love
e.创建controller包下的TopicMessageController类
java
package com.breeze.rabbitmqtopicproducer.controller;

import com.breeze.rabbitmqtopicproducer.producer.TopicMessageProducer;
import lombok.RequiredArgsConstructor;
import org.springframework.web.bind.annotation.GetMapping;
import org.springframework.web.bind.annotation.RequestParam;
import org.springframework.web.bind.annotation.RestController;

@RestController
@RequiredArgsConstructor
public class TopicMessageController {

    private final TopicMessageProducer producer;

    @GetMapping("/topic/sendUser")
    public String sendUserMsg(@RequestParam(defaultValue = "3") int count) {
        producer.sendMultiUserMsg(count);
        return "Topic用户消息已发送" + count + "条";
    }

    @GetMapping("/topic/sendOrder")
    public String sendOrderMsg(@RequestParam(defaultValue = "3") int count) {
        producer.sendMultiOrderMsg(count);
        return "Topic订单消息已发送" + count + "条";
    }
}
f.创建producer包下的TopicMessageProducer类
java
package com.breeze.rabbitmqtopicproducer.producer;

import com.breeze.rabbitmqcommon.dto.MessageDTO;
import org.springframework.amqp.rabbit.core.RabbitTemplate;
import org.springframework.beans.factory.annotation.Value;
import org.springframework.stereotype.Component;
import java.time.LocalDateTime;
import java.util.UUID;

@Component
public class TopicMessageProducer {

    private final RabbitTemplate rabbitTemplate;

    @Value("${topic.exchange}")
    private String exchange;


    @Value("${topic.routing-key-user}")
    private String routingKeyUser;


    @Value("${topic.routing-key-order}")
    private String routingKeyOrder;

    public TopicMessageProducer(RabbitTemplate rabbitTemplate) {
        this.rabbitTemplate = rabbitTemplate;
    }

    // 发送多条用户相关消息(使用正确的路由键)
    public void sendMultiUserMsg(int count) {

        System.out.println("用户消息路由键:" + routingKeyUser);

        for (int i = 0; i < count; i++) {
            MessageDTO message = new MessageDTO(
                    UUID.randomUUID().toString(),
                    "Topic用户消息" + (i + 1),
                    LocalDateTime.now(),
                    "topic-producer"
            );
            rabbitTemplate.convertAndSend(exchange, routingKeyUser, message);
        }
    }

    // 发送多条订单相关消息(使用正确的路由键)
    public void sendMultiOrderMsg(int count) {

        System.out.println("订单消息路由键:" + routingKeyOrder);

        for (int i = 0; i < count; i++) {
            MessageDTO message = new MessageDTO(
                    UUID.randomUUID().toString(),
                    "Topic订单消息" + (i + 1),
                    LocalDateTime.now(),
                    "topic-producer"
            );
            rabbitTemplate.convertAndSend(exchange, routingKeyOrder, message);
        }
    }
}
3.5 创建headers生产者工程 rabbitmq-headers-producer
a.右键父工程rabbitmq-microservices,新建Module...
b.勾选rabbitmq、lombok、springweb起步依赖。
c.在pom.xml文件中引入rabbitmq-common依赖(通用模块),提供子模块调用。
XML
        <dependency>
            <groupId>com.breeze</groupId>
            <artifactId>rabbitmq-common</artifactId>
            <version>0.0.1-SNAPSHOT</version>
        </dependency>
d.编写application.yml配置文件
bash
server:
  port: 8084

spring:
  rabbitmq:
    host: 192.168.1.129
    port: 5672
    username: admin2
    password: 123456
    virtual-host: /love

headers:
  exchange: headers_exchange_love
  routing-key-user: headers.user.love
  routing-key-order: headers.order.love
e.创建controller包下的HeadersMessageController类
java
package com.breeze.rabbitmqheadersproducer.controller;


import com.breeze.rabbitmqheadersproducer.producer.HeadersMessageProducer;
import lombok.RequiredArgsConstructor;
import org.springframework.web.bind.annotation.GetMapping;
import org.springframework.web.bind.annotation.RequestParam;
import org.springframework.web.bind.annotation.RestController;

@RestController
@RequiredArgsConstructor
public class HeadersMessageController {

    private final HeadersMessageProducer producer;

    @GetMapping("/headers/sendText")
    public String sendTextMsg(@RequestParam(defaultValue = "3") int count) {
        producer.sendMultiTextMsg(count);
        return "Headers文本消息已发送" + count + "条";
    }

    @GetMapping("/headers/sendImage")
    public String sendImageMsg(@RequestParam(defaultValue = "3") int count) {
        producer.sendMultiImageMsg(count);
        return "Headers图片消息已发送" + count + "条";
    }
}
f.创建producer包下的HeadersMessageProducer类
java
package com.breeze.rabbitmqheadersproducer.producer;


import com.breeze.rabbitmqcommon.dto.MessageDTO;
import lombok.RequiredArgsConstructor;
import org.springframework.amqp.core.Message;
import org.springframework.amqp.core.MessageBuilder;
import org.springframework.amqp.core.MessageProperties;
import org.springframework.amqp.rabbit.core.RabbitTemplate;
import org.springframework.beans.factory.annotation.Value;
import org.springframework.stereotype.Component;
import java.time.LocalDateTime;
import java.util.UUID;

@Component
@RequiredArgsConstructor
public class HeadersMessageProducer {

    private final RabbitTemplate rabbitTemplate;

    @Value("${headers.exchange}")
    private String exchange;

    // 发送多条文本类型消息(匹配headers_queue1)
    public void sendMultiTextMsg(int count) {
        for (int i = 0; i < count; i++) {
            MessageDTO message = new MessageDTO(
                    UUID.randomUUID().toString(),
                    "Headers文本消息" + (i + 1),
                    LocalDateTime.now(),
                    "headers-producer"
            );
            // 设置消息头(type=text, format=json)
            MessageProperties props = new MessageProperties();
            props.setHeader("type", "text");
            props.setHeader("format", "json");
            Message amqpMsg = MessageBuilder
                    .withBody(rabbitTemplate.getMessageConverter().toMessage(message, props).getBody())
                    .andProperties(props)
                    .build();
            rabbitTemplate.send(exchange, "", amqpMsg);
        }
    }

    // 发送多条图片类型消息(匹配headers_queue2)
    public void sendMultiImageMsg(int count) {
        for (int i = 0; i < count; i++) {
            MessageDTO message = new MessageDTO(
                    UUID.randomUUID().toString(),
                    "Headers图片消息" + (i + 1),
                    LocalDateTime.now(),
                    "headers-producer"
            );
            // 设置消息头(type=image)
            MessageProperties props = new MessageProperties();
            props.setHeader("type", "image");
            Message amqpMsg = MessageBuilder
                    .withBody(rabbitTemplate.getMessageConverter().toMessage(message, props).getBody())
                    .andProperties(props)
                    .build();
            rabbitTemplate.send(exchange, "", amqpMsg);
        }
    }
}
3.6 创建common消费者工程 rabbitmq-common-consumer
a.右键父工程rabbitmq-microservices,新建Module...
b.勾选rabbitmq、lombok、springweb起步依赖。
c.在pom.xml文件中引入rabbitmq-common依赖(通用模块),提供子模块调用。
XML
        <dependency>
            <groupId>com.breeze</groupId>
            <artifactId>rabbitmq-common</artifactId>
            <version>0.0.1-SNAPSHOT</version>
        </dependency>
d.编写application.yml配置文件
bash
server:
  port: 8085

spring:
  rabbitmq:
    host: 192.168.1.129
    port: 5672
    username: admin2
    password: 123456
    virtual-host: /love
    listener:
      simple:
        acknowledge-mode: auto
        concurrency: 2
e.创建listener包下的消息监听类
(1)DirectListener类
java
package com.breeze.rabbitmqcommonconsumer.listener;

import com.breeze.rabbitmqcommon.dto.MessageDTO;
import org.slf4j.Logger;
import org.slf4j.LoggerFactory;
import org.springframework.amqp.rabbit.annotation.Exchange;
import org.springframework.amqp.rabbit.annotation.Queue;
import org.springframework.amqp.rabbit.annotation.QueueBinding;
import org.springframework.amqp.rabbit.annotation.RabbitListener;
import org.springframework.messaging.handler.annotation.Payload;
import org.springframework.stereotype.Component;

@Component
public class DirectListener {

    private static final Logger log = LoggerFactory.getLogger(DirectListener.class);

    @RabbitListener(bindings = @QueueBinding(
            value = @Queue(name = "direct_queue1_love", durable = "true"),
            exchange = @Exchange(name = "direct_exchange_love", type = "direct", durable = "true"),
            key = "direct.key1.love"
    ))
    public void listenDirect1(@Payload MessageDTO message) {
        log.info("[Direct队列1] 接收消息:{}", message);
    }

    @RabbitListener(bindings = @QueueBinding(
            value = @Queue(name = "direct_queue2_love", durable = "true"),
            exchange = @Exchange(name = "direct_exchange_love", type = "direct", durable = "true"),
            key = "direct.key2.love"
    ))
    public void listenDirect2(@Payload MessageDTO message) {
        log.info("[Direct队列2] 接收消息:{}", message);
    }

}
(2)FanoutListener类
java
package com.breeze.rabbitmqcommonconsumer.listener;

import com.breeze.rabbitmqcommon.dto.MessageDTO;
import lombok.extern.slf4j.Slf4j;
import org.slf4j.Logger;
import org.slf4j.LoggerFactory;
import org.springframework.amqp.core.Message;
import org.springframework.amqp.rabbit.annotation.Exchange;
import org.springframework.amqp.rabbit.annotation.Queue;
import org.springframework.amqp.rabbit.annotation.QueueBinding;
import org.springframework.amqp.rabbit.annotation.RabbitListener;
import org.springframework.messaging.handler.annotation.Payload;
import org.springframework.stereotype.Component;

//@Slf4j
@Component
public class FanoutListener {

    private static final Logger log = LoggerFactory.getLogger(DirectListener.class);

    // 绑定Fanout交换机(无需路由键)
    @RabbitListener(bindings = @QueueBinding(
            value = @Queue(name = "fanout_queue1_love", durable = "true"),
            exchange = @Exchange(name = "fanout_exchange_love", type = "fanout", durable = "true")
    ))
    public void listenFanout1(@Payload MessageDTO message) {
        log.info("[Fanout队列1] 接收消息:{}", message);
    }

    @RabbitListener(bindings = @QueueBinding(
            value = @Queue(name = "fanout_queue2_love", durable = "true"),
            exchange = @Exchange(name = "fanout_exchange_love", type = "fanout", durable = "true")
    ))
    public void listenFanout2(@Payload MessageDTO message) {
        log.info("[Fanout队列2] 接收消息:{}", message);
    }

}
(3)HeadersListener类
java
package com.breeze.rabbitmqcommonconsumer.listener;

import com.breeze.rabbitmqcommon.dto.MessageDTO;
import lombok.extern.slf4j.Slf4j;
import org.slf4j.Logger;
import org.slf4j.LoggerFactory;
import org.springframework.amqp.rabbit.annotation.Exchange;
import org.springframework.amqp.rabbit.annotation.Queue;
import org.springframework.amqp.rabbit.annotation.QueueBinding;
import org.springframework.amqp.rabbit.annotation.RabbitListener;
import org.springframework.stereotype.Component;

//@Slf4j
@Component
public class HeadersListener {

    private static final Logger log = LoggerFactory.getLogger(DirectListener.class);

    // 匹配所有头(type=text且format=json)
    @RabbitListener(bindings = @QueueBinding(
            value = @Queue(name = "headers_queue1_love", durable = "true"),
            exchange = @Exchange(name = "headers_exchange_love", type = "headers", durable = "true"),
            arguments = {
                    @org.springframework.amqp.rabbit.annotation.Argument(name = "x-match", value = "all"),
                    @org.springframework.amqp.rabbit.annotation.Argument(name = "type", value = "text"),
                    @org.springframework.amqp.rabbit.annotation.Argument(name = "format", value = "json")
            }
    ))
    public void listenHeadersText(MessageDTO message) {
        log.info("[Headers文本队列] 接收消息:{}", message);
    }

    // 匹配任意头(type=image)
    @RabbitListener(bindings = @QueueBinding(
            value = @Queue(name = "headers_queue2_love", durable = "true"),
            exchange = @Exchange(name = "headers_exchange_love", type = "headers", durable = "true"),
            arguments = {
                    @org.springframework.amqp.rabbit.annotation.Argument(name = "x-match", value = "any"),
                    @org.springframework.amqp.rabbit.annotation.Argument(name = "type", value = "image")
            }
    ))
    public void listenHeadersImage(MessageDTO message) {
        log.info("[Headers图片队列] 接收消息:{}", message);
    }
}
(4)TopicListener类
java
package com.breeze.rabbitmqcommonconsumer.listener;
import com.breeze.rabbitmqcommon.dto.MessageDTO;
import lombok.extern.slf4j.Slf4j;
import org.slf4j.Logger;
import org.slf4j.LoggerFactory;
import org.springframework.amqp.core.Message;
import org.springframework.amqp.rabbit.annotation.Exchange;
import org.springframework.amqp.rabbit.annotation.Queue;
import org.springframework.amqp.rabbit.annotation.QueueBinding;
import org.springframework.amqp.rabbit.annotation.RabbitListener;
import org.springframework.messaging.handler.annotation.Payload;
import org.springframework.stereotype.Component;
//@Slf4j
@Component
public class TopicListener {
private static final Logger log = LoggerFactory.getLogger(TopicListener.class);
// 绑定主题交换机
@RabbitListener(bindings = @QueueBinding(
value = @Queue(name = "topic_queue1_love", durable = "true"),
exchange = @Exchange(name = "topic_exchange_love", type = "topic", durable = "true"),
key = "user.#"
))
public void listenTopic1(@Payload MessageDTO message) {
log.info("[Topic队列1] 接收消息:{}", message);
}
@RabbitListener(bindings = @QueueBinding(
value = @Queue(name = "topic_queue2_love", durable = "true"),
exchange = @Exchange(name = "topic_exchange_love", type = "topic", durable = "true"),
key = "#.error"
))
public void listenTopic2(@Payload MessageDTO message) {
log.info("[Topic队列2] 接收消息:{}", message);
}
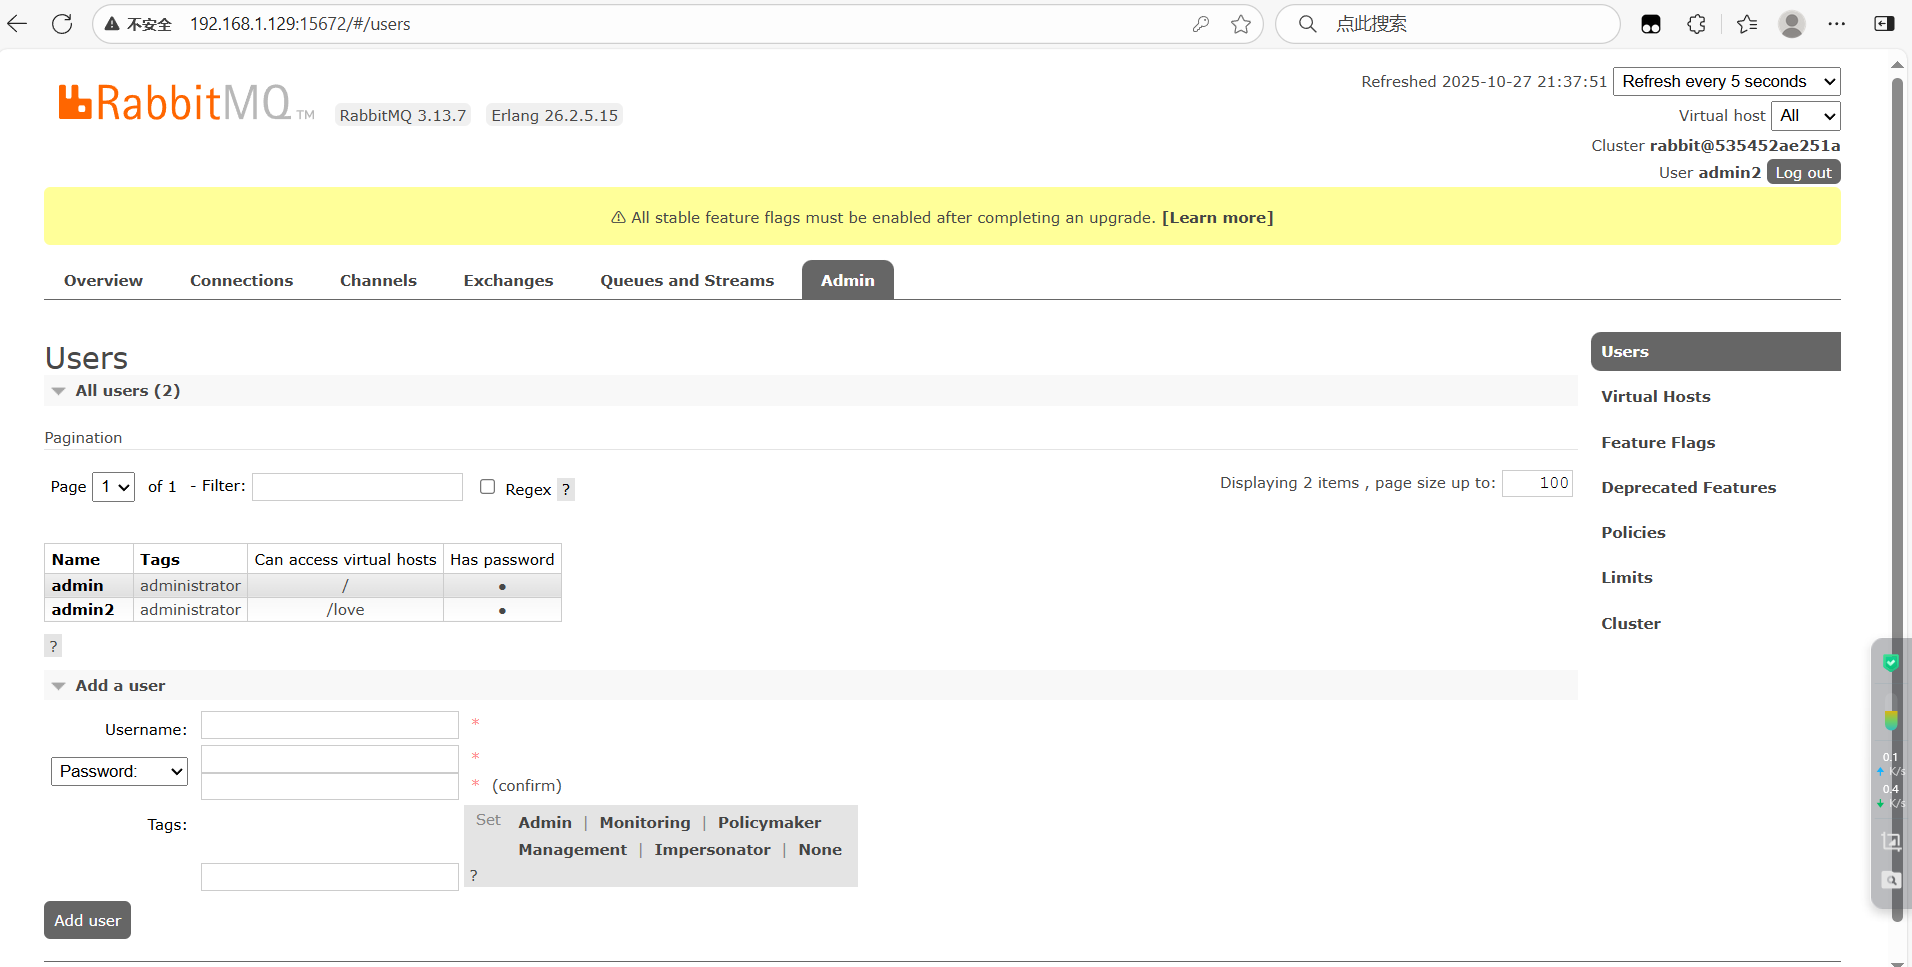
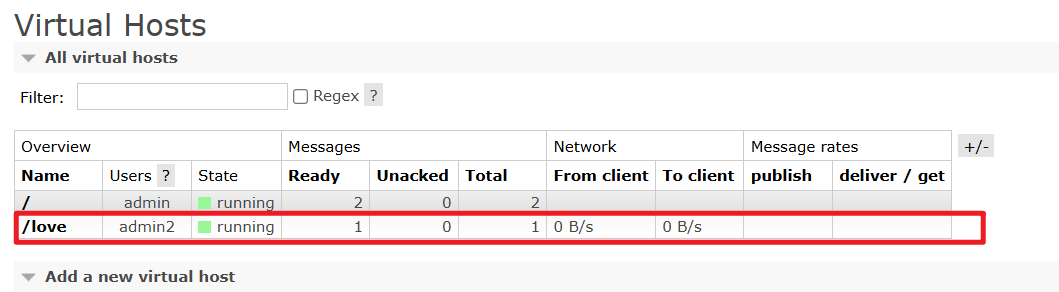
}4. 虚拟主机创建
- 登录 RabbitMQ 管理界面(
http://192.168.1.129:15672),创建虚拟主机/love。 - 给用户
admin授权/love虚拟主机的所有权限(Configure: .*,Write: .*,Read: .*)。
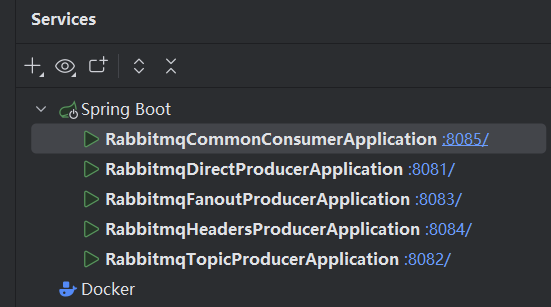
5. 微服务启动与测试
依次启动5个微服务(4个生产者,1个消费者),确保RabbitMQ连接成功。
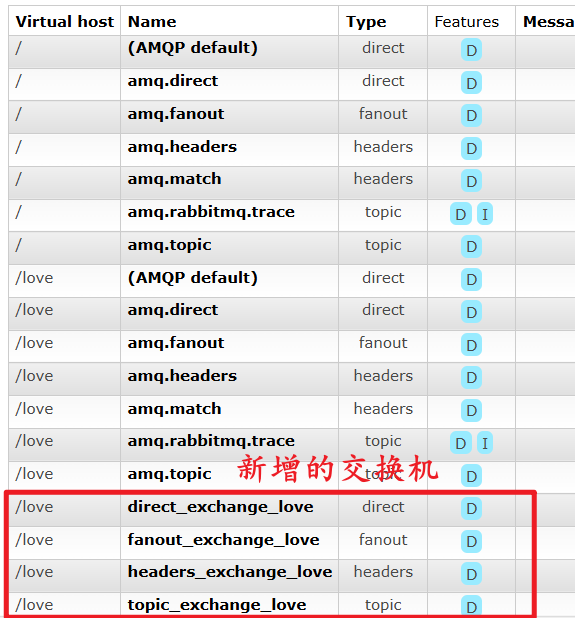
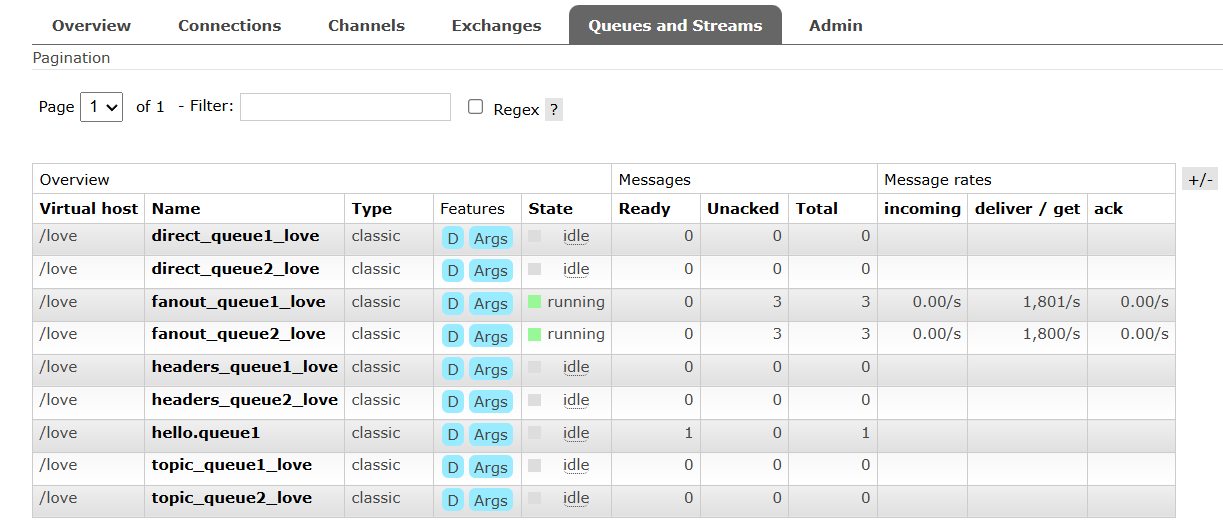
交换机创建成功:
队列创建成功:
发送测试消息:
先关闭消费者服务,测试是否通过交换机将消息转发给队列:
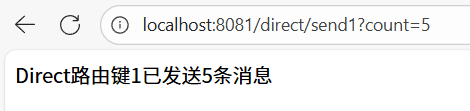
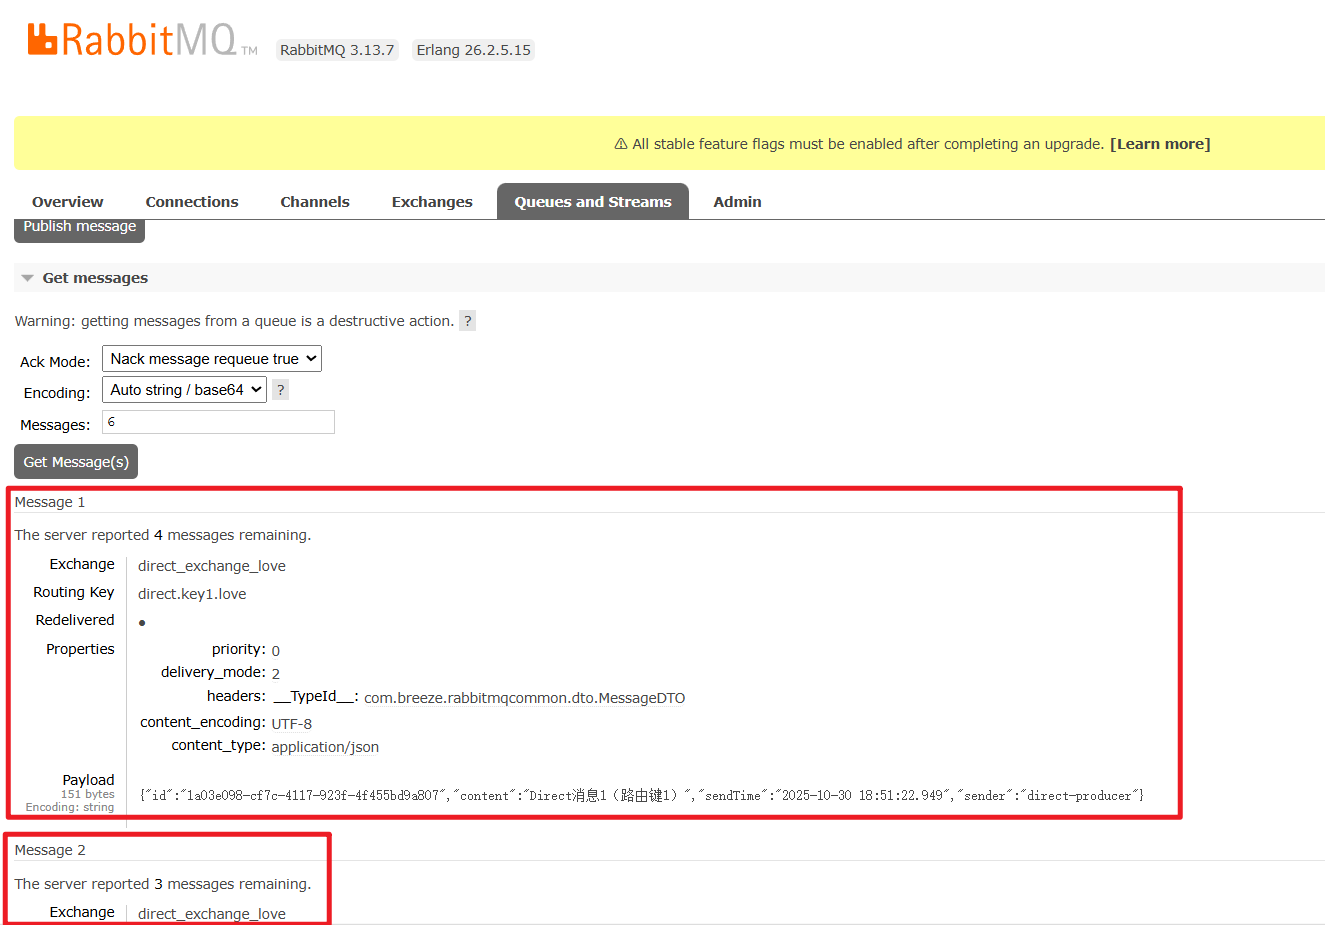
Direct交换机测试
-
访问
http://localhost:8081/direct/send1?count=5(发送 5 条到路由键 1)
此时交换机:

消息队列:
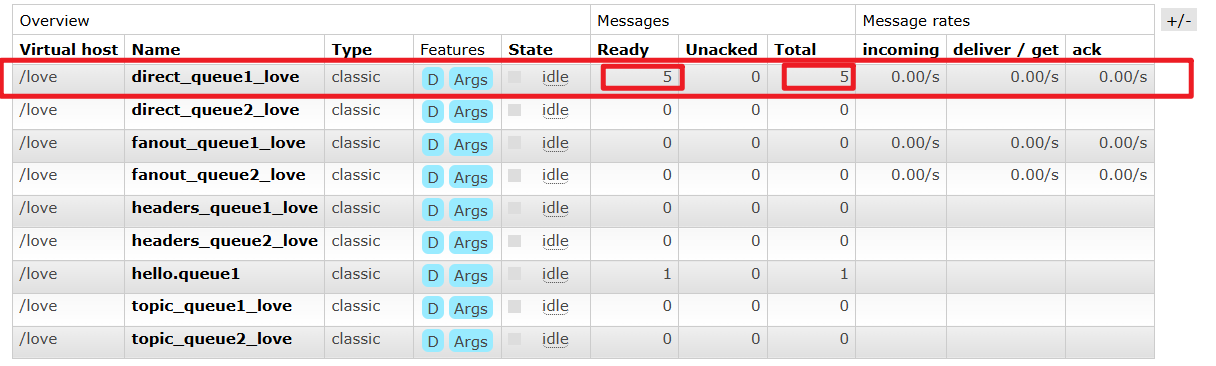
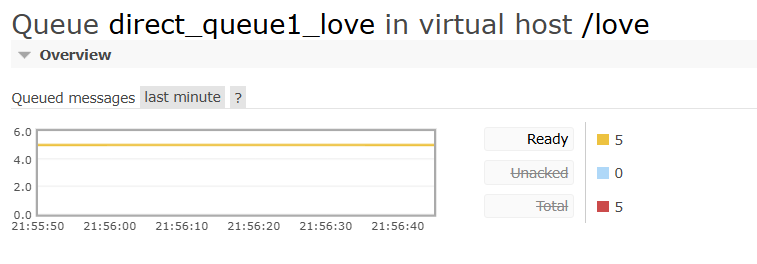
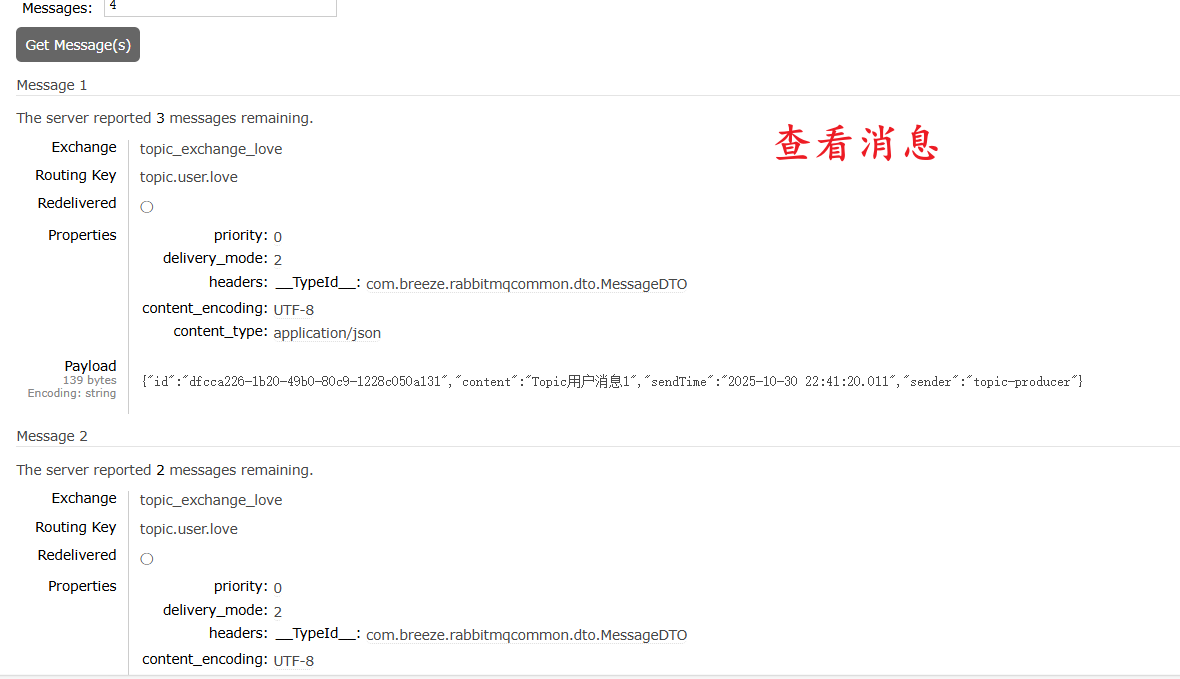
查看消息:
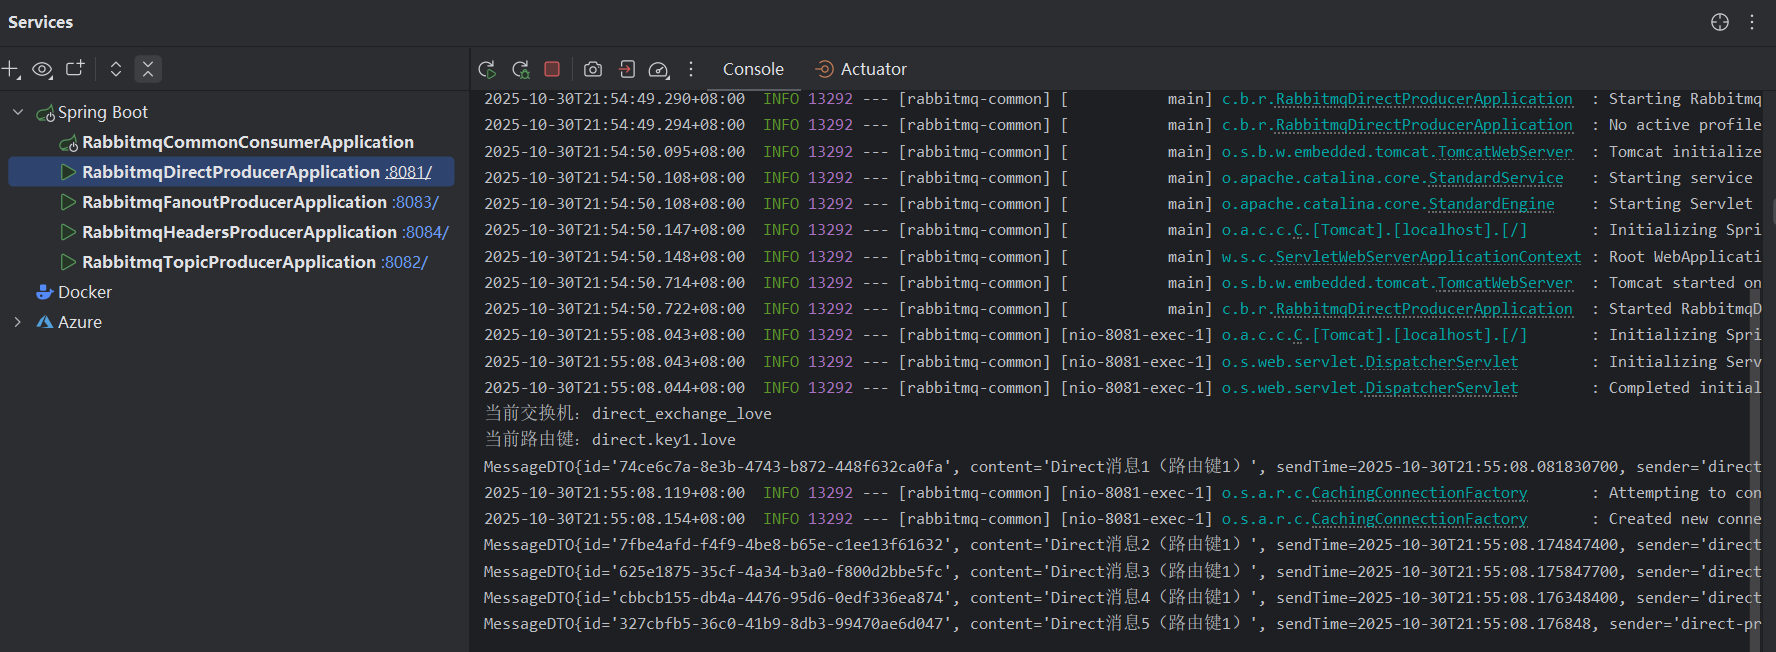
生产者控制台:
打开消费者服务后:
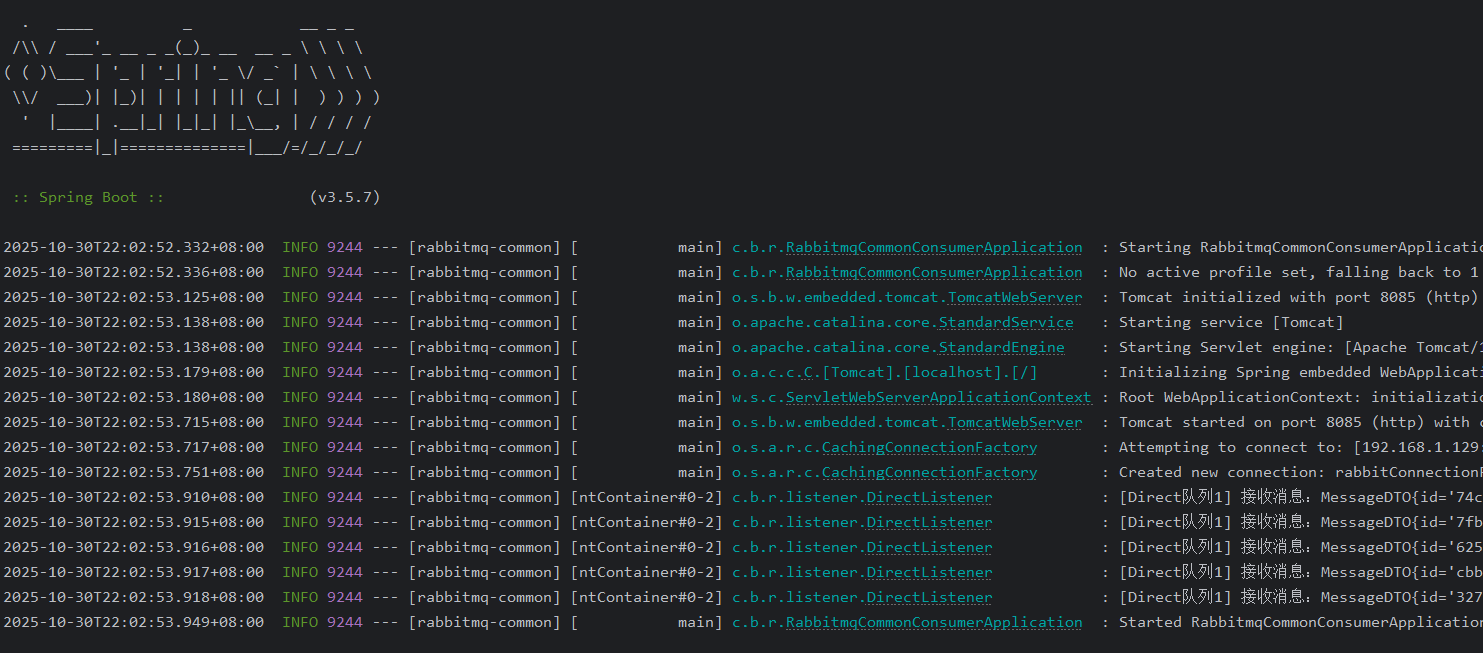
五条消息全部被消费:

查看RabbitMQ控制台,五条就绪的消息全部被消费:
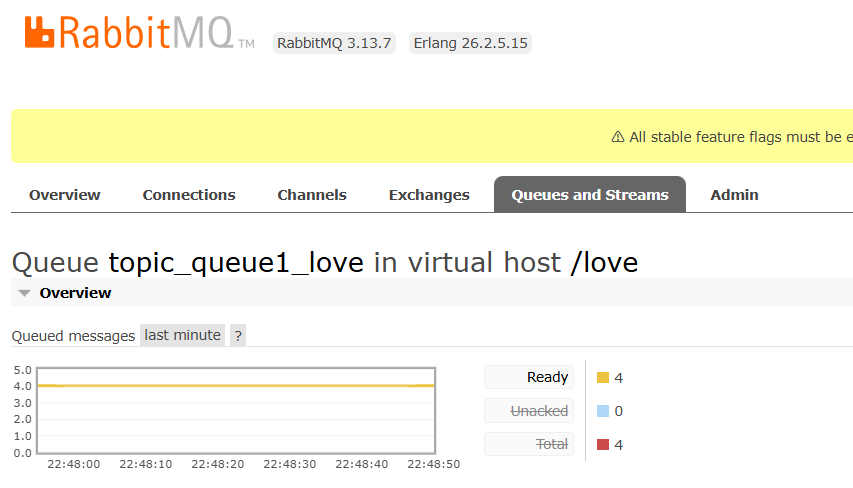
Topic交换机测试
-
访问
http://localhost:8082/topic/sendUser?count=4(发送 4 条用户消息)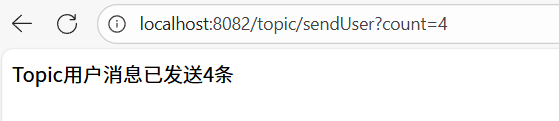
队列里已经就绪的消息:

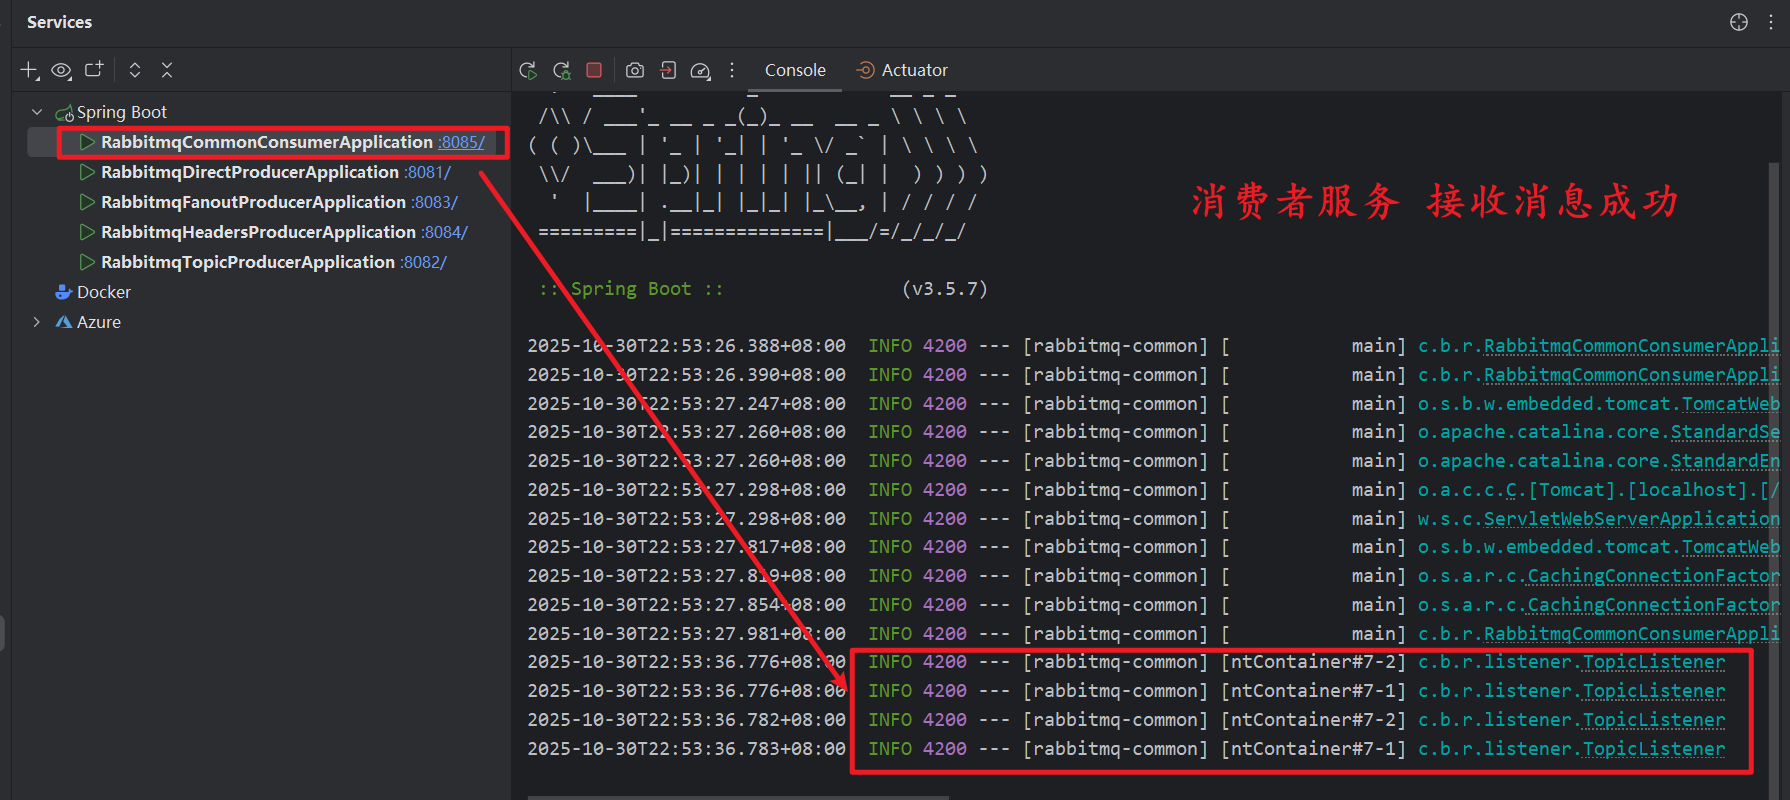
打开消费者服务,消费信息:


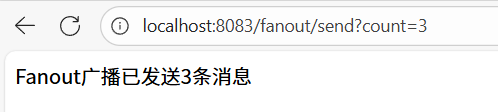
Fanout交换机测试
-
访问
http://localhost:8083/fanout/send?count=3(发送 3 条广播消息)
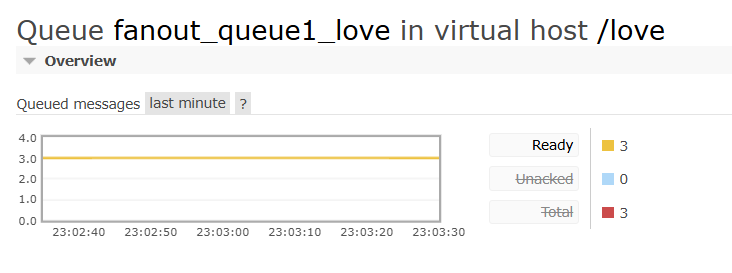
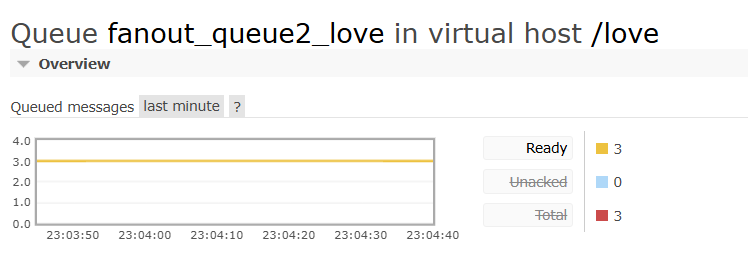
消息成功被队列接收:
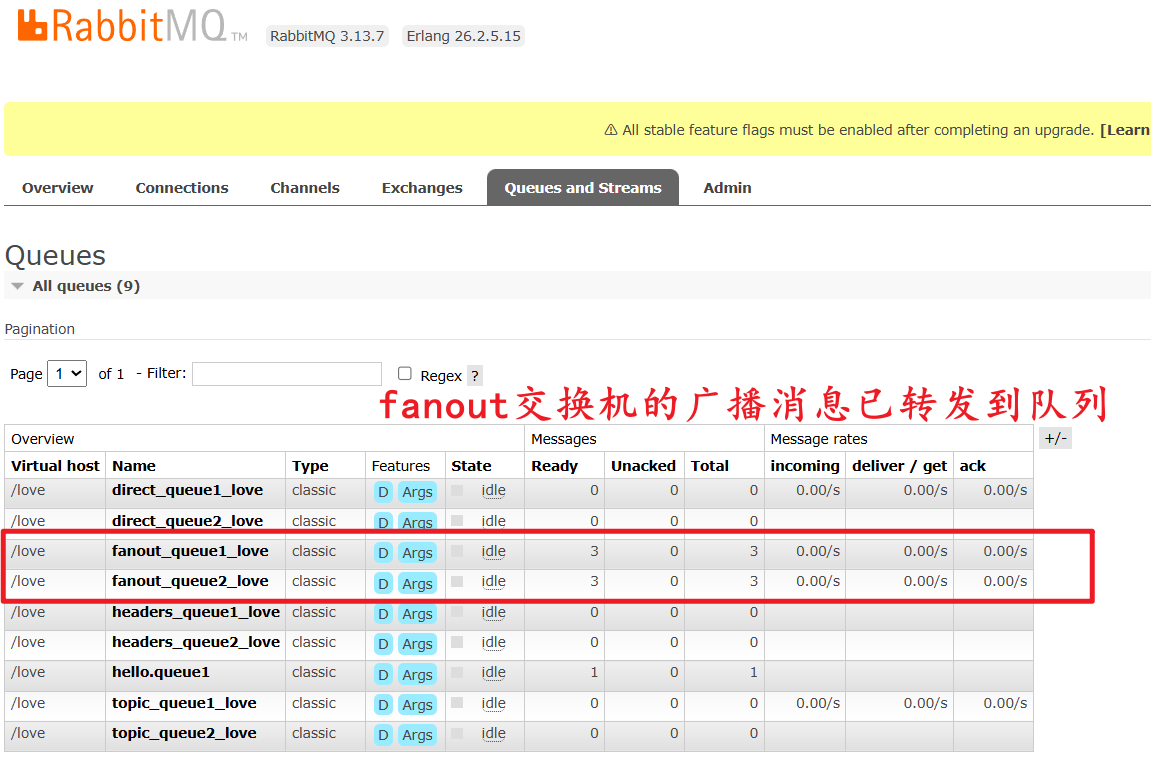
所有队列均接收到fanout广播消息:
打开消费者服务,消费信息:

队列消息已消费:

Headers交换机测试
- 访问
http://localhost:8084/headers/sendImage?count=2(发送 2 条图片消息)

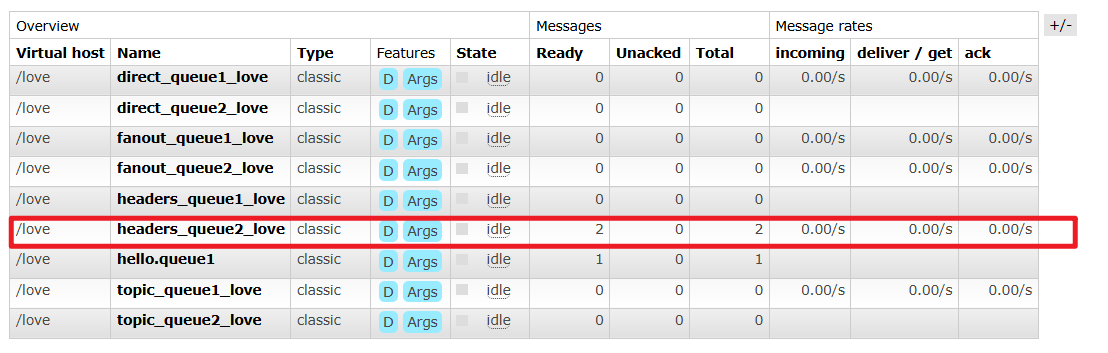
查看消费者微服务(8085 端口)的控制台日志:

消息已被消费者接收: 
-----> 遇到的问题!!!
Spring AMQP 出于安全考虑,默认限制了可反序列化的类,而我的com.breeze.rabbitmqcommon.dto.MessageDTO类不在允许列表中,导致反序列化失败。
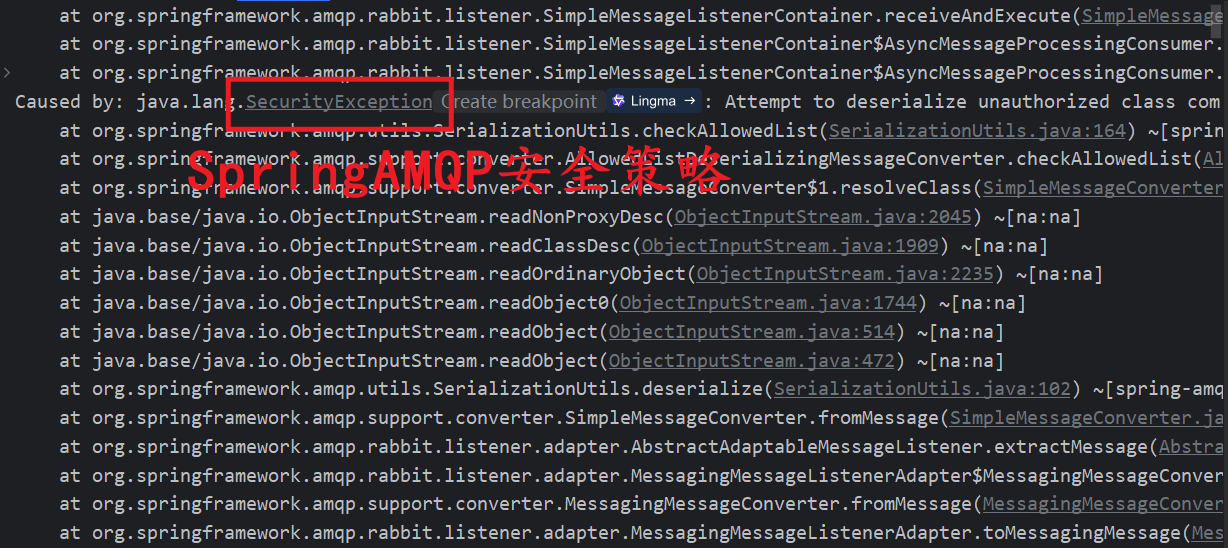
问题的背景知识
Spring AMQP 为了防止 "反序列化漏洞"(恶意攻击者通过构造特殊序列化数据注入恶意代码),默认会检查反序列化的类是否在 "允许列表" 中。如果不在列表中,就会抛出SecurityException,拒绝反序列化。
问题的解决方法
Java 默认的序列化机制存在安全风险,且容易出现此类权限问题。这里使用JSON 格式 传输消息(通过Jackson2JsonMessageConverter),彻底避免序列化权限问题。
步骤 1:在生产者和消费者中统一使用 JSON 消息转换器
需要确保生产者发送消息时用 JSON 序列化,消费者接收时用 JSON 反序列化,双方保持一致。
1.1 添加 Jackson 依赖(通常 Spring Boot 已默认包含)
如果项目中没有 Jackson 依赖,在pom.xml中添加(生产者和消费者都需要):
html
<dependency>
    <groupId>com.fasterxml.jackson.core</groupId>
    <artifactId>jackson-databind</artifactId>
</dependency>
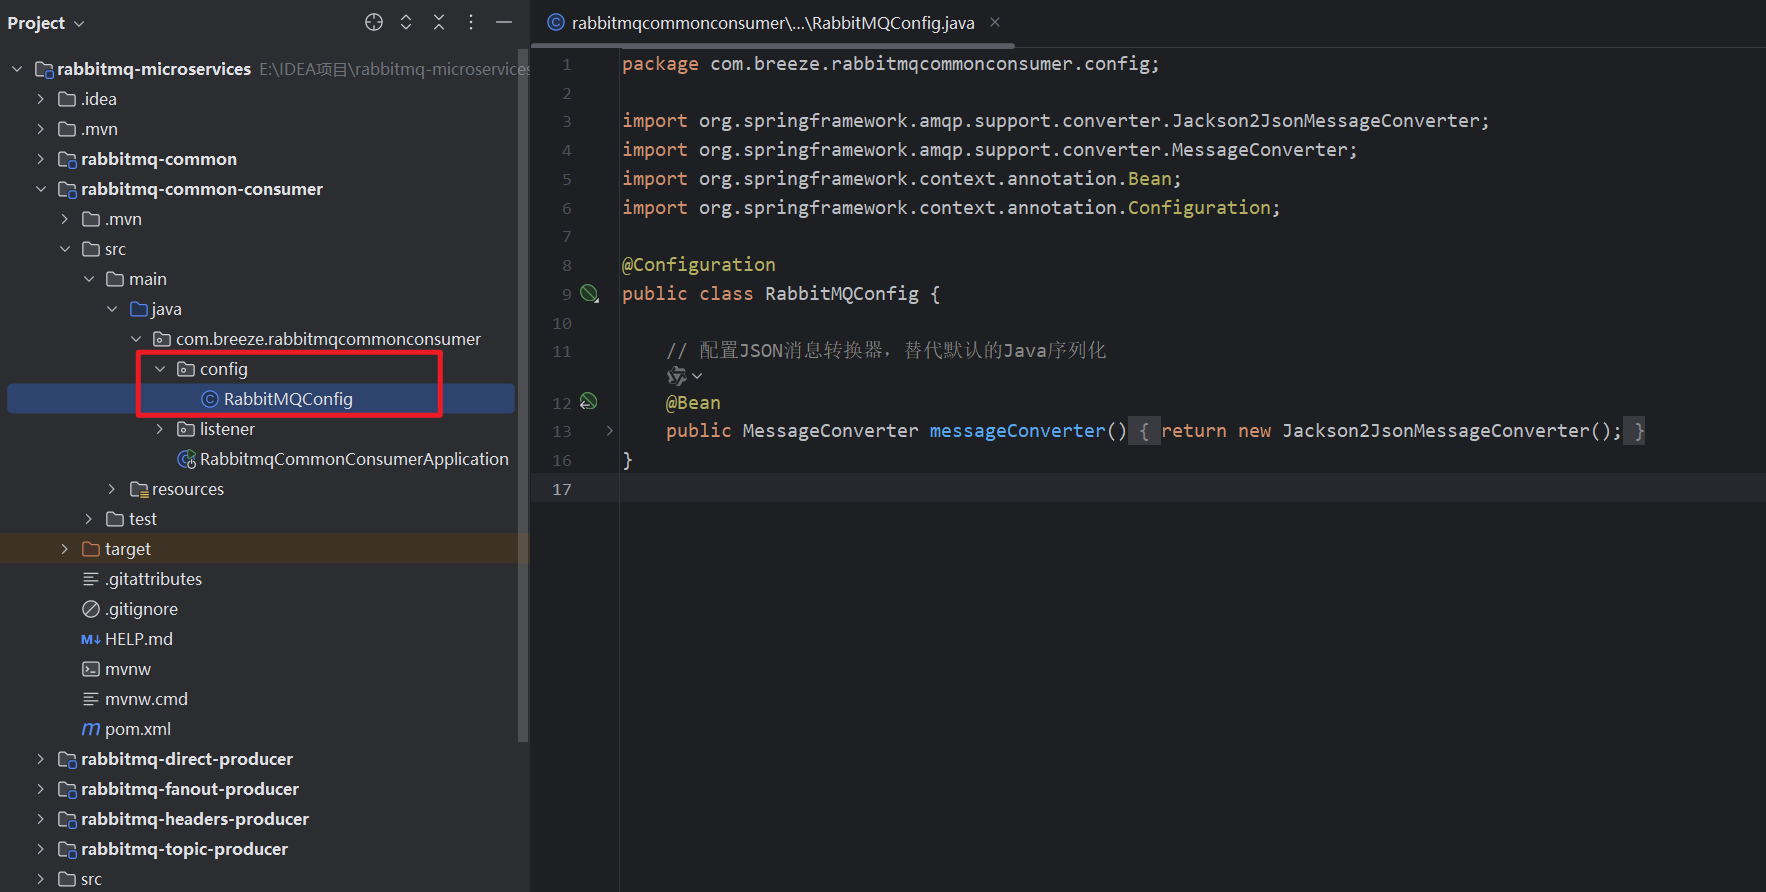
1.2 配置 JSON 消息转换器(生产者和消费者都需要)
创建一个配置类,定义Jackson2JsonMessageConverter作为消息转换器:
java
import org.springframework.amqp.support.converter.Jackson2JsonMessageConverter;
import org.springframework.amqp.support.converter.MessageConverter;
import org.springframework.context.annotation.Bean;
import org.springframework.context.annotation.Configuration;

@Configuration
public class RabbitMQConfig {

    // 配置JSON消息转换器,替代默认的Java序列化
    @Bean
    public MessageConverter messageConverter() {
        return new Jackson2JsonMessageConverter();
    }
}- 生产者通过这个转换器将
MessageDTO序列化为 JSON 字符串发送; - 消费者通过这个转换器将 JSON 字符串反序列化为
MessageDTO对象,无需配置允许列表,因为 JSON 反序列化不涉及 Java 序列化的安全限制。

步骤 2:确保MessageDTO类可被双方访问
MessageDTO类必须放在生产者和消费者都能依赖的模块中(rabbitmq-common模块),确保双方都能加载到该类的字节码(否则会报 "类找不到" 错误)。
四、核心概念与架构
1. 核心组件
1.1 生产者(Producer)
生产者是消息的发送方,负责创建并发送消息到 RabbitMQ 的交换机。
1.2 交换机(Exchange)
交换机是消息的接收点,负责接收生产者发送的消息,并根据路由规则将消息分发到相应的队列。
1.3 队列(Queue)
队列是消息的存储容器,用于存储交换机路由过来的消息,等待消费者处理。
1.4 消费者(Consumer)
消费者是消息的接收方,从队列中获取消息并进行处理。
1.5 绑定(Binding)
绑定是交换机和队列之间的关联,通过路由键实现消息的精确分发。
1.6 路由键(Routing Key)
路由键是交换机在路由消息时使用的关键字,生产者发送消息时指定。
2. 工作原理
2.1 消息传递流程
- 生产者连接到 RabbitMQ 服务器,创建一个通道
- 生产者声明交换机,并设置交换机类型和属性
- 生产者声明队列,并设置队列属性
- 生产者将交换机和队列进行绑定,指定路由键
- 生产者发送消息到交换机,指定路由键
- 交换机根据路由键和绑定规则将消息路由到相应的队列
- 消费者从队列中获取消息并进行处理
- 消费者处理完成后发送确认消息(ACK)
2.2 消息确认机制
2.2.1 生产者确认(Publisher Confirm)
- 普通确认:每条消息单独确认
- 批量确认:批量消息一起确认
- 异步确认:通过回调函数处理确认
2.2.2 消费者确认(Consumer ACK)
- 自动确认:消息一旦被消费者接收就自动确认
- 手动确认:消费者处理完成后手动发送确认
- 否定确认:消费者无法处理时发送否定确认
3. 交换机类型详解
3.1 Direct Exchange(直接交换机)
特点:根据消息的路由键完全匹配队列的绑定键来分发消息。
适用场景:一对一的消息传递。
3.2 Fanout Exchange(扇出交换机)
特点:将消息广播到所有与之绑定的队列,忽略路由键。
适用场景:发布订阅模式,一对多的消息传递。
3.3 Topic Exchange(主题交换机)
特点:使用模糊匹配的方式根据路由键分发消息,支持通配符。
通配符规则:
- *:匹配一个单词
- #:匹配零个或多个单词
适用场景:复杂的路由场景,如日志分类。
3.4 Headers Exchange(消息头交换机)
特点:不依赖路由键,而是根据消息的头部信息进行匹配。
适用场景:需要根据消息内容进行路由的场景。
4. 典型应用场景
4.1 异步通信
问题:系统间同步调用导致耦合度高、响应时间长。
解决方案:使用 RabbitMQ 实现异步通信,主流程无需等待后续操作完成。
示例:用户注册流程
- 用户注册接口保存用户信息
- 发送 "用户注册成功" 消息到 RabbitMQ
- 邮件服务、短信服务、日志服务异步处理
4.2 流量削峰
问题:秒杀、促销等高并发场景下,瞬间大量请求冲击系统。
解决方案:使用 RabbitMQ 作为缓冲器,平滑流量波动。
示例:电商秒杀活动
- 前端将秒杀请求发送到 RabbitMQ
- 后端以最大处理能力从队列消费消息
- 超出库存的请求直接返回 "已抢完"
4.3 系统解耦
问题:服务间直接调用导致强耦合,一个服务故障影响其他服务。
解决方案:通过 RabbitMQ 实现服务间解耦,降低系统依赖。
示例:电商订单流程
- 订单服务创建订单后发送消息
- 库存、物流、积分等服务各自监听消息
- 新增服务只需监听消息,无需修改订单服务
4.4 分布式事务
问题:跨服务事务一致性难以保证。
解决方案:使用本地消息表模式实现最终一致性。
4.5 延迟任务
问题:需要在固定时间后执行特定操作。
解决方案:使用 TTL 和死信队列实现延迟任务。
示例:订单超时取消
- 创建延迟队列,设置 TTL 为 15 分钟
- 消息超时后自动路由到普通队列
- 订单服务从普通队列消费,执行取消操作
4.6 日志收集
问题:分布式系统日志分散,难以集中管理。
解决方案:使用 RabbitMQ 实现日志的高效收集和集中处理。