框架 简介 作用
Elasticsearch 开源分布式搜索引擎,提供存储、分析、搜索功能。特点:分布式、基于reasful风格、支持海量高并发的准实时搜索场景、稳定、可靠、快速、使用方便等。 接收搜集的海量结构化日志数据,并提供给Kibana查询分析。
Logstash 开源日志搜集、分析、过滤框架,支持多种数据输入输出方式。 用于收集日志,对日志进行过滤形成结构化数据,并转发到Elasticsearch中。
Kibana 开源日志报表系统,对Elasticsearch以及Logstash有良好的web页面支持。 对Elasticsearch提供的数据进行分析展示。
一 、下载:采用国内镜像云
选择合适的版本下载(推荐下载自带 JDK 的版本,否者自己配置的 JDK 可能不符合版本要求。注意:Elasticsearch, 会优先使用系统配置的 JDK 。可将 Elasticsearch 自带的 JDK 配置到系统的环境变量中,如果不这样做的话,在安装 Logstash 时,启动会报没有配置 JDK 环境变量的错误。)
二、elasticsearch安装部署
bash
sudo tar -zxvf elasticsearch-7.14.0-linux-x86_64.tar.gz -C /usr/local/
bash
[root@instance-0njusdr9 config]# sudo chown -R d1:d1 /usr/local/elasticsearch-7.14.0/1. 编辑elasticsearch.yml文件
进入elasticsearch-7.14.0/config/文件夹,编辑elasticsearch.yml文件
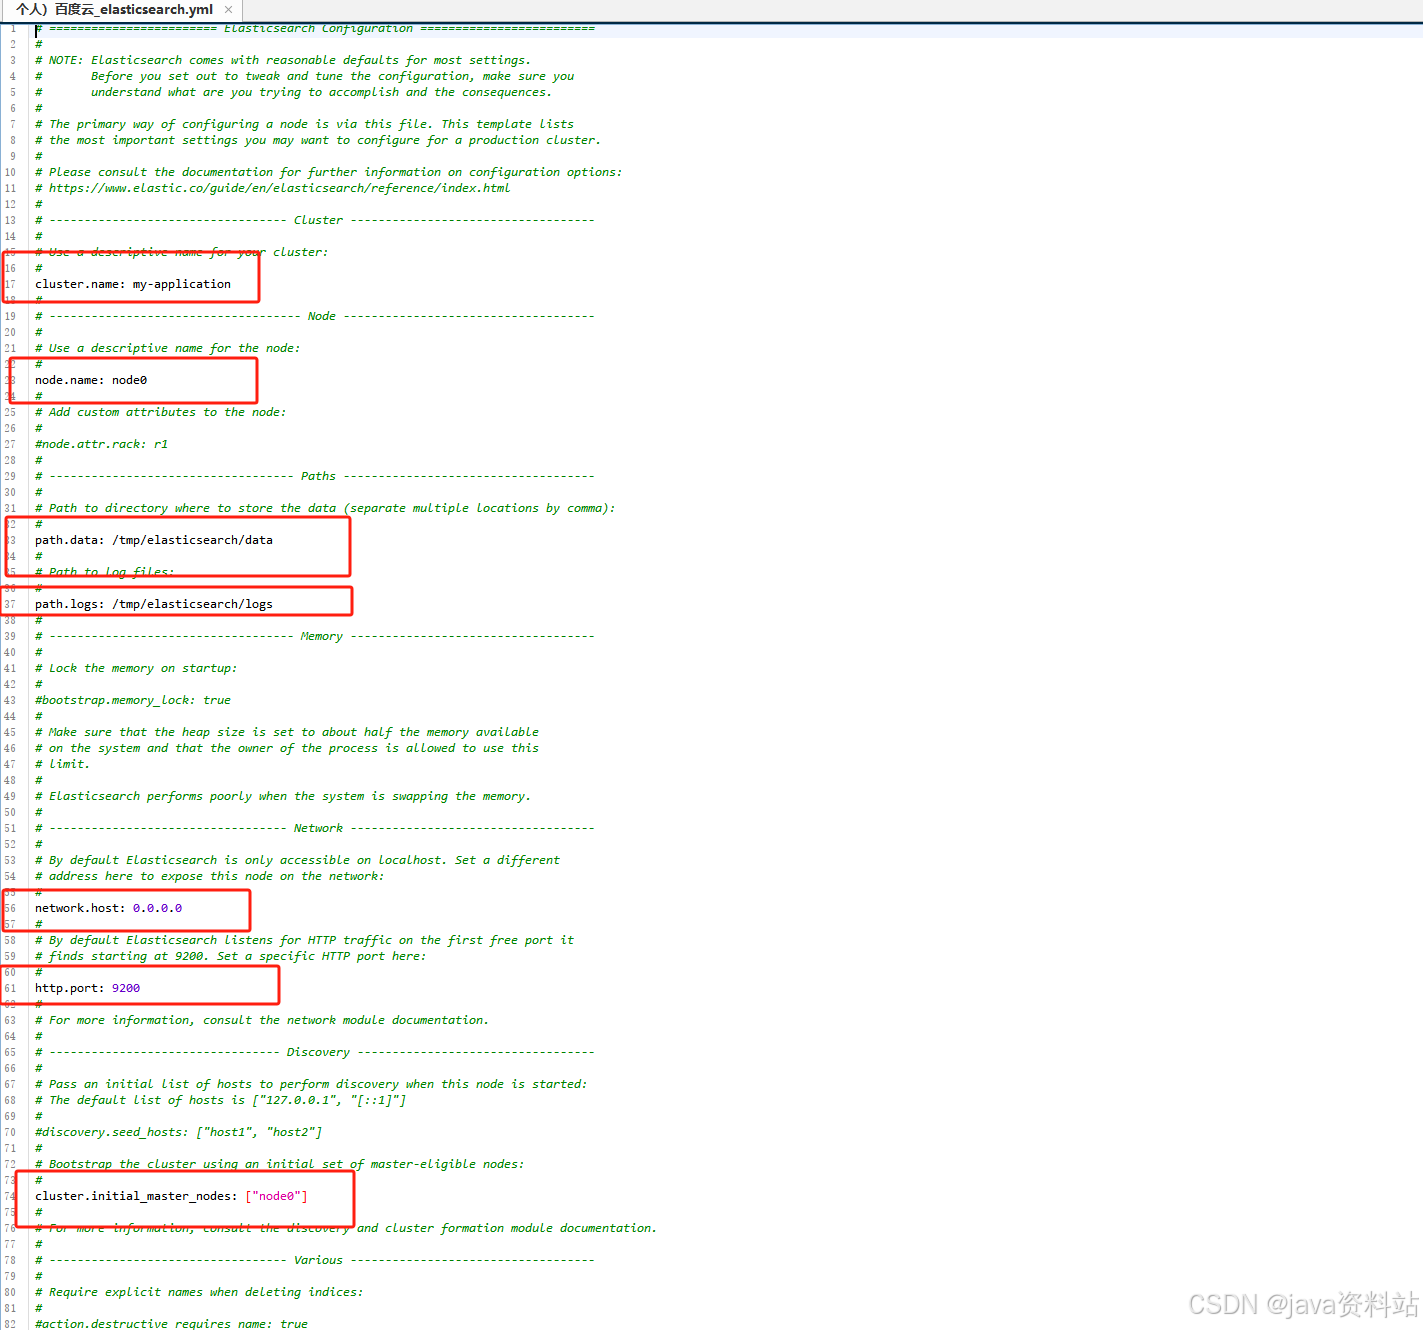
2.创建es用户赋值权限
es不能使用root用户启动,必须用其他用户并且给这个用户赋予操作elasticsearch-7.14.0文件夹的权限
sudo chown -R d1:d1/usr/local/elasticsearch-7.14.0/
3.启动前需要先配置一些环境:
bash
sudo vi /etc/security/limits.conf
添加:

* soft nofile 65536
* hard nofile 65536

2、配置文件包含限制一个进程可以拥有的VMA(虚拟内存区域)的数量
在文件末尾添加
vm.max_map_count=655360
然后执行
sudo sysctl -p
4.启动
在/usr/local/elasticsearch-7.14.0/文件夹下执行
bash
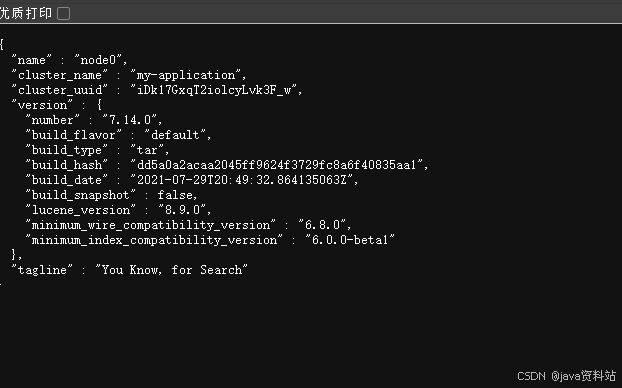
./bin/elasticsearch浏览器打开http://192.168.2.129:9200/,如出现下图,则说明启动成功
三、logstash安装部署
sudo tar -zxvf logstash-7.14.0-linux-x86_64.tar.gz -C /usr/local/
1. 编辑logstash-sample.conf
进入logstash-7.14.0/config目录下编辑logstash-sample.conf文件。当然也可以新建一个配置文件,这里以logstash-sample.conf为例
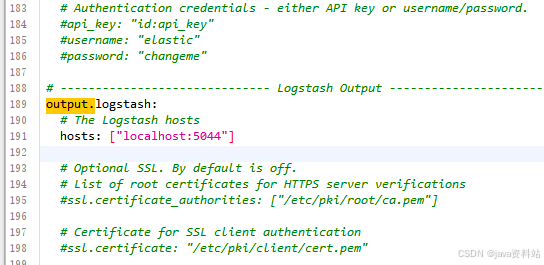
在input->beats->port默认是5044,后面部署的filebeat的日志都会发送到这里,所以filebeat里面的配置要和这里的保持一致
输出到es里的配置增加了action, 配置了es的hosts,另外配置一个index,这里的索引不能使用大写字母
bash
input {
  beats {
    port => 5044
  }
}

output {
  elasticsearch {
    hosts => ["http://localhost:9200"]
    index => "elklog"
    #user => "elastic"
    #password => "changeme"
  }
}
2. 启动
sudo ./bin/logstash -f ./config/logstash-sample.conf
四、filebeat安装部署
filebeat是一个轻量级的日志采集服务,可以将采集的日志发送到es或者logstash,这里测试时将filebeat部署在另外一台服务器上ip:192.168.2.173
解压filebeat到指定位置
bash
sudo tar -zxvf filebeat-7.14.0-linux-x86_64.tar.gz -C /usr/local/1.编辑filebeat.yml文件
进入filebeat-7.14.0-linux-x86_64文件夹,编辑filebeat.yml文件,这里只设置了输入格式为log的路径,同时把enable设置为true

这里的outputs设置,采用输出到logstash后再输入es的方式,因此将es output的配置注释,将logstash的配置打开并配置logstash的hosts
2.运行filebeat:
在filebeat-7.14.0-linux-x86_64文件夹下执行
./filebeat -e -c ./filebeat.yml
注意 :
filebeat运行时要访问logstash,因此logstash要先于filebeat启动
五、kibana安装部署
将kibana安装包解压到/usr/local/目录
sudo tar -zxvf kibana-7.14.0-linux-x86_64.tar.gz -C /usr/local/
1.编辑kibana.yml文件
进入kibana-7.14.0-linux-x86_64/config文件夹,编辑kibana.yml文件
简单配置这4项
bach
sudo chown -R d1:d1 /usr/local/kibana-7.14.0-linux-x86_64/
启动kibana:

在kibana-7.14.0-linux-x86_64文件夹下执行

./bin/kibana
防火墙开放5601端口,网页访问http://192.168.2.129:5601/
五、收集java日志格式
bash
[2022-07-14 10:03:30.310] [http-nio-8080-exec-2] [ERROR] (com.zz.framework.exception.handler.GlobalExceptionHandler:83) - 数据校验异常,异常字段logstash配置
bash
cat > /etc/logstash/conf.d/app-java.conf << EOF
input {
    beats {
        port => 5044
    }
}
filter {
	grok {
		match => [
			"message", "\[%{DATA:logtime}\] "
		]

		break_on_match => false
	}

	date {
		match=> ["logtime","yyyy-MM-dd HH:mm:ss.SSS"]
		target=>"@timestamp"
	}
}
output {
  if "APPname1" in [tags] {
    elasticsearch {
    hosts => ["elasticsearch集群ip:9200"]
    index => "java-APPname-%{+YYYY-MM-dd}"
    user => "elastic"
    password => "123456"
    }
  }else if "APPname2" in [tags] {
    elasticsearch {
    hosts => ["elasticsearch集群ip:9200"]
    index => "java-APPname-%{+YYYY-MM-dd}"
    user => "elastic"
    password => "123456"
    }
  }else {
    elasticsearch {
    hosts => ["elasticsearch集群ip:9200"]
    index => "java-%{+YYYY-MM-dd}"
    user => "elastic"
    password => "123456"
    }
  }
}
EOF
systemctl start logstash
filebeat配置
bash
rpm -ivh filebeat-7.17.4-x86_64.rpm
cp /etc/filebeat/filebeat.yml /etc/filebeat/filebeat.yml.bak
cat > /etc/filebeat/filebeat.yml << EOF
filebeat.inputs:
- type: log
 enabled: true
 paths:
   - /tmp/APPname1.log
 tags: ["APPname1"]
 fields:
   env: test
   app: APPname
 multiline.pattern: '^\['
 multiline.negate: true
 multiline.match: "after"
- type: log
 enabled: true
 paths:
   - /tmp/APPname2.log
 tags: ["APPname2"]
 fields:
   env: stg
   app: APPname
 multiline.pattern: '^\['
 multiline.negate: true
 multiline.match: "after"
filebeat.config.modules:
 path: ${path.config}/modules.d/*.yml
 reload.enabled: true
output.logstash:
 hosts: ["logstashIP1:5044","logstashIP2:5044","logstashIP3:5044"]
EOF

systemctl start filebeat