在前两期,我们已经分别基于仿真环境和世界模型进行了针对Manipulation(动作控制)模型的训练数据合成与模仿学习。我们来回顾下整个过程: 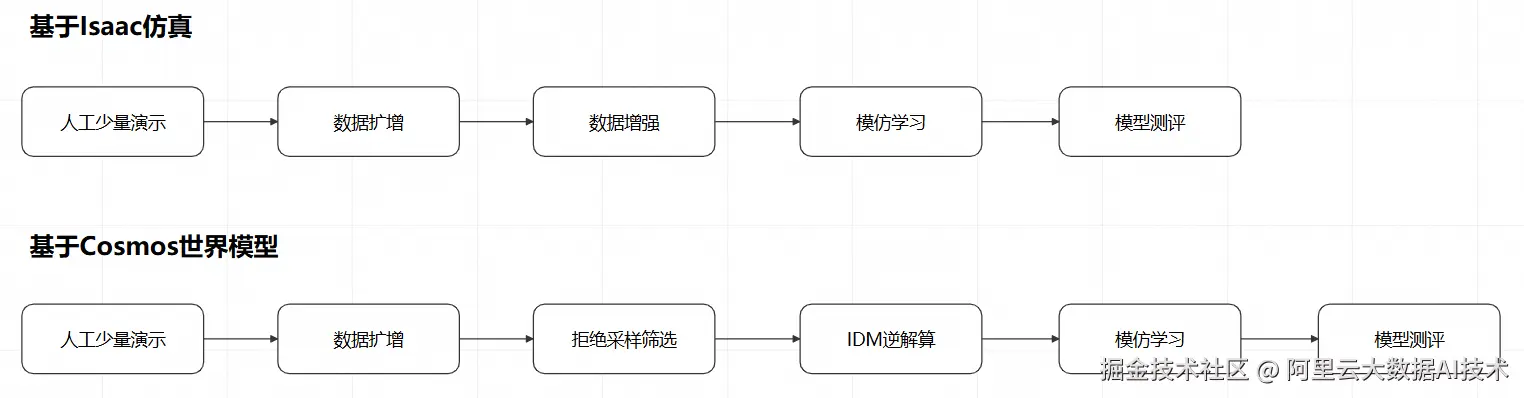
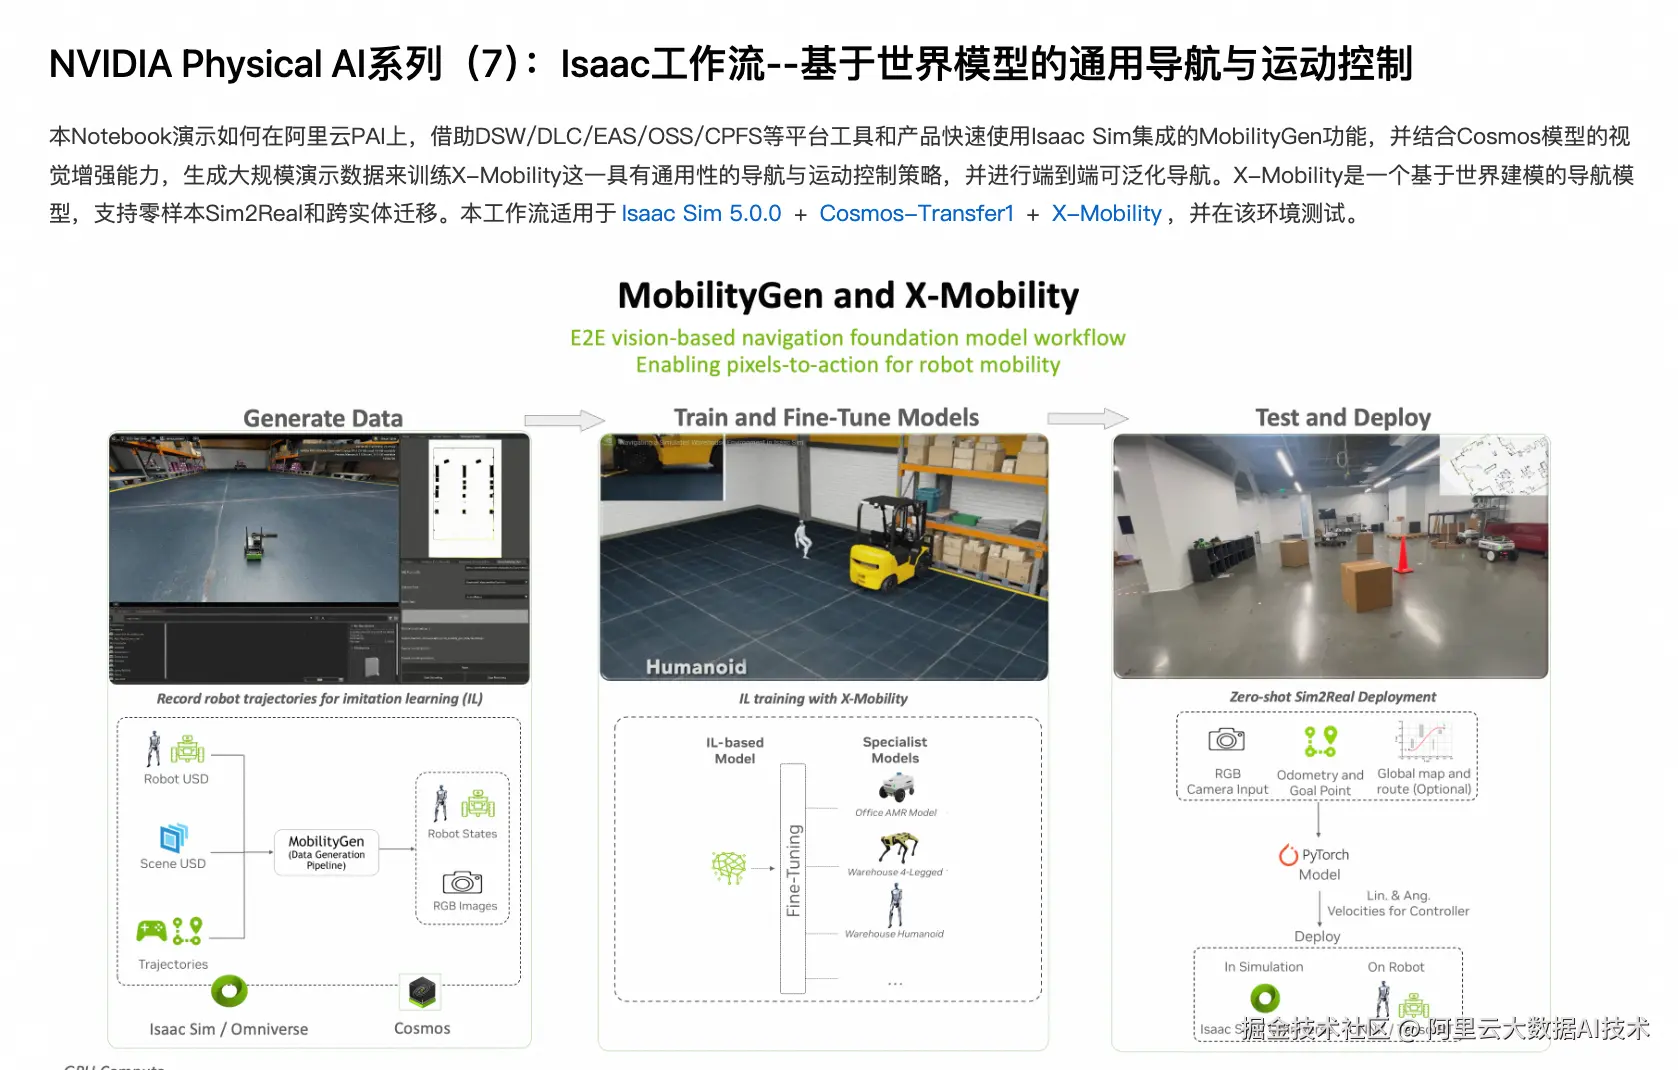
针对具身智能场景,除了Manipution,Navigation(导航)也是一类非常重要的控制模型,本期我们就来详细解读基于仿真环境的导航模型训练的全过程。
和动作控制模型类似,对导航模型的训练也可以通过人工演示、数据扩增、数据增强、模仿学习和模型测评几个环节来进行。 
但是相比动作控制模型,导航模型的训练过程有以下特点:
- 人工演示相对简单,只需要在二维平面上控制运动方向即可
- 数据扩增相对简单,因为二维平面上仅有2个自由度
- 运动控制的目标更复杂,不再是完成先验的特定动作,而是到达一个随机指定的坐标
- 基于上述第3点的原因,对导航模型的测评也更加复杂,需要结合仿真环境和模型推理进行在环验证
在PAI的Notebook Gallery中,我们已经预置了一个最佳实践,就是这个过程的一个具体示例: gallery.pai-ml.com/#/preview/d...
下面我们来详细解读这个示例。
使用Isaac Asset公共数据集
由于导航模型的训练需要一个比较复杂的3D场景,在PAI的公共数据集中已经内置了一个数据集,包含了一些3D场景: 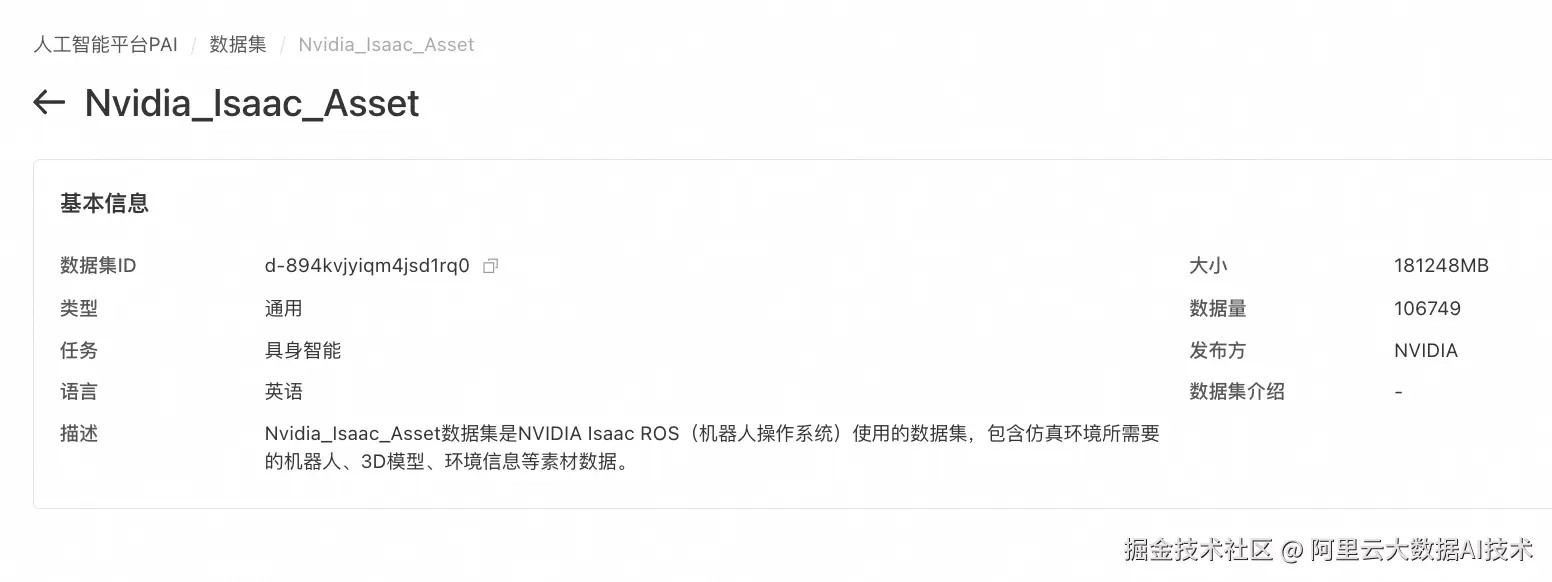
在启动用于人工演示的DSW时,除了选择资源类型、自定义数据集,还可以选择这个公共数据集,方便后续的场景构建 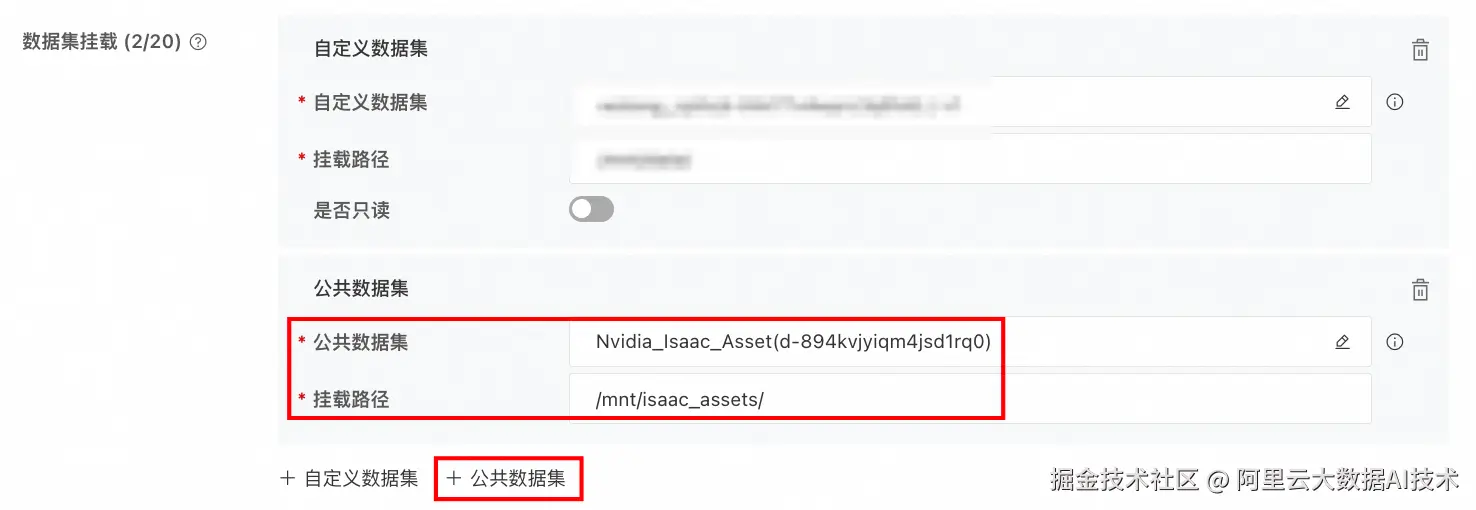
这样,DSW启动后,就可以看到这个公共数据集: 
人工少量演示
加载场景
接下来,我们在这个DSW中,通过livestream启动Isaac Sim环境:
python
export ACCEPT_EULA=Y
PUBLIC_IP=$(curl -s ifconfig.me) && /isaac-sim/runheadless.sh --/persistent/isaac/asset_root/default="/mnt/data/isaac_tmp/isaac_asset/Assets/Isaac/5.0" --/app/livestream/publicEndpointAddress=$PUBLIC_IP --/app/livestream/port=49100
即可在Isaac Sim中通过Isaac Asset公共数据集加载导航模型将要运行的场景:
(场景目录:/mnt/isaac_assets/5.0/Isaac/Environments/Simple_Warehouse/warehouse_multiple_shelves.usd) 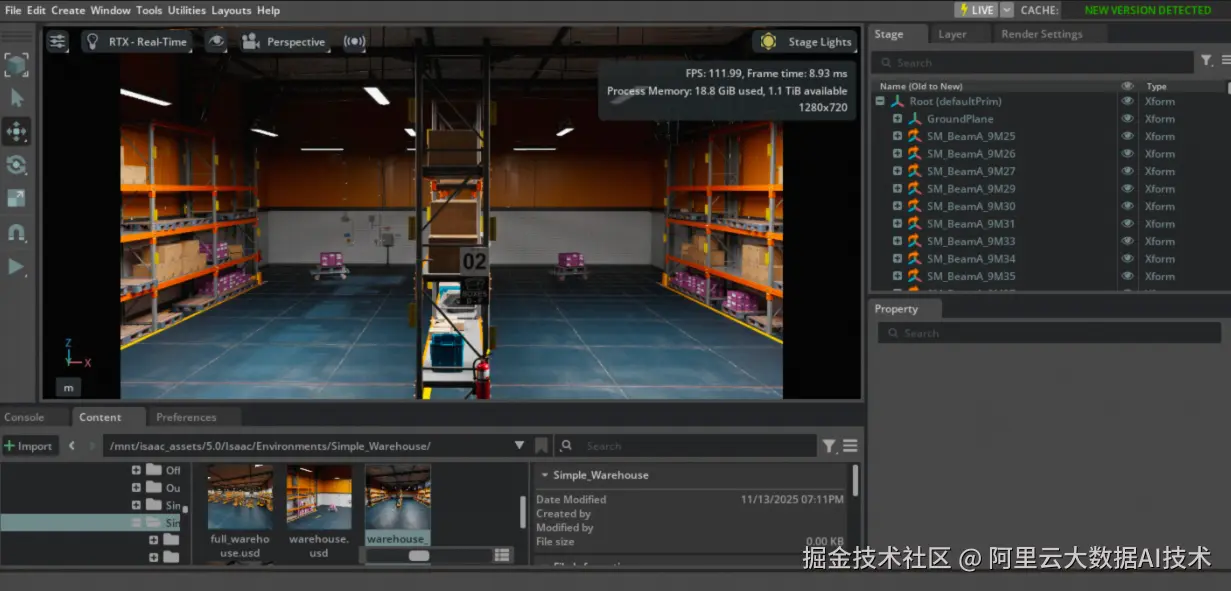
创建Occupancy Map
接下来我们需要为这个场景创建Occupancy Map,这样MobilityGen就知道机器人在哪里可以移动。
- 选择 Tools > Robotics > Occupancy Map 打开占用地图扩展
- 在占用地图窗口中设置参数:
Origin: X=2.0, Y=0.0, Z=0.0
Upper Bound: X=10.0, Y=20.0, Z=2.0
Lower Bound: X=-14.0, Y=-18.0, Z=0.1 - 点击
Calculate生成占用地图 - 点击 Visualize Image 查看占用地图
- 在可视化窗口中选择 Rotate Image: 180
- 选择 Coordinate Type: ROS Occupancy Map Parameters File YAML
- 点击 Regenerate Image
- 复制生成的YAML文本
- 创建文件
~/MobilityGenData/maps/warehouse_multiple_shelves/map.yaml - 粘贴YAML内容并修改
image: warehouse_multiple_shelves.png为image: map.png - 保存文件
- 在可视化窗口中点击 Save Image,在
/root/MobilityGenData/maps/warehouse_multiple_shelves下保存为map.png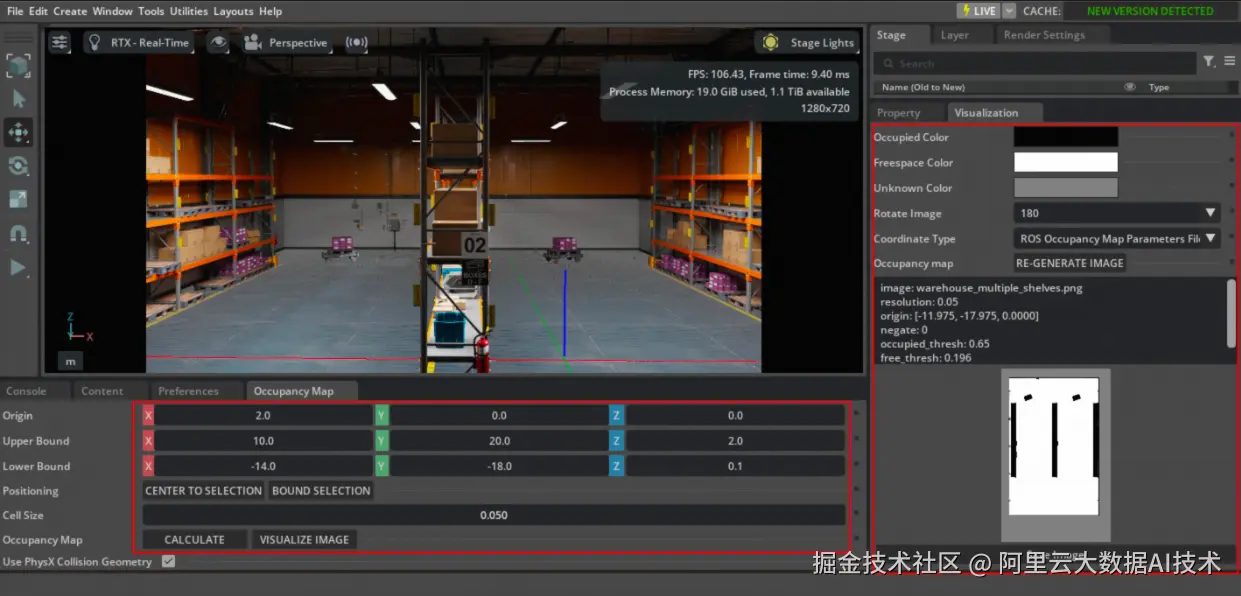
启动MobilityGen插件
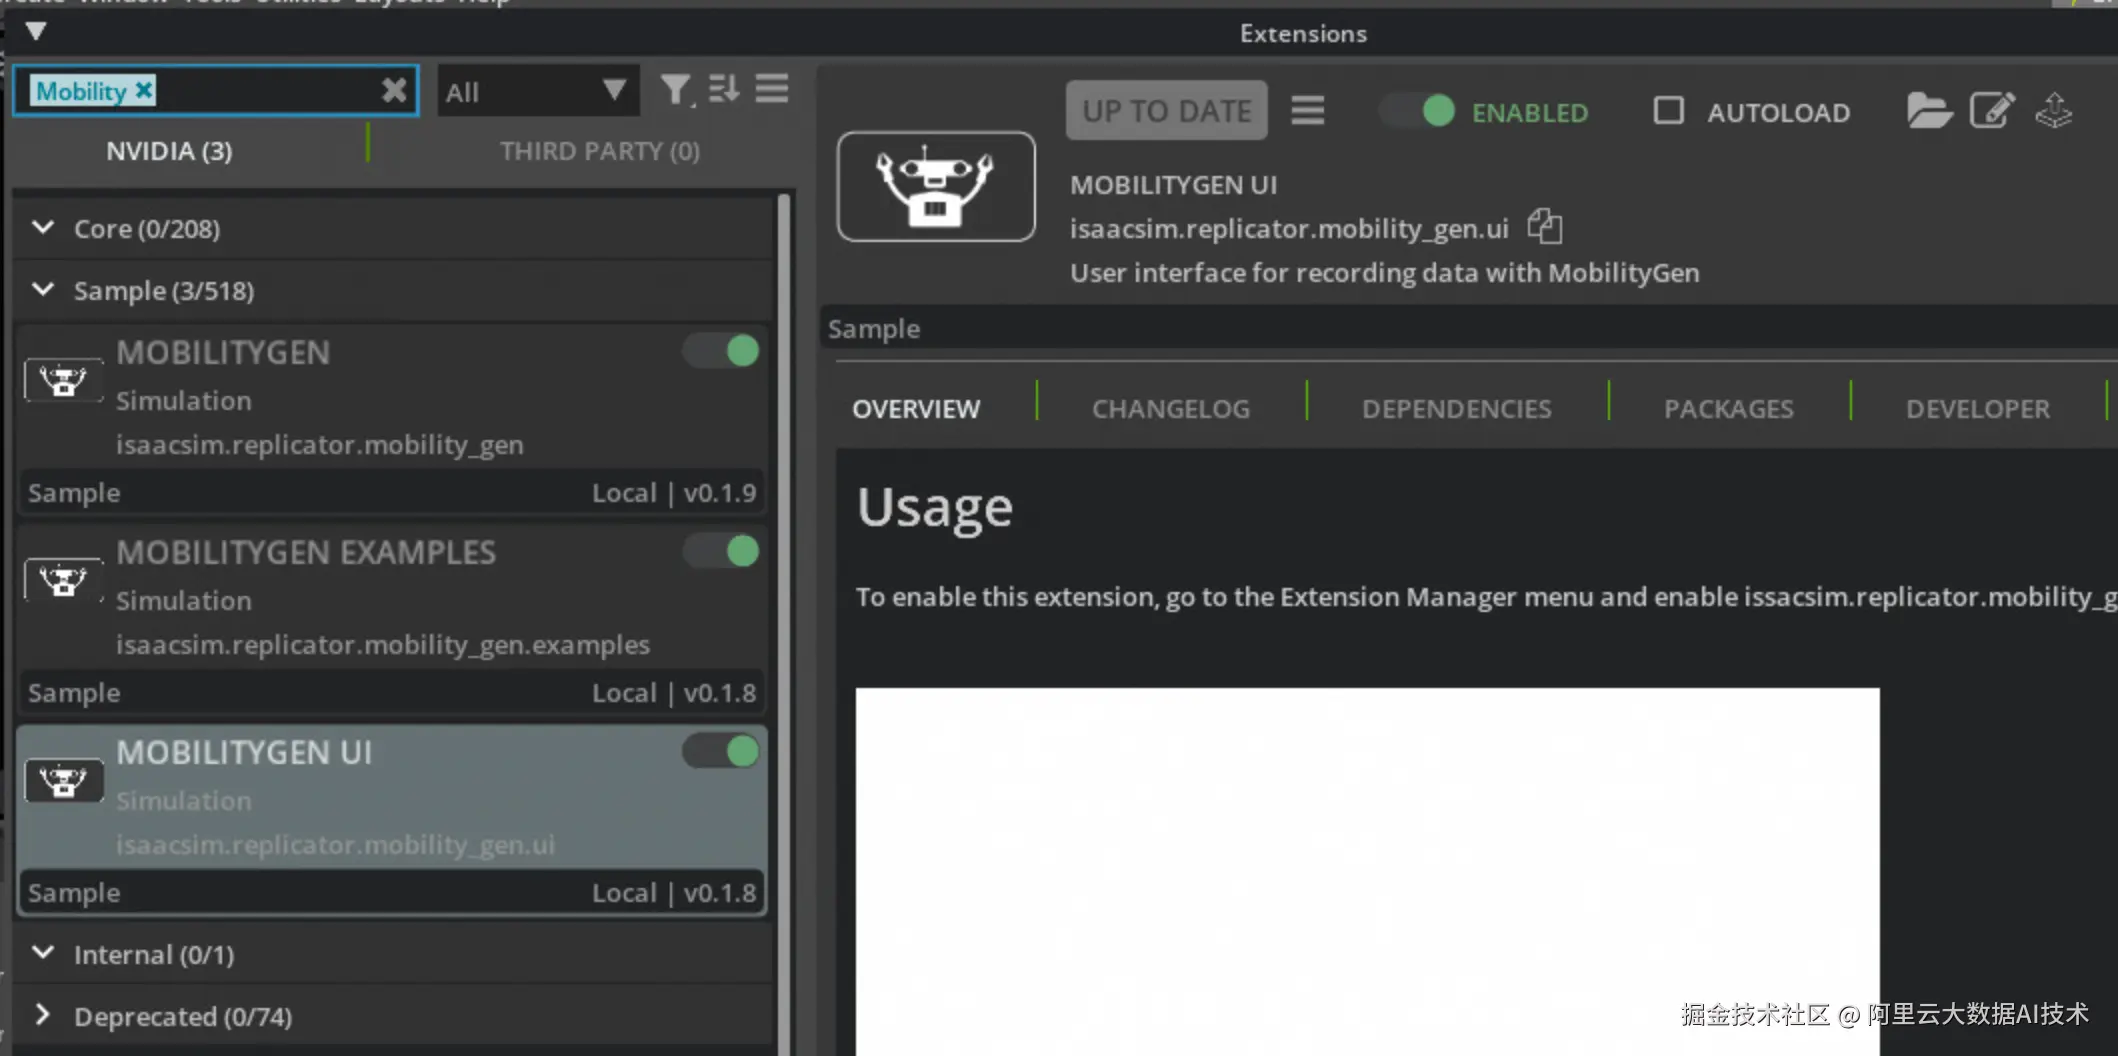
按照下列操作启动MobilityGen插件:
- 导航到 Window > Extensions
- 搜索 MobilityGen UI
- 点击切换开关启用扩展
- 您应该看到两个窗口:MobilityGen UI和占用地图可视化窗口
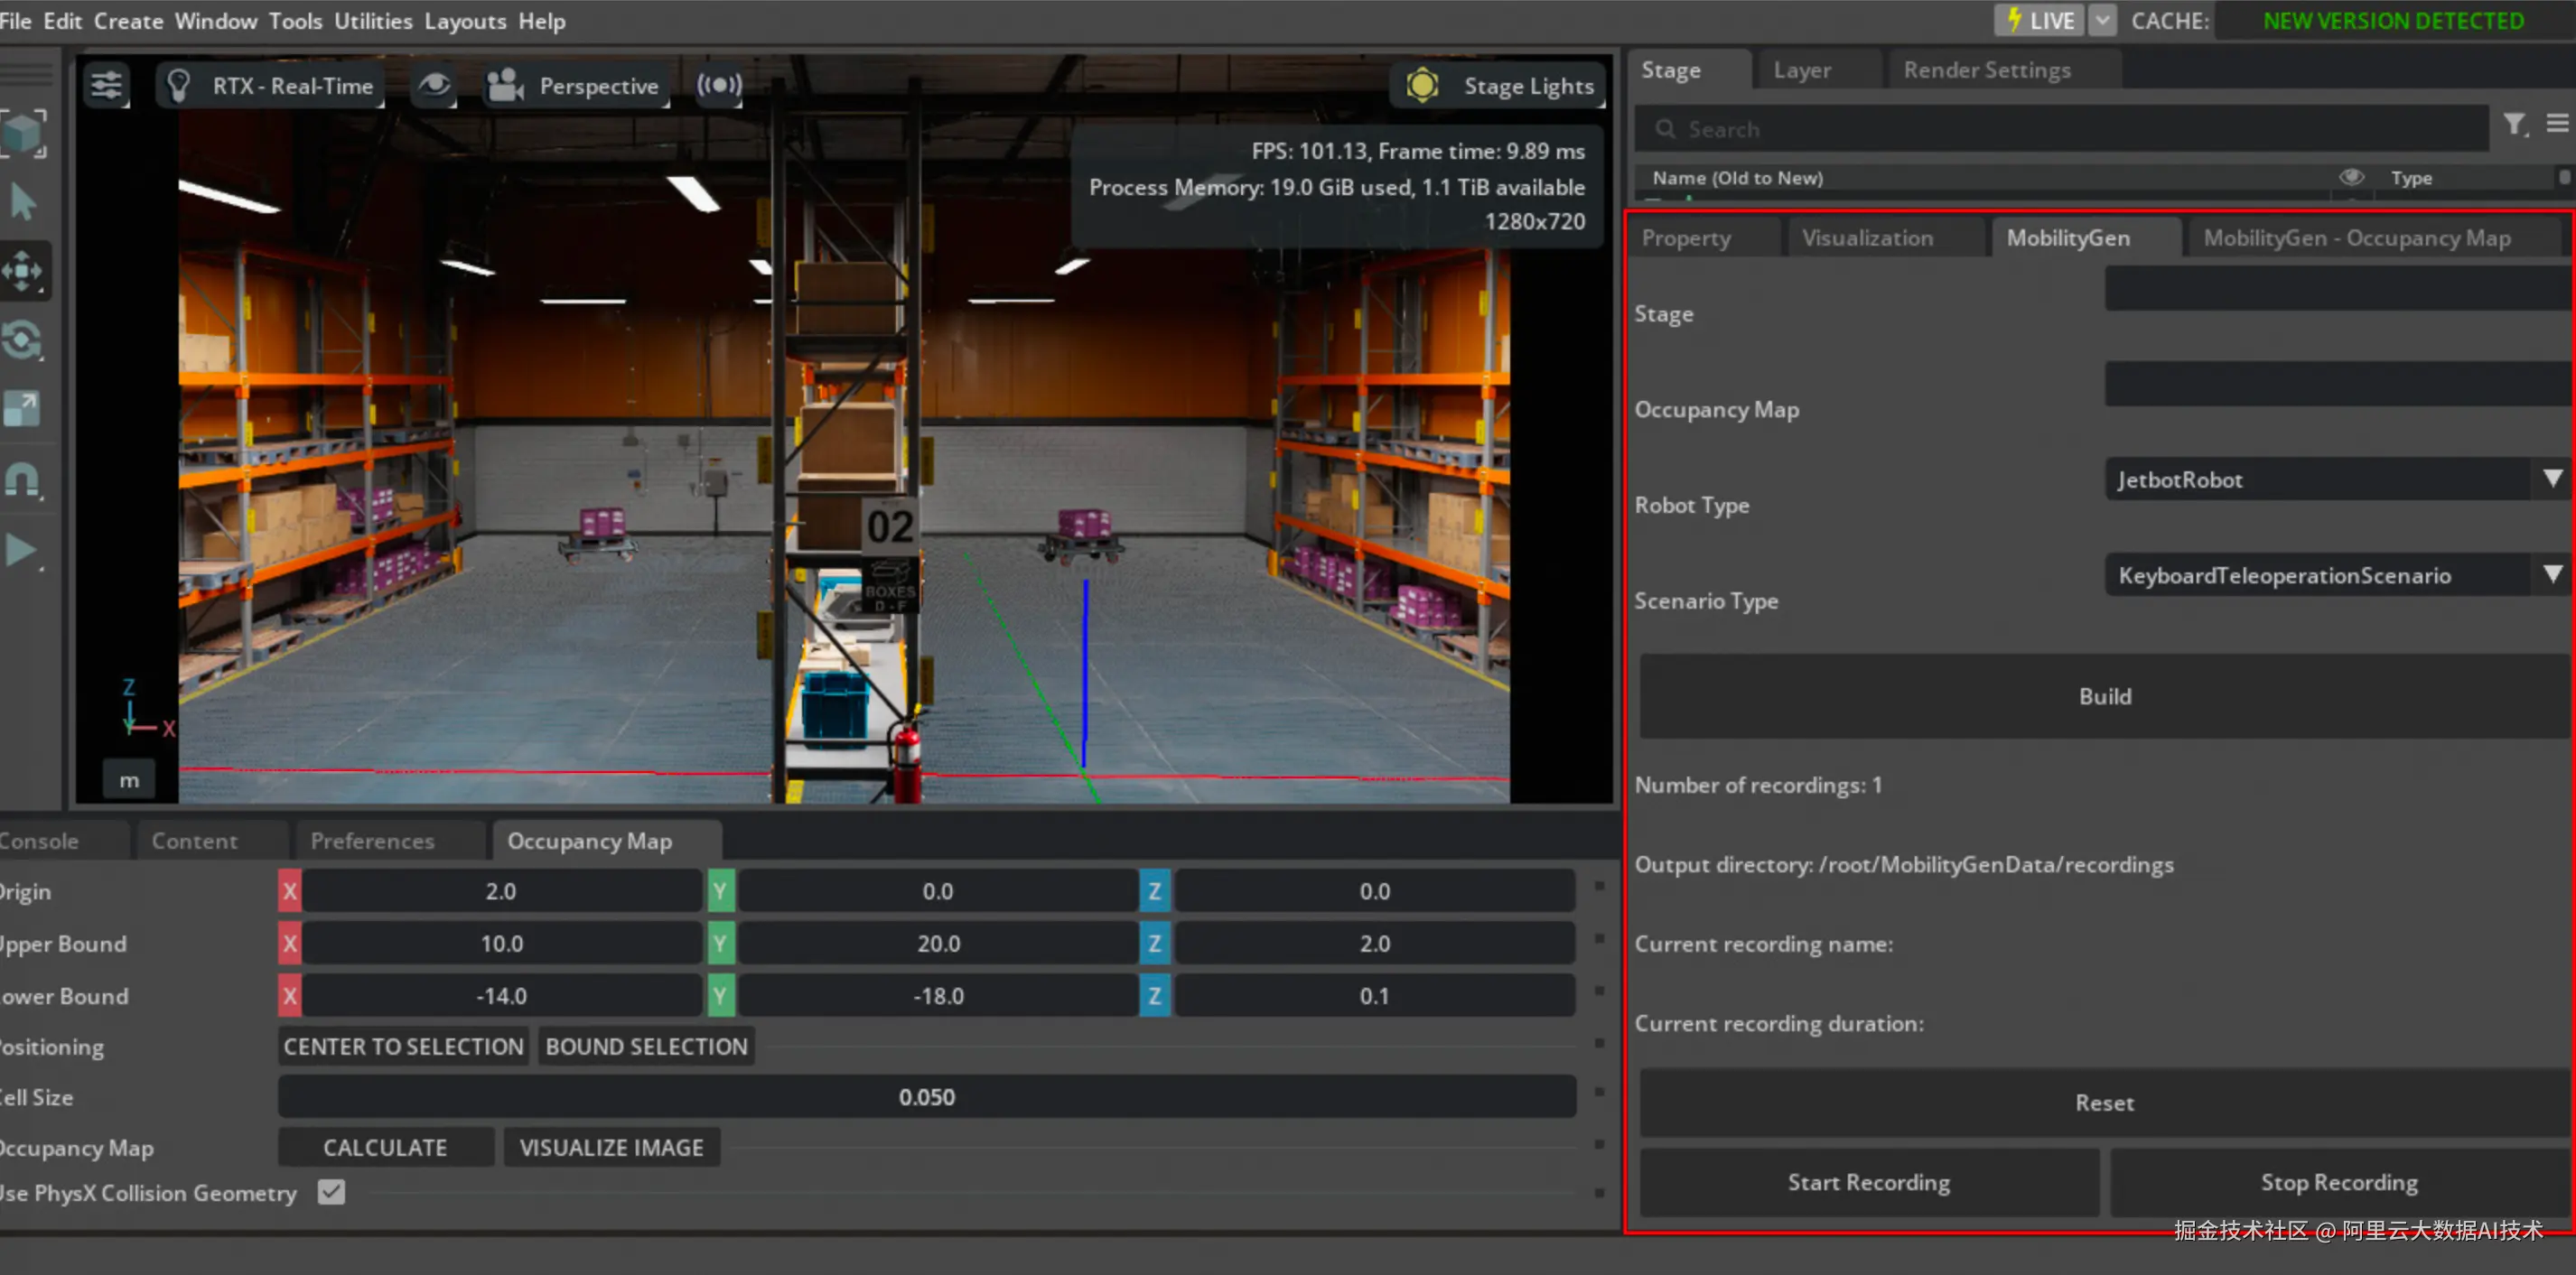
在MobilityGen窗口中设置以下参数:
-
Stage: 粘贴仓库USD路径
plaintext/mnt/isaac_assets/5.0/Isaac/Environments/Simple_Warehouse/warehouse_multiple_shelves.usd -
Occupancy Map: 输入之前创建的map.yaml文件路径
plaintext~/MobilityGenData/maps/warehouse_multiple_shelves/map.yaml -
Robot : 选择 CarterRobot
-
Scenario : 选择 KeyboardTeleoperationScenario (可选:如果您想自动生成数据,请选择 RandomPathFollowingScenario)
-
点击 Build
录制轨迹
- 点击 Start recording 开始记录日志
- 移动机器人(如您选取KeyboardTeleoperationScenario)
- 点击 Stop recording 停止记录
数据现在记录到 ~/MobilityGenData/recordings 目录中。 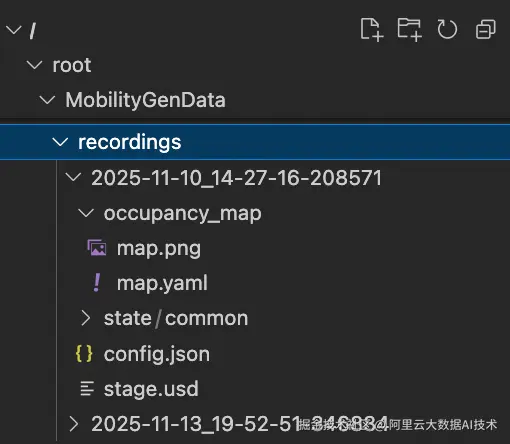
重放生成视频
然后使用Isaac Sim提供的 replay_directory.py Python脚本重放场景:
bash
cd /isaac-sim && \
/isaac-sim/python.sh standalone_examples/replicator/mobility_gen/replay_directory.py --render_interval 10 --enable isaacsim.replicator.mobility_gen.examples
脚本完成后,重放渲染的图像和传感器数据会被保存到 ~/MobilityGenData/replays路径下 
数据增强
我们使用Cosmos-Transfer1-7B模型来增强采集到的图像数据。在PAI-ModelGallery中已经集成了这个模型的部署方案: 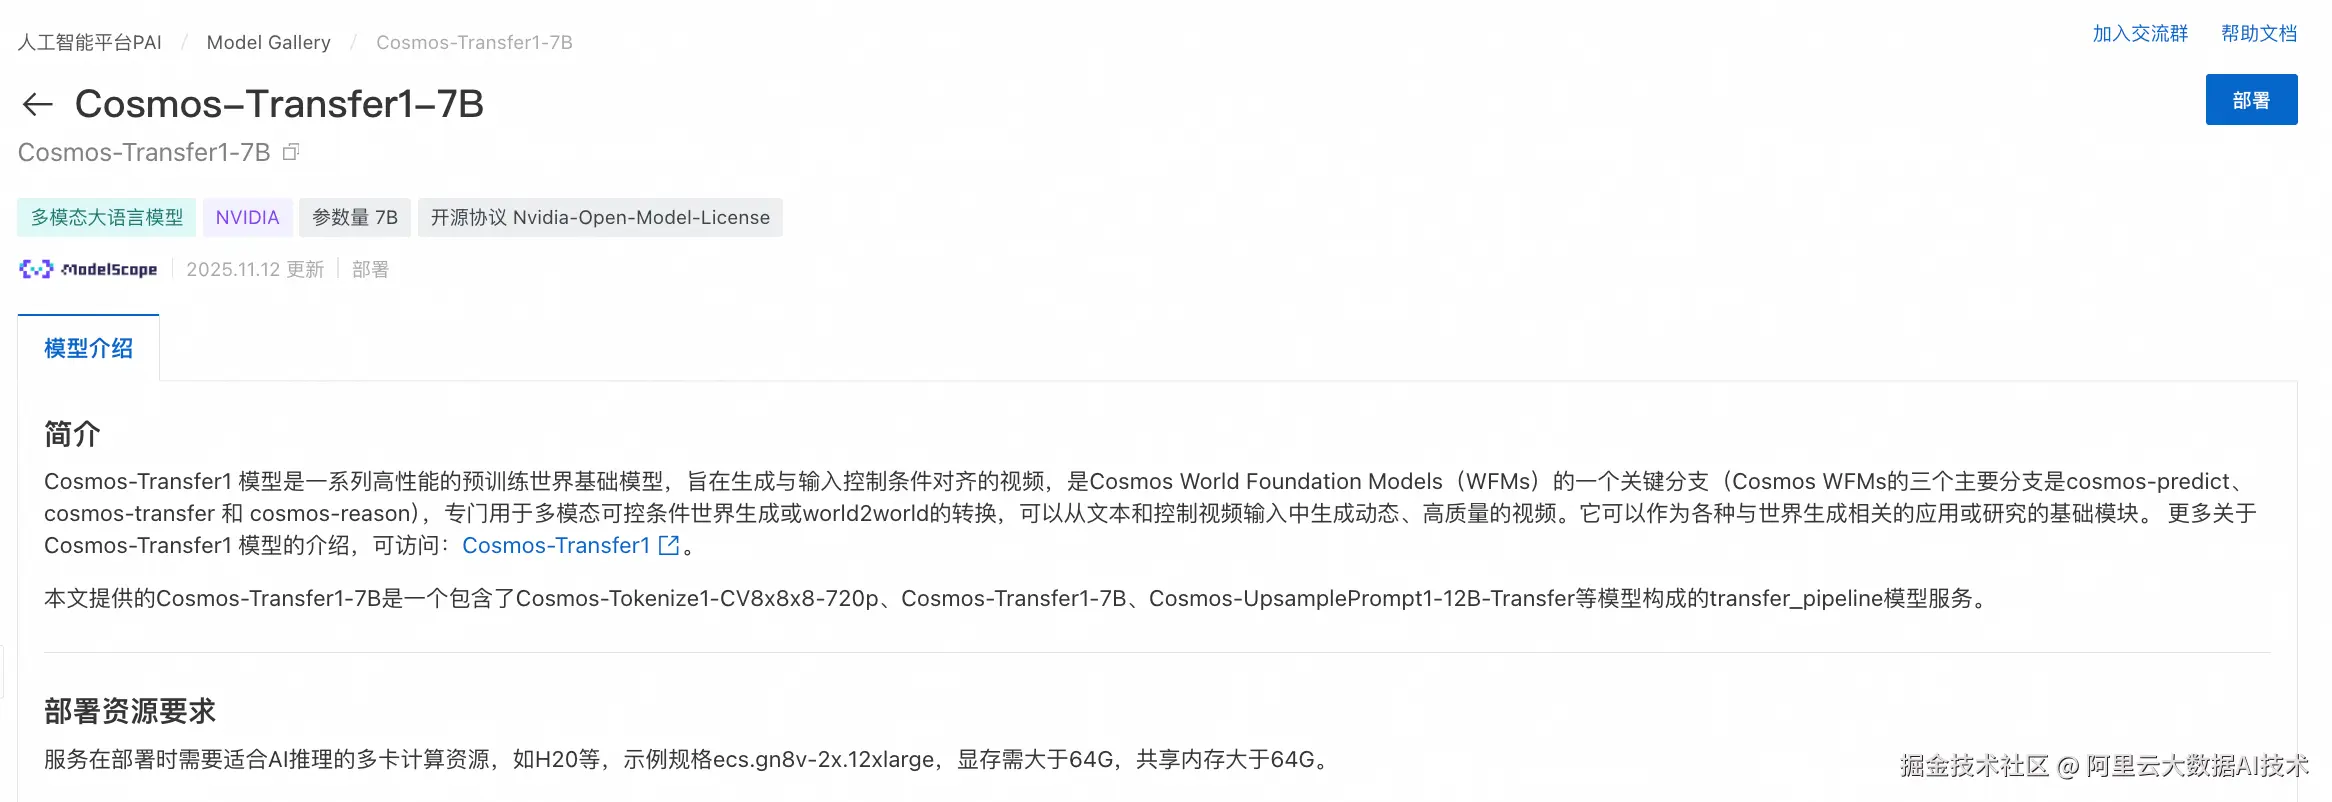
完成模型部署后,可以使用如下脚本来对图像数据进行增强:
python
import cv2
import json
from pathlib import Path
import shutil
import requests
import gradio_client.client as gradio_client
import gradio_client.utils as gradio_utils

# 定义Cosmos服务URL和Token
# COSMOS_SERVICE_URL = "http://xxxxxx"  # 请替换为实际服务URL
# EAS_TOKEN = "your_eas_token"  # 请替换为实际EAS Token

RGB_TARGETS = [
    "state/rgb/robot.front_camera.left.rgb_image",
    "state/rgb/robot.front_camera.right.rgb_image",
]

# --- 模块1: 图像序列转视频 ---
def convert_sequence_to_video(input_dir: Path, output_path: Path, fps: int, image_format: str) -> bool:
    print(f"  - Converting to video: {input_dir.name} (Format: {image_format})")
    image_files = sorted(list(input_dir.glob(f'*.{image_format}')))
    if not image_files:
        print(f"    -> No '{image_format}' images found. Skipping.")
        return False
    try:
        first_img = cv2.imread(str(image_files[0]))
        if first_img is None: raise IOError("Cannot read the first image.")
        height, width = first_img.shape[:2]
    except Exception as e:
        print(f"    -> Error reading first image: {e}. Skipping.")
        return False
    output_path.parent.mkdir(parents=True, exist_ok=True)
    fourcc = cv2.VideoWriter_fourcc(*'mp4v')
    out = cv2.VideoWriter(str(output_path), fourcc, fps, (width, height))
    for image_file in image_files:
        frame = cv2.imread(str(image_file))
        if frame is not None:
            out.write(frame)
    out.release()
    print(f"    -> Video created: {output_path}")
    return True

# --- 新模块: 视频转图像序列 ---
def split_video_to_frames(video_path: Path, output_dir: Path, original_image_dir: Path, image_format: str):
    """
    将视频文件拆分为一帧帧的图片,并使用原始图片的文件名进行命名。
    """
    print(f"  - Splitting video back to frames: {video_path.name}")

    # 1. 获取原始文件名作为模板
    original_image_files = sorted(list(original_image_dir.glob(f'*.{image_format}')))
    original_filenames = [p.name for p in original_image_files]

    if not original_filenames:
        print(f"    -> Warning: Could not find original images in {original_image_dir} to use for naming. Skipping frame splitting.")
        return

    # 2. 准备输出目录
    output_dir.mkdir(parents=True, exist_ok=True)

    # 3. 打开视频文件并逐帧读取
    cap = cv2.VideoCapture(str(video_path))
    if not cap.isOpened():
        print(f"    -> Error: Could not open video file {video_path}. Skipping.")
        return

    frame_index = 0
    while True:
        ret, frame = cap.read()
        if not ret:
            break  # 视频结束

        if frame_index < len(original_filenames):
            # 使用原始文件名来保存新帧
            output_filepath = output_dir / original_filenames[frame_index]
            cv2.imwrite(str(output_filepath), frame)
        else:
            # 如果视频帧数多于原始图片数,则停止,避免命名冲突
            print(f"    -> Warning: Video contains more frames than original image sequence. Stopping at frame {frame_index}.")
            break

        frame_index += 1

    cap.release()
    print(f"    -> Success! {frame_index} frames saved to: {output_dir}")

# --- 模块2: 调用Cosmos服务 ---
def cosmos_sync_with_upload(client, rgb_video_path, seg_video_path, output_dir, original_rgb_dir):
    """上传视频,调用API,下载结果,并触发视频到帧的转换。"""

    def upload_file(filepath: Path):
        if not filepath or not filepath.exists(): return None
        print(f"  - Uploading: {filepath.name}")
        file_desc = gradio_utils.handle_file(str(filepath))
        result_str = client.predict(file_desc, api_name="/upload_file")
        return json.loads(result_str).get("path")

    remote_rgb_path = upload_file(rgb_video_path)
    remote_seg_path = upload_file(seg_video_path)

    if not remote_rgb_path or not remote_seg_path:
        return False, "视频上传失败"

    request_dict = create_cosmos_request(remote_rgb_path, remote_seg_path)
    print("  - Sending generation request to Cosmos service...")
    result = client.predict(json.dumps(request_dict), api_name="/generate_video")

    if isinstance(result, tuple) and len(result) >= 2 and isinstance(result[0], dict):
        video_path = result[0].get("video")
        if not video_path:
            return False, f"API did not return a video path. Message: {result[1]}"

        output_file = Path(output_dir) / f"{rgb_video_path.stem}_cosmos_enhanced.mp4"

        # 统一处理下载或复制的逻辑
        success = False
        if video_path.startswith(("http://", "https://")):
            try:
                resp = requests.get(video_path, stream=True, timeout=300)
                resp.raise_for_status()
                with open(output_file, "wb") as f: shutil.copyfileobj(resp.raw, f)
                success = True
            except requests.exceptions.RequestException as e:
                return False, f"Failed to download video: {e}"
        else:
            source_path = Path(video_path)
            if source_path.exists():
                shutil.copy2(source_path, output_file)
                success = True
            else:
                return False, f"API returned a local path that does not exist: {video_path}"

        if success:
            print(f"  -> Augmented video saved to: {output_file}")
            # 定义新帧的输出目录,例如 .../robot.front_camera.left.rgb_image_cosmos
            new_frames_output_dir = original_rgb_dir.parent / f"{original_rgb_dir.name}_cosmos"
            split_video_to_frames(
                video_path=output_file,
                output_dir=new_frames_output_dir,
                original_image_dir=original_rgb_dir,
                image_format="jpg"  # RGB图像的原始格式
            )
            return True, str(output_file)
        else:
            return False, "Failed to retrieve the generated video file."

    else:
        return False, f"Unexpected API response format: {result}"


def create_cosmos_request(remote_rgb_path, remote_seg_path):
    """动态创建Cosmos请求,包含主视频和分割视频的远程路径。"""
    return {
        "prompt": "A realistic warehouse environment with consistent lighting, perspective, and camera motion. Preserve the original structure, object positions, and layout from the input video. Ensure the output exactly matches the segmentation video frame-by-frame in timing and content. Camera movement must follow the original path precisely.",
        "negative_prompt": "The video captures a game playing, with bad crappy graphics and cartoonish frames. It represents a recording of old outdated games. The images are very pixelated and of poor CG quality. There are many subtitles in the footage. Overall, the video is unrealistic and appears cg. Plane background.",
        "sigma_max": 80,
        "guidance": 7,
        "input_video_path": remote_rgb_path, # 主视频路径
        "blur_strength": "low",
        "canny_threshold": "low",
        "edge": {"control_weight": 0.3},
        "seg": {
            "control_weight": 1.0,
            "input_control": remote_seg_path # 分割视频路径
        }
    }

# --- 模块3: 主工作流控制器 ---
def process_and_augment_replays(output_dir: str, fps: int = 30):
    source_root = Path("/root/MobilityGenData/replays")
    output_root = Path(output_dir)
    if not source_root.is_dir(): return
    timestamp_dirs = [d for d in source_root.iterdir() if d.is_dir()]
    if not timestamp_dirs: return

    client = gradio_client.Client(COSMOS_SERVICE_URL, hf_token=EAS_TOKEN)

    for ts_dir in timestamp_dirs:
        print(f"\nProcessing replay: {ts_dir.name}")
        final_output_dir = output_root / ts_dir.name
        final_output_dir.mkdir(exist_ok=True)

        for rgb_rel_path_str in RGB_TARGETS:
            rgb_image_dir = ts_dir / rgb_rel_path_str
            seg_rel_path_str = rgb_rel_path_str.replace("rgb", "segmentation")
            seg_image_dir = ts_dir / seg_rel_path_str

            if not (rgb_image_dir.is_dir() and seg_image_dir.is_dir()):
                continue

            rgb_video_path = final_output_dir / f"{rgb_image_dir.name}.mp4"
            seg_video_path = final_output_dir / f"{seg_image_dir.name}.mp4"

            rgb_ok = convert_sequence_to_video(rgb_image_dir, rgb_video_path, fps, "jpg")
            seg_ok = convert_sequence_to_video(seg_image_dir, seg_video_path, fps, "png")

            if not (rgb_ok and seg_ok):
                continue

            cosmos_sync_with_upload(
                client,
                rgb_video_path,
                seg_video_path,
                final_output_dir,
                original_rgb_dir=rgb_image_dir
            )

    print("\n" + "="*20 + " 全部处理完成 " + "="*20)

# --- 程序入口 ---
if __name__ == "__main__":
    !mkdir -p /root/MobilityGenData/cosmos_augmented_videos
    output_directory = "/root/MobilityGenData/cosmos_augmented_videos"
    process_and_augment_replays(output_dir=output_directory)
以下是两段数据增强前后的视频数据,作为对比:
增强前 视频演示>>
增强后 视频演示>>
模仿学习
这里选择NVLab的开源模型X-Mobility(github.com/NVlabs/X-Mo...)作为基模,进行模仿学习。
可以使用以下脚本,启动DLC进行分布式训练:
python
import os
import json
import time

from alibabacloud_tea_openapi.models import Config
from alibabacloud_credentials.client import Client as CredClient
from alibabacloud_credentials.models import Config as CredConfig
from alibabacloud_pai_dlc20201203.client import Client as DLCClient
from alibabacloud_pai_dlc20201203.models import (
    CreateJobRequest,
    GetJobRequest,
)

def wait_for_job_to_terminate(client, job_id):
    while True:
        job = client.get_job(job_id, GetJobRequest()).body
        print('job({}) is {}'.format(job_id, job.status))
        if job.status in ('Succeeded', 'Failed', 'Stopped'):
            return job.status
        time.sleep(5)
    return None


def main():
    current_time_tuple = time.localtime()
    year = current_time_tuple.tm_year
    month = current_time_tuple.tm_mon
    day = current_time_tuple.tm_mday
    hour = current_time_tuple.tm_hour
    minute = current_time_tuple.tm_min
    # 请确认您的主账号已授权DLC,且拥有足够的权限。
    display_name = f"train_xmobility_for_isaac_{day}_{hour}-{minute}"  #设置任务名称
    region_id = os.environ.get("dsw_region") #设置regionid
    workspace_id = os.environ.get('PAI_WORKSPACE_ID') #设置成用户自己的工作空间id
    image_uri = f"dsw-registry.{region_id}.cr.aliyuncs.com/pai-training-algorithm/isaac-sim:x-mobility-v10" #使用官方镜像
    ecs_spec = "ecs.gn8v-4x.8xlarge"     #
    #########训练任务相关配置#############
    # 样例数据集设置
    # data_type = 'pqt'
    # dataset1_dir = "/mnt/data/notebook3/x_mobility_isaac_sim_random_160k/data"
    # dataset2_dir = "/mnt/data/notebook3/x_mobility_isaac_sim_nav2_100k/data"
    # output_dir = "/mnt/data/notebook3/sample_output"
    # 样例cosmos数据集设置
    data_type = 'pqt'
    dataset1_dir = "/mnt/data/notebook3/x_mobility_isaac_sim_random_160k_cosmos_to_xmob_resized/afm_isaac_sim_random_160k/data"
    dataset2_dir = "/mnt/data/notebook3/x_mobility_isaac_sim_nav2_100k_cosmos_to_xmob_resized/afm_isaac_sim_nav2_100k/data"
    output_dir = "/mnt/data/notebook3/sample_cosmos_output"
    # mobilitygen数据集设置
    # data_type = 'lerobot'
    # dataset1_dir = "/mnt/data/notebook3/x_mobility_isaac_sim_mobilitygen"
    # dataset2_dir = "/mnt/data/notebook3/x_mobility_isaac_sim_mobilitygen"
    # output_dir = "/mnt/data/notebook3/mobilitygen_output"
    #########训练任务相关配置#############

    # 本示例通过Credentials SDK默认从环境变量中读取AccessKey,来实现身份验证。
    credentialsConfig = CredConfig(
        type='credentials_uri'   # 选填。若您未配置其他"默认凭据链"访问方式,您无需再显式指定,Credentials SDK会通过uri方式获取临时凭证
    )
    cred = CredClient(credentialsConfig)

    # 1. create client;
    dlc_client = DLCClient(
         config=Config(
            credential=cred,
            region_id=region_id,
            endpoint='pai-dlc.{}.aliyuncs.com'.format(region_id),
         )
    )

    print('-------- Create Job ----------')
    # 创建DLC作业。
    create_job_resp = dlc_client.create_job(CreateJobRequest().from_map({
        'WorkspaceId': workspace_id,
        'DisplayName': display_name,
        'JobType': 'PyTorchJob',
        # 'ResourceId': resource_quota_id,
        'JobSpecs': [
            {
                "Type": "Master",
                "Image": image_uri,
                "PodCount": 1,
                "EcsSpec": ecs_spec,
            },
        ],
        'DataSources': [
            {
                "DataSourceId": dataset_id,
            },
        ],
       'UserVpc': {
            "VpcId": vpc_id,  # 替换为实际 VPC ID
            "SwitchId": switch_id,  # 替换为实际交换机 ID
            "SecurityGroupId": security_groupid  # 替换为实际安全组 ID
        },
        "UserCommand": f" export WANDB_MODE=offline && \
            export NCCL_NVLS_ENABLE=0 && \
            cd /workspace && \
            python3 /train_pai/train_wrapper.py \
            -d {dataset1_dir} \
            -o {output_dir} \
            --type {data_type} \
            --stage 1 && \
            python3 /train_pai/train_wrapper.py \
            -d {dataset2_dir} \
            -o {output_dir} \
            --type {data_type} \
            --stage 2 && \
            sleep 30",
    }))
    job_id = create_job_resp.body.job_id

    wait_for_job_to_terminate(dlc_client, job_id)

    pass


if __name__ == '__main__':
    main()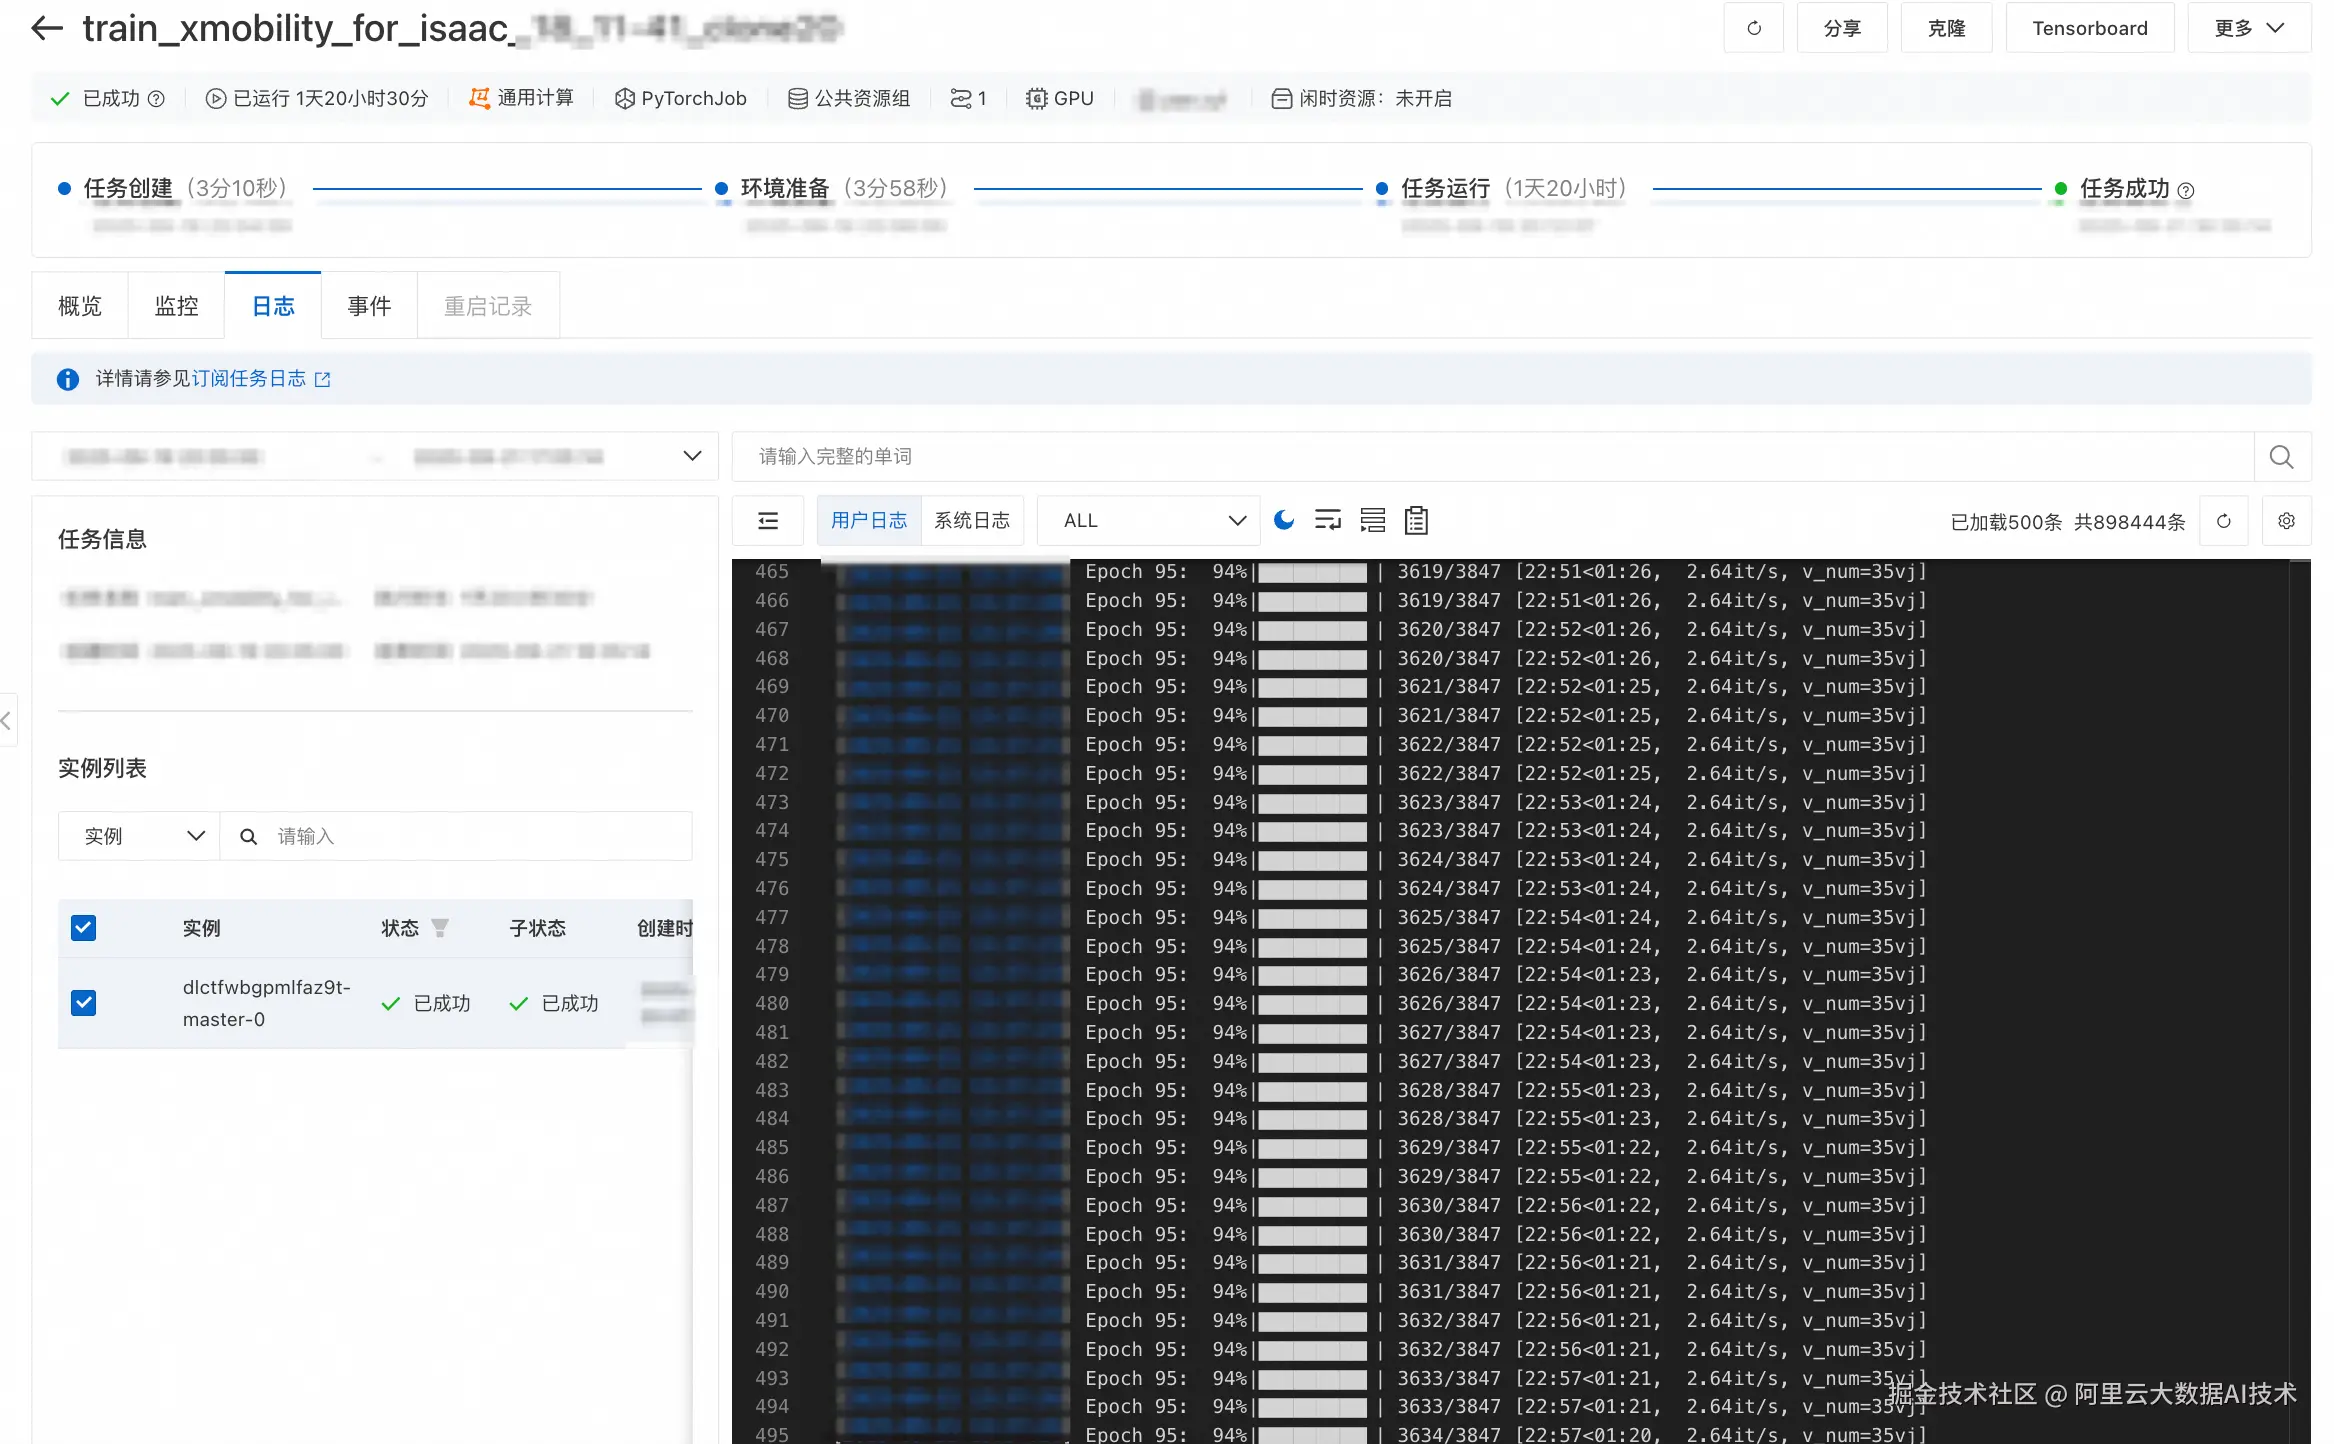
软件在环验证
模型格式转换
使用以下命令将微调得到的X-Mobility模型转换为ONNX格式:
python
%cd /X-MOBILITY
# 以sample训练结果为例,请更换为自己的训练结果路径
!python3 onnx_conversion.py -p /mnt/data/notebook3/nav2_output/checkpoints/last.ckpt -o /tmp/x_mobility.onnx

# 请勿随意更改tensorrt路径,此为X-Mobility默认路径
!python3 trt_conversion.py -o /tmp/x_mobility.onnx -t /tmp/x_mobility.engine
部署ROS2
使用以下脚本部署ROS2环境,以加载X-Mobility模型
python
# 创建ros2工作空间文件夹
!mkdir -p ~/ros2_ws/src

# 创建符号链接到x_mobility_navigator ROS2包
!ln -s /X-MOBILITY/ros2_deployment/x_mobility_navigator ~/ros2_ws/src/x_mobility_navigator

# 构建ROS2工作空间
!cd ~/ros2_ws && colcon build --symlink-install
启动VNC
X-Mobility模型的软件在环验证使用Isaac Sim + ROS2的组合方案,需要使用VNC以驱动图形化界面。使用以下命令在DSW中启动VNC:
shell
/opt/TurboVNC/bin/vncserver :0 -geometry 4000x3000在Isaac Sim中启用ROS2
使用如下步骤在Isaac Sim中启动ROS2插件:
-
进行ROS2预配置
bashsource /opt/ros/humble/setup.bash cd ~/ros2_ws && source install/setup.bash source ~/.bashrc -
启动Isaac Sim
bashACCEPT_EULA=Y /isaac-sim/runapp.sh --/persistent/isaac/asset_root/default="/mnt/isaac_assets/5.0" -
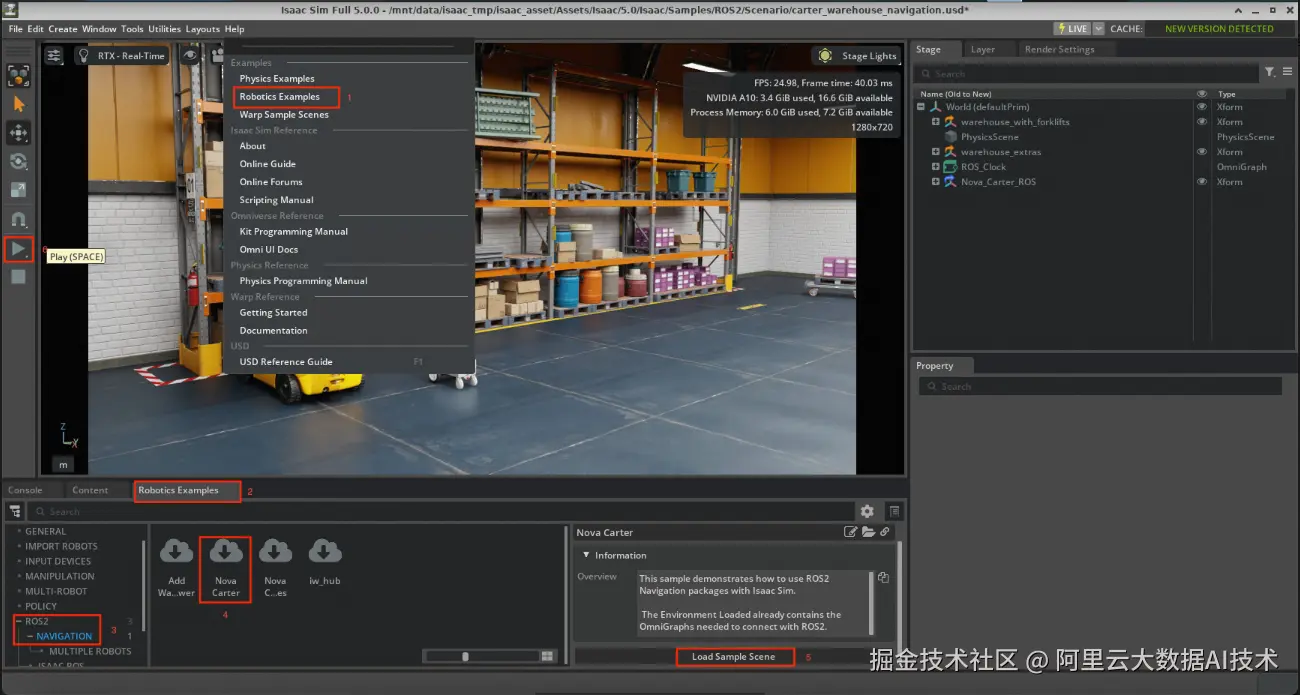
通过点击
Robotics Examples>ROS2>Navigation>Carter Navigation>Load Sample Scene启动Carter导航示例 -
点击左侧工具栏的
Play图标
可以新开一个Terminal测试ROS2连接是否正常工作:
bash
# 设置ROS2环境
source /opt/ros/humble/setup.bash
cd ~/ros2_ws && source install/setup.bash
# 列出可用主题
ros2 topic list
如果看到以下主题:
bash
/back_stereo_imu/imu
/chassis/imu
/chassis/odom
/clock
/cmd_vel
/front_3d_lidar/lidar_points
/front_stereo_camera/left/camera_info
/front_stereo_camera/left/image_raw
/front_stereo_camera/left/image_raw/nitros_bridge
/front_stereo_imu/imu
/left_stereo_imu/imu
/parameter_events
/right_stereo_imu/imu
/rosout
/tf
则证明ROS2插件安装成功。
启动X-Mobility模型
可以通过以下命令在Terminal中启动X-Mobility Navigator软件:
bash
# 设置构建的工作空间
cd ~/ros2_ws && source install/setup.bash
# 启动X-Mobility导航器
ros2 launch x_mobility_navigator x_mobility_navigator.launch.py设置目标姿态:选择2D Goal Pose然后点击地图设置位置/方向。 如果一切正常,应该看到机器人在模拟中向目标位置移动。
总结
在本 Notebook 中,我们基于阿里云 PAI 平台的强大功能,完整地演示了使用 Isaac Sim 和 X-Mobility 的通用导航与运动控制工作流,实现了从数据生成、视觉增强到模型训练和仿真部署的端到端流程。
处理流程包括:
- 人工演示: 使用 Isaac Sim 5.0 和 MobilityGen 自动化生成大规模导航演示数据。
- 数据扩增(可选):使用MobilityGen的Random轨迹生成功能,可以快速扩增演示数据。
- 数据增强: 利用 Cosmos-Transfer1 对仿真数据进行风格迁移,提升其真实感和多样性。
- 模仿学习: 基于生成的数据训练 X-Mobility,一个以世界模型为基础的通用导航与运动控制策略。
- 软件在环验证: 将训练好的模型通过 ROS2 集成到 Isaac Sim 中,进行端到端的闭环导航验证。
通过 Cosmos 增强数据后重新训练的 X-Mobility 模型,在泛化性和鲁棒性上展现了巨大潜力。此工作流为通用机器人导航提供了一套完整的技术方案,显著提升了模型在复杂视觉环境下的泛化能力,并为 Sim2Real 的成功迁移奠定了坚实基础。