上期回顾
上篇文章我们详细讲解了Spring Authorization Server的基本概念,本篇我们直接上代码,从零开始打造认证中心,为了方便演示,项目从零开始搭建,如果是现成项目,集成方式会在文章末尾提及。
项目准备
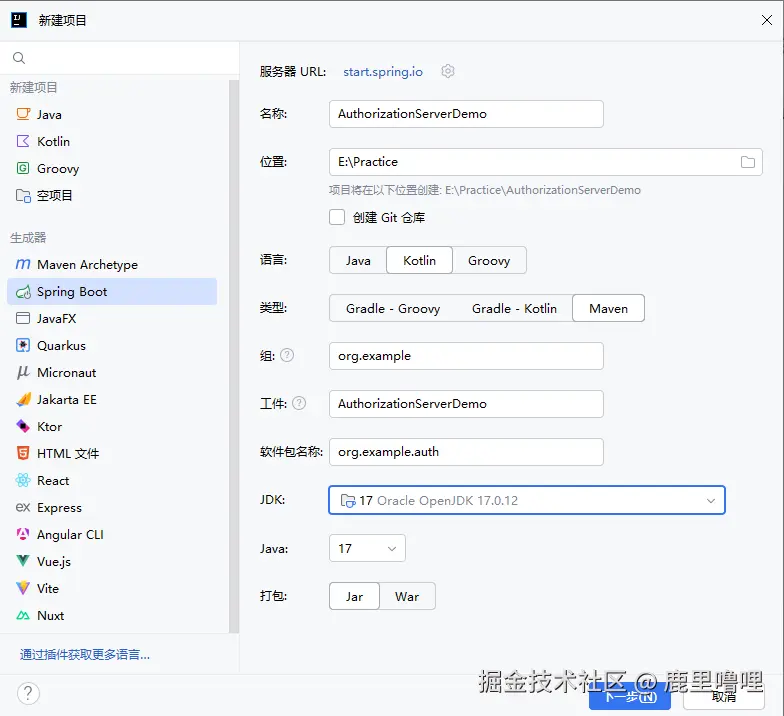
使用IDEA新建SpringBoot项目,笔者使用Kotlin+Maven的组合,Java同学选择Java语言即可。

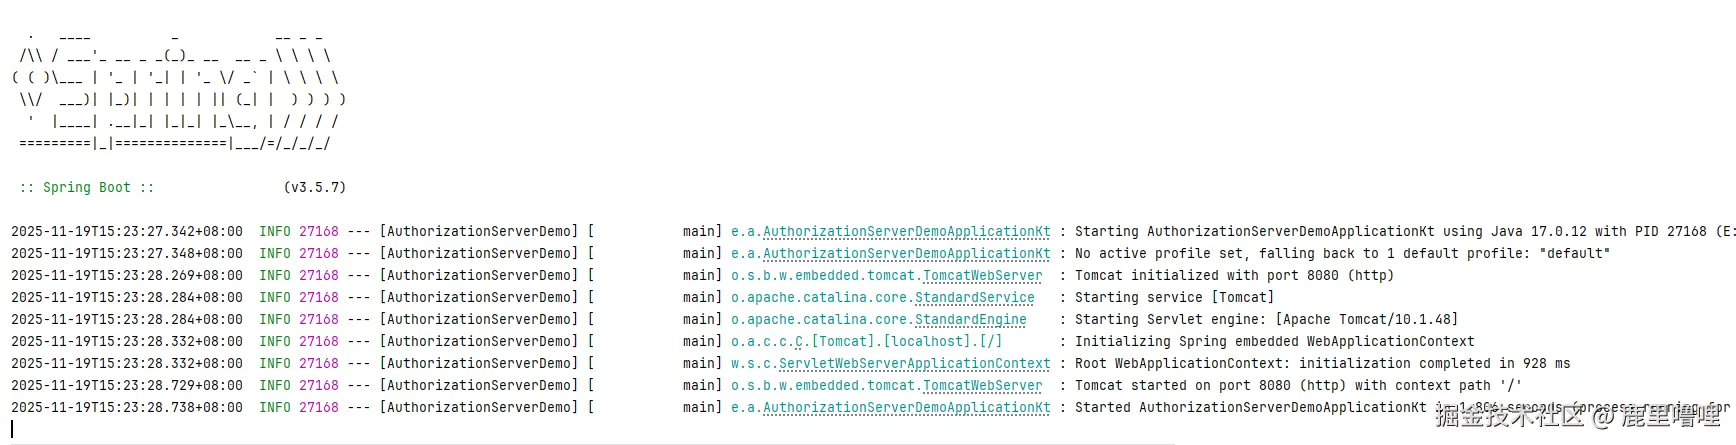
这样我们就得到了一个如下的初始项目:
- SpringBoot 3.5.7
- JDK17
- Maven
- Kotlin
给不熟悉Kotlin语言的读者科普一下,这个也是一个可以运行在JVM上的语言,编译出来也是Class,所以可以和Java互相调用,但是拥有更加简洁强大的语法,现广泛用于安卓开发已取代Java,这里我们拿来做SpringWeb开发也是完全可以的,在本文中,你只需要了解以下几点:
- val和var关键字:val代表常量,对应Java中的final;var则代表变量
- 类型倒置,如 val a: String = "123" 等效于 String a = "123"
- 类型推断,编译器会自动推断类型,上面的声明还可以写成:val a = "123",编译器一看就知道这是个String,所以不写出来也可以。
- 省略new:val a = Demo() 等价于 Demo a = new Demo()
- fun方法关键字:fun test(): String {} 等价于 public String test() {}
好了现在你已经学会kotlin了(玩笑),快去看文章吧,实在有不懂的可以借助AI理解下,问题应该不是很大。
跑一下启动类确保没有问题:
基础示例
- 首先引入最重要的两个依赖:
xml
<dependency>
    <groupId>org.springframework.boot</groupId>
    <artifactId>spring-boot-starter-security</artifactId>
</dependency>
<dependency>
    <groupId>org.springframework.security</groupId>
    <artifactId>spring-security-oauth2-authorization-server</artifactId>
</dependency>- 创建一个
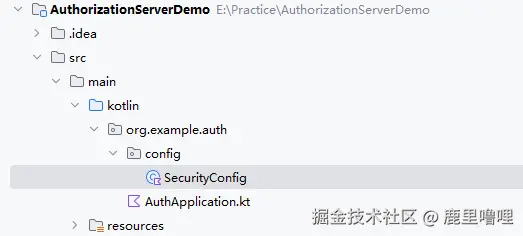
SecurityConfig,配置SpringSecurity以及AuthorizationServer的基础Bean。这一部分内容在官方文档里可以参考到,下面做一下拆分讲解:
首先配置两个拦截链:
kotlin
/**
 * 调用拦截链1:拦截所有oauth2相关请求,交由oauth登录处理
 */
@Bean
@Order(1)
@Throws(java.lang.Exception::class)
fun authorizationServerSecurityFilterChain(http: HttpSecurity): SecurityFilterChain {
    val authorizationServerConfigurer =
        OAuth2AuthorizationServerConfigurer.authorizationServer()
    http
        .securityMatcher(authorizationServerConfigurer.endpointsMatcher)
        .with(authorizationServerConfigurer, Customizer.withDefaults())
        .authorizeHttpRequests { authorize ->
            authorize.anyRequest().authenticated()
        }
        .exceptionHandling { exceptions ->
            exceptions
                .defaultAuthenticationEntryPointFor(
                    LoginUrlAuthenticationEntryPoint("/login"),
                    MediaTypeRequestMatcher(MediaType.TEXT_HTML)
                )
        }
    http
        .getConfigurer(OAuth2AuthorizationServerConfigurer::class.java)
        .oidc(Customizer.withDefaults())
    return http.build()
}

/**
 * 调用拦截链2:其余非oauth2请求拦截到登录页
 */
@Bean
@Order(2)
@Throws(java.lang.Exception::class)
fun defaultSecurityFilterChain(http: HttpSecurity): SecurityFilterChain {
    http
        .authorizeHttpRequests { authorize ->
            authorize.anyRequest().authenticated()
        } // Form login handles the redirect to the login page from the
        // authorization server filter chain
        .formLogin(Customizer.withDefaults())
    return http.build()
}大致来说,就是为了区分开让oauth2相关的请求走链路1,其余的请求都走链路2,因为链路1是通过我们引入spring-authorization-server依赖包而带进来的很多封装逻辑,如/oauth2/authorize和/oauth2/token这两个授权认证接口,所以需要和我们服务中的其他接口区分开来。
然后配置SpringSecurity核心的User信息:
kotlin
// 用于检索用户进行身份验证
@Bean
fun userDetailsService(): UserDetailsService {
    // 方式1:直接在内存定义用户
    val userDetails = User.withUsername("admin")
        .password(passwordEncoder().encode("admin"))
        .roles("admin")
        .build()
    return InMemoryUserDetailsManager(userDetails)
}

// 用于密码加密
@Bean
fun passwordEncoder(): PasswordEncoder {
    return BCryptPasswordEncoder()
}意为我们配置了一个单个的用户admin在内存中存储。
接下来配置Client客户端信息:
Kotlin
//用于管理客户端
@Bean
fun registeredClientRepository(): RegisteredClientRepository {
    // 方式1:直接在内存内定义好clients
    val tokenSettings = TokenSettings.builder()
        .accessTokenTimeToLive(Duration.ofHours(1)) // 设置访问令牌有效期为1小时
        .refreshTokenTimeToLive(Duration.ofDays(30)) // 设置刷新令牌有效期为30天
        //.accessTokenFormat(OAuth2TokenFormat.REFERENCE) // 这个设置是开启不透明token
        .accessTokenFormat(OAuth2TokenFormat.SELF_CONTAINED) // 使用透明token
        .build()
    val oidcClient = RegisteredClient.withId(UUID.randomUUID().toString())
        .clientId("chick")
        .clientSecret(passwordEncoder().encode("123456"))
        .clientAuthenticationMethod(ClientAuthenticationMethod.CLIENT_SECRET_BASIC)
        .clientAuthenticationMethod(ClientAuthenticationMethod.CLIENT_SECRET_POST)
        .clientAuthenticationMethod(ClientAuthenticationMethod.CLIENT_SECRET_JWT)
        .authorizationGrantType(AuthorizationGrantType.AUTHORIZATION_CODE)
        .authorizationGrantType(AuthorizationGrantType.REFRESH_TOKEN)
        .authorizationGrantType(AuthorizationGrantType.CLIENT_CREDENTIALS)
        .redirectUri("https://www.baidu.com")
        .postLogoutRedirectUri("http://127.0.0.1:8000/")
        .scope(OidcScopes.OPENID)
        .scope(OidcScopes.PROFILE)
        .tokenSettings(tokenSettings)
        .clientSettings(ClientSettings.builder().requireAuthorizationConsent(true).build())
        .build()
    return InMemoryRegisteredClientRepository(oidcClient)
}
同样,我们在内存中配置了一个单个的客户端,他的信息有很多,我们重点关注以下信息:
| 属性 | 说明 |
|---|---|
| clientId | 客户端的唯一标识 |
| clientSecret | 客户端密钥,用于识别客户端身份 |
| clientAuthenticationMethod | 客户端认证方法,定义以什么方式来传递客户端的信息,如请求头中携带Authrozation(CLIENT_SECRET_BASIC)、请求体中传递clientId和clientSecret(CLIENT_SECRET_POST),或是请求体中携带JWT(CLIENT_SECRET_JWT) |
| authorizationGrantType | 授权方式,表明当前客户端可以使用哪些授权方式来获得授权,常见的有授权码、RefreshToken刷新授权及客户端认证授权 |
| redirectUri | 回调地址,必须是一个定死的值,也是保证单点登录安全性的关键,它代表在Auth Server的登录页执行登录后,应当携带授权码重定向到哪个地址,避免被恶意拦截 |
| postLogoutRedirectUri | 类似回调地址,这个是执行登出后需要重定向到的地址,也是需要事先配置好的 |
| scope | 授权范围,表明对方可以获得哪些权限 |
先大致有个了解即可,只需要知道我们通过配置Bean,我们的认证服务器拥有了一个客户端,只有这个客户端才能通过我们的认证。
最后再配置一些其他Bean:
kotlin
// 用于签署访问令牌
@Bean
fun jwkSource(): JWKSource<SecurityContext> {
    val keyPair = generateRsaKey()
    val publicKey = keyPair.public as RSAPublicKey
    val privateKey = keyPair.private as RSAPrivateKey
    val rsaKey = RSAKey.Builder(publicKey)
        .privateKey(privateKey)
        .keyID(UUID.randomUUID().toString())
        .build()
    val jwkSet = JWKSet(rsaKey)
    return ImmutableJWKSet(jwkSet)
}

// 用于解码签名访问令牌
@Bean
fun jwtDecoder(jwkSource: JWKSource<SecurityContext>): JwtDecoder {
    return OAuth2AuthorizationServerConfiguration.jwtDecoder(jwkSource)
}

// 用于配置 Spring Authorization Server
@Bean
fun authorizationServerSettings(): AuthorizationServerSettings {
    return AuthorizationServerSettings.builder().build()
}

// 启动时生成的密钥,用于创建上面的JWKSource
private fun generateRsaKey(): KeyPair {
    val keyPair: KeyPair
    try {
        val keyPairGenerator = KeyPairGenerator.getInstance("RSA")
        keyPairGenerator.initialize(2048)
        keyPair = keyPairGenerator.generateKeyPair()
    } catch (ex: Exception) {
        throw IllegalStateException(ex)
    }
    return keyPair
}
现在的完整文件:
kotlin
package org.example.auth.config
import com.nimbusds.jose.jwk.JWKSet
import com.nimbusds.jose.jwk.RSAKey
import com.nimbusds.jose.jwk.source.ImmutableJWKSet
import com.nimbusds.jose.jwk.source.JWKSource
import com.nimbusds.jose.proc.SecurityContext
import org.springframework.context.annotation.Bean
import org.springframework.context.annotation.Configuration
import org.springframework.core.annotation.Order
import org.springframework.http.MediaType
import org.springframework.security.config.Customizer
import org.springframework.security.config.annotation.web.builders.HttpSecurity
import org.springframework.security.config.annotation.web.configuration.EnableWebSecurity
import org.springframework.security.core.userdetails.User
import org.springframework.security.core.userdetails.UserDetailsService
import org.springframework.security.crypto.bcrypt.BCryptPasswordEncoder
import org.springframework.security.crypto.password.PasswordEncoder
import org.springframework.security.oauth2.core.AuthorizationGrantType
import org.springframework.security.oauth2.core.ClientAuthenticationMethod
import org.springframework.security.oauth2.core.oidc.OidcScopes
import org.springframework.security.oauth2.jwt.JwtDecoder
import org.springframework.security.oauth2.server.authorization.client.InMemoryRegisteredClientRepository
import org.springframework.security.oauth2.server.authorization.client.RegisteredClient
import org.springframework.security.oauth2.server.authorization.client.RegisteredClientRepository
import org.springframework.security.oauth2.server.authorization.config.annotation.web.configuration.OAuth2AuthorizationServerConfiguration
import org.springframework.security.oauth2.server.authorization.config.annotation.web.configurers.OAuth2AuthorizationServerConfigurer
import org.springframework.security.oauth2.server.authorization.settings.AuthorizationServerSettings
import org.springframework.security.oauth2.server.authorization.settings.ClientSettings
import org.springframework.security.oauth2.server.authorization.settings.OAuth2TokenFormat
import org.springframework.security.oauth2.server.authorization.settings.TokenSettings
import org.springframework.security.provisioning.InMemoryUserDetailsManager
import org.springframework.security.web.SecurityFilterChain
import org.springframework.security.web.authentication.LoginUrlAuthenticationEntryPoint
import org.springframework.security.web.util.matcher.MediaTypeRequestMatcher
import java.security.KeyPair
import java.security.KeyPairGenerator
import java.security.interfaces.RSAPrivateKey
import java.security.interfaces.RSAPublicKey
import java.time.Duration
import java.util.*
@Configuration
@EnableWebSecurity
class SecurityConfig {
/**
* 调用拦截链1:拦截所有oauth2相关请求,交由oauth登录处理
*/
@Bean
@Order(1)
@Throws(java.lang.Exception::class)
fun authorizationServerSecurityFilterChain(http: HttpSecurity): SecurityFilterChain {
val authorizationServerConfigurer =
OAuth2AuthorizationServerConfigurer.authorizationServer()
http
.securityMatcher(authorizationServerConfigurer.endpointsMatcher)
.with(authorizationServerConfigurer, Customizer.withDefaults())
.authorizeHttpRequests { authorize ->
authorize.anyRequest().authenticated()
}
.exceptionHandling { exceptions ->
exceptions
.defaultAuthenticationEntryPointFor(
LoginUrlAuthenticationEntryPoint("/login"),
MediaTypeRequestMatcher(MediaType.TEXT_HTML)
)
}
http
.getConfigurer(OAuth2AuthorizationServerConfigurer::class.java)
.oidc(Customizer.withDefaults())
return http.build()
}
/**
* 调用拦截链2:其余非oauth2请求拦截到登录页
*/
@Bean
@Order(2)
@Throws(java.lang.Exception::class)
fun defaultSecurityFilterChain(http: HttpSecurity): SecurityFilterChain {
http
.authorizeHttpRequests { authorize ->
authorize.anyRequest().authenticated()
} // Form login handles the redirect to the login page from the
// authorization server filter chain
.formLogin(Customizer.withDefaults())
return http.build()
}
// 用于检索用户进行身份验证
@Bean
fun userDetailsService(): UserDetailsService {
// 方式1:直接在内存定义用户
val userDetails = User.withUsername("admin")
.password(passwordEncoder().encode("admin"))
.roles("admin")
.build()
return InMemoryUserDetailsManager(userDetails)
}
// 用于密码加密
@Bean
fun passwordEncoder(): PasswordEncoder {
return BCryptPasswordEncoder()
}
//用于管理客户端
@Bean
fun registeredClientRepository(): RegisteredClientRepository {
// 方式1:直接在内存内定义好clients
val tokenSettings = TokenSettings.builder()
.accessTokenTimeToLive(Duration.ofHours(1)) // 设置访问令牌有效期为1小时
.refreshTokenTimeToLive(Duration.ofDays(30)) // 设置刷新令牌有效期为30天
//.accessTokenFormat(OAuth2TokenFormat.REFERENCE) // 这个设置是开启不透明token
.accessTokenFormat(OAuth2TokenFormat.SELF_CONTAINED) // 使用透明token
.build()
val oidcClient = RegisteredClient.withId(UUID.randomUUID().toString())
.clientId("chick")
.clientSecret(passwordEncoder().encode("123456"))
.clientAuthenticationMethod(ClientAuthenticationMethod.CLIENT_SECRET_BASIC)
.clientAuthenticationMethod(ClientAuthenticationMethod.CLIENT_SECRET_POST)
.clientAuthenticationMethod(ClientAuthenticationMethod.CLIENT_SECRET_JWT)
.authorizationGrantType(AuthorizationGrantType.AUTHORIZATION_CODE)
.authorizationGrantType(AuthorizationGrantType.REFRESH_TOKEN)
.authorizationGrantType(AuthorizationGrantType.CLIENT_CREDENTIALS)
.redirectUri("https://www.baidu.com")
.postLogoutRedirectUri("http://127.0.0.1:8000/")
.scope(OidcScopes.OPENID)
.scope(OidcScopes.PROFILE)
.tokenSettings(tokenSettings)
.clientSettings(ClientSettings.builder().requireAuthorizationConsent(true).build())
.build()
return InMemoryRegisteredClientRepository(oidcClient)
}
// 用于签署访问令牌
@Bean
fun jwkSource(): JWKSource<SecurityContext> {
val keyPair = generateRsaKey()
val publicKey = keyPair.public as RSAPublicKey
val privateKey = keyPair.private as RSAPrivateKey
val rsaKey = RSAKey.Builder(publicKey)
.privateKey(privateKey)
.keyID(UUID.randomUUID().toString())
.build()
val jwkSet = JWKSet(rsaKey)
return ImmutableJWKSet(jwkSet)
}
// 用于解码签名访问令牌
@Bean
fun jwtDecoder(jwkSource: JWKSource<SecurityContext>): JwtDecoder {
return OAuth2AuthorizationServerConfiguration.jwtDecoder(jwkSource)
}
// 用于配置 Spring Authorization Server
@Bean
fun authorizationServerSettings(): AuthorizationServerSettings {
return AuthorizationServerSettings.builder().build()
}
/** Spring Authorization Server Bean */
@Bean
fun authorizationService(registeredClientRepository: RegisteredClientRepository): OAuth2AuthorizationService {
return InMemoryOAuth2AuthorizationService()
}
// 启动时生成的密钥,用于创建上面的JWKSource
private fun generateRsaKey(): KeyPair {
val keyPair: KeyPair
try {
val keyPairGenerator = KeyPairGenerator.getInstance("RSA")
keyPairGenerator.initialize(2048)
keyPair = keyPairGenerator.generateKeyPair()
} catch (ex: Exception) {
throw IllegalStateException(ex)
}
return keyPair
}
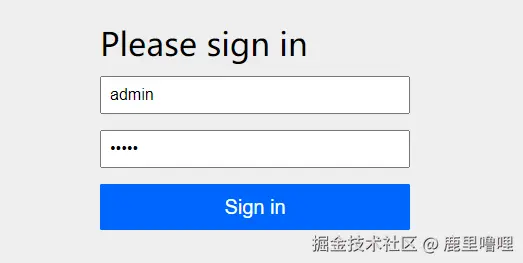
}然后启动服务,随便访问一个接口,会被拦截到login页:
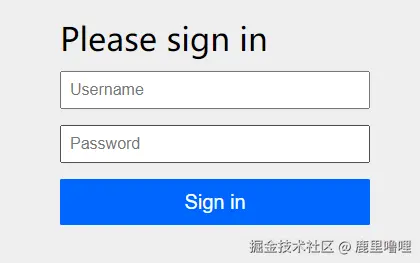
输入账号admin密码admin后点击登录,会出现一个continue标识,表示我们的登录成功了

接下来让我们走一遍授权码模式的流程:
现在假设我是一个客户端,我要请求认证中心:
bash
[GET] http://127.0.0.1:8080/oauth2/authorize?response_type=code&client_id=chick&redirect_uri=https://www.baidu.com&state=71b85679-4981-42b6-b18c-f1bb816b8f4e&scope=openid profile/oauth2/authorize是oauth2协议下标准的认证接口,然后这其中拼接了一些参数,他们的含义如下:
- response_type:授权的方式,这里是授权码(code)
- client_id: 客户端id,我们传入注册好的client
- redirect_uri:回调地址,同样传入我们注册好的client的回调地址
- state:状态值,一般使用随机生成字符串,如
java.util.UUID.randomUUID().toString() - scope:授权范围,和注册的客户端保持一致或者为其子集
我们把以上url复制到浏览器中执行,会被重定向到登录页:
输入账号密码登录后,会跳转到授权勾选页,这个有国外资源所以会很慢:
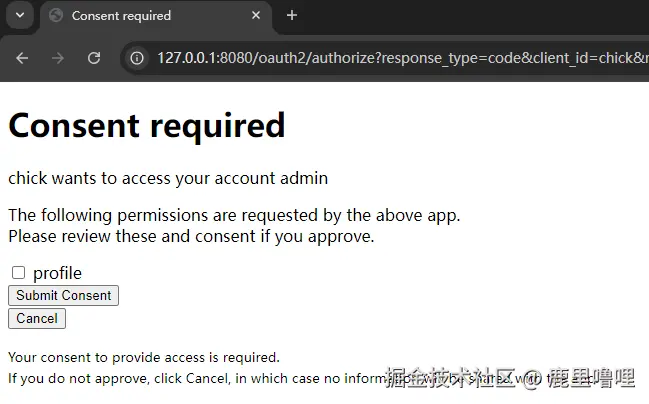
勾选profile点击submit后,浏览器会重定向到我们的目标地址baidu,并且携带了一个code:
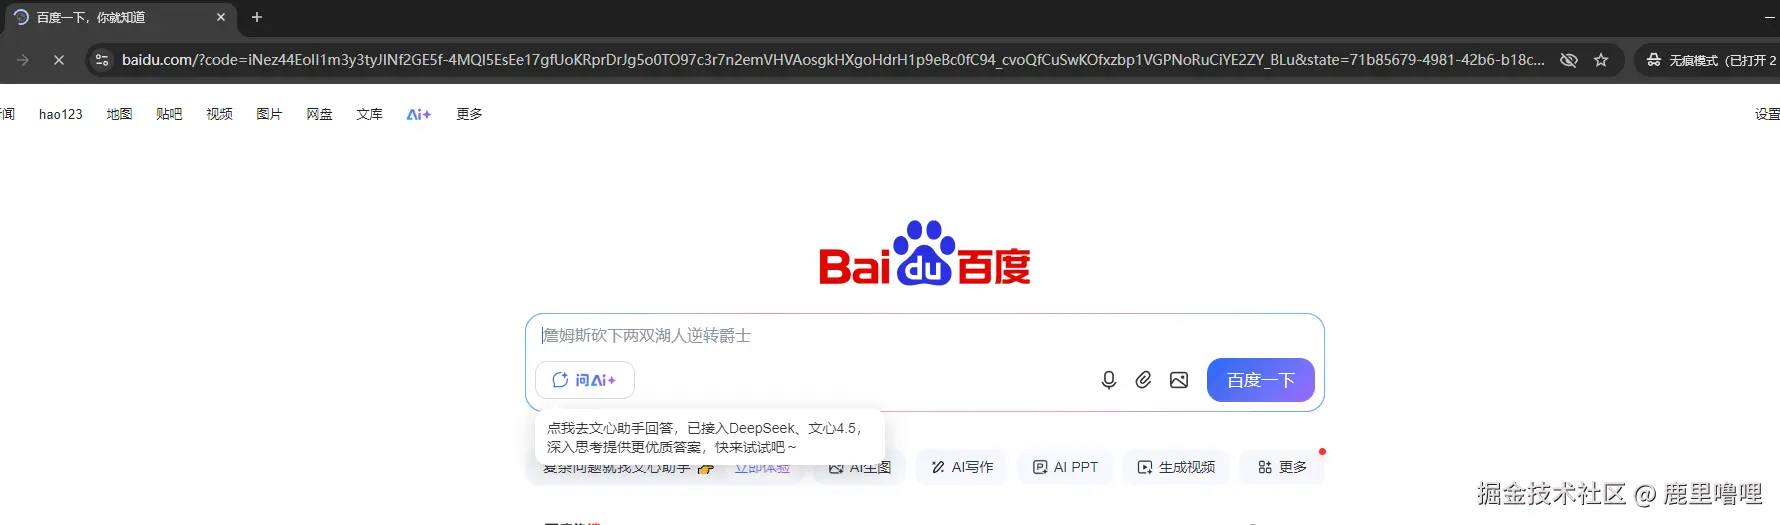
此外还有一个state,和之前传的参是一致的,代表这次操作的唯一性。
ini
https://www.baidu.com/?code=iNez44EoII1m3y3tyJINf2GE5f-4MQI5EsEe17gfUoKRprDrJg5o0TO97c3r7n2emVHVAosgkHXgoHdrH1p9eBc0fC94_cvoQfCuSwKOfxzbp1VGPNoRuCiYE2ZY_BLu&state=71b85679-4981-42b6-b18c-f1bb816b8f4e获取到授权码后,我们再使用授权码来获取access_token:
ini
[POST] http://127.0.0.1:8080/oauth2/token
Content-Type: application/x-www-form-urlencoded
grant_type=authorization_code&
code=iNez44EoII1m3y3tyJINf2GE5f-4MQI5EsEe17gfUoKRprDrJg5o0TO97c3r7n2emVHVAosgkHXgoHdrH1p9eBc0fC94_cvoQfCuSwKOfxzbp1VGPNoRuCiYE2ZY_BLu&
redirect_uri=https://www.baidu.com&
client_id=chick&
client_secret=123456
参数列表和前面已经重合度很高了,快速过一下:
- grant_type=authorization_code 代表以授权码模式来获取token
- code为通过登录后获取的授权码
- client_id,client_secret,redirect_uri严格填写客户端对应的信息
我们借助Postman工具来发送请求,注意传参格式为application/x-www-form-urlencoded ,注意不要耽误太长时间不然授权码会过期,这里我就又重新弄了个🤦♂️
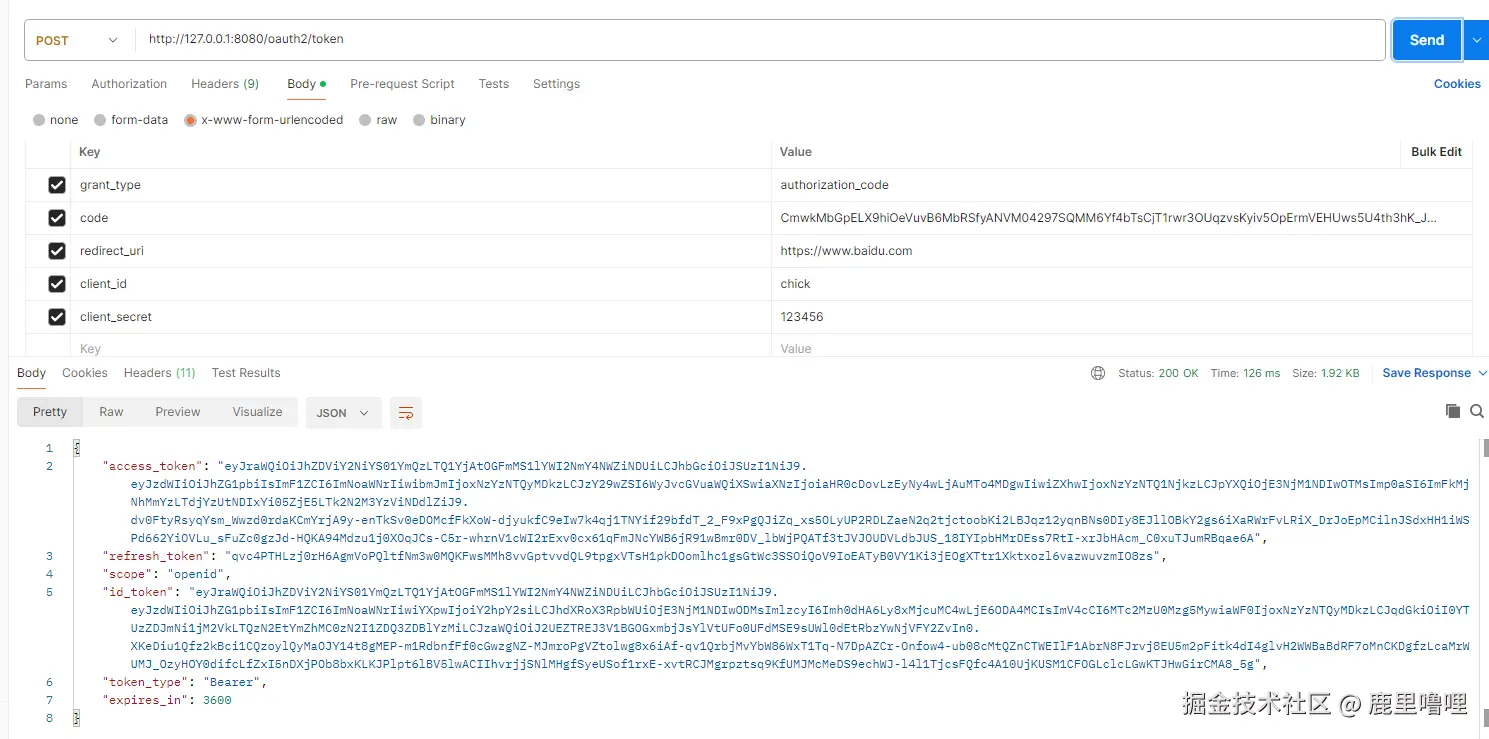
这个接口成功返回后,我们就获得了OAuth2体系中最核心的3个令牌:access_token,refresh_token,id_token,区分如下:
access_token:在应用中使用的正式tokenrefresh_token:顾名思义,用这个令牌可以刷新一个新的access_token出来,所以一般access_token时效较短,refresh_token时效较长id_token:用于辅助标识用户身份,在标准的oauth2登出接口中需要用到
拥有令牌后,就意味着已经正式通过了服务中心的认证,后面可以通过resource server的jwt认证方法去验证令牌,以此保证安全性。
这期就到这里,东西不多但是比较细,主要精讲了一下授权码认证的操作流程,打好基础在以后的环节才能游刃有余。消化一下下篇文章我们继续深入改造认证Server。这里也可以预告一下,当前我们的认证中心只是最初级的形态,只具备基本功能,后面我们还将:
- 使用自己数据库表的用户表作为用户源
- 使用自己数据库表的客户端表作为客户端源
- 自定义账号密码点击登录时的验证逻辑
- More
敬请期待!