目录
- 前言
- 一、弹窗显示
- 二、'预览'解决办法
- 三、禁止另存为
- [四、重构成 子组件 Preview.vue](#四、重构成 子组件 Preview.vue)
- 五、修改iframe内元素样式
- 六、最终敲定
-
- [1、Preview.vue 控件 完整代码](#1、Preview.vue 控件 完整代码)
- [2、重构 ss-preview](#2、重构 ss-preview)
- [3、Preview.vue 控件调用](#3、Preview.vue 控件调用)
前言
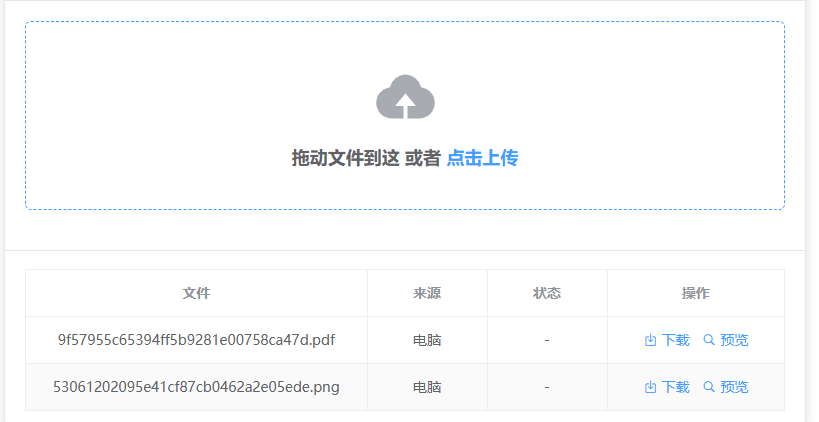
uniapp写一个文件传输小工具,文件上传后需要审核才可下载,但不能影响预览。
功能很简单,但实际落地还是状况百出,记录一下
一、弹窗显示
因为每个文件,后缀不一,路径不一
塞一个webview到popup里 是第一反应。
重写了一个uni-popup-dialog试了下。
但遇到以下情况:
1、webview 会被 popup遮挡,修改z-index 可改善
2、webview 跟popup的打开、关闭,有先后的感觉,延迟响应影响体验
javascript
<template>
  <view>
    <button @click="openPopup">打开 Popup</button>
    <uni-popup ref="popupRef" type="bottom">
      <web-view :src="webviewSrc"></web-view>
    </uni-popup>
  </view>
</template>

<script>
export default {
  data() {
    return {
      webviewSrc: 'https://www.example.com', // 替换为实际的网页地址
    };
  },
  methods: {
    openPopup() {
      this.$refs.popupRef.open();
    },
  },
};
</script>
二、'预览'解决办法
因为webview有延迟,我干脆直接使用iframe自己写弹窗算了
javascript
<template>
   <view v-if="showPopup" class="popup">
 			<view class="popup-content" >
				<!-- 内容 -->
 				<iframe :src="zsrc" class="pipup-win"  ></iframe>
 				<button @click="showPopup = false">关闭</button>
 			</view>
 	</view>
</template>
 	 <script>
 	export default {
 		data() {
 			return {
 				zsrc: '',
 				showPopup:false
 			}
 		},
 		methods: {
	 	 	preview(src) {
	 				this.zsrc =  src;
	 				this.showPopup=true;
	 			},
 		}
 	}
  </script>
   <style scoped lang="scss">
   //自制弹窗
	.popup {
	  position: fixed;
	  top: 30px;
	  left: 30%;
	  width: 600px;
	  height: 700px;
	  background-color: rgba(0, 0, 0, 0.5);
	  display: flex;
	  justify-content: center;
	  align-items: center;
	  z-index: 998;
	}


	.popup-content {
	  background-color: white;
	  width: 90%;
	  height: 90%;
	  padding: 10px;
	}
	.pipup-win{
		width: 95%;
		height: 89%;
		border: solid 1px white!important;
		padding-bottom: 3%;

	}
	.popup button{
		border: solid 1px black;
		width: 95%;
		background-color: white;
	}

</style> 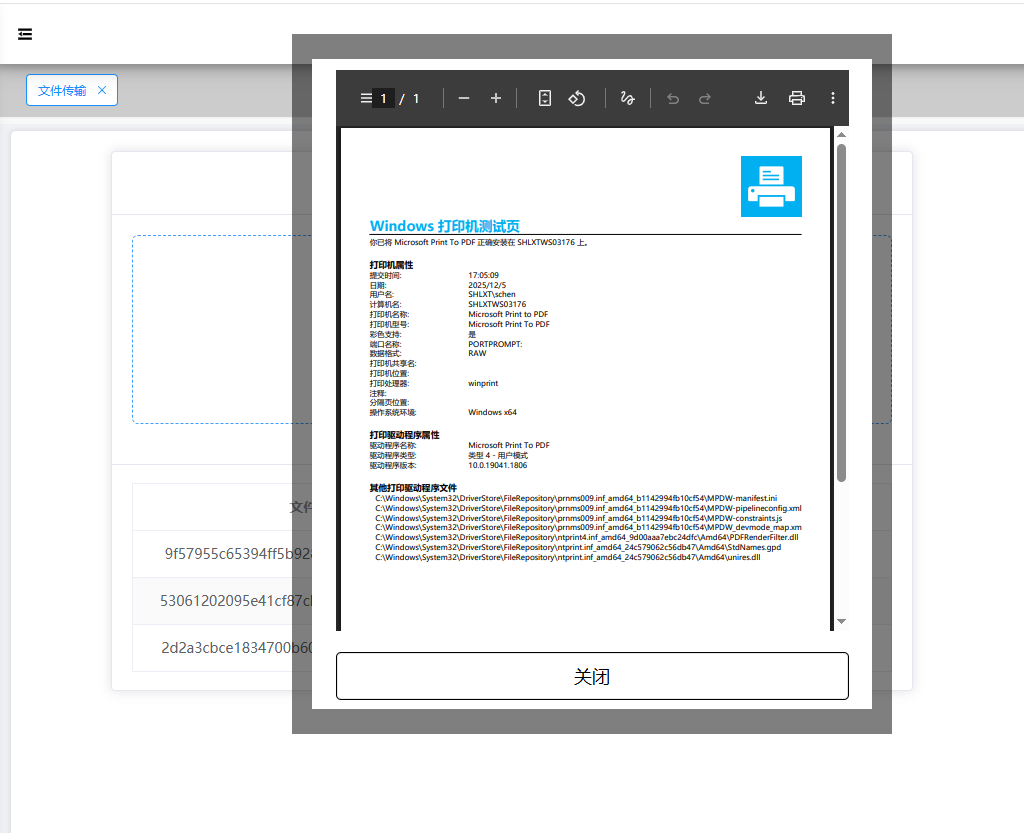
三、禁止另存为
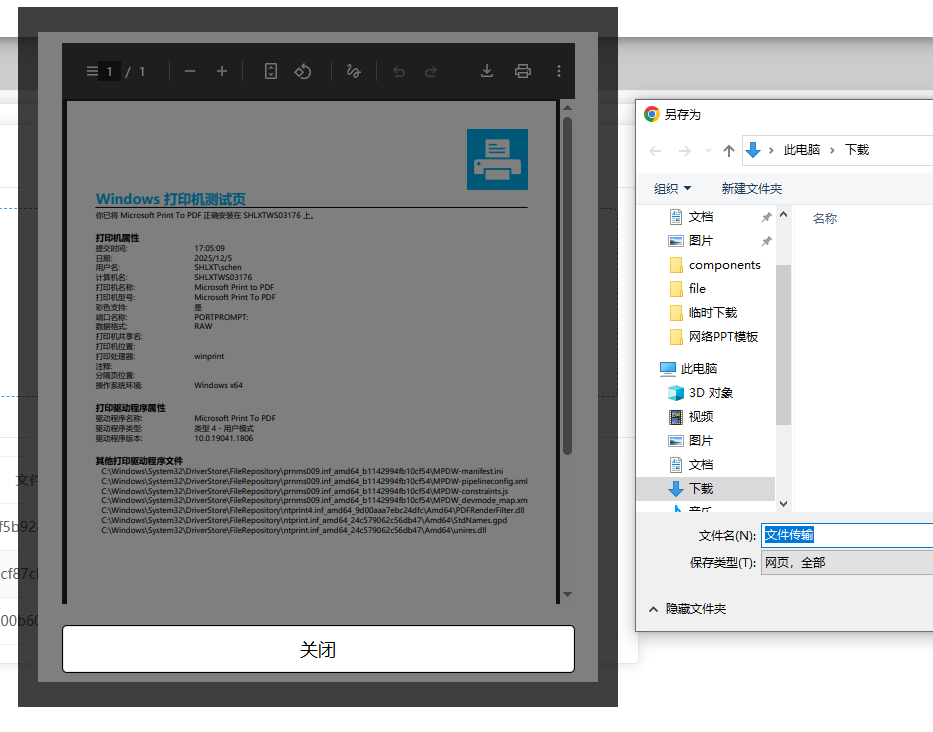
然后我又发现了一个问题:在右键另存为,可以保存?
那我审核的功能不是脱裤子放屁?
这不行。得禁!
分别尝试了在iframe里添加
1、 @contextmenu.stop.prevent="handleRightClick"
2、 style ="pointer-events:none;"
3、 oncontextmenu ="return false"
上面三个办法都不好用
而且我觉得pdf的头也应该禁用。
思索再三,灵光一闪,加遮挡层把iframe 盖住。
哈,人才。
	<view v-if="showPopup" class="popup">
		<view class="popup-content" >
			<!-- 内容 -->
			<iframe :src="zsrc" class="pipup-win"  ></iframe>
			<!-- 遮挡层 防右键保存 -->
			<view class="overlay"></view>
			<button @click="showPopup = false">关闭</button>
		</view>
	</view>

	// 遮挡层样式
	.overlay {
	  position: absolute;
	  top: 0;
	  left: 0;
	  width: 100%;
	  height: 100%;
	  //background-color: rgba(0, 0, 0, 0.5); /* 半透明黑色 */
	}
完美,缺点就是滚动条也无法使用了,不过预览嘛,差不多得了。
四、重构成 子组件 Preview.vue
typescript
<template>
	<view class="popup">
		<view class="popup-content">
			<!-- PDF、txt、img内容主体 -->
			<iframe v-if="office==1" :src="zsrc" class="pipup-win"></iframe>
			<!-- word内容主体 -->
			<div v-if="office==2" v-html="vHtml" class="pipup-win"></div>
			<!-- excel内容主体 -->
			<view class="pipup-win" v-if="office==3">
				<!-- 表内容 -->
				<uni-table border stripe :emptyText="$t('common.empty')" class="utable">
					<uni-tr>
						<!-- 表格头列 -->
						<uni-th v-for="(cell, cellIndex) in headers" :key="cellIndex">{{ cell }}</uni-th>
					</uni-tr>
					<uni-tr v-for="(item ,index) in exlsdata" :key="index">
						<!-- 表格数据列 -->
						<uni-td v-for="(cell, cellIndex) in headers" :key="cellIndex">{{ item[cell] }}</uni-td>
					</uni-tr>
				</uni-table>
			</view>
			<!-- 遮挡层 防内容被右键保存 -->
			<view class="overlay"></view>
			<button @click="close">关闭</button>
		</view>
	</view>
</template>

<script>
	import mammoth from "mammoth"; //项目根目录 npm install mammoth
	import * as XLSX from 'xlsx'; //项目根目录  npm install xlsx
	export default {
		emits: ['close'],
		props: {
			zsrc: {
				type: String,
				default: ''
			}
		},
		data() {
			return {
				showPopup: true,
				office: 1,
				vHtml: "",
				exlsdata: [],
				headers: []
			}
		},
		mounted() {
			this.init();
		},
		methods: {
			init() {
				// 文档方案
				if (this.zsrc.indexOf(".doc") > -1) {
					this.office = 2
					this.readWordFromRemoteFile(this.zsrc)
				}
				// excel方案
				if (this.zsrc.indexOf(".xls") > -1) {
					this.office = 3
					this.readExcelFromRemoteFile(this.zsrc)
				}
			},
			//预览word
			readWordFromRemoteFile(url) {
				var vm = this;
				var xhr = new XMLHttpRequest();
				xhr.open("get", url, true);
				xhr.responseType = "arraybuffer";
				xhr.onload = function() {
					if (xhr.status == 200) {
						mammoth.convertToHtml({
								arrayBuffer: new Uint8Array(xhr.response)
							})
							.then(function(resultObject) {
								vm.$nextTick(() => {
									vm.vHtml = resultObject.value;
								});
							});
					}
				};
				xhr.send();
			},
			//预览excel
			readExcelFromRemoteFile(url) {
				fetch(url)
					.then(response => response.arrayBuffer())
					.then(data => {
						const workbook = XLSX.read(new Uint8Array(data), {
							type: 'array'
						});
						const firstSheetName = workbook.SheetNames[0];
						const worksheet = workbook.Sheets[firstSheetName];
						this.exlsdata = XLSX.utils.sheet_to_json(worksheet);
						console.log(this.exlsdata)
						//取头
						const allHeaders = new Set();
						this.exlsdata.forEach(row => {
							Object.keys(row).forEach(key => {
								allHeaders.add(key);
							});
						});
						this.headers = Array.from(allHeaders);
					});
			},
			close() {
				this.$emit('close')
			},
		}
	}
</script>
这里调用了两个第三方
mammoth解决Word显示问题
xlsx 解决excel显示问题
需要cmd命名提示符  cd到项目路径
分别可以 npm install mammoth、npm install xlsx 下载一下。
当然 微软、谷歌也有远程office预览服务器提供 ,直接判断文档类型、更改路径更简单:
this.Url = `https://view.officeapps.live.com/op/view.aspx?src${encodeURIComponent(remoteFile)}`;
this.Url = `https://docs.google.com/gview?url=${encodeURIComponent(remoteFile)}&embedded=true`;
this.Url = `https://preview.qingflow.com?file=${encodeURIComponent(remoteFile)}`;
因为我是内网使用,确实用不上
五、修改iframe内元素样式
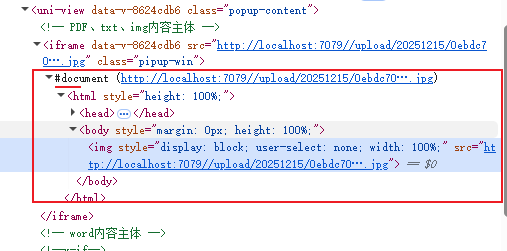

iframe内的元素是自动生成的,样式很难修改。但是又不得不解决图片预览的问题
引入element-resize-detector 创建监听:npm install element-resize-detector
csharp
<template>
	<view class="popup">
		<view class="popup-content">
			<!-- PDF、txt、img内容主体 -->
			<iframe v-if="office==1" :src="zsrc" class="pipup-win" ref="myIframe"></iframe>
		</view>
	</view>
</template>

<script>
	import elementResizeDetectorMaker from 'element-resize-detector'; //项目根目录  npm install element-resize-detector  修改元素宽度
	export default {
		emits: ['close'],
		props: {
			zsrc: {
				type: String,
				default: ''
			}
		},
		data() {
			return {
				showPopup: true,
				office: 1,
				erd: null
			}
		},
		mounted() {
			//二、修改iframe内元素宽度
			if (this.office == 1) {
				// 获取 iframe 元素引用
				const iframe = this.$refs.myIframe;
				// 创建 elementResizeDetector 实例
				this.erd = elementResizeDetectorMaker();
				// 监听 iframe 的尺寸变化
				iframe.addEventListener('load', () => {
					// 获取 iframe 的内容窗口
					const iframeWindow = iframe.contentWindow;
					console.log(iframe.contentWindow)
					console.log(iframe.contentWindow.location)
					if (iframeWindow) {
						console.log(iframeWindow)
						// 获取 iframe 中的所有 img 元素
						const images = iframeWindow.document.querySelectorAll('img');
						//远程图片 跨域不可访问document 会报错:SecurityError:阻止来源为 'http://localhost:5173' 的框架访问跨来源框架

						images.forEach(img => {
							img.style.width = '100%'; // 可根据需求修改宽度
						});
					}
				});
			}
		},
		//targetElement.style.width = '500px';
		beforeDestroy() {
			// 卸载检测器
			if (this.erd) {
				this.erd.uninstall(this.$refs.myIframe.contentDocument);
			}
		}
	}
</script>
但是这里有一个很严重的问题:
this.$refs.myIframe.contentWindow.document.querySelectorAll('img')中的document 读取 需解决跨域问题,就是说,如果是远程资源
测试时谷歌后缀需要加--disable-web-security --user-data-dir=C:\DevUserData
发布时IIS 的图片地址也要重写
以解决跨域问题。
这时我不禁思考,如果资源来源广泛,也许写一个iframe的子组件或 img,更方便一些。
六、最终敲定
把复制的事情简单化,既然iframe难搞,就直接用img
因为pdf 在手机实测,预览前会询问是否下载。所以我直接使用 ss-preview
1、Preview.vue 控件 完整代码
csharp
<template>
	<view class="popup">
		<view class="popup-content">
			<!-- txt内容主体 -->
			<iframe v-if="office==1" :src="zsrc" class="pipup-win" style="user-select: none;"></iframe>
			<!-- img内容主体 -->
			<view v-if="office==2" class="pipup-win">
				<img style="display: block; pointer-events: none;user-select: none;width: 100%;" :src="zsrc" />
			</view>
			<!-- pdf内容主体 -->
			<view v-if="office==3" class="pipup-win">
				<ss-preview :fileUrl="zsrc" ></ss-preview>
			</view>
			<!-- word内容主体 -->
			<view v-if="office==4" v-html="vHtml" class="pipup-win"></view>
			<!-- excel内容主体 -->
			<view class="pipup-win" v-if="office==5">
				<!-- 表内容 -->
				<view class="utable">
					<uni-table border stripe :emptyText="$t('common.empty')">
						<uni-tr>
							<!-- 表格数据列 -->
							<uni-th v-for="(cell, cellIndex) in headers" :key="cellIndex">{{ cell }}</uni-th>
						</uni-tr>
						<uni-tr v-for="(item ,index) in exlsdata" :key="index">
							<!-- 表格数据列 -->
							<uni-td v-for="(cell, cellIndex) in headers" :key="cellIndex">{{ item[cell] }}</uni-td>
						</uni-tr>
					</uni-table>
				</view>
			</view>
			<!-- 遮挡层 防内容被右键保存 -->
			<view class="overlay" v-if="!cando"></view>
			<button @click="close">关闭</button>
		</view>
	</view>
</template>

<script>
	import mammoth from "mammoth"; //项目根目录 npm install mammoth  预览word
	import * as XLSX from 'xlsx'; //项目根目录  npm install xlsx  预览excel
	export default {
		emits: ['close'],
		props: {
			zsrc: {
				type: String,
				default: ''
			},
			// 是否启用遮挡层, 用户查看false  管理审核 true
			cando: {
				type: Boolean,
				default: false
			},
		},
		data() {
			return {
				showPopup: true,
				office: 1,
				vHtml: "",
				exlsdata: [],
				headers: [],
			}
		},
		mounted() {
			//判断打开方式
			this.init();
		},

		methods: {
			init() {
				// img方案
				if (this.zsrc.indexOf(".png") > -1 || this.zsrc.indexOf(".jpg") > -1) {
					this.office = 2
				}
				// pdf方案
				if (this.zsrc.indexOf(".pdf") > -1) {
					this.office = 3
				}
				// 文档方案
				if (this.zsrc.indexOf(".doc") > -1) {
					this.office = 4
					this.readWordFromRemoteFile(this.zsrc)
				}
				// excel方案
				if (this.zsrc.indexOf(".xls") > -1) {
					this.office = 5
					this.readExcelFromRemoteFile(this.zsrc)
				}
			},

			//预览word
			readWordFromRemoteFile(url) {
				var vm = this;
				var xhr = new XMLHttpRequest();
				xhr.open("get", url, true);
				xhr.responseType = "arraybuffer";
				xhr.onload = function() {
					if (xhr.status == 200) {
						mammoth.convertToHtml({
								arrayBuffer: new Uint8Array(xhr.response)
							})
							.then(function(resultObject) {
								vm.$nextTick(() => {
									vm.vHtml = resultObject.value;
								});
							});
					}
				};
				xhr.send();
			},
			//预览excel
			readExcelFromRemoteFile(url) {
				fetch(url)
					.then(response => response.arrayBuffer())
					.then(data => {
						const workbook = XLSX.read(new Uint8Array(data), {
							type: 'array'
						});
						const firstSheetName = workbook.SheetNames[0];
						const worksheet = workbook.Sheets[firstSheetName];
						this.exlsdata = XLSX.utils.sheet_to_json(worksheet);
						console.log(this.exlsdata)
						//取头
						const allHeaders = new Set();
						this.exlsdata.forEach(row => {
							Object.keys(row).forEach(key => {
								allHeaders.add(key);
							});
						});
						this.headers = Array.from(allHeaders);
					});

			},
			close() {
				this.$emit('close')
			},
		}
	}
</script>

<style scoped lang="scss">
	/* 当屏幕宽度小于或等于 600px 时应用以下样式 */
	@media screen and (max-width: 600px) {
		.popup {
			position: fixed;
			top: 30px;
			left: 10%;
			width: 300px;
			height: 500px;
			background-color: rgba(0, 0, 0, 0.5);
			display: flex;
			justify-content: center;
			align-items: center;
			z-index: 1;
		}
	}

	/* 当屏幕宽度大于 600px 时应用以下样式 */
	@media screen and (min-width: 601px) {
		.popup {
			position: fixed;
			top: 30px;
			left: 30%;
			width: 500px;
			height: 700px;
			background-color: rgba(0, 0, 0, 0.5);
			display: flex;
			justify-content: center;
			align-items: center;
			z-index: 1;
		}
	}

	.popup-content {
		background-color: white;
		width: 90%;
		height: 90%;
		padding: 10px;

	}

	.pipup-win {
		background-repeat: repeat;
		width: 100%;
		max-width: 100%;
		height: 85%;
		max-height: 85%;
		border: solid 1px white !important;
		padding-bottom: 3%;
		overflow: auto;
		z-index: 1;
		margin-bottom: 10px;
	}

	.uni-table-scroll {
		overflow-x: inherit !important;
	}

	// 遮挡层
	.overlay {
		position: absolute;
		top: 0;
		left: 0;
		width: 100%;
		height: 85%;
		z-index: 2;
		//background-color: rgba(0, 0, 0, 0.5); /* 半透明黑色 */
		/* 可以添加其他样式,如透明度、颜色等 */
	}

	.popup button {
		border: solid 1px black;
		width: 95%;
		background-color: white;

	}

	.uni-table-th {
		white-space: nowrap;
		max-width: 80px;
		max-height: 25px;
		overflow: hidden;
	}

	.uni-table-td {
		white-space: nowrap;
		max-width: 80px;
		max-height: 25px;
		overflow: hidden;
	}
</style>
2、重构 ss-preview
这里得重构一下,
1、内置webview 显示PDF 有延迟,感觉怪异,改成iframe
2、隐藏PDFJS自带的工具栏
3、修改view.css 去掉多余的边框
4、给到z-index:1 ,保证显示在弹窗之上。
重写ss-preview.vue:
javascript
<template>
	<view class="page">
		<!-- 预览文件 -->
		<iframe :webview-styles="webviewStyles" :src="src"  class="myiframe"></iframe>
	</view>
</template>

<script>
	export default {
		name: 'ss-preview',
		props: {
			fileUrl: {
				type: String,
				default: ''
			},

		},
		data() {
			return {
				webviewStyles: {
					progress: {
						color: '#FF3333'
					}
				},
				src: '',
			};
		},
		methods: {
			previewPdf(value) {
				this.src = `/uni_modules/ss-preview/hybrid/html/pdf-reader/index.html?file=${encodeURIComponent(value)}`;
			},
		},
		watch: {
			fileType: {
				deep: true,
				immediate: true,
				handler: function(value) {
					this.previewPdf(this.fileUrl)
				}
			}
		}
	};
</script>

<style lang="scss" scoped>
	.page {
		height: 100%;

		.video-detail-page {
			width: 100%;

			uni-video {
				width: 100%;
			}

			video {
				width: 100%;
			}
		}

	}
	.myiframe{
		z-index:1;
		width: 100%;
		height:100%;
	}
</style>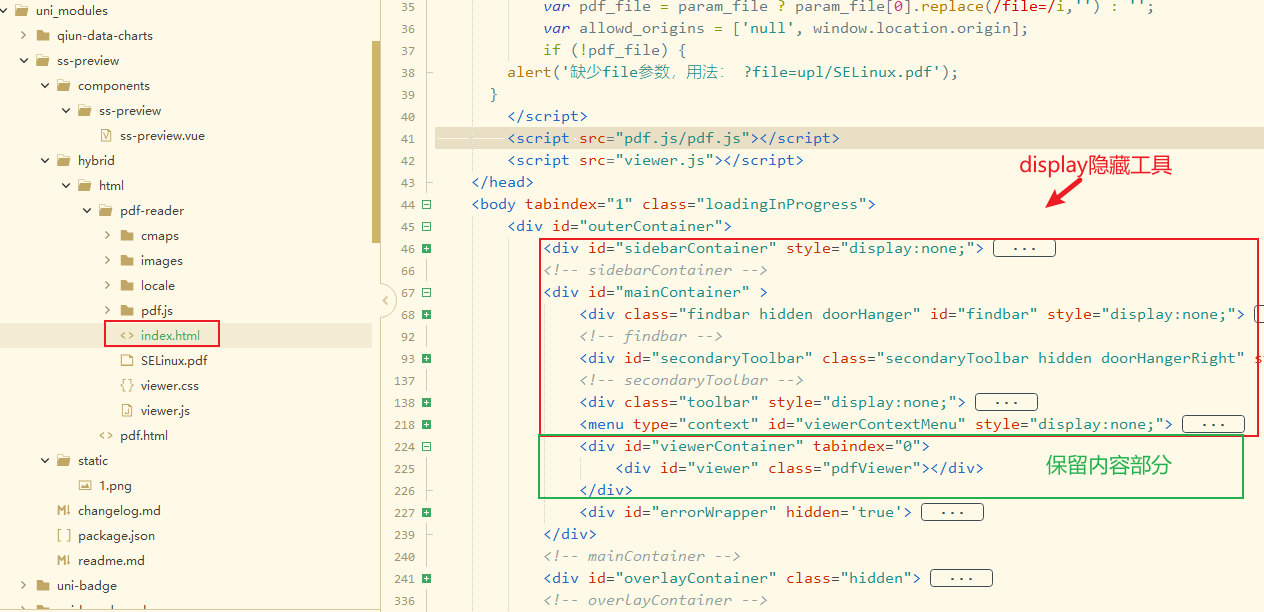
PDFJS顶上的工具栏不见了。完美。
3、Preview.vue 控件调用
typescript
<template>
  <view>
        <button  @click="preview(src)"/>
        <!-- 自定义Popup文件预览 组件调用 -->
        <Preview v-if="showPopup"  cando='false' :zsrc="zsrc" @close="closePopup"/>
	</view>
</template>
<script>
	import Preview from '@/Pages/Preview.vue';
	export default {
		components: {
			Preview
		},
		data() {
			return {
				showPopup: false,
				zsrc:""
			}
		},
		methods: {
		//预览
			preview(src) {
				this.zsrc = this.$mConfig.baseUrl + src;//文件路径
				this.showPopup = true;
			},
		}
	}