第一步:准备数据库以及数据
- 略过安装数据库操作以及创建数据库操作
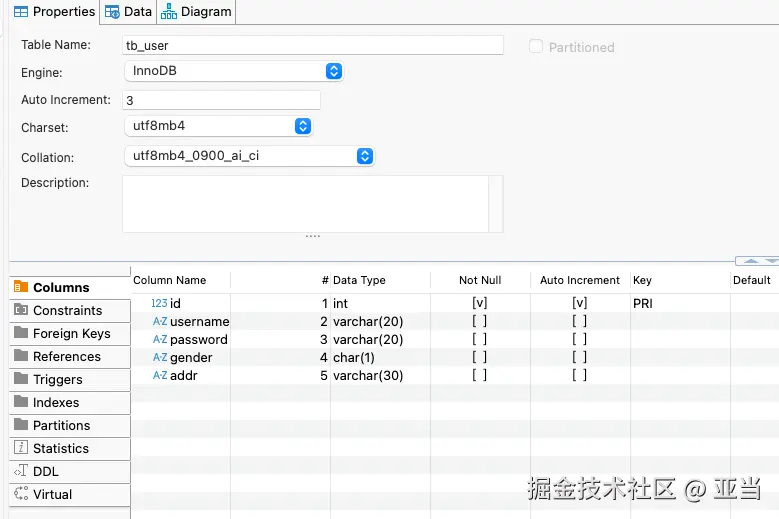
- 创建tb_user表
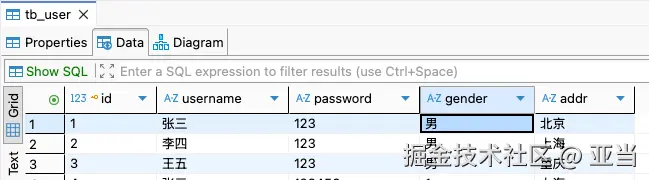
- 初始化数据
第二步:准备Maven工程
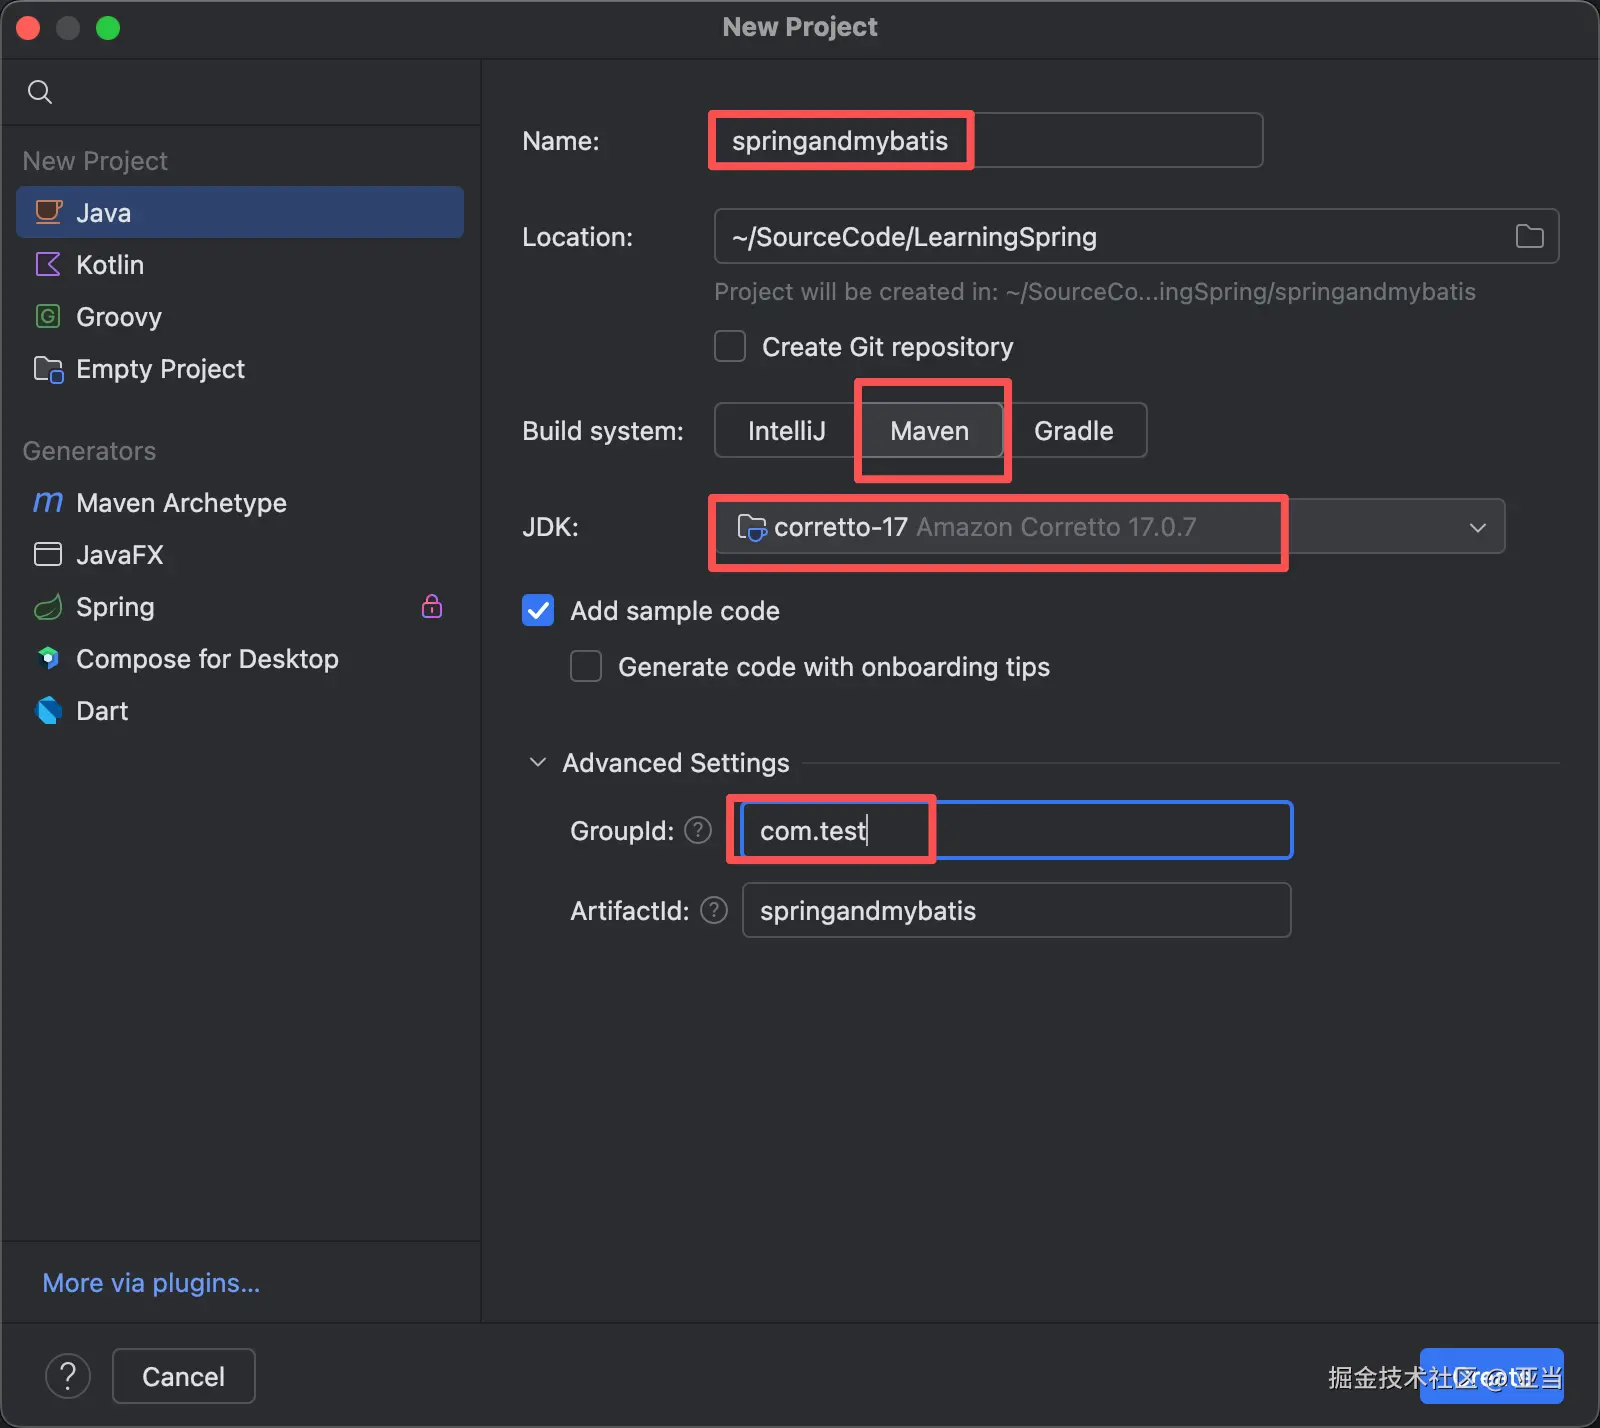
1、使用idea创建一个maven工程
工程名:我使用的是springandmybatis
选择maven
选择JDK17或者以上的版本
groupid:也就是包名,我写的是com.test
2、添加依赖,在pom.xml文件中添加依赖(注意几个添加注释的地方),添加后记得同步
xml
<?xml version="1.0" encoding="UTF-8"?>
<project xmlns="http://maven.apache.org/POM/4.0.0"
         xmlns:xsi="http://www.w3.org/2001/XMLSchema-instance"
         xsi:schemaLocation="http://maven.apache.org/POM/4.0.0 http://maven.apache.org/xsd/maven-4.0.0.xsd">
    <modelVersion>4.0.0</modelVersion>

    <!--  1、添加SpringBoot parent  -->
    <parent>
        <groupId>org.springframework.boot</groupId>
        <artifactId>spring-boot-starter-parent</artifactId>
        <version>3.5.4</version>
    </parent>

    <groupId>com.test</groupId>
    <artifactId>springandmybatis</artifactId>
    <version>1.0-SNAPSHOT</version>

    <properties>
        <maven.compiler.source>17</maven.compiler.source>
        <maven.compiler.target>17</maven.compiler.target>
        <project.build.sourceEncoding>UTF-8</project.build.sourceEncoding>
    </properties>

    <dependencies>

        <!-- 2、添加SpringBoot Web Starter -->
        <dependency>
            <groupId>org.springframework.boot</groupId>
            <artifactId>spring-boot-starter-web</artifactId>
        </dependency>

        <!-- 3、添加Mybatis Starter -->
        <dependency>
            <groupId>org.mybatis.spring.boot</groupId>
            <artifactId>mybatis-spring-boot-starter</artifactId>
            <version>3.0.4</version>
        </dependency>

        <!-- 3、添加MySql -->
        <dependency>
            <groupId>mysql</groupId>
            <artifactId>mysql-connector-java</artifactId>
            <version>8.0.33</version>
        </dependency>
    </dependencies>

</project>
3.添加配置文件(在resources目录下,添加application.yaml文件)
yaml
spring:
  datasource:
    url: jdbc:mysql://localhost:3306/mybatis?serverTimezone=UTC&useSSL=false&autoReconnect=true
    username: root
    password: root
    driver-class-name: com.mysql.cj.jdbc.Driver

# 这种方式比较简单
mybatis:
  mapper-locations: classpath:mapper/*.xml
第三步:编写代码
- 编写UserModel类,其作用是对应数据库表
tb_user
java
package com.test.model;

public class UserModel {
    private Integer id;
    private String username;
    private String password;
    private String gender;
    private String addr;

    public Integer getId() {
        return id;
    }

    public void setId(Integer id) {
        this.id = id;
    }

    public String getUsername() {
        return username;
    }

    public void setUsername(String username) {
        this.username = username;
    }

    public String getPassword() {
        return password;
    }

    public void setPassword(String password) {
        this.password = password;
    }

    public String getGender() {
        return gender;
    }

    public void setGender(String gender) {
        this.gender = gender;
    }

    public String getAddr() {
        return addr;
    }

    public void setAddr(String addr) {
        this.addr = addr;
    }
}- 编写UserMapper接口(注意:在类上面添加了
@Repository注解)
java
package com.test.mapper;

import com.test.model.UserModel;
import org.springframework.stereotype.Repository;

import java.util.List;


@Repository
public interface UserMapper {
    /**
     * 查询所有用户
     * @return
     */
    List<UserModel> selectAll();

    /**
     * 插入用户
     * @param userModel
     * @return
     */
    Integer insertUser(UserModel userModel);
}- 编写userMapper.xml 在resources目录中创建mapper目录,用来专门存放mapper的xml文件,这里暂时先创建userMapper.xml
xml
<?xml version="1.0" encoding="UTF-8" ?>
<!DOCTYPE mapper
        PUBLIC "-//mybatis.org//DTD Mapper 3.0//EN"
        "http://mybatis.org/dtd/mybatis-3-mapper.dtd">

<mapper namespace="com.test.mapper.UserMapper">

    <!-- 插入User -->
    <insert id="insertUser" parameterType="com.test.model.UserModel">
        INSERT INTO tb_user(username, password, gender, addr) VALUES(#{username}, #{password}, #{gender}, #{addr})
    </insert>

    <!-- 查询所有User -->
    <select id="selectAll" resultType="com.test.model.UserModel">
        SELECT * FROM tb_user
    </select>
</mapper>- 编写UserService类(注意:在类上面添加了
@Service注解)
java
package com.test.service;

import com.test.mapper.UserMapper;
import com.test.model.UserModel;
import org.springframework.beans.factory.annotation.Autowired;
import org.springframework.stereotype.Service;
import org.springframework.transaction.annotation.Transactional;

import java.util.List;

@Service
public class UserService {

    private final UserMapper userMapper;

    @Autowired // 构造器注入推荐
    public UserService(UserMapper userMapper) {
        this.userMapper = userMapper;
    }

    public List<UserModel> selectAll() {
        return userMapper.selectAll();
    }

    public int insertUser(UserModel user) {
        return userMapper.insertUser(user);
    }
}- 编写UserController类(注意:在类上面添加了
@RestController注解)
ini
package com.test.controller;

import com.test.model.UserModel;
import com.test.service.UserService;
import org.springframework.beans.factory.annotation.Autowired;
import org.springframework.web.bind.annotation.GetMapping;
import org.springframework.web.bind.annotation.RequestMapping;
import org.springframework.web.bind.annotation.ResponseBody;
import org.springframework.web.bind.annotation.RestController;

@RestController
@RequestMapping("/user")
public class UserController {

    @Autowired
    private UserService userService;


    @GetMapping(path="/all")
    public @ResponseBody Iterable<UserModel> getAllUsers() {
        return userService.selectAll();
    }

    @GetMapping(path="/add")
    public @ResponseBody Iterable<UserModel> addUser() {
        String username = "张三";
        String password = "123456";
        String gender="1";
        String addr = "上海";
        UserModel userModel = new UserModel();
        userModel.setUsername(username);
        userModel.setPassword(password);
        userModel.setGender(gender);
        userModel.setAddr(addr);
        userService.insertUser(userModel);
        return userService.selectAll();
    }
}- 编写程序入口类(注意:在类名上添加了
@SpringBootApplication和@MapperScan("com.test.mapper")两个注解)
java
package com.test;

import org.mybatis.spring.annotation.MapperScan;
import org.springframework.boot.SpringApplication;
import org.springframework.boot.autoconfigure.SpringBootApplication;

@SpringBootApplication
@MapperScan("com.test.mapper")
public class Main {
    public static void main(String[] args) {
        SpringApplication.run(Main.class, args);
    }
}
第四步:测试
运行入口类,如果没有错误,就可以使用浏览器请求UserController中定义的两个接口
- 查询所有
 2. 插入数据