前言
几个月前从0到1搭建落地了现在Next框架的项目,做了很多项目处理,现在想整理一下整个过程,这一次主要是对Next项目中静态资源(图片、打包的静态css、js)的压缩、优化,做个记录
实现了什么
- 存放在public(图片)在commit的时候,会通过tinify进行压缩之后再提交
- 压缩后的public(静态资源),会在jenkins打包的过程统一上传至CF的桶中形成CDN链接url
- url通过配置next.config自定义loaderFile映射到Image组件src
过程
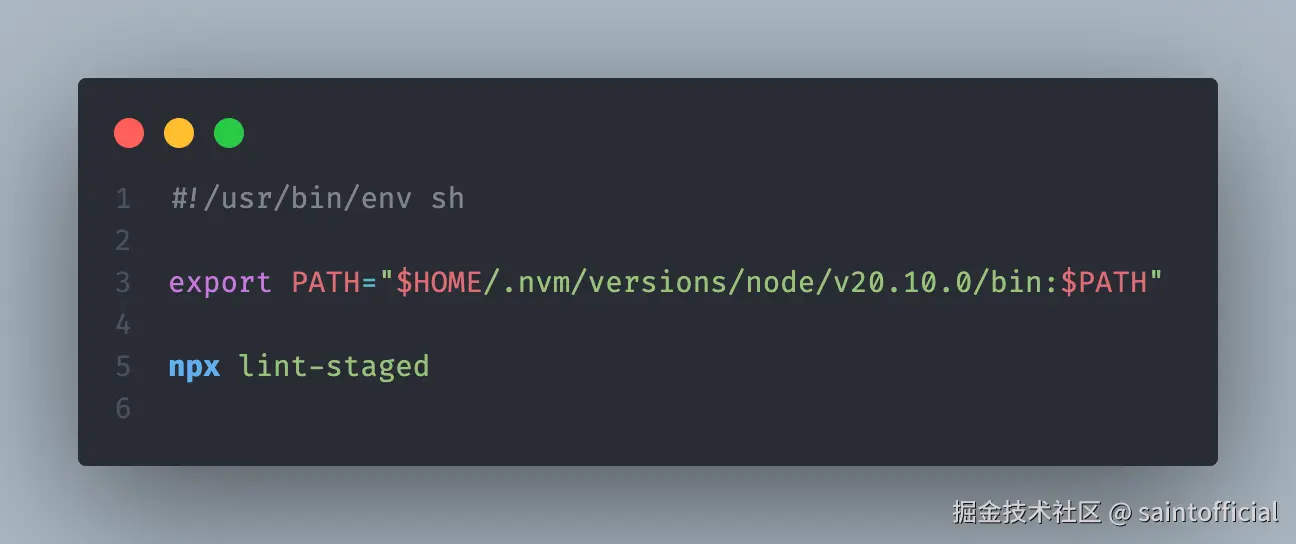
commit进行tinify压缩(实现1)
npm包:husky、lint-staged、tinify
- 触发点:.husky/pre-commit 调用 npx lint-staged,所以每次 git commit 都会跑 lint-staged。
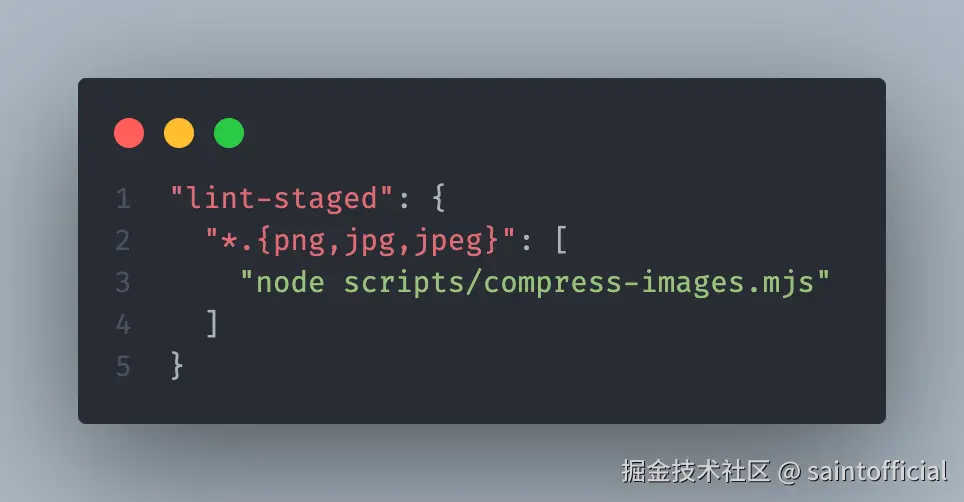
- 匹配规则:package.json 里的 lint-staged 配置,当前匹配 *.png, *.jpg, *.jpeg
- 压缩逻辑:使用 TinyPNG(tinify),读取 .env 的 TINIFY_KEY,对传入的文件(由 lint-staged 提供的已暂存文件列表)逐个压缩并覆盖原文件。
直接覆盖原文件 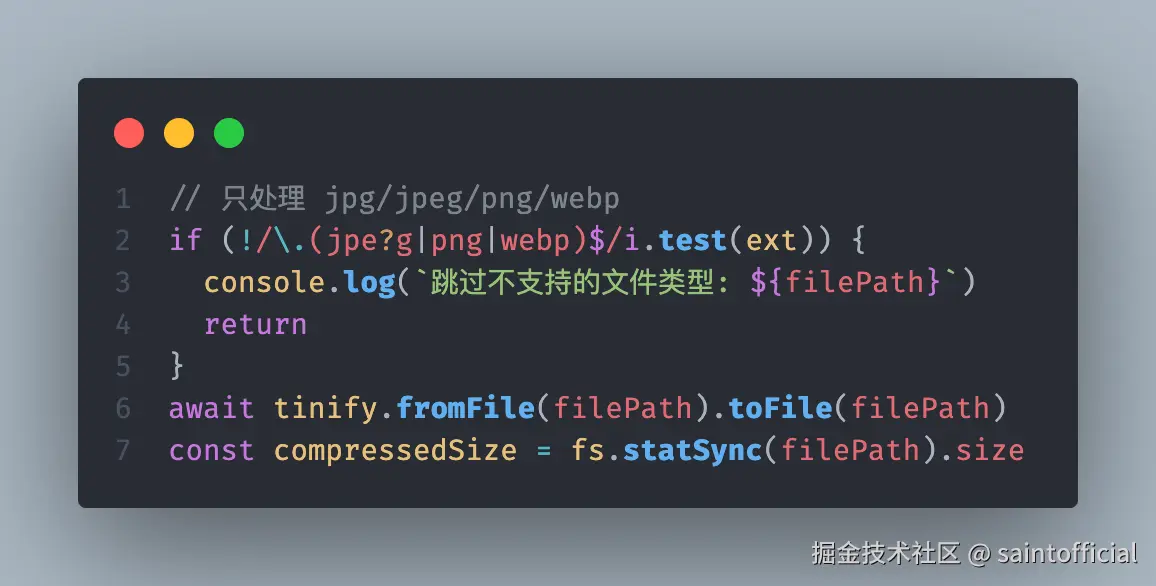
- 完整代码,需要在 .env 设置 TINIFY_KEY
javascript
import fs from "fs"
import path from "path"
import dotenv from "dotenv"
import tinify from "tinify"
// 读取 .env 文件中的 TINIFY_KEY
dotenv.config()
tinify.key = process.env.TINIFY_KEY
function formatFileSize(bytes) {
if (bytes < 1024) return bytes + " B"
else if (bytes < 1024 * 1024) return (bytes / 1024).toFixed(2) + " KB"
else return (bytes / (1024 * 1024)).toFixed(2) + " MB"
}
async function compressImage(filePath) {
const ext = path.extname(filePath).toLowerCase()
const originalSize = fs.statSync(filePath).size
try {
// 只处理 jpg/jpeg/png/webp
if (!/\.(jpe?g|png|webp)$/i.test(ext)) {
console.log(`跳过不支持的文件类型: ${filePath}`)
return
}
await tinify.fromFile(filePath).toFile(filePath)
const compressedSize = fs.statSync(filePath).size
if (compressedSize < originalSize) {
const savings = originalSize - compressedSize
const savingsPercent = ((savings / originalSize) * 100).toFixed(2)
console.log(
`✅ ${path.basename(filePath)} - 原始: ${formatFileSize(originalSize)} → ` +
`压缩后: ${formatFileSize(compressedSize)} (减少: ${formatFileSize(savings)}, ${savingsPercent}%)`
)
} else {
console.log(
`⚠️ ${path.basename(filePath)} - 压缩后变大,已跳过 ` + `(原始: ${formatFileSize(originalSize)} → ${formatFileSize(compressedSize)})`
)
}
} catch (err) {
console.error(`❌ 压缩失败: ${filePath}`, err.message)
}
}
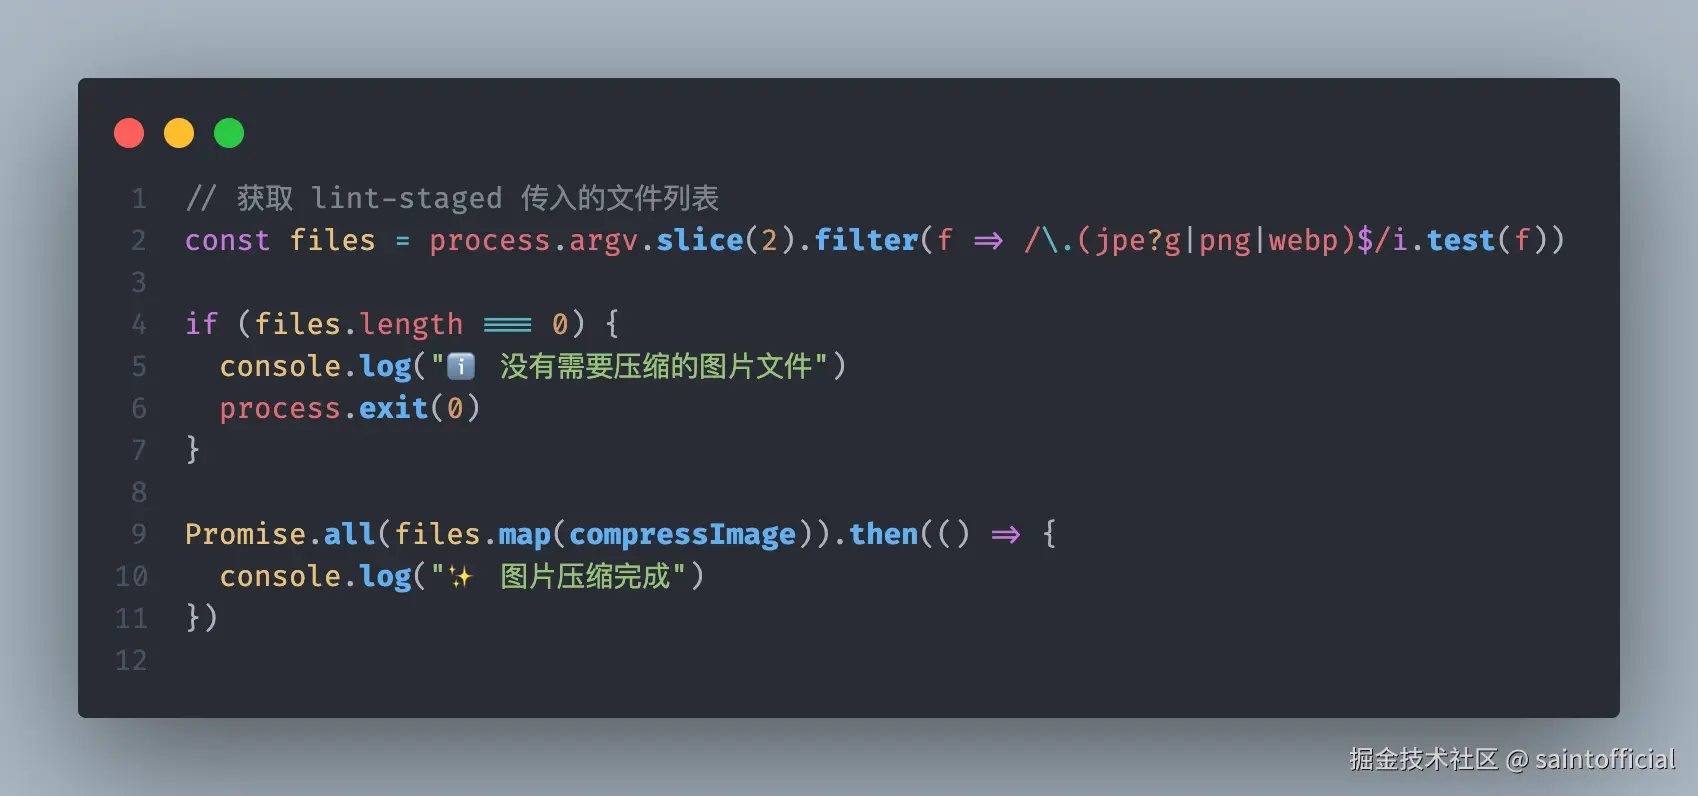
// 获取 lint-staged 传入的文件列表
const files = process.argv.slice(2).filter(f => /\.(jpe?g|png|webp)$/i.test(f))
if (files.length === 0) {
console.log("ℹ️ 没有需要压缩的图片文件")
process.exit(0)
}
Promise.all(files.map(compressImage)).then(() => {
console.log("✨ 图片压缩完成")
})jenkins上传CDN
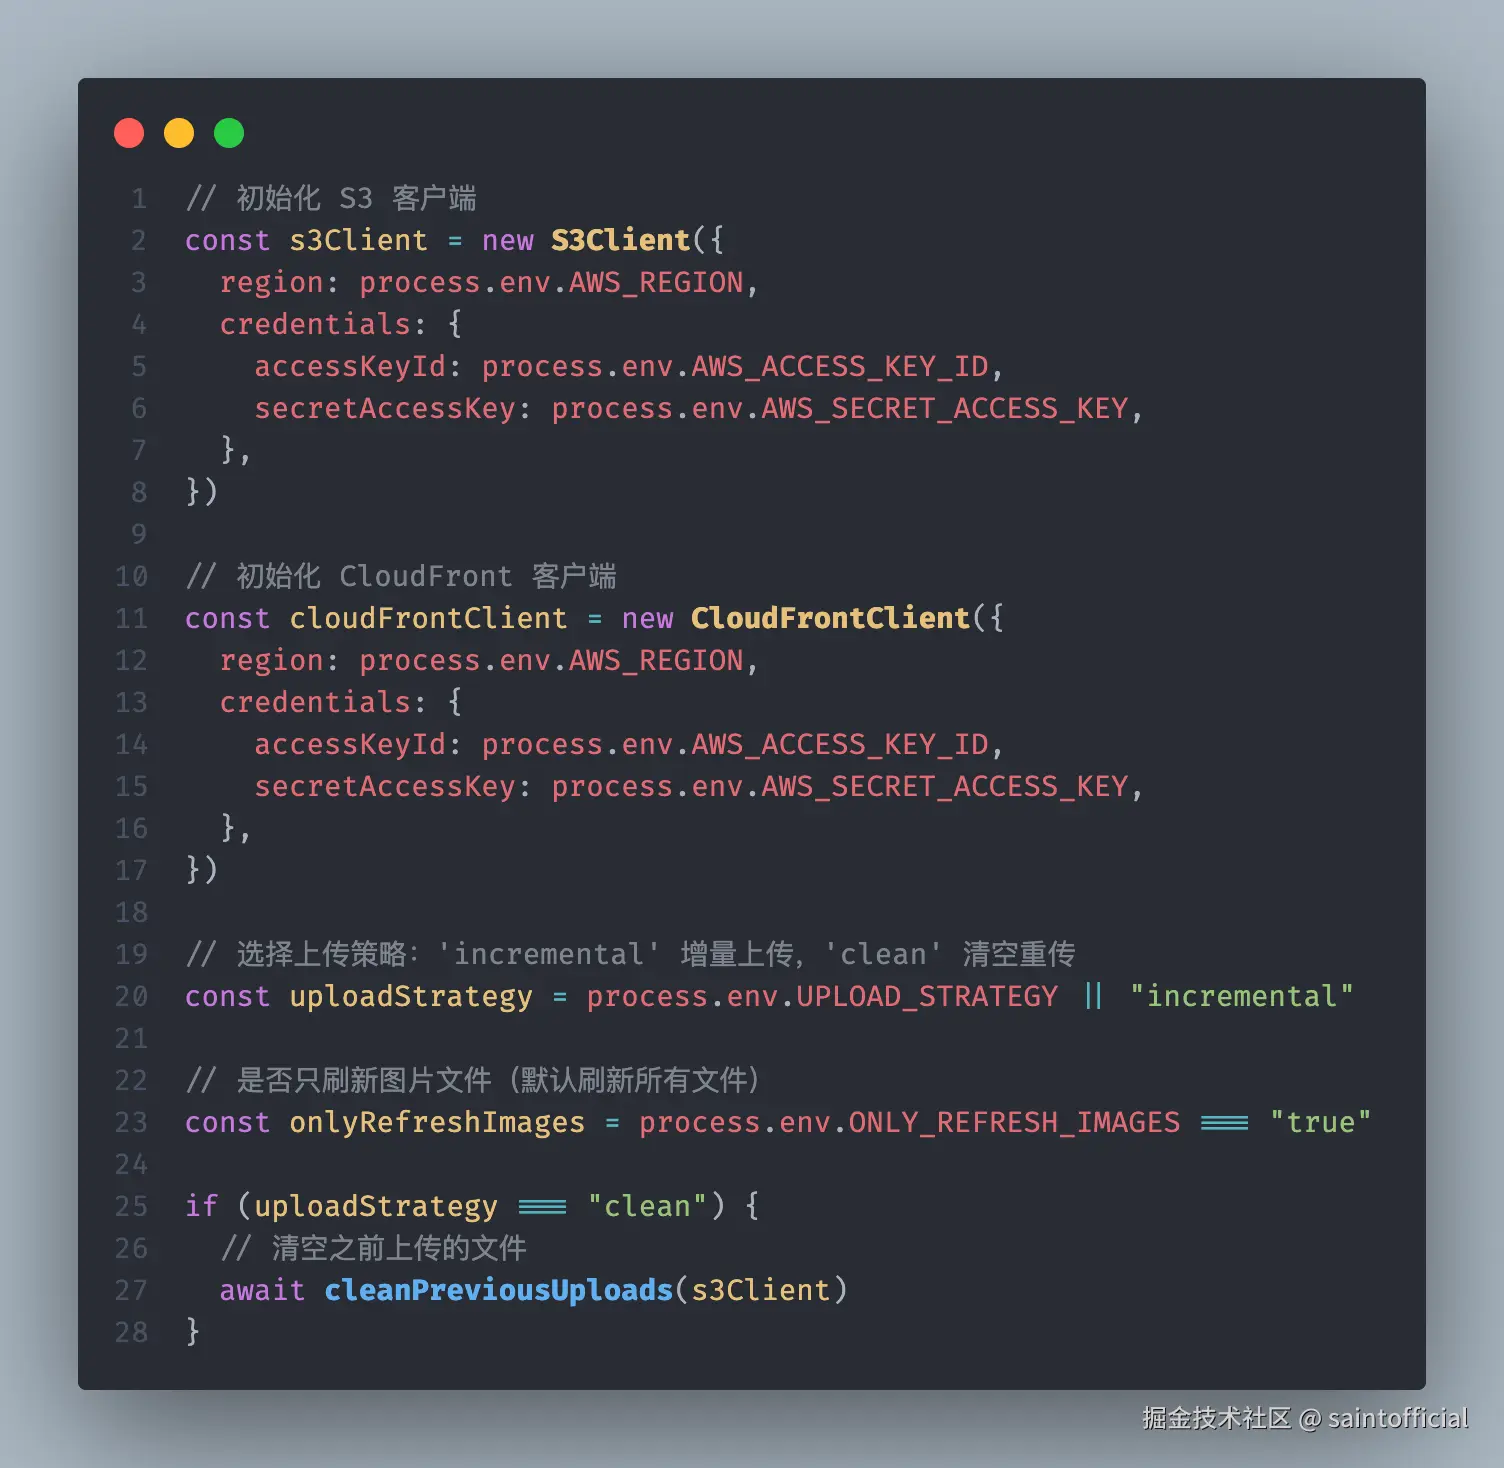
准备:Jenkins、@aws-sdk/client-s3
- 构建前去选择是否需要上传,毕竟上传过一次之后就不用在上传了

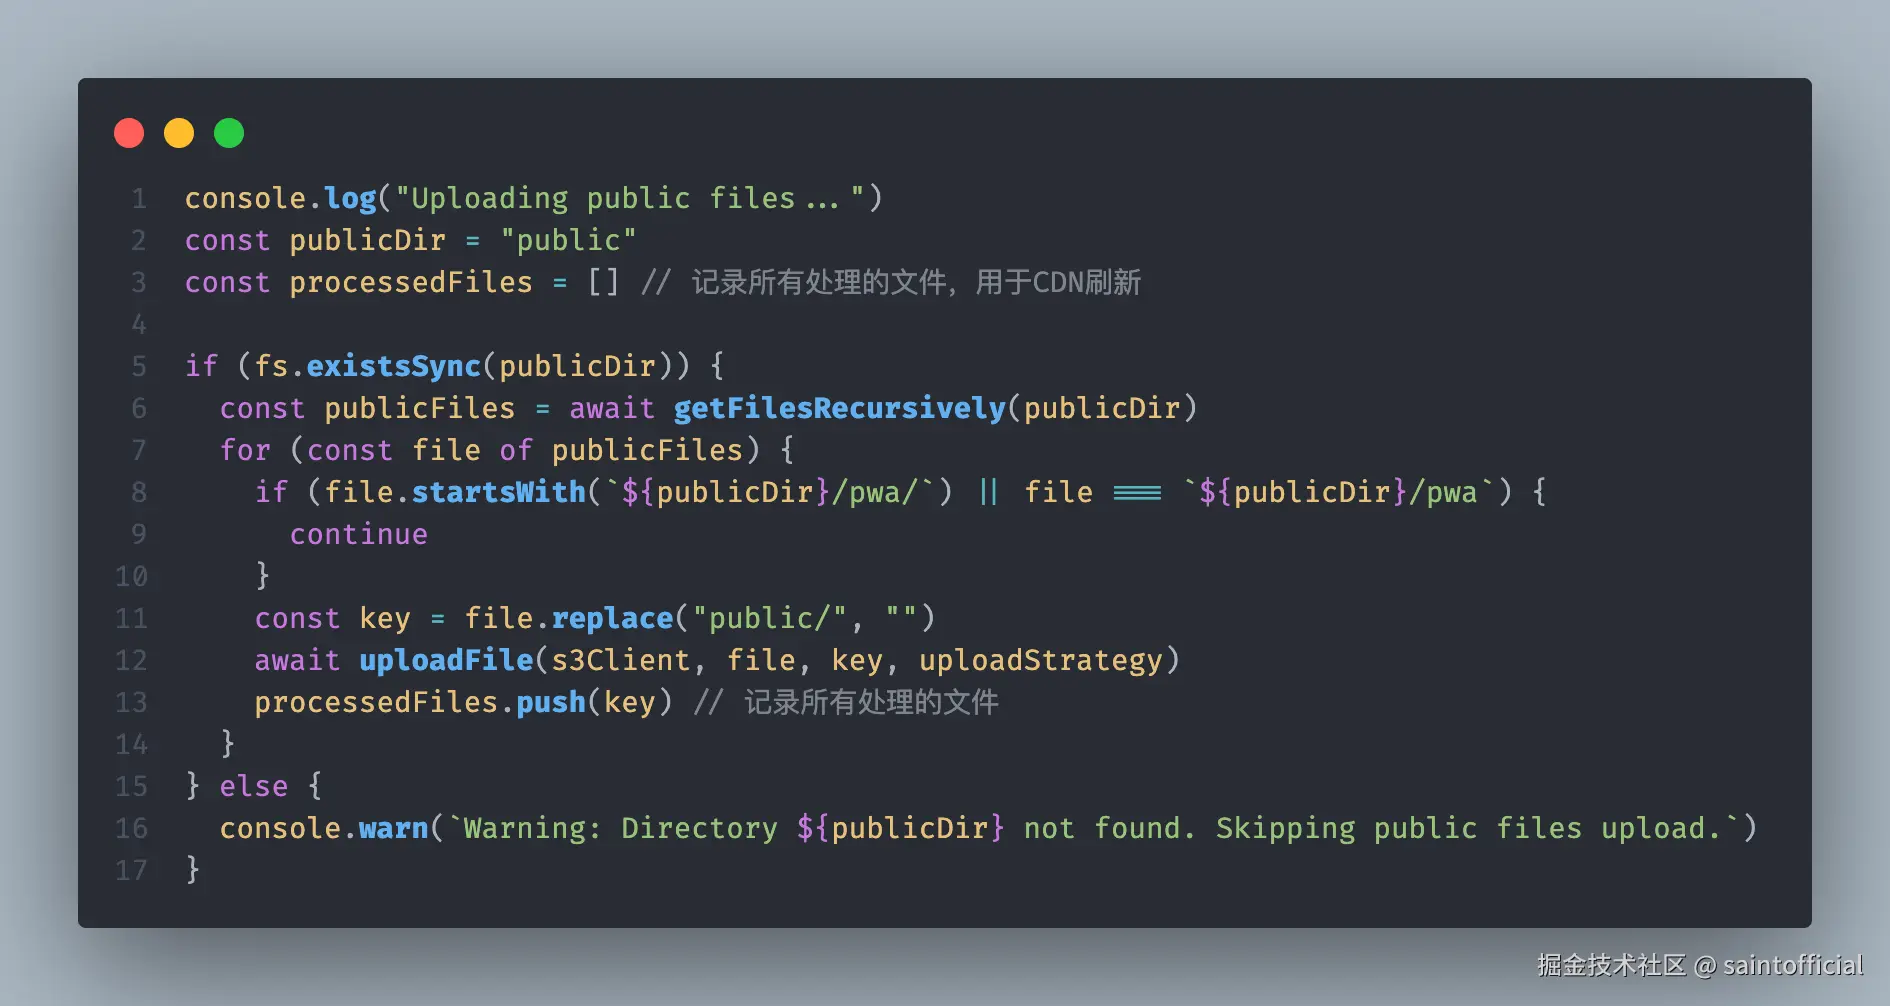
- 在Build Steps的时候写一个shell脚本去执行打包,大致就是在build后之后,去执行自己在项目中写到upload.js,js主要去上传库中public文件夹下的所有静态资源
- 其实也不止这种资源性的,我们打包后的static文件夹下的也可以上传CDN,我们在nginx做一个映射就可以
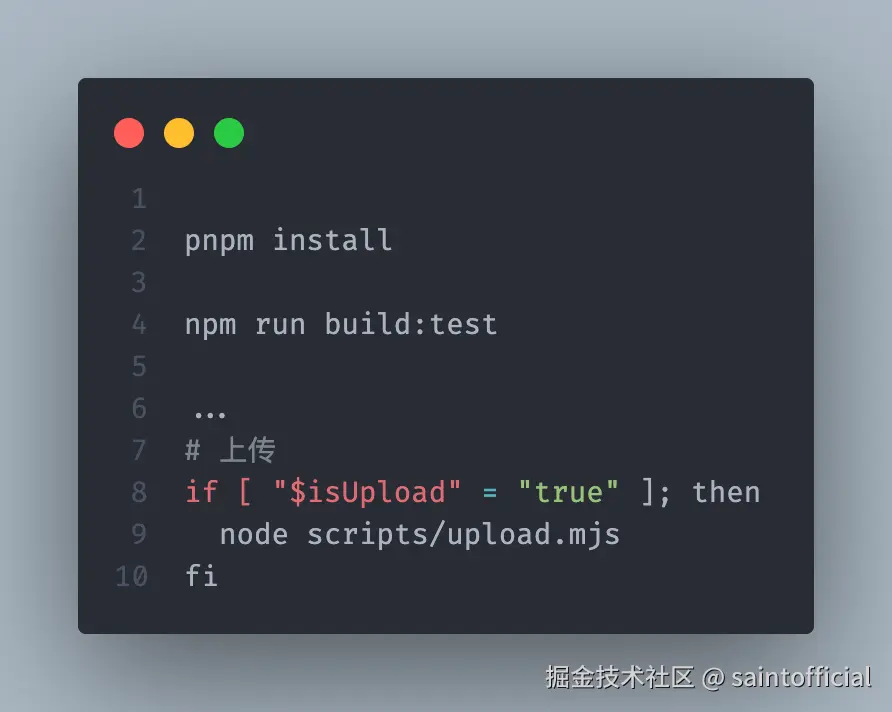
- 实现代码
-
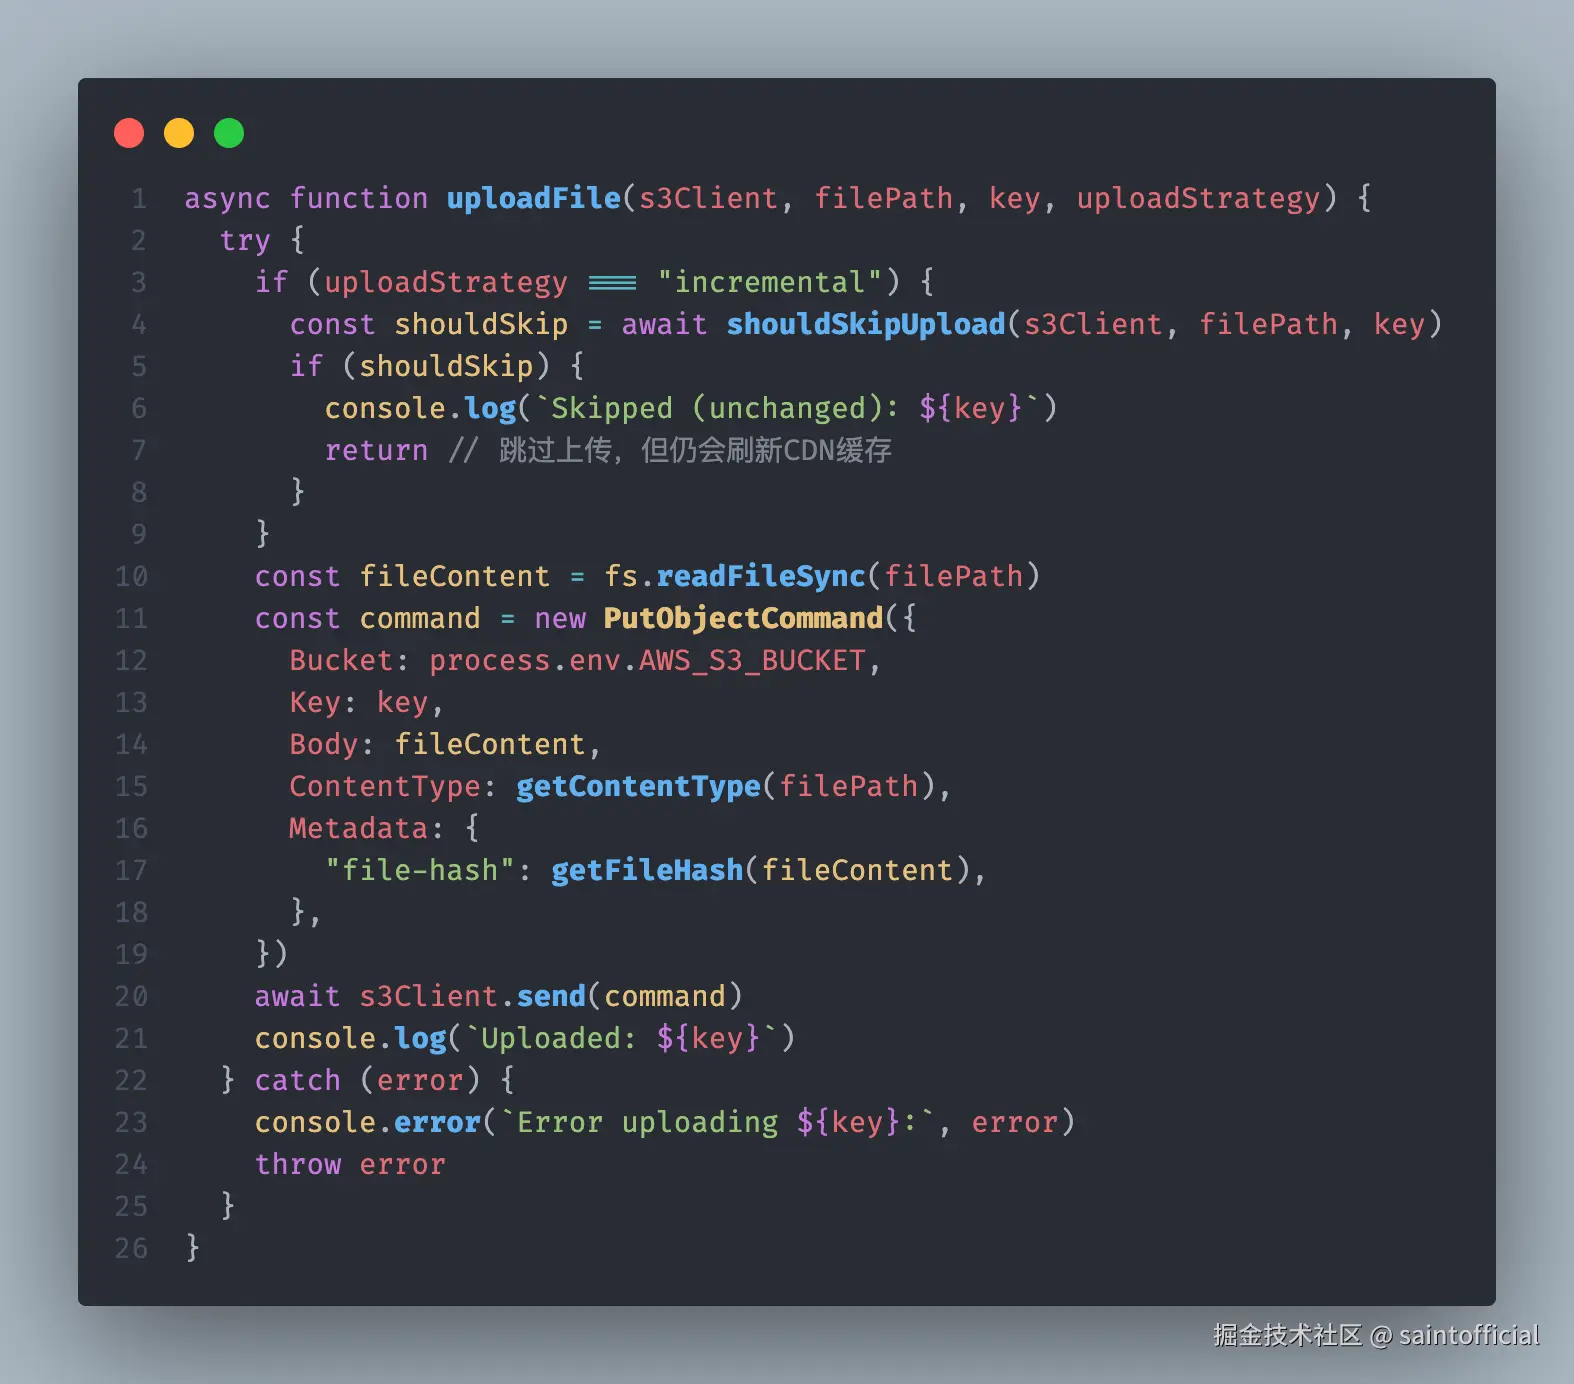
初始化 S3 / CloudFront 与策略控制,增量上传还是全量上传,对比远端 Metadata"file-hash" 与本地 md5,未变则跳过上传
-
遍历与过滤:递归 public/,跳过 public/pwa/,将 bar.png 上传为 bar.png。上传时用 PutObject,设置 ContentType(mime-types 识别)和元数据 file-hash 为 MD5。
上传static
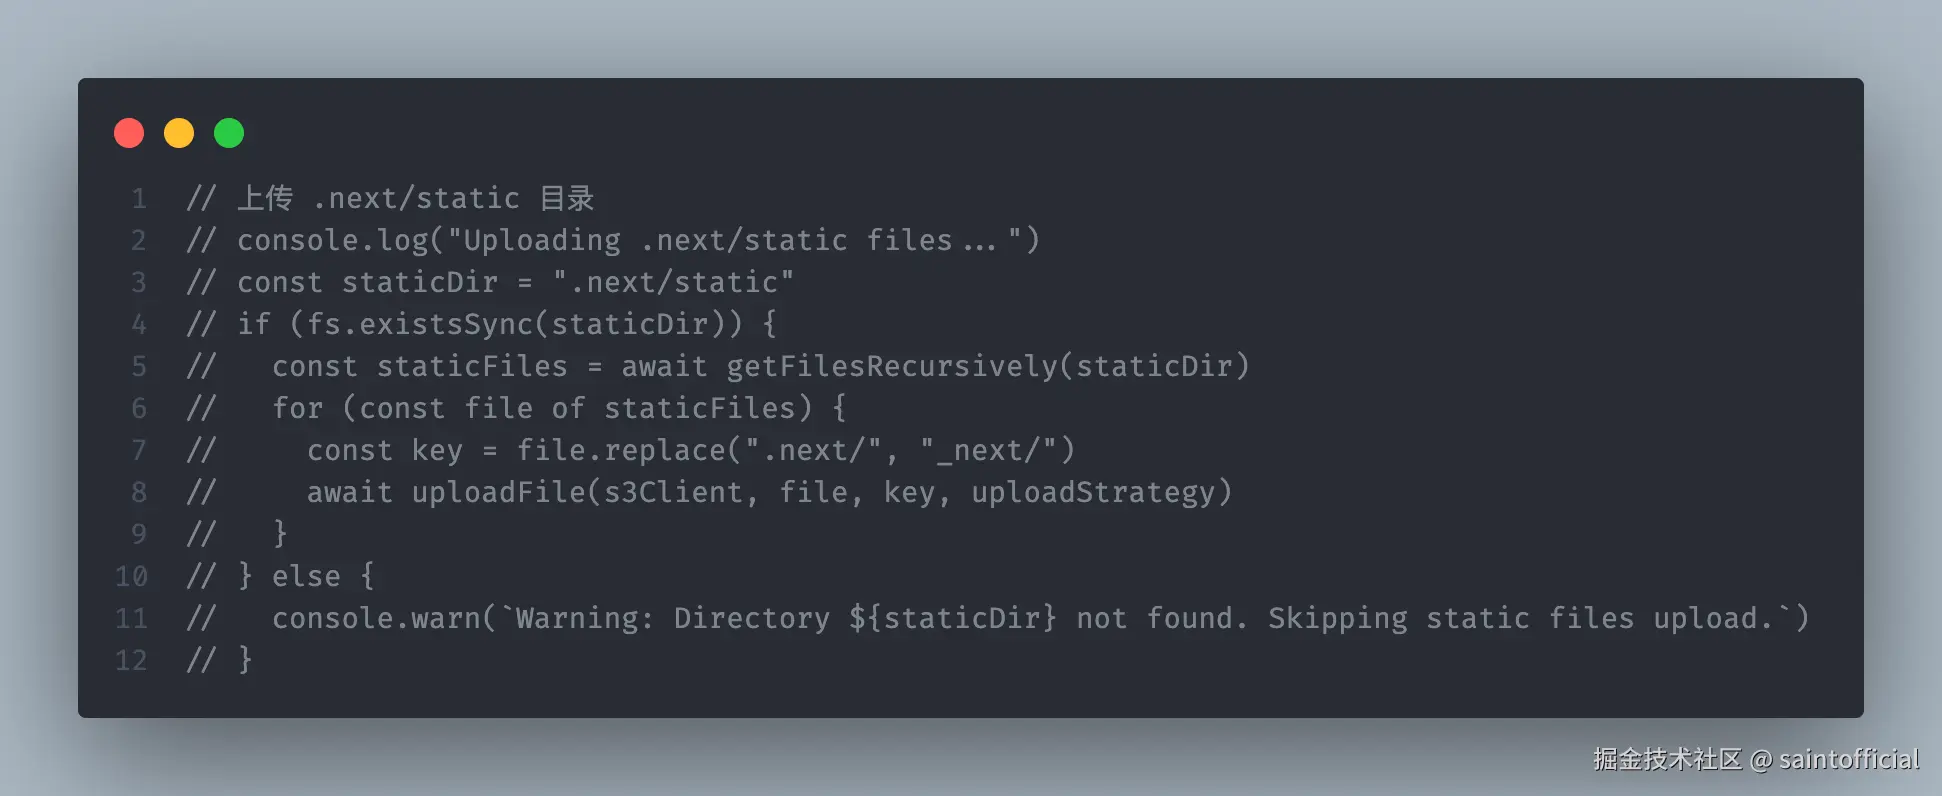
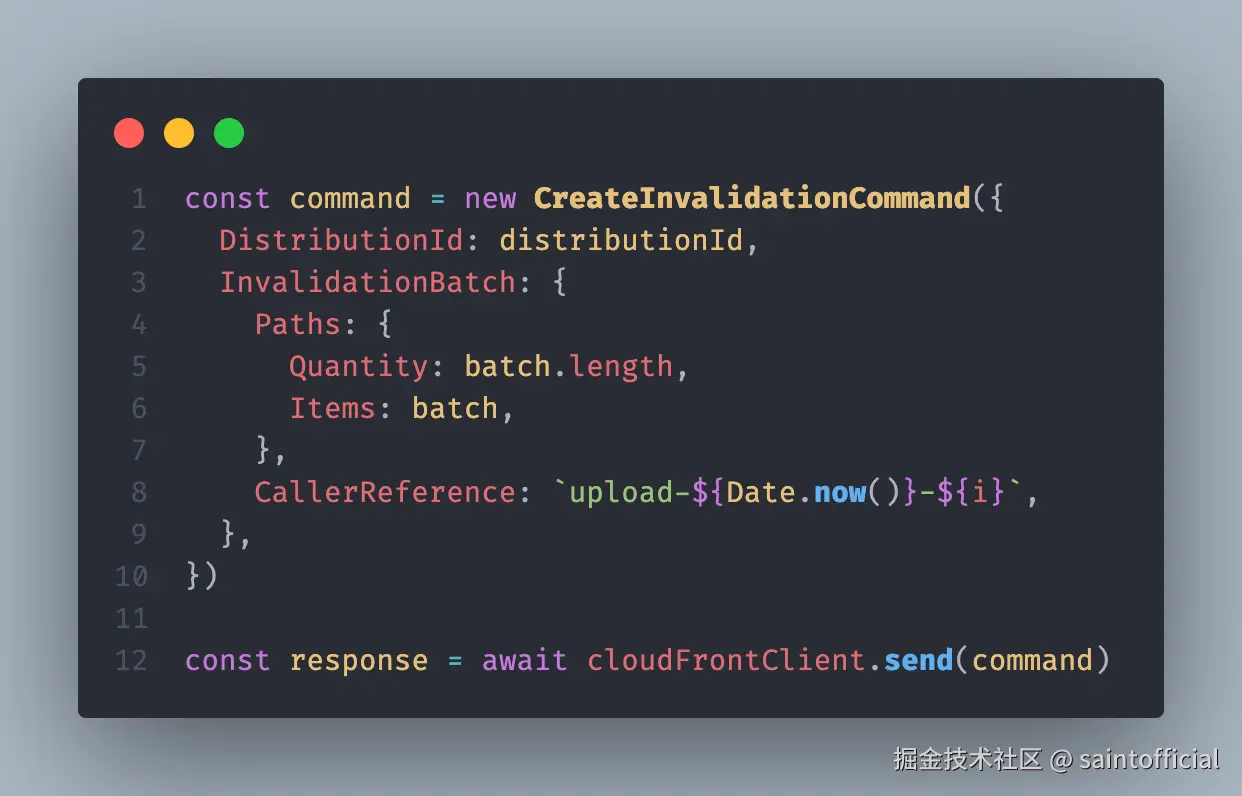
- CDN 刷新:收集本次处理的 key 列表,若 ONLY_REFRESH_IMAGES=true 则只保留图片后缀(png/jpg/jpeg/gif/webp/svg/bmp/ico)。为每批(≤3000)调用 CloudFront CreateInvalidation,路径前加 /,callerReference 用时间戳+批次保证唯一。
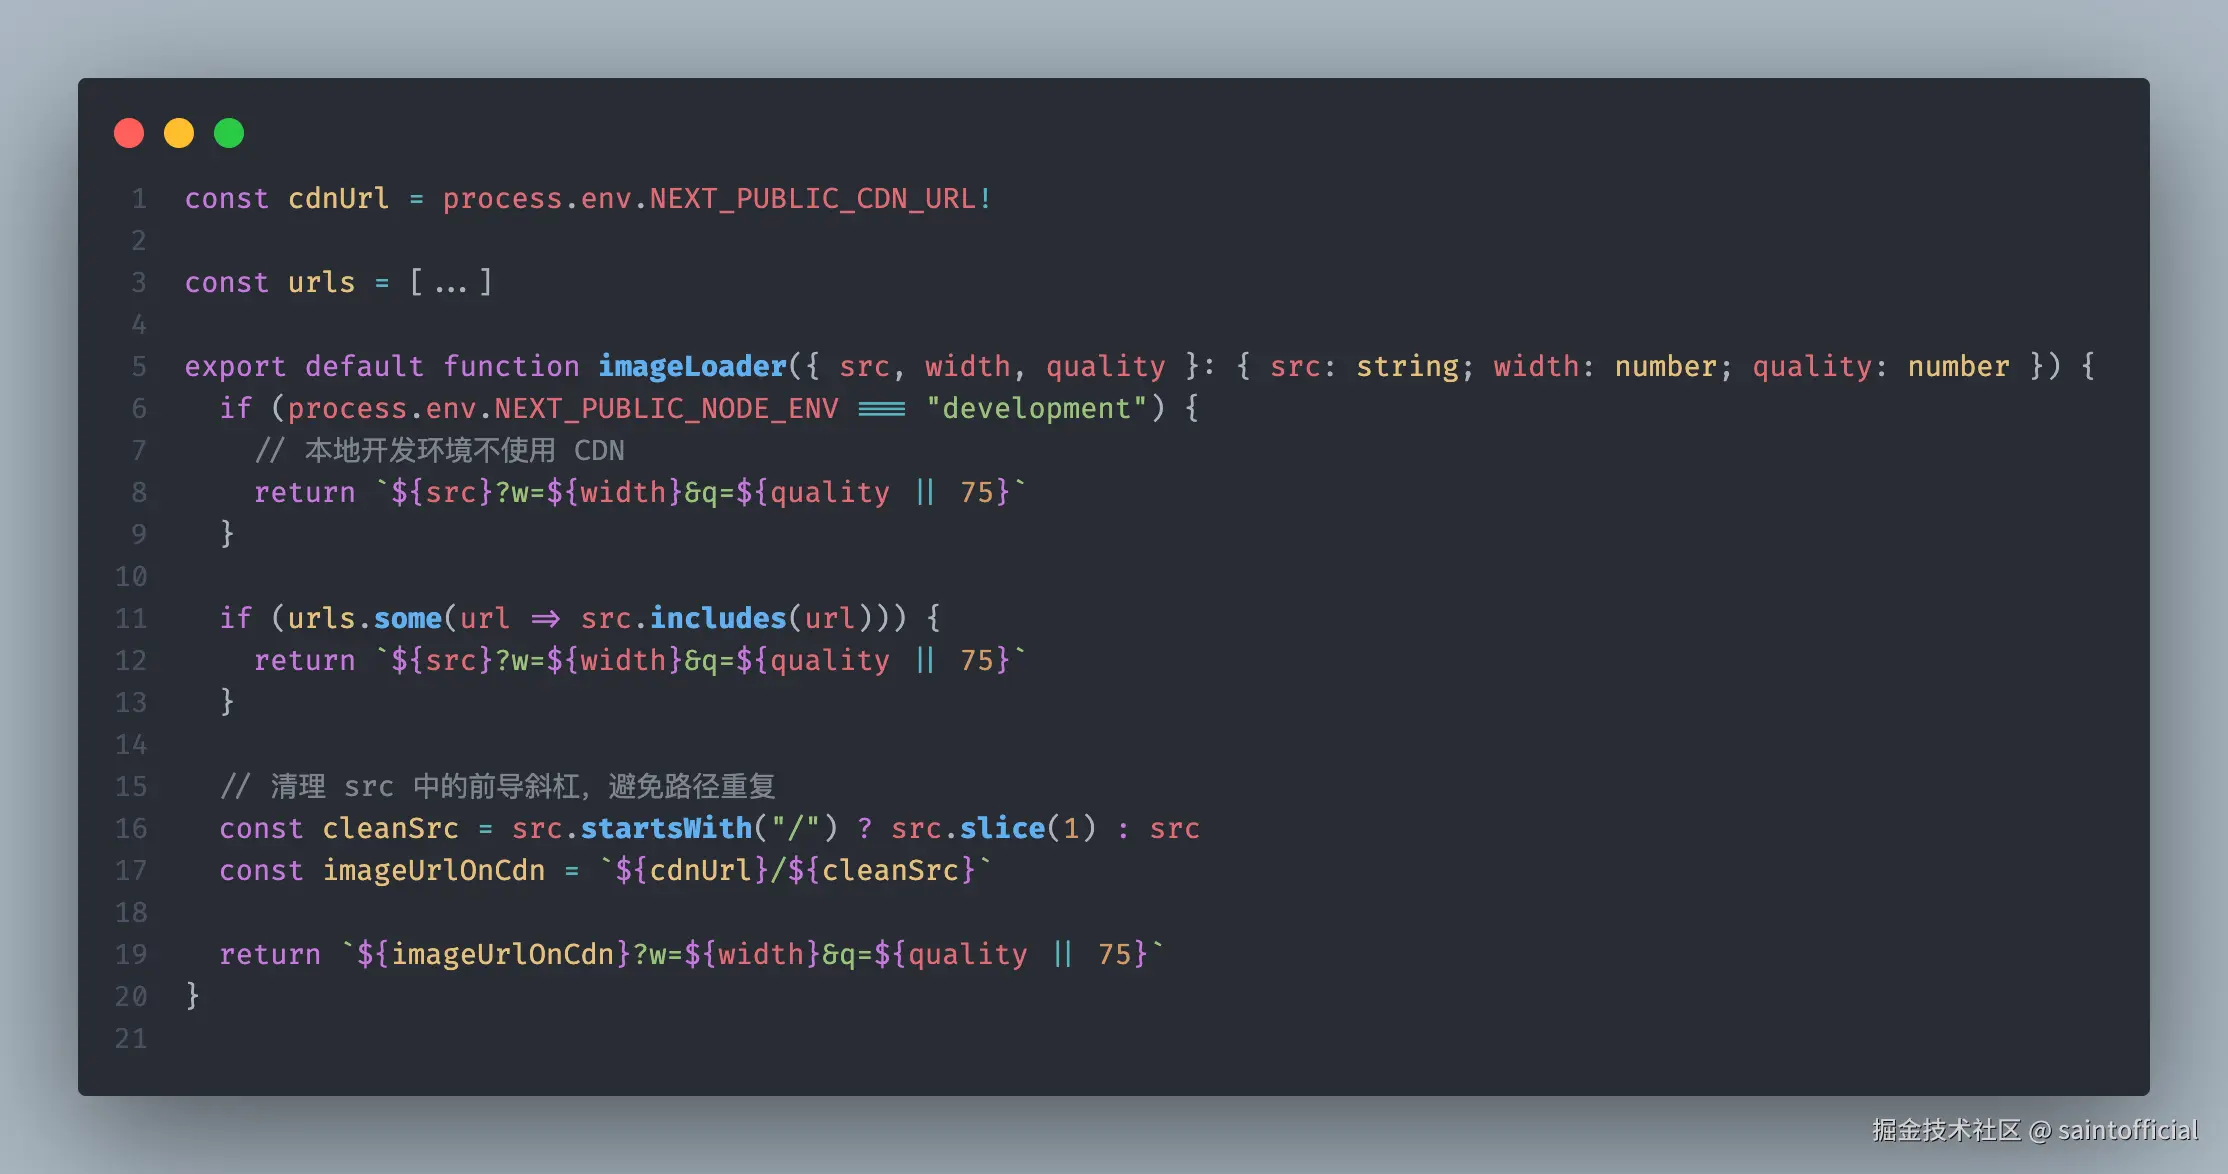
Image的loader
那么接下来让我们的url上自动拼接上CND域名前缀到Image组件上,Image本身用法还是不变
ini
<Image src='/a/b.png' alt='online' ... />

最终networl看到的
<Image src='https://xx.com/a/b.png' alt='xx' ... />
next.config 
imageLoader.ts 具体咋用可以看文档,功能就是帮你拼接前缀到Image到src上,仍然保留w={width}&q={quality || 75},前提是你的CDN支持配置
总结
- 无,还有好多可以写hh