windows+nginx配置自己的前端项目
文章目录
- windows+nginx配置自己的前端项目
-
- 前言
- [什么是 Nginx](#什么是 Nginx)
- [为什么前端项目要使用 Nginx 部署?](#为什么前端项目要使用 Nginx 部署?)
-
- 高效地提供静态资源服务
- [支持前端路由(History 模式)](#支持前端路由(History 模式))
- 轻松实现反向代理,解决跨域问题
- [支持 HTTPS、Gzip 压缩、缓存等优化](#支持 HTTPS、Gzip 压缩、缓存等优化)
- 轻量、稳定、社区成熟
- 前端根据Nginx部署web项目
- nginx常见命令
- nginx.conf配置说明
-
- 全局块(main)
- [events 块(网络连接处)](#events 块(网络连接处))
- [http 块(最重要)](#http 块(最重要))
- 日志相关(调试必备)
- [server 块(虚拟主机)](#server 块(虚拟主机))
- [location 块(`URL` 路由匹配)前端部署的核心!](#location 块(
URL路由匹配)前端部署的核心!) - 常用内置变量(可在配置中使用)
- 总结
- [Vue/React 项目专用 nginx.conf 模板](#Vue/React 项目专用 nginx.conf 模板)
- [ngxin多项目路径共存配置(如 /app1, /app2)区分项目](#ngxin多项目路径共存配置(如 /app1, /app2)区分项目)
-
- [为什么用 alias 而不是 root?](#为什么用 alias 而不是 root?)
- [try_files 中的路径必须带前缀](#try_files 中的路径必须带前缀)
- [嵌套 location 实现资源缓存](#嵌套 location 实现资源缓存)
- 路径设计建议
- [通过 子域名(a.example.com / b.example.com)来隔离多个前端项目](#通过 子域名(a.example.com / b.example.com)来隔离多个前端项目)
- 常见问题【含解决方案】
前言
我在日常前端开发中,我常常会遇到一个令人头疼的问题:本地运行得好好的项目,一旦打包交给后端部署到 Nginx 上,就各种"水土不服"------页面白屏、静态资源 404、路由刷新 404、接口跨域......排查起来费时又费力。
为了减少前后端联调时的沟通成本,也为了避免反复打扰后端同事帮忙验证部署效果,我决定在自己的 Windows 开发机上搭建一套本地 Nginx 环境。这样,在将 dist 包交付给后端之前,我可以先在本地模拟真实的生产部署场景,提前发现并解决配置问题。
实践下来,这一招不仅大大缩短了上线前的调试时间,也让我对前端项目在 Nginx 中的部署机制有了更深入的理解。本文就来分享一下我在 Windows 上安装、配置 Nginx 并部署 Vue/React 等前端项目的完整流程,希望能帮助同样被部署问题困扰的你。
什么是 Nginx
Nginx(发音为 "engine-x")是一个开源的、高性能的 HTTP 服务器和反向代理服务器,同时也支持 IMAP/POP3/SMTP 等协议。 它最初由俄罗斯工程师 Igor Sysoev 于 2004 年开发,旨在解决 C10K(并发连接一万)问题,如今已成为全球最流行的 Web 服务器之一【来源于百度】。
为什么前端项目要使用 Nginx 部署?
在现代Web 开发中,前端项目(如 Vue、React、Angular 等构建出的静态资源)虽然本质上只是一堆 HTML、CSS、JavaScript和图片文件,但直接通过浏览器打开 index.html 或用简单的本地服务器运行,并不能满足生产环境的需求。而 Nginx 凭借其高性能、轻量级和灵活的配置能力,成为了部署前端应用的事实标准。那么,为什么我们普遍选择 Nginx 来部署前端项目?主要有以下几个关键原因:
高效地提供静态资源服务
Nginx 是一个高性能的 HTTP 服务器,专为高并发、低内存消耗设计。它能以极快的速度响应对静态文件(如 .js、.css、.png 等)的请求,远优于 Node.js 的简易服务器(如 http-server)或开发服务器(如 Vite Dev Server),非常适合生产环境。
支持前端路由(History 模式)
Vue Router 或 React Router 在使用 history 模式时,URL 不带 #,看起来更干净(如 /about)。但这类路由在用户直接访问或刷新页面时,会向服务器请求 /about 路径。
如果没有后端配合,服务器会返回 404。
Nginx 可通过简单配置(如 try_files 指令),将所有未知路径 fallback 到 index.html,让前端路由接管,从而完美支持 SPA(单页应用)。
javascript
location / {
    try_files $uri $uri/ /index.html;
}
轻松实现反向代理,解决跨域问题
开发阶段,前端常因跨域无法直接调用后端 API。虽然可以通过 CORS 或代理解决,但在生产环境,我们通常希望前端和后端共用同一个域名。Nginx 可以将 /api 开头的请求代理到真正的后端服务,既隐藏了后端地址,又避免了跨域:
javascript
location /api {
    proxy_pass http://backend-server:8080;
}
这样,前端只需请求 /api/user,Nginx 自动转发,浏览器认为是同源请求。
支持 HTTPS、Gzip 压缩、缓存等优化
HTTPS:Nginx可轻松集成SSL证书,启用安全连接。Gzip压缩:自动压缩文本资源,减少传输体积,提升加载速度。- 缓存控制:通过设置
Cache-Control头,合理利用浏览器缓存,提高二次访问性能。
轻量、稳定、社区成熟
Nginx 占用资源少,稳定性高,被全球数百万网站使用(包括 Netflix、Dropbox 等)。无论是小型项目还是高流量应用,它都能胜任。
前端根据Nginx部署web项目
第一步、下载
地址:https://nginx.org/en/download.html
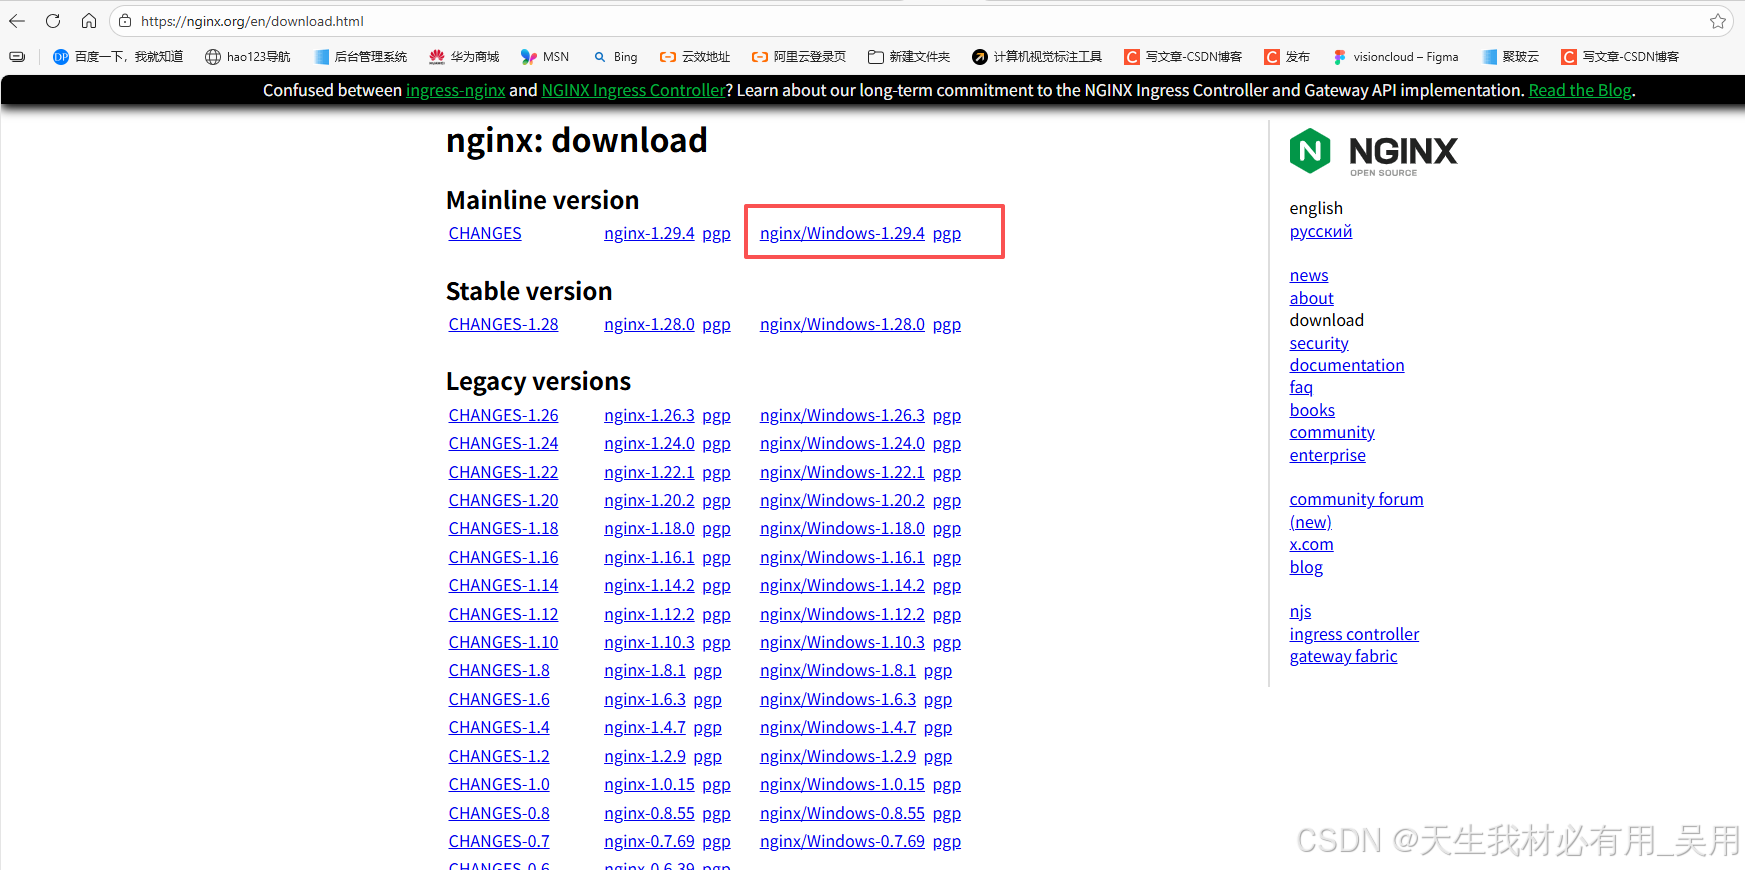
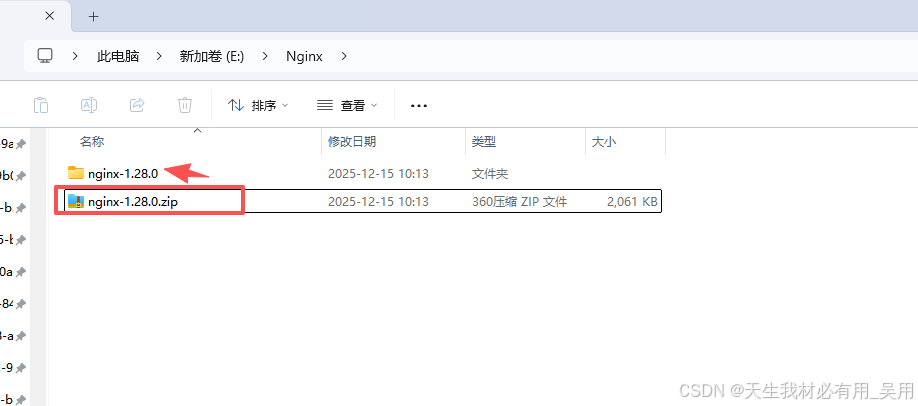
选择window的nginx进行点击下载,下载完成后建立一个nginx的目录,注意路径中不能包含中文。
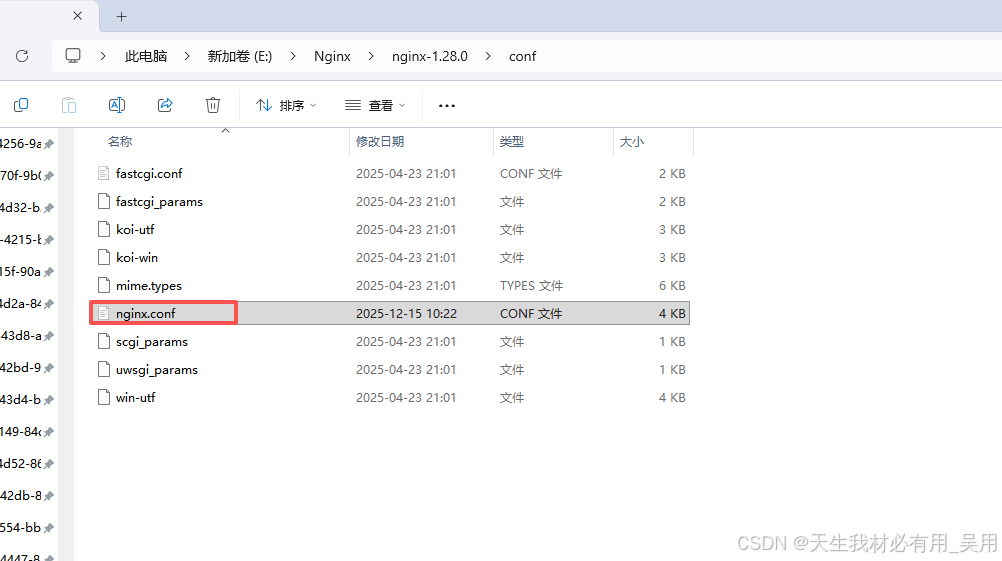
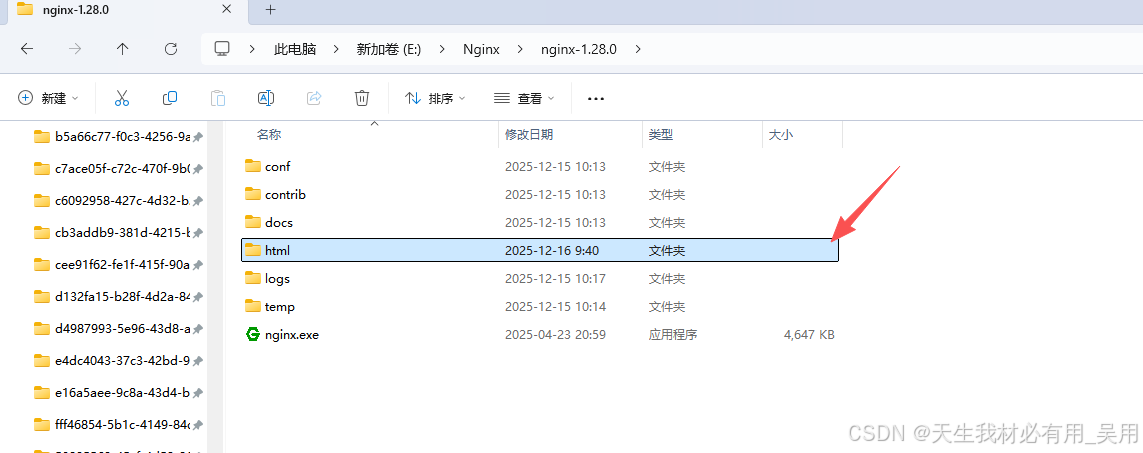
第二步、目录解读
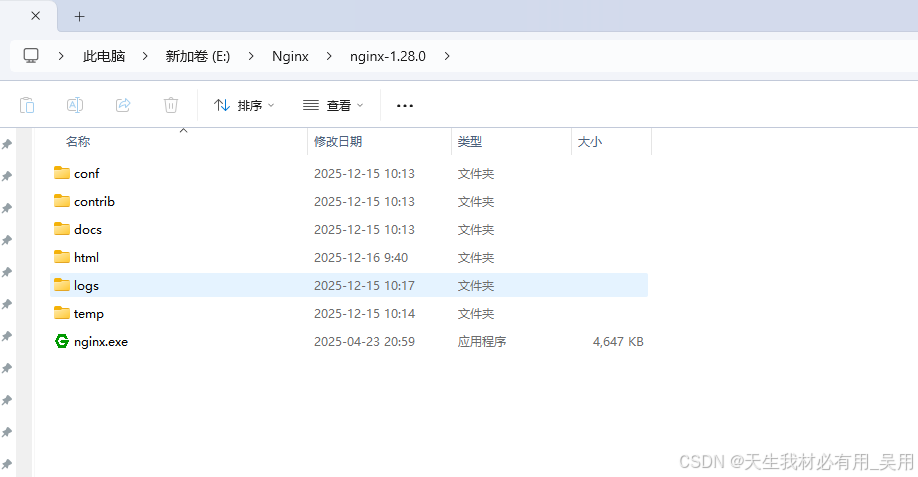
config:nginx的配置文件,其中nginx.conf是nginx主配置文件,它包含了所有全局的nginx配置项。contrib: 提供了nginx语法支持脚本。docs:存放nginx服务器的主要文档资料。html:nginx默认静态资源路径。logs:nginx记录访问成功与失败日志。temp:用于缓存用户上传或代理服务器接收的数据。nginx.exe:windows启动nginx可执行文件。
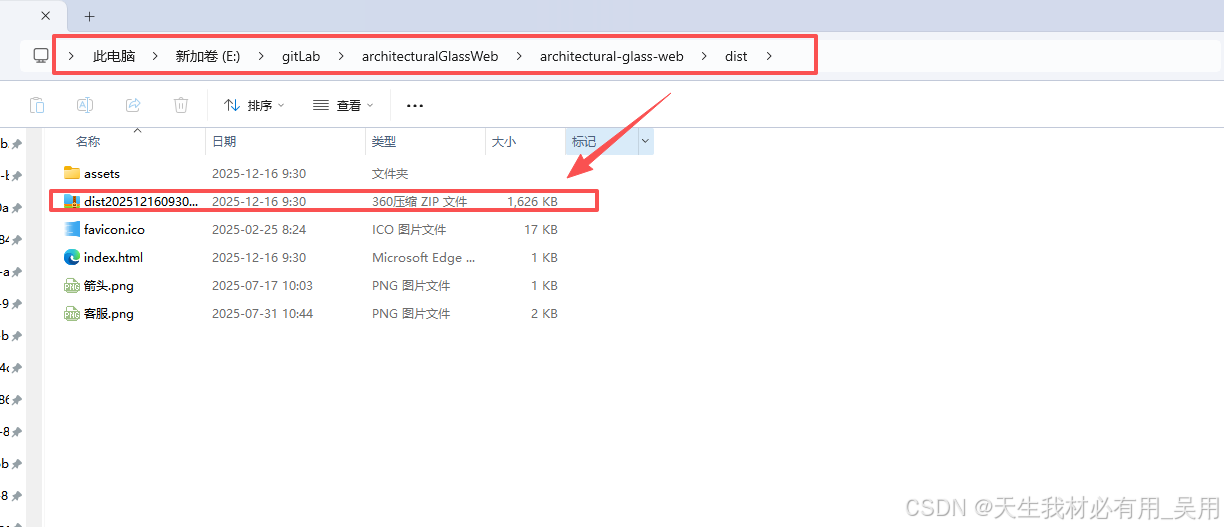
第三步、对部署项目进行打包
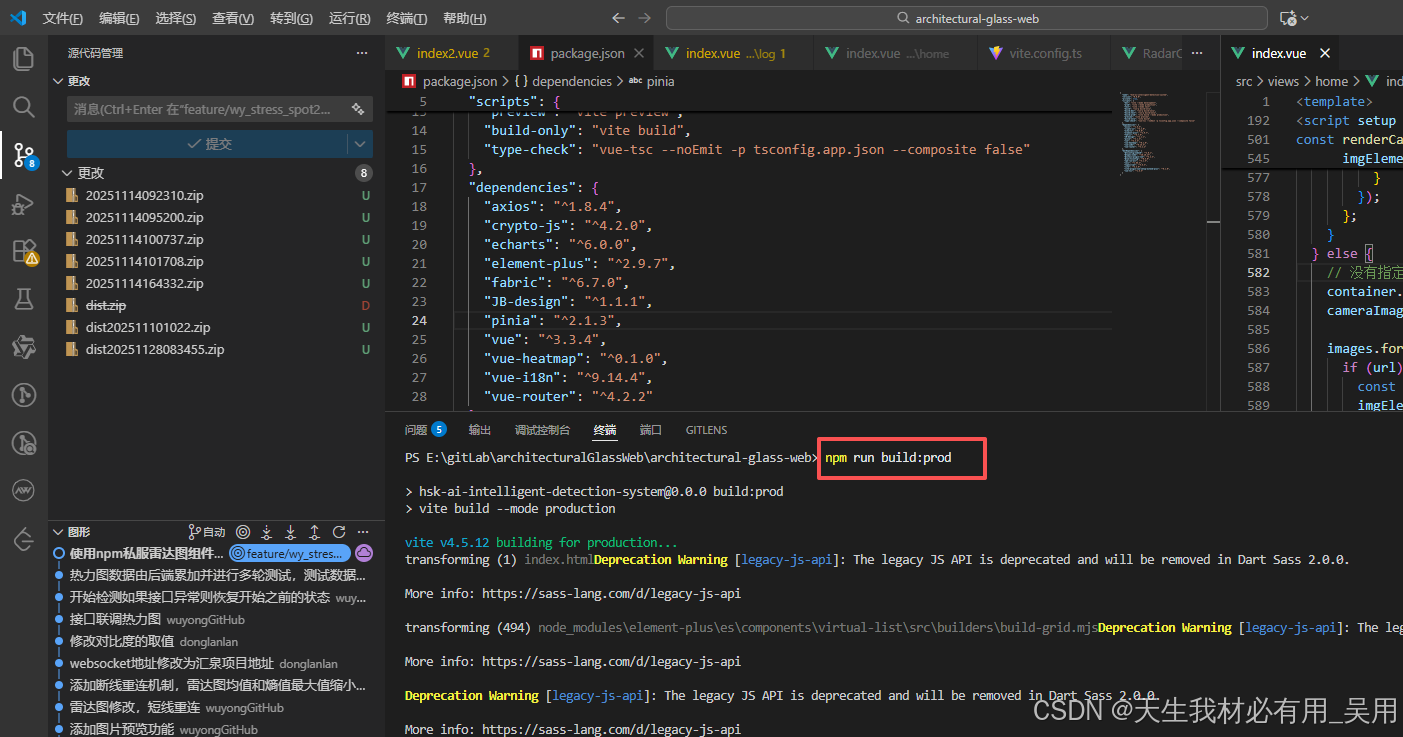
执行npm run build:prod后得到一个dist的包
第四步、配置nginx的conf文件
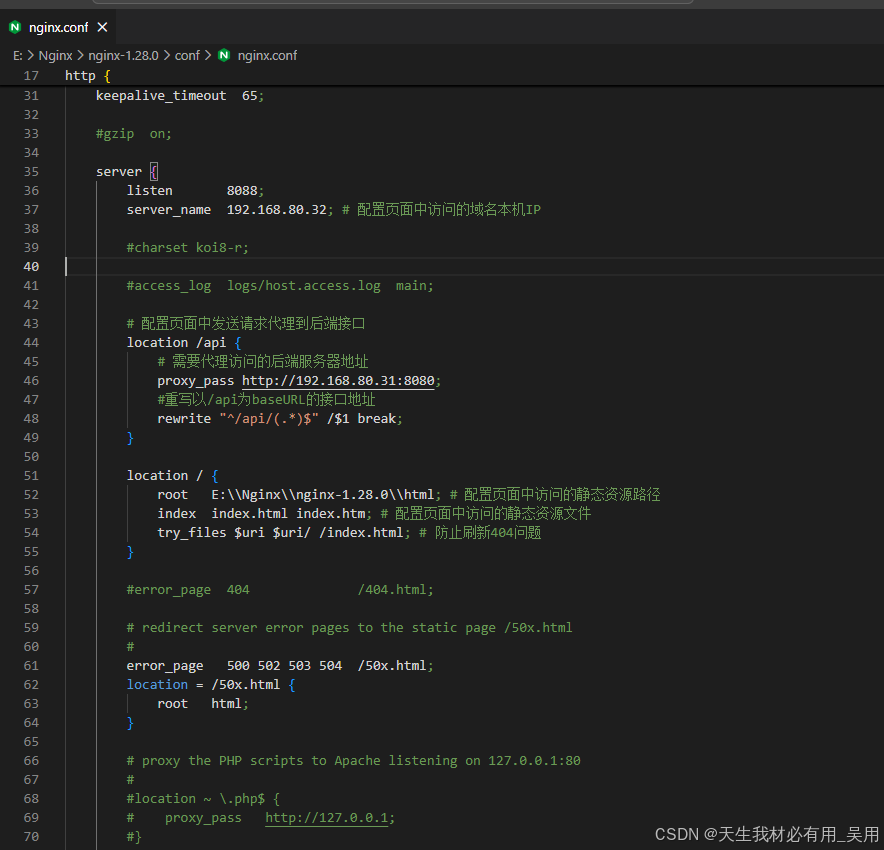
完整代码
javascript
#user  nobody;
worker_processes  1;
#error_log  logs/error.log;
#error_log  logs/error.log  notice;
#error_log  logs/error.log  info;
#pid        logs/nginx.pid;
events {
    worker_connections  1024;
}
http {
    include       mime.types;
    default_type  application/octet-stream;
    #log_format  main  '$remote_addr - $remote_user [$time_local] "$request" '
    #                  '$status $body_bytes_sent "$http_referer" '
    #                  '"$http_user_agent" "$http_x_forwarded_for"';
    #access_log  logs/access.log  main;
    sendfile        on;
    #tcp_nopush     on;
    #keepalive_timeout  0;
    keepalive_timeout  65;
    #gzip  on;
    server {
        listen       8088;
        server_name  192.168.80.32; # 配置页面中访问的域名本机IP
        #charset koi8-r;
        #access_log  logs/host.access.log  main;
        # 配置页面中发送请求代理到后端接口
        location /api {
            # 需要代理访问的后端服务器地址
            proxy_pass http://192.168.80.31:8080;
            #重写以/api为baseURL的接口地址
            rewrite "^/api/(.*)$" /$1 break;
        }
        location / {
            root   E:\\Nginx\\nginx-1.28.0\\html; # 配置页面中访问的静态资源路径
            index  index.html index.htm; # 配置页面中访问的静态资源文件
            try_files $uri $uri/ /index.html; # 防止刷新404问题
        }
        #error_page  404              /404.html;
        # redirect server error pages to the static page /50x.html
        #
        error_page   500 502 503 504  /50x.html;
        location = /50x.html {
            root   html;
        }
    }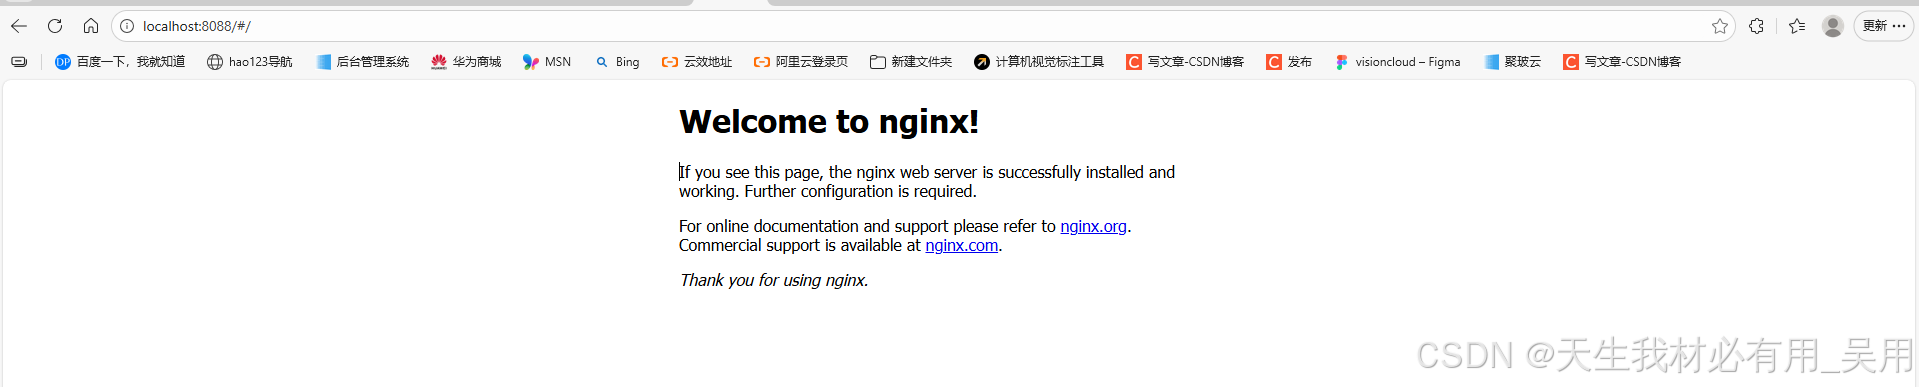
}配置好后,运行nginx,浏览器输入你的ip地址:端口号,就会出现如下界面,表示配置nginx成功
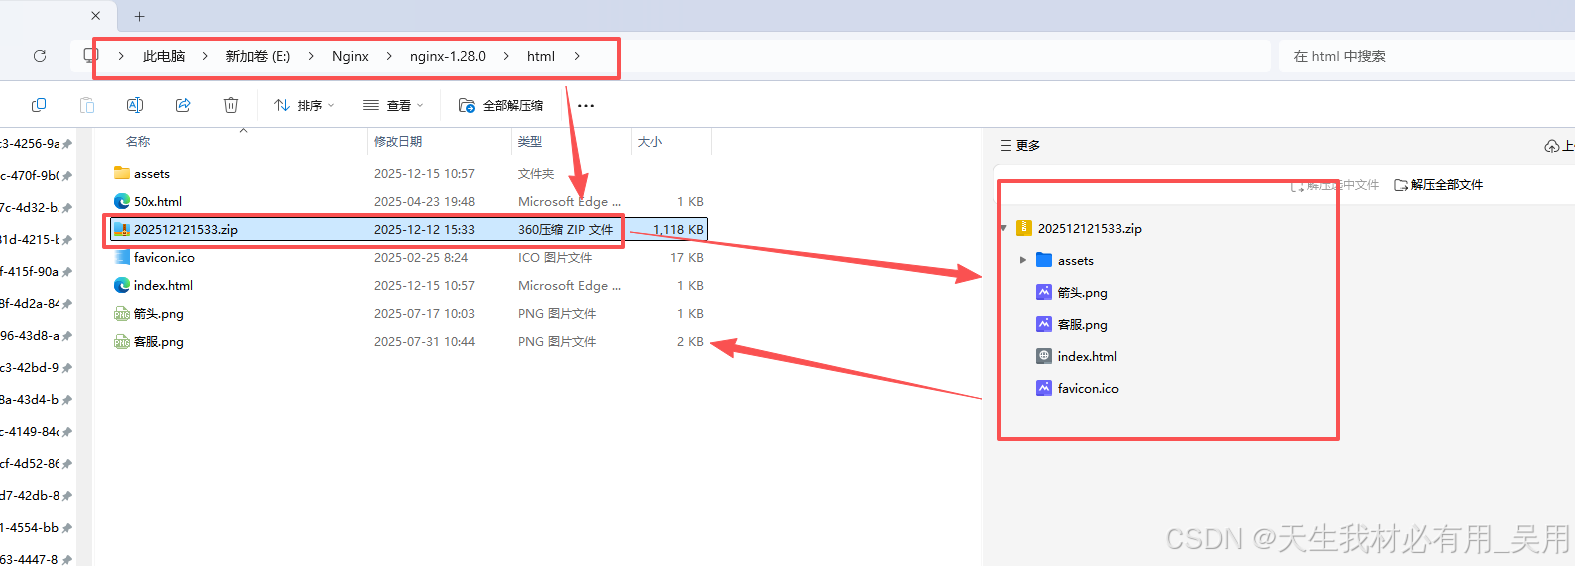
第五步、将上面dist的包解压到html文件夹中
第六步、启动Nginx查看效果
进入nginx-1.28.0目录下,使用 start nginx.exe或者双击nginx.exe图标即可部署完成查看效果,效果如下代表部署成功,浏览器输入【IP地址:端口号】即可访问。

nginx常见命令
javascript
nginx -t                # 测试配置
nginx -s reload         # 重载配置(改完必用!)
nginx -s stop           # 停止服务
nginx -v                # 查看版本
tail -f logs/error.log  # 实时看错误日志
nginx.conf配置说明
nginx.conf 是 Nginx 的主配置文件,它采用分层块结构(block-based),通过一系列指令(directives) 控制 Nginx 的行为。下面为你系统、清晰地梳理 nginx.conf 中所有关键参数的说明,特别聚焦于前端开发者最常接触和需要理解的部分。
javascript
main → events / http → server → location全局块(main)
作用于整个 Nginx实例,对于前端开发来说通常无需修改
| 参数 | 说明 | 示例 |
|---|---|---|
user |
Nginx 工作进程运行的用户(Linux/macOS) |
user nginx; |
worker_processes |
工作进程数,建议设为 auto(等于 CPU 核心数 |
worker_processes auto; |
error_log |
全局错误日志路径和级别(debug/info/notice/warn/error/crit) |
error_log /var/log/nginx/error.log warn; |
pid |
主进程 PID 文件路径 |
pid /run/nginx.pid; |
include |
引入其他配置文件 | include /etc/nginx/modules-enabled/*.conf; |
events 块(网络连接处)
| 参数 | 说明 |
|---|---|
worker_conections |
单个工作进程可同时处理的最大连接数(默认512~1024) |
use |
事件模型(如epoll(linux),kqueue(macOs)),一般情况下自动选择 |
javascript
events {
worker_connections 1024;
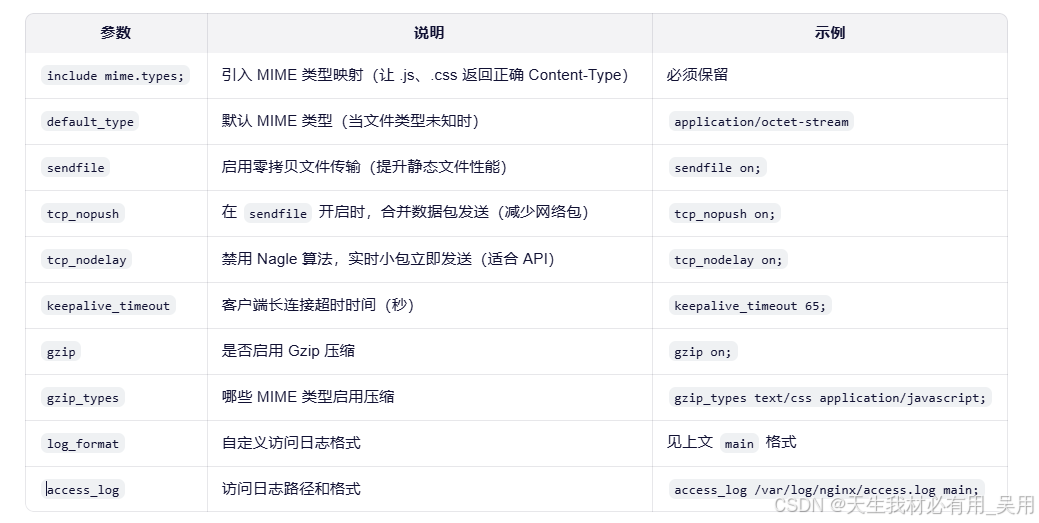
}http 块(最重要)
日志相关(调试必备)
javascript
$remote_addr:客户端 IP
$time_local:请求时间
$request:完整请求行(如 GET /index.html HTTP/1.1)
$status:HTTP 状态码(200, 404, 502...)
$body_bytes_sent:发送字节数
$http_referer:来源页面
$http_user_agent:浏览器标识
server 块(虚拟主机)
每个 server 对应一个网站(可基于端口或域名区分)。
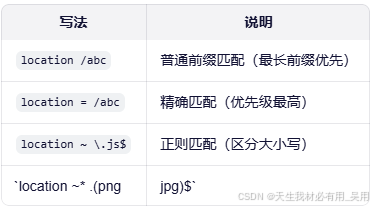
location 块(URL 路由匹配)前端部署的核心!
-
匹配规则:
-
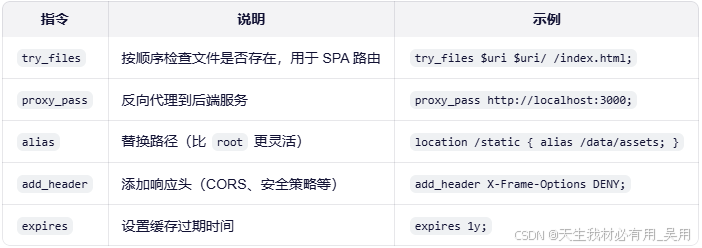
关键指令:
-
真实部署案例
javascript# 支持 Vue/React History 路由 location / { root /dist; try_files $uri $uri/ /index.html; } # 代理 API 解决跨域 location /api { proxy_pass http://backend:8080; proxy_set_header Host $host; proxy_set_header X-Real-IP $remote_addr; } # 静态资源长期缓存 location ~* \.(js|css|png|jpg|woff2)$ { expires 1y; add_header Cache-Control "public, immutable"; }
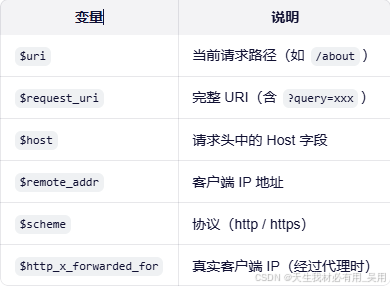
常用内置变量(可在配置中使用)
总结
nginx.conf 虽然看起来复杂,但作为前端,你只需重点关注:
http 块中的 gzip、log、sendfile
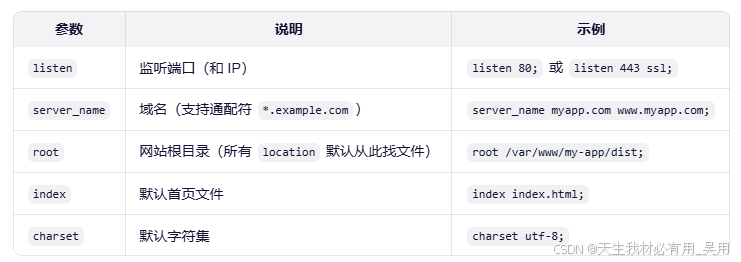
server 块中的 listen、server_name、root
location 块中的 try_files、proxy_pass、expires
Vue/React 项目专用 nginx.conf 模板
通用模板
javascript
# ======================
# 全局配置
# ======================
user  nginx;
worker_processes  auto;

error_log  /var/log/nginx/error.log warn;
pid        /run/nginx.pid;

# ======================
# events 块
# ======================
events {
    worker_connections  1024;
}

# ======================
# HTTP 配置(核心)
# ======================
http {
    include       /etc/nginx/mime.types;
    default_type  application/octet-stream;

    # 日志格式
    log_format  main  '$remote_addr - $remote_user [$time_local] "$request" '
                      '$status $body_bytes_sent "$http_referer" '
                      '"$http_user_agent" "$http_x_forwarded_for"';

    access_log  /var/log/nginx/access.log  main;

    # 高性能传输
    sendfile        on;
    tcp_nopush      on;
    tcp_nodelay     on;
    keepalive_timeout  65;

    # ======================
    # Gzip 压缩(大幅提升加载速度)
    # ======================
    gzip  on;
    gzip_vary on;
    gzip_min_length 1024;
    gzip_proxied any;
    gzip_comp_level 6;
    gzip_types
        text/plain
        text/css
        text/xml
        text/javascript
        application/json
        application/javascript
        application/xml+rss
        application/rss+xml
        application/atom+xml
        application/x-javascript
        font/ttf
        font/otf
        font/x-woff
        font/woff
        font/woff2
        image/svg+xml;

    # ======================
    # 安全与缓存优化
    # ======================
    # 隐藏 Nginx 版本号
    server_tokens off;

    # 添加安全头(可选)
    add_header X-Frame-Options "SAMEORIGIN" always;
    add_header X-Content-Type-Options "nosniff" always;
    add_header Referrer-Policy "no-referrer-when-downgrade" always;
    # 注意:CSP 头建议按需添加,避免阻断资源

    # ======================
    # 前端项目 Server 配置
    # ======================
    server {
        listen       80;
        server_name  localhost;  # 替换为你的域名,如 example.com

        #  替换为你项目的 dist 目录绝对路径
        root   /usr/share/nginx/html;  # Vue: dist, React: build
        index  index.html;

        # ======================
        # 静态资源长期缓存(适用于带 hash 的文件)
        # 如:app.a1b2c3.js → 可安全缓存 1 年
        # ======================
        location ~* \.(js|css|png|jpg|jpeg|gif|ico|svg|woff|woff2|ttf|eot)$ {
            expires 1y;
            add_header Cache-Control "public, immutable";
        }

        # ======================
        # API 反向代理(解决开发/生产跨域)
        # 前端请求 /api/xxx → 代理到后端 http://backend:8080/xxx
        # ======================
        location /api {
            proxy_pass http://localhost:8080;  #  替换为你的后端地址
            proxy_http_version 1.1;
            proxy_set_header Upgrade $http_upgrade;
            proxy_set_header Connection 'upgrade';
            proxy_set_header Host $host;
            proxy_set_header X-Real-IP $remote_addr;
            proxy_set_header X-Forwarded-For $proxy_add_x_forwarded_for;
            proxy_cache_bypass $http_upgrade;
        }

        # ======================
        # SPA 路由支持(Vue Router history 模式 / React Router)
        # 所有非静态资源请求 fallback 到 index.html
        # ======================
        location / {
            try_files $uri $uri/ /index.html;
        }

        # ======================
        # 可选:强制 HTTPS(取消注释并配置 SSL 后使用)
        # ======================
        # listen 443 ssl;
        # ssl_certificate /path/to/fullchain.pem;
        # ssl_certificate_key /path/to/privkey.pem;
        # ssl_protocols TLSv1.2 TLSv1.3;
        # ssl_ciphers ECDHE-RSA-AES256-GCM-SHA512:DHE-RSA-AES256-GCM-SHA512;
        # ssl_prefer_server_ciphers off;
    }
}
使用说明
-
修改关键路径
root /usr/share/nginx/html;javascript→ 替换为你的项目构建输出目录,例如: Windows: root C:/my-project/dist; macOS: root /Users/yourname/project/build; Linux: root /home/user/my-react-app/build; -
修改 API 代理地址
proxy_pass http://localhost:8080;javascript→ 改为你的后端服务地址(如 http://192.168.1.100:3000 或 http://backend-service) -
部署步骤
javascript# 1. 测试配置是否正确 nginx -t # 2. 重载配置(无需重启) nginx -s reload -
我使用
windos部署出现的问题javascript1. 路径使用正斜杠 / 或双反斜杠 \\ 2. 示例:root C:/nginx/html/my-vue-app; 3. 日志路径也需调整(默认在 nginx/logs/) -
如果你用
Docker,可在Dockerfile中复制此配置:javascriptFROM nginx:alpine COPY nginx.conf /etc/nginx/nginx.conf COPY dist/ /usr/share/nginx/html EXPOSE 80
ngxin多项目路径共存配置(如 /app1, /app2)区分项目
其实在实际开发或企业环境中,多个前端项目共用一个 Nginx 服务器(甚至同一个域名) 是非常常见的需求。例如:
javascript
https://example.com/app1 → 项目 A(Vue)
https://example.com/app2 → 项目 B(React)
https://example.com/admin → 后台管理系统
假设你有以下三个前端项目,均已构建(dist 或 build 目录):
| 路径 | 项目类型 | 构建输出目录 |
|---|---|---|
| /app1 | Vue 3 (Vite) | /var/www/app1/dist |
| /app2 | React (CRA) | /var/www/app2/build |
| /admin | Angular | /var/www/admin/dist |
目标:通过 https://your-domain.com/app1 等路径访问各自应用,且各自支持 History 路由。
javascript
# ======================
# 全局 & events(略,同前)
# ======================
user nginx;
worker_processes auto;
error_log /var/log/nginx/error.log warn;
pid /run/nginx.pid;

events {
    worker_connections 1024;
}

http {
    include       /etc/nginx/mime.types;
    default_type  application/octet-stream;
    log_format main '$remote_addr - $remote_user [$time_local] "$request" '
                    '$status $body_bytes_sent "$http_referer" '
                    '"$http_user_agent" "$http_x_forwarded_for"';
    access_log /var/log/nginx/access.log main;

    sendfile on;
    tcp_nopush on;
    tcp_nodelay on;
    keepalive_timeout 65;

    # Gzip 压缩(略,可复用前文配置)
    gzip on;
    gzip_types text/css application/javascript application/json image/svg+xml;

    # 安全头
    server_tokens off;
    add_header X-Frame-Options "SAMEORIGIN" always;
    add_header X-Content-Type-Options "nosniff" always;

    # ======================
    # HTTP → HTTPS 强制跳转
    # ======================
    server {
        listen 80;
        server_name example.com;  # 替换为你的域名

        location /.well-known/acme-challenge/ {
            root /var/www/certbot;
        }

        location / {
            return 301 https://$host$request_uri;
        }
    }

    # ======================
    # HTTPS 主服务器(多项目共存)
    # ======================
    server {
        listen 443 ssl http2;
        server_name example.com;  # 替换为你的域名

        # SSL 证书(Let's Encrypt 示例)
        ssl_certificate /etc/letsencrypt/live/example.com/fullchain.pem;
        ssl_certificate_key /etc/letsencrypt/live/example.com/privkey.pem;

        ssl_protocols TLSv1.2 TLSv1.3;
        ssl_ciphers ECDHE-RSA-AES256-GCM-SHA512:DHE-RSA-AES256-GCM-SHA512;
        ssl_prefer_server_ciphers off;

        add_header Strict-Transport-Security "max-age=31536000; includeSubDomains" always;

        # ======================
        # 项目 1: /app1 (Vue)
        # ======================
        location /app1 {
            alias /var/www/app1/dist;  # 注意:用 alias,不是 root!

            # 静态资源缓存
            location ~* \.(js|css|png|jpg|woff2)$ {
                expires 1y;
                add_header Cache-Control "public, immutable";
            }

            # SPA 路由支持
            try_files $uri $uri/ /app1/index.html;
        }

        # ======================
        # 项目 2: /app2 (React)
        # ======================
        location /app2 {
            alias /var/www/app2/build;

            location ~* \.(js|css|png|jpg|woff2)$ {
                expires 1y;
                add_header Cache-Control "public, immutable";
            }

            try_files $uri $uri/ /app2/index.html;
        }

        # ======================
        # 项目 3: /admin (Angular)
        # ======================
        location /admin {
            alias /var/www/admin/dist;

            location ~* \.(js|css|png|jpg|woff2)$ {
                expires 1y;
                add_header Cache-Control "public, immutable";
            }

            try_files $uri $uri/ /admin/index.html;
        }

        # ======================
        # 可选:根路径跳转到某个项目
        # ======================
        location = / {
            return 302 /app1;
        }

        # ======================
        # 可选:全局 API 代理(如 /api → 后端)
        # ======================
        location /api {
            proxy_pass http://backend:8080;
            proxy_set_header Host $host;
            proxy_set_header X-Real-IP $remote_addr;
            proxy_set_header X-Forwarded-Proto $scheme;
        }
    }
}
为什么用 alias 而不是 root?
-
root会拼接完整路径:javascriptroot /a; location /app1 → /a/app1/file -
alias会替换前缀:javascriptalias /a; location /app1 → /a/file
如果你用 root,会导致 Nginx 去找/var/www/app1/dist/app1/index.html(多了一层),从而 404!
try_files 中的路径必须带前缀
try_files $uri $uri/ /app1/index.html;因为请求 /app1/about,Nginx 需要 fallback 到 /app1/index.html,而不是根目录的 index.html。
嵌套 location 实现资源缓存
在 /app1 内部再定义 location ~* \.(js|css),确保只对该项目资源生效
路径设计建议
所有前端项目构建时,设置正确的 base 路径:
- Vue (Vite): base: '/app1/' in vite.config.js
- React (CRA): "homepage": "/app2" in package.json
- Angular: base href="/admin/" in index.html
否则,JS/CSS 资源会请求根路径(如 /assets/app.js),导致 404!
通过 子域名(a.example.com / b.example.com)来隔离多个前端项目
通过 子域名(如 app1.example.com、app2.example.com) 来隔离多个前端项目,是实现完全独立部署、品牌隔离、权限分离和 SEO 优化的常用方案。每个子域名可视为一个独立站点,拥有自己的:
- 根路径(
root)SSL证书(或共享通配符证书)- 日志文件
- 缓存策略
- 安全头配置
案例模板
你有以下三个前端项目:
| 子域名 | 项目类型 | 构建输出目录 |
|---|---|---|
| app1.example.com | Vue 3 | /var/www/app1/dist |
| app2.example.com | React | /var/www/app2/build |
| admin.example.com | Angular | /var/www/admin/dist |
目标:每个子域名独立访问,互不影响。
javascript
# ======================
# 全局 & events(略)
# ======================
user nginx;
worker_processes auto;
error_log /var/log/nginx/error.log warn;
pid /run/nginx.pid;

events {
    worker_connections 1024;
}

http {
    include       /etc/nginx/mime.types;
    default_type  application/octet-stream;
    log_format main '$host $remote_addr - [$time_local] "$request" '
                    '$status $body_bytes_sent "$http_referer" '
                    '"$http_user_agent"';

    sendfile on;
    tcp_nopush on;
    tcp_nodelay on;
    keepalive_timeout 65;

    gzip on;
    gzip_types text/css application/javascript application/json image/svg+xml;

    server_tokens off;
    add_header X-Frame-Options "SAMEORIGIN" always;
    add_header X-Content-Type-Options "nosniff" always;

    # ======================
    # HTTP → HTTPS 跳转(通用)
    # ======================
    server {
        listen 80;
        server_name ~^(.+\.)*example\.com$;  # 匹配所有 *.example.com

        location /.well-known/acme-challenge/ {
            root /var/www/certbot;
        }

        location / {
            return 301 https://$host$request_uri;
        }
    }

    # ======================
    # 子域名 1: app1.example.com (Vue)
    # ======================
    server {
        listen 443 ssl http2;
        server_name app1.example.com;

        ssl_certificate /etc/letsencrypt/live/example.com/fullchain.pem;      # 通配符或 SAN 证书
        ssl_certificate_key /etc/letsencrypt/live/example.com/privkey.pem;

        ssl_protocols TLSv1.2 TLSv1.3;
        ssl_ciphers ECDHE-RSA-AES256-GCM-SHA512:DHE-RSA-AES256-GCM-SHA512;
        ssl_prefer_server_ciphers off;

        add_header Strict-Transport-Security "max-age=31536000" always;

        # 独立日志(便于排查)
        access_log /var/log/nginx/app1.access.log main;
        error_log  /var/log/nginx/app1.error.log warn;

        # 根目录(直接指向 dist)
        root /var/www/app1/dist;
        index index.html;

        # 静态资源缓存
        location ~* \.(js|css|png|jpg|woff2|svg)$ {
            expires 1y;
            add_header Cache-Control "public, immutable";
        }

        # SPA 路由支持
        location / {
            try_files $uri $uri/ /index.html;
        }

        # 可选:专属 API 代理
        location /api {
            proxy_pass http://backend-app1:8080;
            proxy_set_header Host $host;
            proxy_set_header X-Real-IP $remote_addr;
            proxy_set_header X-Forwarded-Proto $scheme;
        }
    }

    # ======================
    # 子域名 2: app2.example.com (React)
    # ======================
    server {
        listen 443 ssl http2;
        server_name app2.example.com;

        ssl_certificate /etc/letsencrypt/live/example.com/fullchain.pem;
        ssl_certificate_key /etc/letsencrypt/live/example.com/privkey.pem;

        ssl_protocols TLSv1.2 TLSv1.3;
        ssl_ciphers ECDHE-RSA-AES256-GCM-SHA512:DHE-RSA-AES256-GCM-SHA512;
        ssl_prefer_server_ciphers off;

        add_header Strict-Transport-Security "max-age=31536000" always;

        access_log /var/log/nginx/app2.access.log main;
        error_log  /var/log/nginx/app2.error.log warn;

        root /var/www/app2/build;
        index index.html;

        location ~* \.(js|css|png|jpg|woff2|svg)$ {
            expires 1y;
            add_header Cache-Control "public, immutable";
        }

        location / {
            try_files $uri $uri/ /index.html;
        }

        location /api {
            proxy_pass http://backend-app2:8080;
            proxy_set_header Host $host;
            proxy_set_header X-Real-IP $remote_addr;
            proxy_set_header X-Forwarded-Proto $scheme;
        }
    }

    # ======================
    # 子域名 3: admin.example.com (Angular)
    # ======================
    server {
        listen 443 ssl http2;
        server_name admin.example.com;

        ssl_certificate /etc/letsencrypt/live/example.com/fullchain.pem;
        ssl_certificate_key /etc/letsencrypt/live/example.com/privkey.pem;

        ssl_protocols TLSv1.2 TLSv1.3;
        ssl_ciphers ECDHE-RSA-AES256-GCM-SHA512:DHE-RSA-AES256-GCM-SHA512;
        ssl_prefer_server_ciphers off;

        add_header Strict-Transport-Security "max-age=31536000" always;

        access_log /var/log/nginx/admin.access.log main;
        error_log  /var/log/nginx/admin.error.log warn;

        root /var/www/admin/dist;
        index index.html;

        location ~* \.(js|css|png|jpg|woff2|svg)$ {
            expires 1y;
            add_header Cache-Control "public, immutable";
        }

        location / {
            try_files $uri $uri/ /index.html;
        }
    }
}
子域名的优点
-
完全独立
每个
server块独立配置root、日志、代理、缓存策略,一个项目出问题,不影响其他子域名 -
SSL 证书方案
推荐使用通配符证书:
*.example.com,一张证书覆盖所有子域名,Let's Encrypt支持(需DNS验证)或使用SAN(Subject Alternative Name)证书,手动添加多个子域名Let's Encrypt通配符申请示例:javascriptcertbot certonly --manual --preferred-challenges=dns -d '*.example.com' -d example.com -
前端构建无需
base路径因为每个子域名是"根站点",所以:javascriptVue: base: '/'(默认) React: "homepage": "." 或省略 Angular: <base href="/">资源路径如
/assets/app.js直接生效 -
独立日志
/var/log/nginx/app1.access.log只记录app1.example.com的请求,便于监控、审计和故障排查 -
SEO 与品牌友好
app1.example.com可作为独立产品品牌,搜索引擎视为独立站点,利于SEO
子域名部署前提
-
DNS 解析
javascript在域名服务商添加 A 记录: app1 → 你的服务器 IP app2 → 你的服务器 IP admin → 你的服务器 IP 或使用通配符记录:`*.example.com → IP` -
防火墙:开放
80和443端口 -
文件权限:确保
Nginx用户(如nginx或www-data)有权限读取/var/www/...目录
路径 vs 子域名【对比】
| 特性 | 路径隔离(/app1) | 子域名隔离(app1.example.com) |
|---|---|---|
| 部署复杂度 | 简单 | 中等(需 DNS + 证书) |
SSL 证书 |
单张即可 | 需通配符或 SAN |
| 前端构建 | 需设置 base |
无需特殊配置 |
| 品牌独立性 | 弱 | 强 |
Cookie 隔离 |
同域共享(需 path) |
自动隔离 |
SEO |
视为同一站点 | 独立站点 |
| 适用场景 | 内部系统、管理后台 | 多产品线、SaaS、客户门户 |
如上一大堆总结
小团队可用路径方案快速上线;中大型产品建议用子域名。
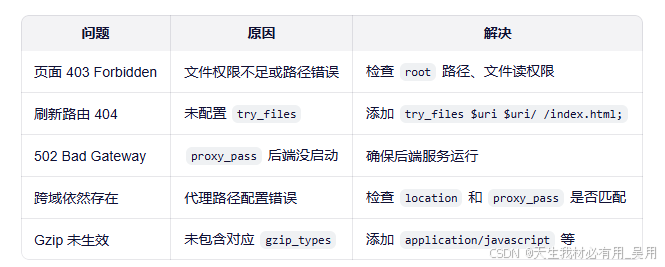
常见问题【含解决方案】