文章目录
- 一、pytest简介和安装
- 二、定义测试类、测试方法
- 三、执行测试方法(重点)
- 四、Fixture风格
- 五、断言
-
- [5.1 断言-案例](#5.1 断言-案例)
- 六、测试报告
一、pytest简介和安装
1、pytest 是开发人员用来实现 "单元测试" 的框架。测试工程师,可以在自动化 "测试执行" 时使用。
2、使用 pytest 的好处:
- 方便管理、维护测试用例。
- 简单的断言方法。
- 生成测试报告。
3、安装 pytest
python
pip install pytest

pip install requests -i https://pypi.douban.com/simple/     # 指定镜像源安装
二、定义测试类、测试方法
- 定义测试类管理测试用例
- 测试类中的测试方法和excel写的测试用例一一对应。(excel表格写一条测试用例,在测试类中添加一条测试方法)
如:登录接口,共 15 条测试用例。但,需要15个测试方法。
python
# 测试类名,建议以Test开头。(类名首字母大写)
class TestXxx(object):

	# 测试方法名,必须以小写test开头。
    def test_xxx(self):
        pass
三、执行测试方法(重点)
yacas
单文件执行(了解)

	方法1:终端命令 pytest -s xxx.py。
	方法2:①方法定义后,右键->运行 此方法。在方法后面去运行,只运行这一个方法。
          ②类定义后,右键->运行 所有方法。在类后面去运行,则运行类里面的所有方法。
          注:方法2需要pycharm2020以上版本,才可以。

	方法3:导包 import pytest
		  if __name__ == '__main__':
			  pytest.main(['-s', 'xxx.py'])


多文件执行【重点】

	1. 直接在项目目录下,创建文件 pytest.ini
	2. 编写 pytest.ini 文件
			[pytest]					固定内容
			addopts = -s				添加命令行参数 add options
			testpaths = ./xxx			.py 测试用例文件,相对于 pytest.ini 位置
			python_files = xxx*.py		.py 文件名。 可用 通配符
			python_classes = Test*		测试类名。  可用 通配符
			python_functions = test*	测试方法名。 可用 通配符
	3. 终端执行命令 pytest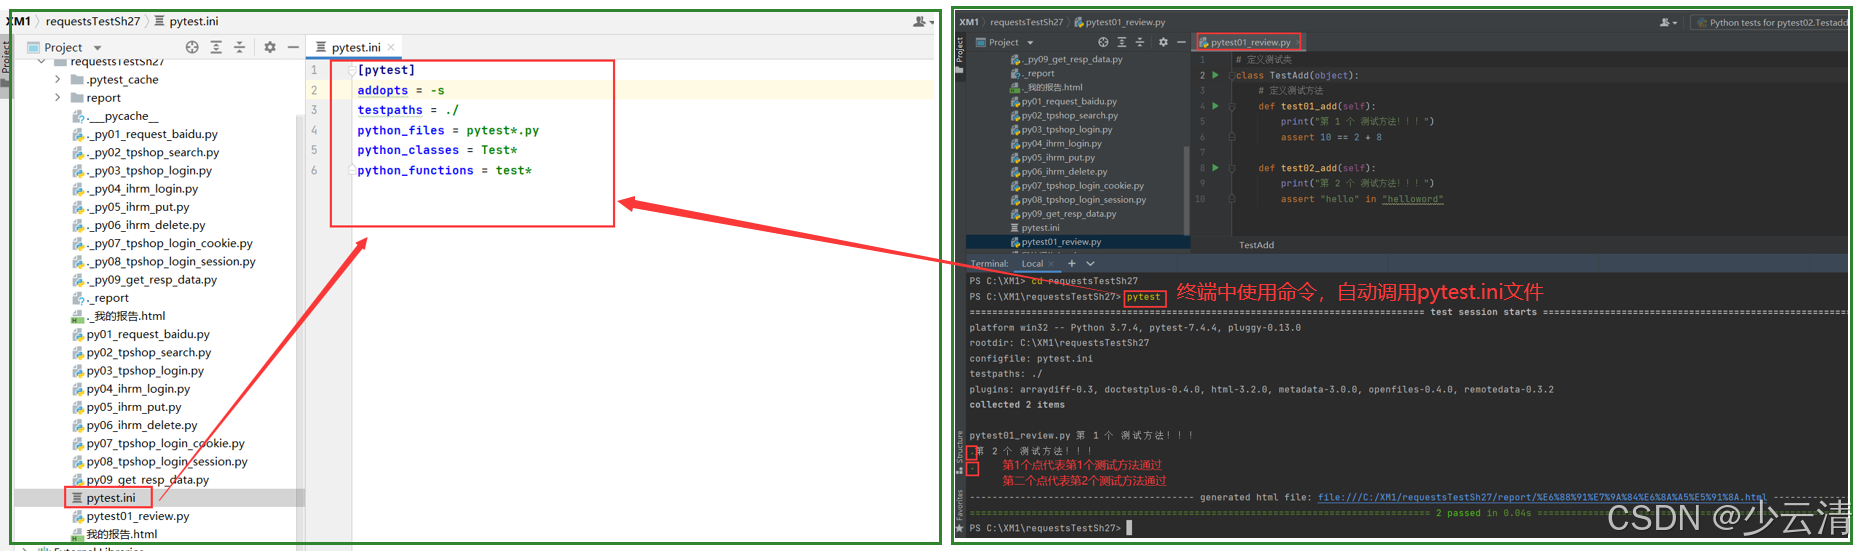
四、Fixture风格
python
# 1.方法级别方法
	def setup(self):    在 每个 普通测试方法执行之前,自动被调用一次。
    def teardown(self): 在 每个 普通测试方法执行之后,自动被调用一次。

# 2.类级别方法
	def setup_class(self):    在 类中 所有测试方法 执行之前,自动被调用一次。
    def teardown_class(self): 在 类中 所有测试方法 执行结束之后,自动被调用一次。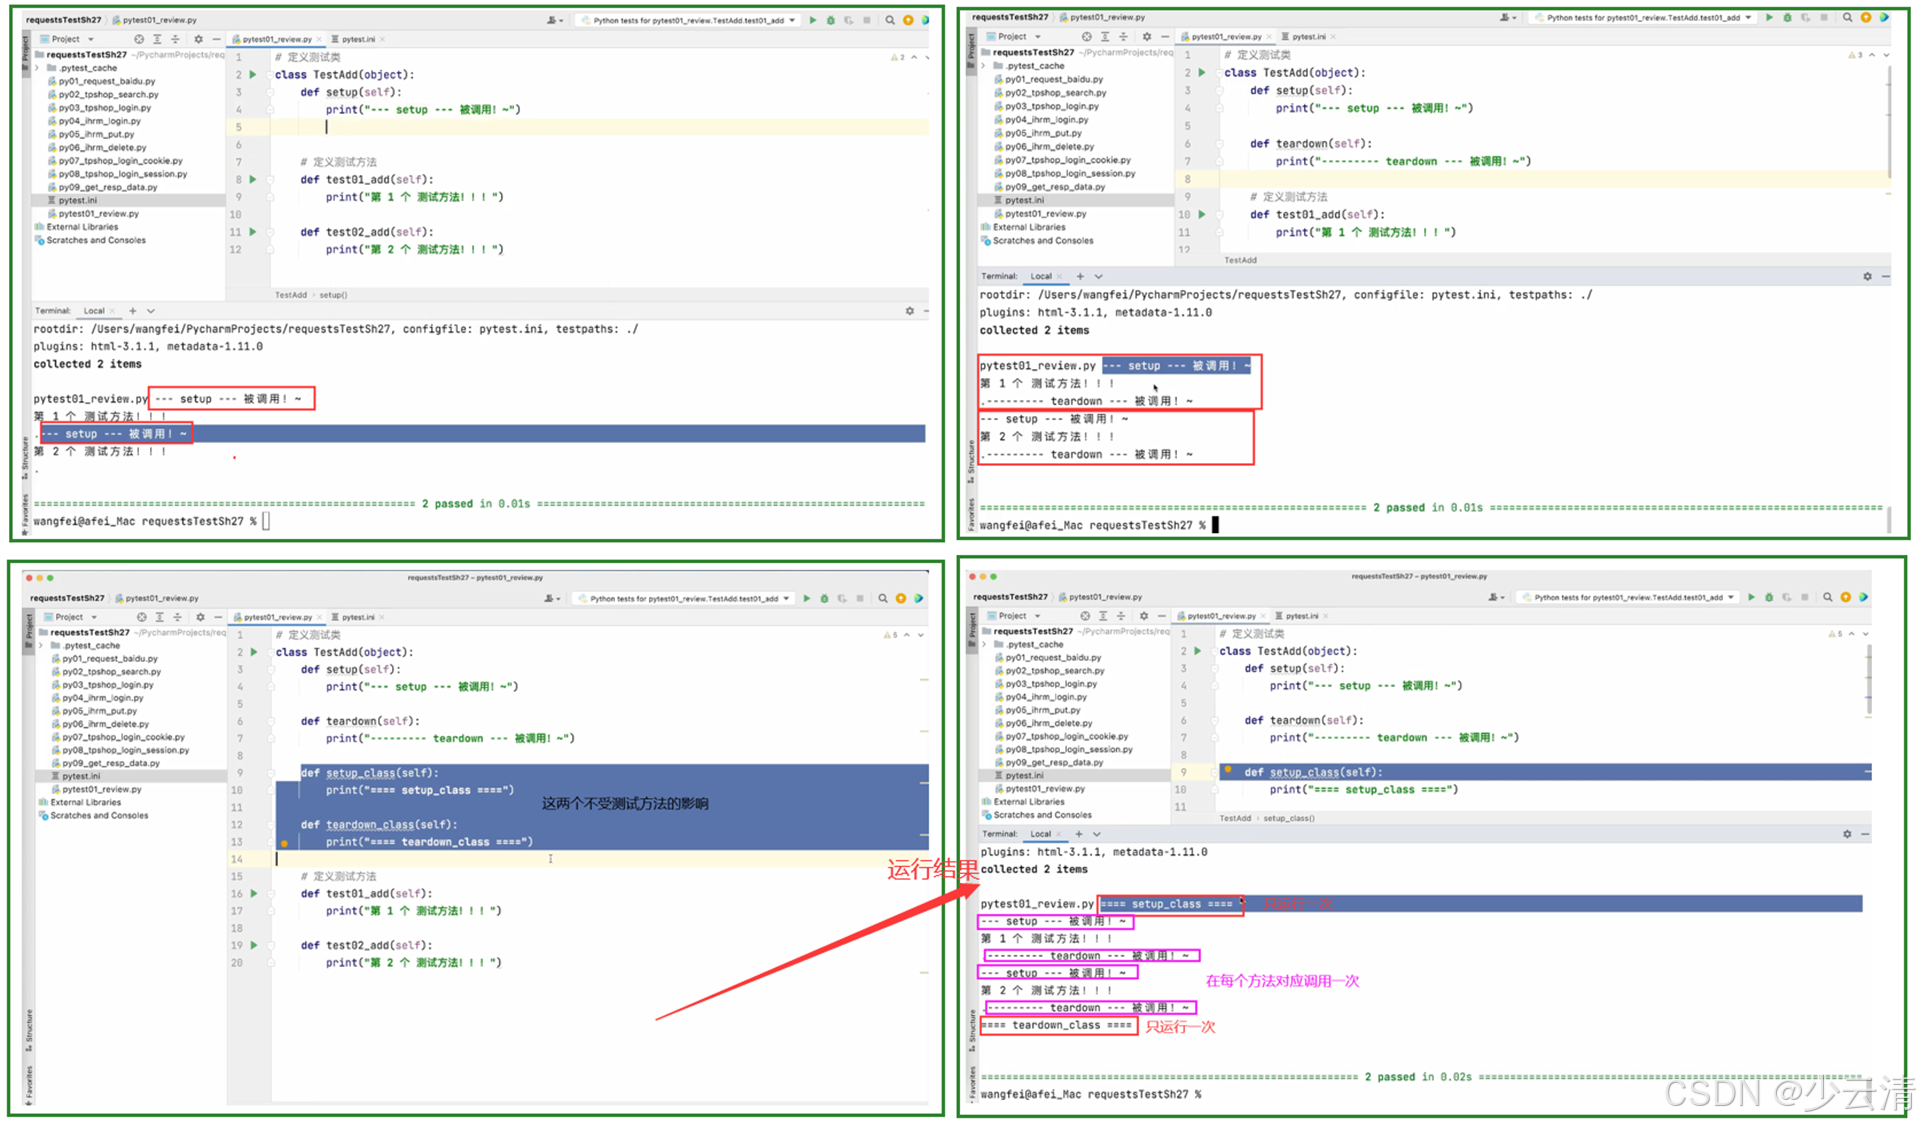
五、断言
断言错误,会在控制台显示断言错误(AssertionError)。
python
# 方法1:
	assert 预期结果 == 实际结果		------------ 断言相等
# 方法2:
	assert 预期结果 in 实际结果		------------ 断言包含
5.1 断言-案例
python
# 定义测试类
class TestAdd(object):
    # 定义测试方法
    def test01_add(self):
        print("第 1 个 测试方法!!!")
        assert 10 == 2 + 8

    def test02_add(self):
        print("第 2 个 测试方法!!!")
        assert "hello" in "helloword"      # hello是包含在hellohelloword里面
结果:
bash
# 前面已经配置了 pytest.ini 文件,才能直接在终端中使用pytest。

PS C:\XM1\requestsTestSh27> pytest
================================================================================= test session starts =================================================================================
platform win32 -- Python 3.7.4, pytest-7.4.4, pluggy-0.13.0
rootdir: C:\XM1\requestsTestSh27
configfile: pytest.ini
testpaths: ./
plugins: arraydiff-0.3, doctestplus-0.4.0, html-3.2.0, metadata-3.0.0, openfiles-0.4.0, remotedata-0.3.2
collected 2 items

pytest01_review.py 第 1 个 测试方法!!!
.第 2 个 测试方法!!!
.

---------------------------------------- generated html file: file:///C:/XM1/requestsTestSh27/report/%E6%88%91%E7%9A%84%E6%8A%A5%E5%91%8A.html ----------------------------------------
================================================================================== 2 passed in 0.05s ==================================================================================
PS C:\XM1\requestsTestSh27>
六、测试报告
必须在项目所在的目录下,执行pytest命令,生成测试报告。
python
# 1. 安装插件
pip install pytest-html
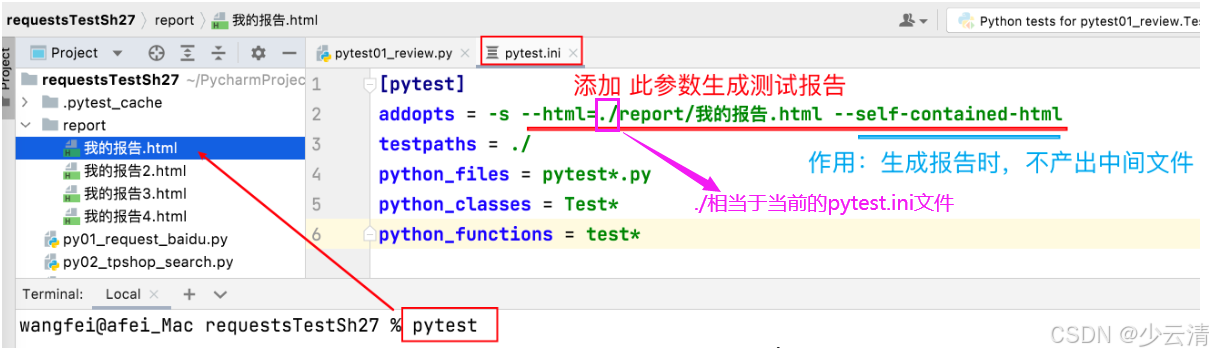
# 2. 修改 pytest.ini 文件的 addopts 的值。
"""
report:表示目录,当前项目下得有这个report目录。
- ①测试报告名.html:自己起测试报告名。
- ②--self-contained-html:这个参数如果不加,每次生成测试报告会有一个中间文件,这个中间文件没用。
这个参数就是不加这个缓存文件。
"""
addopts = -s --html=report/测试报告名.html --self-contained-html
# 3. 使用命令 pytest 生成测试报告