查阅了网上许多VitePress+Github Pages的部署教程,发现要么不完整、要么过时、要么不够详细
于是在这里专门写一篇详细的图文教程以供查阅。
或许存在时效性,注意本文发布于2025年12月26日
环境准备
- Node.JS:点击前往下载=>Node.JS,版本请确保**>18**。
- 支持markdown语法的编辑器:推荐
VsCode并安装对应扩展
创建项目
创建一个文件夹VitePressDemo(取你自己想要的名字即可)并进入终端
你也可以直接在你现有的项目文件夹根目录中这么做,例如你要为自己的后台编写一个文档站
执行指令
根据自己的环境选择:
- npm:
npm add -D vitepress@next - pnpm:
pnpm add -D vitepress@next - yarn:
yarn add -D vitepress@next vue - bun:
bun add -D vitepress@next
安装向导
安装完成后继续输入指令,根据自己的环境选择:
- npm:
npx vitepress init - pnpm:
pnpm vitepress init - yarn:
yarn vitepress init - bun:
bun vitepress init
然后你将需要回答一些问题用于环境的初始配置,推荐按如下设置
js
┌  Welcome to VitePress!
│
◇  Where should VitePress initialize the config?
│  ./docs
│
◇  Where should VitePress look for your markdown files?
│  ./docs
│
◇  Site title:
│  VitePressDemo(可以修改)
│
◇  Site description:
│  VitePressDemo description(可以修改)
│
◇  Theme:
│  Default Theme
│
◇  Use TypeScript for config and theme files?
│  Yes
│
◇  Add VitePress npm scripts to package.json?
│  Yes
│
◇  Add a prefix for VitePress npm scripts?
│  Yes
│
◇  Prefix for VitePress npm scripts:
│  docs
│
└  Done! Now run pnpm run docs:dev and start writing.
项目结构
假设选择在 ./docs 中搭建 VitePress 项目,生成的文件结构应该是这样的:
lua
.
├─ docs
│  ├─ .vitepress
│  │  └─ config.js
│  ├─ api-examples.md
│  ├─ markdown-examples.md
│  └─ index.md
└─ package.json
默认情况下,VitePress 将其开发服务器缓存存储在
.vitepress/cache中,并将生产构建输出存储在.vitepress/dist中。如果使用 Git,应该将它们添加到.gitignore文件中。
bashnode_modules/ docs/node_modules docs/.vuepress/.temp docs/.vitepress/dist docs/.vitepress/cache
本地运行
如果你的安装向导与我描述的一致,你应该可以在 package.json 中看到以下npm脚本
json
{
  ...
  "scripts": {
    "docs:dev": "vitepress dev docs",
    "docs:build": "vitepress build docs",
    "docs:preview": "vitepress preview docs"
  },
  ...
}
启动具有即时热更新的本地开发服务器。根据自己的环境使用以下命令:
- npm:
npx vitepress dev docs - pnpm:
pnpm vitepress dev docs - yarn:
yarn vitepress dev docs - bun:
bun vitepress dev docs
开发服务应该会运行在 http://localhost:5173 上,将URL复制到浏览器中打开,即可在本地访问文档站!
验证编译
有时候项目可以在本地运行,但无法正常编译
所以推荐每次需要更新自己的文档站之前,使用编译指令验证编译是否可行:
sh
npm run docs:build你还可以通过指令来本地预览编译好的网站:
sh
npm run docs:previewpreview 命令将启动一个本地静态 Web 服务 http://localhost:4173,该服务以 .vitepress/dist 作为源文件。这是检查生产版本在本地环境中是否正常的一种简单方法。
部署Github Pages
做一些准备
-
请在项目根目录执行
npm install,生成package-lock.json文件 -
在/docs/.vitepress/config.mts文件中,设置base为自己的项目名,例如
phpimport { defineConfig } from "vitepress"; // https://vitepress.dev/reference/site-config export default defineConfig({ title: "VitePressDemo", description: "VitePressDemo Description", // 设置base base: "/VitePressDemo/", themeConfig: { // https://vitepress.dev/reference/default-theme-config nav: [ { text: "Home", link: "/" }, { text: "Examples", link: "/markdown-examples" }, ], sidebar: [ { text: "Examples", items: [ { text: "Markdown Examples", link: "/markdown-examples" }, { text: "Runtime API Examples", link: "/api-examples" }, ], }, ], socialLinks: [ { icon: "github", link: "https://github.com/vuejs/vitepress" }, ], }, });这一步是必须的,因为
GitHub Pages的默认域名格式为https://你的用户名..github.io/项目名/,你需要告诉vitePress项目的入口在哪。
建立仓库
我们需要在Github中建立一个仓库并将我们的代码放进去。
这一部分的知识与Git有关,网上资料很多在此不做赘述。
推荐在 VsCode 插件中安装 GitHub Pull Requests用于 Github 仓库推送、拉取。
在仓库界面选择Settings-Pages-Build and deployment-Source-下拉框选择 Github Actions

提交渲染逻辑
接下来我们要为网站编写网站渲染逻辑
选择Github Pages Jekyll下方的Configure
按照如图设置写入代码,并将文件名改为deploy.yml,完成后点击Commit changes
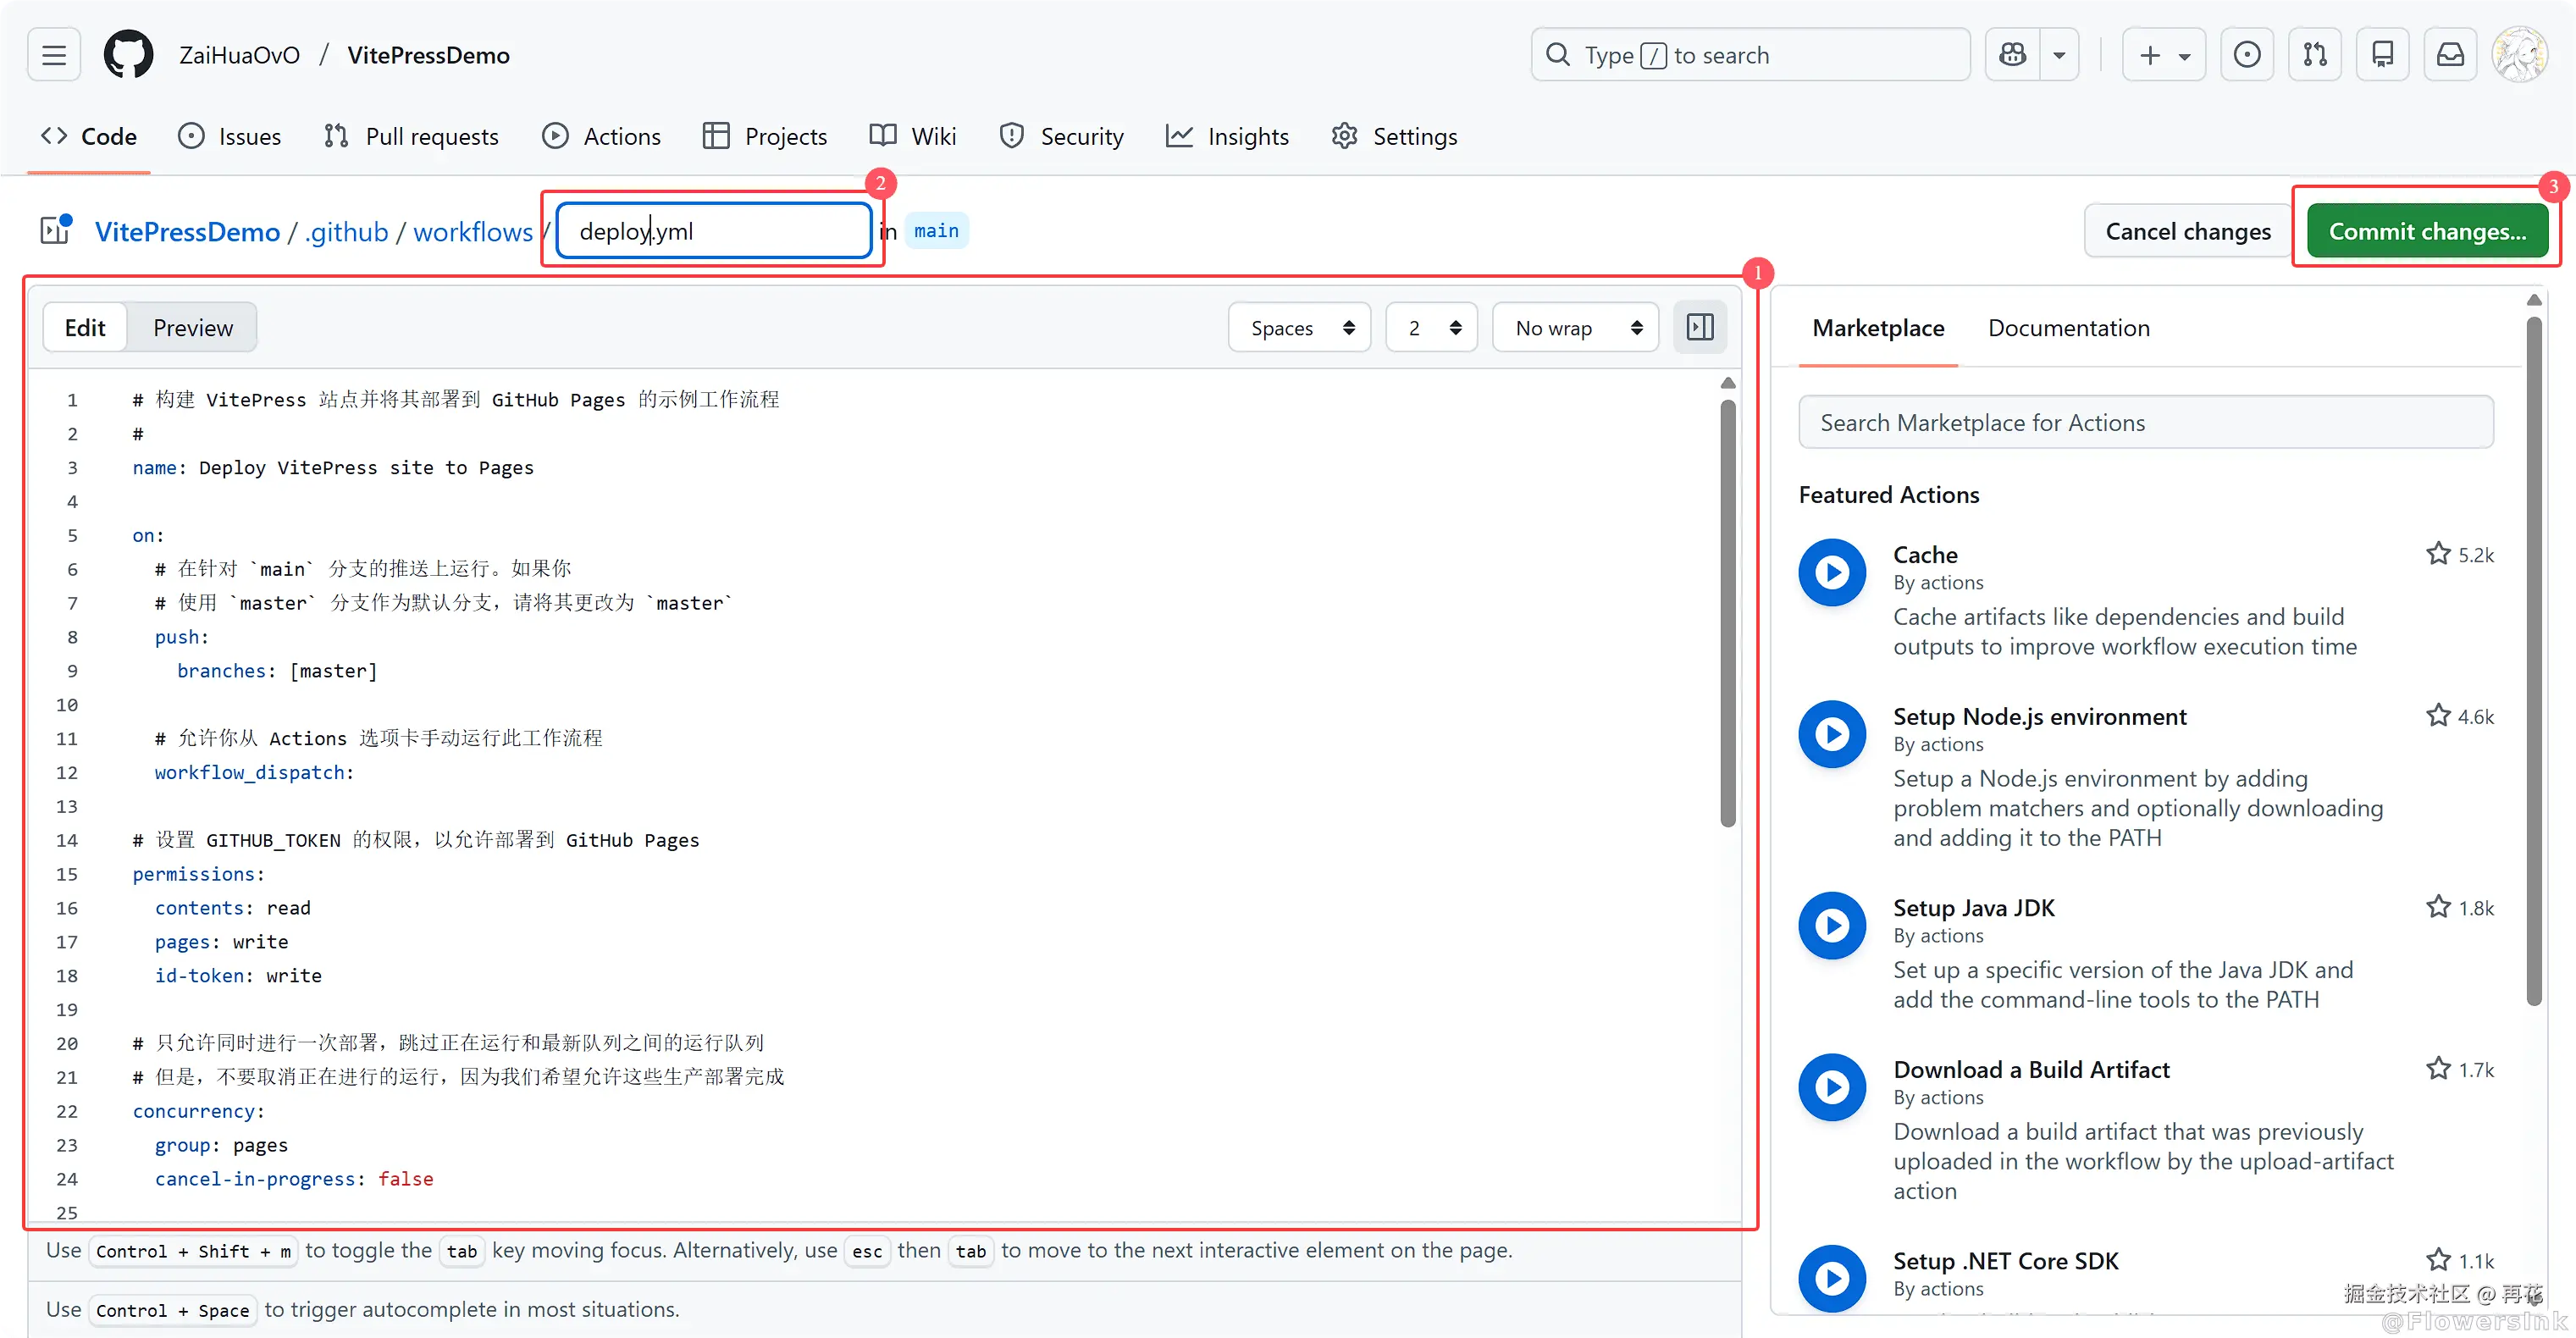
需要写入的代码如下,一定要将环境修改为自己的环境,例如 node-version: 22(Node.JS版本)、cache: npm、run: npm ci
yaml
# 构建 VitePress 站点并将其部署到 GitHub Pages 的示例工作流程
#
name: Deploy VitePress site to Pages

on:
  # 在针对 `main` 分支的推送上运行。如果你
  # 使用 `master` 分支作为默认分支,请将其更改为 `master`
  push:
    branches: [master]

  # 允许你从 Actions 选项卡手动运行此工作流程
  workflow_dispatch:

# 设置 GITHUB_TOKEN 的权限,以允许部署到 GitHub Pages
permissions:
  contents: read
  pages: write
  id-token: write

# 只允许同时进行一次部署,跳过正在运行和最新队列之间的运行队列
# 但是,不要取消正在进行的运行,因为我们希望允许这些生产部署完成
concurrency:
  group: pages
  cancel-in-progress: false

jobs:
  # 构建工作
  build:
    runs-on: ubuntu-latest
    steps:
      - name: Checkout
        uses: actions/checkout@v4
        with:
          fetch-depth: 0 # 如果未启用 lastUpdated,则不需要
      # - uses: pnpm/action-setup@v2 # 如果使用 pnpm,请取消注释
      # - uses: oven-sh/setup-bun@v1 # 如果使用 Bun,请取消注释
      - name: Setup Node
        uses: actions/setup-node@v4
        with:
          node-version: 22
          cache: npm # 或 pnpm / yarn
      - name: Setup Pages
        uses: actions/configure-pages@v4
      - name: Install dependencies
        run: npm ci # 或 pnpm install / yarn install / bun install
      - name: Build with VitePress
        run: |
          npm run docs:build # 或 pnpm docs:build / yarn docs:build / bun run docs:build
          touch docs/.vitepress/dist/.nojekyll
      - name: Upload artifact
        uses: actions/upload-pages-artifact@v3
        with:
          path: docs/.vitepress/dist

  # 部署工作
  deploy:
    environment:
      name: github-pages
      url: ${{ steps.deployment.outputs.page_url }}
    needs: build
    runs-on: ubuntu-latest
    name: Deploy
    steps:
      - name: Deploy to GitHub Pages
        id: deployment
        uses: actions/deploy-pages@v4
编译网站
将deploy.yml文件提交成功后,我们来到Actions编译代码
在仓库界面选择Actions-Deploy VitePress site to Pages-Run workflow下拉框-选择Run workflow
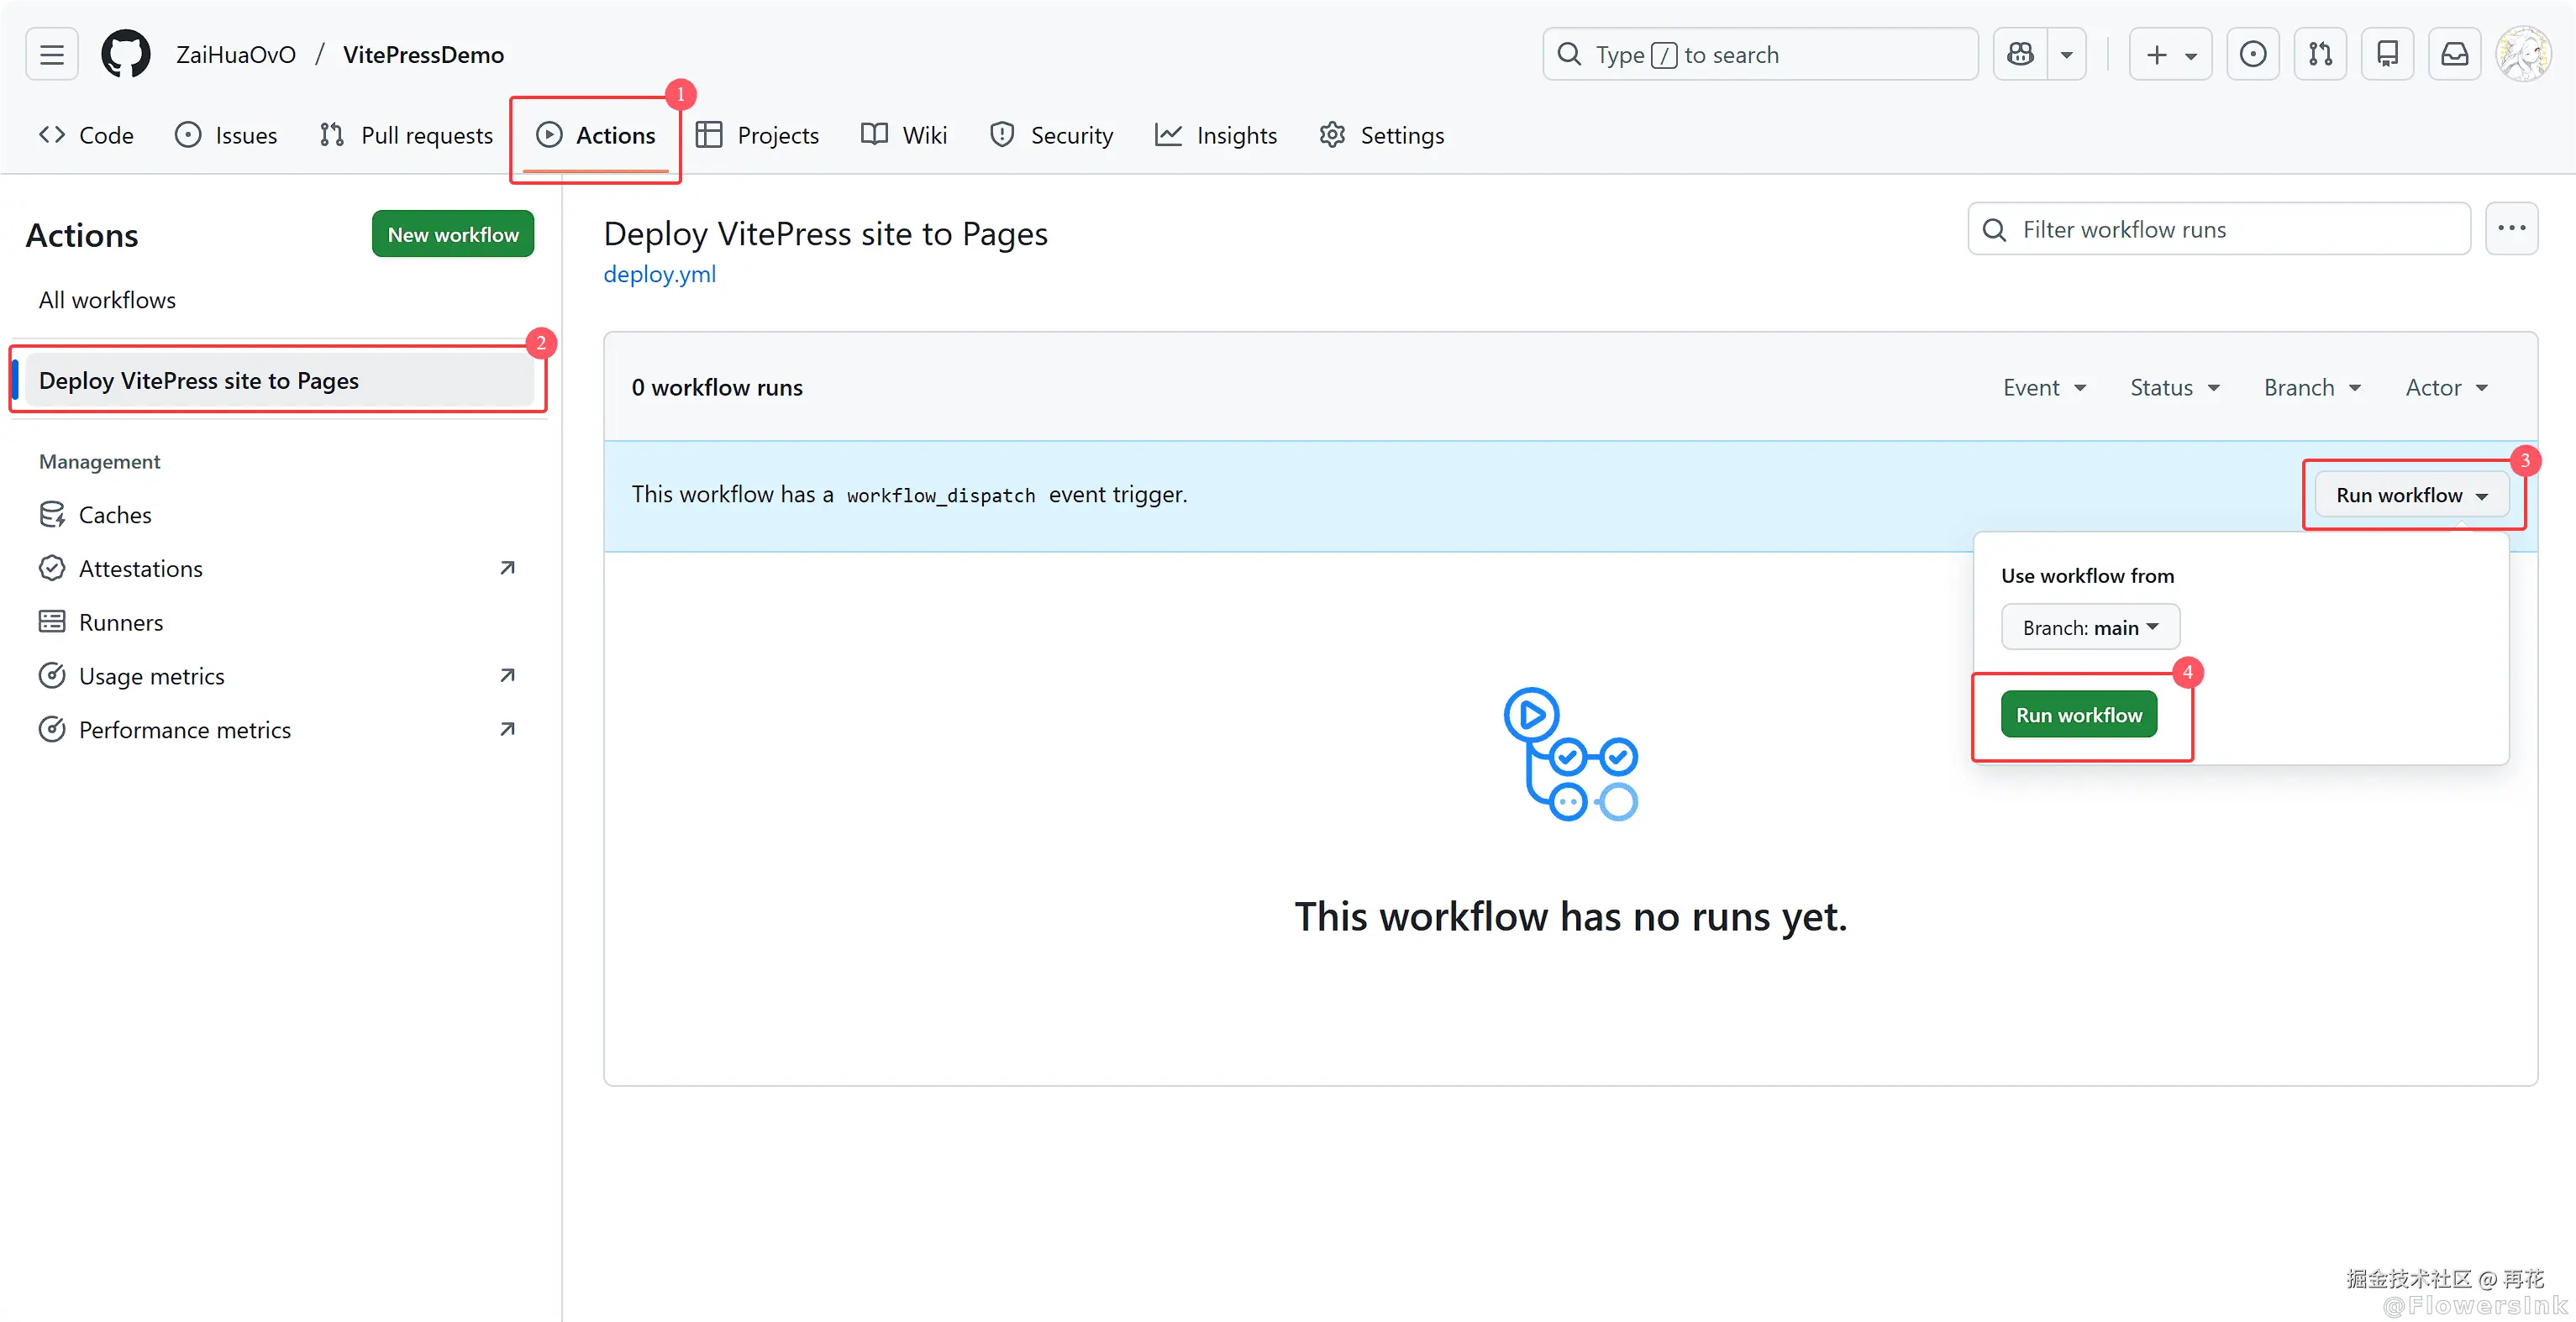
你每次提交并更新了仓库的代码,网站并不会自动更新,需要来这里再次执行一次Run workflow才会重新编译网站
我没有设置自动编译,这个步骤对于我来说相当于一个"确认"键,对我很有必要
如果需要自动编译,将
reploy.yml中的branches: [master]修改为branches: [main]即可
访问网站
你每次编译网站后刷新页面,最新的编译左边会有一个状态
黄色代表正在编译,红色代表编译错误(出BUG了),绿色则代表编译完成。

当它显示绿色的时候,你就可以去访问自己的网站了(刷新才可以看到绿色,网站不会自动刷新)
如果这一步编译错误,请在根目录再次执行
npm add -D vitepress@next确保你的package.json的代码存在以下代码:
json{ "scripts": { "docs:dev": "vitepress dev docs", "docs:build": "vitepress build docs", "docs:preview": "vitepress preview docs" }, "devDependencies": { "vitepress": "^2.0.0-alpha.15" } }
回到Settings-Pages就可以看到自己的网站地址了
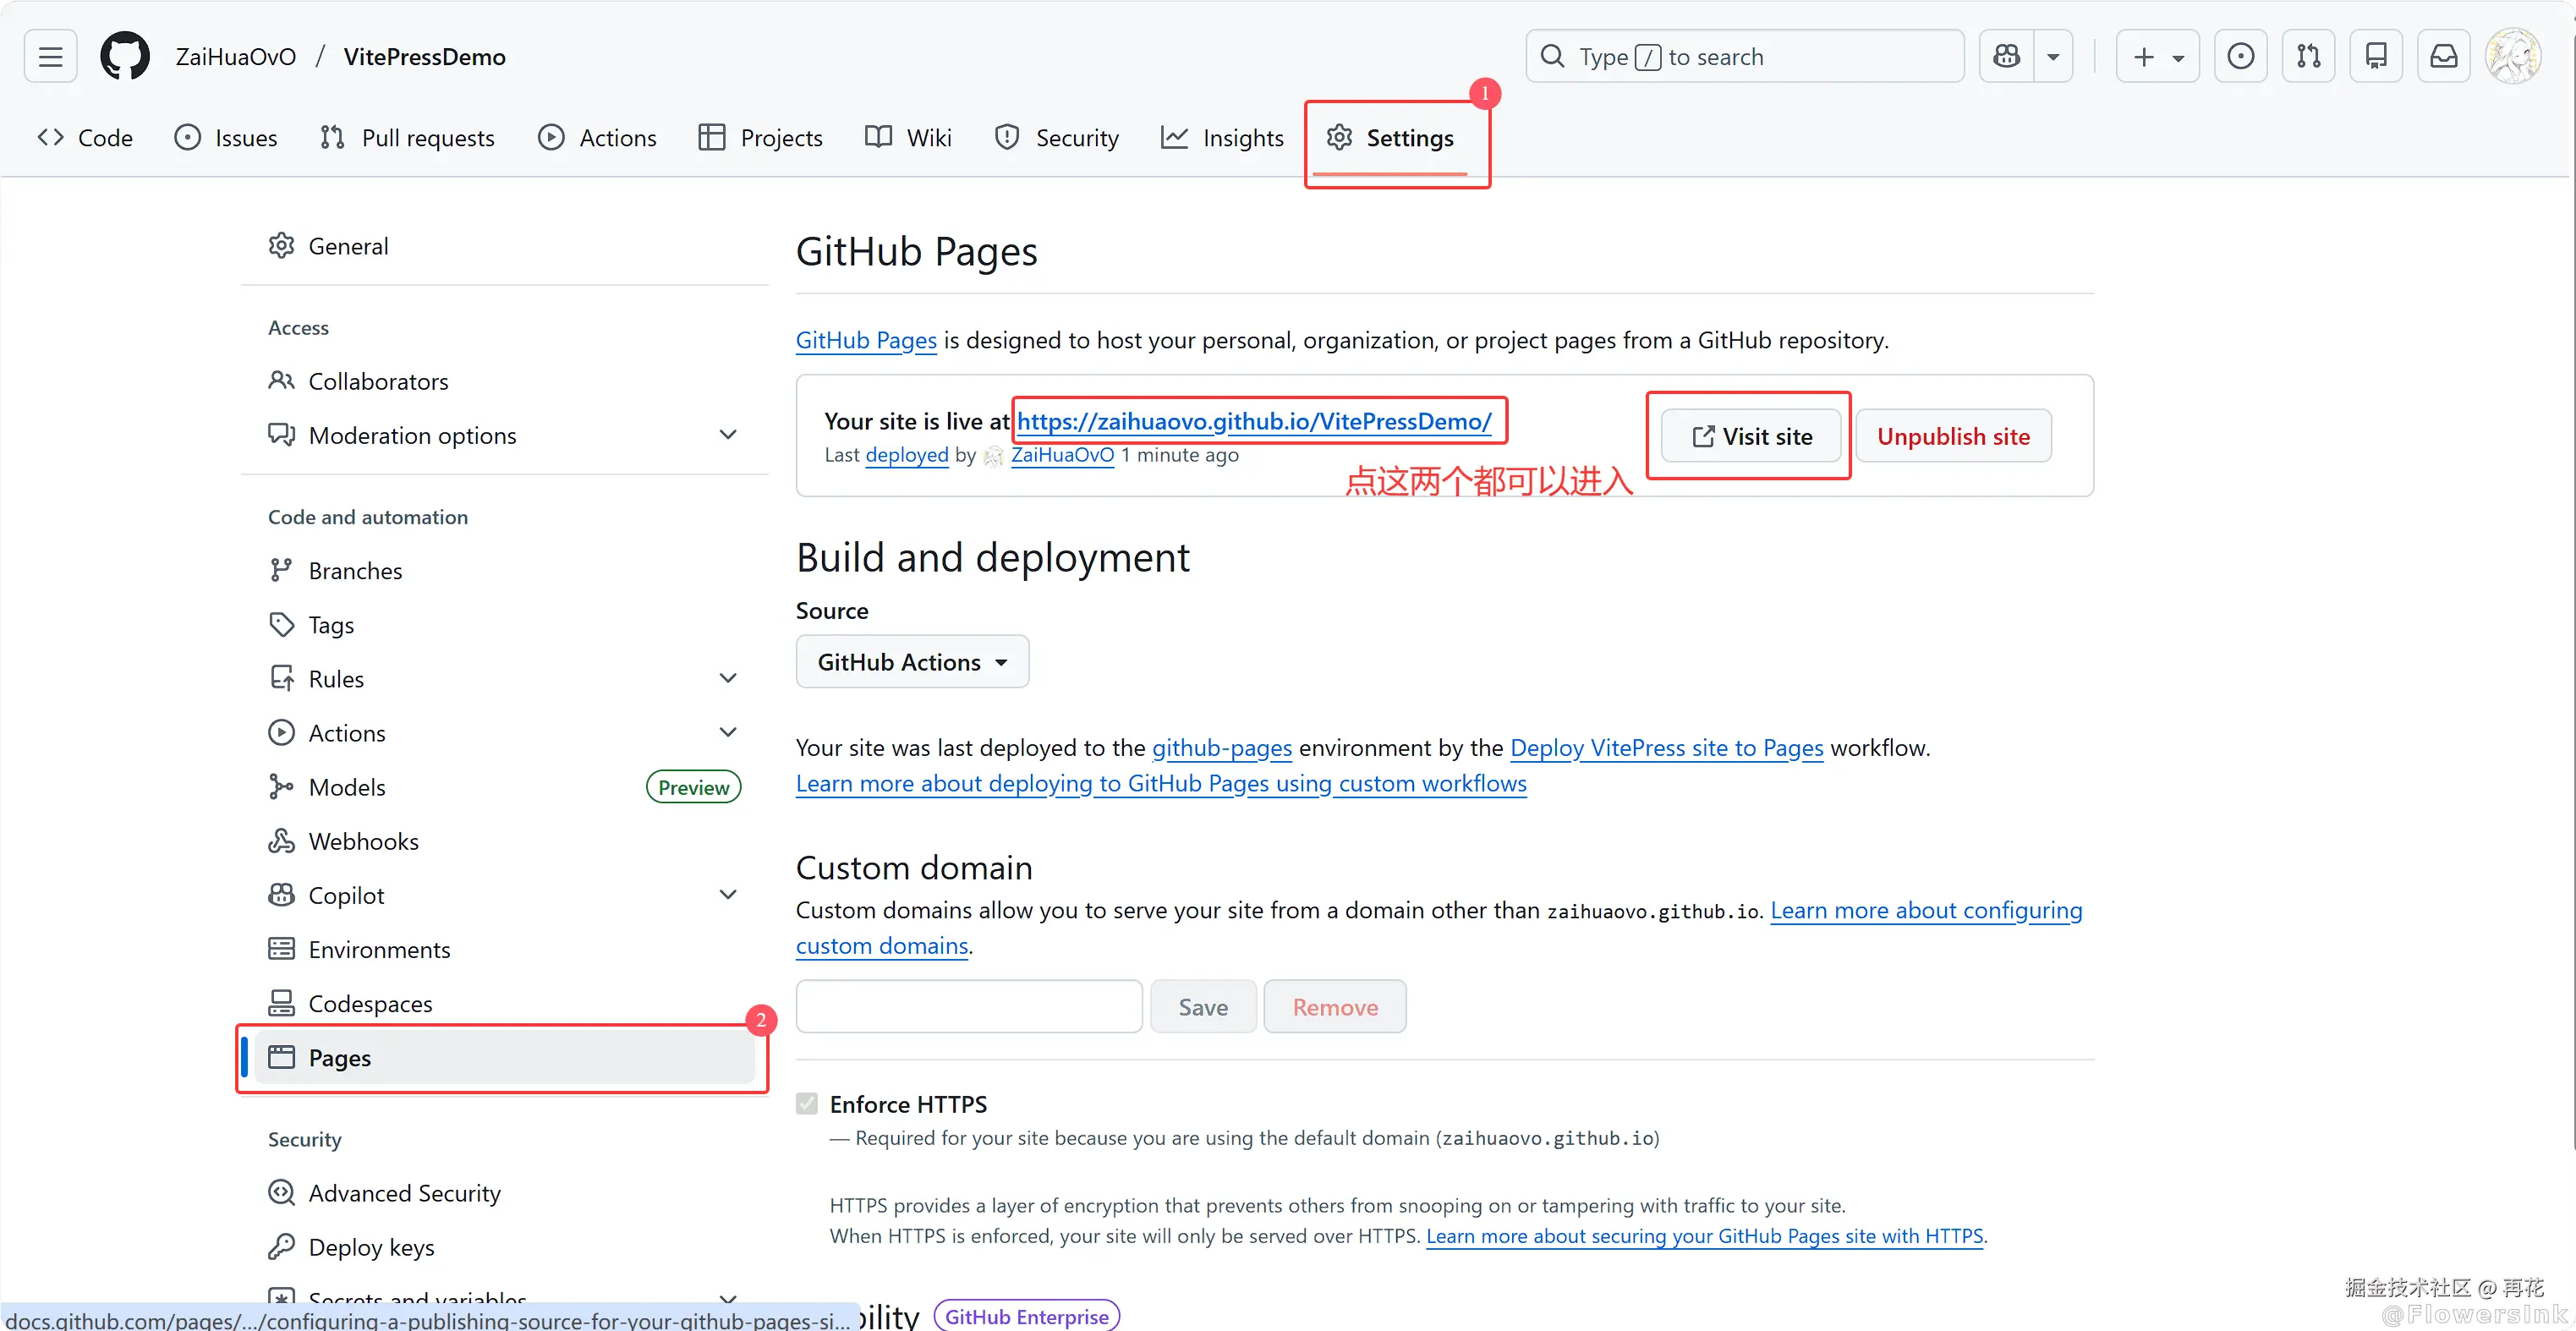
进入网站可以看到vitePress的初始模板
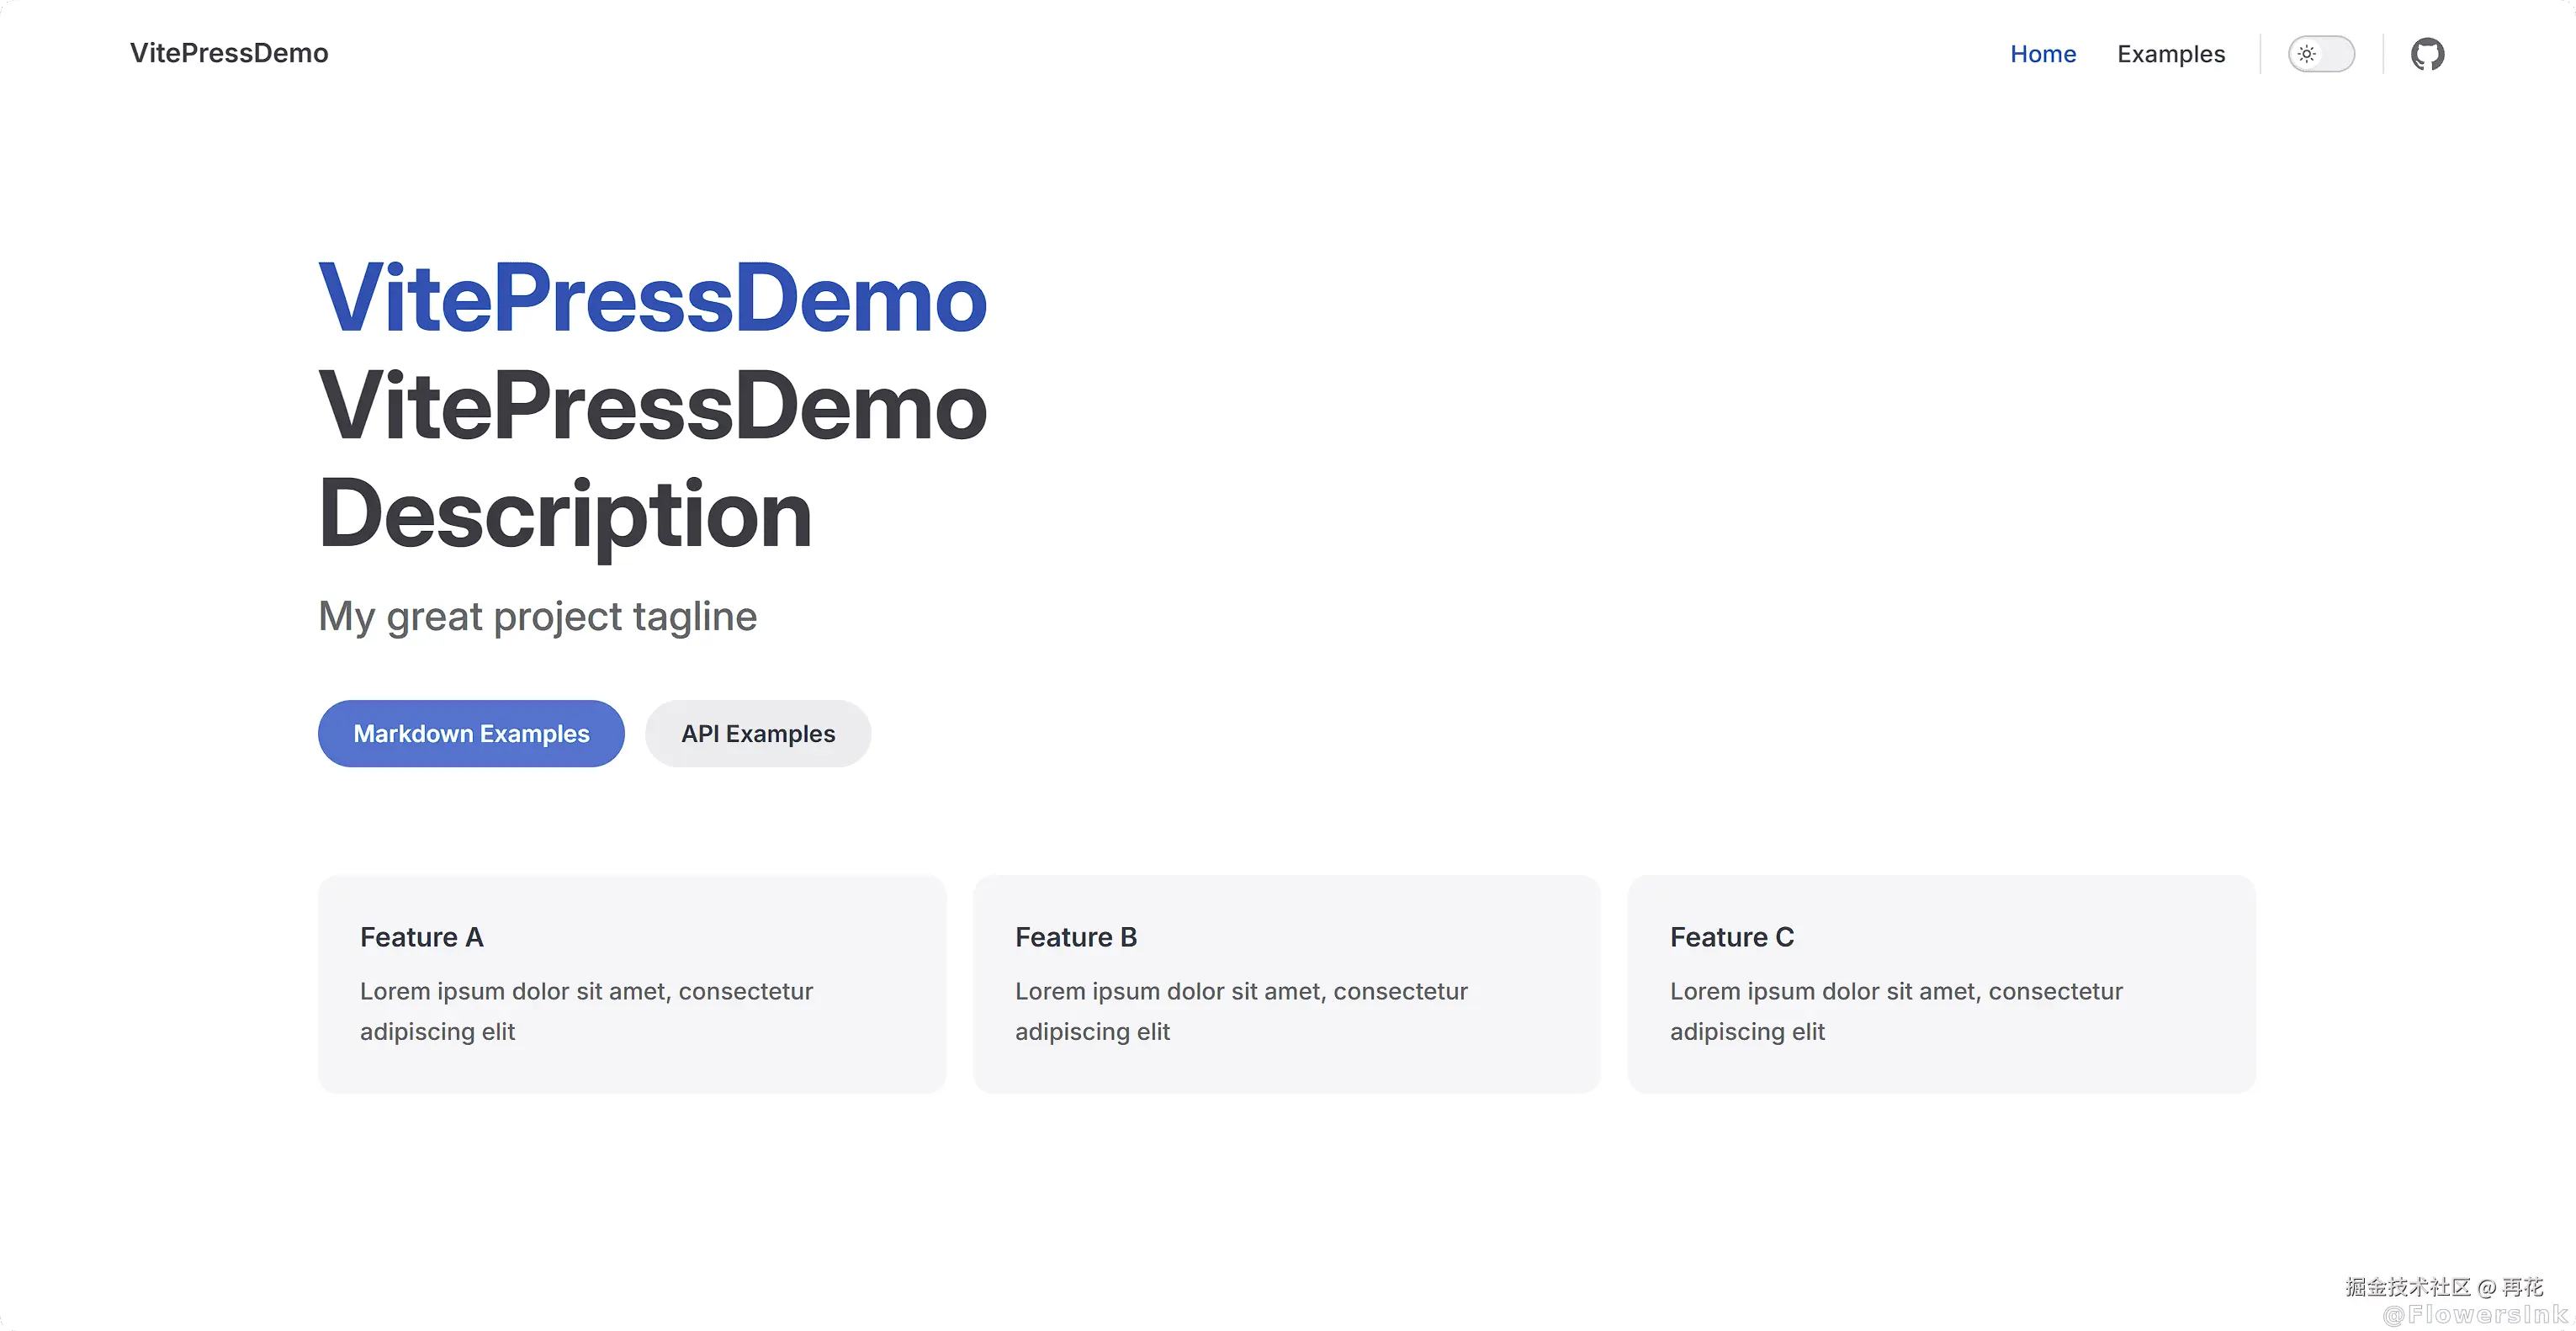
如果进入网页除了一个标题什么都没有,则大概率是base设置的问题。
结尾
本文用于截图的Demo项目地址为:VitePressDemo
关于开发方面可以翻阅文档 VitePress,本文有许多内容都是取自于其中,只是加上了自己的经验理解和截图。
诞生本文的灵感,是由于最近在帮一个小项目编写文档站的时候查阅资料学习,目前文档站编写了目录自动识别、中英文切换、回到顶部等多个功能,想要进一步开发可以参考本项目的代码:MaaLYSK