目录
[🎯 先说说为啥要自己造Starter](#🎯 先说说为啥要自己造Starter)
[✨ 摘要](#✨ 摘要)
[1. 别急着写代码,先想清楚这几个问题](#1. 别急着写代码,先想清楚这几个问题)
[1.1 什么样的组件适合做成Starter?](#1.1 什么样的组件适合做成Starter?)
[✅ 标准一:跨项目复用性强](#✅ 标准一:跨项目复用性强)
[✅ 标准二:配置复杂但模式固定](#✅ 标准二:配置复杂但模式固定)
[✅ 标准三:需要统一管理和升级](#✅ 标准三:需要统一管理和升级)
[1.2 Starter的命名规范:别瞎起名](#1.2 Starter的命名规范:别瞎起名)
[2. Starter的核心架构:不只是@Configuration](#2. Starter的核心架构:不只是@Configuration)
[2.1 一个完整Starter的组成](#2.1 一个完整Starter的组成)
[2.2 自动装配的原理再深入一点](#2.2 自动装配的原理再深入一点)
[3. 实战:手把手写一个分布式锁Starter](#3. 实战:手把手写一个分布式锁Starter)
[3.1 需求分析:我们要解决什么问题?](#3.1 需求分析:我们要解决什么问题?)
[3.2 项目结构设计](#3.2 项目结构设计)
[3.3 核心代码实现](#3.3 核心代码实现)
[3.4 配置元数据:让IDE智能提示](#3.4 配置元数据:让IDE智能提示)
[3.5 默认配置文件](#3.5 默认配置文件)
[4. Starter的使用:简单到哭](#4. Starter的使用:简单到哭)
[4.1 Maven依赖](#4.1 Maven依赖)
[4.2 配置(可选)](#4.2 配置(可选))
[4.3 使用方式](#4.3 使用方式)
[4.4 监控查看](#4.4 监控查看)
[5. 企业级Starter的高级特性](#5. 企业级Starter的高级特性)
[5.1 多版本兼容:向前向后都要考虑](#5.1 多版本兼容:向前向后都要考虑)
[5.2 性能优化:Starter不能拖慢应用](#5.2 性能优化:Starter不能拖慢应用)
[5.3 监控告警:出了问题要知道](#5.3 监控告警:出了问题要知道)
[6. Starter的测试策略](#6. Starter的测试策略)
[6.1 单元测试:保证代码质量](#6.1 单元测试:保证代码质量)
[6.2 集成测试:验证真实环境](#6.2 集成测试:验证真实环境)
[6.3 性能测试:确保不影响应用性能](#6.3 性能测试:确保不影响应用性能)
[7. Starter的发布与治理](#7. Starter的发布与治理)
[7.1 Maven发布配置](#7.1 Maven发布配置)
[7.2 版本管理策略](#7.2 版本管理策略)
[7.3 依赖管理](#7.3 依赖管理)
[8. 企业级Starter架构演进](#8. 企业级Starter架构演进)
[8.1 从单一Starter到Starter套件](#8.1 从单一Starter到Starter套件)
[8.2 Starter的依赖关系管理](#8.2 Starter的依赖关系管理)
[8.3 配置的统一管理](#8.3 配置的统一管理)
[9. 故障排查与调试](#9. 故障排查与调试)
[9.1 常见问题排查清单](#9.1 常见问题排查清单)
[9.2 调试技巧](#9.2 调试技巧)
[技巧3:使用Spring Boot Actuator端点](#技巧3:使用Spring Boot Actuator端点)
[10. 最后的话:Starter开发的"道"与"术"](#10. 最后的话:Starter开发的"道"与"术")
[📚 推荐阅读](#📚 推荐阅读)

🎯 先说说为啥要自己造Starter
三年前我在美团带中间件团队,手下管着30多个微服务。那会儿最头疼的就是配置管理:每个服务都要配一遍Redis、配一遍MQ、配一遍监控。今天这个服务配错了,明天那个服务版本对不上。后来我们一咬牙,花了两个月把所有通用组件打包成Starter,效果立竿见影:
部署时间:从平均2小时降到15分钟
配置错误率:从每月15起降到几乎为零
新人上手速度:从一周降到半天
更绝的是,有个兄弟团队照着我们的Starter抄作业,三个月搞定了他们原来计划半年的微服务改造。
所以今天这篇文章,我不光教你怎么写Starter,更要教你怎么写出生产级的Starter。这中间的坑,我都替你踩过了。
✨ 摘要
Spring Boot Starter是企业级微服务架构的基石。本文从实战出发,完整解析Starter的开发全流程:从Maven配置、自动装配原理、条件注解使用,到配置元数据、健康检查、监控集成。通过多个真实企业级Starter案例(分布式锁、ID生成器、审计日志),提供可复用的代码模板和最佳实践。最后分享Starter治理、版本兼容、性能优化等高级话题。
1. 别急着写代码,先想清楚这几个问题
1.1 什么样的组件适合做成Starter?
不是所有组件都适合做成Starter。我总结了三个判断标准:
✅ 标准一:跨项目复用性强
比如:Redis客户端、消息队列、分布式锁、ID生成器。这些每个服务都要用。
✅ 标准二:配置复杂但模式固定
比如:数据库连接池配置、线程池配置、SSL证书配置。手动配容易出错。
✅ 标准三:需要统一管理和升级
比如:监控上报、链路追踪、安全组件。需要全公司统一。
反面教材:我见过有人把业务层的DTO做成Starter,这就属于走火入魔了。
1.2 Starter的命名规范:别瞎起名
命名看起来是小问题,但很重要。Spring官方有明确的命名规范:
XML
<!-- 好的命名 -->
<artifactId>spring-boot-starter-data-redis</artifactId>
<artifactId>redis-spring-boot-starter</artifactId>  <!-- 第三方可以这样 -->

<!-- 坏的命名 -->
<artifactId>my-redis-starter</artifactId>  <!-- 没有spring-boot前缀 -->
<artifactId>redis-starter-spring-boot</artifactId> <!-- 顺序不对 -->企业内部的命名建议:
XML
<!-- 公司级组件 -->
<artifactId>meituan-spring-boot-starter-distributed-lock</artifactId>

<!-- 团队级组件 -->
<artifactId>payment-spring-boot-starter-audit</artifactId>

<!-- 通用工具 -->
<artifactId>common-spring-boot-starter-id-generator</artifactId>
2. Starter的核心架构:不只是@Configuration
2.1 一个完整Starter的组成
很多人以为Starter就是几个Java类,太天真了!一个生产级的Starter至少包含:

图1:生产级Starter的完整组成
2.2 自动装配的原理再深入一点
我知道你肯定看过@EnableAutoConfiguration的原理,但我今天要说点不一样的。
关键点:Spring Boot 2.7之后,自动配置的注册方式变了:
java
// Spring Boot 2.7之前:用spring.factories
// META-INF/spring.factories
org.springframework.boot.autoconfigure.EnableAutoConfiguration=\
com.example.MyAutoConfiguration

// Spring Boot 2.7之后:推荐用@AutoConfiguration
// src/main/resources/META-INF/spring/
//   └── org.springframework.boot.autoconfigure.AutoConfiguration.imports
// 文件内容:
com.example.MyAutoConfiguration

// 对应的Java代码
@AutoConfiguration  // 新的注解
@EnableConfigurationProperties(MyProperties.class)
@ConditionalOnClass(SomeClass.class)
public class MyAutoConfiguration {
    // 配置内容
}
代码清单1:新旧自动配置注册方式对比
为什么这么改 ?因为@AutoConfiguration支持更多特性:
-
自动排序(通过
@AutoConfigureBefore、@AutoConfigureAfter) -
更好的IDE支持
-
更清晰的元数据
3. 实战:手把手写一个分布式锁Starter
3.1 需求分析:我们要解决什么问题?
在做技术方案前,先明确需求。我们需要的分布式锁要:
-
支持多种实现:Redis、Zookeeper、数据库
-
可配置:超时时间、重试策略
-
监控:锁获取成功率、平均耗时
-
易用:注解式、编程式都要支持
3.2 项目结构设计
先看Maven项目结构:
distributed-lock-spring-boot-starter/
├── pom.xml
├── src/
│   ├── main/
│   │   ├── java/
│   │   │   └── com/
│   │   │       └── meituan/
│   │   │           └── lock/
│   │   │               ├── LockProperties.java          # 配置属性
│   │   │               ├── DistributedLock.java         # 核心接口
│   │   │               ├── RedisDistributedLock.java    # Redis实现
│   │   │               ├── ZkDistributedLock.java       # ZK实现
│   │   │               ├── LockAutoConfiguration.java   # 自动配置
│   │   │               ├── LockAspect.java              # AOP切面
│   │   │               └── annotation/
│   │   │                   └── Lockable.java            # 锁注解
│   │   └── resources/
│   │       ├── META-INF/
│   │       │   └── spring/
│   │       │       └── org.springframework.boot.autoconfigure.AutoConfiguration.imports
│   │       └── application-lock.yml                     # 默认配置
│   └── test/                                            # 测试代码
└── README.md
3.3 核心代码实现
第一步:定义配置属性
java
@ConfigurationProperties(prefix = "meituan.lock")
@Validated
public class LockProperties {

    /**
     * 锁类型:redis、zookeeper、database
     */
    @NotEmpty(message = "锁类型不能为空")
    private String type = "redis";

    /**
     * 默认超时时间(毫秒)
     */
    @Min(value = 1, message = "超时时间必须大于0")
    private long defaultTimeout = 30000;

    /**
     * 默认等待时间(毫秒)
     */
    @Min(value = 0, message = "等待时间不能小于0")
    private long defaultWaitTime = 10000;

    /**
     * 重试次数
     */
    @Min(value = 0, message = "重试次数不能小于0")
    private int retryTimes = 3;

    /**
     * Redis配置(当type=redis时生效)
     */
    private RedisConfig redis = new RedisConfig();

    /**
     * Zookeeper配置(当type=zookeeper时生效)
     */
    private ZkConfig zookeeper = new ZkConfig();

    // 嵌套配置类
    @Data
    public static class RedisConfig {
        private String address = "redis://localhost:6379";
        private String password;
        private int database = 0;
        private int connectionPoolSize = 64;
        private int connectionMinimumIdleSize = 24;
    }

    @Data
    public static class ZkConfig {
        private String servers = "localhost:2181";
        private int sessionTimeout = 30000;
        private int connectionTimeout = 15000;
        private String namespace = "meituan-lock";
    }

    // Getter/Setter省略...
}
代码清单2:分布式锁配置属性类
第二步:定义核心接口
java
public interface DistributedLock {

    /**
     * 获取锁
     * @param lockKey 锁的key
     * @param timeout 超时时间(毫秒)
     * @param waitTime 等待时间(毫秒)
     * @return 是否获取成功
     */
    boolean tryLock(String lockKey, long timeout, long waitTime);

    /**
     * 获取锁(使用默认配置)
     */
    default boolean tryLock(String lockKey) {
        // 实际项目中这里会从ThreadLocal或配置中获取默认值
        return tryLock(lockKey, 30000, 10000);
    }

    /**
     * 释放锁
     */
    void unlock(String lockKey);

    /**
     * 续期锁(防止锁过期)
     */
    boolean renewLock(String lockKey, long expireTime);

    /**
     * 锁监控指标
     */
    LockStats getStats();

    @Data
    class LockStats {
        private long totalAcquireAttempts;      // 总获取尝试次数
        private long successfulAcquisitions;    // 成功获取次数
        private long failedAcquisitions;        // 失败获取次数
        private long averageAcquireTime;        // 平均获取时间(ms)
        private Map<String, Long> keyStats;     // 按key统计
    }
}
代码清单3:分布式锁核心接口
第三步:实现Redis分布式锁
java
@Slf4j
public class RedisDistributedLock implements DistributedLock {

    private final RedissonClient redissonClient;
    private final LockProperties properties;
    private final ConcurrentHashMap<String, RLock> lockCache = new ConcurrentHashMap<>();
    private final LockStats stats = new LockStats();
    private final AtomicLong totalAcquireAttempts = new AtomicLong();
    private final AtomicLong successfulAcquisitions = new AtomicLong();

    public RedisDistributedLock(LockProperties properties) {
        this.properties = properties;
        Config config = new Config();

        RedisConfig redisConfig = properties.getRedis();
        config.useSingleServer()
              .setAddress(redisConfig.getAddress())
              .setPassword(redisConfig.getPassword())
              .setDatabase(redisConfig.getDatabase())
              .setConnectionPoolSize(redisConfig.getConnectionPoolSize())
              .setConnectionMinimumIdleSize(redisConfig.getConnectionMinimumIdleSize());

        this.redissonClient = Redisson.create(config);
    }

    @Override
    public boolean tryLock(String lockKey, long timeout, long waitTime) {
        totalAcquireAttempts.incrementAndGet();
        long startTime = System.currentTimeMillis();

        try {
            RLock lock = lockCache.computeIfAbsent(lockKey,
                key -> redissonClient.getLock(key));

            boolean acquired = lock.tryLock(waitTime, timeout, TimeUnit.MILLISECONDS);

            if (acquired) {
                successfulAcquisitions.incrementAndGet();
                long costTime = System.currentTimeMillis() - startTime;

                // 记录监控指标
                synchronized (stats) {
                    stats.setAverageAcquireTime(
                        (stats.getAverageAcquireTime() * (successfulAcquisitions.get() - 1) + costTime)
                        / successfulAcquisitions.get()
                    );

                    stats.getKeyStats().merge(lockKey, 1L, Long::sum);
                }

                log.debug("成功获取锁: {}, 耗时: {}ms", lockKey, costTime);
            } else {
                log.warn("获取锁失败: {}, 等待时间: {}ms", lockKey, waitTime);
            }

            return acquired;

        } catch (InterruptedException e) {
            Thread.currentThread().interrupt();
            log.error("获取锁被中断: {}", lockKey, e);
            return false;
        } catch (Exception e) {
            log.error("获取锁异常: {}", lockKey, e);
            return false;
        } finally {
            stats.setTotalAcquireAttempts(totalAcquireAttempts.get());
            stats.setSuccessfulAcquisitions(successfulAcquisitions.get());
            stats.setFailedAcquisitions(totalAcquireAttempts.get() - successfulAcquisitions.get());
        }
    }

    @Override
    public void unlock(String lockKey) {
        try {
            RLock lock = lockCache.get(lockKey);
            if (lock != null && lock.isHeldByCurrentThread()) {
                lock.unlock();
                log.debug("释放锁: {}", lockKey);
            }
        } catch (Exception e) {
            log.error("释放锁异常: {}", lockKey, e);
        }
    }

    // 其他方法实现省略...
}
代码清单4:Redis分布式锁实现
第四步:自动配置类
java
@AutoConfiguration
@EnableConfigurationProperties(LockProperties.class)
@ConditionalOnClass(RedissonClient.class)
@ConditionalOnProperty(prefix = "meituan.lock", name = "enabled", havingValue = "true", matchIfMissing = true)
@AutoConfigureAfter(RedisAutoConfiguration.class)
public class LockAutoConfiguration {

    private static final Logger log = LoggerFactory.getLogger(LockAutoConfiguration.class);

    @Bean
    @ConditionalOnMissingBean
    @ConditionalOnProperty(prefix = "meituan.lock", name = "type", havingValue = "redis", matchIfMissing = true)
    public DistributedLock redisDistributedLock(LockProperties properties) {
        log.info("初始化Redis分布式锁, 地址: {}", properties.getRedis().getAddress());
        return new RedisDistributedLock(properties);
    }

    @Bean
    @ConditionalOnMissingBean
    @ConditionalOnProperty(prefix = "meituan.lock", name = "type", havingValue = "zookeeper")
    @ConditionalOnClass(value = {CuratorFramework.class, InterProcessMutex.class})
    public DistributedLock zookeeperDistributedLock(LockProperties properties) {
        log.info("初始化Zookeeper分布式锁, servers: {}", properties.getZookeeper().getServers());
        return new ZkDistributedLock(properties);
    }

    @Bean
    @ConditionalOnMissingBean
    public LockAspect lockAspect(DistributedLock distributedLock) {
        return new LockAspect(distributedLock);
    }

    @Bean
    public LockHealthIndicator lockHealthIndicator(DistributedLock distributedLock) {
        return new LockHealthIndicator(distributedLock);
    }

    @Bean
    public LockMetrics lockMetrics(DistributedLock distributedLock) {
        return new LockMetrics(distributedLock);
    }
}
代码清单5:分布式锁自动配置类
第五步:AOP切面支持注解式锁
java
@Aspect
@Component
@ConditionalOnBean(DistributedLock.class)
public class LockAspect {

    private final DistributedLock distributedLock;

    public LockAspect(DistributedLock distributedLock) {
        this.distributedLock = distributedLock;
    }

    @Around("@annotation(lockable)")
    public Object aroundLock(ProceedingJoinPoint joinPoint, Lockable lockable) throws Throwable {
        String lockKey = generateLockKey(joinPoint, lockable);

        try {
            // 尝试获取锁
            boolean acquired = distributedLock.tryLock(
                lockKey,
                lockable.timeout(),
                lockable.waitTime()
            );

            if (!acquired) {
                throw new LockAcquireException("获取锁失败: " + lockKey);
            }

            // 执行业务方法
            return joinPoint.proceed();

        } finally {
            // 释放锁
            distributedLock.unlock(lockKey);
        }
    }

    private String generateLockKey(ProceedingJoinPoint joinPoint, Lockable lockable) {
        MethodSignature signature = (MethodSignature) joinPoint.getSignature();
        Method method = signature.getMethod();

        // 支持SpEL表达式
        if (StringUtils.hasText(lockable.key())) {
            return evaluateSpel(lockable.key(), joinPoint);
        }

        // 默认生成规则:类名+方法名+参数hash
        String className = method.getDeclaringClass().getSimpleName();
        String methodName = method.getName();
        String argsHash = Arrays.hashCode(joinPoint.getArgs()) + "";

        return String.format("%s.%s.%s", className, methodName, argsHash);
    }

    private String evaluateSpel(String expression, ProceedingJoinPoint joinPoint) {
        // SpEL表达式解析实现
        // ...
        return expression;
    }
}
代码清单6:分布式锁AOP切面
第六步:健康检查
java
@Component
public class LockHealthIndicator implements HealthIndicator {

    private final DistributedLock distributedLock;

    public LockHealthIndicator(DistributedLock distributedLock) {
        this.distributedLock = distributedLock;
    }

    @Override
    public Health health() {
        DistributedLock.LockStats stats = distributedLock.getStats();

        // 计算成功率
        double successRate = stats.getTotalAcquireAttempts() > 0 ?
            (double) stats.getSuccessfulAcquisitions() / stats.getTotalAcquireAttempts() * 100 : 0;

        Map<String, Object> details = new HashMap<>();
        details.put("successRate", String.format("%.2f%%", successRate));
        details.put("totalAttempts", stats.getTotalAcquireAttempts());
        details.put("successCount", stats.getSuccessfulAcquisitions());
        details.put("avgAcquireTime", stats.getAverageAcquireTime() + "ms");

        if (successRate < 95.0) {
            return Health.down()
                .withDetail("message", "锁获取成功率过低")
                .withDetails(details)
                .build();
        }

        return Health.up()
            .withDetails(details)
            .build();
    }
}
代码清单7:分布式锁健康检查
3.4 配置元数据:让IDE智能提示
在src/main/resources/META-INF/下创建:
// additional-spring-configuration-metadata.json
{
  "properties": [
    {
      "name": "meituan.lock.enabled",
      "type": "java.lang.Boolean",
      "description": "是否启用分布式锁",
      "defaultValue": true
    },
    {
      "name": "meituan.lock.type",
      "type": "java.lang.String",
      "description": "锁类型:redis或zookeeper",
      "defaultValue": "redis"
    },
    {
      "name": "meituan.lock.default-timeout",
      "type": "java.lang.Long",
      "description": "默认锁超时时间(毫秒)",
      "defaultValue": 30000,
      "sourceType": "com.meituan.lock.LockProperties"
    },
    {
      "name": "meituan.lock.redis.address",
      "type": "java.lang.String",
      "description": "Redis地址",
      "defaultValue": "redis://localhost:6379"
    },
    {
      "name": "meituan.lock.zookeeper.servers",
      "type": "java.lang.String",
      "description": "Zookeeper服务器地址",
      "defaultValue": "localhost:2181"
    }
  ],
  "hints": [
    {
      "name": "meituan.lock.type",
      "values": [
        {
          "value": "redis",
          "description": "基于Redis的分布式锁"
        },
        {
          "value": "zookeeper",
          "description": "基于Zookeeper的分布式锁"
        }
      ]
    }
  ]
}
代码清单8:配置元数据
3.5 默认配置文件
在src/main/resources/下创建application-lock.yml:
# 分布式锁默认配置
meituan:
  lock:
    enabled: true
    type: redis
    default-timeout: 30000
    default-wait-time: 10000
    retry-times: 3
    redis:
      address: ${REDIS_HOST:redis://localhost:6379}
      password: ${REDIS_PASSWORD:}
      database: 0
      connection-pool-size: 64
      connection-minimum-idle-size: 24
    zookeeper:
      servers: ${ZK_HOST:localhost:2181}
      session-timeout: 30000
      connection-timeout: 15000
      namespace: meituan-lock
代码清单9:默认配置文件
4. Starter的使用:简单到哭
4.1 Maven依赖
XML
<dependency>
    <groupId>com.meituan</groupId>
    <artifactId>distributed-lock-spring-boot-starter</artifactId>
    <version>1.0.0</version>
</dependency>
4.2 配置(可选)
# application.yml
meituan:
  lock:
    type: redis
    redis:
      address: redis://prod-redis:6379
    default-timeout: 60000  # 生产环境可以设长一点
4.3 使用方式
方式一:注解式(推荐)
java
@Service
public class OrderService {

    @Lockable(key = "'order:' + #orderId", timeout = 30000)
    public Order createOrder(String orderId, OrderRequest request) {
        // 业务逻辑,自动加锁
        return orderRepository.save(convertToOrder(request));
    }

    @Lockable(key = "'inventory:' + #productId", waitTime = 5000)
    public void reduceInventory(String productId, int quantity) {
        // 最多等待5秒获取锁
        inventoryService.reduce(productId, quantity);
    }
}
方式二:编程式
java
@Service
public class PaymentService {

    @Autowired
    private DistributedLock distributedLock;

    public void processPayment(String paymentId) {
        String lockKey = "payment:" + paymentId;

        try {
            if (distributedLock.tryLock(lockKey)) {
                // 执行业务逻辑
                paymentProcessor.process(paymentId);
            } else {
                throw new BusinessException("系统繁忙,请稍后重试");
            }
        } finally {
            distributedLock.unlock(lockKey);
        }
    }
}
4.4 监控查看
启动应用后,可以访问:
-
健康检查:
/actuator/health(查看锁的健康状态) -
监控指标:
/actuator/metrics/meituan.lock(查看锁的统计指标) -
详细信息:
/actuator/lock-stats(如果有自定义Endpoint)
5. 企业级Starter的高级特性
5.1 多版本兼容:向前向后都要考虑
Starter一旦被多个服务使用,版本兼容就是大问题。我的经验:
版本策略
XML
<!-- 版本号规范 -->
<version>主版本.次版本.修订版本-里程碑</version>
<!-- 例如:1.2.3-RELEASE -->

<!-- 实际例子 -->
<version>1.0.0</version>      <!-- 第一个稳定版 -->
<version>1.1.0</version>      <!-- 新增功能,向后兼容 -->
<version>2.0.0</version>      <!-- 破坏性变更 -->
兼容性保证
-
配置属性兼容:新增属性要有默认值,删除属性要提供迁移期
-
API兼容:公共接口不轻易修改,用@Deprecated标记过时方法
-
依赖兼容:第三方依赖版本要谨慎升级
java
public interface DistributedLock {

    // v1.0的方法
    boolean tryLock(String lockKey, long timeout, long waitTime);

    // v1.1新增的方法(默认实现保证兼容)
    default boolean tryLock(String lockKey, LockOptions options) {
        return tryLock(lockKey, options.getTimeout(), options.getWaitTime());
    }

    // v1.0的方法,v2.0计划删除
    @Deprecated(since = "2.0.0", forRemoval = true)
    boolean oldMethod(String param);
}
5.2 性能优化:Starter不能拖慢应用
优化点一:懒加载
java
@Bean
@Lazy  // 只有实际使用时才初始化
public DistributedLock distributedLock(LockProperties properties) {
    // 初始化逻辑
}
优化点二:连接池复用
java
@Configuration
public class LockAutoConfiguration {

    @Bean
    @ConditionalOnMissingBean
    public RedissonClient redissonClient(LockProperties properties) {
        // 如果应用中已经有RedissonClient,直接复用
        // 避免创建多个连接池
    }
}
优化点三:缓存优化
java
public class RedisDistributedLock {
    // 使用WeakHashMap,避免内存泄漏
    private final Map<String, WeakReference<RLock>> lockCache =
        Collections.synchronizedMap(new WeakHashMap<>());
}
5.3 监控告警:出了问题要知道
生产级的Starter必须有完整的监控:
java
@Component
public class LockMetrics implements MeterBinder {

    private final DistributedLock distributedLock;

    public LockMetrics(DistributedLock distributedLock) {
        this.distributedLock = distributedLock;
    }

    @Override
    public void bindTo(MeterRegistry registry) {
        Gauge.builder("meituan.lock.success.rate",
                () -> calculateSuccessRate())
             .description("锁获取成功率")
             .baseUnit("percent")
             .register(registry);

        Timer.builder("meituan.lock.acquire.time")
             .description("锁获取耗时")
             .publishPercentiles(0.5, 0.95, 0.99)  // 50%, 95%, 99%分位
             .register(registry);
    }

    private double calculateSuccessRate() {
        DistributedLock.LockStats stats = distributedLock.getStats();
        if (stats.getTotalAcquireAttempts() == 0) {
            return 100.0;
        }
        return (double) stats.getSuccessfulAcquisitions()
               / stats.getTotalAcquireAttempts() * 100;
    }
}告警规则示例(Prometheus):
groups:
  - name: lock_alerts
    rules:
      - alert: LockSuccessRateLow
        expr: meituan_lock_success_rate < 95
        for: 5m
        labels:
          severity: warning
        annotations:
          summary: "锁获取成功率过低"
          description: "锁获取成功率低于95%,当前值: {{ $value }}%"
6. Starter的测试策略
6.1 单元测试:保证代码质量
java
@ExtendWith(MockitoExtension.class)
class RedisDistributedLockTest {

    @Mock
    private RedissonClient redissonClient;

    @Mock
    private RLock rLock;

    private RedisDistributedLock distributedLock;

    @BeforeEach
    void setUp() {
        LockProperties properties = new LockProperties();
        properties.setType("redis");

        when(redissonClient.getLock(anyString())).thenReturn(rLock);

        // 通过反射设置redissonClient
        distributedLock = new RedisDistributedLock(properties);
        setField(distributedLock, "redissonClient", redissonClient);
    }

    @Test
    void testTryLock_Success() throws InterruptedException {
        // given
        when(rLock.tryLock(anyLong(), anyLong(), any())).thenReturn(true);

        // when
        boolean result = distributedLock.tryLock("test-key", 30000, 10000);

        // then
        assertTrue(result);
        verify(rLock).tryLock(10000, 30000, TimeUnit.MILLISECONDS);
    }

    @Test
    void testTryLock_Timeout() throws InterruptedException {
        // given
        when(rLock.tryLock(anyLong(), anyLong(), any())).thenReturn(false);

        // when
        boolean result = distributedLock.tryLock("test-key", 30000, 10000);

        // then
        assertFalse(result);
    }
}
6.2 集成测试:验证真实环境
java
@SpringBootTest
@AutoConfigureMockMvc
@Testcontainers  // 使用Testcontainers启动真实Redis
class DistributedLockIntegrationTest {

    @Container
    static RedisContainer redis = new RedisContainer("redis:6.2")
            .withExposedPorts(6379);

    @DynamicPropertySource
    static void redisProperties(DynamicPropertyRegistry registry) {
        registry.add("meituan.lock.redis.address",
            () -> String.format("redis://%s:%d",
                redis.getHost(),
                redis.getFirstMappedPort()));
    }

    @Autowired
    private DistributedLock distributedLock;

    @Test
    void testDistributedLockInRealRedis() {
        // given
        String lockKey = "integration-test-key";

        // when
        boolean acquired = distributedLock.tryLock(lockKey, 5000, 1000);

        // then
        assertTrue(acquired);

        // 再次获取应该失败
        boolean acquiredAgain = distributedLock.tryLock(lockKey, 5000, 1000);
        assertFalse(acquiredAgain);

        // 释放后可以再次获取
        distributedLock.unlock(lockKey);
        boolean acquiredAfterRelease = distributedLock.tryLock(lockKey, 5000, 1000);
        assertTrue(acquiredAfterRelease);
    }
}
6.3 性能测试:确保不影响应用性能
java
@SpringBootTest
@Tag("performance")
class DistributedLockPerformanceTest {

    @Autowired
    private DistributedLock distributedLock;

    @Test
    @RepeatedTest(10)  // 重复10次
    void testLockAcquirePerformance() {
        // warm up
        IntStream.range(0, 1000).parallel().forEach(i -> {
            distributedLock.tryLock("perf-" + i, 1000, 100);
        });

        // actual test
        long startTime = System.nanoTime();

        IntStream.range(0, 10000).parallel().forEach(i -> {
            distributedLock.tryLock("perf-" + i, 1000, 100);
        });

        long duration = System.nanoTime() - startTime;
        double avgTime = duration / 10000.0 / 1_000_000.0;  // 转换为毫秒

        System.out.printf("平均获取锁时间: %.3f ms%n", avgTime);

        // 断言:平均时间应小于1ms
        assertTrue(avgTime < 1.0, "锁获取时间过长: " + avgTime + "ms");
    }
}
7. Starter的发布与治理
7.1 Maven发布配置
XML
<!-- pom.xml 配置 -->
<project>
    <modelVersion>4.0.0</modelVersion>

    <groupId>com.meituan</groupId>
    <artifactId>distributed-lock-spring-boot-starter</artifactId>
    <version>1.0.0</version>
    <packaging>jar</packaging>

    <name>Meituan Distributed Lock Starter</name>
    <description>Spring Boot Starter for distributed lock</description>

    <!-- 许可证信息 -->
    <licenses>
        <license>
            <name>Apache License, Version 2.0</name>
            <url>https://www.apache.org/licenses/LICENSE-2.0</url>
        </license>
    </licenses>

    <!-- SCM信息 -->
    <scm>
        <url>https://github.com/meituan/distributed-lock-starter</url>
        <connection>scm:git:git://github.com/meituan/distributed-lock-starter.git</connection>
        <developerConnection>scm:git:ssh://github.com/meituan/distributed-lock-starter.git</developerConnection>
    </scm>

    <!-- 开发者信息 -->
    <developers>
        <developer>
            <name>Your Name</name>
            <email>your.email@meituan.com</email>
            <organization>Meituan</organization>
        </developer>
    </developers>

    <!-- 发布到Maven仓库的配置 -->
    <distributionManagement>
        <repository>
            <id>meituan-releases</id>
            <url>https://maven.meituan.com/repository/releases</url>
        </repository>
        <snapshotRepository>
            <id>meituan-snapshots</id>
            <url>https://maven.meituan.com/repository/snapshots</url>
        </snapshotRepository>
    </distributionManagement>
</project>
7.2 版本管理策略
我推荐使用语义化版本(Semantic Versioning):
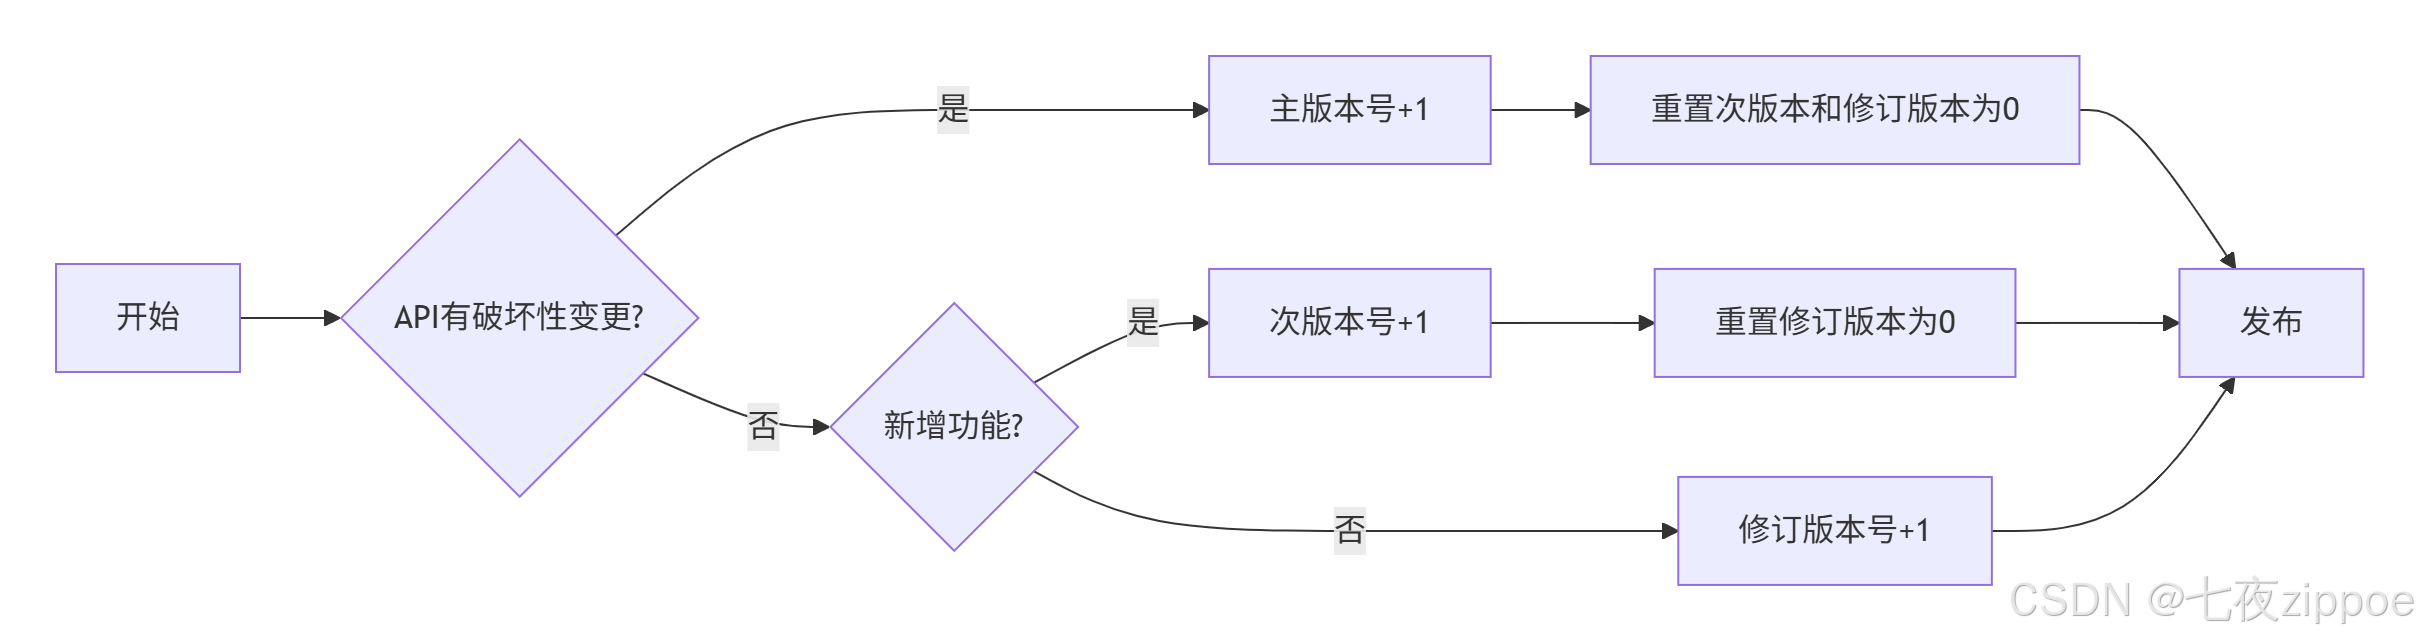
图2:语义化版本管理流程
实际例子:
-
1.0.0:第一个稳定版本 -
1.0.1:修复bug -
1.1.0:新增功能,向后兼容 -
2.0.0:破坏性变更
7.3 依赖管理
Starter的依赖管理要特别小心:
XML
<dependencyManagement>
    <dependencies>
        <!-- 统一管理Spring Boot版本 -->
        <dependency>
            <groupId>org.springframework.boot</groupId>
            <artifactId>spring-boot-dependencies</artifactId>
            <version>${spring-boot.version}</version>
            <type>pom</type>
            <scope>import</scope>
        </dependency>
    </dependencies>
</dependencyManagement>

<dependencies>
    <!-- 必须的依赖 -->
    <dependency>
        <groupId>org.springframework.boot</groupId>
        <artifactId>spring-boot-starter</artifactId>
        <scope>compile</scope>
        <!-- 注意:不要带版本号,由dependencyManagement管理 -->
    </dependency>

    <!-- 可选依赖:用户想用Redis锁时才需要 -->
    <dependency>
        <groupId>org.redisson</groupId>
        <artifactId>redisson-spring-boot-starter</artifactId>
        <scope>provided</scope>  <!-- 关键!provided作用域 -->
        <optional>true</optional>  <!-- 标记为可选 -->
    </dependency>

    <!-- 测试依赖 -->
    <dependency>
        <groupId>org.springframework.boot</groupId>
        <artifactId>spring-boot-starter-test</artifactId>
        <scope>test</scope>
    </dependency>
</dependencies>
关键点 :可选依赖用<optional>true</optional>,这样用户的项目不会强制引入这些依赖。
8. 企业级Starter架构演进
8.1 从单一Starter到Starter套件
当Starter多了之后,就需要考虑架构了。在美团,我们是这样组织的:
meituan-spring-boot-starters/          # 父项目
├── meituan-spring-boot-starter-parent # 父pom,统一管理
├── meituan-spring-boot-starter-lock   # 分布式锁
├── meituan-spring-boot-starter-id     # ID生成器
├── meituan-spring-boot-starter-mq     # 消息队列
├── meituan-spring-boot-starter-cache  # 缓存
├── meituan-spring-boot-starter-trace  # 链路追踪
└── meituan-spring-boot-starter-all    # 全家桶(可选)
8.2 Starter的依赖关系管理
复杂的Starter之间可能有依赖关系,需要仔细管理:
XML
<!-- meituan-spring-boot-starter-cache 的pom.xml -->
<dependencies>
    <!-- 内部依赖:先于其他Starter发布 -->
    <dependency>
        <groupId>com.meituan</groupId>
        <artifactId>meituan-spring-boot-starter-lock</artifactId>
        <version>${project.version}</version>
        <optional>true</optional>
    </dependency>
</dependencies>
8.3 配置的统一管理
多个Starter可能有相同的配置项(比如Redis地址),需要统一:
java
// 公共配置类
@ConfigurationProperties(prefix = "meituan")
public class MeituanCommonProperties {

    /**
     * 公共Redis配置
     */
    private RedisCommonConfig redis = new RedisCommonConfig();

    /**
     * 公共Zookeeper配置
     */
    private ZkCommonConfig zookeeper = new ZkCommonConfig();

    /**
     * 监控配置
     */
    private MonitorConfig monitor = new MonitorConfig();

    @Data
    public static class RedisCommonConfig {
        private String address = "redis://localhost:6379";
        private String password;
        private int database = 0;
    }

    // 其他配置类...
}

// 在各个Starter中引用
@ConfigurationProperties(prefix = "meituan.lock")
public class LockProperties {

    @Autowired
    private MeituanCommonProperties commonProperties;

    // 优先使用专属配置,没有则用公共配置
    public String getRedisAddress() {
        return StringUtils.hasText(redis.getAddress()) ?
               redis.getAddress() :
               commonProperties.getRedis().getAddress();
    }
}
9. 故障排查与调试
9.1 常见问题排查清单
我总结了Starter开发中最常见的10个问题:
问题1:自动配置不生效
排查步骤:
-
检查
META-INF/spring/org.springframework.boot.autoconfigure.AutoConfiguration.imports文件 -
检查条件注解是否满足
-
检查是否有其他Starter排除
bash
# 启动时加参数查看自动配置报告
java -jar app.jar --debug

# 或者在代码中获取
@Autowired
private List<String> autoConfigurations;
问题2:Bean冲突
解决方案:
java
@Bean
@ConditionalOnMissingBean  // 关键:用户有自定义时,不用我们的
public SomeBean someBean() {
    return new SomeBean();
}

// 或者用@Primary指定优先级
@Bean
@Primary
public SomeBean defaultSomeBean() {
    return new SomeBean();
}
问题3:配置属性不生效
排查:
-
检查
spring-configuration-metadata.json格式 -
检查属性前缀是否正确
-
检查是否有其他配置覆盖
java
// 在Starter中添加配置验证
@PostConstruct
public void validateConfig() {
    if (!isValid(config)) {
        throw new IllegalStateException("配置无效: " + config);
    }
}
9.2 调试技巧
技巧1:在IDE中调试自动配置
java
// 在自动配置类中加断点
@AutoConfiguration
public class MyAutoConfiguration {

    public MyAutoConfiguration() {
        // 这里加断点,可以看到什么时候被加载
        System.out.println("MyAutoConfiguration被加载");
    }
}
技巧2:查看条件评估报告
java
@SpringBootApplication
public class Application {

    public static void main(String[] args) {
        SpringApplication app = new SpringApplication(Application.class);

        // 添加监听器,输出条件评估报告
        app.addListeners(new ApplicationListener<ApplicationPreparedEvent>() {
            @Override
            public void onApplicationEvent(ApplicationPreparedEvent event) {
                ConditionEvaluationReport report =
                    ConditionEvaluationReport.get(event.getApplicationContext().getBeanFactory());

                // 打印报告到文件
                try (PrintWriter writer = new PrintWriter("condition-report.txt")) {
                    report.getConditionAndOutcomesBySource().forEach((source, outcomes) -> {
                        writer.println(source);
                        outcomes.forEach(outcome -> {
                            writer.println("  " + outcome.getOutcome());
                        });
                    });
                }
            }
        });

        app.run(args);
    }
}
技巧3:使用Spring Boot Actuator端点
# application.yml
management:
  endpoints:
    web:
      exposure:
        include: conditions,beans,configprops
然后访问:
-
/actuator/conditions:查看条件评估详情 -
/actuator/beans:查看所有Bean -
/actuator/configprops:查看配置属性
10. 最后的话:Starter开发的"道"与"术"
写了这么多年Starter,我最大的体会是:技术是术,设计思想才是道。
好的Starter不是代码堆砌,而是对开发者体验的极致追求。你看Spring Boot官方的Starter,每一个都经过精心设计:
-
开箱即用:默认配置就能工作
-
配置简单:几个属性就能满足大部分需求
-
扩展灵活:可以深度定制
-
文档完整:有明确的指导
所以,在你动手写Starter之前,先问自己几个问题:
-
🤔 这个Starter解决了什么痛点?
-
🤔 用户使用起来方便吗?
-
🤔 配置项是不是太多了?
-
🤔 向后兼容怎么保证?
-
🤔 出了问题怎么排查?
记住:你写的不是代码,是生产力工具。好的Starter能让团队效率翻倍,坏的Starter能让团队陷入泥潭。
📚 推荐阅读
官方文档
-
**Spring Boot官方文档 - Creating Your Own Auto-configuration** - 官方指南,必读
-
**Spring Boot Starter开发指南** - 实操教程
源码学习
-
**Spring Boot Auto-configure源码** - 学习官方实现
-
**Awesome Spring Boot Starters** - 官方Starter列表
最佳实践
-
**阿里巴巴Java开发手册 - 工程规约** - 命名规范、配置规范
-
**Spring Boot最佳实践** - 官方最佳实践
工具资源
-
**Spring Initializr** - 快速生成Starter项目
-
**Maven Central** - 查找依赖和版本
最后建议 :别光看,动手写一个!从最简单的开始,比如一个hello-spring-boot-starter,让它根据配置输出不同的问候语。写完了发布到公司的Maven仓库,让同事用起来。实战一次,胜过看百篇文章。