介绍
单点登录 (SSO) 是一种集中式用户身份验证服务,允许用户一次登录即可访问多个应用程序。SSO 增强了用户的便利性和安全性,减少了对多个密码的需求,并降低了密码疲劳的风险。本文深入探讨了如何使用 IdentityServer4 在 ASP.NET Core 应用程序中实现 SSO。
了解 SSO
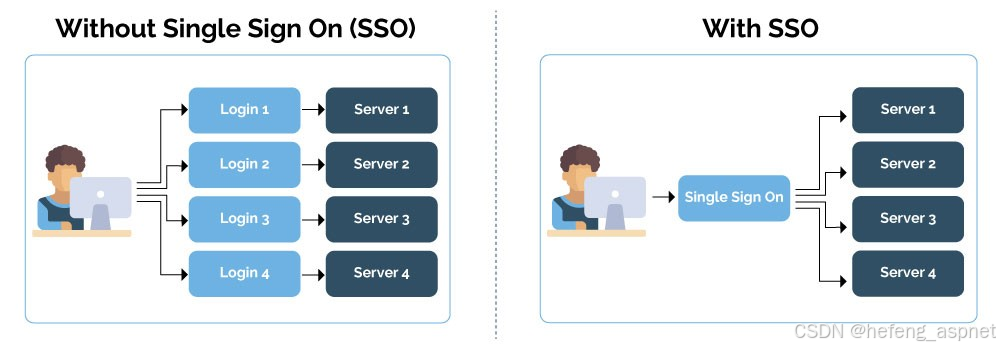
SSO 将身份验证职责委托给中央身份提供商 (IdP)。当用户尝试访问服务时,该服务会将用户重定向到 IDP 进行身份验证。身份验证成功后,IDP 会颁发一个令牌,供服务用于验证用户的身份。
为什么使用 SSO?
改善用户体验:用户只需登录一次即可访问多个应用程序。
增强的安全性:集中式身份验证降低了与密码相关的风险。
简化管理:管理员管理单一身份验证系统。
合规性:更容易执行安全策略和合规性要求。
使用 ASP.NET Core 和 IdentityServer4 实现 SSO
如果您喜欢此文章,请收藏、点赞、评论,谢谢,祝您快乐每一天。
步骤 1. 设置 IdentityServer4
1、创建一个新的 ASP.NET Core 项目。
dotnet new mvc -n SSOApp
cd SSOApp
2、添加 IdentityServer4 NuGet 包。
dotnet add package IdentityServer4
dotnet add package IdentityServer4.AspNetIdentity
3、在 Startup.cs 中配置 IdentityServer4。
public void ConfigureServices(IServiceCollection services)
{
services.AddControllersWithViews();
services.AddIdentity<ApplicationUser, IdentityRole>()
.AddEntityFrameworkStores<ApplicationDbContext>()
.AddDefaultTokenProviders();
services.AddIdentityServer()
.AddDeveloperSigningCredential()
.AddInMemoryIdentityResources(Config.IdentityResources)
.AddInMemoryApiResources(Config.ApiResources)
.AddInMemoryClients(Config.Clients)
.AddAspNetIdentity<ApplicationUser>();
services.AddAuthentication()
.AddGoogle("Google", options =>
{
options.ClientId = "your-client-id";
options.ClientSecret = "your-client-secret";
});
}
public void Configure(IApplicationBuilder app, IWebHostEnvironment env)
{
if (env.IsDevelopment())
{
app.UseDeveloperExceptionPage();
}
else
{
app.UseExceptionHandler("/Home/Error");
app.UseHsts();
}
app.UseHttpsRedirection();
app.UseStaticFiles();
app.UseRouting();
app.UseIdentityServer();
app.UseAuthorization();
app.UseEndpoints(endpoints =>
{
endpoints.MapDefaultControllerRoute();
});
}
4、在 Config.cs 中定义身份资源、API 资源和客户端。
public static class Config
{
public static IEnumerable<IdentityResource> IdentityResources =>
new List<IdentityResource>
{
new IdentityResources.OpenId(),
new IdentityResources.Profile(),
};
public static IEnumerable<ApiResource> ApiResources =>
new List<ApiResource>
{
new ApiResource("api1", "My API")
};
public static IEnumerable<Client> Clients =>
new List<Client>
{
new Client
{
ClientId = "client",
AllowedGrantTypes = GrantTypes.ClientCredentials,
ClientSecrets =
{
new Secret("secret".Sha256())
},
AllowedScopes = { "api1" }
}
};
}
步骤 2. 设置客户端应用程序
1、创建一个新的 ASP.NET Core MVC 项目。
dotnet new mvc -n ClientApp
cd ClientApp
2、添加必要的 NuGet 包。
dotnet add package Microsoft.AspNetCore.Authentication.OpenIdConnect
dotnet add package Microsoft.AspNetCore.Authentication.Cookies
3、在 Startup.cs 中配置身份验证。
public void ConfigureServices(IServiceCollection services)
{
services.AddControllersWithViews();
services.AddAuthentication(options =>
{
options.DefaultScheme = CookieAuthenticationDefaults.AuthenticationScheme;
options.DefaultChallengeScheme = OpenIdConnectDefaults.AuthenticationScheme;
})
.AddCookie()
.AddOpenIdConnect(options =>
{
options.Authority = "https://localhost:5001";
options.ClientId = "client";
options.ClientSecret = "secret";
options.ResponseType = "code";
options.SaveTokens = true;
options.Scope.Add("api1");
options.Scope.Add("offline_access");
});
}
public void Configure(IApplicationBuilder app, IWebHostEnvironment env)
{
if (env.IsDevelopment())
{
app.UseDeveloperExceptionPage();
}
else
{
app.UseExceptionHandler("/Home/Error");
app.UseHsts();
}
app.UseHttpsRedirection();
app.UseStaticFiles();
app.UseRouting();
app.UseAuthentication();
app.UseAuthorization();
app.UseEndpoints(endpoints =>
{
endpoints.MapDefaultControllerRoute();
});
}
步骤 3.测试 SSO 实现
1、运行 IdentityServer4 和客户端应用程序。
dotnet run --project SSOApp
dotnet run --project ClientApp
2、访问客户端应用程序:导航到客户端应用程序 URL(例如,https://localhost:5002)。
3、启动登录:单击登录按钮将您重定向到 IdentityServer4 登录页面。
4、身份验证:提供您的凭证,身份验证成功后,您将被重定向回已建立 SSO 会话的客户端应用程序。

结论
使用 IdentityServer4 在 ASP.NET Core 应用程序中实现单点登录,可显著提升用户体验和安全性。通过集中身份验证,您可以简化用户管理并增强整体安全性。本文提供了在 ASP.NET Core 应用程序中设置 SSO 的全面指南,为更高效、更安全的身份验证流程奠定了基础。
参考
IdentityServer4 文档
ASP.NET Core 文档
实施 SSO 一开始看起来很困难,但有了正确的工具和指导,您可以在 ASP.NET Core 应用程序中实现无缝且安全的身份验证系统。
如果您喜欢此文章,请收藏、点赞、评论,谢谢,祝您快乐每一天。