第九章 WebSocket

WebSocket 是一种在单个 TCP 连接上实现全双工通信的协议,允许客户端和服务器之间实时、双向地传输数据。相比传统的 HTTP 请求-响应模式,WebSocket 在建立连接后可以持续通信,无需反复建立连接,大大降低了延迟和开销。
main.py
py
import logging
from typing import Annotated

from fastapi import (
    Depends,
    FastAPI,
    WebSocket,
    WebSocketException,
    status,
)
from fastapi.websockets import WebSocketDisconnect

from app.chat import router as chat_router
from app.exclusive_chatroom import (
    router as exclusive_chatroom_router,
)
from app.security import get_username_from_token
from app.security import router as security_router

app = FastAPI()
app.include_router(security_router)
app.include_router(exclusive_chatroom_router)
# 注册聊天路由
app.include_router(chat_router)

logger = logging.getLogger("uvicorn")
端点创建
py
# 装饰器将函数注册为WebSocket端点
@app.websocket("/ws")
async def ws_endpoint(websocket: WebSocket):
    # 接受客户端的WebSocket握手请求
    await websocket.accept()
    # 向客户端发送欢迎消息
    await websocket.send_text(
        "欢迎"
    )
    try:
        # 使用无限循环保持活跃
        while True:
            # 异步接受消息 阻塞直到有消息到达
            data = await websocket.receive_text()
            logger.info(f"Message received: {data}")
            # 发送确认消息
            await websocket.send_text("Message received!")
            # 当收到"disconnect"消息时,主动关闭连接
            if data == "disconnect":
                logger.warn("Disconnecting...")
                # 关闭连接
                return await websocket.close(
                    # 使用标准WebSocket关闭码1000表示正常关闭
                    code=status.WS_1000_NORMAL_CLOSURE,
                    reason="Disconnecting...",
                )
            # 在客户端发送不好的内容时断开连接
            if "bad message" in data:
                raise WebSocketException(
                    code=status.WS_1008_POLICY_VIOLATION,
                    reason="Inappropriate message",
                )
    # 捕获WebSocket断开异常
    except WebSocketDisconnect:
        logger.warning(
            "客户断开连接"
        )
py
# 在服务端运行这个代码即可进行体验
import asyncio
import websockets

SERVER = "ws://服务器地址:8000/ws"

async def main():
    async with websockets.connect(SERVER) as ws:
        print(f"已连接到 {SERVER}")

        async def recv_loop():
            async for msg in ws:
                print("服务器消息:", msg)

        async def send_loop():
            while True:
                text = input("输入要发送的内容(exit 退出): ")
                if text == "exit":
                    await ws.close()
                    break
                await ws.send(text)

        await asyncio.gather(recv_loop(), send_loop())

if __name__ == "__main__":
    asyncio.run(main())
实现聊天功能
WebSocket连接管理器
连接管理器的作用是跟踪打开的WebSocket连接并向活跃连接广播消息。
python
# ConnectionManage.py
import asyncio
from fastapi import WebSocket

# 通常使用单例模式
class ConnectionManager:
    def __init__(self):
        # :维护活跃连接列表作为共享状态
        self.active_connections: list[WebSocket] = []

    async def connect(self, websocket: WebSocket):
        # 接受WebSocket握手
        await websocket.accept()
        # 添加到活跃连接列表
        self.active_connections.append(websocket)
	# 同步的断开连接方法
    def disconnect(self, websocket: WebSocket):
        self.active_connections.remove(websocket)

    # 向指定用户的连接发送消息
    async def send_personal_message(
        self, message: dict, websocket: WebSocket
    ):
        # 使用send_json()自动序列化字典为JSON字符串
        await websocket.send_json(message)

    # 广播消息
    async def broadcast(
        self, message: dict, exclude: WebSocket = None
    ):
        tasks = [
            connection.send_json(message)
            for connection in self.active_connections
            if connection != exclude
        ]
        await asyncio.gather(*tasks)
聊天端点
py
# chat.py
import logging

from fastapi import APIRouter, Request, WebSocket, WebSocketDisconnect
from fastapi.responses import HTMLResponse

from app.templating import templates
from app.ws_manager import ConnectionManager

# 获取一个全局连接管理器示例
conn_manager = ConnectionManager()
logger = logging.getLogger("uvicorn")

router = APIRouter()

@router.websocket("/chatroom/{username}")
async def chatroom_endpoint(
    websocket: WebSocket, username: str
):
    # 注册新连接
    await conn_manager.connect(websocket)
    # 向其他用户广播新用户加入消息
    await conn_manager.broadcast(
        {
            "sender": "system",
            "message": f"{username} joined the chat",
        },
        # 排除新加入用户,避免看到自己的加入消息
        exclude=websocket,
    )
    logger.info(f"{username} joined the chat")

    try:
        while True:
            # 接收消息
            data = await websocket.receive_text()
            # 向其他所有用户广播消息
            await conn_manager.broadcast(
                {"sender": username, "message": data},
                exclude=websocket,
            )
            # 消息回显只发给自己
            await conn_manager.send_personal_message(
                {"sender": "You", "message": data},
                websocket,
            )
            logger.info(
                f"{username} says: {data}"
            )
    except WebSocketDisconnect:
        # 连接断开时的清理工作
        conn_manager.disconnect(websocket)  # 从连接池移除
        # 通知其他用户该用户离开
        await conn_manager.broadcast(
            {
                "sender": "system",
                "message": f"{username} "
                "left the chat",
            }
        )
        logger.info(f"{username} left the chat")


@router.get("/chatroom/{username}")
async def chatroom_page_endpoint(
    request: Request, username: str
) -> HTMLResponse:
    return templates.TemplateResponse(
        request=request,
        # 模板文件名
        name="chatroom.html",
        # 传递用户名到模板
        context={"username": username},
    )
前端页面
py
# templating.py
# 创建一个模板引擎实例,用于渲染 HTML 页面
from fastapi.templating import Jinja2Templates

templates = Jinja2Templates(directory="templates")假设用户访问 http://服务器地址:8000/chatroom/alice
浏览器 → GET /chatroom/alice
↓
chat.py 中的 chatroom_page_endpoint(username="alice") 被调用
↓
templates.TemplateResponse(
name="chatroom.html",
context={"username": "alice"}
)
↓
读取 templates/chatroom.html 文件
↓
把模板中的 {{ username }} 替换为 "alice"
↓
返回渲染后的 HTML 给浏览器
↓
浏览器显示聊天页面,页面中的 JavaScript 看到:
var client_id = "alice";
var ws = new WebSocket(`ws://服务器地址:8000/chatroom/alice`);
html
<!doctype html>
<html>
  <head>
    <title>Chat</title>
  </head>

  <body>
    <h1>WebSocket Chat</h1>
    <h2>Your ID: <span id="ws-id"></span></h2>
    <form action="" onsubmit="sendMessage(event)">
      <input
        type="text"
        id="messageText"
        autocomplete="off"
      />
      <button>Send</button>
    </form>
    <ul id="messages"></ul>
    <script>
      var client_id = "{{ username }}";
      document.querySelector("#ws-id").textContent =
        client_id;
      var ws = new WebSocket(
        `ws://服务器地址:8000/chatroom/${client_id}`
      );
      ws.onmessage = function (event) {
        var messages =
          document.getElementById("messages");
        var message = document.createElement("li");
        var data = JSON.parse(event.data);
        if (data.sender == "You") {
          data_message =
            "You wrote: \n" + data.message;
          message.style.textAlign = "right";
          message.style.color = "blue";
          message.style.listStyle = "none";
        } else if (data.sender == "system") {
          data_message = data.message;
          message.style.textAlign = "center";
          message.style.color = "red";
          message.style.listStyle = "none";
        } else {
          data_message =
            data.sender + ":\n" + data.message;
          message.style.textAlign = "left";
          message.style.color = "green";
          message.style.listStyle = "none";
        }
        var content =
          document.createTextNode(data_message);
        message.appendChild(content);
        messages.appendChild(message);
      };
      function sendMessage(event) {
        var input =
          document.getElementById("messageText");
        ws.send(input.value);
        input.value = "";
        event.preventDefault();
      }
    </script>
  </body>
</html>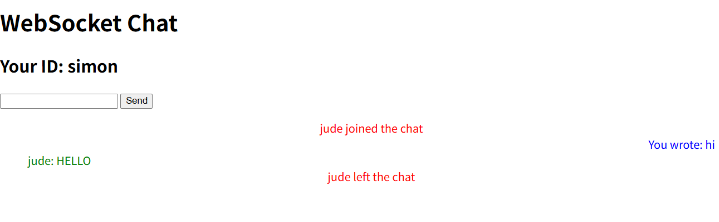
用户B的WebSocket 用户A的WebSocket ConnectionManager chat.py 用户B浏览器 用户A浏览器 用户B的WebSocket 用户A的WebSocket ConnectionManager chat.py 用户B浏览器 用户A浏览器 1. 用户A登录(打开页面) 2. 用户B登录(打开页面) 3. 用户A发送消息 4. 用户B发送消息 5. 用户A退出登录(关闭页面) GET /chatroom/alice 返回 chatroom.html (username=alice) WebSocket 连接 /chatroom/alice connect(websocket_A) accept() 接受连接 active_connections.append(websocket_A) broadcast("alice joined", exclude=websocket_A) send_json("alice joined") GET /chatroom/bob 返回 chatroom.html (username=bob) WebSocket 连接 /chatroom/bob connect(websocket_B) accept() 接受连接 active_connections.append(websocket_B) broadcast("bob joined", exclude=websocket_B) send_json("bob joined") send("hello") broadcast({sender:"alice", message:"hello"}, exclude=websocket_A) send_json({sender:"alice", message:"hello"}) send_personal_message({sender:"You", message:"hello"}, websocket_A) send_json({sender:"You", message:"hello"}) 显示"alice: hello"(绿色,左对齐) 显示"You wrote: hello"(蓝色,右对齐) send("hi alice") broadcast({sender:"bob", message:"hi alice"}, exclude=websocket_B) send_json({sender:"bob", message:"hi alice"}) send_personal_message({sender:"You", message:"hi alice"}, websocket_B) send_json({sender:"You", message:"hi alice"}) 显示"bob: hi alice"(绿色,左对齐) 显示"You wrote: hi alice"(蓝色,右对齐) WebSocketDisconnect disconnect(websocket_A) active_connections.remove(websocket_A) broadcast("alice left the chat") send_json("alice left the chat") 显示"alice left the chat"(红色,居中)
性能测试
建立一个 WebSocket 负载测试脚本,用于模拟多个客户端同时连接到 FastAPI 服务器的 WebSocket 端点,并测试服务器在并发连接下的行为。核心功能是启动一个服务器进程,同时创建多个异步客户端连接,最后优雅关闭。
py
import asyncio
import multiprocessing

import uvicorn
from websockets import connect

from app.main import app


# 在独立进程中启动 FastAPI 服务器
def run_server():
    uvicorn.run(app)

# 模拟单个客户端行为
async def connect_client(
    n: int, n_messages: int = 3
):
    # 连接到专属 WebSocket 端点
    async with connect(
        f"ws://localhost:8000/chatroom/user{n}",
    ) as client:
        for _ in range(n_messages):
            await client.send(
                f"Hello World from user{n}"
            )
            await asyncio.sleep(n * 0.1)
        await asyncio.sleep(2)


async def main(n_clients: int = 10):
    # 启动服务器进程
    p = multiprocessing.Process(target=run_server)
    p.start()
    # 等待服务器启动
    await asyncio.sleep(1)

    connections = [
        connect_client(n) for n in range(n_clients)
    ]

    await asyncio.gather(*connections)

    await asyncio.sleep(1)
    p.terminate()


if __name__ == "__main__":
    asyncio.run(main())
客户端(0-9) 服务器子进程 主进程 客户端(0-9) 服务器子进程 主进程 每个客户端: 启动进程(p.start()) 等待1秒(确保服务启动) 并发创建10个连接 同时连接/chatroom/user{n} 发送3条消息(间隔n*0.1秒) 保持连接2秒后断开 等待所有客户端完成 额外等待1秒 终止进程(p.terminate())
OAuth2 加密
py
# main.py
@app.websocket("/secured-ws")
async def secured_websocket(
    websocket: WebSocket,
    username: Annotated[
        get_username_from_token, Depends()
    ],
):
    await websocket.accept()
    await websocket.send_text(f"Welcome {username}!")
    async for data in websocket.iter_text():
        await websocket.send_text(
            f"You wrote: {data}"
        )
py
# ws_password_bearer.py
# 实现了一个 WebSocket 专用的 OAuth2 Bearer Token 认证器
from fastapi import (
    WebSocket,
    WebSocketException,
    status,
)
from fastapi.security import OAuth2PasswordBearer


class OAuth2WebSocketPasswordBearer(
    # 通过继承复用父类逻辑 通过重写 __call__ 适配 WebSocket
    OAuth2PasswordBearer
):
    async def __call__(
        self, websocket: WebSocket
    ) -> str:
        # 获取认证头
        authorization: str = websocket.headers.get(
            "authorization"
        )
        # 缺失认证处理
        if not authorization:
            raise WebSocketException(
                code=status.WS_1008_POLICY_VIOLATION,
                reason="Not authenticated",
            )
        #  解析 Bearer Token
        scheme, param = authorization.split()
        if scheme.lower() != "bearer":
            raise WebSocketException(
                code=status.WS_1008_POLICY_VIOLATION,
                reason="Invalid authentication credentials",
            )
        return param
常用命令
PowerShell
Test-NetConnection x.x.x.x -Port 8000测试本地计算机是否能与目标 IP 地址的 TCP 端口 8000 建立连接,常用于排查网络连通性或服务是否监听的问题
Linux
curl -v http://x.x.x.x