大家好,我是加洛斯,是一名全栈工程师👨💻,这里是我的知识笔记与分享,旨在把复杂的东西讲明白。如果发现有误🔍,万分欢迎你帮我指出来!废话不多说,正文开始 👇
如果没看过入门篇1的小伙伴建议先看一下入门篇1SpringSecurity入门篇(1)
书接上回,我们了解到了基本的关于SpringSecurity的知识并且依靠于内置的登录页完成了基本用法的展示,但是在实际开发过程当中,我们当然要用自己的登录页,并且是前后端分离的项目,接下来我们讲述一下如何实现前后端分离并且指定我们自己写的登录页。
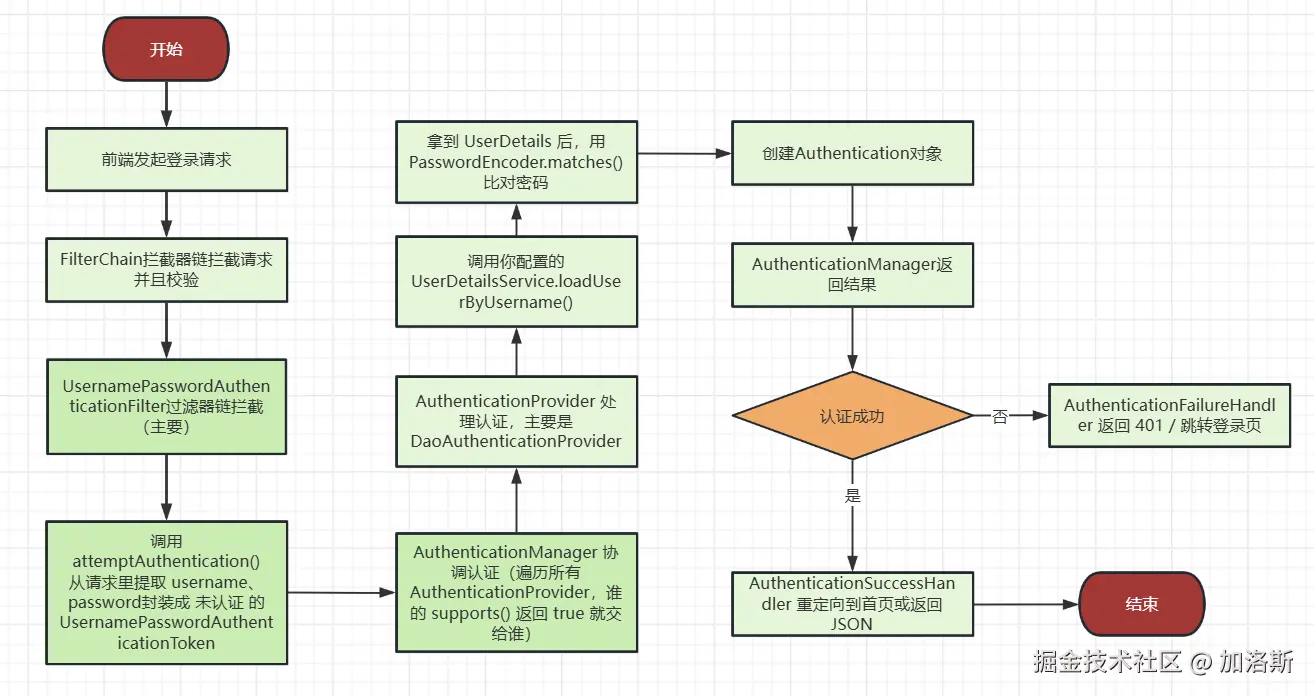
我们先看一下整体的流程图,有一个大概的印象
一、前端准备
前端是Vite+Vue3+JS编写,如果不会的话理解就好了。
js
<template>
  <div>
    <form>
      <div>
        <label>账号:</label>
        <input type="text" v-model="loginForm.username" />
      </div>
      <div>
        <label>密码:</label>
        <input type="password" v-model="loginForm.password" />
      </div>
      <button type="button" @click="handleSubmit">登录</button>
    </form>
  </div>
</template>

<script setup>
import { ref } from 'vue'
import axios from 'axios'
import { useRouter } from 'vue-router'

const router = useRouter()
const loginForm = ref({ username: '', password: '' })
const handleSubmit = () => {
  const formData = new FormData()
  formData.append('username', loginForm.value.username)
  formData.append('password', loginForm.value.password)
  axios
    .post('http://localhost:8080/login', formData)
    .then((res) => {
      if (res.data.code === 200) {
        console.log(res.data)
        // 跳转到首页
        router.push('/home')
      } else {
        console.log(res.data.msg)
      }
    })
    .catch((err) => {
      console.log(err)
    })
}
</script>
然后是部分router.js的代码,可以展示我的登录页面的地址与home页面的地址
js
    {
      path: '/',
      redirect: '/login' // 默认重定向到登录页面
    },
    {
      path: '/login',
      name: 'Login',
      component: () => import('@/view/login/index.vue'), // 懒加载登录页面
      meta: {
        title: '登录',
        requiresAuth: false // 不需要登录
      }
    },
    {
      path: '/home',
      name: 'Home',
      component: () => import('@/view/home/home.vue'), // 懒加载主页
      meta: {
        title: '首页',
        requiresAuth: true // 需要登录
      }
    },
二、后端准备
2.1 pom依赖
xml
<dependencies>
    <!-- Spring Security -->
    <dependency>
        <groupId>org.springframework.boot</groupId>
        <artifactId>spring-boot-starter-security</artifactId>
    </dependency>
    <!-- Spring Web -->
    <dependency>
        <groupId>org.springframework.boot</groupId>
        <artifactId>spring-boot-starter-web</artifactId>
    </dependency>
    <!-- MySQL -->
    <dependency>
        <groupId>com.mysql</groupId>
        <artifactId>mysql-connector-j</artifactId>
        <scope>runtime</scope>
    </dependency>
    <!-- MyBatis -->
    <dependency>
        <groupId>org.mybatis.spring.boot</groupId>
        <artifactId>mybatis-spring-boot-starter</artifactId>
        <version>3.0.3</version>
    </dependency>
    <!-- Lombok -->
    <dependency>
        <groupId>org.projectlombok</groupId>
        <artifactId>lombok</artifactId>
        <optional>true</optional>
    </dependency>
    <!--hutool-->
    <dependency>
        <groupId>cn.hutool</groupId>
        <artifactId>hutool-all</artifactId>
        <version>5.8.32</version>
    </dependency>

    <dependency>
        <groupId>org.springframework.boot</groupId>
        <artifactId>spring-boot-starter-test</artifactId>
        <scope>test</scope>
    </dependency>
    <dependency>
        <groupId>org.springframework.security</groupId>
        <artifactId>spring-security-test</artifactId>
        <scope>test</scope>
    </dependency>
    <dependency>
        <groupId>org.projectlombok</groupId>
        <artifactId>lombok</artifactId>
        <scope>provided</scope>
    </dependency>
</dependencies>
2.2 实体类LoginUser
可以看到,我们的实体类LoginUse实现了一个叫UserDetails的接口,Spring Security是一个合约驱动的框架。它定义了一套标准接口,你的登录类必须实现这些接口,框架才知道:
- 从哪里获取用户名
- 从哪里获取密码
- 用户的权限有哪些
- 用户账户状态是否正常
当用户登录时,Spring Security 执行以下流程:
text
用户提交登录 → Security框架调用 → 你的UserDetailsService → 返回UserDetails对象 → Security验证密码 → 创建认证令牌框架只认识 UserDetails 类型的对象。如果你不实现这个接口,框架不知道如何从你的用户对象中获取认证信息。 UserDetails 规定了必须有的字段:
getUsername():返回用户名(框架用这个比对登录名)getPassword():返回加密后的密码(框架用这个验证密码)getAuthorities():返回权限列表(决定用户能做什么)
账户状态管理:实际业务中,用户可能有多种状态:
- 账号被禁用(isEnabled)
- 账号被锁定(isAccountNonLocked)
- 密码过期(isCredentialsNonExpired)
- 账号过期(isAccountNonExpired)
这些状态检查是Spring Security自动完成 的,但前提是你的登录类必须通过UserDetails接口提供这些信息。
java
import com.fasterxml.jackson.annotation.JsonIgnoreProperties;
import lombok.Data;
import org.springframework.security.core.GrantedAuthority;
import org.springframework.security.core.authority.SimpleGrantedAuthority;
import org.springframework.security.core.userdetails.UserDetails;
import org.springframework.util.ObjectUtils;
import java.io.Serializable;
import java.util.ArrayList;
import java.util.Collection;
import java.util.List;

/**
 * 用户表
 */
@Data
@JsonIgnoreProperties(ignoreUnknown = true) // 忽略未知属性
public class LoginUser implements UserDetails,Serializable {
    // 主键
    private Integer id;
    // 登录账号
    private String loginAct;
    // 登录密码
    private String loginPwd;
    // 昵称
    private String name;
    // 账户是否没有过期,0已过期 1正常
    private Integer accountNoExpired;
    // 密码是否没有过期,0已过期 1正常
    private Integer credentialsNoExpired;
    // 账号是否没有锁定,0已锁定 1正常
    private Integer accountNoLocked;
    // 账号是否启用,0禁用 1启用
    private Integer accountEnabled;
    // 角色
    private List<String> roleList;
    // 权限标识符
    private List<String> permissionList;

    // ----------------------------重写detail中的方法-------------------
    @Override
    public Collection<? extends GrantedAuthority> getAuthorities() {
        List<GrantedAuthority>  list = new ArrayList<>();

        if(!ObjectUtils.isEmpty(this.getRoleList())){
            this.getRoleList().forEach(role -> list.add(new SimpleGrantedAuthority(role)));
        }
        if(!ObjectUtils.isEmpty(this.getPermissionList())){
            this.getPermissionList().forEach(permission ->
                    list.add(new SimpleGrantedAuthority(permission)));
        }
        return list;
    }

    @Override
    public String getPassword() {
        return this.getLoginPwd();
    }

    @Override
    public String getUsername() {
        return this.getLoginAct();
    }

    @Override
    public boolean isEnabled() {
        return this.getAccountEnabled() == 1;
    }

    @Override
    public boolean isCredentialsNonExpired() {
        return this.getCredentialsNoExpired() == 1;
    }

    @Override
    public boolean isAccountNonLocked() {
        return this.getAccountNoLocked() == 1;
    }

    @Override
    public boolean isAccountNonExpired() {
        return this.getAccountNoExpired() == 1;
    }
}
2.3 LoginUserService与Impl
java
import org.springframework.security.core.userdetails.UserDetailsService;

public interface LoginUserService extends UserDetailsService {

}这回我们可以看到,我们并没有重新创建一个UserDetails的实现类,而是直接返回了我们的LoginUser对象,原因就是我们在刚刚的LoginUser实体类中实现了UserDetails
java
import com.example.entity.LoginUser;
import com.example.mapper.LoginUserMapper;
import com.example.service.LoginUserService;
import jakarta.annotation.Resource;
import org.springframework.security.core.userdetails.UserDetails;
import org.springframework.security.core.userdetails.UsernameNotFoundException;
import org.springframework.stereotype.Service;

@Service
public class LoginUserServiceImpl implements LoginUserService {

    @Resource
    private LoginUserMapper loginUserMapper;

    @Override
    public UserDetails loadUserByUsername(String username) throws UsernameNotFoundException {
        LoginUser user = loginUserMapper.getUserByUsername(username);
        if (user == null) {
            throw new UsernameNotFoundException("用户不存在");
        }
        return user;
    }
}
2.4 SecurityConfig
接下来是很重要的SecurityConfig文件,可以说我们绝大部分要实现的功能都得通过这个config,我们先看代码,然后我会逐步的讲解。
java
import com.example.handle.FailAuthenticationFailureHandler;
import com.example.handle.MyAuthenticationSuccessHandler;
import jakarta.annotation.Resource;
import org.springframework.context.annotation.Bean;
import org.springframework.context.annotation.Configuration;
import org.springframework.security.config.annotation.web.builders.HttpSecurity;
import org.springframework.security.config.annotation.web.configurers.AbstractHttpConfigurer;
import org.springframework.security.crypto.bcrypt.BCryptPasswordEncoder;
import org.springframework.security.crypto.password.PasswordEncoder;
import org.springframework.security.web.SecurityFilterChain;
import org.springframework.web.cors.CorsConfiguration;
import org.springframework.web.cors.CorsConfigurationSource;
import org.springframework.web.cors.UrlBasedCorsConfigurationSource;
import java.util.List;

@Configuration
public class SecurityConfig {

    @Resource
    public MyAuthenticationSuccessHandler myAuthenticationSuccessHandler;
    @Resource
    public FailAuthenticationFailureHandler failAuthenticationFailureHandler;

    /**
     * 创建一个密码编码器(加密器)供 Spring Security 使用
     */
    @Bean
    public PasswordEncoder passwordEncoder() {
        return new BCryptPasswordEncoder();
    }

    @Bean
    public CorsConfigurationSource configurationSource() {
        CorsConfiguration configuration = new CorsConfiguration();
        configuration.setAllowedOriginPatterns(List.of("*")); // 允许所有来源,生产环境建议指定具体域名
        configuration.setAllowedMethods(List.of("*")); // 允许所有请求方法
        configuration.setAllowedHeaders(List.of("*")); // 允许所有请求头
        configuration.setAllowCredentials(true); // 允许携带凭据
        UrlBasedCorsConfigurationSource source = new UrlBasedCorsConfigurationSource();
        source.registerCorsConfiguration("/**", configuration);
        return source;
    }

    /**
     * 创建一个 SecurityFilterChain 对象,用于配置 Spring Security 的安全过滤链
     */
    @Bean
    public SecurityFilterChain securityFilterChain(HttpSecurity httpSecurity,CorsConfigurationSource configurationSource) throws Exception {
        httpSecurity
                .formLogin((formLogin) -> formLogin.loginProcessingUrl("/login")
                        .successHandler(myAuthenticationSuccessHandler)
                        .failureHandler(failAuthenticationFailureHandler)
                )
                .authorizeHttpRequests((authorize) ->
                        authorize.requestMatchers("/login").permitAll()
                                .anyRequest().authenticated())
                .csrf(AbstractHttpConfigurer::disable)
                //支持跨域请求
                .cors( (cors) -> {
                    cors.configurationSource(configurationSource);
                });
        return httpSecurity.build();
    }
}
2.4.1 密码加密器
首先是编码加密器PasswordEncoder,这个我们在上篇中讲过,PasswordEncoder 是Spring Security中专门负责密码加密和验证 的接口。想要使用Spring Security就必须配置一个加密器,而我们选的是BCryptPasswordEncoder
java
/**
 * 创建一个密码编码器(加密器)供 Spring Security 使用
 */
@Bean
public PasswordEncoder passwordEncoder() {
    return new BCryptPasswordEncoder();
}
2.4.2 跨域解决
其次就是下面这段代码,这是 Spring Security中配置CORS(跨域资源共享) 的代码。当你的前端应用(如运行在 http://localhost:3000)要访问后端 API(如运行在 http://localhost:8080)时,就会触发浏览器的安全策略------同源策略,即浏览器默认禁止网页从一个源向另一个源发送请求,除非目标源明确允许。就需要这个配置。
所以我们配置如下代码允许别的源向我们后台访问,以达到解决跨域问题。这个代码基本上可以说是通用的,不会有太多变动与配置。如果在生产环境,可以配置具体的来源,而不是使用*号。
java
@Bean
public CorsConfigurationSource configurationSource() {
    CorsConfiguration configuration = new CorsConfiguration();
    configuration.setAllowedOriginPatterns(List.of("*")); // 允许所有来源,生产环境建议指定具体域名
    configuration.setAllowedMethods(List.of("*")); // 允许所有请求方法
    configuration.setAllowedHeaders(List.of("*")); // 允许所有请求头
    configuration.setAllowCredentials(true); // 允许携带凭据
    UrlBasedCorsConfigurationSource source = new UrlBasedCorsConfigurationSource();
    source.registerCorsConfiguration("/**", configuration);
    return source;
}
2.4.3 过滤器链SecurityFilterChain
java
/**
 * 创建一个 SecurityFilterChain 对象,用于配置 Spring Security 的安全过滤链
 */
@Bean
public SecurityFilterChain securityFilterChain(HttpSecurity httpSecurity,CorsConfigurationSource configurationSource) throws Exception {
    httpSecurity
            .formLogin((formLogin) -> formLogin.loginProcessingUrl("/login")
                     //.usernameParameter("username")   如果前端的用户名与密码不叫username和password,需要指定参数名
                     //.passwordParameter("password")   而这个例子当中我们的用户名与security里面需求的一样,所以不用特别指定
                    .successHandler(myAuthenticationSuccessHandler) // 登录成功处理器 如果登录成功,则会执行里面的代码
                    .failureHandler(failAuthenticationFailureHandler) // 登录失败处理器 如果登录失败,则会执行里面的代码
            )
            .authorizeHttpRequests((authorize) ->
                    authorize.requestMatchers("/login").permitAll().anyRequest().authenticated())
            .csrf(AbstractHttpConfigurer::disable)
            //支持跨域请求
            .cors( (cors) -> {
                cors.configurationSource(configurationSource);
            });
    return httpSecurity.build();
}SpringSecurity本质上是一系列过滤器的集合,所有的请求会依次通过这些过滤器,而我们对于SpringSecurity的配置主要就是自定义每个过滤器的行为。
先来讲一下两个参数:
HttpSecurity:Spring Security 的核心配置对象,用它来配置安全规则- 自动注入前面定义的
CorsConfigurationSource配置
java
.formLogin((formLogin) -> formLogin.loginProcessingUrl("/login")
         //.usernameParameter("username")   如果前端的用户名与密码不叫username和password,需要指定参数名
         //.passwordParameter("password")   而这个例子当中我们的用户名与security里面需求的一样,所以不用特别指定
        .successHandler(myAuthenticationSuccessHandler) // 登录成功处理器 如果登录成功,则会执行里面的代码
        .failureHandler(failAuthenticationFailureHandler) // 登录失败处理器 如果登录失败,则会执行里面的代码
)
第一部分上述代码是表单配置
formLogin():启用表单登录
- 作用:告诉Spring Security使用基于表单的登录方式
- 默认行为 :如果不配置,Spring Security 会自动生成一个登录页面(
/login)
loginProcessingUrl("/login"):指定登录页
- 作用:指定登录表单提交的URL
- 处理流程:
text
1. 前端 POST 请求到 /login
2. 提交 username 和 password 参数
3. Spring Security 自动拦截这个请求
4. 调用 UserDetailsService 验证用户名密码
5. 验证成功 → 调用 successHandler
6. 验证失败 → 调用 failureHandler
java
.authorizeHttpRequests((authorize) ->
    authorize.requestMatchers("/login").permitAll()
             .anyRequest().authenticated()
)
第二部分上述代码是请求授权配置
authorizeHttpRequests()- 请求授权
- 作用:配置哪些请求需要认证,哪些不需要
- 执行时机:在请求到达Controller之前进行拦截检查
requestMatchers("/login").permitAll()
- 作用:匹配指定路径,允许所有人访问(无需登录)
- 为什么需要:登录页面本身必须能被未登录用户访问
- 它可以匹配多种模式:
java
.requestMatchers("/login", "/register").permitAll()  // 多个路径
.requestMatchers("/public/**").permitAll()          // 所有public开头的路径
.requestMatchers(HttpMethod.GET, "/api/info").permitAll()  // 指定HTTP方法
.requestMatchers("/swagger-ui/**", "/v3/api-docs/**").permitAll()  // Swagger文档
.anyRequest().authenticated()
- 作用:其他所有请求都需要认证(登录)
- 执行顺序 :Spring Security 按顺序检查规则
- 重要原则 :先匹配的规则先生效!
- 错误示例:
java
// ❌ 错误:anyRequest() 匹配所有请求,后面的规则永远不会生效
.authorizeHttpRequests(authorize -> authorize
    .anyRequest().authenticated()  // 这个匹配所有!
    .requestMatchers("/login").permitAll()  // 永远执行不到这里
)

// ✅ 正确:先配置不需要认证的,再配置需要认证的
.authorizeHttpRequests(authorize -> authorize
    .requestMatchers("/login").permitAll()  // 先匹配:登录页不需要认证
    .anyRequest().authenticated()           // 后匹配:其他都需要认证
)
第三部分:CSRF 防护配置
java
.csrf(AbstractHttpConfigurer::disable)- CSRF 是什么?
- 全称:Cross-Site Request Forgery(跨站请求伪造)
- 攻击原理:用户登录A网站后,访问恶意网站B,B网站诱导浏览器向A网站发送请求
- 防御机制:要求请求携带一个随机的Token
- 为什么要禁用?
- 前后端分离:前端可能是React/Vue,不是服务端渲染的页面
- 无状态API:使用JWT等无状态认证,没有Session
- 开发方便:开发阶段可以禁用,生产环境应重新考虑
- 什么时候需要开启?
java
// 传统服务端渲染应用(如Thymeleaf)必须开启
.csrf(csrf -> csrf
    .csrfTokenRepository(CookieCsrfTokenRepository.withHttpOnlyFalse())
)

// 或者:如果前端能正确处理CSRF Token
.csrf(csrf -> csrf
    .csrfTokenRepository(new CookieCsrfTokenRepository())
    .csrfTokenRequestHandler(new CsrfTokenRequestAttributeHandler())
)
第四部分:CORS 跨域配置
java
.cors((cors) -> {
    cors.configurationSource(configurationSource);
})- 为什么需要这个配置? 虽然我们刚刚定义了
CorsConfigurationSourceBean,但还需要告诉 Security 使用它 ,因为Security有自己的CORS处理机制,如果我们不指定,他就会用默认的。
text
浏览器发送跨域请求 →
Spring Security的CorsFilter拦截 →
从configurationSource获取配置 →
添加CORS响应头 →
允许请求继续
2.4.4 AuthenticationSuccessHandler
AuthenticationSuccessHandler 是 Spring Security 中的一个关键接口,用于处理用户认证成功后的行为。
- 控制认证成功后的重定向:当用户登录成功后,决定跳转到哪个页面
- 执行成功后的逻辑:比如记录日志、更新最后登录时间、设置会话等
java
import cn.hutool.json.JSONUtil;
import com.example.result.R;
import jakarta.servlet.ServletException;
import jakarta.servlet.http.HttpServletRequest;
import jakarta.servlet.http.HttpServletResponse;
import org.springframework.security.core.Authentication;
import org.springframework.security.web.authentication.AuthenticationSuccessHandler;
import org.springframework.stereotype.Component;

import java.io.IOException;

@Component
public class MyAuthenticationSuccessHandler implements AuthenticationSuccessHandler {
    @Override
    public void onAuthenticationSuccess(HttpServletRequest request, HttpServletResponse response, Authentication authentication) throws IOException, ServletException {
        response.setContentType("application/json;charset=UTF-8");
        R result = R.builder().code(200).msg("登录成功!").data(authentication).build();
        // hutool工具包下的json工具类 作用是把R对象转换成json字符串
        String jsonStr = JSONUtil.toJsonStr(result);
        response.getWriter().write(jsonStr);
    }
}
2.4.5 AuthenticationFailureHandler
AuthenticationFailureHandler 是 Spring Security 中处理认证失败的接口,用于控制用户登录失败后的行为。
- 处理认证失败逻辑:当用户名/密码错误、账户被锁定、验证码错误等情况时执行
- 控制失败后的响应:决定是重定向到错误页面,还是返回 JSON 错误信息
- 记录失败信息:记录登录失败尝试,用于安全审计或账户锁定机制
java
import cn.hutool.json.JSONUtil;
import com.example.result.R;
import jakarta.servlet.ServletException;
import jakarta.servlet.http.HttpServletRequest;
import jakarta.servlet.http.HttpServletResponse;
import org.springframework.security.core.AuthenticationException;
import org.springframework.security.web.authentication.AuthenticationFailureHandler;
import org.springframework.stereotype.Component;

import java.io.IOException;

@Component
public class FailAuthenticationFailureHandler implements AuthenticationFailureHandler {
    @Override
    public void onAuthenticationFailure(HttpServletRequest request, HttpServletResponse response, AuthenticationException exception) throws IOException, ServletException {
        response.setContentType("application/json;charset=UTF-8");
        R result = R.builder().code(500).msg("登录失败:"+exception.getMessage()).data(null).build();
        // hutool工具包下的json工具类 作用是把R对象转换成json字符串
        String jsonStr = JSONUtil.toJsonStr(result);
        response.getWriter().write(jsonStr);
    }
}
2.5 运行
经过上面的配置我们已经准备了一个基本能运行的前后端分离配置,接下来我们来测试一下,我们先输入首页的网址http://localhost:5173/home ,然后系统自动为我们重定向到了登录页

接着登录成功后我们自动跳回了首页
