文章目录
- [2. Git基本操作](#2. Git基本操作)
-
- [2.1 创建本地仓库](#2.1 创建本地仓库)
- [2.2 配置本地仓库](#2.2 配置本地仓库)
- [2.3 Git工作原理](#2.3 Git工作原理)
- [2.4 文件操作](#2.4 文件操作)
-
- [2.4.1 添加文件](#2.4.1 添加文件)
- [2.4.2 修改文件](#2.4.2 修改文件)
- [2.4.3 删除文件](#2.4.3 删除文件)
- [2.5 .git文件](#2.5 .git文件)
-
- [2.5.1 查看git目录](#2.5.1 查看git目录)
- [2.5.2 git对象](#2.5.2 git对象)
- [2.5.3 查看指针指向的分支](#2.5.3 查看指针指向的分支)
- [2.5.4 查看分支](#2.5.4 查看分支)
- [2.5.5 查看commit id](#2.5.5 查看commit id)
- [2.5.6 查看tree对象](#2.5.6 查看tree对象)
- [2.6 查看提交记录](#2.6 查看提交记录)
- [2.7 版本回退](#2.7 版本回退)
- [2.8 撤销修改](#2.8 撤销修改)
更多Git相关知识: Git专栏
2. Git基本操作
2.1 创建本地仓库
- 创建一个目录。仓库需要在文件目录下进行创建的。
bash
root@VM-0-3-ubuntu:~# mkdir gitcode/

root@VM-0-3-ubuntu:~# cd gitcode- 初始化一个空的Git仓库
bash
root@VM-0-3-ubuntu:~/gitcode# git init
hint: Using 'master' as the name for the initial branch. This default branch name
hint: is subject to change. To configure the initial branch name to use in all
hint: of your new repositories, which will suppress this warning, call:
hint:
hint: 	git config --global init.defaultBranch <name>
hint:
hint: Names commonly chosen instead of 'master' are 'main', 'trunk' and
hint: 'development'. The just-created branch can be renamed via this command:
hint:
hint: 	git branch -m <name>
Initialized empty Git repository in /root/gitcode/.git/

root@VM-0-3-ubuntu:~/gitcode# la
.git此时会在当前目录下出现一个隐藏文件.git。
查看.git 目录
bash
root@VM-0-3-ubuntu:~/gitcode# tree .git/
.git/
├── branches
├── config
├── description
├── HEAD
├── hooks
│   ├── applypatch-msg.sample
│   ├── commit-msg.sample
│   ├── fsmonitor-watchman.sample
│   ├── post-update.sample
│   ├── pre-applypatch.sample
│   ├── pre-commit.sample
│   ├── pre-merge-commit.sample
│   ├── prepare-commit-msg.sample
│   ├── pre-push.sample
│   ├── pre-rebase.sample
│   ├── pre-receive.sample
│   ├── push-to-checkout.sample
│   ├── sendemail-validate.sample
│   └── update.sample
├── info
│   └── exclude
├── objects
│   ├── info
│   └── pack
└── refs
    ├── heads
    └── tags
该git目录是追踪管理git仓库的,如果对该目录进行修改的话,会直接将该git仓库破坏掉。
2.2 配置本地仓库
方式1:单独设置
- 配置用户名和邮箱
bash
root@VM-0-3-ubuntu:~/gitcode# git config user.name "cuckoo"

root@VM-0-3-ubuntu:~/gitcode# git config user.email "buxinyu163@163.com"- 查看配置
bash
root@VM-0-3-ubuntu:~/gitcode# git config -l
core.repositoryformatversion=0
core.filemode=true
core.bare=false
core.logallrefupdates=true
user.name=cuckoo
user.email=buxinyu163@163.com- 删除配置
bash
root@VM-0-3-ubuntu:~/gitcode# git config --unset user.name

root@VM-0-3-ubuntu:~/gitcode# git config --unset user.email

root@VM-0-3-ubuntu:~/gitcode# git config -l
core.repositoryformatversion=0
core.filemode=true
core.bare=false
core.logallrefupdates=true
方式2:全局设置
上面的设置方式是只在当前的本地仓库上生效。
但是,在一台服务器上可以创建多个本地仓库,加上--global选项,表示配置在当前机器上所有的本地仓库上。
bash
root@VM-0-3-ubuntu:~/gitcode# git config --global user.name "cuckoo"

root@VM-0-3-ubuntu:~/gitcode# git config --global user.email "buxinyu163@163.com"

root@VM-0-3-ubuntu:~/gitcode# git config -l
user.name=cuckoo
user.email=buxinyu163@163.com
core.repositoryformatversion=0
core.filemode=true
core.bare=false
core.logallrefupdates=true
同样删除配置时,也是只需要加上--global选项即可。
2.3 Git工作原理
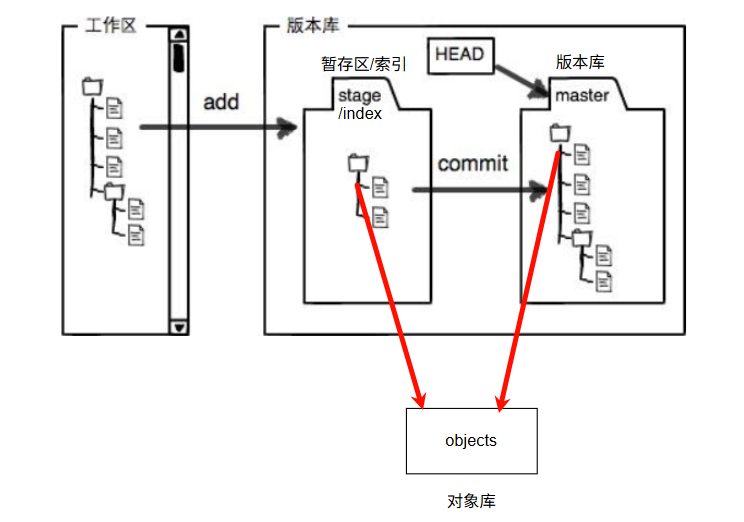
工作区:电脑上文件的目录。
暂存区/索引 和 版本库 中存放的不是具体的内容,而是一个个git对象的索引。
每add一次,在工作区中修改的内容会写入对象库中一个新的git对象中(Git会为每个被修改/新添加的文件创建一个blob对象,如果文件内容没有变化,就会重用已有的blob对象),同时暂存区中目录树的文件索引会被更新。git追踪管理的是修改,并不是文件。
在创建Git版本库时,Git会自动创建一个唯一的master分支,HEAD指针指向master分支。
当执行commit命令时,HEAD指向的分支会做出相应的更新。此时,暂存区中的目录树才被真正写到版本库中。
2.4 文件操作
2.4.1 添加文件
- 创建一个文件
bash
root@VM-0-3-ubuntu:~/gitcode# touch ReadMe

root@VM-0-3-ubuntu:~/gitcode# la
.git ReadMe- 在文件中写入内容
bash
root@VM-0-3-ubuntu:~/gitcode# vim ReadMe

root@VM-0-3-ubuntu:~/gitcode# cat ReadMe
hello git- 提交到暂存区中
git add .表示:将工作区中所有修改的文件提交到暂存区中。
git add ReadMe表示:指定ReadMe文件添加到暂存区中。
如果想要一次指定多个文件进行add,用空格隔开文件名即可。
bash
root@VM-0-3-ubuntu:~/gitcode# touch file1 file2 file3

root@VM-0-3-ubuntu:~/gitcode# la
file1  file2  file3  .git  ReadMe

root@VM-0-3-ubuntu:~/gitcode# git add .

root@VM-0-3-ubuntu:~/gitcode# git commit -m "新增3个文件"
[master 46fcecf] 新增3个文件
 3 files changed, 0 insertions(+), 0 deletions(-)
 create mode 100644 file1
 create mode 100644 file2
create mode 100644 file3- 提交到版本库中
bash
root@VM-0-3-ubuntu:~/gitcode# git commit -m "新增ReadMe文件"
[master (root-commit) 77fde10] 新增ReadMe文件
 1 file changed, 1 insertion(+)
create mode 100644 ReadMe需要注意的是,执行commit命令时,只会将暂存区中的内容提交到版本库中,工作区中未被add的内容不会被提交到版本库中。
2.4.2 修改文件
- 修改
bash
root@VM-0-3-ubuntu:~/gitcode# vim ReadMe

root@VM-0-3-ubuntu:~/gitcode# cat ReadMe
hello git
hello world
查看当前仓库的状态
bash
root@VM-0-3-ubuntu:~/gitcode# git status
On branch master
Changes not staged for commit:
  (use "git add <file>..." to update what will be committed)
  (use "git restore <file>..." to discard changes in working directory)
	modified:   ReadMe
no changes added to commit (use "git add" and/or "git commit -a")
只记录哪些文件被修改了,并不记录修改了哪些内容
查看当前工作区和暂存区的具体差异
bash
root@VM-0-3-ubuntu:~/gitcode# git diff
diff --git a/ReadMe b/ReadMe
index 8d0e412..05fe86c 100644
--- a/ReadMe
+++ b/ReadMe
@@ -1 +1,2 @@
 hello git
+hello world- 提交到版本库中
bash
root@VM-0-3-ubuntu:~/gitcode# git add .

root@VM-0-3-ubuntu:~/gitcode# git commit -m "修改ReadMe文件"
[master 97d8589] 修改ReadMe文件
 1 file changed, 1 insertion(+)
2.4.3 删除文件
方式一
bash
root@VM-0-3-ubuntu:~/gitcode# la
file1  file2  file3  .git  ReadMe

root@VM-0-3-ubuntu:~/gitcode# rm file1

root@VM-0-3-ubuntu:~/gitcode# la
file2  file3  .git  ReadMe

root@VM-0-3-ubuntu:~/gitcode# git add .

root@VM-0-3-ubuntu:~/gitcode# git commit -m "delete file1"
[master 07344ec] delete file1
 1 file changed, 0 insertions(+), 0 deletions(-)
 delete mode 100644 file1
方式二
bash
root@VM-0-3-ubuntu:~/gitcode# la
file2  file3  .git  ReadMe

root@VM-0-3-ubuntu:~/gitcode# git rm file2
rm 'file2'

root@VM-0-3-ubuntu:~/gitcode# la
file3  .git  ReadMe

root@VM-0-3-ubuntu:~/gitcode# git status
On branch master
Changes to be committed:
  (use "git restore --staged <file>..." to unstage)
	deleted:    file2
git rm命令会直接删除工作区和暂存区中的file2。只需要再执行依次commit操作即可。
bash
root@VM-0-3-ubuntu:~/gitcode# git commit -m "delete file2"
[master 5a01a0a] delete file2
 1 file changed, 0 insertions(+), 0 deletions(-)
 delete mode 100644 file2

root@VM-0-3-ubuntu:~/gitcode# git status
On branch master
nothing to commit, working tree clean
2.5 .git文件
2.5.1 查看git目录
bash
root@VM-0-3-ubuntu:~/gitcode# tree .git
.git
├── branches
├── COMMIT_EDITMSG
├── config
├── description
├── HEAD
├── hooks
│?? ├── applypatch-msg.sample
│?? ├── commit-msg.sample
│?? ├── fsmonitor-watchman.sample
│?? ├── post-update.sample
│?? ├── pre-applypatch.sample
│?? ├── pre-commit.sample
│?? ├── pre-merge-commit.sample
│?? ├── prepare-commit-msg.sample
│?? ├── pre-push.sample
│?? ├── pre-rebase.sample
│?? ├── pre-receive.sample
│?? ├── push-to-checkout.sample
│?? ├── sendemail-validate.sample
│?? └── update.sample
├── index
├── info
│?? └── exclude
├── logs
│?? ├── HEAD
│?? └── refs
│??     └── heads
│??         └── master
├── objects
│?? ├── 0e
│?? │?? └── 6b1780b73cd9220ec5073dc64b42f7ad4bd945
│?? ├── 15
│?? │?? └── a37e9ef171cca4a5d985fccd1fcf9414b2c7cf
│?? ├── 46
│?? │?? └── fcecf10dd0b16e4b0a219b60c0f65aead13977
│?? ├── 77
│?? │?? └── fde109374766c4a3bcf52f069c16f05d9f0532
│?? ├── 8d
│?? │?? └── 0e41234f24b6da002d962a26c2495ea16a425f
│?? ├── e6
│?? │?? └── 9de29bb2d1d6434b8b29ae775ad8c2e48c5391
│?? ├── info
│?? └── pack
└── refs
    ├── heads
    │?? └── master
    └── tags

19 directories, 29 files
2.5.2 git对象
git对象分为四种:
-
commit 对象
-
blob对象
-
tree对象
-
tag对象
2.5.3 查看指针指向的分支
bash
root@VM-0-3-ubuntu:~/gitcode# cat .git/HEAD
ref: refs/heads/master
2.5.4 查看分支
master指向的就是最新的一次提交的commit id .
bash
root@VM-0-3-ubuntu:~/gitcode# cat .git/refs/heads/master
46fcecf10dd0b16e4b0a219b60c0f65aead13977
2.5.5 查看commit id
bash
git cat-file -p commitId
2.5.6 查看tree对象
bash
root@VM-0-3-ubuntu:~/gitcode# git cat-file -p 15a37e9ef171cca4a5d985fccd1fcf9414b2c7cf
100644 blob 8d0e41234f24b6da002d962a26c2495ea16a425f	ReadMe
100644 blob e69de29bb2d1d6434b8b29ae775ad8c2e48c5391	file1
100644 blob e69de29bb2d1d6434b8b29ae775ad8c2e48c5391	file2
100644 blob e69de29bb2d1d6434b8b29ae775ad8c2e48c5391	file3
root@VM-0-3-ubuntu:~/gitcode# git cat-file -p 8d0e41234f24b6da002d962a26c2495ea16a425f
hello git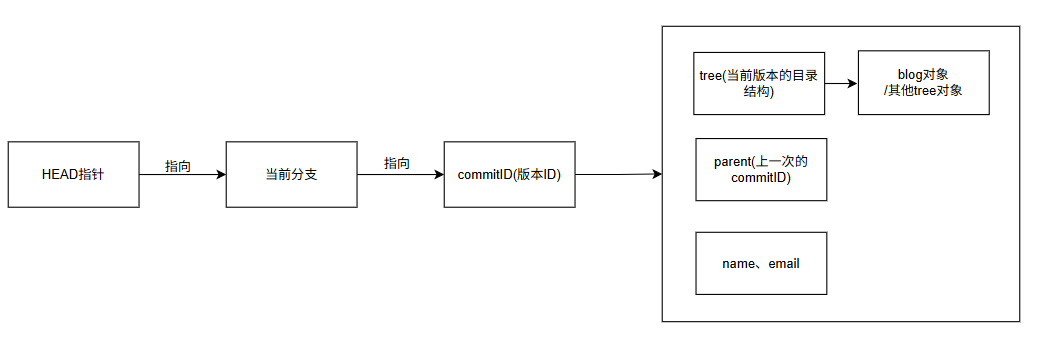
commitID指向的是一个tree对象的引用,tree对象代表的是目录结构,指向的是blob对象(文件内容)和其他的tree对象(子目录)。
2.6 查看提交记录
bash
root@VM-0-3-ubuntu:~/gitcode# git log
commit 46fcecf10dd0b16e4b0a219b60c0f65aead13977 (HEAD -> master)
Author: cuckoo <buxinyu163@163.com>
Date:   Sat Jan 10 15:02:56 2026 +0800

    新增3个文件

commit 77fde109374766c4a3bcf52f069c16f05d9f0532
Author: cuckoo <buxinyu163@163.com>
Date:   Sat Jan 10 14:45:38 2026 +0800

    新增ReadMe文件
更加美观的打印方式:
bash
root@VM-0-3-ubuntu:~/gitcode# git log --pretty=oneline
46fcecf10dd0b16e4b0a219b60c0f65aead13977 (HEAD -> master) 新增3个文件
77fde109374766c4a3bcf52f069c16f05d9f0532 新增ReadMe文件
2.7 版本回退
版本回退其实git只需要修改对应分支指向的commit ID即可。
版本回退reset命令的三个选项:
-
--soft:回退版本库中的内容,工作区和暂存区中的内容不进行回退。 -
--mixed:回退版本库和暂存区中的内容,工作区中的内容不进行回退。 -
--hard:回退工作区、暂存区、版本库中的内容。
默认时--mixed选项。
这是我们现在
bash
root@VM-0-3-ubuntu:~/gitcode# git log --pretty=oneline
97d8589fc0a517644a879826e165ee247020a9ce (HEAD -> master) 修改ReadMe文件
46fcecf10dd0b16e4b0a219b60c0f65aead13977 新增3个文件
77fde109374766c4a3bcf52f069c16f05d9f0532 新增ReadMe文件
root@VM-0-3-ubuntu:~/gitcode# la
file1  file2  file3  .git  ReadMe
root@VM-0-3-ubuntu:~/gitcode# cat ReadMe
hello git
hello world
回退到上一个版本:
bash
root@VM-0-3-ubuntu:~/gitcode# git reset --hard 46fcecf10dd0b16e4b0a219b60c0f65aead13977
HEAD is now at 46fcecf 新增3个文件
root@VM-0-3-ubuntu:~/gitcode# la
file1  file2  file3  .git  ReadMe
root@VM-0-3-ubuntu:~/gitcode# cat ReadMe
hello git
只要知道对应版本的commit id就可以实现回退。
2.8 撤销修改
情况一:撤销还没有add的工作区中的内容
修改前:
bash
root@VM-0-3-ubuntu:~/gitcode# cat ReadMe
hello git
hello world
修改后:
bash
root@VM-0-3-ubuntu:~/gitcode# vim ReadMe
root@VM-0-3-ubuntu:~/gitcode# cat ReadMe
hello git
hello world
hello cuckoo
撤销修改后:
bash
root@VM-0-3-ubuntu:~/gitcode# git checkout -- ReadMe
root@VM-0-3-ubuntu:~/gitcode# cat ReadMe
hello git
hello world
情况二:撤销已经add,但还未commit的内容
修改前:
bash
root@VM-0-3-ubuntu:~/gitcode# cat ReadMe
hello git
hello world
修改后:
bash
root@VM-0-3-ubuntu:~/gitcode# vim ReadMe
root@VM-0-3-ubuntu:~/gitcode# cat ReadMe
hello git
hello world
hello cuckoo
add后:
bash
root@VM-0-3-ubuntu:~/gitcode# git add ReadMe
root@VM-0-3-ubuntu:~/gitcode# git status
On branch master
Changes to be committed:
  (use "git restore --staged <file>..." to unstage)
	modified:   ReadMe
撤销修改后:
- 使用
--hard可以使工作区、暂存区都回退到版本库的当前版本。
bash
root@VM-0-3-ubuntu:~/gitcode# git reset --hard HEAD
HEAD is now at 97d8589 修改ReadMe文件
root@VM-0-3-ubuntu:~/gitcode# cat ReadMe
hello git
hello world- 使用
--mixed可以使暂存区中的内容回退到版本库的当前版本,就变成了情况1。
bash
root@VM-0-3-ubuntu:~/gitcode# cat ReadMe
hello git
hello world
hello cuckoo

root@VM-0-3-ubuntu:~/gitcode# git add ReadMe
root@VM-0-3-ubuntu:~/gitcode# git status
On branch master
Changes to be committed:
  (use "git restore --staged <file>..." to unstage)
	modified:   ReadMe

root@VM-0-3-ubuntu:~/gitcode# git reset --mixed HEAD ReadMe
warning: --mixed with paths is deprecated; use 'git reset -- <paths>' instead.
Unstaged changes after reset:
M	ReadMe

root@VM-0-3-ubuntu:~/gitcode# git status
On branch master
Changes not staged for commit:
  (use "git add <file>..." to update what will be committed)
  (use "git restore <file>..." to discard changes in working directory)
	modified:   ReadMe
no changes added to commit (use "git add" and/or "git commit -a")

root@VM-0-3-ubuntu:~/gitcode# git checkout -- ReadMe

root@VM-0-3-ubuntu:~/gitcode# git status
On branch master
nothing to commit, working tree clean
情况三:撤销已经commit的内容(前提:commit之后,没有执行push操作)
修改前:
bash
root@VM-0-3-ubuntu:~/gitcode# cat ReadMe
hello git
hello world
修改后:
bash
root@VM-0-3-ubuntu:~/gitcode# vim ReadMe
root@VM-0-3-ubuntu:~/gitcode# cat ReadMe
hello git
hello world
hello cuckoo
add & commit 后:
bash
root@VM-0-3-ubuntu:~/gitcode# git add ReadMe
root@VM-0-3-ubuntu:~/gitcode# git commit -m "修改ReadMe文件"
[master 7963664] 修改ReadMe文件
 1 file changed, 1 insertion(+)
撤销后:
bash
root@VM-0-3-ubuntu:~/gitcode# git reset --hard HEAD^
HEAD is now at 97d8589 修改ReadMe文件
root@VM-0-3-ubuntu:~/gitcode# cat ReadMe
hello git
hello world几个^就表示回退到前几个版本