ItemDecoration 最常用的功能是给 RecyclerView 的 child 之间添加间隔,代码如下:
kotlin
// 自定义 ItemDecoration
class CustomItemDecoration : RecyclerView.ItemDecoration() {

    override fun getItemOffsets(
        outRect: Rect,
        view: View,
        parent: RecyclerView,
        state: RecyclerView.State
    ) {
        // 配置 outRect 的 bottom 为 5dp
        outRect.bottom = ScreenUtils.dip2px(5).toInt()
    }
}
kotlin
// 调用 RecyclerView 的 addItemDecoration() 添加自定义的 ItemDecoration
recyclerView.addItemDecoration(CustomItemDecoration())
这样就在纵向的 RecyclerView 的每个 child 之间添加了 5dp 的间隔,用起来很简单,但是具体是怎么实现的呢?我们通过源码来分析,本文源码基于 androidx.recyclerview:recyclerview:1.2.1。
RecyclerView 测量 child 的宽高的时候会调用 LayoutManager 的 measureChildWithMargins() 方法:
java
public void measureChildWithMargins(@NonNull View child, int widthUsed, int heightUsed) {
    final LayoutParams lp = (LayoutParams) child.getLayoutParams();

    final Rect insets = mRecyclerView.getItemDecorInsetsForChild(child);
    widthUsed += insets.left + insets.right; // 把 insets 的 left 和 right 添加给 widthUsed
    heightUsed += insets.top + insets.bottom; // 把 insets 的 top 和 bottom 添加给 heightUsed

    final int widthSpec = getChildMeasureSpec(getWidth(), getWidthMode(),
            getPaddingLeft() + getPaddingRight()
                    + lp.leftMargin + lp.rightMargin + widthUsed, lp.width,
            canScrollHorizontally());
    final int heightSpec = getChildMeasureSpec(getHeight(), getHeightMode(),
            getPaddingTop() + getPaddingBottom()
                    + lp.topMargin + lp.bottomMargin + heightUsed, lp.height,
            canScrollVertically());
    if (shouldMeasureChild(child, widthSpec, heightSpec, lp)) {
        child.measure(widthSpec, heightSpec);
    }
}
可以看到测量的时候不只会考虑 RecyclerView 的 padding 和 child 的 margin,还会把 insets 的上下左右的值计算在内,insets 来自 RecyclerView 的 getItemDecorInsetsForChild() 方法:
java
Rect getItemDecorInsetsForChild(View child) {
    final LayoutParams lp = (LayoutParams) child.getLayoutParams();
    ...
    final Rect insets = lp.mDecorInsets;
    final int decorCount = mItemDecorations.size();
    insets.set(0, 0, 0, 0);
    for (int i = 0; i < decorCount; i++) {
        // mTempRect 默认上下左右都是 0
        mTempRect.set(0, 0, 0, 0);
        // 通过 getItemOffsets() 给 mTempRect 赋值
        mItemDecorations.get(i).getItemOffsets(mTempRect, child, this, mState);
        insets.left += mTempRect.left;
        insets.top += mTempRect.top;
        insets.right += mTempRect.right;
        insets.bottom += mTempRect.bottom;
    }
    ...
    return insets;
}
在这里会遍历 mItemDecorations 并把每个 ItemDecoration 的 mTempRect 的上下左右的值累加给 insets,mItemDecorations 是通过 RecyclerView 的 addItemDecoration() 添加的,insets 来自 child 的 LayoutParams。mTempRect 的上下左右可以通过 ItemDecoration 的 getItemOffsets() 来进行赋值,其默认上下左右的值都是 0。
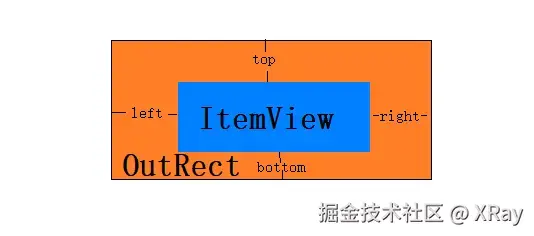
所以其实 outRect 是 itemView 外面的一个框,类似一个相框,把 itemView 围了起来,其实就类似于给当前 itemView 外面添加了 margin,如下图所示:
如果还有第二个 ItemDecoration,就在现在 outRect 外面再围一个框,依此类推。
再来看看 RecyclerView 是怎么布局 child 的,在 LayoutManager 的 layoutDecoratedWithMargins() 方法中:
java
public void layoutDecoratedWithMargins(@NonNull View child, int left, int top, int right,
                                       int bottom) {
    final LayoutParams lp = (LayoutParams) child.getLayoutParams();
    final Rect insets = lp.mDecorInsets;
    child.layout(left + insets.left + lp.leftMargin, top + insets.top + lp.topMargin,
            right - insets.right - lp.rightMargin,
            bottom - insets.bottom - lp.bottomMargin);
}
可以看到布局 child 的时候也会把 insets 的 上下左右考虑进去。
ItemDecoration 是 RecyclerView 的抽象静态内部类,除了 getItemOffsets() 方法,里面还有 2 个方法需要关注:
- onDraw(),用于在提供给 RecyclerView 的画布上绘制装饰,通过此方法绘制的任何内容都将在 itemView 之前绘制,因此将显示在 itemView 下方。
- onDrawOver(),用于在提供给 RecyclerView 的画布上绘制装饰,通过此方法绘制的任何内容都将在 itemView 之后绘制,因此将显示在 itemView 上方。
这两个方法会在 RecyclerView 的绘制过程中调用:
java
@Override
public void draw(Canvas c) {
    super.draw(c);

    final int count = mItemDecorations.size();
    for (int i = 0; i < count; i++) {
        mItemDecorations.get(i).onDrawOver(c, this, mState);
    }
    ...
}

@Override
public void onDraw(Canvas c) {
    super.onDraw(c);

    final int count = mItemDecorations.size();
    for (int i = 0; i < count; i++) {
        mItemDecorations.get(i).onDraw(c, this, mState);
    }
}
这里 draw() 方法会先调用 super.draw(c),super.draw(c) 即 View 中的 draw() 方法,这里会依次调用 onDraw() 和 dispatchDraw() 方法,dispatchDraw() 方法用于绘制 child,这就是 onDraw() 方法绘制的内容显示在 itemView 的下方,而 onDrawOver() 绘制的的内容显示在 itemView 的上方的原因。