调用第三方接口
鸿蒙ArkTS-发请求给第三方接口显示实时新闻列表页面
开发环境为:
开发工具:DevEco Studio 6.0.1 Release
API版本是:API21
本文所有代码都已使用模拟器测试成功!
1. 准备工作
1. 申请key
我们本案例中调用的第三方接口来自于聚合数据,官网地址:https://dashboard.juhe.cn
我们页面的所有数据都会调用聚合提供的接口,来获取数据,所以我们需要先到官网上进行账号注册
然后进行实名认证,之后我们需要申请具体接口的key(获取不同数据的接口需要不同的key,这个key类似于授权码,没有这个key,就无法调用接口)
下面是申请key的步骤:
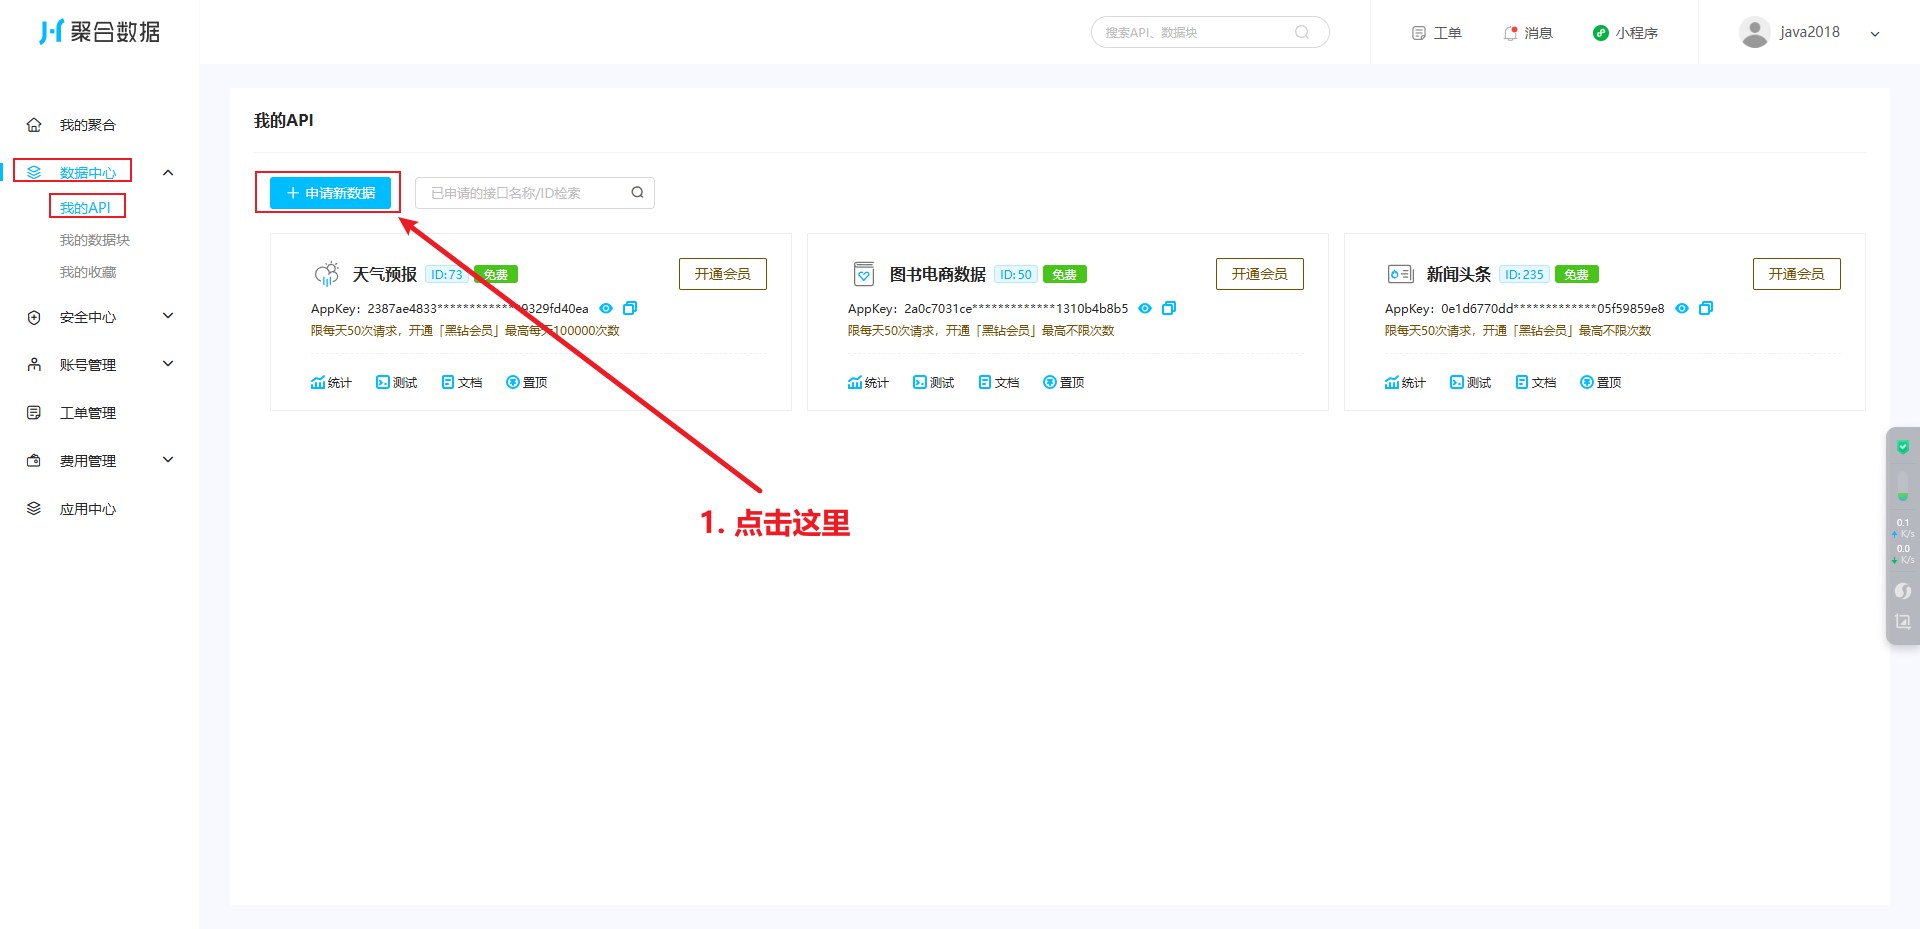

我这里以新闻为例,比如我想调用接口获取实时新闻数据,那我就这样选:
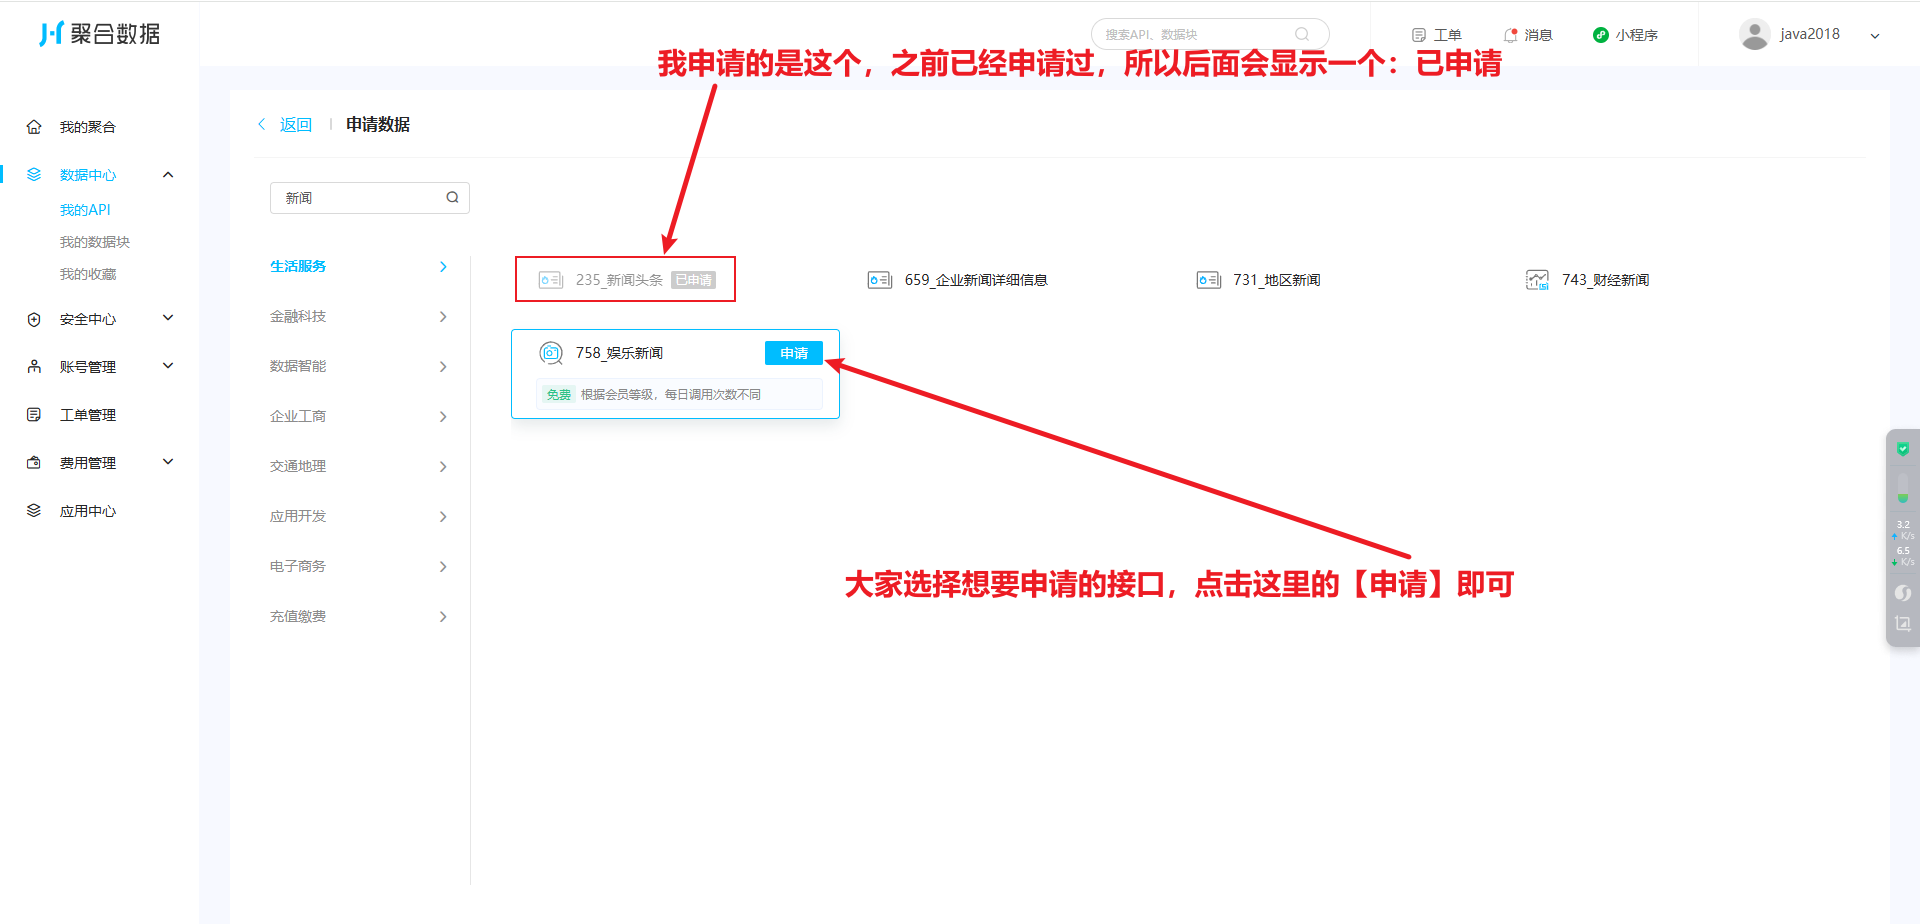
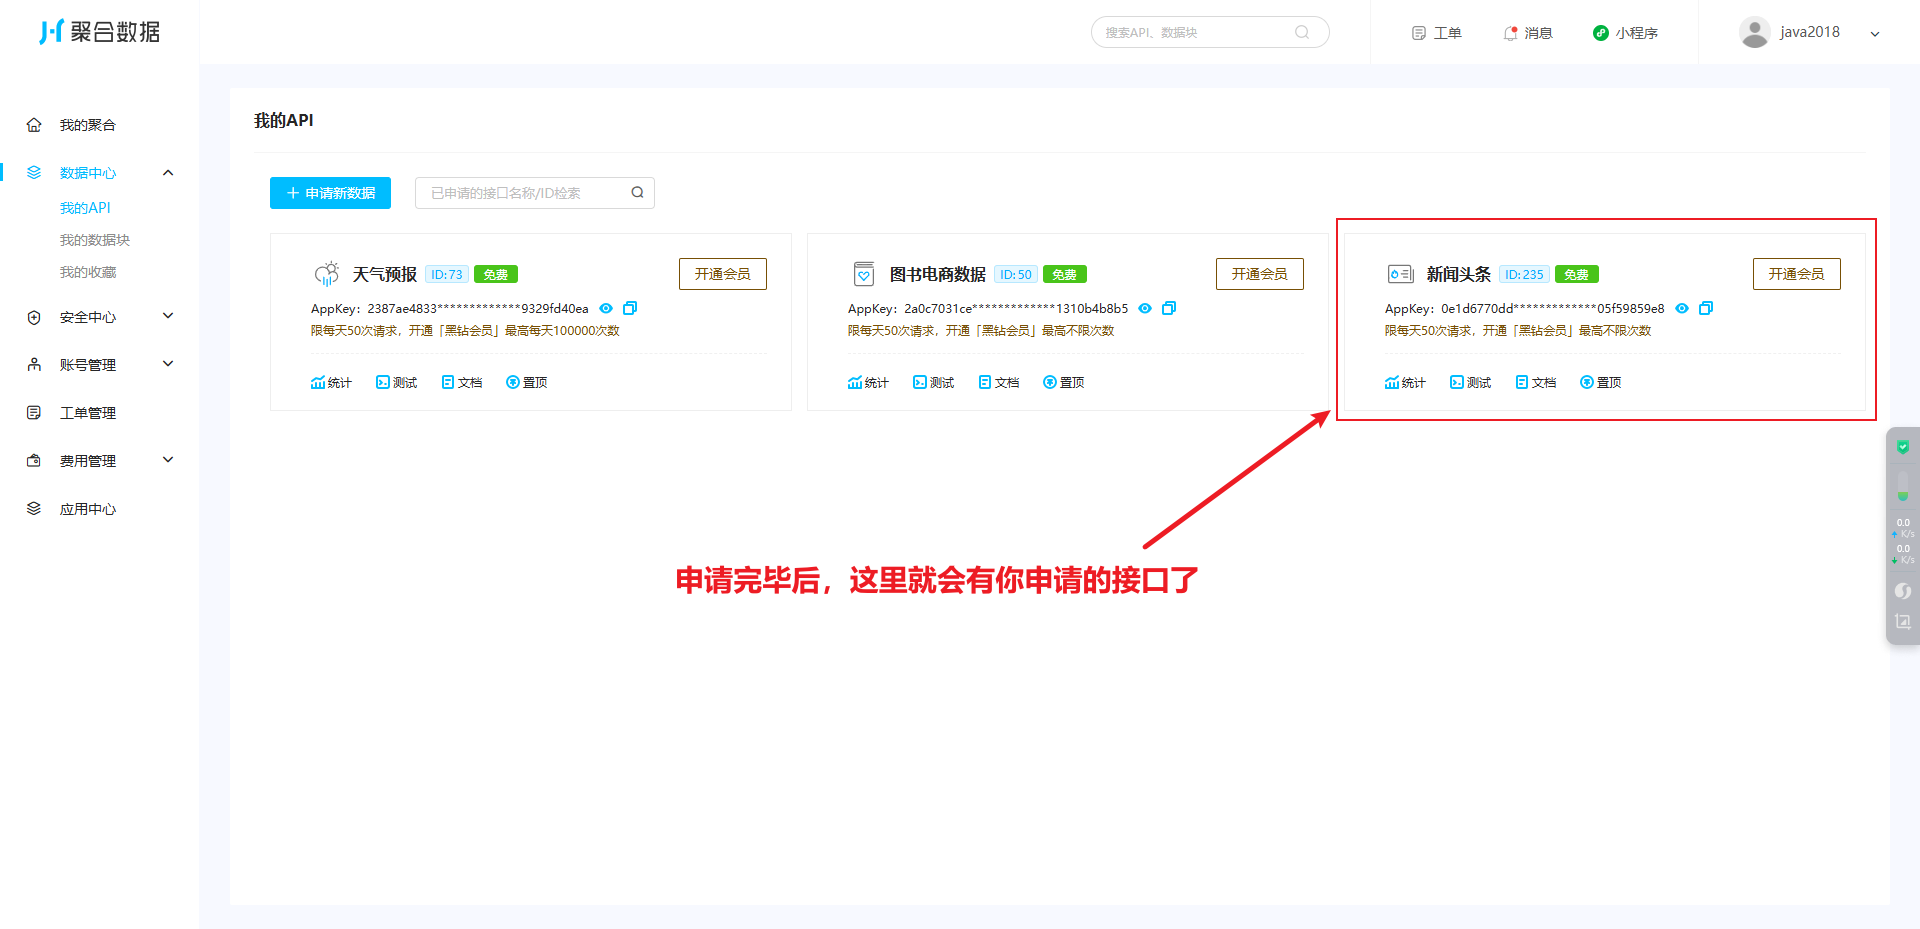
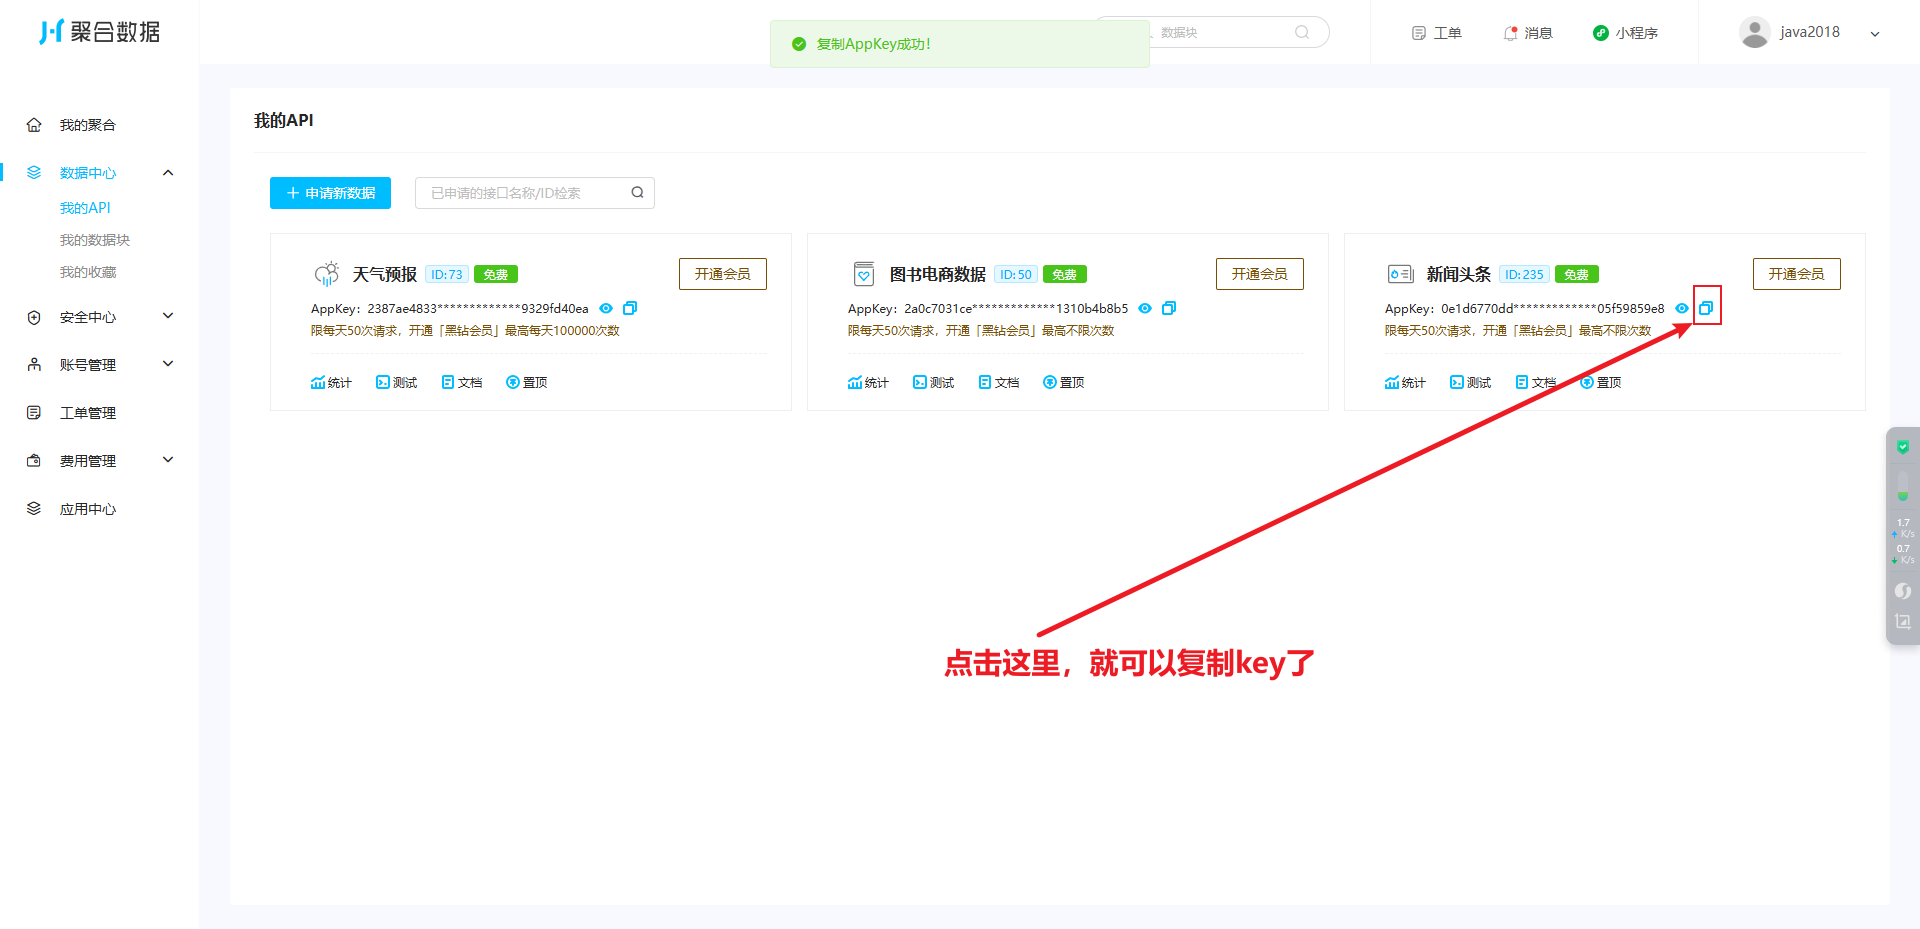
这样我们就得到了调用这个获取新闻信息的key了
但是需要注意的是:免费额度是每天只能调用50次,如果需要更多次数的调用,需要开会员额外收费
另外,每个账号只能申请3个免费接口,超出3个的话,需要额外收费了
2. 开发思路
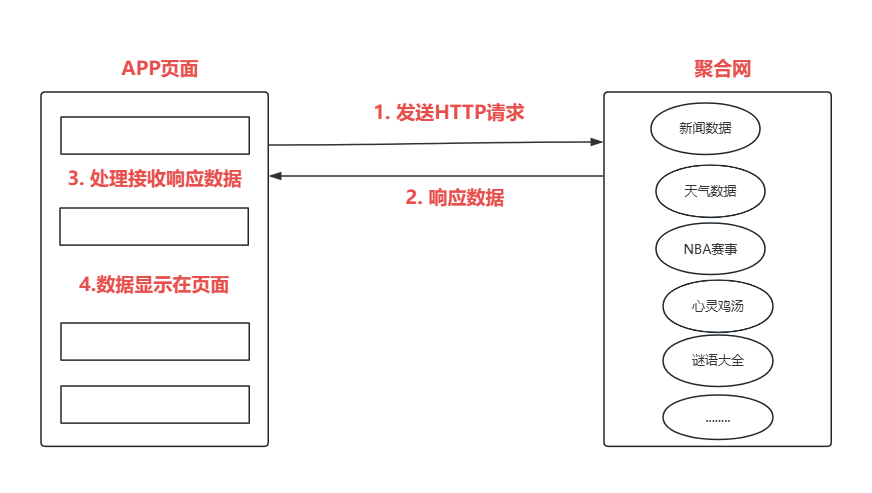
准备工作做好之后,接下来我们开始按照上面的开发思路,分为如下四步实现我们的需求
- 发送HTTP请求给聚合网
- 查看聚合网给我们返回的响应数据
- 处理响应数据
- 响应数据显示到页面上
2. 实战编码
1. 发送HTTP请求给聚合网
代码如下:
js
import { http } from '@kit.NetworkKit';

@Entry
@Component
struct NewsTest1 {
  //调用聚合网API接口的key(换成自己申请的key即可)
  @State keyString: string = 'xxxxxxxxxxxxxxxxxx';
  //新闻类型
  @State newsType: string = 'top';

  /**
   * aboutToAppear:页面加载时就会执行,在build之前执行
   */
  aboutToAppear(): void {
    //定义变量url,保存访问第三方接口的地址
    let url: string = 'http://v.juhe.cn/toutiao/index?key=' + this.keyString + '&type=' + this.newsType + '&page=1&page_size=20&is_filter=1';
    //向第三方接口发请求
    MyTools.getHTTPData(url);
  }

  build() {
    Column() {
      Text('Hello World')
    }
    .height('100%')
    .width('100%')
  }
}

/**
 * 工具类
 */
class MyTools {

  /**
   * 发请求给第三方接口获取数据
   */
  static getHTTPData(url: string): Promise<object> {
    return new Promise((resolve: Function, reject: Function) => {
      let httpRequest = http.createHttp();
      httpRequest.request(url, { method: http.RequestMethod.GET }
      ).then((resp: http.HttpResponse) => {
        //HTTP响应状态码200表示请求成功
        if (resp.responseCode === 200) {
          console.log('第三方接口返回数据:', resp.result)
          //将从第三方接口获取的数据返回给调用方
          resolve(JSON.parse(resp.result.toString()));//JSON.parse:作用是将字符串转成对象
        } else {
          console.log('HTTP请求获取数据失败,error:', JSON.stringify(resp))
          reject('HTTP请求获取数据失败!')
        }
      })
    })
  }
}
2. 查看相应数据
控制台可以看到打印日志:

有数据返回,说明我们调用第三方接口成功了,接下来就是需要将这些数据显示到页面上就可以了
3. 处理响应数据
通过官网API接口说明文档,我们可以得知,响应数据的格式如下:
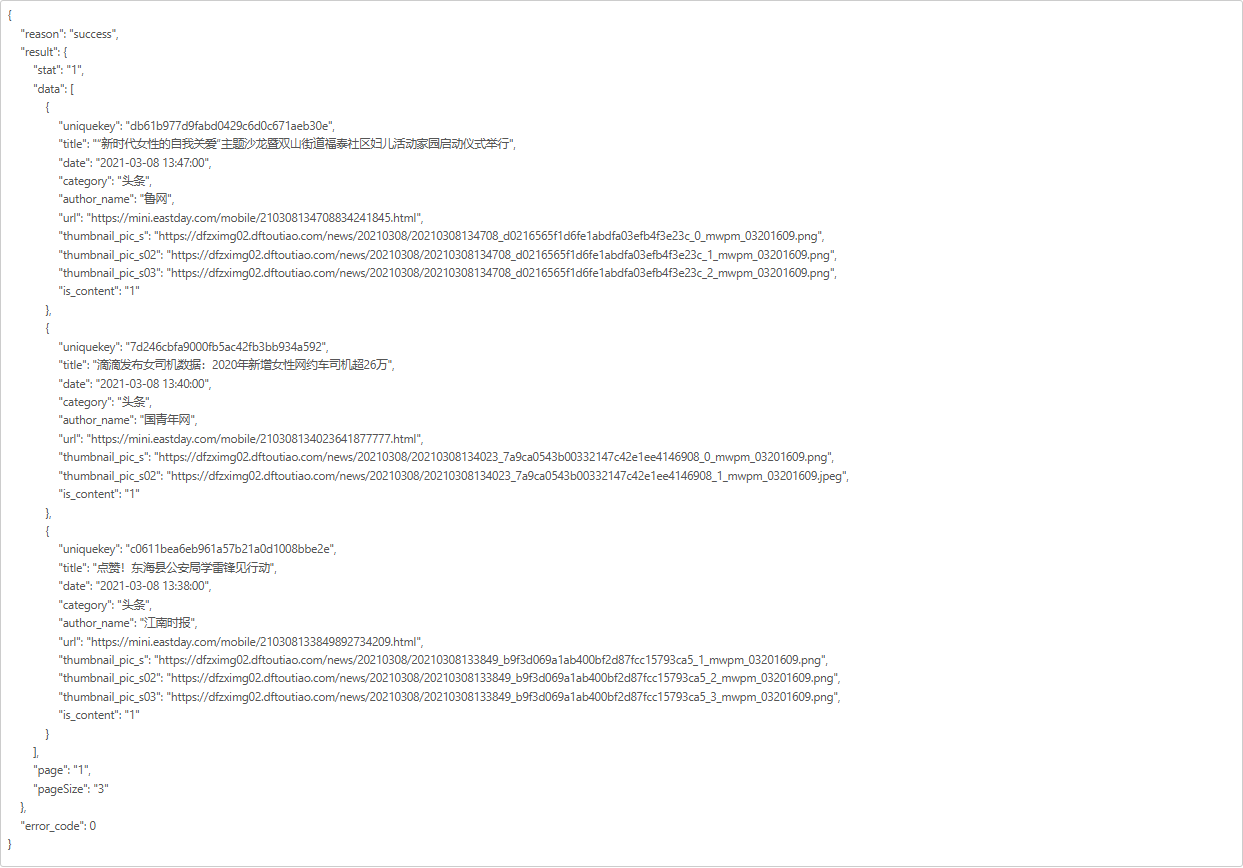
每个字段的含义官网也有详细解释,如下:
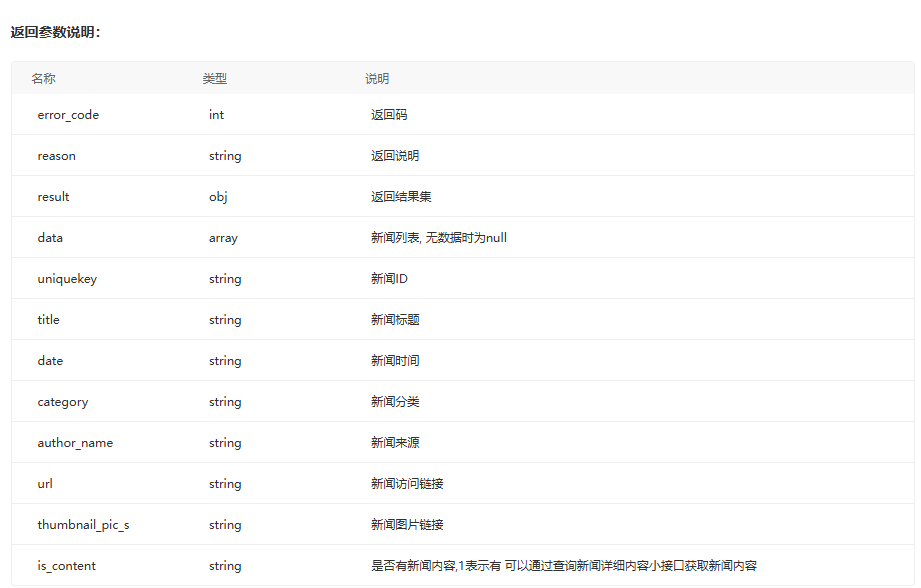
此时我们需要定义一些数据结构,来接收官网给我们返回的数据,最终代码如下:
js
import { http } from '@kit.NetworkKit';
import { promptAction } from '@kit.ArkUI';
import { BusinessError } from '@kit.BasicServicesKit';

interface NewsResult {
  reason: string
  result: ResultJson
  error_code: number
}

interface ResultJson {
  stat: string
  data: Array<ResultData>
  page: string
  pageSize: string
}

interface ResultData {
  uniquekey: string
  title: string
  date: string
  category: string
  author_name: string
  url: string
  thumbnail_pic_s: string
  is_content: string
}

@Entry
@Component
struct NewsTest1 {
  //调用聚合网API接口的key(换成自己申请的key即可)
  @State keyString: string = 'xxxxxxxx';
  //新闻类型
  @State newsType: string = 'top';
  //定义响应数据存放的变量
  @State responseResult: NewsResult | null = null;
  //定义新闻数据存放的变量
  @State dataList: Array<ResultData> = [];

  /**
   * aboutToAppear:页面加载时就会执行,在build之前执行
   */
  aboutToAppear(): void {
    //定义变量url,保存访问第三方接口的地址
    let url: string = 'http://v.juhe.cn/toutiao/index?key=' + this.keyString + '&type=' + this.newsType +
      '&page=1&page_size=20&is_filter=1';
    //向第三方接口发请求
    MyTools.getHTTPData(url).then((res: NewsResult) => {
      //打印请求结果
      console.log('接口响应数据=', JSON.stringify(res)); //JSON.stringify:作用是将res对象转成JSON字符串
      //将新闻结果数据赋值给全局变量:newsResult
      this.responseResult = res;
      if (this.responseResult?.error_code == 0) {
        this.dataList = this.responseResult.result.data;
        console.log('新闻数据=', JSON.stringify(this.dataList));
      } else {
        //弹框提示
        promptAction.showToast({ message: this.responseResult?.reason })
      }
    }).catch((error: BusinessError) => {
      //发生异常时,弹框提示错误信息
      promptAction.showToast({ message: '发生异常:' + JSON.stringify(error) })
    })
  }

  build() {
    Column() {
      Text('Hello World')
    }
    .height('100%')
    .width('100%')
  }
}

/**
 * 工具类
 */
class MyTools {
  /**
   * 发请求给第三方接口获取数据
   */
  static getHTTPData(url: string): Promise<NewsResult> {
    return new Promise((resolve: Function, reject: Function) => {
      let httpRequest = http.createHttp();
      httpRequest.request(url, { method: http.RequestMethod.GET }
      ).then((resp: http.HttpResponse) => {
        //HTTP响应状态码200表示请求成功
        if (resp.responseCode === 200) {
          console.log('第三方接口返回数据:', resp.result)
          //将从第三方接口获取的数据返回给调用方
          resolve(JSON.parse(resp.result.toString())); //JSON.parse:作用是将字符串转成对象
        } else {
          console.log('HTTP请求获取数据失败,error:', JSON.stringify(resp))
          reject('HTTP请求获取数据失败!')
        }
      })
    })
  }
}观察控制台,发现数据新闻数据已经获取到了,并且存入全局变量dataList中了,如下图所示:

4. 响应数据显示到页面上
全局变量dataList中有数据了,那现在就是将变量中的值循环展示到页面中就可以了
代码如下:
js
import { http } from '@kit.NetworkKit';
import { promptAction } from '@kit.ArkUI';
import { BusinessError } from '@kit.BasicServicesKit';

interface NewsResult {
  reason: string
  result: ResultJson
  error_code: number
}

interface ResultJson {
  stat: string
  data: Array<ResultData>
  page: string
  pageSize: string
}

interface ResultData {
  uniquekey: string
  title: string
  date: string
  category: string
  author_name: string
  url: string
  thumbnail_pic_s: string
  is_content: string
}

@Entry
@Component
struct NewsTest1 {
  //调用聚合网API接口的key(换成自己申请的key即可)
  @State keyString: string = 'xxxxxxxxxxxxxxxxxxxx';
  //新闻类型
  @State newsType: string = 'top';
  //定义响应数据存放的变量
  @State responseResult: NewsResult | null = null;
  //定义新闻数据存放的变量
  @State dataList: Array<ResultData> = [];

  /**
   * aboutToAppear:页面加载时就会执行,在build之前执行
   */
  aboutToAppear(): void {
    //定义变量url,保存访问第三方接口的地址
    let url: string = 'http://v.juhe.cn/toutiao/index?key=' + this.keyString + '&type=' + this.newsType +
      '&page=1&page_size=20&is_filter=1';
    //向第三方接口发请求
    MyTools.getHTTPData(url).then((res: NewsResult) => {
      //打印请求结果
      console.log('接口响应数据=', JSON.stringify(res)); //JSON.stringify:作用是将res对象转成JSON字符串
      //将新闻结果数据赋值给全局变量:newsResult
      this.responseResult = res;
      if (this.responseResult?.error_code == 0) {
        this.dataList = this.responseResult.result.data;
        console.log('新闻数据=', JSON.stringify(this.dataList));
      } else {
        //弹框提示
        promptAction.showToast({ message: this.responseResult?.reason })
      }
    }).catch((error: BusinessError) => {
      //发生异常时,弹框提示错误信息
      promptAction.showToast({ message: '发生异常:' + JSON.stringify(error) })
    })
  }

  build() {
    Column() {
      List() {
        ForEach(this.dataList, (item: ResultData) => {
          ListItem() {
            Column() {
              Row() {
                //标题
                Text(item.title)
                  .fontSize(17)//设置文字大小
                  .lineHeight(26)//设置行高度
                  .fontWeight(300)//设置文字加粗效果
                  .maxLines(2)//最多显示n行
                  .textOverflow({ overflow: TextOverflow.Ellipsis }) //超过n行就显示省略号
              }
              .padding({ top: 2, bottom: 2 }) //设置内边距
              .width('100%') //设置宽度

              //配图
              if (item.thumbnail_pic_s) {
                Image(item.thumbnail_pic_s)
                  .width('100%')
                  .height(140)
              }

              Row({ space: 12 }) {
                //作者
                Text(item.author_name)
                  .fontSize(13)
                  .fontWeight(500)
                  .fontColor('#cccccc')
                //时间
                Text(item.date)
                  .fontSize(13)
                  .fontWeight(500)
                  .fontColor('#cccccc')
              }
              .padding({ top: 5, bottom: 5 }) //设置内边距
              .width('100%')

              //分割线
              Divider()
                .strokeWidth(1)
                .color('#fff1f1f1')
                .opacity(1)//设置透明度
                .width('100%')

            }
            .padding(12) //设置内边距
            .width('100%')
          }
        })
      }
      .alignListItem(ListItemAlign.Center) //设置List每个子组件都居中显示
      .height('98%')
    }
    .height('100%')
    .width('100%')
  }
}

/**
 * 工具类
 */
class MyTools {
  /**
   * 发请求给第三方接口获取数据
   */
  static getHTTPData(url: string): Promise<NewsResult> {
    return new Promise((resolve: Function, reject: Function) => {
      let httpRequest = http.createHttp();
      httpRequest.request(url, { method: http.RequestMethod.GET }
      ).then((resp: http.HttpResponse) => {
        //HTTP响应状态码200表示请求成功
        if (resp.responseCode === 200) {
          console.log('第三方接口返回数据:', resp.result)
          //将从第三方接口获取的数据返回给调用方
          resolve(JSON.parse(resp.result.toString())); //JSON.parse:作用是将字符串转成对象
        } else {
          console.log('HTTP请求获取数据失败,error:', JSON.stringify(resp))
          reject('HTTP请求获取数据失败!')
        }
      })
    })
  }
}
5. 成果图

6. 代码优化(新增Tabs)
效果图如下:

全量代码如下:
js
import { http } from '@kit.NetworkKit';
import { promptAction } from '@kit.ArkUI';
class Header {
public contentType: string;
constructor(contentType: string) {
this.contentType = contentType;
}
}
interface R {
reason?: string
result?: ResultModel
error_code?: number
}
interface ResultModel {
stat: string
data: Array<NewsModel>
page: string
pageSize: string
}
interface NewsModel {
uniquekey: string
title: string
date: string
category: string
author_name: string
url: string
thumbnail_pic_s: string
thumbnail_pic_s02: string
thumbnail_pic_s03: string
is_content: string
}
/**
* Desc: 新闻页面
* Author: 波波老师(weixin: javabobo0513)
*/
@Entry
@Component
struct NewsPage {
@State fontColor: ResourceStr = '#ff6d6d6e'
@State selectedFontColor: ResourceStr = '#111111'
@State currentIndex: number = 0
private controller: TabsController = new TabsController()
@State r: R = {} //保存第三方接口返回的所有数据
@State newsList: Array<NewsModel> = [] //只保存新闻数据
@State newsType: string = 'top' //新闻类型
@Builder
TabBuilder(index: number, name: string) {
Column({ space: 5 }) {
Text(name)
.fontColor(this.currentIndex === index ? this.selectedFontColor : this.fontColor)
.fontSize(this.currentIndex === index ? 18 : 16)
.fontWeight(this.currentIndex === index ? 900 : 400)
.lineHeight(22)
Divider()
.width(23)
.strokeWidth(4)
.color('#111111')
.opacity(this.currentIndex === index ? 1 : 0)
}
.width(50)
}
//发请求获取新闻数据-函数
getNewsData(): void {
console.log('开始执行函数了.....')
let httpRequest = http.createHttp();
let promise =
httpRequest.request("http://v.juhe.cn/toutiao/index?key=xxxxxxxxxxxxxxxxx&type=" + this.newsType +
"&page=20&page_size=30&is_filter=1",
{
method: http.RequestMethod.GET,
connectTimeout: 60000,
readTimeout: 60000,
header: new Header('application/json')
});
promise.then((data: http.HttpResponse) => {
console.info('Result:' + data.result);
if (data.responseCode == 200) {
/**
* JSON.stringify:将对象转成JSON格式的字符串
* JSON.parse:将JSON格式字符串转成对象
*/
this.r = JSON.parse(data.result.toString())
if (this.r.error_code == 0) {
//接口OK,处理数据
this.newsList = this.r.result?.data as Array<NewsModel>
console.info('新闻数据=' + JSON.stringify(this.r.result?.data));
} else {
//错误弹框
promptAction.showToast({
message: this.r.reason,
duration: 5000 //单位:毫秒
})
}
} else {
//错误弹框
promptAction.showToast({
message: '网络故障...',
duration: 5000 //单位:毫秒
})
}
}).catch((err: Error) => {
console.error('error:' + JSON.stringify(err));
});
}
aboutToAppear(): void {
this.getNewsData();
}
//展示新闻数据的函数
@Builder
NewsView() {
Scroll() {
Column({ space: 13 }) {
ForEach(this.newsList, (item: NewsModel) => {
//新闻小卡片
Column({ space: 13 }) {
//新闻标题
Text(item.title)
//新闻封面照
Image(item.thumbnail_pic_s ? item.thumbnail_pic_s :
(item.thumbnail_pic_s02 ? item.thumbnail_pic_s02 : item.thumbnail_pic_s03))
.width('100%')
.height(180)
.borderRadius(5)
//作者+时间
Row({ space: 10 }) {
Text(item.author_name)
.fontColor('#ccc')
Text(item.date)
.fontColor('#ccc')
}
.width('100%')
}
.backgroundColor('#ffffff')
.borderRadius(8)
.padding(5)
.alignItems(HorizontalAlign.Start)
})
}
.padding({ left: 10, right: 10 })
.width('100%')
}
.height('100%')
.width('100%')
.backgroundColor('#ccc')
}
build() {
Column() {
Tabs({ barPosition: BarPosition.Start, index: this.currentIndex, controller: this.controller }) {
TabContent() {
this.NewsView();
}.tabBar(this.TabBuilder(0, '推荐'))
TabContent() {
this.NewsView();
}.tabBar(this.TabBuilder(1, '国内'))
TabContent() {
this.NewsView();
}.tabBar(this.TabBuilder(2, '国际'))
TabContent() {
this.NewsView();
}.tabBar(this.TabBuilder(3, '娱乐'))
TabContent() {
this.NewsView();
}.tabBar(this.TabBuilder(4, '体育'))
TabContent() {
this.NewsView();
}.tabBar(this.TabBuilder(5, '军事'))
TabContent() {
this.NewsView();
}.tabBar(this.TabBuilder(6, '科技'))
TabContent() {
this.NewsView();
}.tabBar(this.TabBuilder(7, '财经'))
TabContent() {
this.NewsView();
}.tabBar(this.TabBuilder(8, '游戏'))
}
.vertical(false) //设置为false是为横向Tabs,设置为true时为纵向Tabs
.scrollable(true) //设置为true时可以通过滑动页面进行页面切换,为false时不可滑动切换页面
.barMode(BarMode.Scrollable) //TabBar布局模式
.barWidth('100%') //TabBar的宽度值
.animationDuration(100) //TabContent滑动动画时长。不设置时,点击切换页签无动画,滑动切换有动画;设置时,点击切换和滑动切换都有动画
.width('100%')
.height('100%')
.backgroundColor('#ffffff')
.onChange((index: number) => {
console.log('index=' + index)
this.currentIndex = index;
if (index == 0) {
this.newsType = 'top'
}
else if (index == 1) {
this.newsType = 'guonei'
}
else if (index == 2) {
this.newsType = 'guoji'
}
else if (index == 3) {
this.newsType = 'yule'
}
else if (index == 4) {
this.newsType = 'tiyu'
}
else if (index == 5) {
this.newsType = 'junshi'
}
else if (index == 6) {
this.newsType = 'keji'
}
else if (index == 7) {
this.newsType = 'caijing'
}
else if (index == 8) {
this.newsType = 'youxi'
}
this.getNewsData();//重新发请求获取最新的新闻数据
})
}
}
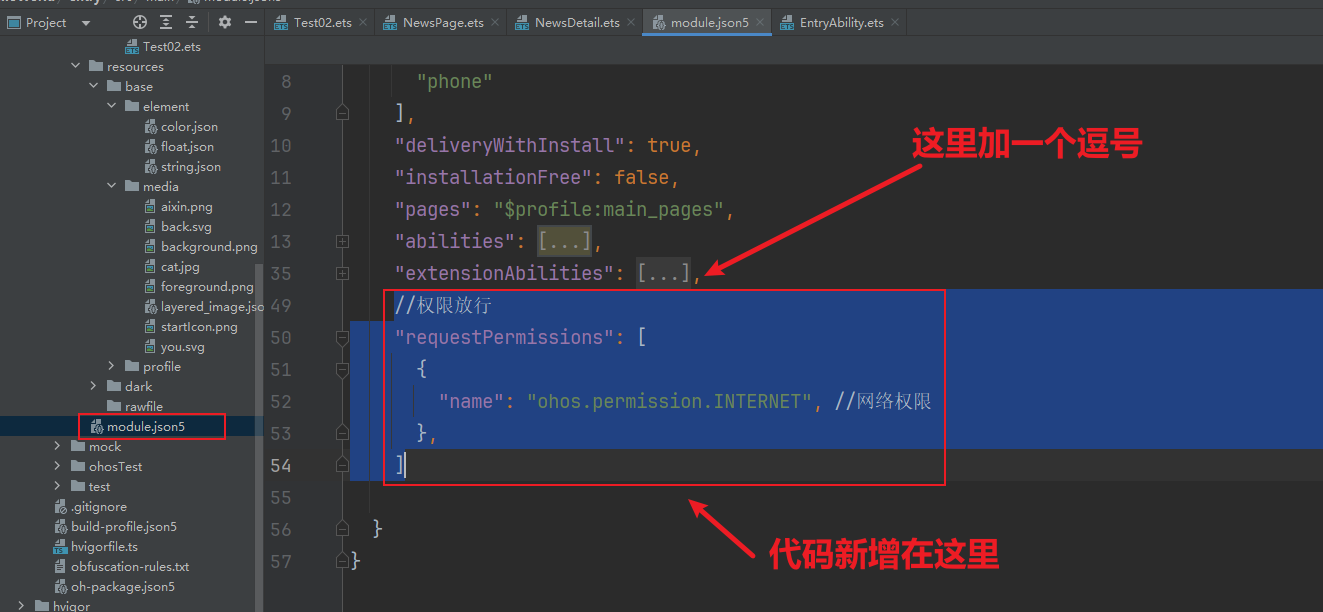
}7. 开通网络权限(模拟器)
注意:我们使用预览器时,不需要开通网络权限就可以正常发请求,但是如果使用模拟器的话,就不能了,必须要先开通网络权限后,APP才能发请求出去,如何开通网络权限呢?看下面介绍即可,比较简单
在module.json5文件后面加入下面代码即可开通网络权限
json
//权限放行
"requestPermissions": [
    {
        "name": "ohos.permission.INTERNET", //网络权限
    },
]
3. 优化
现在可以展示新闻列表了,但是只有标题和配图,没有新闻详情,所以我们需要加一个新闻详情页面,点击某一个新闻之后,跳转到新闻详情页面
通过官网API接口字段解释,我们得知,返回数据字段中有一个url字段,这个字段就是新闻详情的访问地址了,我们只需要在新的页面中访问这个url地址就可以了
1. 新闻详情页面
首先我们新建一个页面,叫做:NewsDetails.ets,代码如下:
js
import { router } from '@kit.ArkUI';
import { webview } from '@kit.ArkWeb';

/**
 * 新闻详情页面
 */
@Entry
@Component
struct NewsDetails {
  //web控制器
  controllerWeb: webview.WebviewController = new webview.WebviewController();
  //接收上一个页面传来的参数 url 的值(网址)
  @State url: string = (router.getParams() as Record<string, string>)['url'];

  build() {
    Column() {
      Row({ space: 3 }) {
        Text('返回')
          .onClick(() => {
            router.back();//返回上一页
          })
      }
      .padding(10)
      .width('100%')

      /**
       * Web组件,就是用来显示一个网址的
       */
      Web({ controller: this.controllerWeb, src: this.url })
        .id(String(new Date().getTime()))
        .domStorageAccess(true)
    }
  }
}
2. 新闻列表页面优化
新闻列表页面,我们需要给每一个新闻加上一个点击事件,这样用户点击某一个新闻就可以额跳转到上面写的新闻详情页面了
改动如下:
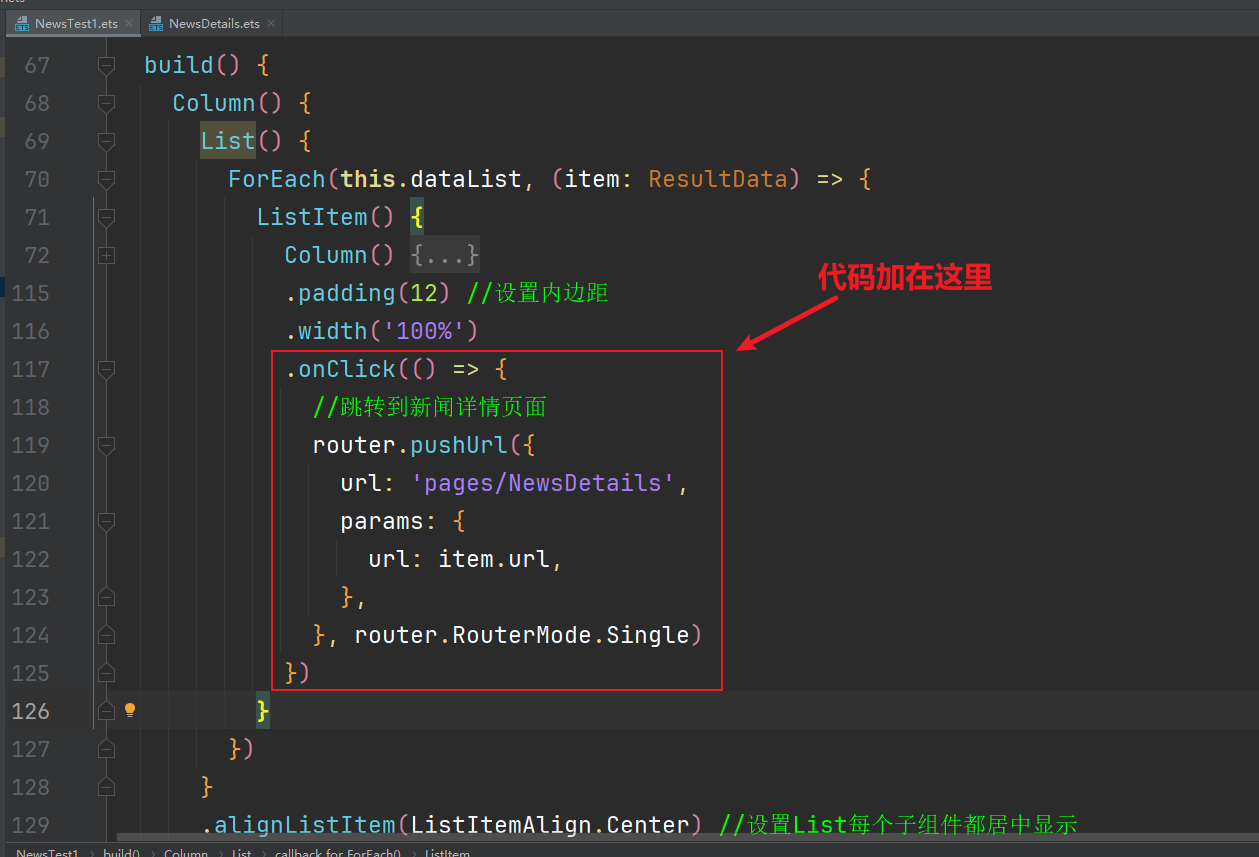
添加代码如下:
js
.onClick(() => {
    //跳转到新闻详情页面
    router.pushUrl({
        url: 'pages/NewsDetails',
        params: {
            url: item.url,
        },
    }, router.RouterMode.Single)
})
注意:router需要引入依赖包:import { router } from '@kit.ArkUI';
3. 测试
现在我们随便点击某一个新闻,就可以跳转到新闻相亲页面了,如下图所示:(注意:此时需要用模拟器来访问,因为使用到了web组件,预览器是没有效果的)

4. 小作业
以上代码只能查看某一页的数据,不能查看第二页或者后面其他页的数据
请自由编写代码,实现以下功能:可以下一页,或者上一页(其实很简单,加油💪,你可以的...)