📋 项目概述
本文档详细介绍如何在 HarmonyOS 平台上使用 Flutter 框架集成 local_auth 插件,实现生物识别认证功能。通过实际开发案例,展示从插件配置到功能实现的完整流程,并记录开发过程中遇到的问题及解决方案。本项目构建了一个现代化的生物识别认证应用,采用 Material Design 3 设计规范,提供了流畅的用户体验和丰富的动画效果,全面展示了指纹识别、人脸识别等多种生物识别方式的集成和使用。
运行截图说明:本文档中的代码已在 HarmonyOS 设备上实际运行测试,功能正常运行。建议读者在阅读时结合实际操作,以获得更好的学习效果。
🎯 项目目标
- ✅ 在 HarmonyOS 平台上集成
local_auth插件 - ✅ 实现生物识别功能检测
- ✅ 实现指纹识别认证
- ✅ 实现人脸识别认证
- ✅ 构建美观的 Material Design 3 风格UI
- ✅ 实现流畅的动画效果和用户反馈
- ✅ 处理各种认证状态和错误情况
🛠️ 技术栈
- 开发框架: Flutter 3.6.2+
- 三方库 : local_auth (OpenHarmony TPC 适配版本)
- UI 框架: Material Design 3
- 目标平台: HarmonyOS (OpenHarmony)
- 开发工具: DevEco Studio / VS Code
📦 一、项目初始化
1.1 创建 Flutter 项目
bash
flutter create --platforms=ohos local_auth_demo
cd local_auth_demo
1.2 配置依赖
在 pubspec.yaml 中添加 local_auth 依赖:
yaml
dependencies:
  flutter:
    sdk: flutter
  cupertino_icons: ^1.0.8
  local_auth:
    git:
      url: https://atomgit.com/openharmony-tpc/flutter_packages.git
      path: packages/local_auth/local_auth
ref: br_local_auth-v2.3.0_ohos重要说明:
- 必须使用 OpenHarmony TPC 提供的适配版本,pub.dev 上的官方版本不支持 HarmonyOS 平台
- 需要指定正确的分支引用
br_local_auth-v2.3.0_ohos local_auth主包会自动处理平台实现包的依赖,无需手动添加local_auth_ohos
1.3 安装依赖
bash
flutter pub get🔐 二、权限配置
local_auth 插件在 HarmonyOS 平台上需要申请生物识别权限才能正常工作。
2.1 在 entry 目录下的 module.json5 中添加权限
打开 ohos/entry/src/main/module.json5,在 requestPermissions 数组中添加以下配置:
json5
{
  "module": {
    "requestPermissions": [
      {
        "name": "ohos.permission.ACCESS_BIOMETRIC",
        "reason": "$string:EntryAbility_accessBiometricReason",
        "usedScene": {
          "abilities": [
            "EntryAbility"
          ],
          "when": "inuse"
        }
      }
    ]
  }
}
2.2 在 entry 目录下添加申请权限的原因
打开 ohos/entry/src/main/resources/base/element/string.json,添加权限申请原因字符串:
json
{
  "string": [
    {
      "name": "EntryAbility_accessBiometricReason",
      "value": "Verify User"
    }
  ]
}注意事项:
- 权限名称必须是
ohos.permission.ACCESS_BIOMETRIC,不能使用其他权限名称 reason字段用于向用户说明为什么需要此权限usedScene指定了权限的使用场景,when: "inuse"表示应用在前台使用时需要此权限
💻 三、核心功能实现
3.1 导入必要的包
dart
import 'package:flutter/material.dart';
import 'package:flutter/services.dart';
import 'package:local_auth/local_auth.dart';
3.2 初始化 LocalAuthentication
创建 LocalAuthentication 实例:
dart
final LocalAuthentication _localAuth = LocalAuthentication();3.3 检查设备是否支持生物识别
在进行认证之前,应该先检查设备是否支持生物识别功能:
dart
Future<void> _checkBiometrics() async {
  try {
    final bool canCheck = await _localAuth.canCheckBiometrics;
    final bool isDeviceSupported = await _localAuth.isDeviceSupported();
    final List<BiometricType> availableBiometrics =
        await _localAuth.getAvailableBiometrics();

    setState(() {
      _canCheckBiometrics = canCheck && isDeviceSupported;
      _availableBiometrics = availableBiometrics;
    });
  } catch (e) {
    setState(() {
      _canCheckBiometrics = false;
      _statusMessage = '检查生物识别功能时出错: $e';
    });
  }
}方法说明:
canCheckBiometrics: 检查是否可以检查生物识别isDeviceSupported(): 检查设备是否支持生物识别getAvailableBiometrics(): 获取设备上可用的生物识别类型列表
3.4 执行生物识别认证
使用 authenticate 方法执行生物识别认证:
dart
Future<void> _authenticate() async {
if (!_canCheckBiometrics) {
_showMessage('设备不支持生物识别', isError: true);
return;
}
setState(() {
_isChecking = true;
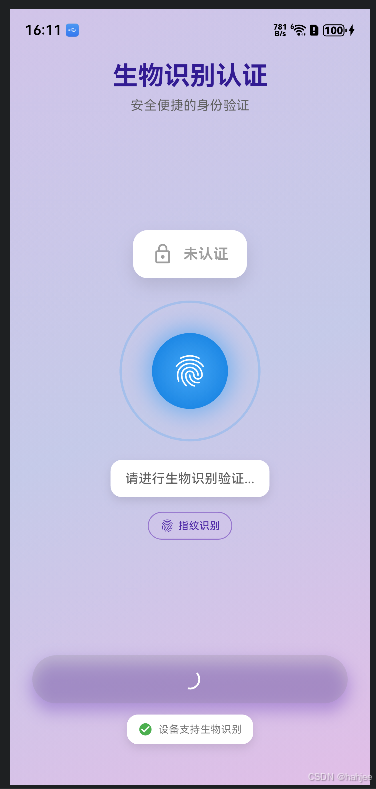
_statusMessage = '请进行生物识别验证...';
});
try {
final bool didAuthenticate = await _localAuth.authenticate(
localizedReason: '请验证您的身份以继续',
options: const AuthenticationOptions(
biometricOnly: false,
stickyAuth: true,
),
);
if (didAuthenticate) {
setState(() {
_isAuthenticated = true;
_statusMessage = '认证成功!';
});
} else {
setState(() {
_statusMessage = '认证失败或被取消';
});
}
} on PlatformException catch (e) {
setState(() {
_statusMessage = '认证出错: ${e.message}';
});
} finally {
setState(() {
_isChecking = false;
});
}
}参数说明:
localizedReason: 向用户显示的认证原因说明biometricOnly: 是否仅使用生物识别(false表示允许使用密码等备用方式)stickyAuth: 是否保持认证状态
3.5 处理生物识别类型
local_auth 支持多种生物识别类型:
dart
String _getBiometricTypeName(BiometricType type) {
  switch (type) {
    case BiometricType.face:
      return '人脸识别';
    case BiometricType.fingerprint:
      return '指纹识别';
    case BiometricType.strong:
      return '强生物识别';
    case BiometricType.weak:
      return '弱生物识别';
    case BiometricType.iris:
      return '虹膜识别';
    default:
      return '未知类型';
  }
}
3.6 完整示例代码
以下是一个完整的生物识别认证页面示例:
dart
import 'package:flutter/material.dart';
import 'package:flutter/services.dart';
import 'package:local_auth/local_auth.dart';
class AuthPage extends StatefulWidget {
const AuthPage({super.key});
@override
State<AuthPage> createState() => _AuthPageState();
}
class _AuthPageState extends State<AuthPage> {
final LocalAuthentication _localAuth = LocalAuthentication();
bool _isAuthenticated = false;
bool _isChecking = false;
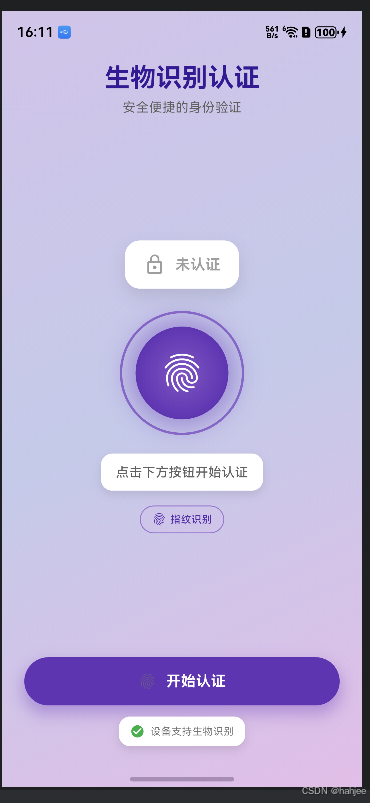
String _statusMessage = '点击下方按钮开始认证';
List<BiometricType> _availableBiometrics = [];
bool _canCheckBiometrics = false;
@override
void initState() {
super.initState();
_checkBiometrics();
}
Future<void> _checkBiometrics() async {
try {
final bool canCheck = await _localAuth.canCheckBiometrics;
final bool isDeviceSupported = await _localAuth.isDeviceSupported();
final List<BiometricType> availableBiometrics =
await _localAuth.getAvailableBiometrics();
setState(() {
_canCheckBiometrics = canCheck && isDeviceSupported;
_availableBiometrics = availableBiometrics;
});
} catch (e) {
setState(() {
_canCheckBiometrics = false;
_statusMessage = '检查生物识别功能时出错: $e';
});
}
}
Future<void> _authenticate() async {
if (!_canCheckBiometrics) {
ScaffoldMessenger.of(context).showSnackBar(
const SnackBar(content: Text('设备不支持生物识别')),
);
return;
}
setState(() {
_isChecking = true;
_statusMessage = '请进行生物识别验证...';
});
try {
final bool didAuthenticate = await _localAuth.authenticate(
localizedReason: '请验证您的身份以继续',
options: const AuthenticationOptions(
biometricOnly: false,
stickyAuth: true,
),
);
if (didAuthenticate) {
setState(() {
_isAuthenticated = true;
_statusMessage = '认证成功!';
});
HapticFeedback.mediumImpact();
} else {
setState(() {
_statusMessage = '认证失败或被取消';
});
HapticFeedback.heavyImpact();
}
} on PlatformException catch (e) {
setState(() {
_statusMessage = '认证出错: ${e.message}';
});
HapticFeedback.heavyImpact();
} finally {
setState(() {
_isChecking = false;
});
}
}
@override
Widget build(BuildContext context) {
return Scaffold(
appBar: AppBar(
title: const Text('生物识别认证'),
),
body: Center(
child: Padding(
padding: const EdgeInsets.all(24.0),
child: Column(
mainAxisAlignment: MainAxisAlignment.center,
children: [
Icon(
_availableBiometrics.contains(BiometricType.fingerprint)
? Icons.fingerprint
: Icons.face,
size: 100,
color: _isAuthenticated ? Colors.green : Colors.deepPurple,
),
const SizedBox(height: 32),
Text(
_statusMessage,
textAlign: TextAlign.center,
style: Theme.of(context).textTheme.titleLarge,
),
const SizedBox(height: 32),
if (_availableBiometrics.isNotEmpty) ...[
Text(
'可用生物识别方式:',
style: Theme.of(context).textTheme.bodyMedium,
),
const SizedBox(height: 8),
Wrap(
spacing: 8,
children: _availableBiometrics.map((type) {
return Chip(
label: Text(_getBiometricTypeName(type)),
);
}).toList(),
),
const SizedBox(height: 32),
],
ElevatedButton(
onPressed: _isChecking ? null : _authenticate,
child: _isChecking
? const SizedBox(
width: 20,
height: 20,
child: CircularProgressIndicator(strokeWidth: 2),
)
: const Text('开始认证'),
),
],
),
),
),
);
}
String _getBiometricTypeName(BiometricType type) {
switch (type) {
case BiometricType.face:
return '人脸识别';
case BiometricType.fingerprint:
return '指纹识别';
case BiometricType.strong:
return '强生物识别';
case BiometricType.weak:
return '弱生物识别';
case BiometricType.iris:
return '虹膜识别';
default:
return '未知类型';
}
}
}🎨 四、UI设计实现
4.1 动态渐变背景
使用 LinearGradient 创建动态渐变背景:
dart
Container(
  decoration: BoxDecoration(
    gradient: LinearGradient(
      begin: Alignment.topLeft,
      end: Alignment.bottomRight,
      colors: isDark
          ? [
              Colors.deepPurple.shade900,
              Colors.indigo.shade900,
              Colors.purple.shade900,
            ]
          : [
              Colors.deepPurple.shade100,
              Colors.indigo.shade100,
              Colors.purple.shade100,
            ],
    ),
  ),
  child: // 内容
)
4.2 脉冲动画效果
使用 AnimationController 创建脉冲动画:
dart
class _AuthPageState extends State<AuthPage>
    with TickerProviderStateMixin {
  late AnimationController _pulseController;
  late Animation<double> _pulseAnimation;

  @override
  void initState() {
    super.initState();
    _pulseController = AnimationController(
      vsync: this,
      duration: const Duration(milliseconds: 1500),
    )..repeat(reverse: true);

    _pulseAnimation = Tween<double>(begin: 0.8, end: 1.2).animate(
      CurvedAnimation(parent: _pulseController, curve: Curves.easeInOut),
    );
  }

  @override
  Widget build(BuildContext context) {
    return AnimatedBuilder(
      animation: _pulseAnimation,
      builder: (context, child) {
        return Transform.scale(
          scale: _isChecking ? _pulseAnimation.value : 1.0,
          child: Icon(
            Icons.fingerprint,
            size: 120,
          ),
        );
      },
    );
  }

  @override
  void dispose() {
    _pulseController.dispose();
    super.dispose();
  }
}
4.3 涟漪动画效果
创建涟漪扩散动画:
dart
late AnimationController _rippleController;
late Animation<double> _rippleAnimation;

@override
void initState() {
  super.initState();
  _rippleController = AnimationController(
    vsync: this,
    duration: const Duration(milliseconds: 2000),
  )..repeat();

  _rippleAnimation = Tween<double>(begin: 0.0, end: 1.0).animate(
    CurvedAnimation(parent: _rippleController, curve: Curves.easeOut),
  );
}

Widget _buildRippleEffect() {
  return AnimatedBuilder(
    animation: _rippleAnimation,
    builder: (context, child) {
      return Container(
        width: 150 + (_rippleAnimation.value * 50),
        height: 150 + (_rippleAnimation.value * 50),
        decoration: BoxDecoration(
          shape: BoxShape.circle,
          border: Border.all(
            color: Colors.deepPurple.withOpacity(1.0 - _rippleAnimation.value),
            width: 3,
          ),
        ),
      );
    },
  );
}
4.4 成功动画反馈
使用弹性动画创建成功反馈:
dart
late AnimationController _successController;
late Animation<double> _successAnimation;

@override
void initState() {
  super.initState();
  _successController = AnimationController(
    vsync: this,
    duration: const Duration(milliseconds: 800),
  );

  _successAnimation = Tween<double>(begin: 0.0, end: 1.0).animate(
    CurvedAnimation(parent: _successController, curve: Curves.elasticOut),
  );
}

Future<void> _authenticate() async {
  // ... 认证逻辑
  if (didAuthenticate) {
    _successController.forward();
    HapticFeedback.mediumImpact();
  }
}

Widget _buildSuccessIcon() {
  return AnimatedBuilder(
    animation: _successAnimation,
    builder: (context, child) {
      return Transform.scale(
        scale: 1.0 + (_successAnimation.value * 0.3),
        child: Container(
          width: 120,
          height: 120,
          decoration: BoxDecoration(
            shape: BoxShape.circle,
            color: Colors.green.shade400,
          ),
          child: const Icon(
            Icons.check_circle,
            size: 80,
            color: Colors.white,
          ),
        ),
      );
    },
  );
}
4.5 状态卡片设计
创建美观的状态卡片:
dart
Widget _buildStatusCard(bool isDark) {
  return Container(
    padding: const EdgeInsets.all(20),
    decoration: BoxDecoration(
      color: _isAuthenticated
          ? Colors.green.shade400
          : isDark
              ? Colors.grey.shade800
              : Colors.white,
      borderRadius: BorderRadius.circular(20),
      boxShadow: [
        BoxShadow(
          color: _isAuthenticated
              ? Colors.green.withOpacity(0.3)
              : Colors.black.withOpacity(0.1),
          blurRadius: 20,
          offset: const Offset(0, 10),
        ),
      ],
    ),
    child: Row(
      mainAxisAlignment: MainAxisAlignment.center,
      children: [
        Icon(
          _isAuthenticated ? Icons.check_circle : Icons.lock_outline,
          color: _isAuthenticated ? Colors.white : Colors.grey,
          size: 32,
        ),
        const SizedBox(width: 12),
        Text(
          _isAuthenticated ? '已认证' : '未认证',
          style: TextStyle(
            fontSize: 20,
            fontWeight: FontWeight.bold,
            color: _isAuthenticated ? Colors.white : Colors.grey,
          ),
        ),
      ],
    ),
  );
}
⚠️ 五、常见问题与解决方案
5.1 MissingPluginException 错误
问题 :运行时出现 MissingPluginException: No implementation found for method...
解决方案:
-
确保依赖正确配置 :在
pubspec.yaml中正确配置了local_auth依赖 -
重新构建项目:
bashflutter clean flutter pub get cd ohos/entry && ohpm install -
检查插件注册 :检查
ohos/entry/src/main/ets/plugins/GeneratedPluginRegistrant.ets文件是否包含local_auth_ohos的注册 -
验证配置 :检查
.flutter-plugins文件是否包含local_auth_ohos:bashcat .flutter-plugins | grep local_auth
5.2 权限申请失败
问题:应用无法申请生物识别权限
解决方案:
- 检查权限配置 :确保在
module.json5中正确配置了ohos.permission.ACCESS_BIOMETRIC权限 - 检查权限原因字符串 :确保在
string.json中添加了权限申请原因 - 检查权限使用场景 :确保
usedScene配置正确
5.3 设备不支持生物识别
问题 :canCheckBiometrics 返回 false 或 isDeviceSupported() 返回 false
解决方案:
- 检查设备硬件:确认设备是否具备生物识别硬件(指纹传感器、人脸识别摄像头等)
- 检查系统设置:确认设备是否已设置生物识别(指纹、人脸等)
- 提供备用方案:当设备不支持生物识别时,提供密码等备用认证方式
5.4 认证被取消
问题 :用户取消认证后,authenticate 返回 false
解决方案:
dart
final bool didAuthenticate = await _localAuth.authenticate(
  localizedReason: '请验证您的身份以继续',
  options: const AuthenticationOptions(
    biometricOnly: false,  // 允许使用密码等备用方式
    stickyAuth: true,      // 保持认证状态
  ),
);

if (!didAuthenticate) {
  // 用户取消认证,可以提示用户或提供其他认证方式
  setState(() {
    _statusMessage = '认证已取消';
  });
}
5.5 认证失败
问题:生物识别认证失败
解决方案:
dart
try {
  final bool didAuthenticate = await _localAuth.authenticate(
    localizedReason: '请验证您的身份以继续',
  );

  if (!didAuthenticate) {
    // 认证失败,可能是:
    // 1. 用户取消了认证
    // 2. 生物识别不匹配
    // 3. 认证次数过多被锁定
    _showMessage('认证失败,请重试');
  }
} on PlatformException catch (e) {
  // 处理平台异常
  if (e.code == 'NotAvailable') {
    _showMessage('生物识别功能不可用');
  } else if (e.code == 'NotEnrolled') {
    _showMessage('未设置生物识别');
  } else if (e.code == 'LockedOut') {
    _showMessage('生物识别已锁定,请稍后再试');
  } else {
    _showMessage('认证出错: ${e.message}');
  }
}
📝 六、最佳实践总结
6.1 权限处理
- 正确配置权限 :在
module.json5中正确配置ohos.permission.ACCESS_BIOMETRIC权限 - 提供权限说明 :在
string.json中添加清晰的权限申请原因 - 权限检查:在使用生物识别功能前,先检查权限是否已授予
6.2 错误处理
- 处理平台异常 :使用
try-catch捕获PlatformException,并根据错误码提供相应的处理 - 用户友好提示:向用户提供清晰的错误信息和解决建议
- 提供备用方案:当生物识别不可用时,提供密码等备用认证方式
6.3 用户体验优化
- 加载状态:在认证过程中显示加载指示器
- 触觉反馈 :使用
HapticFeedback提供触觉反馈 - 动画效果:使用动画增强用户体验
- 状态反馈:清晰地向用户展示认证状态
6.4 安全性考虑
- 本地存储:不要在本地存储敏感的生物识别数据
- 认证结果:认证成功后,应该立即使用认证结果,不要长时间保存
- 错误处理:妥善处理认证失败的情况,避免泄露敏感信息
🔗 七、相关资源
📄 八、完整代码示例
完整代码请参考项目中的 lib/main.dart 文件。
使用说明:
- 将代码保存到
lib/main.dart文件中 - 确保
pubspec.yaml中已添加local_auth依赖 - 确保
module.json5中已配置生物识别权限 - 运行
flutter pub get安装依赖 - 运行
flutter run启动应用
🌐 社区支持
欢迎加入开源鸿蒙跨平台社区,与其他开发者交流学习,共同推进鸿蒙跨平台生态建设:
开源鸿蒙跨平台社区:https://openharmonycrossplatform.csdn.net
在这里你可以:
- 📚 获取最新的跨平台开发技术文档
- 💬 与其他开发者交流开发经验
- 🐛 反馈问题和建议
- 🎯 参与开源项目贡献
- 📖 学习更多跨平台开发最佳实践
享受你的生物识别认证开发之旅! 🚀✨