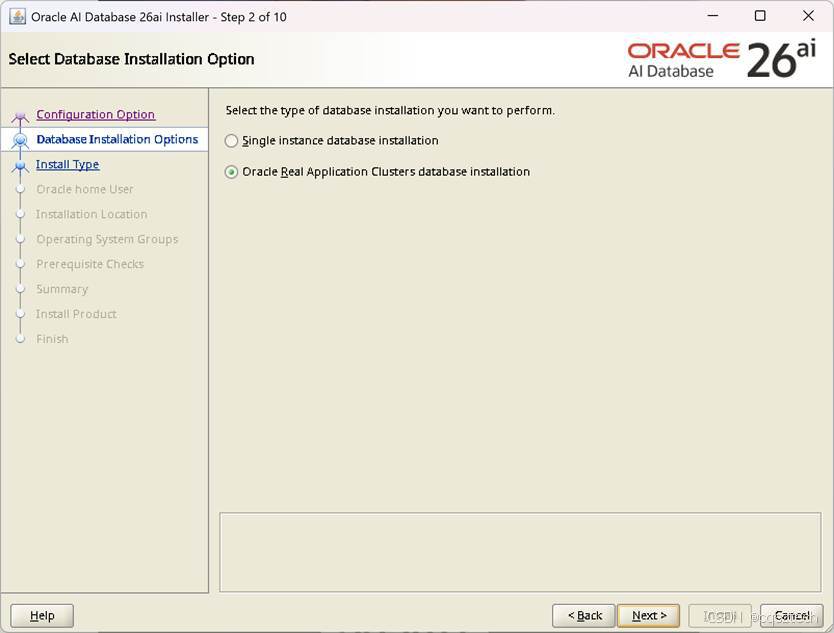
Oracle Database 26ai 已于1月28日发布,终于可以在本地安装了。
以下是Oracle 26ai 2节点RAC安装步骤:
- 相关软件
虚拟机软件:
只是为了测试验证数据库RAC的安装,因此,使用虚拟机来完成RAC安装。
版本,我使用VMware Workstation 17 Pro。
操作系统:
26ai 官方认证是 linux8/9,但想到LINUX10已经发布半年了,现在最新版本是10.1,前面19C也在LINUX10上能安装,因此,选择了Oracle LINUX 10.1,
https://yum.oracle.com/ISOS/OracleLinux/OL10/u1/x86_64/OracleLinux-R10-U1-x86_64-dvd.iso
数据库:
26ai:https://www.oracle.com/database/technologies/oracle26ai-linux-downloads.html
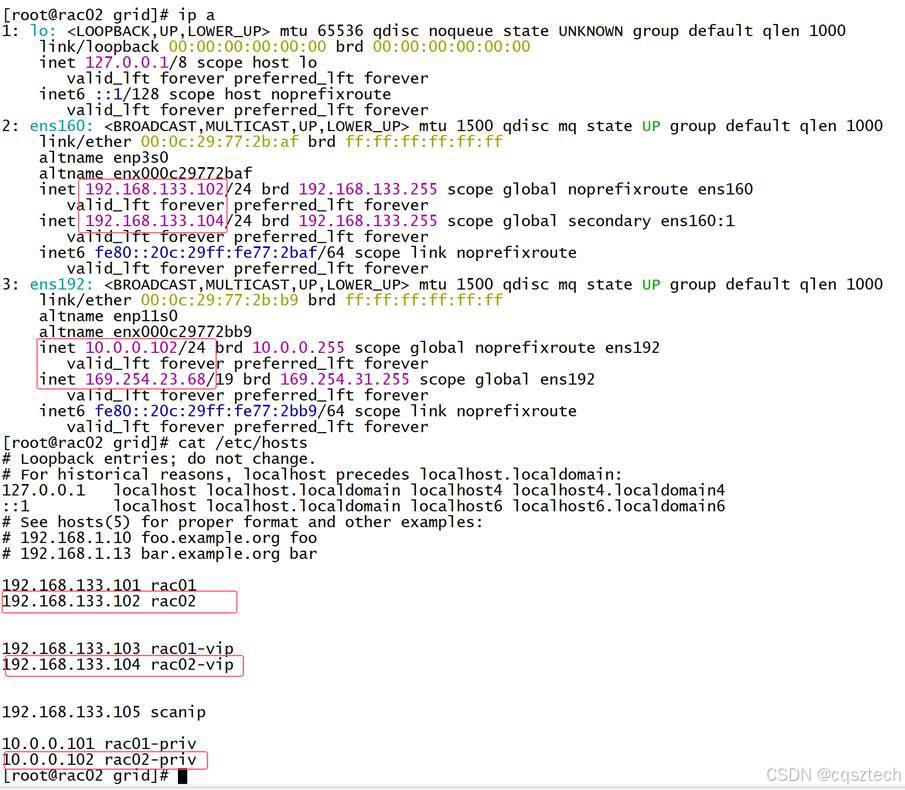
- IP规划
|-------|-----------------|-----------------|------------|-----------------|
| 主机名称 | 网卡IP | VIP | 私网IP | SCANIP |
| RAC01 | 192.168.133.101 | 192.168.133.103 | 10.0.0.101 | 192.168.133.105 |
| RAC02 | 192.168.133.102 | 192.168.133.104 | 10.0.0.102 | 192.168.133.105 |
- 操作系统准备
- 操作系统安装
3.1.1 资源配置
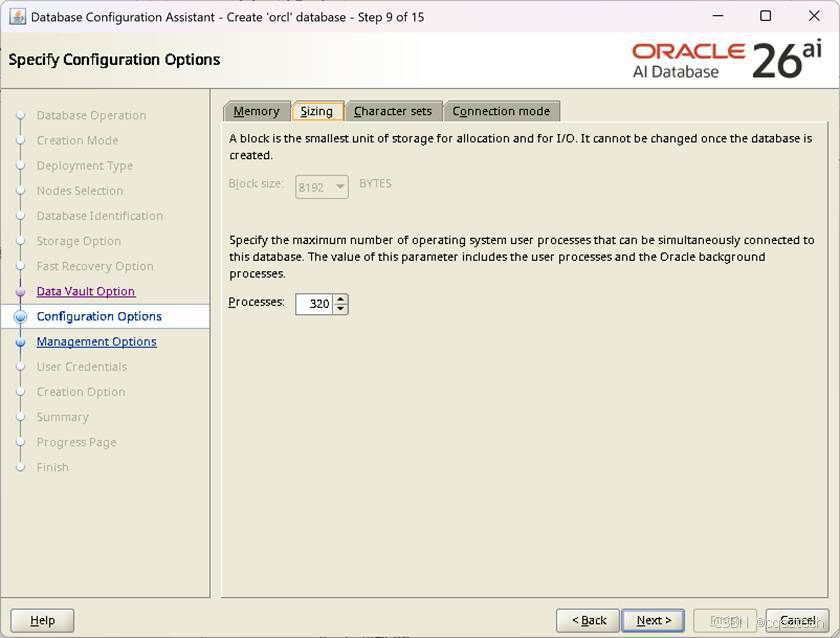
4c/8g/120g/两块网卡
3.1.2 最小安装
root@rac01 \~# yum grouplist |grep -i install
Installed Environment Groups:
Minimal Install
3.1.3 安装版本
root@rac01 \~# cat /etc/oracle-release
Oracle Linux Server release 10.1
-
- 主机名解析
两个节点/etc/hosts文件添加:
|--------------------------------------------------------------------------------------------------------------------------------------------------------------------------------------------------------|
| #public ip 192.168.133.101 rac01 192.168.133.102 rac02 #private ip 10.0.0.101 rac01-priv 10.0.0.102 rac02-priv #vip 192.168.133.103 rac01-vip 192.168.133.104 rac02-vip #scanip 192.168.133.105 scanip |
3.3关闭防火墙
Systemctl disable --now firewalld
3.4 关闭SELINUX
grubby --update-kernel ALL --args selinux=0
3.5 关闭透明大页
Vim /etc/default/grub
...
GRUB_CMDLINE_LINUX=... transparent_hugepage=never
...
grub2-mkconfig -o /boot/grub/grub.cfg
3.1.7 创建用户及组
添加用户组:
|-------------------------------------------------------------------------------------------------------------------------------------------------------------------------------------------------------------------------------------------------------------|
| groupadd -g 54330 oinstall groupadd -g 54331 dba groupadd -g 54332 racoper groupadd -g 54323 asmdba groupadd -g 54324 asmoper groupadd -g 54325 asmadmin groupadd -g 54326 oper groupadd -g 54327 backupdba groupadd -g 54328 dgdba groupadd -g 54329 kmdba |
创建用户:
|----------------------------------------------------------------------------------------------------------------------------------------------------|
| useradd -u 54322 -g oinstall -G asmoper,asmadmin,asmdba grid useradd -u 54321 -g oinstall -G dba,asmdba,backupdba,dgdba,kmdba,oper,asmadmin oracle |
修改密码:
|-----------------------------------------------------------------------|
| echo "oracle"|passwd --stdin oracle echo "grid"|passwd --stdin grid |
3.6配置用户环境变量
注意节点2 oracle_sid变量需要修改
cat /home/grid/.bash_profile
|-----------------------------------------------------------------------------------------------------------------------------------------------------------------------------------------------------------------|
| export ORACLE_BASE=/u01/app/grid export ORACLE_HOME=/u01/app/26.1.0/grid export ORACLE_SID=+ASM1 export PATH=ORACLE_HOME/bin:PATH export LD_LIBRARY_PATH=ORACLE_HOME/lib:ORACLE_HOME/lib32:$LD_LIBRARY_PATH |
cat /home/oracle/.bash_profile
|-----------------------------------------------------------------------------------------------------------------------------------------------------------------------------------------------------------------------------------|
| export ORACLE_BASE=/u01/app/oracle export ORACLE_HOME=ORACLE_BASE/product/26.1.0/dbhome_1 export ORACLE_SID=orcl1 export PATH=ORACLE_HOME/bin:PATH export LD_LIBRARY_PATH=ORACLE_HOME/lib:ORACLE_HOME/lib32:LD_LIBRARY_PATH |
3.7 创建相关目录
创建目录:
|------------------------------------------------------------------------------------------------------------------------------------------------------------------------------------------------------|
| mkdir -p /u01/app/26.1.0/grid mkdir -p /u01/app/grid mkdir -p /u01/app/oracle/product/26.1.0/dbhome_1 chown -R grid:oinstall /u01/app chown -R oracle:oinstall /u01/app/oracle chmod -R 775 /u01/app |
3.8 设置用户limit
Cat /etc/security/limits.conf
|---------------------------------------------------------------------------------------------------------------------------------------------------------------------------------------------------------------------------------------------------------------------------------------------------------------------------------------------------------------------------------------------|
| oracle soft nproc 655350 oracle hard nproc 655350 oracle soft nofile 655360 oracle hard nofile 655360 grid soft nproc 655350 grid hard nproc 655350 grid soft nofile 655360 grid hard nofile 655360 oracle soft stack 102400 oracle hard stack 327680 grid soft stack 102400 grid hard stack 327680 oracle soft memlock -1 oracle hard memlock -1 grid soft memlock -1 grid hard memlock -1 |
3.9 修改内核参数
在9及以上版本,/etc/sysctl.conf下配置内核参数仍然可以永久生效,但按照推荐修改/etc/sysctl.d/99-oracle.conf文件
执行sysctl -p命令使参数生效
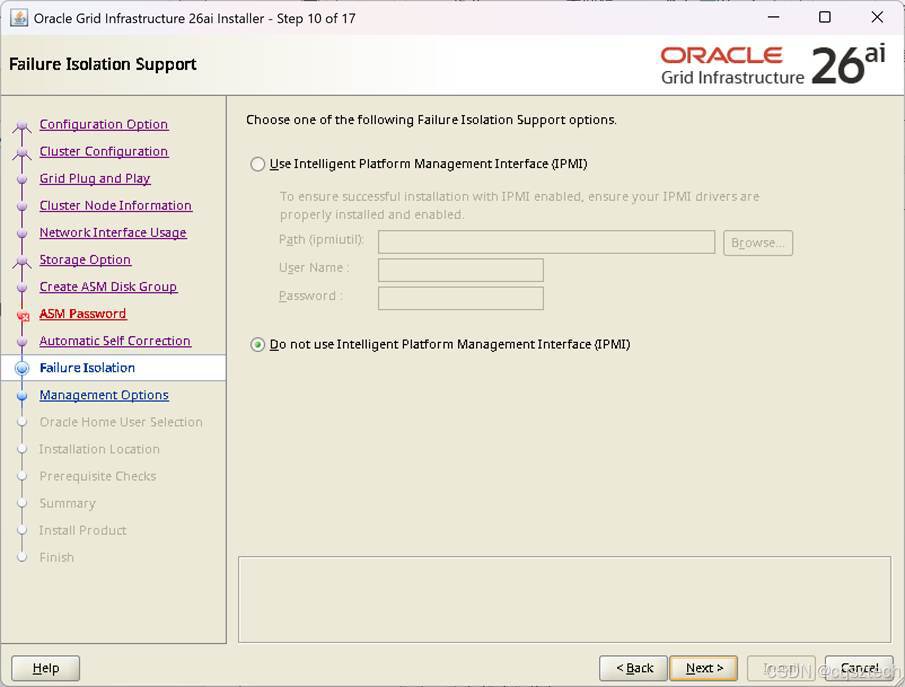
这里可以不设置,26AI,可以帮我们自动修复。Automatic Self Correction
- 存储设置
- 创建共享磁盘
在虚拟机软件的安装目录下,有个vmware-vdiskmanager.exe文件
比如:C:\Program Files (x86)\VMware\VMware Workstation
-
-
- 创建集群盘
-
用于验证,使用外部冗余只创建一个盘即可,大小2g
vmware-vdiskmanager.exe -c -s 2048Mb -a lsilogic -t 2 "E:\vm\26ai\sharedisk\ocr_vote.vmdk"
说明: -c 选项为创建, -s 指定大小, -t 2 为预分配
-
-
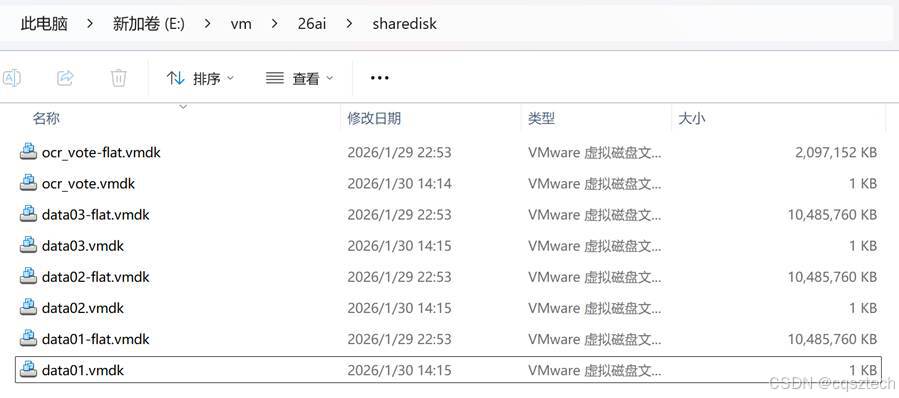
- 创建数据盘
-
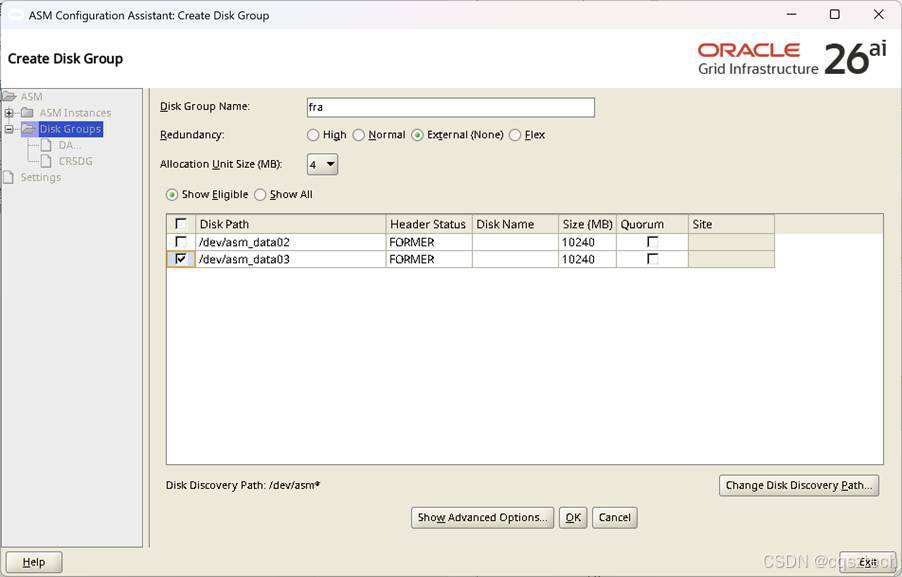
创建3个10g大小的盘,两个用于数据,一个用于fra,26ai,不再需要GIMR 磁盘
vmware-vdiskmanager.exe -c -s 10240Mb -a lsilogic -t 2 "E:\vm\26ai\sharedisk\data01.vmdk"
vmware-vdiskmanager.exe -c -s 10240Mb -a lsilogic -t 2 "E:\vm\26ai\sharedisk\data02.vmdk"
最后结果
-
- 添加到虚拟机
4.2.1 在虚拟机中添加硬盘,总线设成scsi1:0
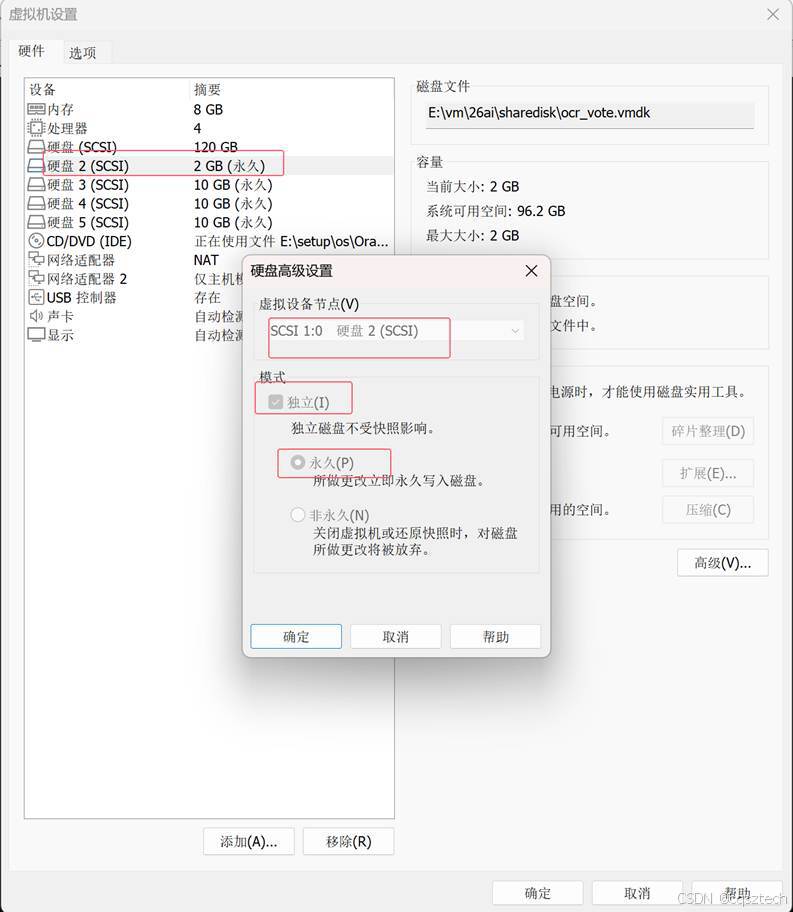
4.2.2修改虚拟机配置文件
分别打开两台虚拟机目录中的vmx文件,在最后一行添加:
disk.EnableUUID = "TRUE"
disk.locking = "FALSE"
scsi1.sharedBus = "virtual"
scsi1.shared = "TRUE"
diskLib.dataCacheMaxSize = "0"
diskLib.dataCacheMaxReadAheadSize = "0"
diskLib.DataCacheMinReadAheadSize = "0"
diskLib.dataCachePageSize = "4096"
diskLib.maxUnsyncedWrites = "0"
-
- 产生设备
使用udev方式
cat /etc/udev/rules.d/99-oracle-asmdevices.rules
KERNEL=="sd*", ENV{DEVTYPE}=="disk", SUBSYSTEM=="block", PROGRAM=="/usr/lib/udev/scsi_id -g -u -d $devnode", RESULT=="36000c298c023134185171eee842e13be", RUN+="/bin/sh -c 'mknod
/dev/asm_ocr01 b major minor; chown grid:asmadmin /dev/asm_ocr01; chmod 0660 /dev/asm_ocr01'"
KERNEL=="sd*", ENV{DEVTYPE}=="disk", SUBSYSTEM=="block", PROGRAM=="/usr/lib/udev/scsi_id -g -u -d devnode", RESULT=="36000c291354bea14fe0642e9e848a6b6", RUN+="/bin/sh -c 'mknod /dev/asm_data01 b major $minor; chown grid:asmadmin /dev/asm_data01; chmod 0660 /dev/asm_data01'"
KERNEL=="sd*", ENV{DEVTYPE}=="disk", SUBSYSTEM=="block", PROGRAM=="/usr/lib/udev/scsi_id -g -u -d $devnode", RESULT=="36000c297a6b927a679468c61c03fc7d8", RUN+="/bin/sh -c 'mknod
/dev/asm_data02 b major minor; chown grid:asmadmin /dev/asm_data02; chmod 0660 /dev/asm_data02'"
KERNEL=="sd*", ENV{DEVTYPE}=="disk", SUBSYSTEM=="block", PROGRAM=="/usr/lib/udev/scsi_id -g -u -d devnode", RESULT=="36000c297ddb6a25b827313a8b56d1615", RUN+="/bin/sh -c 'mknod /dev/asm_data03 b major $minor; chown grid:asmadmin /dev/asm_data03; chmod 0660 /dev/asm_data03'"
手动加载
/sbin/udevadm trigger --type=devices --action=change
udevadm control --reload-rules
结果:
root@rac01 \~# ls -ltr /dev/asm*
brw-rw---- 1 grid asmadmin 8, 32 Jan 30 15:46 /dev/asm_data01
brw-rw---- 1 grid asmadmin 8, 48 Jan 30 15:46 /dev/asm_data02
brw-rw---- 1 grid asmadmin 8, 64 Jan 30 15:46 /dev/asm_data03
brw-rw---- 1 grid asmadmin 8, 16 Jan 30 15:46 /dev/asm_ocr01
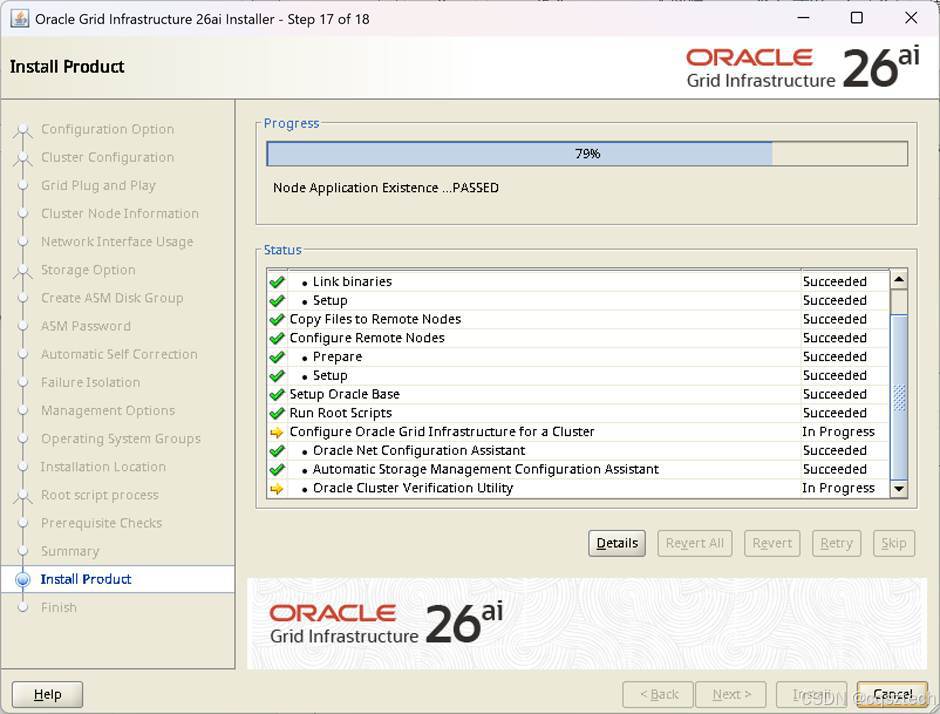
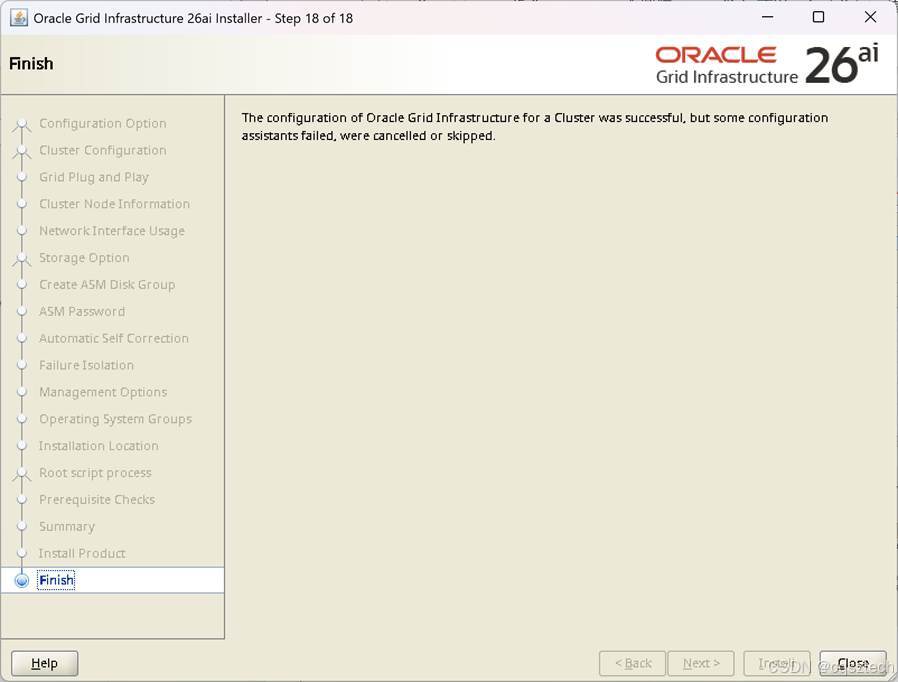
- GI安装
- 解压安装文件
su -- grid
unzip -d $ORACLE_HOME LINUX.X64_2326100_grid_home.zip
-
- 安装gi
su - grid
cd $ORACLE_HOME
export DISPLAY=192.168.133.1:0.0
./gridSetup.sh
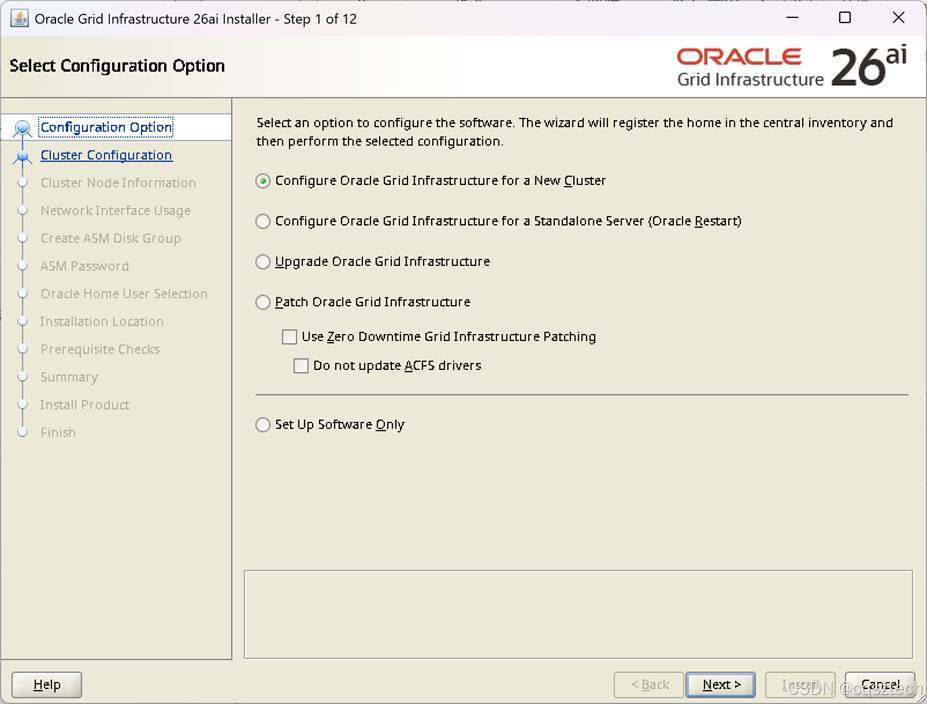
和19C 相比,多了一个 patch Oracle Grid Infrastruture

这个和19c 没有什么变化
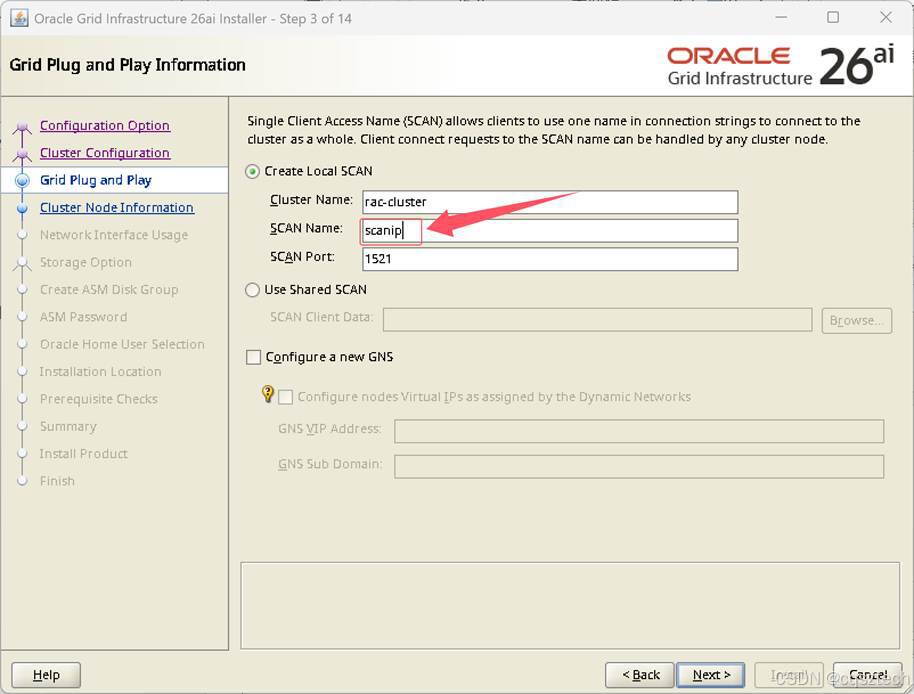
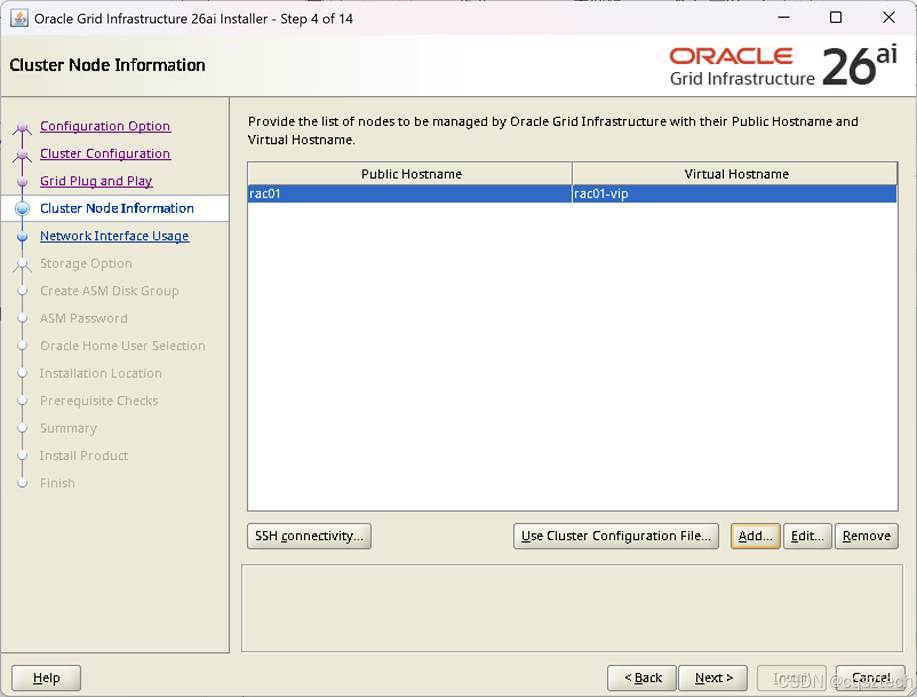
这个和19c没有变化,注意,这个scan name需要和/etc/hosts中的对应。
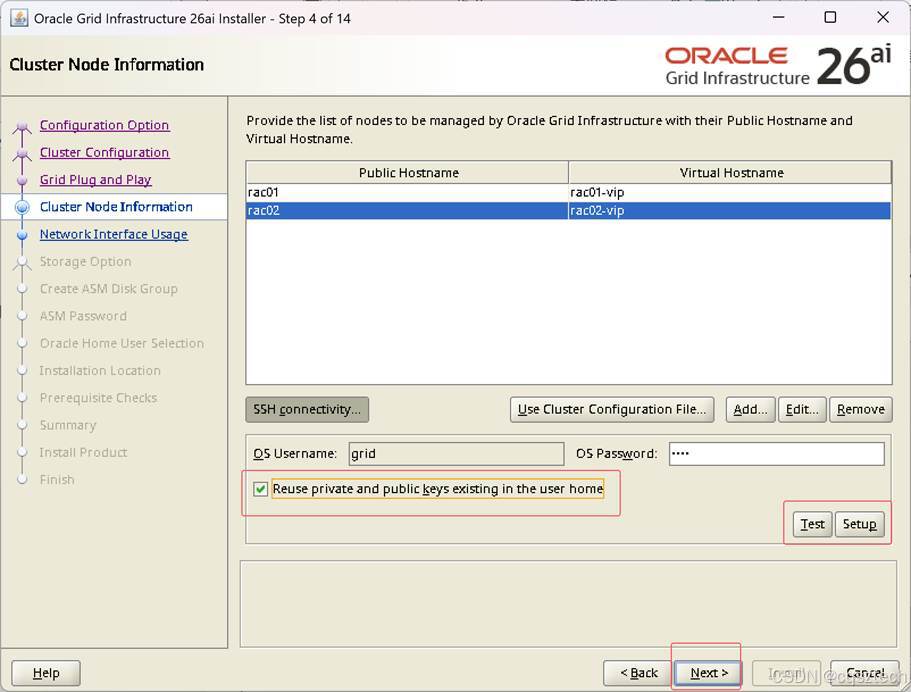
注意:这里,使用手工去做SSH对等性设置,使用界面上的SETUP,会失败,可能与我使用的ORACLE LINUX 10.1 有关,这个在19c遇到过,同时,26ai 官方认证的也是linux8/9。不过,手工做对等性设置后,勾上复用公私钥,点下一步即可。
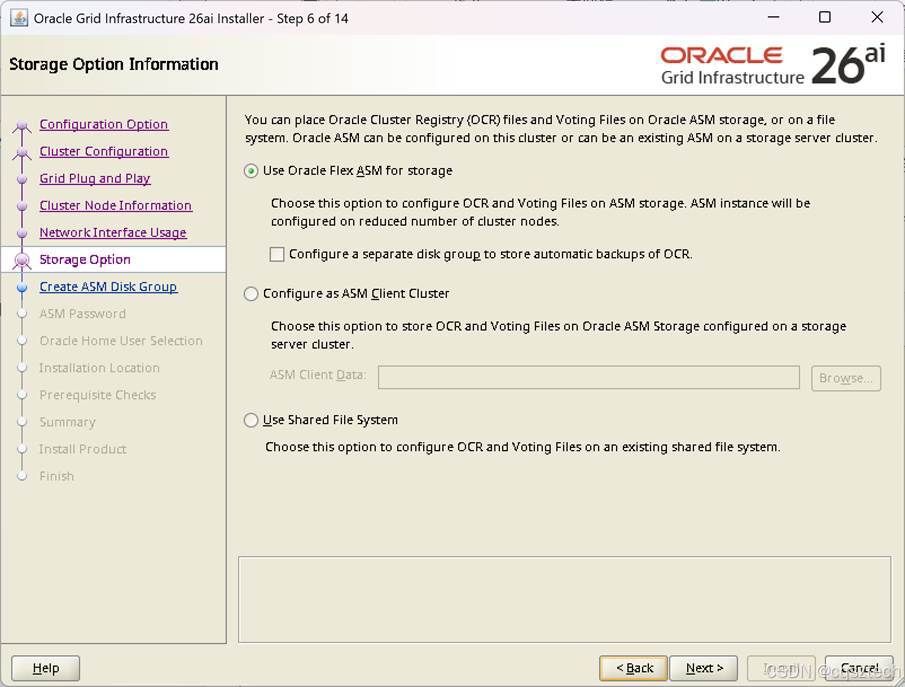
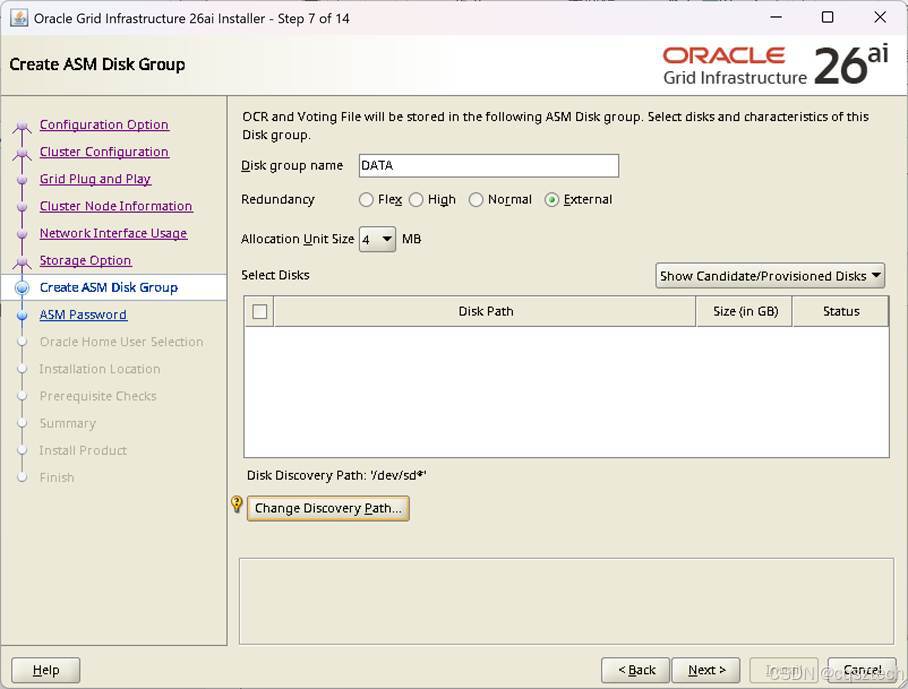
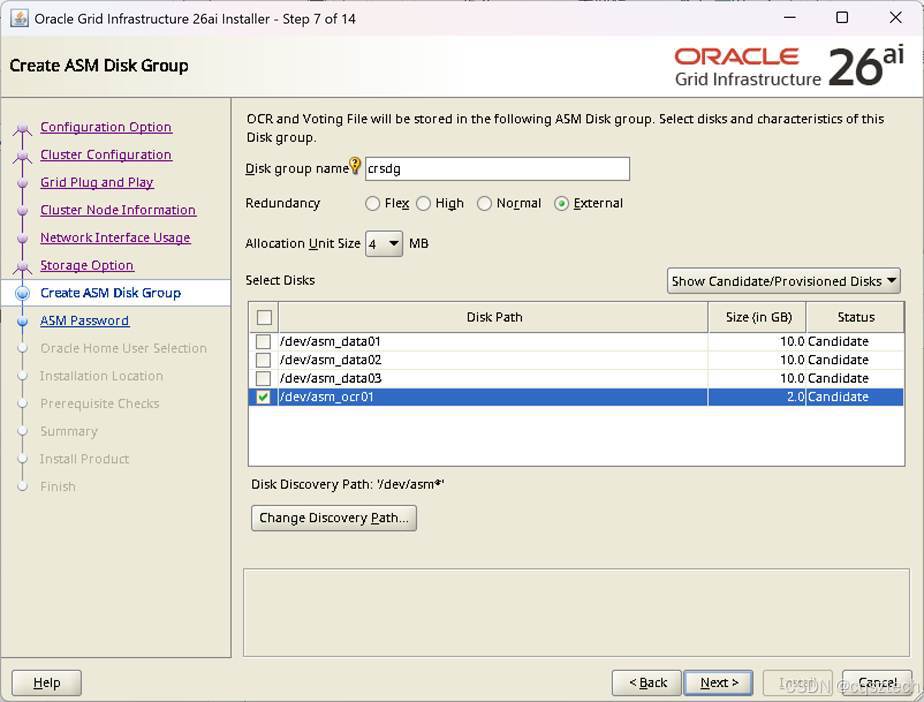
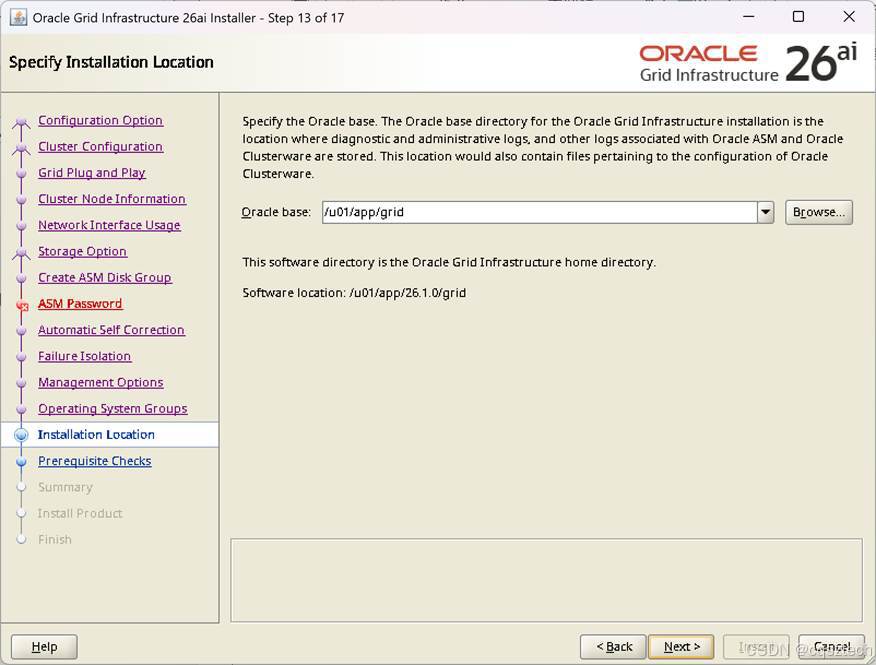
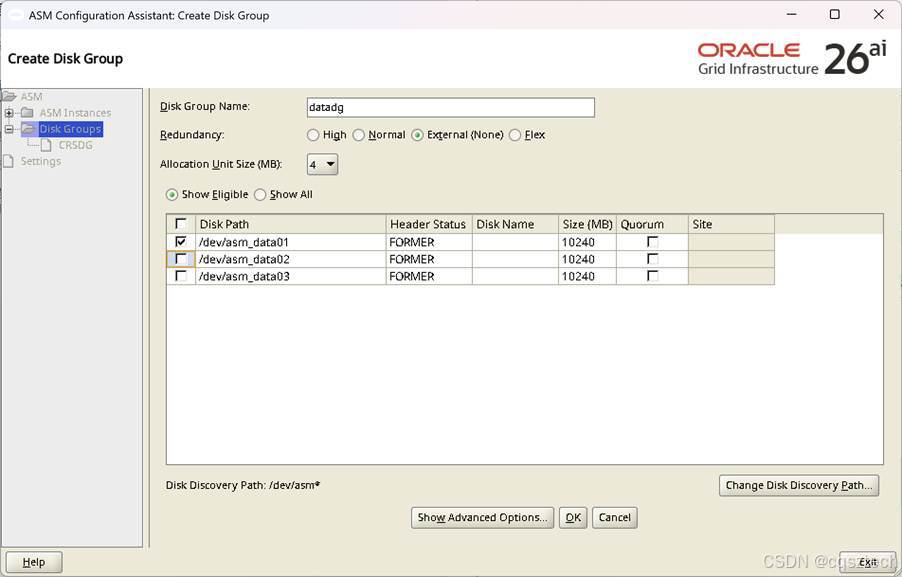
我只规划了一块盘,选择外部。
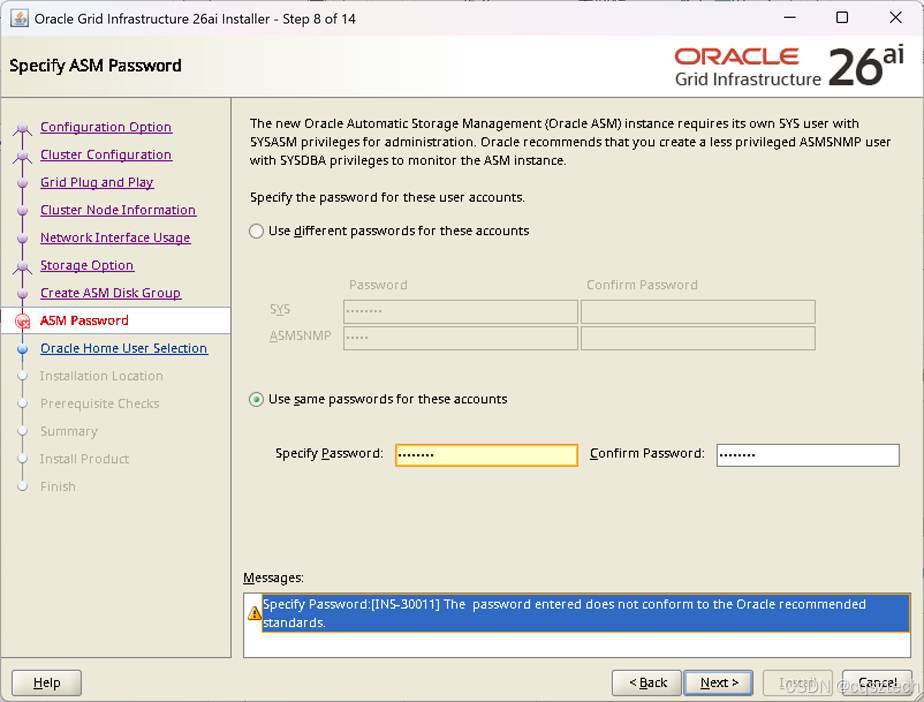
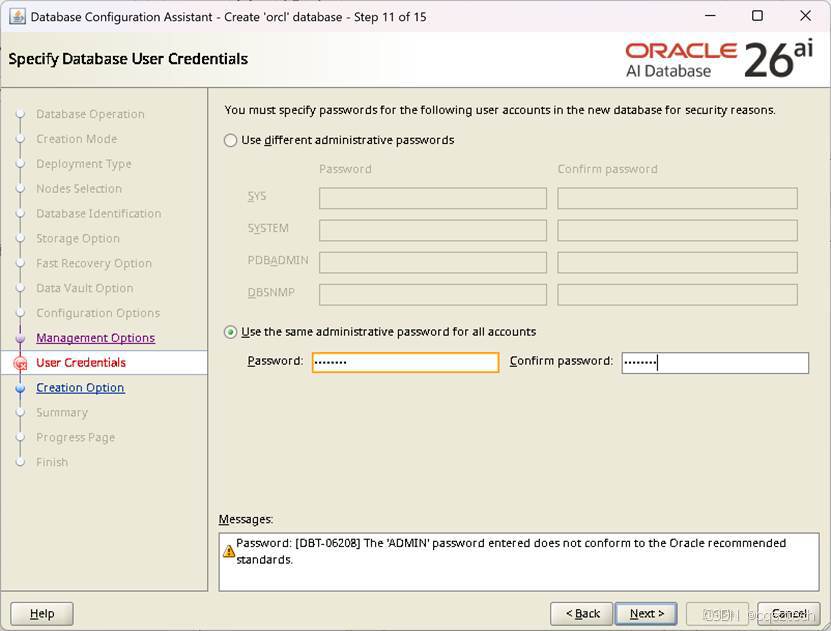
这个密码提示不满足推荐标准,可以忽略
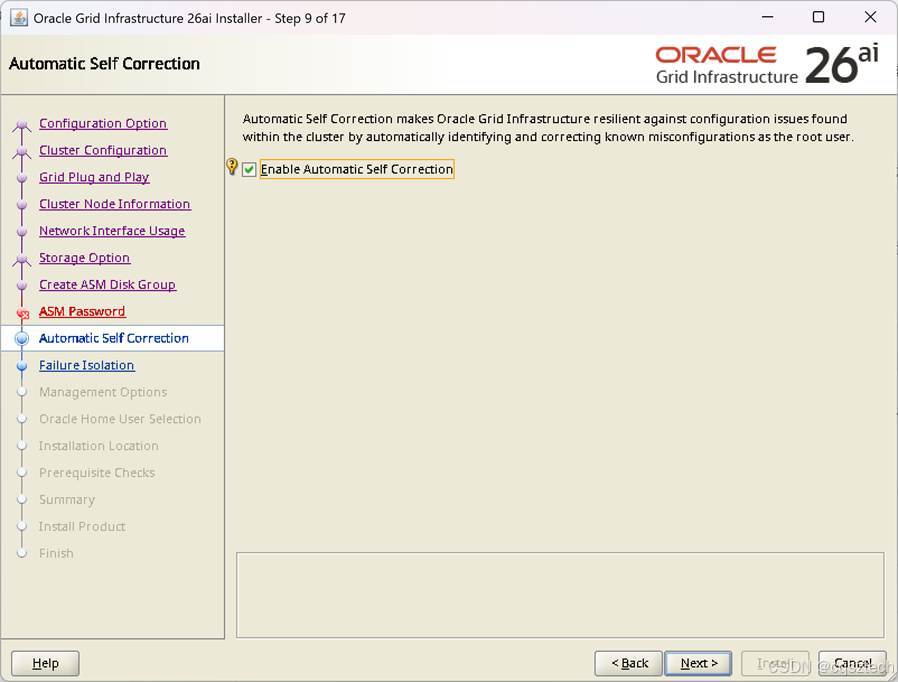
勾选,让它帮我们修复。

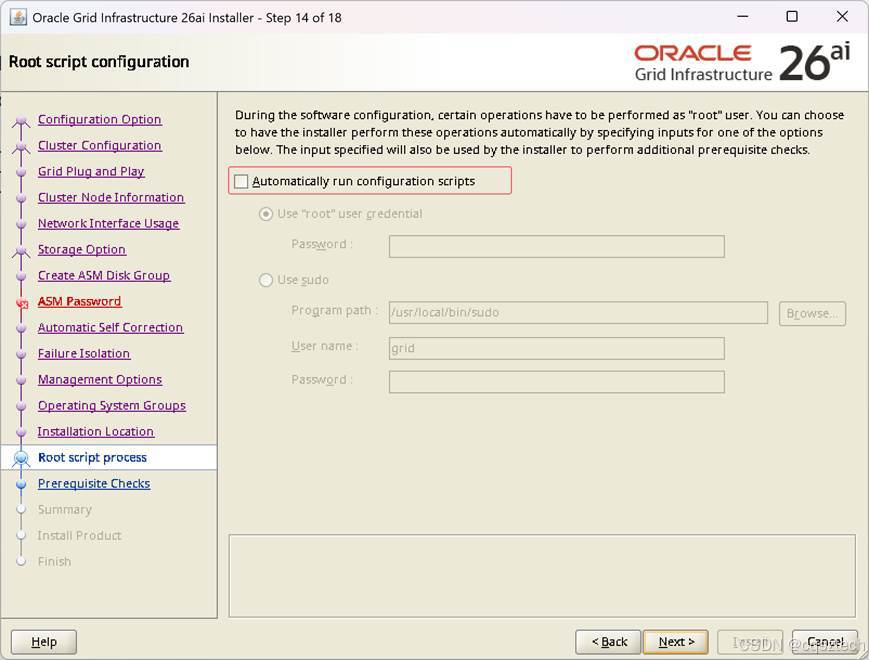
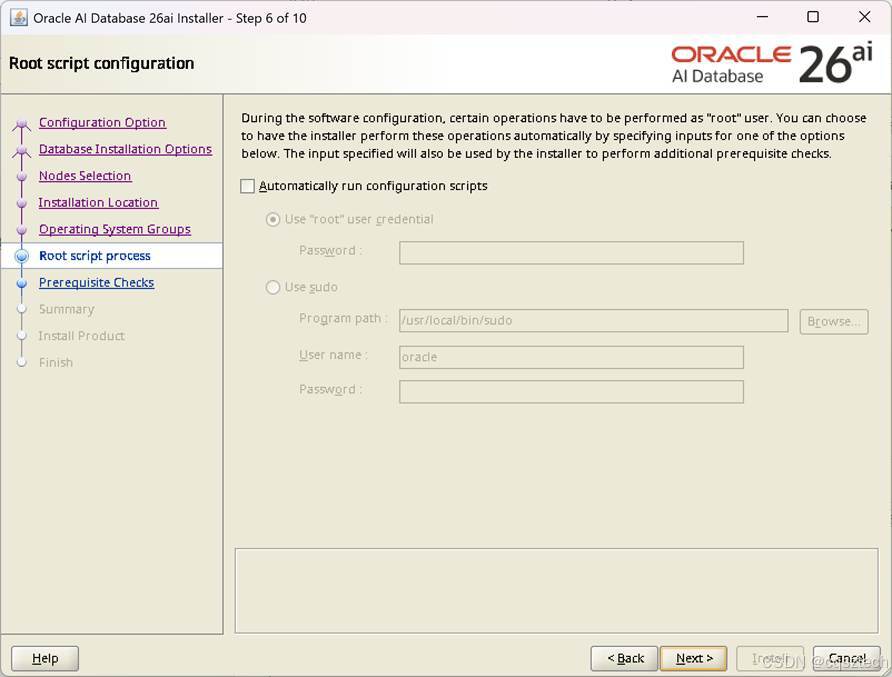
这里不能勾选自动运行配置脚本,可能与操作系统高版本有关。
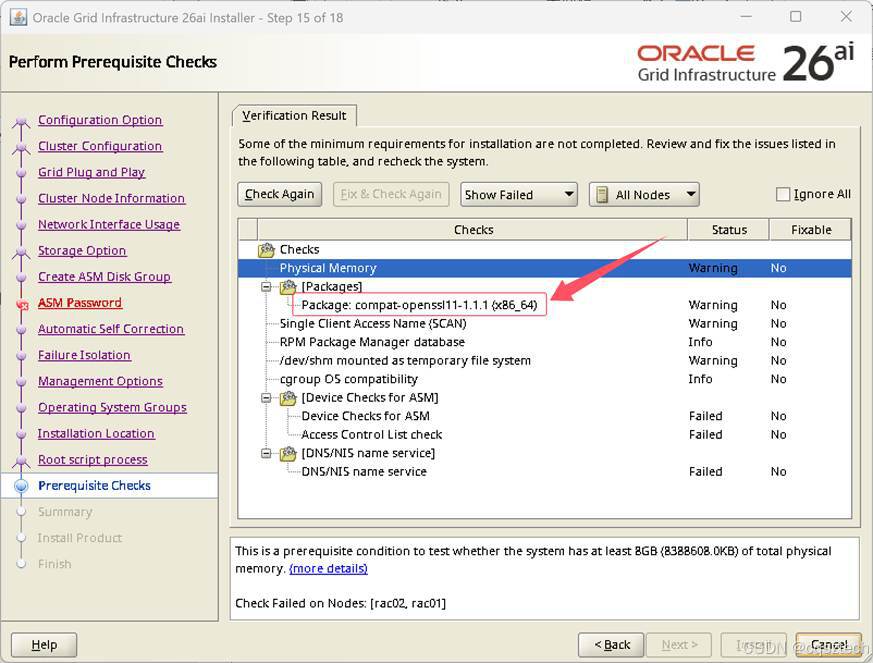
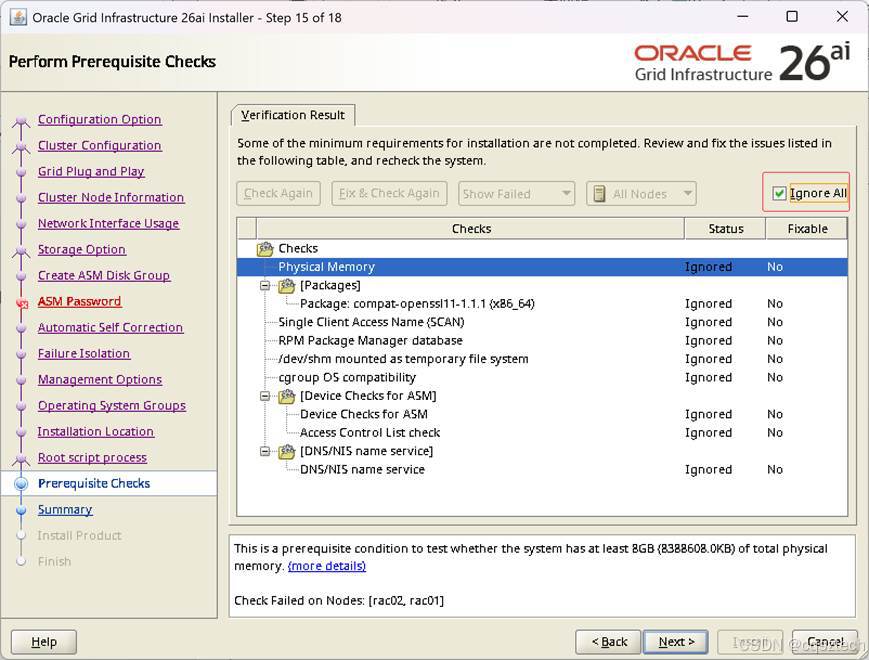
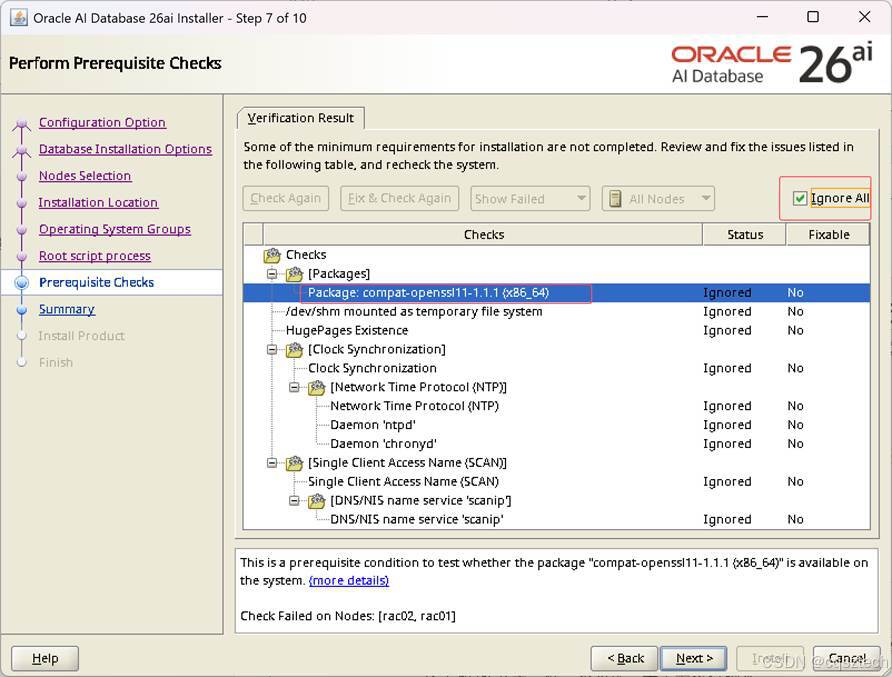
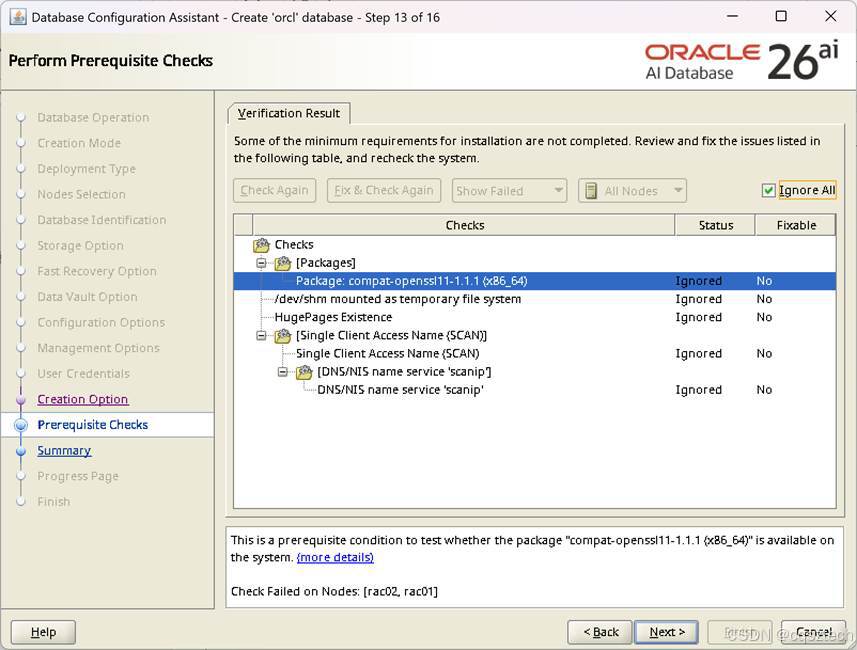
这个compat-openssl11-1.1.1 (x86_64) 没有,点忽略all
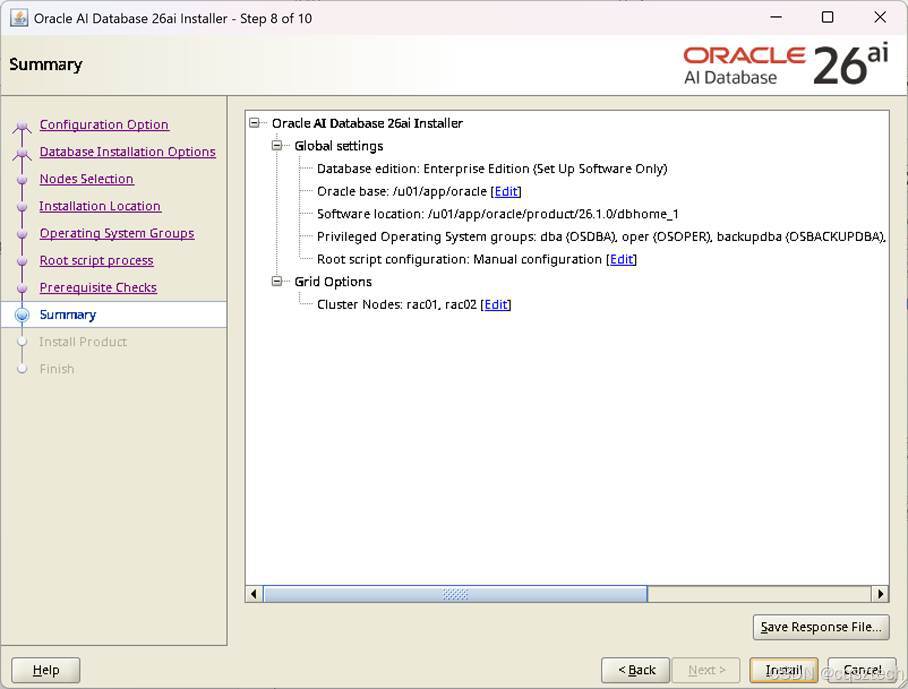
这个直接下一步即可
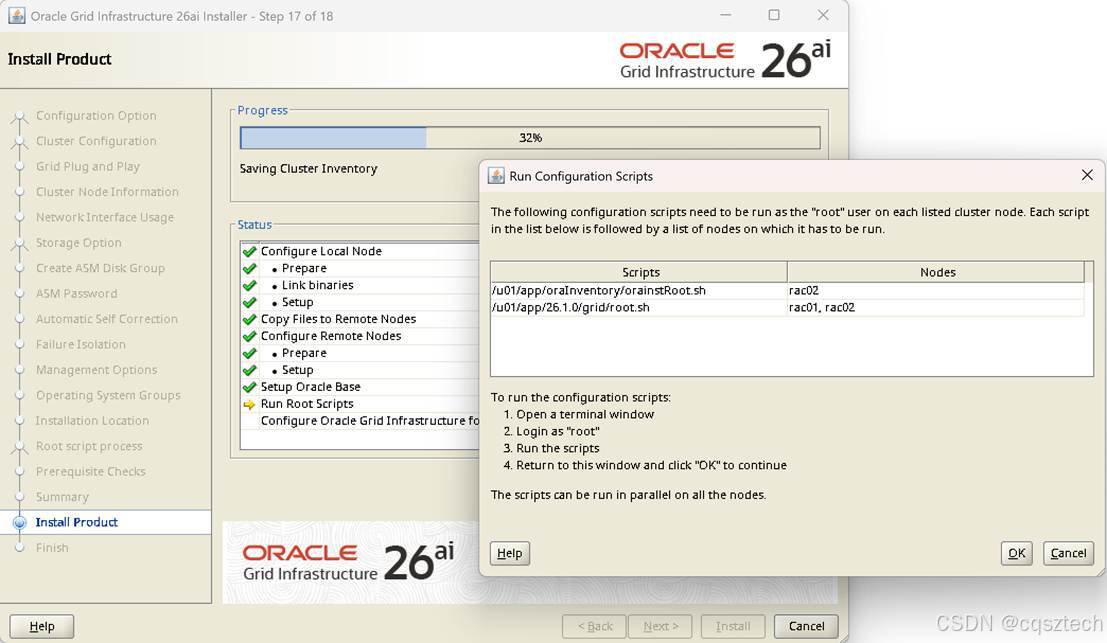
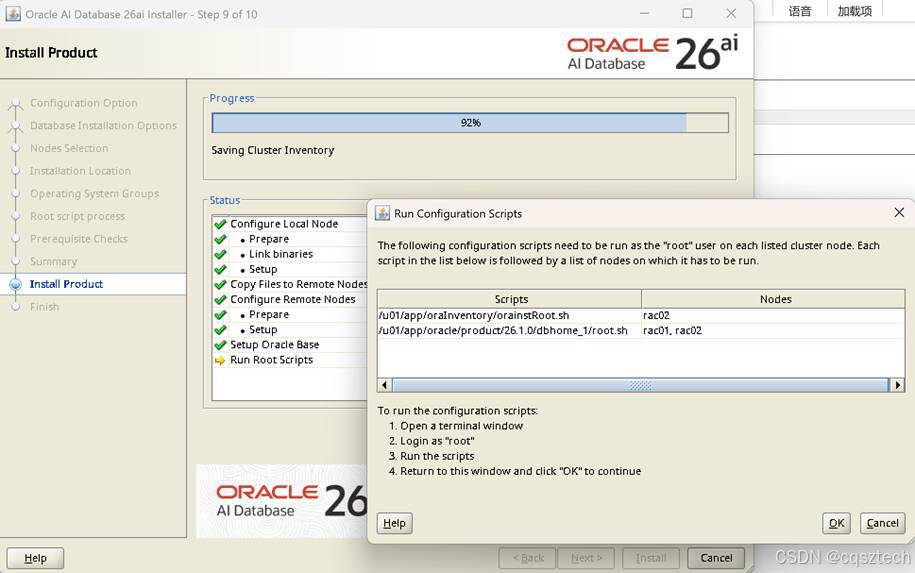
在两个节点的ROOT用户窗口,手工去执行对应的脚本
root@rac01 grid# /u01/app/oraInventory/orainstRoot.sh
Changing permissions of /u01/app/oraInventory.
Adding read,write permissions for group.
Removing read,write,execute permissions for world.
Changing groupname of /u01/app/oraInventory to oinstall.
The execution of the script is complete.
root@rac01 grid# /u01/app/26.1.0/grid/root.sh
Performing root user operation.
The following environment variables are set as:
ORACLE_OWNER= grid
ORACLE_HOME= /u01/app/26.1.0/grid
Enter the full pathname of the local bin directory: /usr/local/bin:
The contents of "dbhome" have not changed. No need to overwrite.
The contents of "oraenv" have not changed. No need to overwrite.
The contents of "coraenv" have not changed. No need to overwrite.
Creating /etc/oratab file...
Entries will be added to the /etc/oratab file as needed by
Database Configuration Assistant when a database is created
Finished running generic part of root script.
Now product-specific root actions will be performed.
RAC option enabled on: Linux
Executing command '/u01/app/26.1.0/grid/perl/bin/perl -I/u01/app/26.1.0/grid/perl/lib -I/u01/app/26.1.0/grid/crs/install /u01/app/26.1.0/grid/crs/install/rootcrs.pl '
Using configuration parameter file: /u01/app/26.1.0/grid/crs/install/crsconfig_params
The log of current session can be found at:
/u01/app/grid/crsdata/rac01/crsconfig/rootcrs_rac01_2026-01-30_05-15-27PM.log
2026/01/30 17:15:32 CLSRSC-594: Executing installation step 1 of 18: 'ValidateEnv'.
2026/01/30 17:15:33 CLSRSC-594: Executing installation step 2 of 18: 'CheckRootCert'.
2026/01/30 17:15:33 CLSRSC-594: Executing installation step 3 of 18: 'GenSiteGUIDs'.
2026/01/30 17:15:34 CLSRSC-594: Executing installation step 4 of 18: 'SetupOSD'.
Redirecting to /bin/systemctl restart rsyslog.service
2026/01/30 17:15:35 CLSRSC-594: Executing installation step 5 of 18: 'CheckCRSConfig'.
2026/01/30 17:15:35 CLSRSC-594: Executing installation step 6 of 18: 'SetupLocalGPNP'.
2026/01/30 17:15:39 CLSRSC-594: Executing installation step 7 of 18: 'CreateRootCert'.
2026/01/30 17:15:54 CLSRSC-594: Executing installation step 8 of 18: 'ConfigOLR'.
2026/01/30 17:15:57 CLSRSC-594: Executing installation step 9 of 18: 'ConfigCHMOS'.
2026/01/30 17:15:57 CLSRSC-594: Executing installation step 10 of 18: 'CreateOHASD'.
2026/01/30 17:15:58 CLSRSC-594: Executing installation step 11 of 18: 'ConfigOHASD'.
2026/01/30 17:15:58 CLSRSC-330: Adding Clusterware entries to file 'oracle-ohasd.service'
2026/01/30 17:16:09 CLSRSC-594: Executing installation step 12 of 18: 'SetupTFA'.
2026/01/30 17:16:09 CLSRSC-594: Executing installation step 13 of 18: 'InstallACFS'.
2026/01/30 17:16:11 CLSRSC-594: Executing installation step 14 of 18: 'CheckFirstNode'.
2026/01/30 17:16:11 CLSRSC-594: Executing installation step 15 of 18: 'InitConfig'.
CRS-4256: Updating the profile
Successful addition of voting disk 437b597e62964f78bf2e4f997f8a3845.
Successfully replaced voting disk group with +crsdg.
CRS-4256: Updating the profile
CRS-4266: Voting file(s) successfully replaced
STATE File Universal Id File Name Disk group
- ONLINE 437b597e62964f78bf2e4f997f8a3845 (/dev/asm_ocr01) CRSDG
Located 1 voting disk(s).
2026/01/30 17:17:15 CLSRSC-594: Executing installation step 16 of 18: 'StartCluster'.
2026/01/30 17:17:15 CLSRSC-4002: Successfully installed Oracle Autonomous Health Framework (AHF).
2026/01/30 17:17:35 CLSRSC-343: Successfully started Oracle Clusterware stack
2026/01/30 17:17:39 CLSRSC-594: Executing installation step 17 of 18: 'ConfigNode'.
clscfg: EXISTING configuration version 23 detected.
Successfully accumulated necessary OCR keys.
Creating OCR keys for user 'root', privgrp 'root'..
Operation successful.
2026/01/30 17:18:04 CLSRSC-594: Executing installation step 18 of 18: 'PostConfig'.
2026/01/30 17:18:18 CLSRSC-325: Configure Oracle Grid Infrastructure for a Cluster ... succeeded
root@rac01 grid#
二号机
root@rac02 grid# /u01/app/26.1.0/grid/root.sh
Performing root user operation.
The following environment variables are set as:
ORACLE_OWNER= grid
ORACLE_HOME= /u01/app/26.1.0/grid
Enter the full pathname of the local bin directory: /usr/local/bin:
The contents of "dbhome" have not changed. No need to overwrite.
The contents of "oraenv" have not changed. No need to overwrite.
The contents of "coraenv" have not changed. No need to overwrite.
Creating /etc/oratab file...
Entries will be added to the /etc/oratab file as needed by
Database Configuration Assistant when a database is created
Finished running generic part of root script.
Now product-specific root actions will be performed.
RAC option enabled on: Linux
Executing command '/u01/app/26.1.0/grid/perl/bin/perl -I/u01/app/26.1.0/grid/perl/lib -I/u01/app/26.1.0/grid/crs/install /u01/app/26.1.0/grid/crs/install/rootcrs.pl '
Using configuration parameter file: /u01/app/26.1.0/grid/crs/install/crsconfig_params
The log of current session can be found at:
/u01/app/grid/crsdata/rac02/crsconfig/rootcrs_rac02_2026-01-30_05-18-53PM.log
2026/01/30 17:18:59 CLSRSC-594: Executing installation step 1 of 18: 'ValidateEnv'.
2026/01/30 17:19:00 CLSRSC-594: Executing installation step 2 of 18: 'CheckRootCert'.
2026/01/30 17:19:00 CLSRSC-594: Executing installation step 3 of 18: 'GenSiteGUIDs'.
2026/01/30 17:19:00 CLSRSC-594: Executing installation step 4 of 18: 'SetupOSD'.
Redirecting to /bin/systemctl restart rsyslog.service
2026/01/30 17:19:01 CLSRSC-594: Executing installation step 5 of 18: 'CheckCRSConfig'.
2026/01/30 17:19:01 CLSRSC-594: Executing installation step 6 of 18: 'SetupLocalGPNP'.
2026/01/30 17:19:01 CLSRSC-594: Executing installation step 7 of 18: 'CreateRootCert'.
2026/01/30 17:19:01 CLSRSC-594: Executing installation step 8 of 18: 'ConfigOLR'.
2026/01/30 17:19:05 CLSRSC-594: Executing installation step 9 of 18: 'ConfigCHMOS'.
2026/01/30 17:19:05 CLSRSC-594: Executing installation step 10 of 18: 'CreateOHASD'.
2026/01/30 17:19:06 CLSRSC-594: Executing installation step 11 of 18: 'ConfigOHASD'.
2026/01/30 17:19:06 CLSRSC-330: Adding Clusterware entries to file 'oracle-ohasd.service'
2026/01/30 17:19:17 CLSRSC-594: Executing installation step 12 of 18: 'SetupTFA'.
2026/01/30 17:19:17 CLSRSC-594: Executing installation step 13 of 18: 'InstallACFS'.
2026/01/30 17:19:19 CLSRSC-594: Executing installation step 14 of 18: 'CheckFirstNode'.
2026/01/30 17:19:20 CLSRSC-594: Executing installation step 15 of 18: 'InitConfig'.
2026/01/30 17:19:24 CLSRSC-594: Executing installation step 16 of 18: 'StartCluster'.
2026/01/30 17:19:36 CLSRSC-343: Successfully started Oracle Clusterware stack
2026/01/30 17:19:36 CLSRSC-594: Executing installation step 17 of 18: 'ConfigNode'.
2026/01/30 17:19:36 CLSRSC-594: Executing installation step 18 of 18: 'PostConfig'.
2026/01/30 17:19:41 CLSRSC-325: Configure Oracle Grid Infrastructure for a Cluster ... succeeded
root@rac02 grid# 2026/01/30 17:20:17 CLSRSC-4002: Successfully installed Oracle Autonomous Health Framework (AHF).
root@rac02 grid#
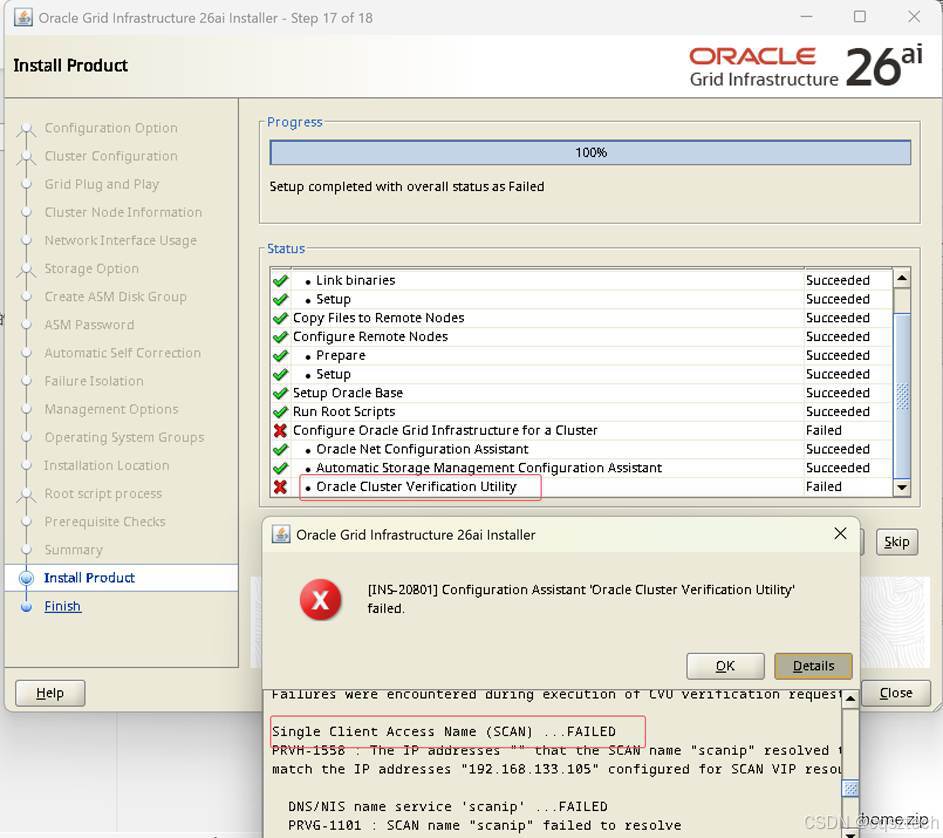
没有配置DNS,可以跳过。
-
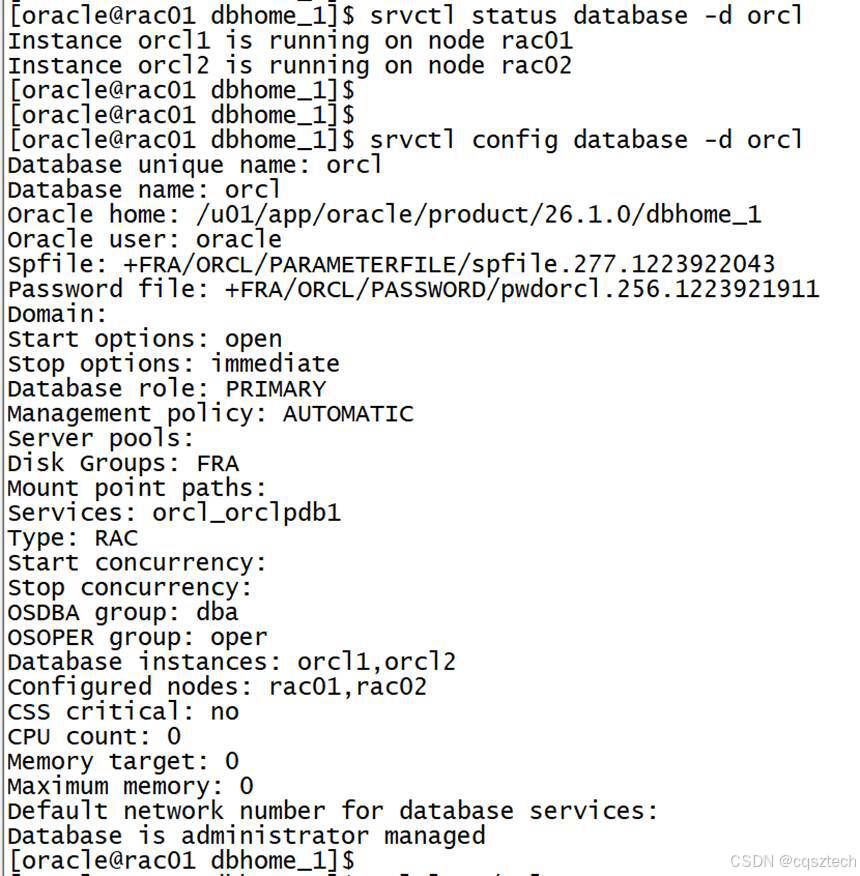
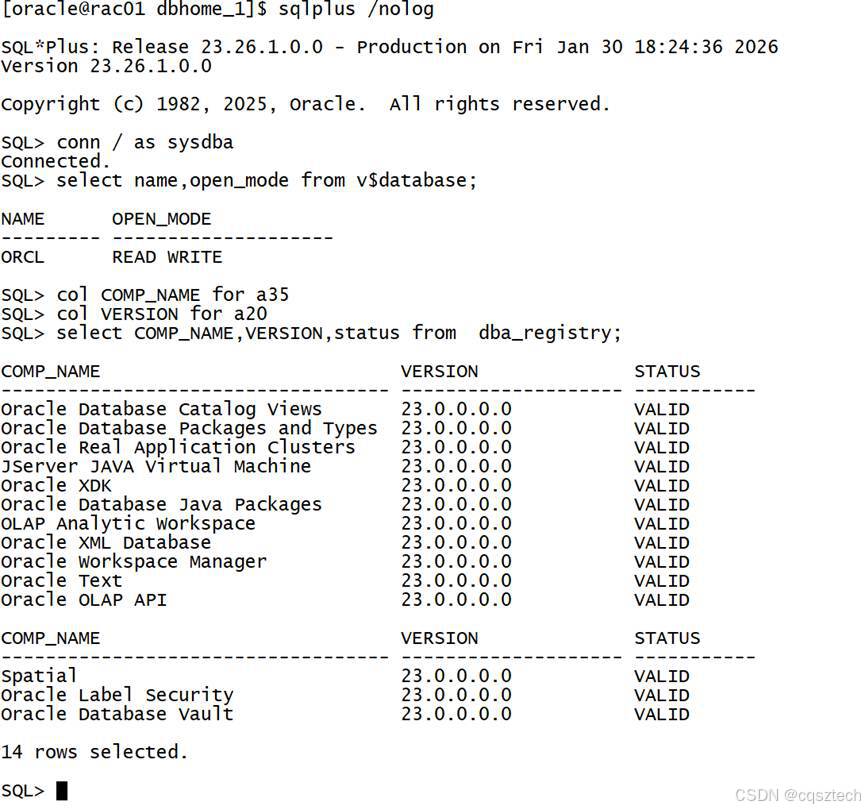
- 验证一下
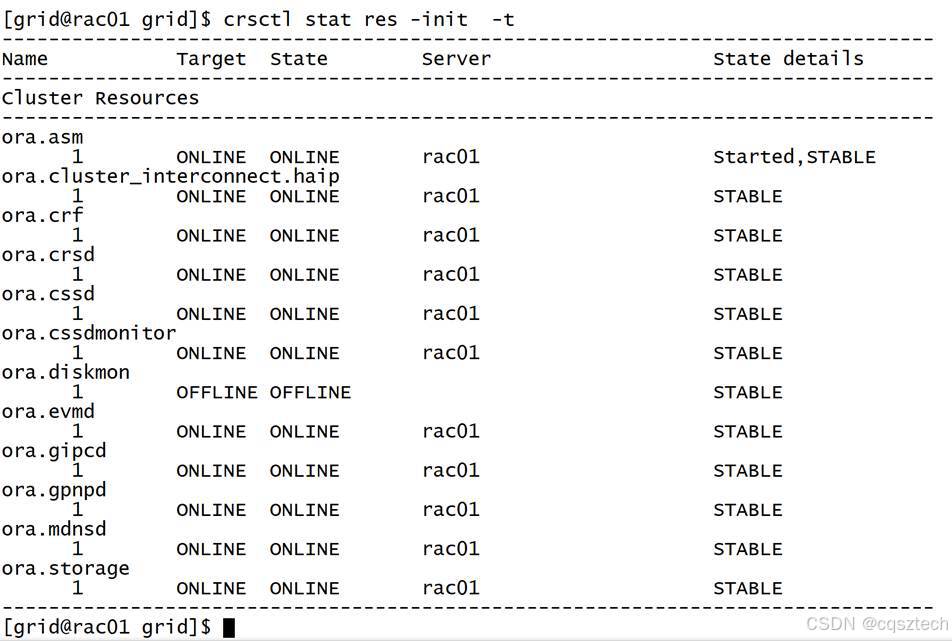
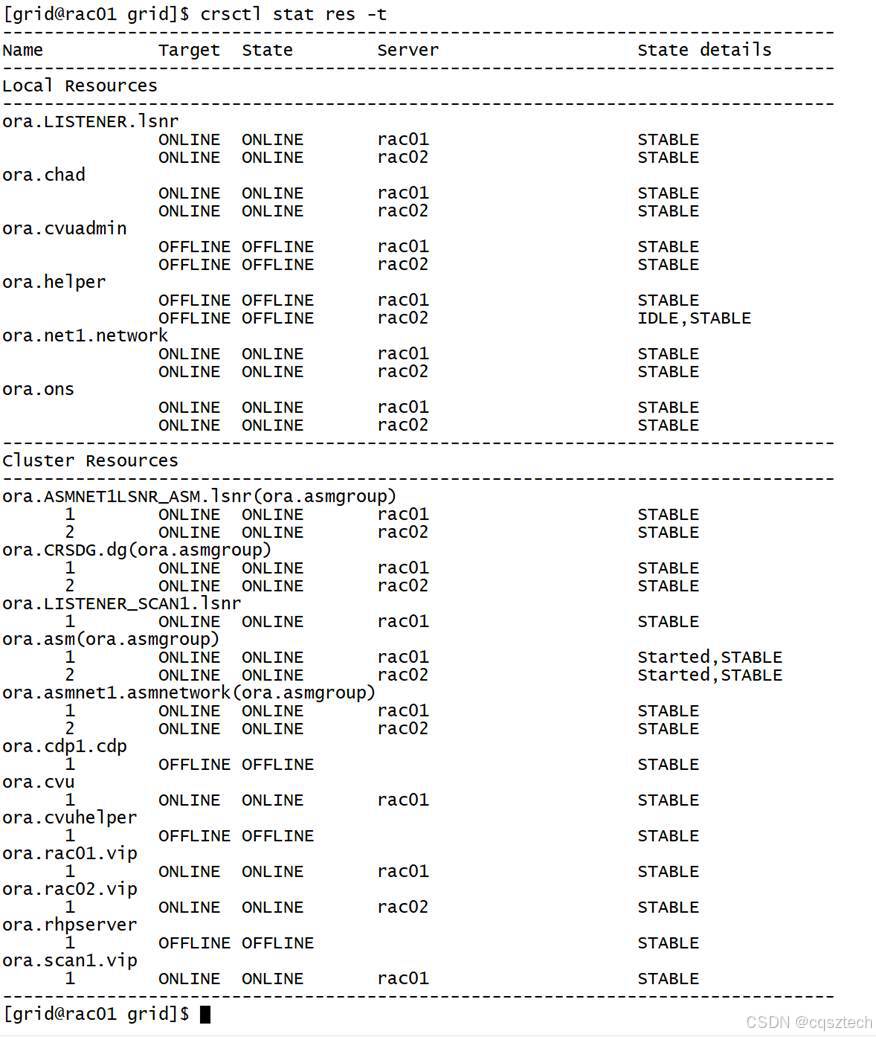

- ASM磁盘组创建
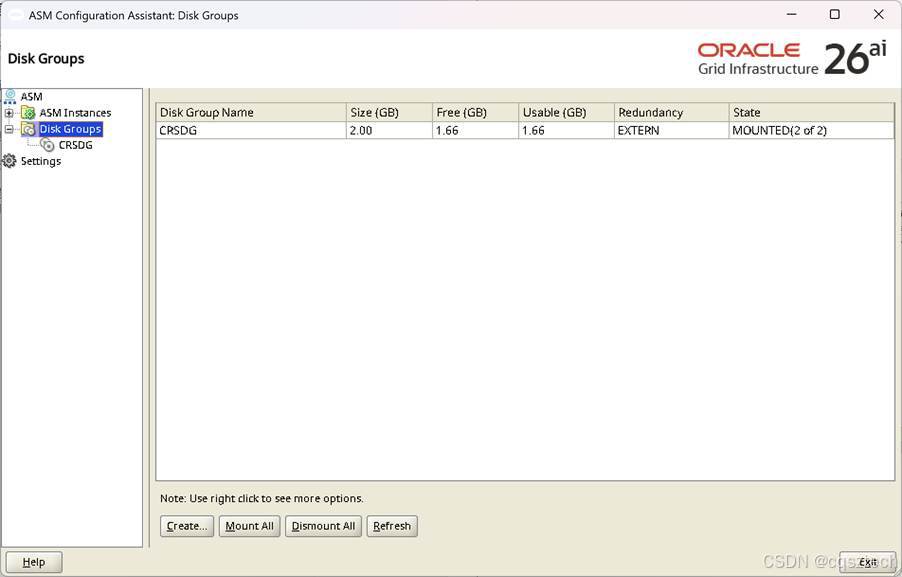
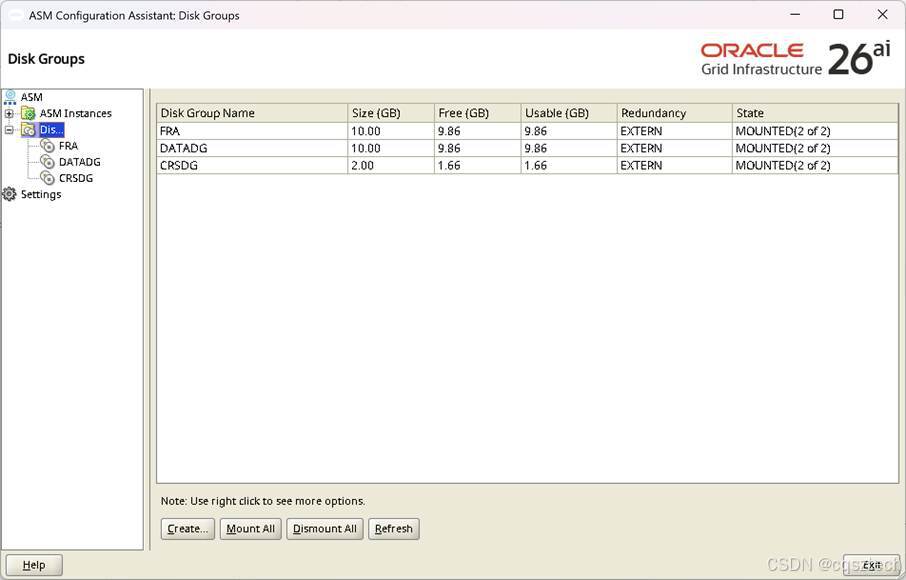
到此,ASM磁盘组创建完。
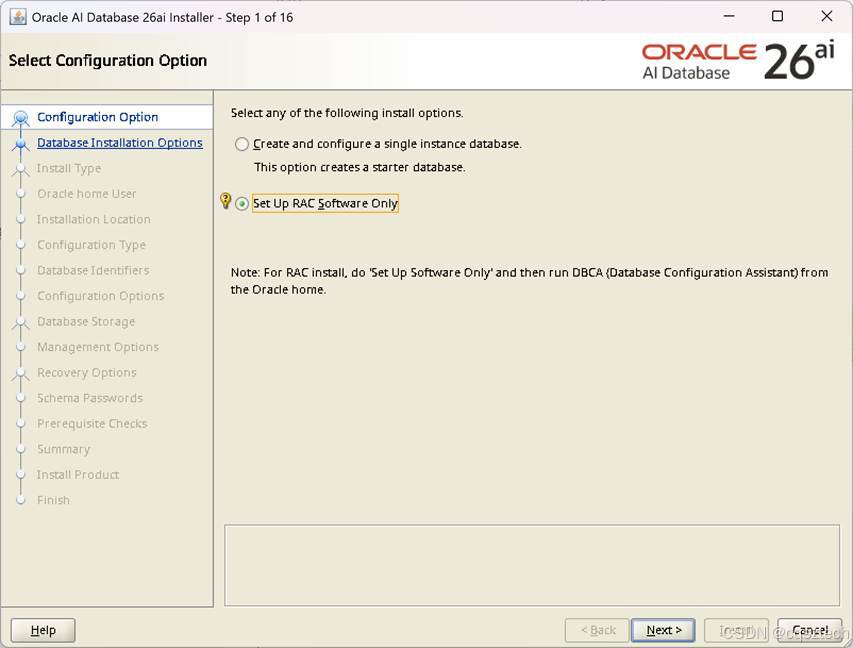
- RAC安装
- 解压
Su - oracle
unzip -d $ORACLE_HOME LINUX.X64_2326100_db_home.zip
-
- 安装RAC
cd $ORACLE_HOME/
export DISPLAY=192.168.133.1:0.0
./runInstaller

这里和 GI安装一样,使用手工去创建SSH对等性,否则要报错。
这里和GI安装一样,不勾选,手工去执行脚本
到此,软件安装完成
-
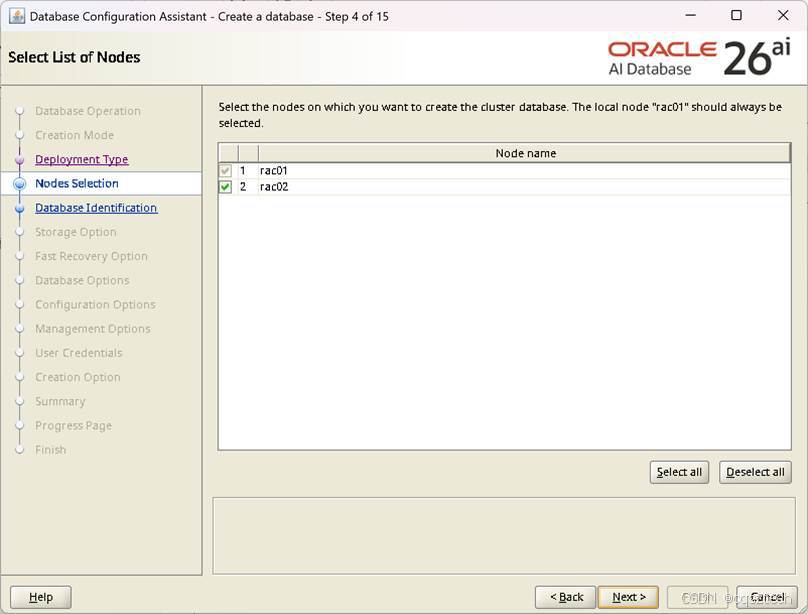
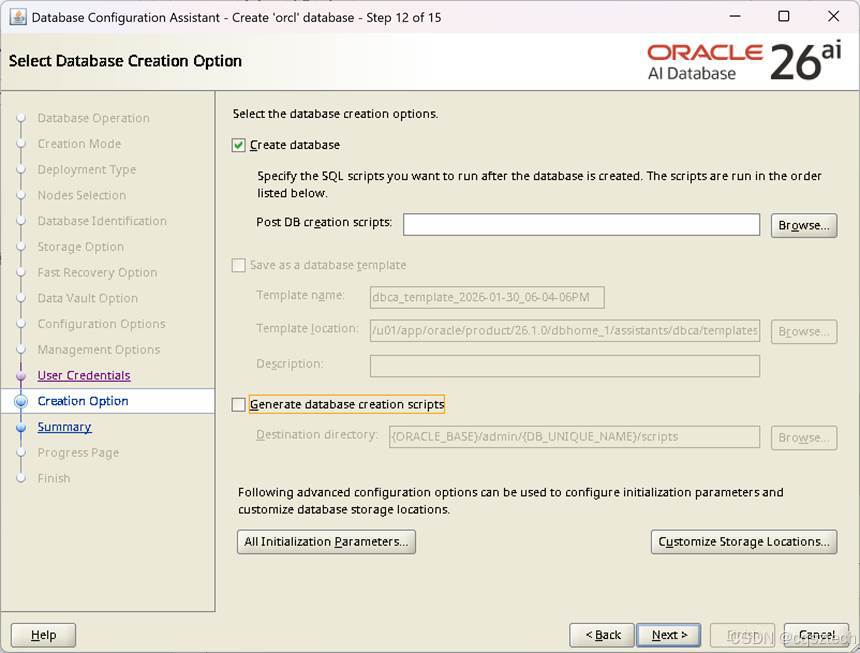
- DB创建
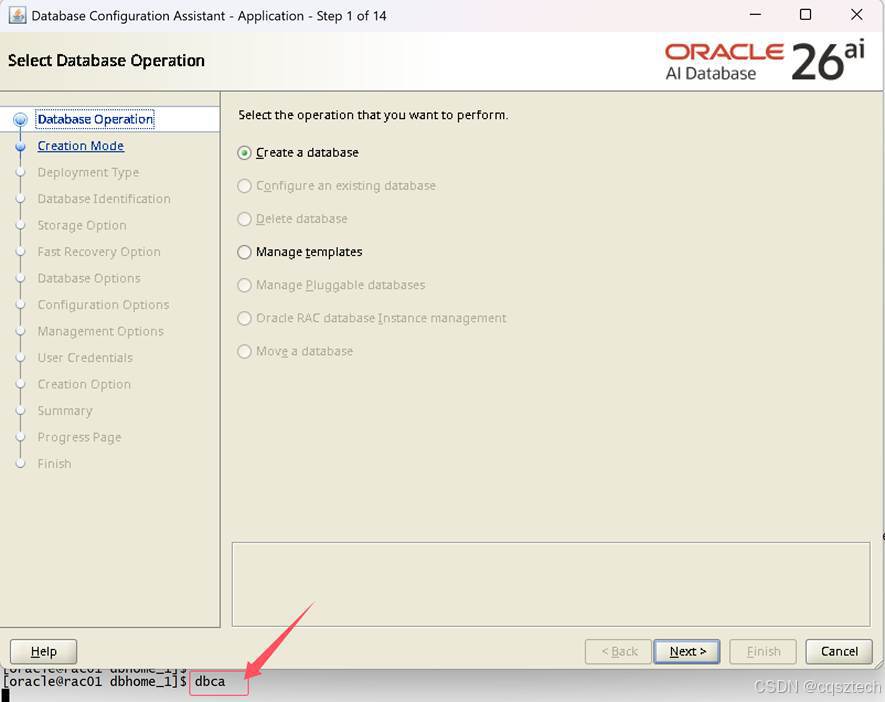
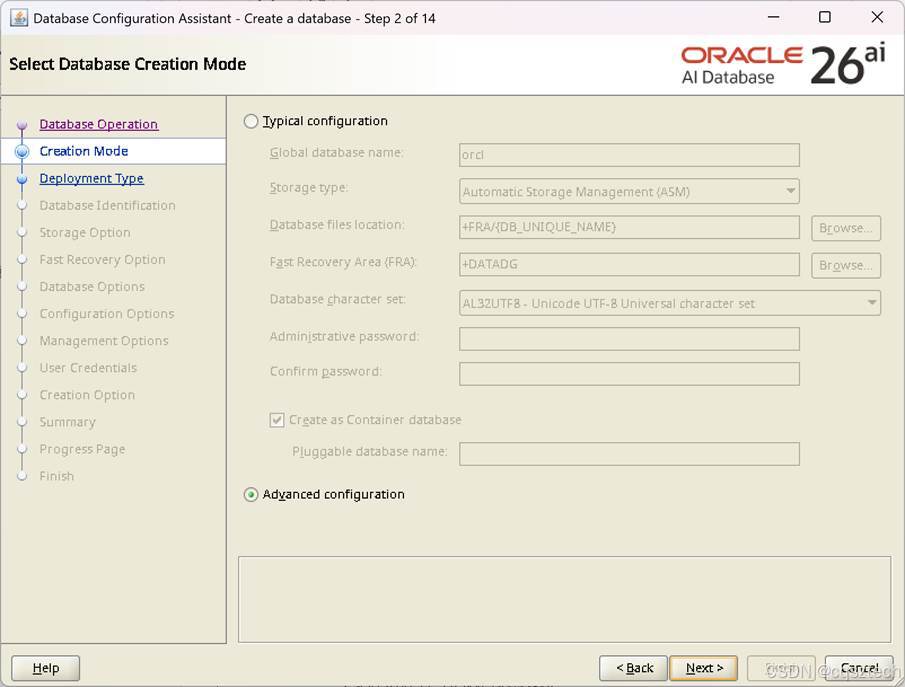
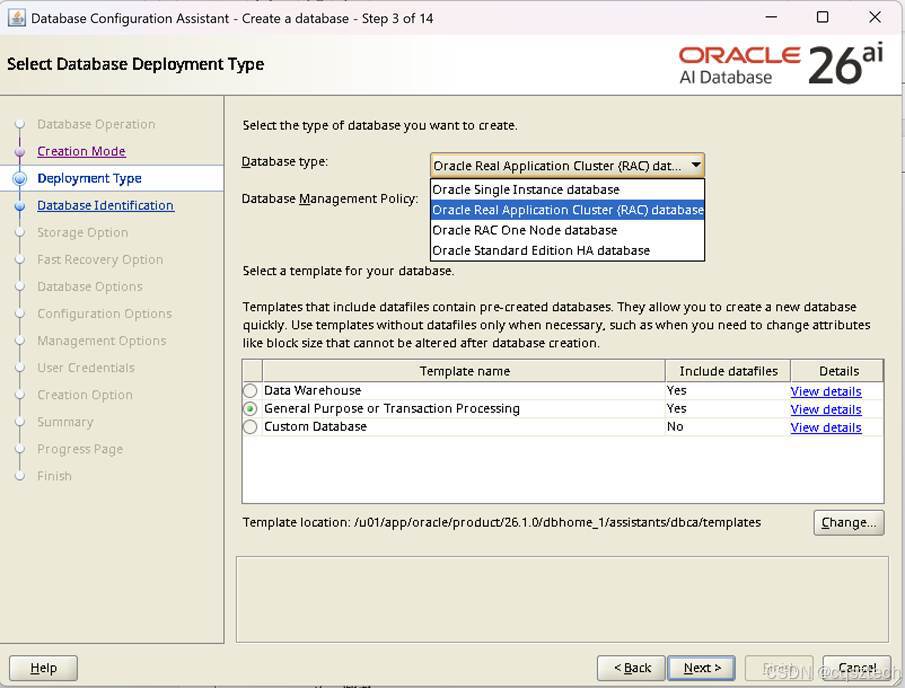
数据库类型中多了一个:标准版 ha

管理策略多了一个rank
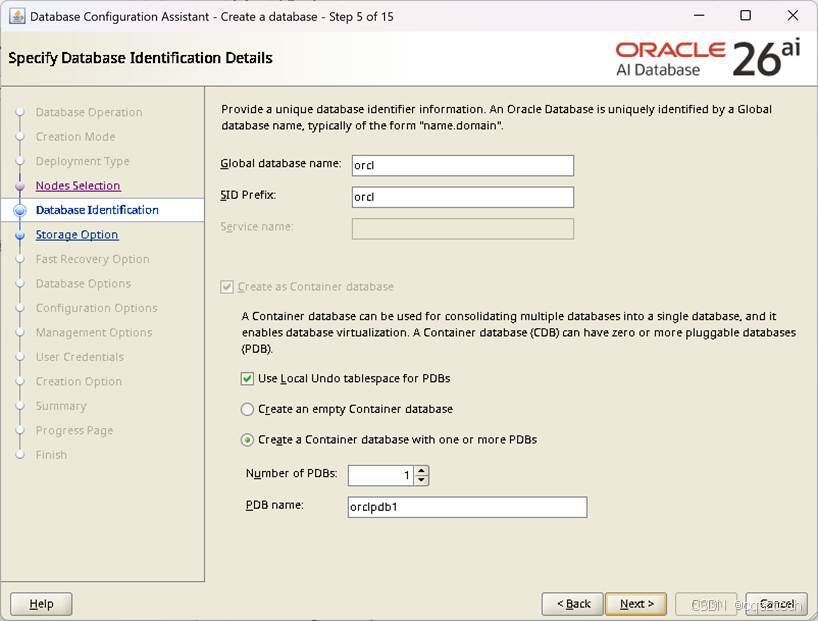

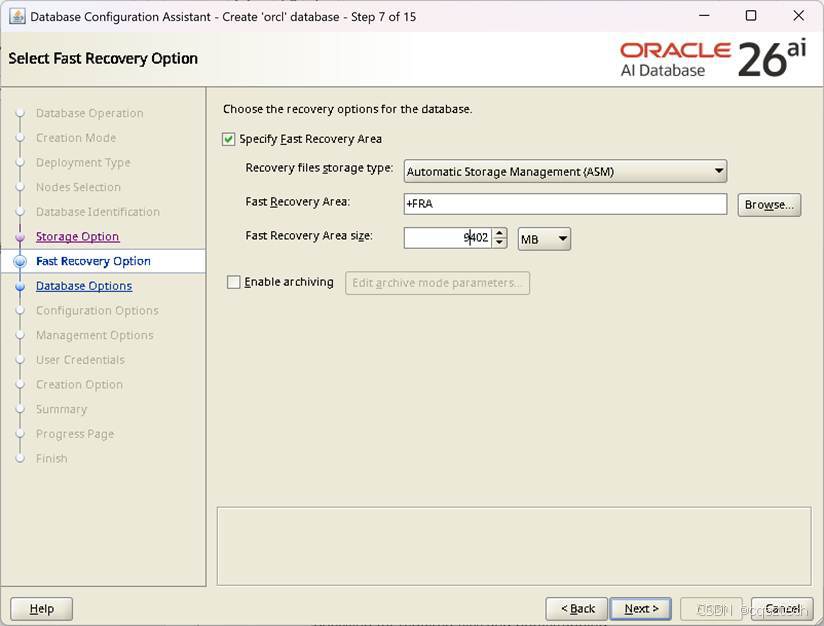
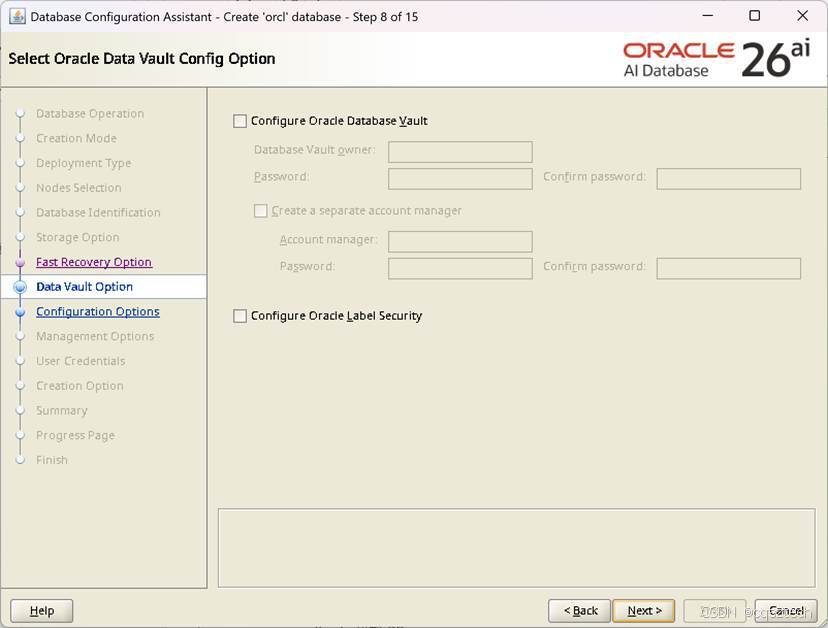
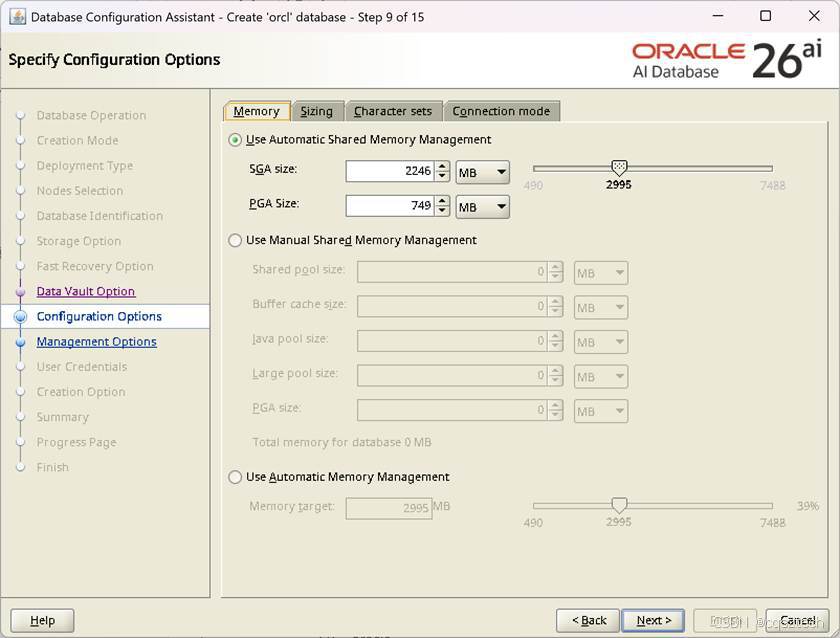
口令不符合标准,可以忽略。
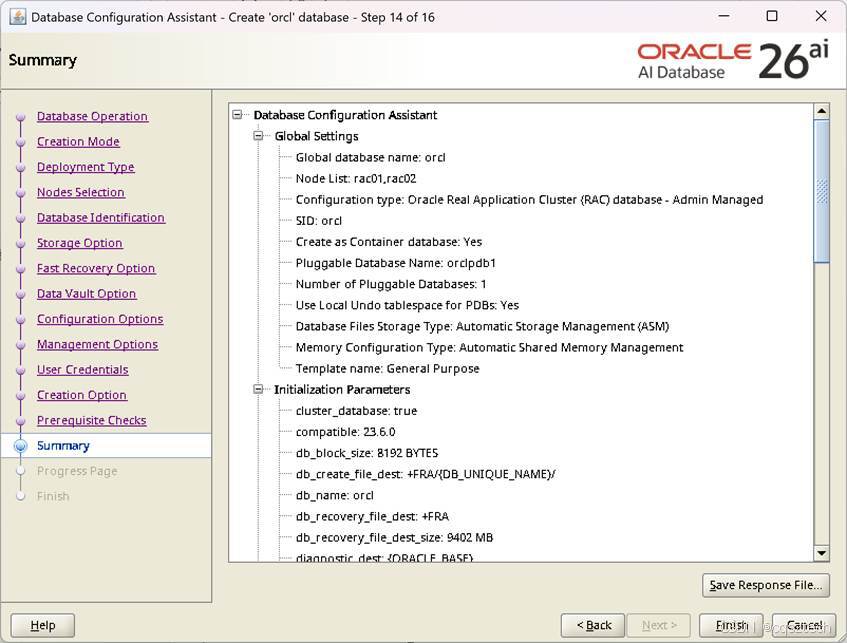
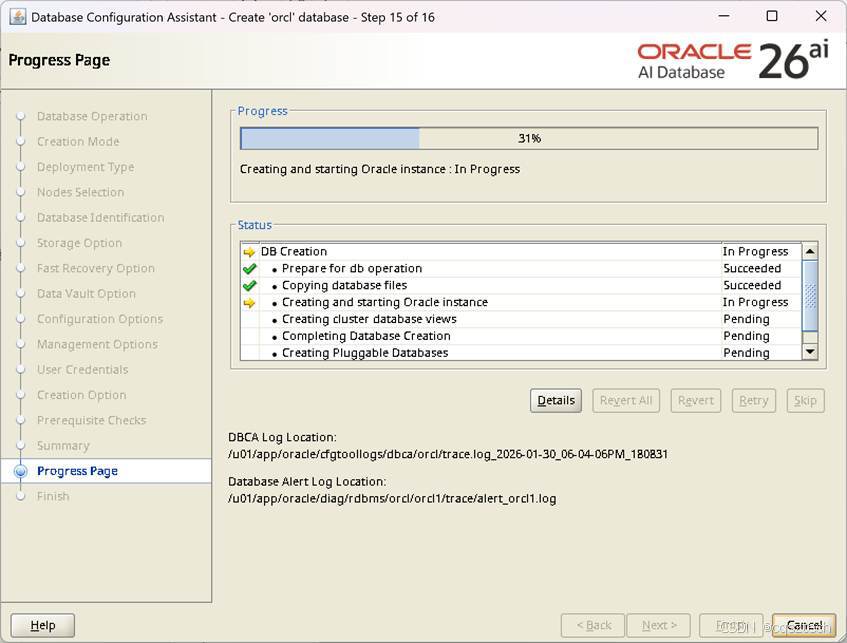
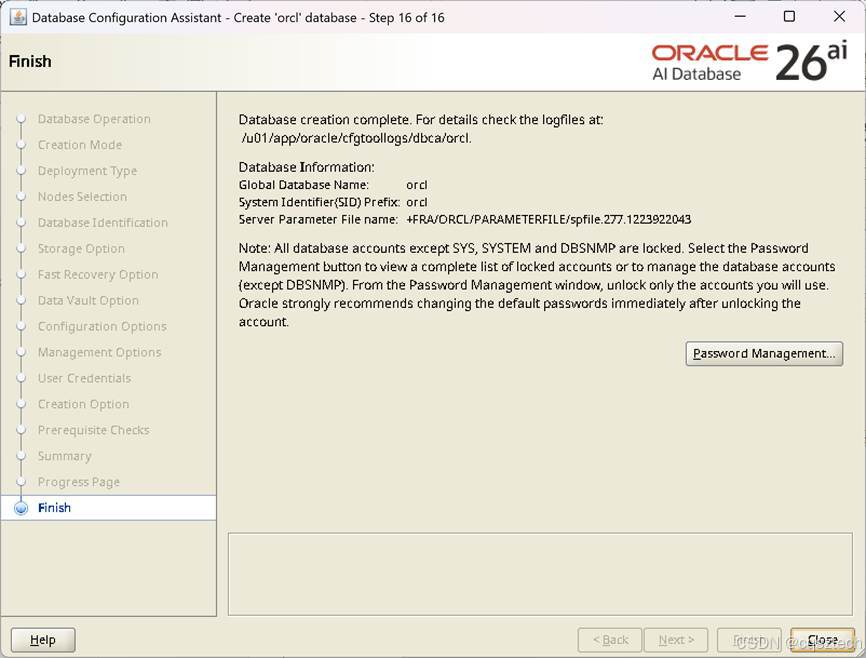


看来26ai,内部组件版本,还是 23
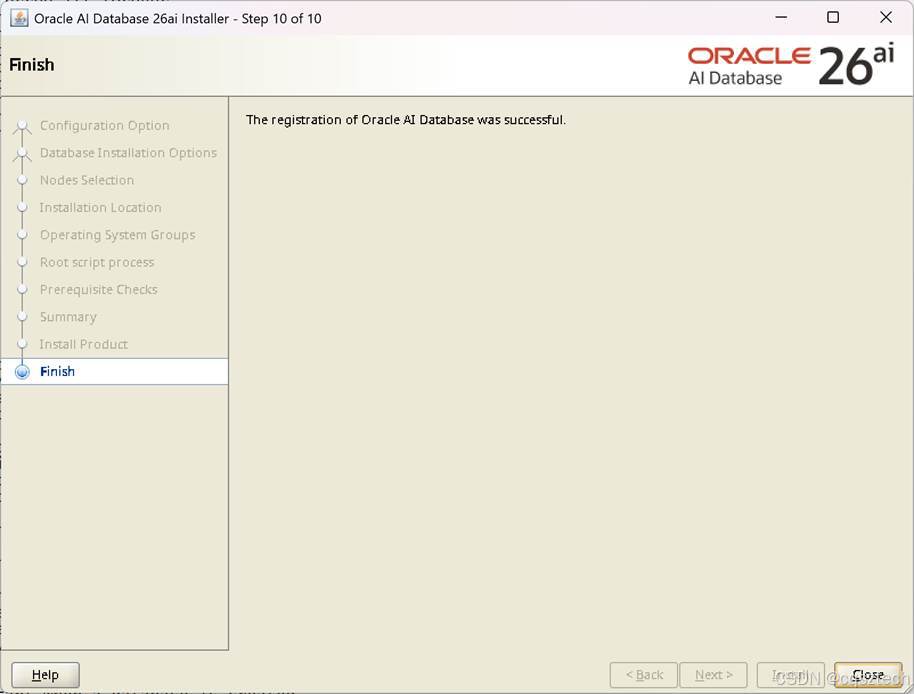
到此,26ai 的安装就结束了。
- 卸载
8.1 卸载db
Su -- oracle
Cd $ORACLE_HOME/deinstall
./deinstall
Checking for required files and bootstrapping ...
Please wait ...
Location of logs /u01/app/oraInventory/logs/
############ ORACLE DECONFIG TOOL START ############
######################### DECONFIG CHECK OPERATION START #########################
START Install check configuration
Checking for existence of the Oracle home location /u01/app/oracle/product/26.1.0/dbhome_1
Oracle Home type selected for deinstall is: Oracle Real Application Cluster Database
Oracle Base selected for deinstall is: /u01/app/oracle
Checking for existence of central inventory location /u01/app/oraInventory
Checking for existence of the Oracle Grid Infrastructure home /u01/app/26.1.0/grid
The following nodes are part of this cluster: rac01,rac02
Checking for sufficient temp space availability on node(s) : 'rac01'
END Install check configuration
Network Configuration check config START
Network de-configuration trace file location: /u01/app/oraInventory/logs/netdc_check2026-01-30_04-12-47PM.log
Network Configuration check config END
Database Check Configuration START
Database de-configuration trace file location: /u01/app/oraInventory/logs/databasedc_check2026-01-30_04-12-47PM.log
Use comma as separator when specifying list of values as input
Specify the list of database names that are configured in this Oracle home orcl:
For Database 'orcl'
RAC Database
The nodes on which this database has instances: rac01, rac02
The instance names: orcl1, orcl2
The local instance name on node: orcl1
The diagnostic destination location of the database: /u01/app/oracle/diag/rdbms/orcl
Storage type used by the Database: ASM
The details of database(s) orcl have been discovered automatically. Do you still want to modify the details of orcl database(s)? n:
Database Check Configuration END
######################### DECONFIG CHECK OPERATION END #########################
####################### DECONFIG CHECK OPERATION SUMMARY #######################
Oracle Grid Infrastructure Home is: /u01/app/26.1.0/grid
The following nodes are part of this cluster: rac01,rac02
The cluster node(s) on which the Oracle home deinstallation will be performed are:rac01
Oracle Home selected for deinstall is: /u01/app/oracle/product/26.1.0/dbhome_1
Inventory Location where the Oracle home registered is: /u01/app/oraInventory
The following databases were selected for de-configuration. The databases will be deleted and will not be useful upon de-configuration : orcl
Database unique name : orcl
Storage used : ASM
Do you want to continue (y - yes, n - no)? n: y
A log of this session will be written to: '/u01/app/oraInventory/logs/deinstall_deconfig2026-01-30_04-12-30-PM.out'
Any error messages from this session will be written to: '/u01/app/oraInventory/logs/deinstall_deconfig2026-01-30_04-12-30-PM.err'
######################## DECONFIG CLEAN OPERATION START ########################
START De-Configuring Global Service Manager
END De-Configuring Global Service Manager
Database de-configuration trace file location: /u01/app/oraInventory/logs/databasedc_clean2026-01-30_04-12-47PM.log
Database Clean Configuration START orcl
This operation may take few minutes.
Database Clean Configuration END orcl
Network Configuration clean config START
Network de-configuration trace file location: /u01/app/oraInventory/logs/netdc_clean2026-01-30_04-12-47PM.log
The network configuration has been cleaned up successfully.
Network Configuration clean config END
######################### DECONFIG CLEAN OPERATION END #########################
####################### DECONFIG CLEAN OPERATION SUMMARY #######################
Successfully de-configured the following database instances : orcl
There is no Oracle Grid Management database to de-configure in this Oracle home
Oracle database home OraDB23Home1 is de-configured successfully.
#######################################################################
############# ORACLE DECONFIG TOOL END #############
Using properties file /tmp/deinstall2026-01-30_04-12-23PM/response/deinstall_2026-01-30_04-12-30-PM.rsp
Location of logs /u01/app/oraInventory/logs/
############ ORACLE DEINSTALL TOOL START ############
####################### DEINSTALL CHECK OPERATION SUMMARY #######################
A log of this session will be written to: '/u01/app/oraInventory/logs/deinstall_deconfig2026-01-30_04-12-30-PM.out'
Any error messages from this session will be written to: '/u01/app/oraInventory/logs/deinstall_deconfig2026-01-30_04-12-30-PM.err'
######################## DEINSTALL CLEAN OPERATION START ########################
START Preparing for Deinstall
Setting LOCAL_NODE to rac01
Setting CLUSTER_NODES to rac01
Setting CRS_HOME to false
Setting oracle.installer.invPtrLoc to /tmp/deinstall2026-01-30_04-12-23PM/oraInst.loc
Setting oracle.installer.local to false
END Preparing for Deinstall
Oracle Universal Installer clean START
Detach Oracle home 'OraDB23Home1' from the central inventory on the local node : Done
Delete directory '/u01/app/oracle/product/26.1.0/dbhome_1' on the local node : Done
Failed to delete the directory '/u01/app/oracle'. Either user has no permission to delete or it is in use.
Delete directory '/u01/app/oracle' on the local node : Failed <<<<
You can find a log of this session at:
'/u01/app/oraInventory/logs/Cleanup2026-01-30_04-14-45PM.log'
Oracle Universal Installer clean END
START Oracle install clean
END Oracle install clean
######################### DEINSTALL CLEAN OPERATION END #########################
####################### DEINSTALL CLEAN OPERATION SUMMARY #######################
Successfully detached Oracle home 'OraDB23Home1' from the central inventory on the local node.
Successfully deleted directory '/u01/app/oracle/product/26.1.0/dbhome_1' on the local node.
Failed to delete directory '/u01/app/oracle' on the local node due to error : Either user has no permission to delete or file is in use.
Review the permissions and manually delete '/u01/app/oracle' on local node.
Oracle Universal Installer cleanup completed with errors.
Run 'rm -r /opt/ORCLfmap' as root on node(s) 'rac01' at the end of the session.
Review the permissions and contents of '/u01/app/oracle' on nodes(s) 'rac01'.
If there are no Oracle home(s) associated with '/u01/app/oracle', manually delete '/u01/app/oracle' and its contents.
Oracle deinstall tool successfully cleaned up temporary directories.
#######################################################################
############# ORACLE DEINSTALL TOOL END #############
8.2 卸载gi
Su -- grid
cd $ORACLE_HOME/deinstall
./deinstall
Checking for required files and bootstrapping ...
Please wait ...
Location of logs /tmp/deinstall2026-01-30_04-17-45PM/logs/
############ ORACLE DECONFIG TOOL START ############
######################### DECONFIG CHECK OPERATION START #########################
START Install check configuration
Checking for existence of the Oracle home location /u01/app/26.1.0/grid
Oracle Home type selected for deinstall is: Oracle Grid Infrastructure for a Cluster
Oracle Base selected for deinstall is: /u01/app/grid
Checking for existence of central inventory location /u01/app/oraInventory
Checking for existence of the Oracle Grid Infrastructure home /u01/app/26.1.0/grid
The following nodes are part of this cluster: rac01,rac02
Active Remote Nodes are rac02
Checking for sufficient temp space availability on node(s) : 'rac01,rac02'
END Install check configuration
Traces log file: /tmp/deinstall2026-01-30_04-17-45PM/logs//crsdc_2026-01-30_04-18-04-PM.log
Network Configuration check config START
Network de-configuration trace file location: /tmp/deinstall2026-01-30_04-17-45PM/logs/netdc_check2026-01-30_04-18-09PM.log
Specify all RAC listeners (do not include SCAN listener) that are to be de-configured. Enter .(dot) to deselect all. LISTENER:.
At least one listener from the discovered listener list LISTENER is missing in the specified listener list \[\]. The Oracle home will be cleaned up, so all the listeners will not be available after deinstall. If you want to remove a specific listener, please use Oracle Net Configuration Assistant instead. Do you want to continue? (y|n) n: y
Network Configuration check config END
Asm Check Configuration START
ASM de-configuration trace file location: /tmp/deinstall2026-01-30_04-17-45PM/logs/asmcadc_check2026-01-30_04-18-09PM.log
Automatic Storage Management (ASM) instance is detected in this Oracle home /u01/app/26.1.0/grid.
ASM Diagnostic Destination : /u01/app/grid
ASM Diskgroups : +CRSDG,+DATADG
ASM diskstring : /dev/asm*
Diskgroups will be dropped
De-configuring ASM will drop all the diskgroups and their contents at cleanup time. This will affect all of the databases and ACFS that use this ASM instance(s).
If you want to retain the existing diskgroups or if any of the information detected is incorrect, you can modify by entering 'y'. Do you want to modify above information (y|n) n:
######################### DECONFIG CHECK OPERATION END #########################
####################### DECONFIG CHECK OPERATION SUMMARY #######################
Oracle Grid Infrastructure Home is: /u01/app/26.1.0/grid
The following nodes are part of this cluster: rac01,rac02
Active Remote Nodes are rac02
The cluster node(s) on which the Oracle home deinstallation will be performed are:rac01,rac02
Oracle Home selected for deinstall is: /u01/app/26.1.0/grid
Inventory Location where the Oracle home registered is: /u01/app/oraInventory
ASM instance will be de-configured from this Oracle home
Do you want to continue (y - yes, n - no)? n: y
A log of this session will be written to: '/tmp/deinstall2026-01-30_04-17-45PM/logs/deinstall_deconfig2026-01-30_04-17-52-PM.out'
Any error messages from this session will be written to: '/tmp/deinstall2026-01-30_04-17-45PM/logs/deinstall_deconfig2026-01-30_04-17-52-PM.err'
######################## DECONFIG CLEAN OPERATION START ########################
ASM de-configuration trace file location: /tmp/deinstall2026-01-30_04-17-45PM/logs/asmcadc_clean2026-01-30_04-18-09PM.log
ASM Clean Configuration START
ASM Clean Configuration END
Network Configuration clean config START
Network de-configuration trace file location: /tmp/deinstall2026-01-30_04-17-45PM/logs/netdc_clean2026-01-30_04-18-09PM.log
The network configuration has been cleaned up successfully.
Network Configuration clean config END
---------------------------------------->
The deconfig command below can be executed in parallel on all the remote nodes. Execute the command on the local node after the execution completes on all the remote nodes.
Run the following command as the root user or the administrator on node "rac02".
/u01/app/26.1.0/grid/crs/install/rootcrs.sh -force -deconfig -paramfile "/tmp/deinstall2026-01-30_04-17-45PM/response/deinstall_OraGI23Home1.rsp"
Run the following command as the root user or the administrator on node "rac01".
/u01/app/26.1.0/grid/crs/install/rootcrs.sh -force -deconfig -paramfile "/tmp/deinstall2026-01-30_04-17-45PM/response/deinstall_OraGI23Home1.rsp" -lastnode
Press Enter after you finish running the above commands
<----------------------------------------