系统环境
ubuntu 22.04
docker
环境准备
ECS密码 未解决
安装jdk
shell
sudo apt update
sudo apt install openjdk-21-jdk

java --version
javac --version

which java # 查看java命令所在位置
which javac # 查看javac命令所在位置
安装docker
shell
# 装依赖的
sudo apt update
sudo apt install -y \
    ca-certificates \
    curl \
    gnupg \
    lsb-release

echo   "deb [arch=$(dpkg --print-architecture) signed-by=/etc/apt/keyrings/docker.gpg] https://mirrors.aliyun.com/docker-ce/linux/ubuntu \
  $(lsb_release -cs) stable" | sudo tee /etc/apt/sources.list.d/docker.list > /dev/null

# 下载密钥文件的,放在/etc/apt/keyrings/docker.gpg下面


    # 换源,换成阿里云的
    echo \
  "deb [arch=$(dpkg --print-architecture) signed-by=/etc/apt/keyrings/docker.gpg] https://mirrors.aliyun.com/docker-ce/linux/ubuntu \
  $(lsb_release -cs) stable" | sudo tee /etc/apt/sources.list.d/docker.list > /dev/null
sudo apt install -y docker-ce docker-ce-cli containerd.io docker-buildx-plugin docker-compose-plugin
镜像源配置问题,百度搜索一下docker 镜像源 2025 最新,然后你复制到云服务器里面去,ping一下,看通不通,搞多个
配置镜像源
shell
sudo tee /etc/docker/daemon.json <<-'EOF'
{
  "registry-mirrors": [
    "https://docker.m.daocloud.io",
    "https://docker.1panel.live",
    "https://docker.xuanyuan.me",
    "https://registry.docker-cn.com",
    "https://ustc-edu-cn.mirror.aliyuncs.com"
  ]
}
EOF
sudo systemctl restart docker
  ...
查看是否生效
shell
docker info | grep -A10 "Mirrors"
 Registry Mirrors:
  https://docker.m.daocloud.io/
  https://docker.1panel.live/
  https://docker.xuanyuan.me/
  https://registry.docker-cn.com/
  https://ustc-edu-cn.mirror.aliyuncs.com/
 Live Restore Enabled: false
 Firewall Backend: iptables
docker安装mysql8
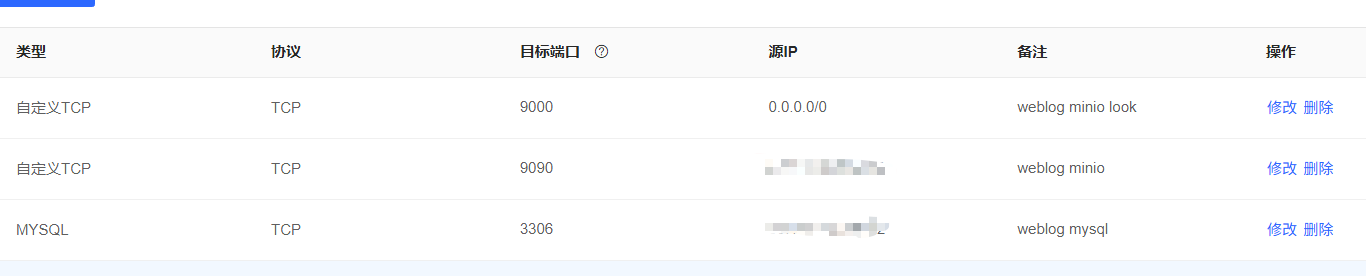
注意,因为要开启3306端口,所在ECS中的
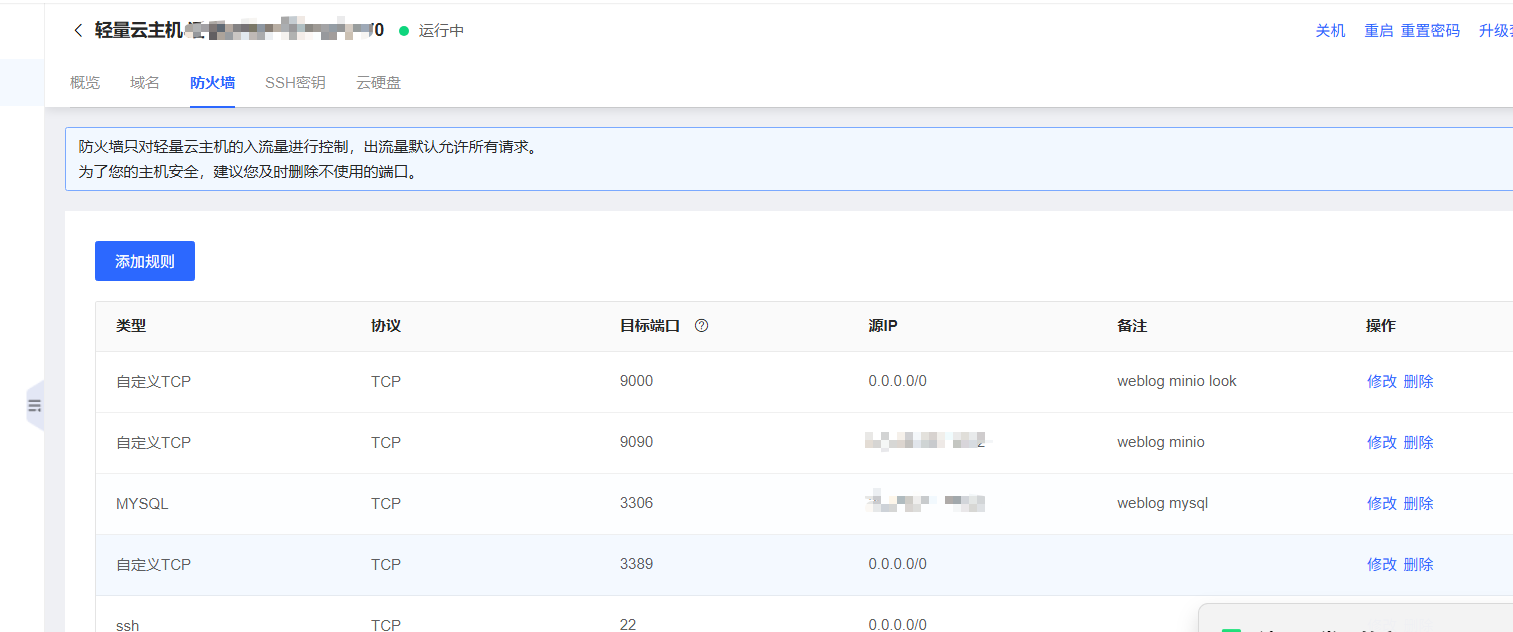
查看私网地址转换公网地址
把你现在的IP一栏后面IP地址填到ECS中去
shell
# 创建数据与配置目录
mkdir -p /docker/mysql/data
mkdir -p /docker/mysql/config
mkdir -p /docker/mysql/config/conf.d  # ✅ 关键:手动创建 conf.d 目录

vim /docker/mysql/config/my.cnf
这就是一个简单的东西
text
[mysqld]
character-set-server=utf8mb4
collation-server=utf8mb4_unicode_ci
default-time-zone='+08:00'
shell
docker run -d \
  --name mysql8 \
  -p 3306:3306 \
  -v /docker/mysql/config:/etc/mysql \
  -v /docker/mysql/data:/var/lib/mysql \
  -e MYSQL_ROOT_PASSWORD=你的密码\
  mysql:8.0
docker ps # 查看是否运行
docker logs mysql8 # 查看日志
开启远程访问
shell
docker exec -it mysql8 mysql -uroot -p你的密码
-- 1. 允许 root 用户从任意 IP 地址访问(% 代表任意主机)这一步如果已有就跳过
CREATE USER 'root'@'%' IDENTIFIED BY '123456';

-- 2. 给这个 root@'%' 用户授予所有数据库的全部权限
GRANT ALL PRIVILEGES ON *.* TO 'root'@'%' WITH GRANT OPTION;

-- 3. 刷新权限,让设置立即生效
FLUSH PRIVILEGES;
然后你就可以试了,mysql -uroot -p你的密码 -h 你的ECS服务器的公网地址
本地数据库数据上云
idea中有一个sql generate,直接生成表结构
数据按照如下操作
在你的本机上操作
shell
mysqldump -h 127.0.0.1 -u 你的本地数据库用户名 -p \
  --no-create-info \
  --skip-triggers \
  --compact \
  --extended-insert \
  你的本地数据库名 > data-only.sql
你把data-only.sql传到服务器上面去,我用的是FinalShell,我上传到了/tmp/data-only.sql
在ECS的终端中执行
bash
# 1. 将本地的 data-only.sql 拷贝到容器内的 /tmp/
docker cp /root/data-only.sql mysql8:/tmp/data-only.sql

# 2. 进入 MySQL 容器命令行
docker exec -it mysql8 mysql -uroot -p你的密码

# 3. 在 MySQL 命令行中执行以下 SQL:
USE 你的数据库名字;
source /tmp/data-only.sql;
会让你输入密码的哈
装minio
也差不多,就是要在ECS的防火墙中把9090端口打开,并且只允许你自己访问,与前面mysql的一样,就是输入那个网址,看公网地址
它查看图片是9000
它登录的那个端口是9090/login
spring打包
因为我有两套配置,一套是dev,一套是prod,就是你需要把prod的mysql的地址换成ECS的私网地址
,通过ifconfig来查看,另外为了防止出现中文乱码
yml
url: jdbc:mysql://你的私网地址:3306/你的数据库名字?useUnicode=true&useSSL=false&serverTimezone=Asia/Shanghai&allowPublicKeyRetrieval=truemaven clean 跳过测试
maven package 跳过测试
把jar包上传到服务器中去,我这里的路径是/app/myblog,
在这下面输入如下命令
shell
vim startup.sh
APP_NAME=weblog-springboot-0.0.1-SNAPSHOT.jar

#使用说明,用来提示输入参数
usage() {
    echo "Usage: sh 执行脚本.sh [start|stop|restart|status]"
    exit 1
}

#检查程序是否在运行
is_exist(){
    pid=$(ps -ef | grep $APP_NAME | grep -v grep | awk '{print $2}')
    #如果不存在返回1,存在返回0
    if [ -z "${pid}" ]; then
        return 1
    else
        return 0
    fi
}

#启动方法
start(){
    is_exist
    if [ $? -eq "0" ]; then
        echo "${APP_NAME} is already running. pid=$pid ."
    else
        LOG_DIR="./logs"
        mkdir -p $LOG_DIR
        TIMESTAMP=$(date +"%Y-%m-%d-%H-%M-%S")
        LOG_FILE="$LOG_DIR/weblog-$TIMESTAMP.log"
        nohup java -jar $APP_NAME -Xms200m -Xmx200m --spring.profiles.active=prod > $LOG_FILE 2>&1 &
        echo "${APP_NAME} started. Logs are being written to $LOG_FILE"
    fi
}

#停止方法
stop(){
    is_exist
    if [ $? -eq "0" ]; then
        kill -9 $pid
        echo "${APP_NAME} stopped. Pid was $pid"
    else
        echo "${APP_NAME} is not running"
    fi
}

#输出运行状态
status(){
    is_exist
    if [ $? -eq "0" ]; then
        echo "${APP_NAME} is running. Pid is $pid"
    else
        echo "${APP_NAME} is NOT running."
    fi
}

#重启
restart(){
    stop
    start
}

#根据输入参数,选择执行对应方法,不输入则执行使用说明
case "$1" in
    "start")
        start
        ;;
    "stop")
        stop
        ;;
    "status")
        status
        ;;
    "restart")
        restart
        ;;
    *)
        usage
        ;;
esac
保存退出,之后直接 chmod +x startup.sh
前端打包
npm run build
nginx
这个也是和mysql装的差不多,也要改ECS防火墙
改革配置,就是在conf.d/default.conf的东西
shell
location /api/ {
   proxy_pass http://你的ECS的私网地址:8080/;  # 注意结尾的 /,会去掉 /api
   proxy_set_header Host $host;
   proxy_set_header X-Real-IP $remote_addr;
   proxy_set_header X-Forwarded-For $proxy_add_x_forwarded_for;
   proxy_set_header X-Forwarded-Proto $scheme;
   }                                                                         }
压缩的话,要改nginx.conf
shell
user  nginx;
worker_processes  1;

error_log  /var/log/nginx/error.log warn;
pid        /var/run/nginx.pid;


events {
    worker_connections  1024;
}


http {
    include       /etc/nginx/mime.types;
    default_type  application/octet-stream;

    log_format  main  '$remote_addr - $remote_user [$time_local] "$request" '
                      '$status $body_bytes_sent "$http_referer" '
                      '"$http_user_agent" "$http_x_forwarded_for"';

    access_log  /var/log/nginx/access.log  main;
    sendfile        on;
    #tcp_nopush     on;
    keepalive_timeout  65;
    gzip  on;
    gzip_min_length 1k;
    gzip_buffers 32 4k;
    gzip_http_version 1.1;
    gzip_comp_level 6;
    gzip_types text/plain application/x-javascript text/css application/xml text/javascript application/x-httpd-php application/javascript application/json;
    gzip_disable "MSIE [1-6]\."
    gzip_vary on;
    gzip_static on;
    include /etc/nginx/conf.d/*.conf;
}
问题
idea连接不上ecs中docker中的mysql 超时
mysql启动正常,有一个用于远程连接的用户,用户密码也是对的,端口映射正常
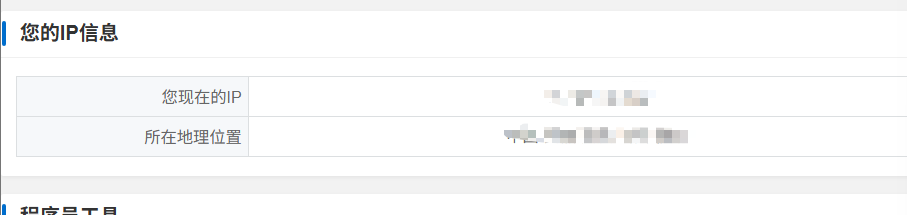
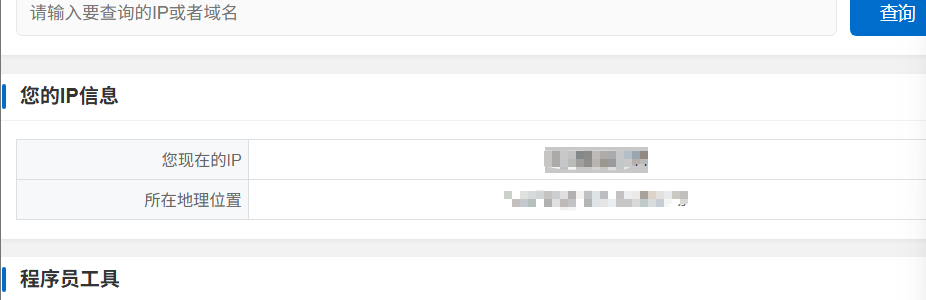
由于本机的私网地址转换为公网地址,这个公网地址不是固定的,又因为我在ECS防火墙中设置了只能由我上一个公网地址才能连接mysql,就导致了超时,解决办法就是
你把下面图片中的IP地址填到ECS中防火墙中去
docker重启
你docker重启后之前所有的容器全部停止了,你需要手动开启,要不然就会出现mysql数据库连接异常的问题