cargo 是官方的 Rust 包管理工具。 它有很多非常有用的功能来提高代码质量和开发人员的开发效率! 这些功能包括:
- 依赖管理和与 crates.io(官方 Rust 包注册服务)集成
- 方便的单元测试
- 方便的基准测试
本章将介绍一些快速入门的基础知识,不过你可以在 cargo 官方手册中找到详细内容。
12.1 依赖
大多数程序都会依赖于某些库。如果你曾经手动管理过库依赖,那么你就知道这会带来的极大的痛苦。幸运的是,Rust 的生态链标配 cargo 工具!cargo 可以管理项目的依赖关系。
下面创建一个新的 Rust 项目:
# 二进制可执行文件
cargo new foo

# 或者库
cargo new --lib foo
对于本章的其余部分,我们选定创建的都是二进制可执行文件而不是库,但所有的概念都是相同的。
完成上述命令后,将看到如下内容:
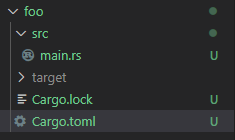
foo
├── Cargo.toml
└── src
    └── main.rs
main.rs 是新项目的入口源文件------这里没什么新东西。 默认的代码如下:
fn main() {
    println!("Hello, world!");
}
Cargo.toml 是本项目(foo)的 cargo 的配置文件。 浏览 Cargo.toml 文件,将看到类似以下的的内容:
[package]
name = "foo"
version = "0.1.0"
edition = "2024"
authors = ["mark"]

[dependencies]
package 下面的 name 字段表明项目的名称。 如果您发布 crate(后面将做更多介绍),那么 crates.io 将使用此字段标明的名称。 这也是编译时输出的二进制可执行文件的名称。
version 字段是使用语义版本控制(Semantic Versioning)的 crate 版本号。
authors 字段表明发布 crate 时的作者列表。
dependencies 这部分可以让你为项目添加依赖。
编译运行:
PS F:\rustproject\rustbyexample\chapter12> cargo new foo
    Creating binary (application) `foo` package
note: see more `Cargo.toml` keys and their definitions at https://doc.rust-lang.org/cargo/reference/manifest.html
PS F:\rustproject\rustbyexample\chapter12> cd foo
PS F:\rustproject\rustbyexample\chapter12\foo> cargo build
   Compiling foo v0.1.0 (F:\rustproject\rustbyexample\chapter12\foo)
    Finished `dev` profile [unoptimized + debuginfo] target(s) in 0.17s
PS F:\rustproject\rustbyexample\chapter12\foo> cargo run
    Finished `dev` profile [unoptimized + debuginfo] target(s) in 0.00s
     Running `target\debug\foo.exe`
Hello, world!
PS F:\rustproject\rustbyexample\chapter12\foo>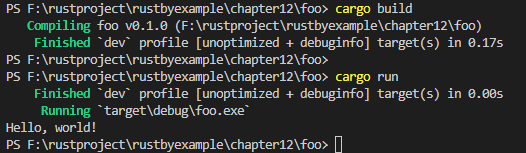
举个例子,假设我们希望程序有一个很棒的命令行界面(command-line interface,CLI))。 你可以在 crates.io(官方的 Rust 包注册服务)上找到很多很棒的 Rust 包。其中一个受欢迎的包是 clap(译注:一个命令行参数的解析器)。在撰写本文时,clap 最新发布的版本为 2.27.1。要在程序中添加依赖,我们可以很简单地在 Cargo.toml 文件中的 dependencies 项后面将以下内容添加进来 :clap = "2.27.1"。当然,在 main.rs 文件中写上 extern crate clap,就和平常一样。 就是这样!你就可以在程序中开始使用 clap 了。
cargo 还支持其他类型的依赖。 下面是一个简单的示例:
[package]
name = "foo"
version = "0.1.0"
authors = ["mark"]

[dependencies]
clap = "2.27.1" # 来自 crates.io
rand = { git = "https://github.com/rust-lang-nursery/rand" } # 来自网上的仓库
#bar = { path = "../bar" } # 来自本地文件系统的路径
cargo 不仅仅是一个包依赖管理器。Cargo.toml 的所有可用配置选项都列在 格式规范中。
要构建我们的项目,我们可以在项目目录中的任何位置(包括子目录!)执行 cargo build。我们也可以执行 cargo run 来构建和运行。请注意,这些命令将处理所有依赖,在需要时下载 crate,并构建所有内容,包括 crate。(请注意,它只重新构建尚未构建的内容,这和 make 类似)。
编译运行:
PS F:\rustproject\rustbyexample\chapter12\foo> cargo build
   Compiling winapi v0.3.9
   Compiling cfg-if v1.0.4
   Compiling rand_core v0.10.0
   Compiling cpufeatures v0.3.0
   Compiling unicode-width v0.1.14
   Compiling strsim v0.8.0
   Compiling bitflags v1.3.2
   Compiling vec_map v0.8.2
   Compiling chacha20 v0.10.0
   Compiling textwrap v0.11.0
   Compiling rand v0.10.0 (https://github.com/rust-lang-nursery/rand#87638fb7)
   Compiling atty v0.2.14
   Compiling clap v2.34.0
   Compiling foo v0.1.0 (F:\rustproject\rustbyexample\chapter12\foo)
    Finished `dev` profile [unoptimized + debuginfo] target(s) in 2.98s
PS F:\rustproject\rustbyexample\chapter12\foo> cargo run
    Finished `dev` profile [unoptimized + debuginfo] target(s) in 0.02s
     Running `target\debug\foo.exe`
Hello, world!
PS F:\rustproject\rustbyexample\chapter12\foo>
瞧!这里的所有都和 cargo 有关!
12.2 约定规范
在上一小节中,我们看到了以下目录层次结构:
foo
├── Cargo.toml
└── src
    └── main.rs
假设我们要在同一个项目中有两个二进制可执行文件。 那要怎样做呢?
很显然,cargo 支持这一点。正如我们之前看到的,默认二进制名称是 main,但可以通过将文件放在 bin/ 目录中来添加其他二进制可执行文件:
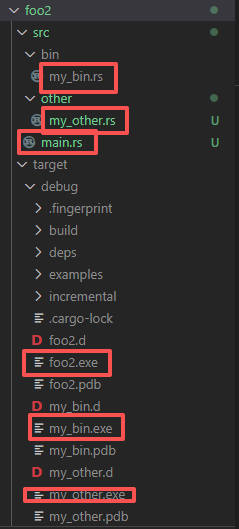
foo2
├── Cargo.toml
└── src
    ├── main.rs
    |── bin
    |    └── my_bin.rs
    └── other
         └── my_other.rs
为了使得 cargo 编译或运行这个二进制可执行文件而不是默认或其他二进制可执行文件,我们只需给 cargo 增加一个参数 --bin my_bin,其中 my_bin 是我们想要使用的二进制可执行文件的名称。
src/main.rs文件内容:
fn main() {
    println!("Hello, world!");
}
src/bin/my_bin.rs文件内容:
fn main() {
    println!("Hello, this is my_bin");
}
src/bin/my_other.rs文件内容:
fn main() {
    println!("Hello, this is my_other");
}
编译:
PS F:\rustproject\rustbyexample\chapter12> cargo new foo2
    Creating binary (application) `foo2` package
note: see more `Cargo.toml` keys and their definitions at https://doc.rust-lang.org/cargo/reference/manifest.html
PS F:\rustproject\rustbyexample\chapter12> cd foo2
PS F:\rustproject\rustbyexample\chapter12\foo2> cargo build
   Compiling foo2 v0.1.0 (F:\rustproject\rustbyexample\chapter12\foo2)
    Finished `dev` profile [unoptimized + debuginfo] target(s) in 0.23s
PS F:\rustproject\rustbyexample\chapter12\foo2>
生成3个可执行文件:
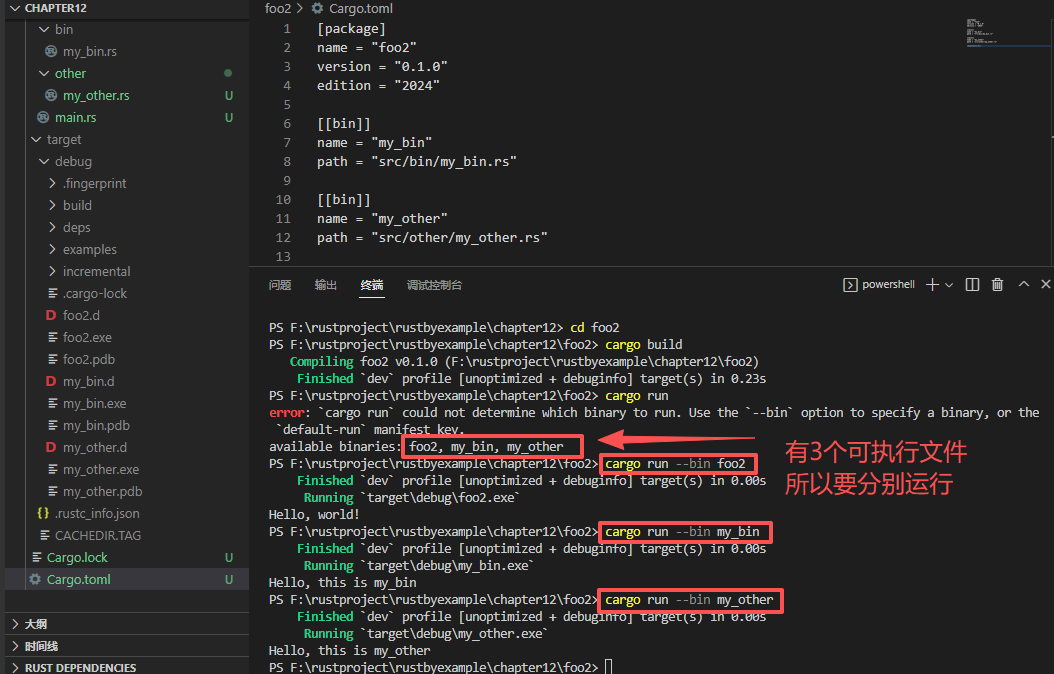
在Cargo.toml文件中要加\[bin]内容,这个很重要,否则生成不了其它两个子文件:
foo2\Cargo.toml文件:
[package]
name = "foo2"
version = "0.1.0"
edition = "2024"

[[bin]]
name = "my_bin"
path = "src/bin/my_bin.rs"

[[bin]]
name = "my_other"
path = "src/other/my_other.rs"

[dependencies]
运行:
除了可添加其他二进制可执行文件外,cargo 还支持更多功能,如基准测试,测试和示例。
在下一节中,我们将更仔细地学习测试的内容。
12.3 测试
我们知道测试是任何软件不可缺少的一部分!Rust 对单元和集成测试提供一流的支持(参见《Rust 程序设计语言》中的关于测试的章节)。
通过上面链接的关于测试章节,我们看到了如何编写单元测试和集成测试。在代码目录组织上,我们可以将单元测试放在需要测试的模块中,并将集成测试放在源码中 tests/ 目录中:
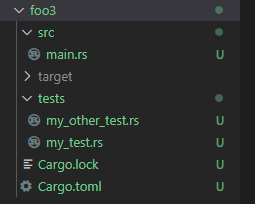
foo3
├── Cargo.toml
├── src
│   └── main.rs
└── tests
    ├── my_test.rs
    └── my_other_test.rs
tests 目录下的每个文件都是一个单独的集成测试。
foo3\src\main.rs文件:
fn main() {
    println!("Hello, world!");
}
foo3\tests\my_other_test.rs文件:
pub fn add2(left: u64, right: u64) -> u64 {
    left + right
}

#[cfg(test)]
mod tests {
    use super::*;

    #[test]
    fn test_foo_bar() {
        let result = add2(2, 2);
        assert_eq!(result, 4);
    }

    #[test]
    fn test_foo() {
        let result = add2(3, 5);
        assert_eq!(result, 8);
    }
}
foo3\tests\my_test.rs文件:
pub fn add(left: u64, right: u64) -> u64 {
    left + right
}

#[cfg(test)]
mod tests {
    use super::*;

    #[test]
    fn test_bar() {
        let result = add(2, 2);
        assert_eq!(result, 4);
    }

    #[test]
    fn test_baz() {
        let result = add(5, 5);
        assert_eq!(result, 10);
    }
}
编译运行:
PS F:\rustproject\rustbyexample\chapter12\foo3> cargo run
    Finished `dev` profile [unoptimized + debuginfo] target(s) in 0.00s
     Running `target\debug\foo3.exe`
Hello, world!
PS F:\rustproject\rustbyexample\chapter12\foo3>
cargo 很自然地提供了一种便捷的方法来运行所有测试!
cargo test你将会看到像这样的输出:
PS F:\rustproject\rustbyexample\chapter12> cargo new foo3
    Creating binary (application) `foo3` package
note: see more `Cargo.toml` keys and their definitions at https://doc.rust-lang.org/cargo/reference/manifest.html
PS F:\rustproject\rustbyexample\chapter12> cd foo3
PS F:\rustproject\rustbyexample\chapter12\foo3> cargo test
    Finished `test` profile [unoptimized + debuginfo] target(s) in 0.00s
     Running unittests src\main.rs (target\debug\deps\foo3-9d039c80cc2a34da.exe)

running 0 tests

test result: ok. 0 passed; 0 failed; 0 ignored; 0 measured; 0 filtered out; finished in 0.00s

     Running tests\my_other_test.rs (target\debug\deps\my_other_test-fb44eed62e563717.exe)

running 2 tests
test tests::test_foo ... ok
test tests::test_foo_bar ... ok

test result: ok. 2 passed; 0 failed; 0 ignored; 0 measured; 0 filtered out; finished in 0.00s

     Running tests\my_test.rs (target\debug\deps\my_test-83b815518c909f3e.exe)

running 2 tests
test tests::test_bar ... ok
test tests::test_baz ... ok

test result: ok. 2 passed; 0 failed; 0 ignored; 0 measured; 0 filtered out; finished in 0.00s

PS F:\rustproject\rustbyexample\chapter12\foo3>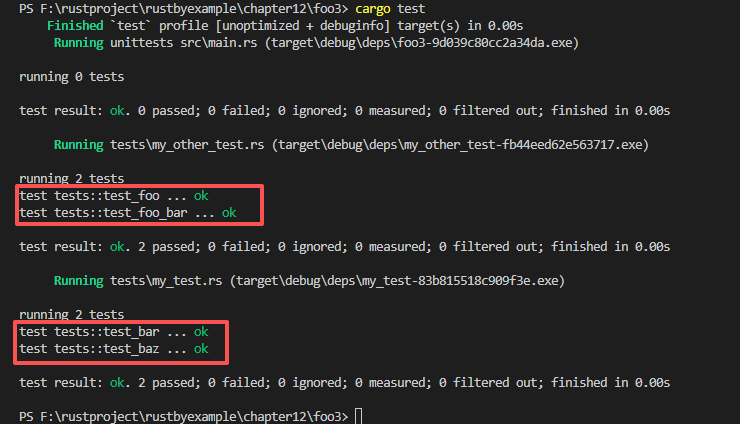
你还可以运行如下测试,其中名称匹配一个模式:
cargo test test_foo

PS F:\rustproject\rustbyexample\chapter12\foo3> cargo test test_foo
    Finished `test` profile [unoptimized + debuginfo] target(s) in 0.00s
     Running unittests src\main.rs (target\debug\deps\foo3-9d039c80cc2a34da.exe)

running 0 tests

test result: ok. 0 passed; 0 failed; 0 ignored; 0 measured; 0 filtered out; finished in 0.00s

     Running tests\my_other_test.rs (target\debug\deps\my_other_test-fb44eed62e563717.exe)

running 2 tests
test tests::test_foo ... ok
test tests::test_foo_bar ... ok

test result: ok. 2 passed; 0 failed; 0 ignored; 0 measured; 0 filtered out; finished in 0.00s

     Running tests\my_test.rs (target\debug\deps\my_test-83b815518c909f3e.exe)

running 0 tests

test result: ok. 0 passed; 0 failed; 0 ignored; 0 measured; 2 filtered out; finished in 0.00s

PS F:\rustproject\rustbyexample\chapter12\foo3> 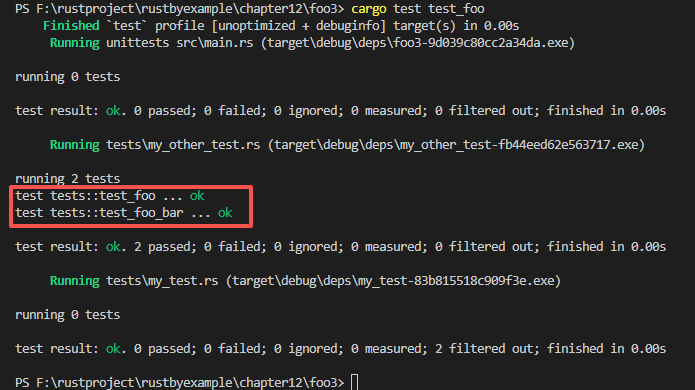
需要注意的一点是:cargo 可能同时进行多项测试,因此请确保它们不会相互竞争。例如,如果它们都输出到文件,则应该将它们写入不同的文件。
12.4 构建脚本
有时使用 cargo 正常构建还是不够的。也许你的 crate 在 cargo 成功编译之前需要一些先决条件,比如代码生成或者需要编译的一些本地代码。为了解决这个问题,我们构建了 cargo 可以运行的脚本。
要向包中添加构建脚本,可以在 Cargo.toml 中指定它,如下所示:
[package]
...
build = "build.rs"
跟默认情况不同,这里 cargo 将在项目目录中优先查找 build.rs 文件。(本句采用意译,英文原文为:Otherwise Cargo will look for a build.rs file in the project directory by default.)
怎么使用构建脚本
构建脚本只是另一个 Rust 文件,此文件将在编译包中的任何其他内容之前,优先进行编译和调用。 因此,此文件可实现满足 crate 的先决条件。
cargo 通过此处指定的可以使用的环境变量为脚本提供输入。(英文原文:Cargo provides the script with inputs via environment variables specified here that can be used.)
此脚本通过 stdout (标准输出)提供输出。打印的所有行都写入到 target/debug/build/<pkg>/output。另外,以 cargo: 为前缀的行将由 cargo 直接解析,因此可用于定义包编译的参数。
有关进一步的说明和示例,请阅读 cargo 规定说明文档。