目录
[二、TX-LCN 介绍](#二、TX-LCN 介绍)
[2.1 TX-LCN 是什么](#2.1 TX-LCN 是什么)
[2.2 TX-LCN 核心原理](#2.2 TX-LCN 核心原理)
[2.3 TX-LCN支持的三种事务模式](#2.3 TX-LCN支持的三种事务模式)
[2.4 TX-LCN 优缺点](#2.4 TX-LCN 优缺点)
[2.5 TX-LCN 与其他分布式事务对比](#2.5 TX-LCN 与其他分布式事务对比)
[三、TX-LCN 代码整合案例实战过程](#三、TX-LCN 代码整合案例实战过程)
[3.1 前置准备](#3.1 前置准备)
[3.1.1 技术栈说明](#3.1.1 技术栈说明)
[3.1.2 初始化事务表和业务表](#3.1.2 初始化事务表和业务表)
[3.1.3 添加服务基本依赖](#3.1.3 添加服务基本依赖)
[3.2 TX-LCN 服务端完整代码](#3.2 TX-LCN 服务端完整代码)
[3.2.1 服务端yml配置](#3.2.1 服务端yml配置)
[3.2.2 TX-LCN 服务端启动类](#3.2.2 TX-LCN 服务端启动类)
[3.3 TX-LCN 两个客户端完整整合过程](#3.3 TX-LCN 两个客户端完整整合过程)
[3.3.1 订单服务代码整合过程](#3.3.1 订单服务代码整合过程)
[3.3.2 库存服务代码整合过程](#3.3.2 库存服务代码整合过程)
[3.4 完整测试过程](#3.4 完整测试过程)
[3.4.1 启动服务](#3.4.1 启动服务)
[3.4.2 测试正常流程](#3.4.2 测试正常流程)
[3.4.3 模拟异常流程](#3.4.3 模拟异常流程)
一、前言
在微服务开发模式中,分布式事务问题可以说是一个绕不开的话题。随着项目的发展壮大,单体服务必然适应不了发展的需求。当项目经过微服务拆分后,原本单体事务就变成了分布式事务,随之而来,在处理事务这个事情上就会变得复杂起来。经过多年的发展和沉淀,也出现了很多优秀的分布式事务解决方案,比如Seata,hmily,以及基于消息中间件Rocketmq的解决方案等。本文以另一种比较轻量级且实用性较强的分布式事务框架TX-LCN为例进行详细的说明。
二、TX-LCN 介绍
2.1 TX-LCN 是什么
TX-LCN是一款开源的分布式事务协调框架,其核心思想是"LCN并不生产事务,LCN只是本地事务的协调工"。它通过对本地事务的协调控制,而不是创建新的事务,来实现分布式系统下多个微服务操作的数据一致性。
2.2 TX-LCN 核心原理
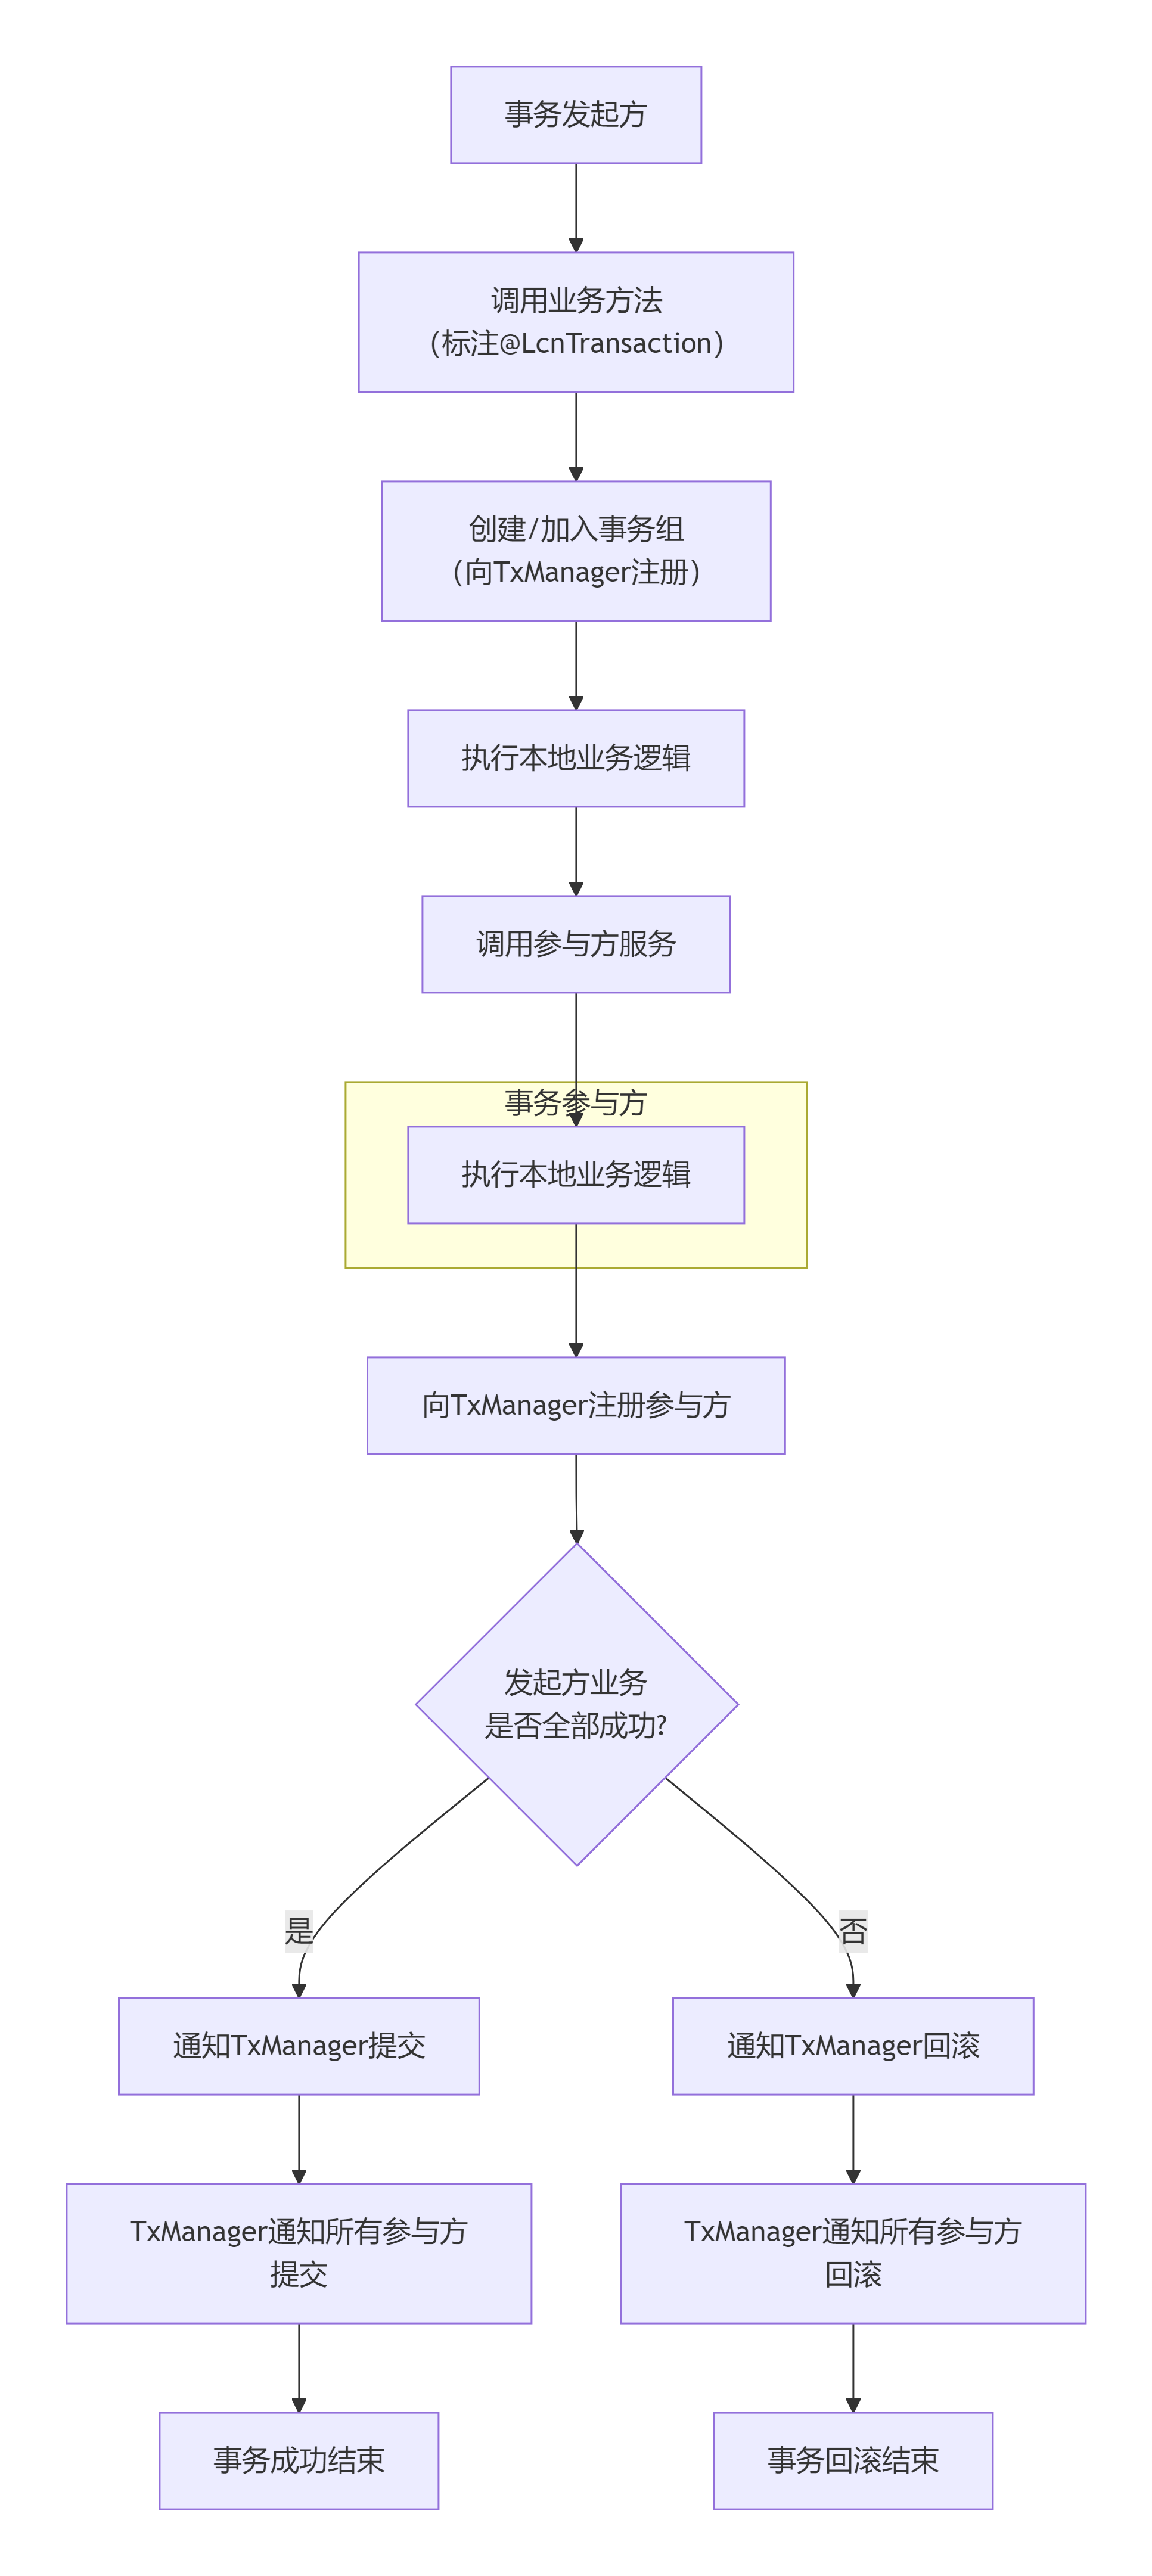
TX-LCN核心设计思想是协调本地事务,而非创建新事务,其运行过程中依赖两大模块:
-
TxManager:作为独立部署的事务协调者,负责创建、维护和通知事务组,并根据最终结果(成功或失败)向所有参与者(TxClient)发出全局提交或回滚指令。
-
TxClient:嵌入在每个业务服务中,作为框架的客户端代理。它负责拦截本地事务连接,在收到TxManager的最终指令前,会通过"假关闭"等方式挂起本地事务,等待协调。
一次完整的分布式事务包含三个核心步骤:
-
创建事务组:事务发起方在业务开始前,向TxManager申请创建一个全局事务组,并获取唯一的事务组ID(GroupId)。
-
加入事务组:其他参与方(服务)执行完本地业务操作后,将自己的事务信息注册到该事务组中。
-
通知事务组:发起方业务执行完毕后,将结果通知TxManager。TxManager根据结果通知组内所有参与者统一提交或回滚。
为了更清晰地了解TX-LCN如何协调事务,可以参考下面的流程图,它描绘了一次完整的LCN模式分布式事务流程:
2.3 TX-LCN支持的三种事务模式
在之前学习分布式事务框架Seata的时候应该还记得, Seata支持多种类型的分布式事务,比如AT模式,TCC模式等。TX-LCN也不例外,自5.0版本起,TX-LCN抽象出三种事务模式,可通过不同注解指定,下面这个表比较详细的列举了TX-LCN支持的几种事务模式
|--------|--------------------------------------------------|-----------------------------------------------------------------------------------------------------------|
| 模式 | 核心原理 | 特点与适用场景 |
| LCN模式 | 通过代理数据库连接,控制本地事务的提交时机。 | 强一致性;对代码侵入低;但会长时间占用数据库连接,不适用于热点数据或长事务场景。 |
| TCC模式 | 业务需要实现Try(尝试)、Confirm(确认)、Cancel(取消)三个补偿方法 | 最终一致性;不依赖数据库事务,适用范围广(如Redis、MongoDB);对代码侵入性高,业务开发复杂-。 |
| TXC模式 | 在执行业务SQL前,先查询并保存数据快照。回滚时,用快照数据生成补偿SQL进行还原 | 不占用连接;但每次执行SQL需额外查询,性能消耗较大;仅适用于支持SQL的数据库 |
基于上面三种模式的总结和对比,TX-LCN提供的三种模式分别适用于不同场景:
-
LCN模式
- 你的业务主要基于支持事务的关系型数据库(如MySQL),且希望代码侵入性低,主要通过注解
@LcnTransaction即可实现。
- 你的业务主要基于支持事务的关系型数据库(如MySQL),且希望代码侵入性低,主要通过注解
-
TCC模式
- 你的业务涉及非事务型数据库(如MongoDB),或需要更精细地控制业务资源(如预留库存)。这需要你为每个业务方法编码实现
Try、Confirm、Cancel三个逻辑。
- 你的业务涉及非事务型数据库(如MongoDB),或需要更精细地控制业务资源(如预留库存)。这需要你为每个业务方法编码实现
-
TXC模式
- 你希望避免长时间占用数据库连接,但可以接受因保存SQL快照带来的额外性能开销。
2.4 TX-LCN 优缺点
TX-LCN 具有如下优缺点,作为在实际选择时候进行参考
-
主要优势:
-
强一致性保障:尤其LCN模式,基于对本地事务的协调,能提供较强的一致性保证。
-
使用相对简单:LCN和TXC模式对业务代码侵入性较低,通过注解即可实现。
-
兼容性好:支持Spring Cloud、Dubbo等主流微服务框架。
-
-
核心局限性:
-
LCN模式的连接占用:代理连接在事务完成前不会释放,在高并发下可能成为瓶颈。
-
TCC模式的开发复杂度:需要开发者手动编写三个阶段的业务逻辑,设计补偿机制,难度和成本较高。
-
社区活跃度:作为开源项目,其社区活跃度和后续支持力度是选型时需要考虑的风险点之一。
-
2.5 TX-LCN 与其他分布式事务对比
下表将TX-LCN与业界其他主流方案进行对比:
|----------------|-----------|-------------------------------|--------------------|-----------------------|
| 方案 | 一致性模型 | 核心原理 | 优点 | 缺点 |
| TX-LCN (LCN模式) | 强一致性 | 代理数据库连接,协调本地事务提交 | 对代码侵入低;保证强一致性。 | 长时间占用数据库连接,性能有损耗。 |
| Seata (AT模式) | 最终一致性 | 基于全局锁和Undo Log快照,实现自动补偿回滚。 | 对业务零侵入;生态丰富,社区活跃。 | 全局锁存在性能开销和死锁风险。 |
| 消息队列 (最终一致性) | 最终一致性 | 依赖消息中间件的可靠性,保证本地事务与消息发送的原子性。 | 系统解耦彻底,吞吐量高,性能好。 | 依赖消息队列的可靠性,只能保证最终一致性。 |
| TCC (如ByteTCC) | 最终一致性 | 业务编码实现Try、Confirm、Cancel三个阶段。 | 不依赖数据库锁,性能好;适用范围广。 | 对业务侵入性极高,开发和维护复杂。 |
对不同的分布式事务解决方案,该怎么选择呢?可以参考下面的建议:
-
追求强一致性,且业务多为短事务:可以考虑TX-LCN的LCN模式。
-
业务涉及非关系型数据库(如Redis)或复杂业务补偿:TX-LCN的TCC模式更合适,但需评估开发成本。
-
希望完全无侵入、社区支持强:Seata可能是更主流的选择。
-
业务容忍秒级延迟,追求高吞吐和解耦:采用基于消息队列的最终一致性方案。
总的来说,TX-LCN提供了一套多模式的分布式事务解决方案,尤其LCN模式在强一致性场景下有一定优势。选择时,你需要仔细权衡业务对一致性的要求、系统性能瓶颈的容忍度以及团队的开发运维成本。
三、TX-LCN 代码整合案例实战过程
接下来通过一个实际案例,演示下如何在springboot 微服务项目中集成和使用TX-LCN。
3.1 前置准备
提前创建3个springboot工程,并搭建一个nacos服务,作为后续微服务的注册中心
3.1.1 技术栈说明
本案例中核心技术栈如下:
-
maven,3.6.3
-
springboot,2.3.12.RELEASE
-
txlcn,5.0.2.RELEASE
-
mysql,8.0.25
3.1.2 初始化事务表和业务表
程序在运行过程中,TX-LCN需要依赖几个表从而管理分布式事务产生的数据
sql
-- t_tx_exception 表 - 事务异常记录表
CREATE TABLE `t_tx_exception` (
  `id` bigint(20) NOT NULL AUTO_INCREMENT,
  `group_id` varchar(64) DEFAULT NULL,
  `unit_id` varchar(32) DEFAULT NULL,
  `mod_id` varchar(128) DEFAULT NULL,
  `transaction_state` tinyint(4) DEFAULT NULL,
  `registrar` tinyint(4) DEFAULT NULL COMMENT '-1 未知 0 Manager 通知事务失败,1 Client 询问事务状态失败',
  `ex_state` tinyint(4) DEFAULT NULL COMMENT '0 待处理 1已处理',
  `create_time` datetime DEFAULT NULL,
  PRIMARY KEY (`id`)
) ENGINE=InnoDB DEFAULT CHARSET=utf8mb4;

-- 可根据需要添加以下表(如果使用默认H2内存数据库则不需要)
CREATE TABLE IF NOT EXISTS `t_tx_log` (
    `id` bigint(20) NOT NULL AUTO_INCREMENT,
    `group_id` varchar(64) NOT NULL,
    `unit_id` varchar(32) NOT NULL,
    `tag` varchar(50) DEFAULT NULL,
    `content` blob,
    `create_time` datetime DEFAULT NULL,
    PRIMARY KEY (`id`)
) ENGINE=InnoDB DEFAULT CHARSET=utf8mb4;
再添加2个业务数据表
sql
-- 订单服务数据库
CREATE DATABASE IF NOT EXISTS `order_db`;
USE `order_db`;

CREATE TABLE `t_order` (
  `id` bigint(20) NOT NULL AUTO_INCREMENT,
  `order_no` varchar(50) NOT NULL,
  `user_id` bigint(20) NOT NULL,
  `product_id` bigint(20) NOT NULL,
  `amount` decimal(10,2) NOT NULL,
  `quantity` int(11) NOT NULL,
  `status` tinyint(4) DEFAULT '0' COMMENT '0-待支付,1-已支付,2-已取消',
  `create_time` datetime DEFAULT CURRENT_TIMESTAMP,
  `update_time` datetime DEFAULT CURRENT_TIMESTAMP ON UPDATE CURRENT_TIMESTAMP,
  PRIMARY KEY (`id`),
  UNIQUE KEY `uk_order_no` (`order_no`)
) ENGINE=InnoDB DEFAULT CHARSET=utf8mb4;

-- 库存服务数据库
CREATE DATABASE IF NOT EXISTS `inventory_db`;
USE `inventory_db`;

CREATE TABLE `t_inventory` (
  `id` bigint(20) NOT NULL AUTO_INCREMENT,
  `product_id` bigint(20) NOT NULL,
  `stock` int(11) NOT NULL DEFAULT '0',
  `lock_stock` int(11) DEFAULT '0',
  `create_time` datetime DEFAULT CURRENT_TIMESTAMP,
  `update_time` datetime DEFAULT CURRENT_TIMESTAMP ON UPDATE CURRENT_TIMESTAMP,
  PRIMARY KEY (`id`),
  UNIQUE KEY `uk_product_id` (`product_id`)
) ENGINE=InnoDB DEFAULT CHARSET=utf8mb4;

-- 初始化库存数据
INSERT INTO `t_inventory` (`product_id`, `stock`) VALUES (1, 100);
3.1.3 添加服务基本依赖
使用TX-LCN 做分布式事务管理框架,主要包括2个部分:
-
TX-LCN 服务端
-
独立的springboot 服务,相当于是一个中央事务管理器;
-
实际使用中,相当于是暴露出去一个IP+端口;
-
-
TX-LCN 客户端
-
即其他需要接入TX-LCN 服务端应用
-
一般通过IP+端口进行连接
-
1)添加TX-LCN 服务端依赖
也即TM - 事务管理器,添加如下核心依赖
java
<?xml version="1.0" encoding="UTF-8"?>
<project xmlns="http://maven.apache.org/POM/4.0.0"
         xmlns:xsi="http://www.w3.org/2001/XMLSchema-instance"
         xsi:schemaLocation="http://maven.apache.org/POM/4.0.0
         http://maven.apache.org/xsd/maven-4.0.0.xsd">

    <!-- Spring Boot 父依赖 -->
    <parent>
        <groupId>org.springframework.boot</groupId>
        <artifactId>spring-boot-starter-parent</artifactId>
        <version>2.3.12.RELEASE</version>
    </parent>

    <dependencies>
        <!-- Spring Boot Web -->
        <dependency>
            <groupId>org.springframework.boot</groupId>
            <artifactId>spring-boot-starter-web</artifactId>
        </dependency>

        <!-- TX-LCN 服务端 -->
        <dependency>
            <groupId>com.codingapi.txlcn</groupId>
            <artifactId>txlcn-tm</artifactId>
        </dependency>

        <!-- JDBC (用于存储事务日志) -->
        <dependency>
            <groupId>org.springframework.boot</groupId>
            <artifactId>spring-boot-starter-jdbc</artifactId>
        </dependency>

        <!-- MySQL 驱动 -->
        <dependency>
            <groupId>mysql</groupId>
            <artifactId>mysql-connector-java</artifactId>
            <version>8.0.25</version>
        </dependency>
    </dependencies>


    <!-- TX-LCN 服务端 -->
    <dependencyManagement>
        <dependencies>
            <dependency>
                <groupId>com.codingapi.txlcn</groupId>
                <artifactId>txlcn-dependencies</artifactId>
                <version>5.0.2.RELEASE</version>
                <type>pom</type>
                <scope>import</scope>
            </dependency>
        </dependencies>
    </dependencyManagement>
</project>
2)添加客户端依赖
TC - 事务控制方,RM - 资源管理器 ,添加如下核心依赖
java
<!-- Spring Boot Web -->
<dependency>
    <groupId>org.springframework.boot</groupId>
    <artifactId>spring-boot-starter-web</artifactId>
</dependency>

<!-- TX-LCN 客户端 -->
<dependency>
    <groupId>com.codingapi.txlcn</groupId>
    <artifactId>txlcn-tc</artifactId>
</dependency>

<dependency>
    <groupId>com.codingapi.txlcn</groupId>
    <artifactId>txlcn-txmsg-netty</artifactId>
</dependency>

<!-- Spring Cloud Feign (服务调用) -->
<dependency>
    <groupId>org.springframework.cloud</groupId>
    <artifactId>spring-cloud-starter-openfeign</artifactId>
    <version>2.2.8.RELEASE</version>
</dependency>

<!-- 数据库相关 -->
<dependency>
    <groupId>org.mybatis.spring.boot</groupId>
    <artifactId>mybatis-spring-boot-starter</artifactId>
    <version>2.1.4</version>
</dependency>

<dependency>
    <groupId>mysql</groupId>
    <artifactId>mysql-connector-java</artifactId>
    <version>8.0.25</version>
</dependency>
3.2 TX-LCN 服务端完整代码
3.2.1 服务端yml配置
在TX-LCN 服务端工程的配置文件中,添加如下内容
java
server:
  port: 7970

spring:
  application:
    name: tx-manager
  datasource:
    driver-class-name: com.mysql.cj.jdbc.Driver
    url: jdbc:mysql://localhost:3306/tx_manager?useUnicode=true&characterEncoding=utf8&serverTimezone=Asia/Shanghai
    username: root
    password: 你的账号密码
    hikari:
      maximum-pool-size: 5

# TX-LCN 配置
tx-lcn:
  manager:
    # TM监听端口
    port: 8070
    # 心跳时间(秒)
    heartbeat-time: 10
    # 分布式事务锁
    dtx-time: 30
  logger:
    enabled: true
    driver-class-name: com.mysql.cj.jdbc.Driver
    url: jdbc:mysql://localhost:3306/tx_manager?useUnicode=true&characterEncoding=utf8&serverTimezone=Asia/Shanghai
    username: root
    password: 你的账号密码

# 日志级别
logging:
  level:
    com.codingapi.txlcn: debug
3.2.2 TX-LCN 服务端启动类
参考下面的启动类代码
java
package com.example.tm;

import com.codingapi.txlcn.tm.config.EnableTransactionManagerServer;
import org.springframework.boot.SpringApplication;
import org.springframework.boot.autoconfigure.SpringBootApplication;

@SpringBootApplication
@EnableTransactionManagerServer
public class TMApplication {
    public static void main(String[] args) {
        SpringApplication.run(TMApplication.class, args);
    }
}
3.3 TX-LCN 两个客户端完整整合过程
服务端整合完成并启动之后,接下来需要2个单独的微服务作为TX-LCN客户端,比如这里我们模拟下单扣库存的业务场景,分别准备一个订单服务,和一个库存服务。
3.3.1 订单服务代码整合过程
该服务模拟作为事务发起方,在工程的配置文件添加如下配置内容
java
server:
  port: 8081

spring:
  application:
    name: order-service
  datasource:
    driver-class-name: com.mysql.cj.jdbc.Driver
    url: jdbc:mysql://localhost:3306/order_db?useUnicode=true&characterEncoding=utf8&serverTimezone=Asia/Shanghai
    username: root
    password: 你的密码
    hikari:
      maximum-pool-size: 5
  cloud:
    nacos:
      discovery:
        server-addr: localhost:8848  # Nacos注册中心地址

# TX-LCN 客户端配置
tx-lcn:
  client:
    manager-address: 127.0.0.1:8070  # TM地址
  springcloud:
    loadbalance:
      enabled: true

# MyBatis配置
mybatis:
  configuration:
    map-underscore-to-camel-case: true

# 日志级别
logging:
  level:
    com.codingapi.txlcn: debug
    com.example.order: debug
1)服务启动类
注意添加@EnableDistributedTransaction这个事务注解
java
package com.example.order;

import org.springframework.boot.SpringApplication;
import org.springframework.boot.autoconfigure.SpringBootApplication;
import org.springframework.cloud.client.discovery.EnableDiscoveryClient;
import org.springframework.cloud.openfeign.EnableFeignClients;
import com.codingapi.txlcn.tc.config.EnableDistributedTransaction;

@SpringBootApplication
@EnableDiscoveryClient
@EnableFeignClients
@EnableDistributedTransaction
public class OrderApplication {
    public static void main(String[] args) {
        SpringApplication.run(OrderApplication.class, args);
    }
}
2)业务实现类
OrderService中添加如下核心代码
java
package com.example.order.service;

import com.codingapi.txlcn.tc.annotation.LcnTransaction;
import com.example.order.entity.Order;
import com.example.order.feign.InventoryFeignClient;
import com.example.order.mapper.OrderMapper;
import org.springframework.beans.factory.annotation.Autowired;
import org.springframework.stereotype.Service;
import org.springframework.transaction.annotation.Transactional;

import java.math.BigDecimal;
import java.util.UUID;

@Service
public class OrderService {

    @Autowired
    private OrderMapper orderMapper;

    @Autowired
    private InventoryFeignClient inventoryFeignClient;

    /**
     * 创建订单(分布式事务 - LCN模式)
     */
    @LcnTransaction
    @Transactional
    public Order createOrder(Long productId, Integer quantity, Long userId) {
        // 1. 创建订单
        Order order = new Order();
        order.setOrderNo(UUID.randomUUID().toString().replace("-", ""));
        order.setUserId(userId);
        order.setProductId(productId);
        order.setQuantity(quantity);
        order.setAmount(new BigDecimal("100.00").multiply(new BigDecimal(quantity)));
        order.setStatus(0);

        orderMapper.insert(order);

        // 2. 调用库存服务扣减库存(通过Feign)
        inventoryFeignClient.reduceStock(productId, quantity);

        // 3. 模拟异常(测试事务回滚)
        // int i = 1 / 0;
        return order;
    }

    /**
     * TCC模式示例
     */
    @LcnTransaction
    @Transactional
    public Order createOrderTcc(Long productId, Integer quantity, Long userId) {
        // 业务代码
        Order order = new Order();
        order.setOrderNo("TCC_" + UUID.randomUUID().toString().replace("-", ""));
        order.setUserId(userId);
        order.setProductId(productId);
        order.setQuantity(quantity);
        order.setAmount(new BigDecimal("100.00").multiply(new BigDecimal(quantity)));
        order.setStatus(0);

        orderMapper.insert(order);

        // TCC模式调用
        inventoryFeignClient.reduceStockTcc(productId, quantity);

        return order;
    }
}
3)OrderMapper接口文件
java
package com.example.order.mapper;

import com.example.order.entity.Order;
import org.apache.ibatis.annotations.Insert;
import org.apache.ibatis.annotations.Mapper;
import org.apache.ibatis.annotations.Param;
import org.apache.ibatis.annotations.Select;

@Mapper
public interface OrderMapper {

    @Insert("INSERT INTO t_order(order_no, user_id, product_id, amount, quantity, status) " +
            "VALUES(#{orderNo}, #{userId}, #{productId}, #{amount}, #{quantity}, #{status})")
    int insert(Order order);

    @Select("SELECT * FROM t_order WHERE id = #{id}")
    Order selectById(@Param("id") Long id);
}
4)添加一个测试接口
为方便测试,增加下面的测试接口
java
package com.example.order.controller;

import com.example.order.entity.Order;
import com.example.order.service.OrderService;
import org.springframework.beans.factory.annotation.Autowired;
import org.springframework.web.bind.annotation.*;

@RestController
@RequestMapping("/order")
public class OrderController {

    @Autowired
    private OrderService orderService;

    @PostMapping("/create")
    public Order createOrder(@RequestParam Long productId,
                            @RequestParam Integer quantity,
                            @RequestParam Long userId) {
        return orderService.createOrder(productId, quantity, userId);
    }

    @PostMapping("/create/tcc")
    public Order createOrderTcc(@RequestParam Long productId,
                               @RequestParam Integer quantity,
                               @RequestParam Long userId) {
        return orderService.createOrderTcc(productId, quantity, userId);
    }
}
5)InventoryFeignClient 接口
订单服务中通过Feign接口调用库存服务
java
package com.example.order.feign;

import org.springframework.cloud.openfeign.FeignClient;
import org.springframework.web.bind.annotation.PostMapping;
import org.springframework.web.bind.annotation.RequestParam;

@FeignClient(name = "inventory-service", path = "/inventory")
public interface InventoryFeignClient {

    @PostMapping("/reduce")
    Boolean reduceStock(@RequestParam("productId") Long productId,
                       @RequestParam("quantity") Integer quantity);

    @PostMapping("/reduce/tcc")
    Boolean reduceStockTcc(@RequestParam("productId") Long productId,
                          @RequestParam("quantity") Integer quantity);
}
3.3.2 库存服务代码整合过程
该服务作为服务提供方,在工程配置文件中添加如下配置信息
java
server:
  port: 8082

spring:
  application:
    name: inventory-service
  datasource:
    driver-class-name: com.mysql.cj.jdbc.Driver
    url: jdbc:mysql://localhost:3306/inventory_db?useUnicode=true&characterEncoding=utf8&serverTimezone=Asia/Shanghai
    username: root
    password: 你的密码
    hikari:
      maximum-pool-size: 5
  cloud:
    nacos:
      discovery:
        server-addr: localhost:8848  # Nacos注册中心地址

# TX-LCN 客户端配置
tx-lcn:
  client:
    manager-address: 127.0.0.1:8070  # TM地址
  springcloud:
    loadbalance:
      enabled: true

# MyBatis配置
mybatis:
  configuration:
    map-underscore-to-camel-case: true

# 日志级别
logging:
  level:
    com.codingapi.txlcn: debug
    com.example.inventory: debug
1)添加启动类
java
package com.example.inventory;

import org.springframework.boot.SpringApplication;
import org.springframework.boot.autoconfigure.SpringBootApplication;
import org.springframework.cloud.client.discovery.EnableDiscoveryClient;
import com.codingapi.txlcn.tc.config.EnableDistributedTransaction;

@SpringBootApplication
@EnableDiscoveryClient
@EnableDistributedTransaction
public class InventoryApplication {
    public static void main(String[] args) {
        SpringApplication.run(InventoryApplication.class, args);
    }
}
2)核心业务实现
java
package com.example.inventory.service;

import com.codingapi.txlcn.tc.annotation.LcnTransaction;
import com.codingapi.txlcn.tc.annotation.TxcTransaction;
import com.codingapi.txlcn.tc.annotation.TccTransaction;
import com.example.inventory.mapper.InventoryMapper;
import org.springframework.beans.factory.annotation.Autowired;
import org.springframework.stereotype.Service;
import org.springframework.transaction.annotation.Transactional;

import java.util.concurrent.ConcurrentHashMap;

@Service
public class InventoryService {

    @Autowired
    private InventoryMapper inventoryMapper;

    private static final ConcurrentHashMap<String, Boolean> TCC_CACHE = new ConcurrentHashMap<>();

    /**
     * LCN模式 - 扣减库存
     */
    @LcnTransaction
    @Transactional
    public Boolean reduceStock(Long productId, Integer quantity) {
        int result = inventoryMapper.reduceStock(productId, quantity);
        if (result <= 0) {
            throw new RuntimeException("库存不足");
        }

        // 模拟异常(测试事务回滚)
        // int i = 1 / 0;

        return result > 0;
    }

    /**
     * TCC模式 - Try方法
     */
    @TccTransaction(confirmMethod = "confirmReduceStock", cancelMethod = "cancelReduceStock")
    @Transactional
    public Boolean tryReduceStock(Long productId, Integer quantity) {
        // 1. 检查库存是否充足
        Integer stock = inventoryMapper.selectStock(productId);
        if (stock < quantity) {
            throw new RuntimeException("库存不足");
        }

        // 2. 预扣减库存(锁定库存)
        int result = inventoryMapper.lockStock(productId, quantity);
        if (result <= 0) {
            throw new RuntimeException("锁定库存失败");
        }

        // 3. 记录TCC状态
        String key = "reduceStock:" + productId + ":" + quantity;
        TCC_CACHE.put(key, true);

        return true;
    }

    /**
     * TCC模式 - Confirm方法
     */
    public Boolean confirmReduceStock(Long productId, Integer quantity) {
        String key = "reduceStock:" + productId + ":" + quantity;
        if (TCC_CACHE.containsKey(key)) {
            // 实际扣减库存
            int result = inventoryMapper.confirmReduceStock(productId, quantity);
            TCC_CACHE.remove(key);
            return result > 0;
        }
        return false;
    }

    /**
     * TCC模式 - Cancel方法
     */
    public Boolean cancelReduceStock(Long productId, Integer quantity) {
        String key = "reduceStock:" + productId + ":" + quantity;
        if (TCC_CACHE.containsKey(key)) {
            // 释放锁定的库存
            int result = inventoryMapper.cancelReduceStock(productId, quantity);
            TCC_CACHE.remove(key);
            return result > 0;
        }
        return false;
    }

    /**
     * TXC模式示例(基于SQL解析)
     */
    @TxcTransaction
    @Transactional
    public Boolean reduceStockByTxc(Long productId, Integer quantity) {
        int result = inventoryMapper.reduceStock(productId, quantity);
        if (result <= 0) {
            throw new RuntimeException("库存不足");
        }
        return result > 0;
    }
}
3)数据表操作mapper
java
package com.example.inventory.mapper;

import org.apache.ibatis.annotations.Mapper;
import org.apache.ibatis.annotations.Param;
import org.apache.ibatis.annotations.Update;
import org.apache.ibatis.annotations.Select;

@Mapper
public interface InventoryMapper {

    @Update("UPDATE t_inventory SET stock = stock - #{quantity} " +
            "WHERE product_id = #{productId} AND stock >= #{quantity}")
    int reduceStock(@Param("productId") Long productId,
                   @Param("quantity") Integer quantity);

    @Select("SELECT stock FROM t_inventory WHERE product_id = #{productId}")
    Integer selectStock(@Param("productId") Long productId);

    @Update("UPDATE t_inventory SET lock_stock = lock_stock + #{quantity}, " +
            "stock = stock - #{quantity} " +
            "WHERE product_id = #{productId} AND stock >= #{quantity}")
    int lockStock(@Param("productId") Long productId,
                 @Param("quantity") Integer quantity);

    @Update("UPDATE t_inventory SET lock_stock = lock_stock - #{quantity} " +
            "WHERE product_id = #{productId}")
    int confirmReduceStock(@Param("productId") Long productId,
                          @Param("quantity") Integer quantity);

    @Update("UPDATE t_inventory SET lock_stock = lock_stock - #{quantity}, " +
            "stock = stock + #{quantity} " +
            "WHERE product_id = #{productId}")
    int cancelReduceStock(@Param("productId") Long productId,
                         @Param("quantity") Integer quantity);
}
4)添加一个测试接口
java
package com.example.inventory.controller;

import com.example.inventory.service.InventoryService;
import org.springframework.beans.factory.annotation.Autowired;
import org.springframework.web.bind.annotation.PostMapping;
import org.springframework.web.bind.annotation.RequestMapping;
import org.springframework.web.bind.annotation.RequestParam;
import org.springframework.web.bind.annotation.RestController;

@RestController
@RequestMapping("/inventory")
public class InventoryController {

    @Autowired
    private InventoryService inventoryService;

    @PostMapping("/reduce")
    public Boolean reduceStock(@RequestParam Long productId,
                              @RequestParam Integer quantity) {
        return inventoryService.reduceStock(productId, quantity);
    }

    @PostMapping("/reduce/tcc")
    public Boolean reduceStockTcc(@RequestParam Long productId,
                                 @RequestParam Integer quantity) {
        return inventoryService.tryReduceStock(productId, quantity);
    }

    @PostMapping("/reduce/txc")
    public Boolean reduceStockTxc(@RequestParam Long productId,
                                 @RequestParam Integer quantity) {
        return inventoryService.reduceStockByTxc(productId, quantity);
    }
}
3.4 完整测试过程
3.4.1 启动服务
依次启动下面的服务
-
启动 MySQL 数据库,创建相关数据库和表
-
启动 Nacos 注册中心
-
启动 TX-LCN TM 服务端(端口:7970)
-
启动库存服务(端口:8082)
-
启动订单服务(端口:8081)
3.4.2 测试正常流程
执行下面的命令,执行完成后,查看订单数据库和库存数据库数据变化
bash
# 创建订单(调用订单服务)
curl -X POST "http://localhost:8081/order/create?productId=1&quantity=2&userId=1001"
3.4.3 模拟异常流程
模拟异常,观察回滚过程
-
在 OrderService.createOrder() 方法中取消异常注释(int i = 1 / 0)
-
再次调用创建订单接口
-
观察订单和库存是否都回滚
整合过程中,注意以下事项:
-
连接超时:检查 TM 服务端地址和端口配置
-
事务不生效:确保 @LcnTransaction/@TccTransaction 注解正确使用
-
回滚失败:检查数据库连接和网络状况
-
Feign调用问题:确保服务注册发现正常
四、写在文末
本文通过较大的篇幅详细介绍了分布式事务解决方案TX-LCN的使用,并通过实际案例演示了一个使用TX-LCN处理分布式事务的完整代码过程,希望对看到的同学有用,本篇到此结束,感谢观看!