文章目录
- [1 案例介绍](#1 案例介绍)
- [2 案例步骤](#2 案例步骤)
-
- 准备工具包
-
- [1、.py 文件第一行加:# coding: utf-8](# coding: utf-8)
- 2、导入工具包
- [1、获取常用的字符和标点,用作 人名 的词表](#1、获取常用的字符和标点,用作 人名 的词表)
- 2、获取国家的类别总数
- 3、读取数据
- [4、构建数据集 Dataset](#4、构建数据集 Dataset)
- 5、测试数据迭代器
- [6、构建 RNN模型](#6、构建 RNN模型)
- [7、构建 LSTM 模型](#7、构建 LSTM 模型)
- [8、构建 GRU 模型](#8、构建 GRU 模型)
- 9、模型训练
-
- [`tqdm` 进度条显示](#
tqdm进度条显示) - 代码:
- [`tqdm` 进度条显示](#
- 10、模型预测
-
- [Top-K 算法](#Top-K 算法)
- [Top-K - API 详解](#Top-K - API 详解)
- 代码:
- 11、main函数
- 12、整体代码
1 案例介绍
-
关于人名分类问题:
以一个人名为输入, 使用模型帮助我们判断它最有可能是来自哪一个国家的人名, 这在某些国际化公司的业务中具有重要意义, 在用户注册过程中, 会根据用户填写的名字直接给他分配可能的国家或地区选项, 以及该国家或地区的国旗, 限制手机号码位数等等.
-
人名分类数据预览
-
数据格式说明 每一行第一个单词为人名,第二个单词为国家名。中间用制表符tab分割
Huffmann German
Hummel German
Hummel German
Hutmacher German
Ingersleben German
Jaeger German
Jager German
Deng Chinese
Ding Chinese
Dong Chinese
Dou Chinese
Duan Chinese
Eng Chinese
Fan Chinese
Fei Chinese
Abaimov Russian
Abakeliya Russian
Abakovsky Russian
Abakshin Russian
Abakumoff Russian
Abakumov Russian
Abakumtsev Russian
Abakushin Russian
Abalakin Russian完整的训练数据(一个.txt文件):
百度网盘分享的文件:name_classfication.txt
链接: https://pan.baidu.com/s/1rknN3ZYAWfO5XhYLzxUYsw?pwd=6666
2 案例步骤
整个案例的实现可分为以下五个步骤
- 第一步导入必备的工具包
- 第二步对data文件中的数据进行处理,满足训练要求
- 第三步构建RNN模型(包括传统RNN, LSTM以及GRU)
- 第四步构建训练函数并进行训练
- 第五步构建预测函数并进行预测
准备工具包
1、.py 文件第一行加:# coding: utf-8
不仅仅是一个给人看的注释,而是对 Python 解释器有实际作用的编码声明(encoding declaration)。
✅ 告诉 Python 解释器:这个源文件是用 UTF-8 编码保存的
Python 在读取 .py 源文件时,需要知道该文件使用的是什么字符编码,这样才能正确解析其中的字符串、注释、变量名(如果包含非 ASCII 字符)等内容。
冒号后面加不加空格都可以,Python 解释器都能正确识别。
✅ 合法的写法包括(不限于):
python
# coding: utf-8
# coding:utf-8
# -*- coding: utf-8 -*-
# -*-coding:utf-8-*-
# vim: set fileencoding=utf-8 :
Python 的编码声明识别规则是基于正则表达式的,官方文档中定义的匹配模式大致如下(简化版):
python
coding[=:]\s*([-\w.]+)解释:
coding是关键字;- 后面跟
=或:; - 然后允许 0 个或多个空白字符 (
\s*,包括空格、制表符等); - 最后是编码名称(如
utf-8、gbk等)。
因此:
# coding:utf-8→ ✅ 匹配(\s*允许 0 个空格)# coding: utf-8→ ✅ 匹配(有空格也行)# coding: utf-8→ ✅ 多个空格也可以
2、导入工具包
刚开始可能一时间想不起来总共要用到哪些包,这些工具包可以用一个导入一个
python
# coding: utf-8

import string
from torch.utils.data import Dataset, DataLoader
import torch
import torch.nn as nn
import torch.optim as optim
import time
from tqdm import tqdm  # 可视化模型训练的进程
import matplotlib.pyplot as plt

import os
os.environ["KMP_DUPLICATE_LIB_OK"] = "TRUE"  # ←←← 关键!放在最前面(解决报错)
from pylab import mpl
mpl.rcParams["font.sans-serif"] = ["SimHei"]  # 设置显示中文字体
mpl.rcParams["axes.unicode_minus"] = False  # 设置正常显示符号
1、获取常用的字符和标点,用作 人名 的词表
string.ascii_letters
在 Python 中,string.ascii_letters 是标准库 string 模块中的一个字符串常量 ,它包含了 所有 ASCII 字母,即:
- 所有小写英文字母(a--z)
- 所有大写英文字母(A--Z)
其值等价于:
python
string.ascii_lowercase + string.ascii_uppercase也就是:
python
'abcdefghijklmnopqrstuvwxyzABCDEFGHIJKLMNOPQRSTUVWXYZ'使用示例:
python
import string

print(string.ascii_letters)
# 输出: abcdefghijklmnopqrstuvwxyzABCDEFGHIJKLMNOPQRSTUVWXYZ

# 常用于判断字符是否为英文字母
char = 'X'
if char in string.ascii_letters:
    print(f"{char} 是 ASCII 字母")
与其他 string 常量对比:
| 常量 | 内容 |
|---|---|
string.ascii_lowercase |
'abcdefghijklmnopqrstuvwxyz' |
string.ascii_uppercase |
'ABCDEFGHIJKLMNOPQRSTUVWXYZ' |
string.ascii_letters |
上面两个的拼接(大小写全有) |
string.digits |
'0123456789' |
string.punctuation |
所有 ASCII 标点符号,如 !"#$%&'()*+,-./:;<=>?@[\]^_{ |
python
import string

# 小写字母
print(string.ascii_lowercase)  # 'abcdefghijklmnopqrstuvwxyz'

# 大写字母
print(string.ascii_uppercase)  # 'ABCDEFGHIJKLMNOPQRSTUVWXYZ'

# 数字
print(string.digits)           # '0123456789'

# 十六进制数字
print(string.hexdigits)        # '0123456789abcdefABCDEF'

# 八进制数字
print(string.octdigits)        # '01234567'

# 标点符号 【 punctuation  n.标点符号 】
print(string.punctuation)      # '!"#$%&\'()*+,-./:;<=>?@[\\]^_`{|}~'

# 可打印字符(字母+数字+标点+空格)
print(string.printable)

# 空白字符
print(string.whitespace)       # 空格、制表符、换行等
常见用途
- 生成随机字符串
python
import string
import random

# 生成8位随机字母字符串
random_str = ''.join(random.choice(string.ascii_letters) for _ in range(8))
print(random_str)  # 如: 'aBcDeFgH'

# 生成包含字母和数字的随机字符串
all_chars = string.ascii_letters + string.digits
random_str = ''.join(random.choice(all_chars) for _ in range(10))- 数据验证/过滤
python
import string

# 检查字符串是否只包含字母
text = "HelloWorld"
if all(c in string.ascii_letters for c in text):
    print("只包含字母")

# 移除非字母字符
text = "Hello123World!"
letters_only = ''.join(c for c in text if c in string.ascii_letters)
print(letters_only) # 'HelloWorld'- 创建字符映射表
python
import string

# 创建凯撒密码(字母偏移3位)
def caesar_cipher(text, shift=3):
    # 创建映射表
    alphabet = string.ascii_lowercase
    shifted = alphabet[shift:] + alphabet[:shift]
    trans_table = str.maketrans(alphabet + alphabet.upper(),
                               shifted + shifted.upper())
    return text.translate(trans_table)

encrypted = caesar_cipher("Hello World")
print(encrypted) # 'Khoor Zruog'- 数据处理
python
import string

# 统计字母频率
text = "The quick brown fox jumps over the lazy dog"
letter_count = {letter: text.lower().count(letter)
                for letter in string.ascii_lowercase}
print(letter_count)

# 创建字母索引
alphabet_index = {letter: idx for idx, letter in enumerate(string.ascii_lowercase)}
print(alphabet_index['a'])  # 0
print(alphabet_index['z'])  # 25
注意事项:
- 它只包含英文字母 ,不包括带重音符号的字母(如
é,ñ,ü)或其他语言的字符。 - 如果你需要判断 Unicode 字母(比如中文、法语字符等),应使用
str.isalpha()方法,而不是依赖string.ascii_letters。
python
'ä'.isalpha()        # True(是字母)
'ä' in string.ascii_letters  # False(不在 ASCII 范围内)
总结:
string.ascii_letters是一个方便的常量,用于表示全部 52 个英文字母(大小写),常用于字符校验、随机生成、过滤等场景。
代码:
python
# 1. 获取常用的字符和标点,用作 人名 的词表
all_letters = string.ascii_letters + " .,;'"
print(all_letters)  # abcdefghijklmnopqrstuvwxyzABCDEFGHIJKLMNOPQRSTUVWXYZ .,;'

# 构建词表大小
letter_len = len(all_letters)
print(letter_len)   # 57
2、获取国家的类别总数
python
# 2. 获取国家的类别总数
# 国家名 种类数
country_kinds = ['Italian', 'English', 'Arabic', 'Spanish', 'Scottish', 'Irish', 'Chinese', 'Vietnamese', 'Japanese',
             'French', 'Greek', 'Dutch', 'Korean', 'Polish', 'Portuguese', 'Russian', 'Czech', 'German']
# 国家名 个数
country_len = len(country_kinds)
print('country_kinds:', country_kinds)
print('国家的数量:', country_len)  # 18个国家
3、读取数据
python
# 3. 读取数据
def read_data(file_path):
    list_name, list_country = [], []

    with open(file_path, mode='r', encoding='utf-8') as f:
        lines = f.readlines()

    # print(lines)    # 每行: 姓名\t国家\n
    # Abl	Czech
    # Adsit	Czech
    # Ajdrna	Czech
    # ...

    for line in lines:
        # 整行长度 < 5,则视为脏数据
        if len(line) < 5:
            continue
        name, country = line.strip().split('\t')
        list_name.append(name)
        list_country.append(country)

    print(f'样本长度 = {len(list_name)}')   # 20074

    return list_name, list_country


if __name__ == '__main__':
    list_name, list_country = read_data('./data/name_classfication.txt')
4、构建数据集 Dataset
enumerate
【 enumerate v.列举、枚举 】
在 Python 中,enumerate() 是一个内置函数,用于在遍历可迭代对象(如列表、元组、字符串等)时,同时获取元素的索引和值。
基本语法:
python
enumerate(iterable, start=0)iterable:要遍历的可迭代对象(如列表、元组、字符串等)。start:索引的起始值,默认为 0。
返回值:
enumerate() 返回一个 枚举对象(enumerate object) ,它是一个迭代器,每次迭代会返回一个包含索引和对应元素的元组 (index, value)。
示例:
- 默认从 0 开始编号
python
fruits = ['apple', 'banana', 'cherry']
for i, fruit in enumerate(fruits):
    print(i, fruit)
输出:
0 apple
1 banana
2 cherry- 自定义起始索引
python
for i, fruit in enumerate(fruits, start=1):
    print(i, fruit)
输出:
1 apple
2 banana
3 cherry- 转换为列表
python
list(enumerate(fruits))
# 输出: [(0, 'apple'), (1, 'banana'), (2, 'cherry')]
主要用途
- 同时获取索引和值
python
names = ['Alice', 'Bob', 'Charlie']
for index, name in enumerate(names):
print(f"索引 {index}: {name}")- 自定义起始索引
python
# 从 1 开始计数
for i, value in enumerate(['a', 'b', 'c'], start=1):
print(i, value) # 输出: 1 a, 2 b, 3 c- 转换为列表
python
colors = ['red', 'green', 'blue']
enum_list = list(enumerate(colors))
print(enum_list)  # [(0, 'red'), (1, 'green'), (2, 'blue')]

# 从 66 开始
enum_list_66 = list(enumerate(colors, 66))
print(enum_list_66) # [(66, 'red'), (67, 'green'), (68, 'blue')]- 实际应用场景
python
# 示例1:标记列表中特定元素的位罝
def find_positions(items, target):
    """返回目标元素在列表中的所有位置"""
    return [i for i, item in enumerate(items) if item == target]

numbers = [1, 2, 3, 2, 4, 2]
print(find_positions(numbers, 2))  # [1, 3, 5]

# 示例2:处理字典时保持索引
my_dict = {'a': 1, 'b': 2, 'c': 3}
for i, (key, value) in enumerate(my_dict.items()):
    print(f"{i}: {key} = {value}")

# 示例3:文件处理时记录行号
lines = ["第一行", "第二行", "第三行"]
for line_num, line in enumerate(lines, start=1):
    print(f"第{line_num}行: {line}")
与 zip 的配合使用
python
names = ['Alice', 'Bob', 'Charlie']
scores = [85, 92, 78]

for i, (name, score) in enumerate(zip(names, scores)):
    print(f"{i}: {name} 得分 {score}")
使用场景:
- 需要知道当前元素的位置(比如生成带序号的菜单)。
- 替代手动维护计数器变量(避免写
i = 0; i += 1这样的代码)。 - 在处理多个列表或需要索引参与逻辑时非常方便。
小贴士:
enumerate() 不仅适用于列表,也适用于任何可迭代对象,比如字符串:
python
for i, char in enumerate("hello"):
    print(i, char)
# 输出:
# 0 h
# 1 e
# 2 l
# 3 l
# 4 o总之,enumerate() 是 Python 中简洁、高效、Pythonic 的一种遍历方式。
代码:
本案例是把人名(如Tom)用 one-hot 表示,one-hot 确实几乎不用了,但,在本案例中,名字的词嵌入怎么表示并不是重点,所以别去纠结词嵌入怎么不用常见的 Embedding而是用老掉牙的 one-hot
python
# 4. 构建数据集 Dataset
class NameClassDataset(Dataset):
    def __init__(self, list_name, list_country):
        self.list_name = list_name
        self.list_country = list_country

    def __len__(self):
        return len(self.list_name)

    def __getitem__(self, index):
        if index < 0 or index >= len(self.list_name):
            print('getitem() 函数索引出现问题')

        # max(0, index): 索引不能为负
        # len(self.list_name) - 1: 索引最大值
        index = min(max(0, index), len(self.list_name) - 1)

        # 根据当前索引拿到对应的 人名、国家名
        name = self.list_name[index]
        country = self.list_country[index]

        # 把 人名 变为 one-hot 编码
        # 比如: Bob,则 one-hot 矩阵形状为 3 x 57
        # 梯度计算需要浮点型, 所以这里是 float32
        tensor_name = torch.zeros(len(name), letter_len, dtype=torch.float32)
        for i, char in enumerate(name):
            # .find() 是 字符串(str) 的方法。
            target_index = all_letters.find(char)   # 当前字母在 全部字符 中的位置
            tensor_name[i][target_index] = 1        # one-hot 编码, 令为 1

        # 国家对应的索引
        # 列表要查找元素索引,应该用 .index() 方法
        # 交叉熵损失需要长整型, 所以这里是 long
        tensor_country = torch.tensor(data=country_kinds.index(country), dtype=torch.long)

        return tensor_name, tensor_country
5、测试数据迭代器
python
# 5. 测试数据迭代器
def create_dataloader(list_name, list_country):
    my_dataset = NameClassDataset(list_name=list_name, list_country=list_country)

    # 人名的长度不同,所以 batch_size 只能为 1 。如果不为 1 就要使用 padding 等处理方式,人名就没意义了
    my_dataloader = DataLoader(dataset=my_dataset, batch_size=1, shuffle=True)

    for name, country in my_dataloader:
        print(name, country)
        break   # 用作测试,只测试一次即可


if __name__ == '__main__':
    list_name, list_country = read_data('./data/name_classfication.txt')

    a = NameClassDataset(list_name=list_name, list_country=list_country)
    print(a[0])
    # (tensor([[0., 0., 0., 0., 0., 0., 0., 0., 0., 0., 0., 0., 0., 0., 0., 0., 0., 0.,
    #          0., 0., 0., 0., 0., 0., 0., 0., 1., 0., 0., 0., 0., 0., 0., 0., 0., 0.,
    #          0., 0., 0., 0., 0., 0., 0., 0., 0., 0., 0., 0., 0., 0., 0., 0., 0., 0.,
    #          0., 0., 0.],
    #         [0., 1., 0., 0., 0., 0., 0., 0., 0., 0., 0., 0., 0., 0., 0., 0., 0., 0.,
    #          0., 0., 0., 0., 0., 0., 0., 0., 0., 0., 0., 0., 0., 0., 0., 0., 0., 0.,
    #          0., 0., 0., 0., 0., 0., 0., 0., 0., 0., 0., 0., 0., 0., 0., 0., 0., 0.,
    #          0., 0., 0.],
    #         [0., 0., 0., 0., 0., 0., 0., 0., 0., 0., 0., 1., 0., 0., 0., 0., 0., 0.,
    #          0., 0., 0., 0., 0., 0., 0., 0., 0., 0., 0., 0., 0., 0., 0., 0., 0., 0.,
    #          0., 0., 0., 0., 0., 0., 0., 0., 0., 0., 0., 0., 0., 0., 0., 0., 0., 0.,
    #          0., 0., 0.]]), tensor(16))
6、构建 RNN模型
python
# 6. 构建 RNN模型
class MyRNN(nn.Module):
    def __init__(self, input_size: int, hidden_size: int, output_size: int, num_layers: int=1):
        super().__init__()
        self.input_size = input_size
        self.hidden_size = hidden_size
        self.output_size = output_size
        self.num_layers = num_layers

        self.rnn = nn.RNN(input_size=self.input_size,
                          hidden_size=self.hidden_size,
                          num_layers=self.num_layers,
                          batch_first=True)

        self.linear = nn.Linear(in_features=self.hidden_size,
                                out_features=output_size)

    def forward(self, x, h0=None):
        # hn: (num_directions * num_layers, N, hidden_size)
        output, hn = self.rnn(x, h0)        # RNN 层

        # output shape: (batch, seq_len, hidden_size)
        # logits = self.linear(output[:, -1, :])
        logits = self.linear(hn[-1])     # 可以用 output[-1], 也可以用 hn

        return logits

    def init_hidden(self):
        # 初始化隐藏状态,这里就不实现了,只是代表可以写这个方法
        # h_0: (num_directions * num_layers, N, hidden_size) , 与 batch_first 无关!
        pass
7、构建 LSTM 模型
python
# 7. 构建 LSTM 模型
class MyLSTM(nn.Module):
    def __init__(self, input_size: int, hidden_size: int, output_size: int, num_layers: int=1):
        super().__init__()
        self.input_size = input_size
        self.hidden_size = hidden_size
        self.output_size = output_size
        self.num_layers = num_layers

        self.lstm = nn.LSTM(input_size=self.input_size,
                            hidden_size=self.hidden_size,
                            num_layers=self.num_layers,
                            batch_first=True)

        self.linear = nn.Linear(in_features=self.hidden_size,
                                out_features=self.output_size)

    def forward(self, x, h0=None, c0=None):
        # H_out = proj_size if proj_size > 0 else hidden_size
        # hn: (num_layers × num_directions, N, H_out)
        output, (hn, c) = self.lstm(x, (h0, c0))

        # output shape: (batch, seq_len, hidden_size)
        # logits = self.linear(output[:, -1, :])
        logits = self.linear(hn[-1])

        return logits

    def init_hidden(self):
        # 初始化隐藏状态,这里就不实现了,只是代表可以写这个方法
        # h_0: (num_directions * num_layers, N, proj_size if proj_size > 0 else hidden_size) , 与 batch_first 无关!
        # c: (num_directions * num_layers, N, hidden_size) , 与 batch_first 无关!
        pass
8、构建 GRU 模型
python
# 8. 构建 GRU 模型
class MyGRU(nn.Module):
    def __init__(self, input_size: int, hidden_size: int, output_size: int, num_layers: int = 1):
        super().__init__()
        self.input_size = input_size
        self.hidden_size = hidden_size
        self.output_size = output_size
        self.num_layers = num_layers

        self.gru = nn.GRU(input_size=self.input_size,
                          hidden_size=self.hidden_size,
                          num_layers=self.num_layers,
                          batch_first=True)

        self.linear = nn.Linear(in_features=self.hidden_size,
                                out_features=self.output_size)

    def forward(self, x, h0=None):
        # hn: (num_layers × num_directions, batch, hidden_size)
        output, hn = self.gru(x, h0)

        # output shape: (batch, seq_len, hidden_size)
        # logits = self.linear(output[:, -1, :])
        logits = self.linear(hn[-1])

        return logits

    def init_hidden(self):
        # 初始化隐藏状态,这里就不实现了,只是代表可以写这个方法
        # h_0: (num_directions * num_layers, N, hidden_size) , 与 batch_first 无关!
        pass
9、模型训练
- 基本过程【重要】
properties
1.获取数据
2.构建数据源Dataset
3.构建数据迭代器Dataloader
4.加载自定义的模型
5.实例化损失函数对象
6.实例化优化器对象
7.定义打印日志参数
8.开始训练
8.1 实现外层大循环epoch
(可以在这构建数据迭代器Dataloader)
8.2 内部遍历数据迭代球dataloader
8.3 将数据送入模型得到输出结果
8.4 计算损失
8.5 梯度清零: optimizer.zero_grad()
8.6 反向传播: loss.backward()
8.7 参数更新(梯度更新): optimizer.step()
8.8 打印训练日志
9. 保存模型: torch.save(model.state_dict(), "model_path")
tqdm 进度条显示
📘 tqdm 详细使用(Python 进度条神器)
一、什么是 tqdm?
-
全称 :taqadum(阿拉伯语"进展")
-
作用 :为 Python 中的可迭代对象 (如列表、
range、生成器等)自动添加动态进度条 -
核心特点:
- 轻量无侵入:不改变原有循环逻辑
- 自动计算:进度百分比、迭代速度、剩余时间
- 多环境支持:终端、Jupyter Notebook、多线程/进程
-
安装命令:
bashpip install tqdm
二、核心用途
在长时间运行的循环或迭代任务中,实时可视化执行进度,提升开发体验与用户感知。
典型应用场景:
- 批量文件处理(图像、日志、CSV)
- 数据清洗与转换(Pandas、NumPy)
- 网络请求(爬虫、API 调用)
- 机器学习训练/验证循环
- 大规模数据遍历(数据库、HDF5)
三、基本用法(最常用)
✅ 包装可迭代对象(推荐方式)
python
from tqdm import tqdm

for item in tqdm(iterable, desc="描述"):
    # 你的处理逻辑
    pass
💡 只需将原循环中的
iterable传给tqdm()即可!
✅ 手动控制进度(适用于 while 或非标准循环)
python
with tqdm(total=100) as pbar:
    while condition:
        do_work()
pbar.update(1) # 每完成一步 +1四、函数签名(tqdm 类初始化参数)
python
tqdm(
    iterable=None,        # 要包装的可迭代对象(可选;若不传,需手动 update)
    desc=None,            # 进度条前缀描述文字(如 "下载中")
    total=None,           # 总迭代次数(若 iterable 无 __len__,必须手动指定)
    leave=True,           # 循环结束后是否保留进度条
    file=None,            # 输出流(默认 sys.stderr,即标准错误输出)
    ncols=None,           # 进度条总宽度(字符数),None 表示自动适配
    mininterval=0.1,      # 最小刷新间隔(秒),防止刷屏
    maxinterval=10.0,     # 最大刷新间隔(用于极慢任务)
    miniters=None,        # 最小更新步数(与 mininterval 互斥)
    ascii=False,          # 使用 ASCII 字符(True 时兼容老旧终端)
    disable=False,        # 是否完全禁用进度条(True 时透明通过)
    unit="it",            # 迭代单位(如 "file", "sample")
    unit_scale=False,     # 自动缩放单位(如 1k, 1M, 1G)
    dynamic_ncols=False,  # 动态调整宽度(适应终端窗口大小)
    smoothing=0.3,        # 速度平滑因子(0=瞬时速度,1=完全平均)
    bar_format=None,      # 自定义格式(见下方示例)
    initial=0,            # 初始计数值(用于恢复中断任务)
    position=None,        # 多进度条位置索引(嵌套或多线程时使用)
    postfix=None,         # 末尾附加信息(支持 dict 或 str)
    unit_divisor=1000,    # 单位缩放除数(1000 → KB/MB;1024 → KiB/MiB)
    colour=None,          # 进度条颜色(如 'green', '#ff0000')
    delay=0,              # 延迟显示(秒),避免短任务闪现
    gui=False,            # GUI 模式(一般不用)
    **kwargs
)
⚠️ 日常只需关注 :
iterable,desc,total,unit,disable
五、常用参数详解
| 参数 | 默认值 | 说明 | 示例 |
|---|---|---|---|
iterable |
None |
要包装的可迭代对象(如 range(100)) |
tqdm(range(100)) |
desc |
None |
描述前缀 | desc="处理文件" → 处理文件: 50%... |
total |
None |
总步数(当 iterable 无长度时必填) | tqdm(gen(), total=1000) |
unit |
"it" |
单位名称 | unit="张图片" → 显示 50 张图片 |
leave |
True |
循环结束是否保留进度条 | leave=False → 执行完自动清除 |
disable |
False |
临时关闭进度条(调试/生产开关) | tqdm(..., disable=not DEBUG) |
colour |
None |
进度条颜色 | colour='green' 或 '#00ff00' |
postfix |
None |
动态附加信息(支持 dict) | pbar.set_postfix(loss=0.123) |
🔔 注意 :如果
total与实际迭代次数不一致,进度条会出错!
六、常用操作示例
- 基础循环 + 描述
python
from tqdm import tqdm
import time

for i in tqdm(range(50), desc="处理数据"):
time.sleep(0.05)- 生成器 + 手动指定 total
python
def data_generator():
    for i in range(200):
        yield i ** 2

for x in tqdm(data_generator(), total=200, desc="生成数据"):
pass- 手动控制进度(推荐用上下文管理器)
python
from tqdm import tqdm

with tqdm(total=100, desc="安全模式") as pbar:
    for _ in range(10):
        work()
        pbar.update(10)  # 每次 +10
# 自动 close(),避免资源泄漏- 动态更新附加信息(如 loss、acc)
python
pbar = tqdm(range(100))
for i in pbar:
    loss = 1.0 / (i + 1)
    pbar.set_postfix(loss=f"{loss:.4f}", stage="train")
输出效果:
50%|█████ | 50/100 [00:00<00:00, 98.76it/s, loss=0.0200, stage=train]- 禁用进度条(调试/生产环境开关)
python
DEBUG = False
for i in tqdm(range(1000), disable=not DEBUG):
    process(i)
→ 当 DEBUG=False 时,tqdm 完全透明,等价于原生循环。
- 嵌套进度条(多层循环)
python
for i in tqdm(range(3), desc="外层"):
    for j in tqdm(range(100), desc="内层", leave=False):
        time.sleep(0.001)
✅ 内层建议
leave=False,避免终端刷屏。
- 自定义格式(
bar_format)
python
bar_format = "{l_bar}{bar}| {n_fmt}/{total_fmt} [{elapsed}<{remaining}]"
for i in tqdm(range(100), bar_format=bar_format):
    time.sleep(0.01)
七、注意事项 & 技巧
| 问题 | 解决方案 |
|---|---|
| 进度条闪烁/错乱 | 增大 mininterval=0.5 减少刷新频率 |
| Jupyter 中显示异常 | 改用 from tqdm.notebook import tqdm |
| 想隐藏进度条 | 传 disable=True(比注释掉更灵活) |
| 进度条太长/太短 | 用 ncols=80 固定宽度,或 dynamic_ncols=True 自适应 |
| 处理字节数据? | unit='B', unit_scale=True → 自动转为 KB/MB/GB |
| 恢复中断任务 | 用 initial=N 设置起始点(需配合 total) |
| 多线程冲突 | 使用 position 参数分配独立行 |
八、Jupyter Notebook 专用
在 Jupyter 中,使用更美观的交互式 HTML 进度条:
python
from tqdm.notebook import tqdm

for i in tqdm(range(100)):
    time.sleep(0.01)
→ 显示为彩色、可折叠的进度条,体验更佳。
💡 也可以自动检测环境:
from tqdm.auto import tqdm→ 自动选择终端或 notebook 后端
九、一句话总结
tqdm是一个"可迭代对象的进度显示器",你只需把要遍历的对象传给它,它就自动告诉你:"干了多少、还剩多少、还要多久"。
✅ 最佳实践口诀:
"有循环,就包
tqdm;没长度,就加total;要描述,就写desc;不想看,就设disable=True。"
代码:
python
# 9. 训练模型(RNN 模型训练比较快,就用的这个模型进行训练,LSTM、GRU 差不多)
def train_model_rnn(list_name, list_country):
epochs = 5
my_lr = 1e-3
my_dataset = NameClassDataset(list_name=list_name, list_country=list_country)
# 人名的长度不同,所以 batch_size 只能为 1 。如果不为 1 就要使用 padding 等处理方式,人名就没意义了
my_dataloader = DataLoader(dataset=my_dataset, batch_size=1, shuffle=True)
my_model = MyRNN(input_size=letter_len, hidden_size=128, output_size=country_len)
my_model.train() # 开启训练模式
optimizer = optim.Adam(params=my_model.parameters(), lr=my_lr)
criterion = nn.CrossEntropyLoss()
train_num = 0 # 已训练的样本数
train_num_list = [] # 训练次数列表,用于画图
loss_sum = 0 # 已训练总损失
loss_list = [] # 每 x 个样本求一次平均损失 形成损失列表
right_num = 0 # 已训练样本中,预测正确的个数
right_rate_list = [] # 每100个样本求一次平均准确率 形成平均准确率列表
start_time = time.perf_counter() # 训练开始时间
for epoch in range(epochs):
start_time1 = time.perf_counter() # 单轮训练开始时间
for i, (x, y) in enumerate(tqdm(my_dataloader)):
# print(x.shape) # torch.Size([1, 6, 57]), 一个名字有6个字母,每个字母的词向量维度是57
# print(y) # tensor([2])
optimizer.zero_grad() # 梯度清零
logits = my_model(x) # 前向传播
loss = criterion(logits, y) # 计算损失
loss.backward() # 反向传播
optimizer.step() # 梯度更新
# # x被 DataLoader 封装成了 (batch_size, sequence_length, embedding_dim) 了,所以直接去第 0 维就能拿到当前批次的真实样本个数
train_num += x.size(0) # 此处就是1, 因为 batch_size 被赋值成了1,这里就是准确的1个样本
loss_sum += loss.item() # 总损失增加
# 统计正确个数. 如果预测值和目标值相同,则加1,否则,加0
# right_num += 1 if torch.argmax(logits, dim=-1) == y.item() else 0 # 仅限于当前环境下,因为只预测1个样本
right_num += torch.sum(torch.argmax(logits, dim=-1) == y).item() # 更加通用,统计正确预测正确个数
if train_num % 100 == 0: # 每100个样本统计一次
loss_list.append(loss_sum / train_num) # 平均损失
right_rate_list.append(right_num / train_num) # 准确率
train_num_list.append(train_num)
if train_num % 2000 == 0: # 每2000个样本打印一次
avg_loss = loss_sum / train_num # 平均损失
right_rate = right_num / train_num # 准确率
end_time1 = time.perf_counter()
print('批次:%d,平均损失:%.5f,训练时间:%.3f,准确率:%.3f' % (i, avg_loss, end_time1 - start_time1, right_rate))
# 批次:1999,平均损失:1.54360,训练时间:3.529,准确率:0.548
# 批次:3999,平均损失:1.40876,训练时间:6.896,准确率:0.585
# 批次:5999,平均损失:1.33242,训练时间:10.345,准确率:0.611
# ...
# 批次:19999,平均损失:1.12845,训练时间:35.357,准确率:0.662
end_time = time.perf_counter() # 结束结束时间
print(f'训练总耗时: {end_time - start_time}s') # 175.08s
# 平均损失曲线
plt.plot(train_num_list, loss_list)
plt.xlabel('样本个数')
plt.ylabel('每个样本的平均损失')
plt.title('总损失 / 样本个数')
plt.show()
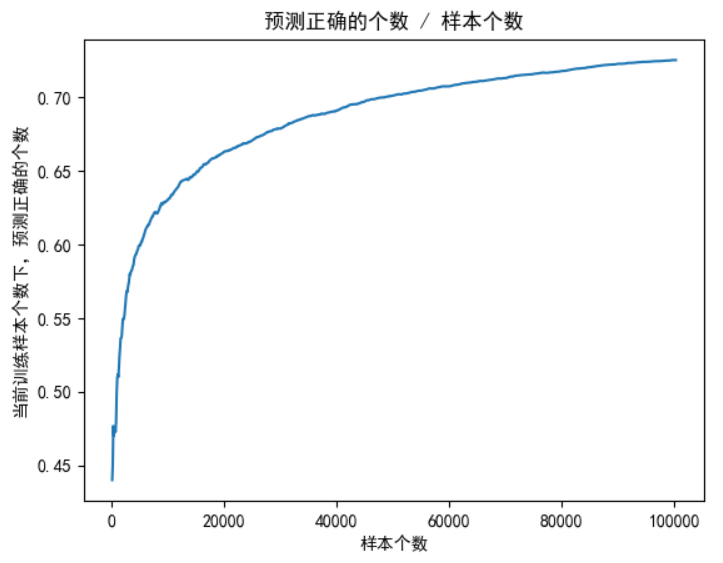
# 准确率曲线
plt.plot(train_num_list, right_rate_list)
plt.xlabel('样本个数')
plt.ylabel('当前训练样本个数下,预测正确的个数')
plt.title('预测正确的个数 / 样本个数')
plt.show()
# 保存模型
torch.save(my_model.state_dict(), r'./data/my_model.pth')
def train_model_lstm(list_name, list_country):
# 与 train_model_rnn 同理
pass
def train_model_gru(list_name, list_country):
# 与 train_model_rnn 同理
pass
if __name__ == '__main__':
list_name, list_country = read_data('./data/name_classfication.txt')
train_model_rnn(list_name, list_country)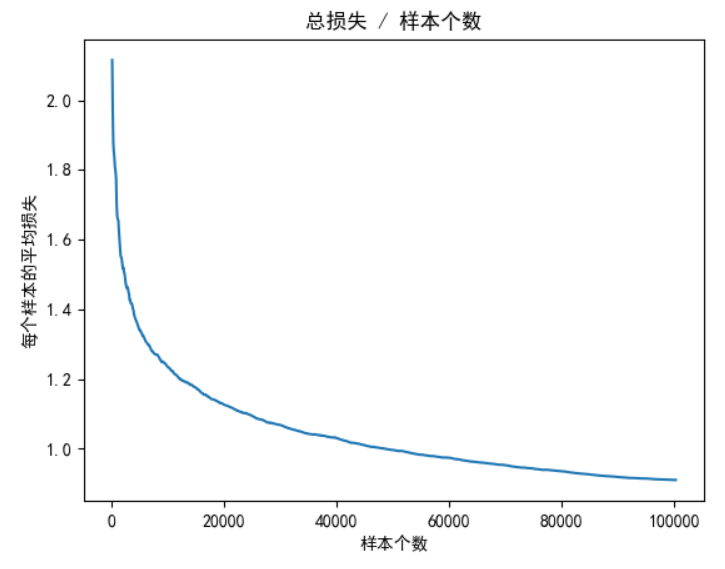
10、模型预测
- 基本过程【重要】
properties
1.获取数据
2.数据预处理:将数据转化one-hot编码
3.实例化模型
4.加载模型训练好的参数: model.load_state_dict(torch.load("model_path"))
5.with torch.no_grad():
6.将数据送入模型进行预测(注意:张量的形状变换)
Top-K 算法
🌟 一、Top-K 是什么?(一句话定义)
Top-K 就是从一组数值中,找出最大的(或最小的)K 个值及其位置。
- "Top" = 排名靠前
- "K" = 你要取多少个(比如 K=3 → 取前三名)
就像考试排名:
- 全班 50 人,老师说:"请 Top-3 上台领奖!"
- 那就是分数最高的 3 个人。
在 AI 里,模型输出一堆"打分",我们想知道最可能的几个答案,就用 Top-K!
🧠 二、为什么需要 Top-K?(而不是只看最高分?)
❓ 场景:你输入一个名字 "Zhang",模型要猜国籍。
模型输出 18 个国家的"信心分数"(logits):
| 国家 | 分数 |
|---|---|
| Chinese | 4.2 ✅ |
| Korean | 3.8 |
| Vietnamese | 3.5 |
| Japanese | 2.1 |
| ... | ... |
- 如果只用
argmax(即 Top-1),你会得到:Chinese - 但模型其实也觉得 Korean、Vietnamese 很有可能!
👉 Top-3 能告诉你:模型的"前三猜想"是什么,这在很多场景下比单一答案更有用!
🛠️ 三、Top-K 在代码中怎么用?(以 PyTorch 为例)
python
import torch

# 假设模型输出 logits,shape=(1, 5) 表示 1 个样本,5 个类别
output = torch.tensor([[2.1, 0.5, 3.9, -1.2, 2.8]])

# 取 Top-3
top_values, top_indices = output.topk(k=3, dim=1, largest=True)

print("Top-3 分数:", top_values)   # [[3.9, 2.8, 2.1]]
print("对应索引:", top_indices)   # [[2, 4, 0]]
参数详解:
| 参数 | 说明 |
|---|---|
k=3 |
取前 3 名 |
dim=1 |
在第 1 维(类别维度)上找 top-k |
largest=True |
取最大值(False 就是最小值) |
✅ 返回两个张量:
top_values:具体的分数top_indices:这些分数对应的类别 ID
🌍 四、Top-K 的经典应用场景
| 场景 | 用途 |
|---|---|
| 文本生成(如 ChatGPT) | 每次生成下一个词时,从 Top-K 个最可能的词中随机选一个,避免总是选最高分(太死板) |
| 推荐系统 | "猜你喜欢" → 推荐 Top-K 个商品/视频 |
| 图像分类 | "这张图可能是:猫(85%)、狐狸(10%)、狗(3%)" → Top-3 解释 |
| 语音识别 | 你说"apple",模型可能输出:"apple", "apply", "ample" → 让用户选择 |
| 信息检索 | 搜索"AI",返回 Top-K 相关网页 |
💡 Top-K 让 AI 更"人性化"------它承认自己可能有多个合理答案,而不是武断地只给一个。
🔁 五、Top-K vs 其他采样策略
| 方法 | 特点 |
|---|---|
| Argmax (Greedy) | 总是选最高分 → 结果稳定但死板,容易重复 |
| Top-K Sampling | 只考虑分数最高的 K 个,然后按概率随机选 → 多样性 + 合理性 |
| Top-p (Nucleus Sampling) | 动态决定 K:累计概率到 p(如 0.9)为止 → 更灵活 |
| Random Sampling | 所有词都可能被选 → 太随机,可能胡说 |
📌 实际大模型(如 Llama、ChatGPT)通常用 Top-p + Temperature,但 Top-K 是基础!
🎯 六、为什么用 Top-3?
python
topv, topi = output.topk(3, 1, True)因为:
- 做的是人名国籍分类
- 一个名字可能对应多个文化背景(比如 "Lee" 可能是 Chinese、Korean、English)
- 返回 Top-3 能让用户看到模型的多种可能性,而不是盲目相信唯一答案
这叫 可解释性(Interpretability) ------ 好的 AI 不仅要准,还要让人理解它"怎么想的"。
✅ 总结:Top-K 的核心思想
| 关键点 | 说明 |
|---|---|
| 不是只信第一名 | 模型也可能犹豫,Top-K 展示它的"备选答案" |
| 提升用户体验 | 用户看到多个选项,可以自己判断 |
| 增加多样性 | 在生成任务中避免千篇一律 |
| 简单高效 | 一行代码搞定,计算开销小 |
所以,下次听到 "Top-K Sampling"、"Top-5 Accuracy" 这些术语,你就知道:
"哦~不就是取前 K 名嘛!我早就会了!" 😎
是不是没那么"著名"得吓人了?其实就是个聪明的排序+截取而已!
Top-K - API 详解
📌 一、函数签名(官方定义)
python
torch.topk(input, k, dim=None, largest=True, sorted=True, *, out=None)作用 :返回输入张量
input沿指定维度dim上最大的(或最小的)k个元素及其索引。
🧩 二、参数详解
| 参数 | 类型 | 默认值 | 说明 |
|---|---|---|---|
input |
Tensor | --- | 输入张量,任意 shape |
k |
int | --- | 要取的 top-k 个元素数量(必须 ≤ 对应维度的大小) |
dim |
int | -1(最后一个维度) |
沿哪个维度计算 topk。非常重要! |
largest |
bool | True |
True 表示取最大值;False 取最小值 |
sorted |
bool | True |
返回的 top-k 是否按降序(或升序)排列 |
out |
(Tensor, Tensor) | None |
可选输出张量,用于避免内存分配 |
🔍 关键参数深入解释
dim(核心!)
- 决定"在哪一维上找 top-k"。
- 例如:
input.shape = (B, C)(如分类 logits)dim=1→ 对每个样本的 C 个类别找 top-k(最常见!)
input.shape = (N,)(一维向量)dim=0或默认dim=-1都行
- ❗ 如果不指定
dim,默认是 最后一个维度 (dim=-1)
sorted
-
sorted=True(默认):返回的 top-k 是从大到小排好序的pythonvalues: [9.0, 7.5, 6.2] indices: [3, 1, 4] -
sorted=False:只保证是 top-k,但顺序不确定(可能更快,但一般不用)
largest=False
- 用于找最小的 k 个值(比如找损失最小的样本、距离最近的点等)
- out:
🎯 一、为什么
out是一个元组(两个 Tensor)?因为
torch.topk()返回两个东西:
values:top-k 的数值indices:这些数值对应的索引所以它的输出天然就是 一对张量(a tuple of two tensors)。
注意,两个都是张量 ,如果要用返回的索引,则需
topi.item()因此,
out参数也必须能容纳这两个结果 ------ 所以它是一个 包含两个已分配好内存的空张量的元组。
python# 正确用法示例 input = torch.randn(1000, 100) # 预先分配好两个张量,形状必须匹配 topk 的输出 pre_allocated_vals = torch.empty(1000, 5) # 存 values pre_allocated_idxs = torch.empty(1000, 5, dtype=torch.long) # 存 indices # 把它们打包成元组传给 out torch.topk(input, k=5, dim=1, out=(pre_allocated_vals, pre_allocated_idxs)) # 现在 pre_allocated_vals 和 pre_allocated_idxs 已被填入结果!✅ 这样做避免了每次调用
topk时都新建两个张量,节省内存分配开销。
🔧 二、
out参数的作用:避免重复内存分配(Memory Allocation Avoidance)❓ 为什么要避免内存分配?
- 内存分配(
malloc/new)是有时间开销的- 在高频调用 的场景(如训练循环、推理服务),频繁分配/释放小张量会导致:
- 性能下降(几十微秒 × 百万次 = 几秒延迟)
- 内存碎片
- 触发不必要的 GC(垃圾回收)
✅ 使用
out的好处:
- 复用已有内存
- 减少内存峰值
- 提升推理/训练速度(尤其在部署或高性能场景)
📌 三、使用
out的注意事项
- 形状必须严格匹配
pythonx = torch.randn(2, 10) # 错误:形状不对 out_vals = torch.empty(2, 3) # k=5 但这里只给 3 列 → ❌ RuntimeError out_idxs = torch.empty(2, 3, dtype=torch.long) torch.topk(x, k=5, dim=1, out=(out_vals, out_idxs)) # 报错!✅ 正确:
pythonout_vals = torch.empty(2, 5) out_idxs = torch.empty(2, 5, dtype=torch.long) # 注意:indices 必须是 long/int64
- dtype 必须正确
values的 dtype 应与input相同(如 float32)indices的 dtype 必须是整型 (通常是torch.long)
- device 必须一致
out张量必须和input在同一个设备(CPU/GPU)
🚀 四、什么时候该用
out?
场景 是否推荐用 out一次性脚本、实验代码 ❌ 不用,写起来麻烦 训练循环中的高频操作 ⚠️ 一般也不用(PyTorch 内部已优化) 部署推理(如 ONNX/TensorRT 前的预处理) ✅ 可考虑 自定义 CUDA 算子或高性能库 ✅ 强烈推荐 需要严格控制内存使用的嵌入式/移动端 ✅ 推荐 💡 对于绝大多数 PyTorch 用户(包括当前的项目),不需要手动使用
out。它主要是为底层库开发者 或极致性能优化场景准备的。
🧪 五、对比:用 vs 不用
out
pythonimport torch import time x = torch.randn(10000, 10 0) # --- 不用 out --- start = time.time() for _ in range(1000): vals, idxs = torch.topk(x, k=10, dim=1) print("Without out:", time.time() - start) # --- 用 out --- vals_out = torch.empty(10000, 10) idxs_out = torch.empty(10000, 10, dtype=torch.long) start = time.time() for _ in range(1000): torch.topk(x, k=10, dim=1, out=(vals_out, idxs_out)) print("With out:", time.time() - start)在某些环境下(尤其是 CPU 或小张量),用
out可能快 10%~30%,但差距不会特别大,因为 PyTorch 的内存池(memory pool)已经做了很多优化。
✅ 总结
问题 答案 为什么 out是元组?因为 topk返回两个张量(值 + 索引),out要能装下它们out有什么用?预分配内存,避免重复分配,提升性能 我需要现在就用吗? 不需要! 除非你在做高性能部署或底层开发 面试会问吗? 可能会问"如何优化 PyTorch 性能",这时提到 out参数会显得很专业 😎
📦 三、返回值
返回一个 namedtuple : (values, indices)
values: 与input同 shape,只是在dim维度上大小变为kindices: 与values同 shape,表示这些值在原张量中的位置索引
✅ 你可以这样解构:
pythontop_vals, top_ids = torch.topk(x, k=3, dim=1)
🛠️ 四、常用操作 & 实战示例
✅ 示例 1:分类任务中取 Top-3 预测
python
logits = torch.randn(1, 18)  # (batch=1, num_classes=18)
values, indices = torch.topk(logits, k=3, dim=1)  # dim=1 是类别维

print(values.shape)   # torch.Size([1, 3])
print(indices.shape)  # torch.Size([1, 3])

# 映射回标签
for i in range(3):
    print(f"第{i+1}名: 分数={values[0,i]:.2f}, 类别ID={indices[0,i]}")
✅ 示例 2:批量处理多个样本(batch > 1)
python
logits = torch.randn(4, 10)  # 4 个样本,10 个类别
values, indices = torch.topk(logits, k=2, dim=1)

print(values.shape)   # [4, 2]
print(indices.shape)  # [4, 2]

# 第 2 个样本的 top-2
print("样本2的top2分数:", values[1])      # 如 tensor([2.1, 1.8])
print("对应类别ID:", indices[1])         # 如 tensor([5, 2])
✅ 示例 3:找最小的 k 个(如最近邻)
python
distances = torch.tensor([[5.0, 1.2, 3.3, 0.8],
                          [2.1, 4.0, 0.5, 3.7]])

# 找每个样本中距离最小的 2 个(即最近的 2 个)
min_vals, min_ids = torch.topk(distances, k=2, dim=1, largest=False)

print(min_vals)  # [[0.8, 1.2], [0.5, 2.1]]
print(min_ids)   # [[3, 1], [2, 0]]
✅ 示例 4:一维向量找 top-k
python
x = torch.tensor([10, 3, 8, 9, 1])
vals, ids = torch.topk(x, k=3)  # dim 默认为 -1(即 dim=0)

print(vals)  # [10, 9, 8]
print(ids)   # [0, 3, 2]
✅ 示例 5:结合 softmax 得到概率形式的 top-k
python
logits = torch.randn(1, 5)
probs = torch.softmax(logits, dim=1)
top_probs, top_idx = torch.topk(probs, k=3, dim=1)

print("Top-3 概率:", top_probs)  # 如 [[0.6, 0.25, 0.1]]
print("总和接近1吗?", top_probs.sum().item())  # 不一定!只是前3个的概率
⚠️ 注意:Top-K 概率之和 ≠ 1,因为只取了部分!
⚠️ 五、注意事项 & 常见错误
❌ 错误 1:k 大于维度大小
python
x = torch.randn(2, 3)
torch.topk(x, k=5, dim=1)  # ❌ RuntimeError: k not in range for dimension
✅ 解决:确保 k <= input.size(dim)
❌ 错误 2:忘了指定 dim(尤其在高维时)
python
x = torch.randn(2, 3, 4)
torch.topk(x, k=2)  # 默认 dim=-1 → 在 size=4 的维度上操作
# 如果你本意是在类别维(比如 dim=2),那没问题;
# 但如果类别在 dim=1,就错了!
✅ 建议:显式写出 dim=,避免歧义!
❌ 错误 3:混淆 argmax 和 topk(k=1)
torch.argmax(x, dim=1)返回 索引(shape 少一维)torch.topk(x, k=1, dim=1)返回 (values, indices),且 shape 不变(只是最后一维为1)
python
x = torch.randn(2, 5)
idx1 = torch.argmax(x, dim=1)        # shape: [2]
_, idx2 = torch.topk(x, 1, dim=1)    # shape: [2, 1]

# 所以 idx1 == idx2.squeeze(-1) 才对!
🎯 六、高级技巧
🔧 技巧 1:用 topk 实现 argmax(不推荐,但可行)
python
_, idx = torch.topk(x, 1, dim=1)
idx = idx.squeeze(-1)  # 等价于 argmax
🔧 技巧 2:获取 top-k 的原始位置(用于 attention、mask 等)
python
# 比如在序列中找最重要的 k 个 token
attn_scores = torch.randn(1, 10)  # 10 个 token 的注意力分数
_, top_indices = torch.topk(attn_scores, k=3, dim=1)  # shape [1,3]
# 可用于后续 gather 或 masking
🔧 技巧 3:与 torch.gather 联用
python
# 从另一个张量中提取 top-k 对应的值
scores = torch.randn(2, 5)
values = torch.randn(2, 5) * 10

_, idx = torch.topk(scores, k=2, dim=1)
selected_values = torch.gather(values, dim=1, index=idx)
✅ 总结:一张表掌握 torch.topk
| 用途 | 代码示例 |
|---|---|
| 分类 Top-K 预测 | topk(logits, k=3, dim=1) |
| 找最小值(如距离) | topk(dist, k=5, dim=1, largest=False) |
| 一维向量排序取前K | topk(x, k=10) |
| 获取索引用于采样 | _, idx = topk(probs, k=5); sampled = x[idx] |
| 高维张量操作 | 显式指定 dim,如 dim=2 |
代码:
python
# 传入名字,返回 one-hot 矩阵
def get_onehot(name):
    # 要进行预测,就不需要计算梯度,故不需要保证张量是 浮点类型
    tensor_name = torch.zeros(len(name), letter_len)
    for i, char in enumerate(name):
        tensor_name[i][all_letters.find(char)] = 1    # 赋值为1
    return tensor_name

# 10. 模型预测
def model_predict(name):
    tensor_name = get_onehot(name)

    # 构建模型
    my_model = MyRNN(input_size=letter_len, hidden_size=128, output_size=country_len)
    my_model.eval()  # 开启测试模式

    # 加载模型参数
    my_model.load_state_dict(torch.load(r'./data/my_model.pth', map_location='cpu'))

    # 开始测试
    with torch.no_grad():
        x = tensor_name.unsqueeze(0)    # 需要升维成 (N, S, D)
        print(x.shape)      # torch.Size([1, 5, 57])

        logits = my_model(x)
        probability = torch.softmax(logits, dim=-1)
        print(probability.shape)    # torch.Size([1, 18])

        k = 3

        # Top-K 算法
        # top_val: 与 `input` 同 shape,只是在 `dim` 维度上大小变为 `k`
        # top_idx: 与 `values` 同 shape,表示这些值在原张量中的位置索引
        top_val, top_idx = torch.topk(input=probability, k=k, dim=-1, largest=True)
        print(top_val.shape)    # torch.Size([1, 3])
        print(top_idx.shape)    # torch.Size([1, 3])

        for i in range(k):
            country = country_kinds[top_idx[0][i]]
            prob = top_val[0][i]
            print(f'国家: {country}, 概率: {prob:.2f}')
            # 国家: Chinese, 概率: 0.89
            # 国家: Russian, 概率: 0.05
            # 国家: Korean, 概率: 0.02
11、main函数
python
if __name__ == '__main__':
    list_name, list_country = read_data('./data/name_classfication.txt')

    train_model_rnn(list_name, list_country)

    model_predict('zhang')
12、整体代码
python
# coding: utf-8

import string
from torch.utils.data import Dataset, DataLoader
import torch
import torch.nn as nn
import torch.optim as optim
import time
from tqdm import tqdm  # 可视化模型训练的进程
import matplotlib.pyplot as plt

import os
os.environ["KMP_DUPLICATE_LIB_OK"] = "TRUE"  # ←←← 关键!放在最前面(解决报错)
from pylab import mpl
mpl.rcParams["font.sans-serif"] = ["SimHei"]  # 设置显示中文字体
mpl.rcParams["axes.unicode_minus"] = False  # 设置正常显示符号

# 1. 获取常用的字符和标点,用作 人名 的词表
all_letters = string.ascii_letters + " .,;'"
print(all_letters)  # abcdefghijklmnopqrstuvwxyzABCDEFGHIJKLMNOPQRSTUVWXYZ .,;'

# 构建词表大小
letter_len = len(all_letters)
print(letter_len)   # 57

# 2. 获取国家的类别总数
# 国家名 种类数
country_kinds = ['Italian', 'English', 'Arabic', 'Spanish', 'Scottish', 'Irish', 'Chinese', 'Vietnamese', 'Japanese',
             'French', 'Greek', 'Dutch', 'Korean', 'Polish', 'Portuguese', 'Russian', 'Czech', 'German']
# 国家名 个数
country_len = len(country_kinds)
print('country_kinds:', country_kinds)
print('国家的数量:', country_len)  # 18个国家


# 3. 读取数据
def read_data(file_path):
    list_name, list_country = [], []

    with open(file_path, mode='r', encoding='utf-8') as f:
        lines = f.readlines()

    # print(lines)    # 每行: 姓名\t国家\n
    # Abl	Czech
    # Adsit	Czech
    # Ajdrna	Czech
    # ...

    for line in lines:
        # 整行长度 < 5,则视为脏数据
        if len(line) < 5:
            continue
        name, country = line.strip().split('\t')
        list_name.append(name)
        list_country.append(country)

    print(f'样本长度 = {len(list_name)}')   # 20074

    return list_name, list_country


# 4. 构建数据集 Dataset
class NameClassDataset(Dataset):
    def __init__(self, list_name, list_country):
        self.list_name = list_name
        self.list_country = list_country

    def __len__(self):
        return len(self.list_name)

    def __getitem__(self, index):
        if index < 0 or index >= len(self.list_name):
            print('getitem() 函数索引出现问题')

        # max(0, index): 索引不能为负
        # len(self.list_name) - 1: 索引最大值
        index = min(max(0, index), len(self.list_name) - 1)

        # 根据当前索引拿到对应的 人名、国家名
        name = self.list_name[index]
        country = self.list_country[index]

        # 把 人名 变为 one-hot 编码
        # 比如: Bob,则 one-hot 矩阵形状为 3 x 57
        # 梯度计算需要浮点型, 所以这里是 float32
        tensor_name = torch.zeros(len(name), letter_len, dtype=torch.float32)
        for i, char in enumerate(name):
            # .find() 是 字符串(str) 的方法。
            target_index = all_letters.find(char)   # 当前字母在 全部字符 中的位置
            tensor_name[i][target_index] = 1        # one-hot 编码, 令为 1

        # 国家对应的索引
        # 列表要查找元素索引,应该用 .index() 方法
        # 交叉熵损失需要长整型, 所以这里是 long
        tensor_country = torch.tensor(data=country_kinds.index(country), dtype=torch.long)

        return tensor_name, tensor_country


# 5. 测试数据迭代器
def create_dataloader(list_name, list_country):
    my_dataset = NameClassDataset(list_name=list_name, list_country=list_country)

    # 人名的长度不同,所以 batch_size 只能为 1 。如果不为 1 就要使用 padding 等处理方式,人名就没意义了
    my_dataloader = DataLoader(dataset=my_dataset, batch_size=1, shuffle=True)

    for name, country in my_dataloader:
        print(name, country)
        break   # 用作测试,只测试一次即可


# 6. 构建 RNN模型
class MyRNN(nn.Module):
    def __init__(self, input_size: int, hidden_size: int, output_size: int, num_layers: int=1):
        super().__init__()
        self.input_size = input_size
        self.hidden_size = hidden_size
        self.output_size = output_size
        self.num_layers = num_layers

        self.rnn = nn.RNN(input_size=self.input_size,
                          hidden_size=self.hidden_size,
                          num_layers=self.num_layers,
                          batch_first=True)

        self.linear = nn.Linear(in_features=self.hidden_size,
                                out_features=output_size)

    def forward(self, x, h0=None):
        # hn: (num_directions * num_layers, N, hidden_size)
        output, hn = self.rnn(x, h0)        # RNN 层

        # output shape: (batch, seq_len, hidden_size)
        # logits = self.linear(output[:, -1, :])
        logits = self.linear(hn[-1])     # 可以用 output[-1], 也可以用 hn

        return logits

    def init_hidden(self):
        # 初始化隐藏状态,这里就不实现了,只是代表可以写这个方法
        # h_0: (num_directions * num_layers, N, hidden_size) , 与 batch_first 无关!
        pass


# 7. 构建 LSTM 模型
class MyLSTM(nn.Module):
    def __init__(self, input_size: int, hidden_size: int, output_size: int, num_layers: int=1):
        super().__init__()
        self.input_size = input_size
        self.hidden_size = hidden_size
        self.output_size = output_size
        self.num_layers = num_layers

        self.lstm = nn.LSTM(input_size=self.input_size,
                            hidden_size=self.hidden_size,
                            num_layers=self.num_layers,
                            batch_first=True)

        self.linear = nn.Linear(in_features=self.hidden_size,
                                out_features=self.output_size)

    def forward(self, x, h0=None, c0=None):
        # H_out = proj_size if proj_size > 0 else hidden_size
        # hn: (num_layers × num_directions, N, H_out)
        output, (hn, c) = self.lstm(x, (h0, c0))

        # output shape: (batch, seq_len, hidden_size)
        # logits = self.linear(output[:, -1, :])
        logits = self.linear(hn[-1])

        return logits

    def init_hidden(self):
        # 初始化隐藏状态,这里就不实现了,只是代表可以写这个方法
        # h_0: (num_directions * num_layers, N, proj_size if proj_size > 0 else hidden_size) , 与 batch_first 无关!
        # c: (num_directions * num_layers, N, hidden_size) , 与 batch_first 无关!
        pass


# 8. 构建 GRU 模型
class MyGRU(nn.Module):
    def __init__(self, input_size: int, hidden_size: int, output_size: int, num_layers: int = 1):
        super().__init__()
        self.input_size = input_size
        self.hidden_size = hidden_size
        self.output_size = output_size
        self.num_layers = num_layers

        self.gru = nn.GRU(input_size=self.input_size,
                          hidden_size=self.hidden_size,
                          num_layers=self.num_layers,
                          batch_first=True)

        self.linear = nn.Linear(in_features=self.hidden_size,
                                out_features=self.output_size)

    def forward(self, x, h0=None):
        # hn: (num_layers × num_directions, batch, hidden_size)
        output, hn = self.gru(x, h0)

        # output shape: (batch, seq_len, hidden_size)
        # logits = self.linear(output[:, -1, :])
        logits = self.linear(hn[-1])

        return logits

    def init_hidden(self):
        # 初始化隐藏状态,这里就不实现了,只是代表可以写这个方法
        # h_0: (num_directions * num_layers, N, hidden_size) , 与 batch_first 无关!
        pass


# 9. 训练模型(RNN 模型训练比较快,就用的这个模型进行训练,LSTM、GRU 差不多)
def train_model_rnn(list_name, list_country):
    epochs = 5
    my_lr = 1e-3

    my_dataset = NameClassDataset(list_name=list_name, list_country=list_country)

    # 人名的长度不同,所以 batch_size 只能为 1 。如果不为 1 就要使用 padding 等处理方式,人名就没意义了
    my_dataloader = DataLoader(dataset=my_dataset, batch_size=1, shuffle=True)

    my_model = MyRNN(input_size=letter_len, hidden_size=128, output_size=country_len)
    my_model.train()    # 开启训练模式

    optimizer = optim.Adam(params=my_model.parameters(), lr=my_lr)
    criterion = nn.CrossEntropyLoss()

    train_num = 0       # 已训练的样本数
    train_num_list = [] # 训练次数列表,用于画图
    loss_sum = 0        # 已训练总损失
    loss_list = []      # 每 x 个样本求一次平均损失 形成损失列表
    right_num = 0       # 已训练样本中,预测正确的个数
    right_rate_list = []      # 每100个样本求一次平均准确率 形成平均准确率列表

    start_time = time.perf_counter()    # 训练开始时间
    for epoch in range(epochs):
        start_time1 = time.perf_counter()    # 单轮训练开始时间
        for i, (x, y) in enumerate(tqdm(my_dataloader)):
            # print(x.shape)  # torch.Size([1, 6, 57]), 一个名字有6个字母,每个字母的词向量维度是57
            # print(y)        # tensor([2])

            optimizer.zero_grad()   # 梯度清零

            logits = my_model(x)    # 前向传播

            loss = criterion(logits, y)  # 计算损失

            loss.backward()         # 反向传播

            optimizer.step()        # 梯度更新

            # # x被 DataLoader 封装成了 (batch_size, sequence_length, embedding_dim) 了,所以直接去第 0 维就能拿到当前批次的真实样本个数
            train_num += x.size(0)  # 此处就是1, 因为 batch_size 被赋值成了1,这里就是准确的1个样本
            loss_sum += loss.item()     # 总损失增加

            # 统计正确个数. 如果预测值和目标值相同,则加1,否则,加0
            # right_num += 1 if torch.argmax(logits, dim=-1) == y.item() else 0 # 仅限于当前环境下,因为只预测1个样本
            right_num += torch.sum(torch.argmax(logits, dim=-1) == y).item()    # 更加通用,统计正确预测正确个数

            if train_num % 100 == 0:    # 每100个样本统计一次
                loss_list.append(loss_sum / train_num)          # 平均损失
                right_rate_list.append(right_num / train_num)   # 准确率
                train_num_list.append(train_num)

            if train_num % 2000 == 0:   # 每2000个样本打印一次
                avg_loss = loss_sum / train_num     # 平均损失
                right_rate = right_num / train_num  # 准确率
                end_time1 = time.perf_counter()
                print('批次:%d,平均损失:%.5f,训练时间:%.3f,准确率:%.3f' % (i, avg_loss, end_time1 - start_time1, right_rate))
                # 批次:1999,平均损失:1.54360,训练时间:3.529,准确率:0.548
                # 批次:3999,平均损失:1.40876,训练时间:6.896,准确率:0.585
                # 批次:5999,平均损失:1.33242,训练时间:10.345,准确率:0.611
                # ...
                # 批次:19999,平均损失:1.12845,训练时间:35.357,准确率:0.662

    end_time = time.perf_counter()      # 结束结束时间
    print(f'训练总耗时: {end_time - start_time}s')    # 175.08s

    # 平均损失曲线
    plt.plot(train_num_list, loss_list)
    plt.xlabel('样本个数')
    plt.ylabel('每个样本的平均损失')
    plt.title('总损失 / 样本个数')
    plt.show()

    # 准确率曲线
    plt.plot(train_num_list, right_rate_list)
    plt.xlabel('样本个数')
    plt.ylabel('当前训练样本个数下,预测正确的个数')
    plt.title('预测正确的个数 / 样本个数')
    plt.show()

    # 保存模型
    torch.save(my_model.state_dict(), r'./data/my_model.pth')

def train_model_lstm(list_name, list_country):
    # 与 train_model_rnn 同理
    pass

def train_model_gru(list_name, list_country):
    # 与 train_model_rnn 同理
    pass

# 传入名字,返回 one-hot 矩阵
def get_onehot(name):
    # 要进行预测,就不需要计算梯度,故不需要保证张量是 浮点类型
    tensor_name = torch.zeros(len(name), letter_len)
    for i, char in enumerate(name):
        tensor_name[i][all_letters.find(char)] = 1    # 赋值为1
    return tensor_name

# 10. 模型预测
def model_predict(name):
    tensor_name = get_onehot(name)

    # 构建模型
    my_model = MyRNN(input_size=letter_len, hidden_size=128, output_size=country_len)
    my_model.eval()  # 开启测试模式

    # 加载模型参数
    my_model.load_state_dict(torch.load(r'./data/my_model.pth', map_location='cpu'))

    # 开始测试
    with torch.no_grad():
        x = tensor_name.unsqueeze(0)    # 需要升维成 (N, S, D)
        print(x.shape)      # torch.Size([1, 5, 57])

        logits = my_model(x)
        probability = torch.softmax(logits, dim=-1)
        print(probability.shape)    # torch.Size([1, 18])

        k = 3

        # Top-K 算法
        # top_val: 与 `input` 同 shape,只是在 `dim` 维度上大小变为 `k`
        # top_idx: 与 `values` 同 shape,表示这些值在原张量中的位置索引
        top_val, top_idx = torch.topk(input=probability, k=k, dim=-1, largest=True)
        print(top_val.shape)    # torch.Size([1, 3])
        print(top_idx.shape)    # torch.Size([1, 3])

        for i in range(k):
            country = country_kinds[top_idx[0][i]]
            prob = top_val[0][i]
            print(f'国家: {country}, 概率: {prob:.2f}')
            # 国家: Chinese, 概率: 0.89
            # 国家: Russian, 概率: 0.05
            # 国家: Korean, 概率: 0.02


if __name__ == '__main__':
    list_name, list_country = read_data('./data/name_classfication.txt')

    a = NameClassDataset(list_name=list_name, list_country=list_country)
    print(a[0])
    # (tensor([[0., 0., 0., 0., 0., 0., 0., 0., 0., 0., 0., 0., 0., 0., 0., 0., 0., 0.,
    #          0., 0., 0., 0., 0., 0., 0., 0., 1., 0., 0., 0., 0., 0., 0., 0., 0., 0.,
    #          0., 0., 0., 0., 0., 0., 0., 0., 0., 0., 0., 0., 0., 0., 0., 0., 0., 0.,
    #          0., 0., 0.],
    #         [0., 1., 0., 0., 0., 0., 0., 0., 0., 0., 0., 0., 0., 0., 0., 0., 0., 0.,
    #          0., 0., 0., 0., 0., 0., 0., 0., 0., 0., 0., 0., 0., 0., 0., 0., 0., 0.,
    #          0., 0., 0., 0., 0., 0., 0., 0., 0., 0., 0., 0., 0., 0., 0., 0., 0., 0.,
    #          0., 0., 0.],
    #         [0., 0., 0., 0., 0., 0., 0., 0., 0., 0., 0., 1., 0., 0., 0., 0., 0., 0.,
    #          0., 0., 0., 0., 0., 0., 0., 0., 0., 0., 0., 0., 0., 0., 0., 0., 0., 0.,
    #          0., 0., 0., 0., 0., 0., 0., 0., 0., 0., 0., 0., 0., 0., 0., 0., 0., 0.,
    #          0., 0., 0.]]), tensor(16))

    # create_dataloader(list_name, list_country)

    # train_model_rnn(list_name, list_country)

    # model_predict('zhang')